


作者:马顺华
从事运维管理工作多年,目前就职于六棱镜(杭州)科技有限公司,熟悉运维自动化、OceanBase部署运维、MySQL 运维以及各种云平台技术和产品。并已获得OceanBase认证OBCA、OBCP证书。

机器信息
| 机器类型 | 主机配置 | 备注 |
|---|---|---|
| OS | Centos 7.4 | |
| 中控机 /OBD | CPU:8C | 内存:16G |
| 目标机器 /OBserver | CPU:16C | 内存:64G |
| 系统盘 / | dev/vda 50G | LVS分区、文件系统:EXT4 |
| 数据盘 /data | dev/vdb 100G | GPT分区、文件系统:xfs |
| 事务日志盘 /redo | dev/vdc 100G | GPT分区、文件系统:xfs |
安装环境部署版本
| 软件名 | 版本 | 安装方式 | 备注 |
|---|---|---|---|
| obclient | 2.0.0-2.el7.x86_64 | yum安装 | OBserver客户端工具 |
| oceanbase-ce | oceanbase-ce-4.0.0.0 | docker 安装 | OBserver单机 |
| docker | 19.03.8 | yum安装 |
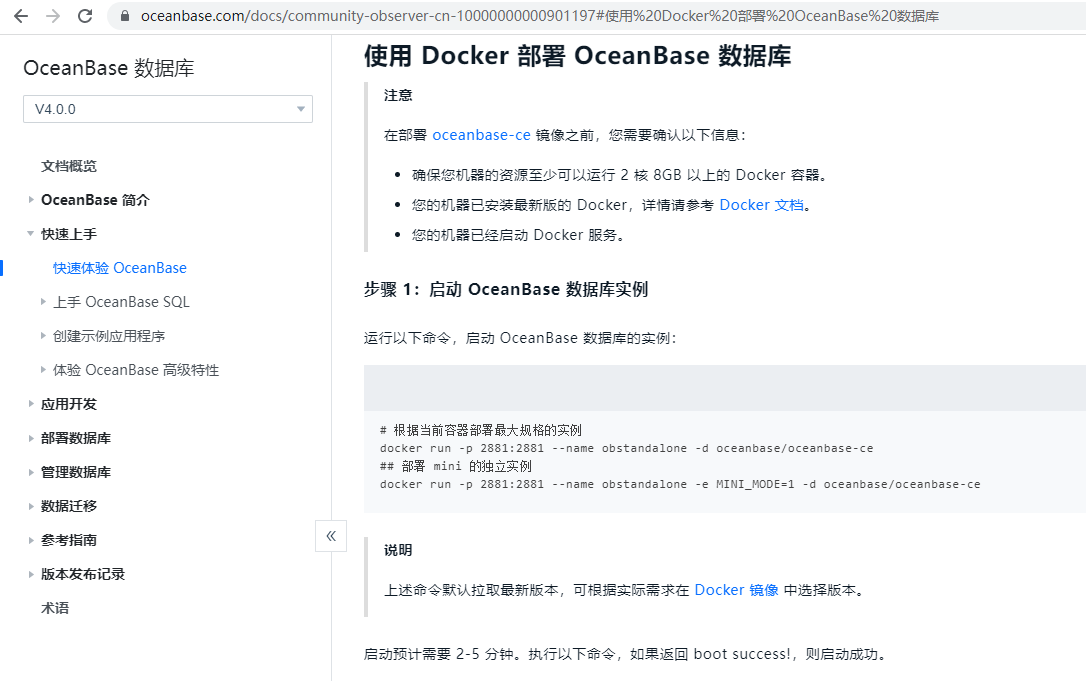
一、使用 Docker 部署 OceanBase 数据库
注意
在部署 oceanbase-ce 镜像之前,您需要确认以下信息:
确保您机器的资源至少可以运行 2 核 8GB 以上的 Docker 容器。
您的机器已安装最新版的 Docker,详情请参考 OB 官方文档。
https://www.oceanbase.com/docs/community-observer-cn-10000000000901197#%E4%BD%BF%E7%94%A8%20Docker%20%E9%83%A8%E7%BD%B2%20OceanBase%20%E6%95%B0%E6%8D%AE%E5%BA%93
1、启动 Docker
您的机器已经启动 Docker 服务。
[root@CAIP131 data]# docker ps
CONTAINER ID        IMAGE               COMMAND             CREATED             STATUS              PORTS               NAMES

2、搜索镜像 oceanbase-ce
[root@CAIP131 ~]# docker search oceanbase-ce
NAME                             DESCRIPTION                                     STARS               OFFICIAL            AUTOMATED
oceanbase/oceanbase-ce           OceanBase is an open-source, distributed HTA…   11
obpilot/oceanbase-ce             3 steps to run an OceanBase-CE docker in you…   4
zibuyu886/oceanbase-ce-cluster   OceanBase ce cluster                            1
huweijie/oceanbase-ce-deploy                                                     0
hnwyllmm/oceanbase-ce                                                            0
hnwyllmm/oceanbase-ce-x86                                                        0
hnwyllmm/oceanbase-ce-aarch64                                                    0
landnow/oceanbase-ce                                                             0

3、下载最新版 oceanbase-ce
[root@CAIP131 ~]# docker pull oceanbase/oceanbase-ce
Using default tag: latest
latest: Pulling from oceanbase/oceanbase-ce
2d473b07cdd5: Pull complete
22338b824aaa: Pull complete
09a412a0d9a2: Pull complete
8ca6368c2328: Pull complete
Digest: sha256:b16bcfb6c48dac735e09667b41b97e15539e359370f05dcebdc23863a7b9518f
Status: Downloaded newer image for oceanbase/oceanbase-ce:latest
docker.io/oceanbase/oceanbase-ce:latest

二、启动 OceanBase 数据库实例
运行以下命令,启动 OceanBase 数据库的实例:
1、根据当前容器部署最大规格的实例(可选)
docker run -p 2881:2881 --name obstandalone -d oceanbase/oceanbase-ce
[root@CAIP131 ~]# docker run -p 2881:2881 --name obstandalone -d oceanbase/oceanbase-ce
2、部署 mini 的独立实例 (可选)
docker run -p 2881:2881 --name obstandalone -e MINI_MODE=1 -d oceanbase/oceanbase-ce
说明
上述命令默认拉取最新版本,可根据实际需求在 Docker 镜像 中选择版本。
启动预计需要 2-5 分钟。执行以下命令,如果返回 boot success!,则启动成功。
[root@CAIP131 ~]# docker logs obstandalone | tail -1
Package obagent-1.2.0-4.el7 is available.
3、查看部署状态
正在部署

部署成功
[root@CAIP131 data]# docker logs obstandalone | tail -1
boot success!
[root@CAIP131 data]#

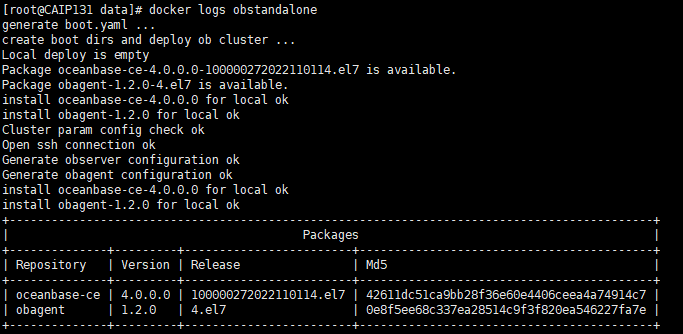
4、查看部署细节
[root@CAIP131 data]# docker logs obstandalone
generate boot.yaml ...
create boot dirs and deploy ob cluster ...
Local deploy is empty
Package oceanbase-ce-4.0.0.0-100000272022110114.el7 is available.
Package obagent-1.2.0-4.el7 is available.
install oceanbase-ce-4.0.0.0 for local ok
install obagent-1.2.0 for local ok
Cluster param config check ok
Open ssh connection ok
Generate observer configuration ok
Generate obagent configuration ok
install oceanbase-ce-4.0.0.0 for local ok
install obagent-1.2.0 for local ok
+--------------------------------------------------------------------------------------------+
| Packages |
+--------------+---------+------------------------+------------------------------------------+
| Repository | Version | Release | Md5 |
+--------------+---------+------------------------+------------------------------------------+
| oceanbase-ce | 4.0.0.0 | 100000272022110114.el7 | 42611dc51ca9bb28f36e60e4406ceea4a74914c7 |
| obagent | 1.2.0 | 4.el7 | 0e8f5ee68c337ea28514c9f3f820ea546227fa7e |
+--------------+---------+------------------------+------------------------------------------+
Repository integrity check ok
Parameter check ok
Open ssh connection ok
Cluster status check ok
Initializes observer work home ok
Initializes obagent work home ok
Remote oceanbase-ce-4.0.0.0-100000272022110114.el7-42611dc51ca9bb28f36e60e4406ceea4a74914c7 repository install ok
Remote oceanbase-ce-4.0.0.0-100000272022110114.el7-42611dc51ca9bb28f36e60e4406ceea4a74914c7 repository lib check !!
Remote obagent-1.2.0-4.el7-0e8f5ee68c337ea28514c9f3f820ea546227fa7e repository install ok
Remote obagent-1.2.0-4.el7-0e8f5ee68c337ea28514c9f3f820ea546227fa7e repository lib check ok
Try to get lib-repository
Package oceanbase-ce-libs-4.0.0.0-100000272022110114.el7 is available.
install oceanbase-ce-libs-4.0.0.0 for local ok
Remote oceanbase-ce-libs-4.0.0.0-100000272022110114.el7-188919f8128394bf9b62e3989220ded05f1d14da repository install ok
Remote oceanbase-ce-4.0.0.0-100000272022110114.el7-42611dc51ca9bb28f36e60e4406ceea4a74914c7 repository lib check ok
obcluster deployed
Get local repositories ok
Search plugins ok
Open ssh connection ok
Load cluster param plugin ok
Check before start observer ok
[WARN] OBD-1007: (127.0.0.1) The recommended number of open files is 655350 (Current value: 65536)
[WARN] (127.0.0.1) clog and data use the same disk (/)
Check before start obagent ok
Start observer ok
observer program health check ok
Connect to observer ok
Initialize cluster ok
Start obagent ok
obagent program health check ok
Wait for observer init ok
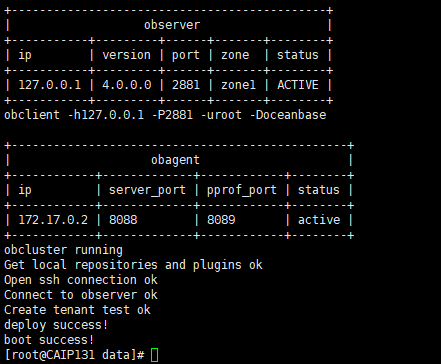
+---------------------------------------------+
| observer |
+-----------+---------+------+-------+--------+
| ip | version | port | zone | status |
+-----------+---------+------+-------+--------+
| 127.0.0.1 | 4.0.0.0 | 2881 | zone1 | ACTIVE |
+-----------+---------+------+-------+--------+
obclient -h127.0.0.1 -P2881 -uroot -Doceanbase
+------------------------------------------------+
| obagent |
+------------+-------------+------------+--------+
| ip | server_port | pprof_port | status |
+------------+-------------+------------+--------+
| 172.17.0.2 | 8088 | 8089 | active |
+------------+-------------+------------+--------+
obcluster running
Get local repositories and plugins ok
Open ssh connection ok
Connect to observer ok
Create tenant test ok
deploy success!
boot success!
三、连接 OceanBase 数据库实例
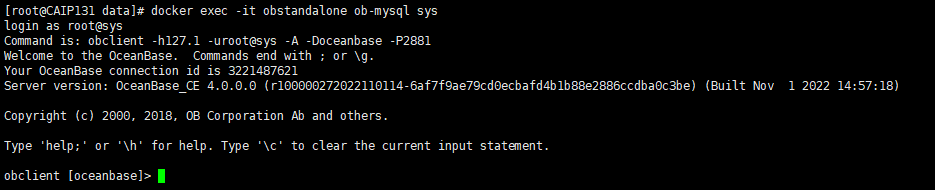
oceanbase-ce 镜像安装了 OceanBase 数据库客户端 OBClient,并提供了默认连接脚本 ob-mysql。
1、连接 sys 租户的 root 用户
docker exec -it obstandalone ob-mysql sys
[root@CAIP131 data]# docker exec -it obstandalone ob-mysql sys
login as root@sys
Command is: obclient -h127.1 -uroot@sys -A -Doceanbase -P2881
Welcome to the OceanBase.  Commands end with ; or \g.
Your OceanBase connection id is 3221487621
Server version: OceanBase_CE 4.0.0.0 (r100000272022110114-6af7f9ae79cd0ecbafd4b1b88e2886ccdba0c3be) (Built Nov  1 2022 14:57:18)

Copyright (c) 2000, 2018, OB Corporation Ab and others.

Type 'help;' or '\h' for help. Type '\c' to clear the current input statement.

obclient [oceanbase]>
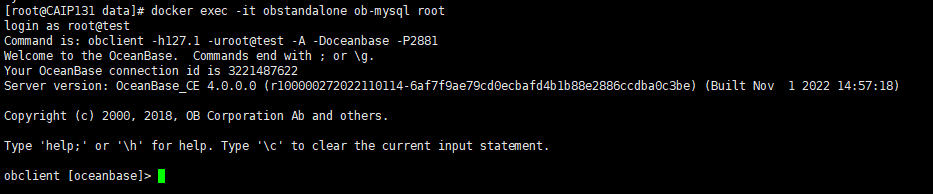
2、连接 test 租户的 root 用户
docker exec -it obstandalone ob-mysql root
[root@CAIP131 data]# docker exec -it obstandalone ob-mysql root
login as root@test
Command is: obclient -h127.1 -uroot@test -A -Doceanbase -P2881
Welcome to the OceanBase.  Commands end with ; or \g.
Your OceanBase connection id is 3221487622
Server version: OceanBase_CE 4.0.0.0 (r100000272022110114-6af7f9ae79cd0ecbafd4b1b88e2886ccdba0c3be) (Built Nov  1 2022 14:57:18)

Copyright (c) 2000, 2018, OB Corporation Ab and others.

Type 'help;' or '\h' for help. Type '\c' to clear the current input statement.

obclient [oceanbase]>
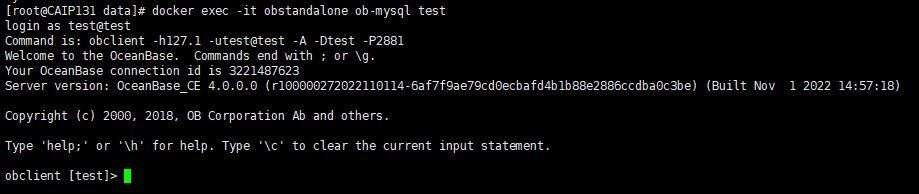
3、连接 test 租户的 test 用户
docker exec -it obstandalone ob-mysql test
[root@CAIP131 data]# docker exec -it obstandalone ob-mysql test
login as test@test
Command is: obclient -h127.1 -utest@test -A -Dtest -P2881
Welcome to the OceanBase.  Commands end with ; or \g.
Your OceanBase connection id is 3221487623
Server version: OceanBase_CE 4.0.0.0 (r100000272022110114-6af7f9ae79cd0ecbafd4b1b88e2886ccdba0c3be) (Built Nov  1 2022 14:57:18)

Copyright (c) 2000, 2018, OB Corporation Ab and others.

Type 'help;' or '\h' for help. Type '\c' to clear the current input statement.

obclient [test]>
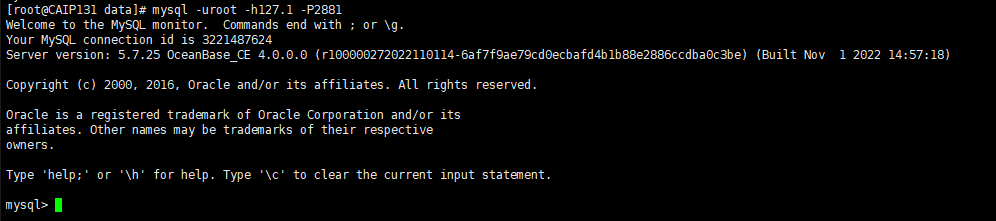
4、mysql 客户端连接实例
您也可以运行以下命令,使用您本机的 OBClient 或者 MySQL 客户端连接实例。
mysql -uroot -h127.1 -P2881
[root@CAIP131 data]# mysql -uroot -h127.1 -P2881
Welcome to the MySQL monitor.  Commands end with ; or \g.
Your MySQL connection id is 3221487624
Server version: 5.7.25 OceanBase_CE 4.0.0.0 (r100000272022110114-6af7f9ae79cd0ecbafd4b1b88e2886ccdba0c3be) (Built Nov  1 2022 14:57:18)

Copyright (c) 2000, 2016, Oracle and/or its affiliates. All rights reserved.

Oracle is a registered trademark of Oracle Corporation and/or its
affiliates. Other names may be trademarks of their respective
owners.

Type 'help;' or '\h' for help. Type '\c' to clear the current input statement.

mysql>
5、obclient 客户端连接实例
obclient -uroot -h127.1 -P2881
[root@CAIP131 data]# obclient -uroot -h127.1 -P2881
Welcome to the OceanBase.  Commands end with ; or \g.
Your MySQL connection id is 3221487625
Server version: 5.7.25 OceanBase_CE 4.0.0.0 (r100000272022110114-6af7f9ae79cd0ecbafd4b1b88e2886ccdba0c3be) (Built Nov  1 2022 14:57:18)

Copyright (c) 2000, 2018, Oracle, MariaDB Corporation Ab and others.

Type 'help;' or '\h' for help. Type '\c' to clear the current input statement.

MySQL [(none)]>

连接成功后,终端将显示如下内容:
$ docker exec -it obstandalone ob-mysql sys
login as root@sys
Command is: obclient -h127.1 -uroot@sys -A -Doceanbase -P2881
Welcome to the OceanBase. Commands end with ; or \g.
Your OceanBase connection id is 3221487638
Server version: 5.7.25 OceanBase 4.0.0 (r10100032022041510-a09d3134c10665f03fd56d7f8bdd413b2b771977) (Built Oct 15 2022 02:16:22)
Copyright © 2000, 2022, OceanBase and/or its affiliates. All rights reserved.
Type ‘help;’ or ‘\h’ for help. Type ‘\c’ to clear the current input statement.
MySQL [oceanbase]>
四、OceanBase 数据库增删改查
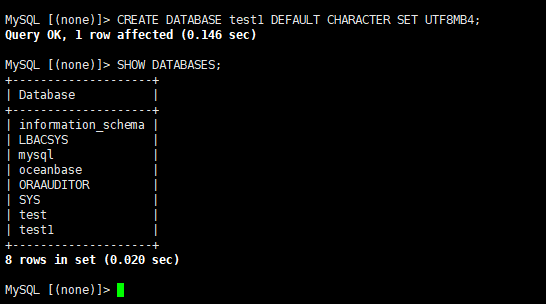
1、创建数据库
使用 CREATE DATABASE 语句创建数据库。
MySQL [(none)]> CREATE DATABASE test1 DEFAULT CHARACTER SET UTF8MB4;
Query OK, 1 row affected (0.146 sec)

MySQL [(none)]> SHOW DATABASES;
+--------------------+
| Database           |
+--------------------+
| information_schema |
| LBACSYS            |
| mysql              |
| oceanbase          |
| ORAAUDITOR         |
| SYS                |
| test               |
| test1              |
+--------------------+
8 rows in set (0.020 sec)

MySQL [(none)]>
2、创建表 ob_01 ob_name2
使用 CREATE TABLE 语句在数据库中创建新表。
创建2个非分区表,创建非分区表是指创建只有一个分区的表。
MySQL [(none)]> use test1;
Database changed
MySQL [test1]> CREATE TABLE ob_01(w_id int
    -> , w_ytd decimal(12,2)
    -> , w_tax decimal(4,4)
    -> , w_name varchar(10)
    -> , w_street_1 varchar(20)
    -> , w_street_2 varchar(20)
    -> , w_city varchar(20)
    -> , w_state char(2)
    -> , w_zip char(9)
    -> , unique(w_name, w_city)
    -> , primary key(w_id)
    -> );
Query OK, 0 rows affected (0.047 sec)

MySQL [test1]> CREATE TABLE ob_name2 (c_w_id int NOT NULL
    -> , c_d_id int NOT null
    -> , c_id int NOT null
    -> , c_discount decimal(4, 4)
    -> , c_credit char(2)
    -> , c_last varchar(16)
    -> , c_first varchar(16)
    -> , c_middle char(2)
    -> , c_balance decimal(12, 2)
    -> , c_ytd_payment decimal(12, 2)
    -> , c_payment_cnt int
    -> , c_credit_lim decimal(12, 2)
    -> , c_street_1 varchar(20)
    -> , c_street_2 varchar(20)
    -> , c_city varchar(20)
    -> , c_state char(2)
    -> , c_zip char(9)
    -> , c_phone char(16)
    -> , c_since date
    -> , c_delivery_cnt int
    -> , c_data varchar(500)
    -> , index icust(c_last, c_d_id, c_w_id, c_first, c_id)
    -> , FOREIGN KEY (c_w_id) REFERENCES table_name1(w_id)
    -> , primary key (c_w_id, c_d_id, c_id)
    -> );
Query OK, 0 rows affected (0.057 sec)
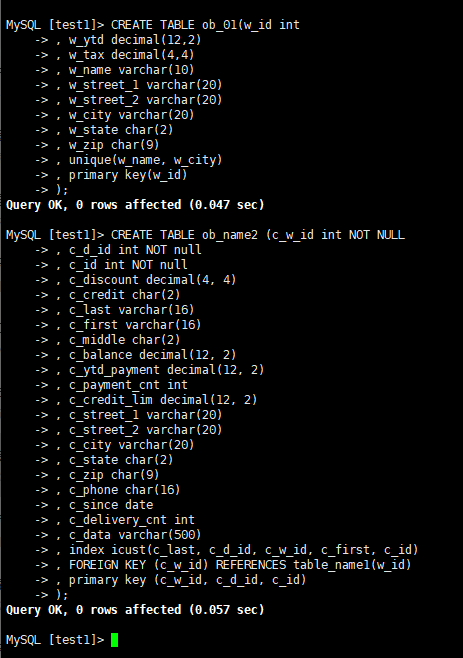
示例中创建了 2 个表,并同时对表中的列定义了一些约束信息,包括在不同列上创建的主键和外键等。
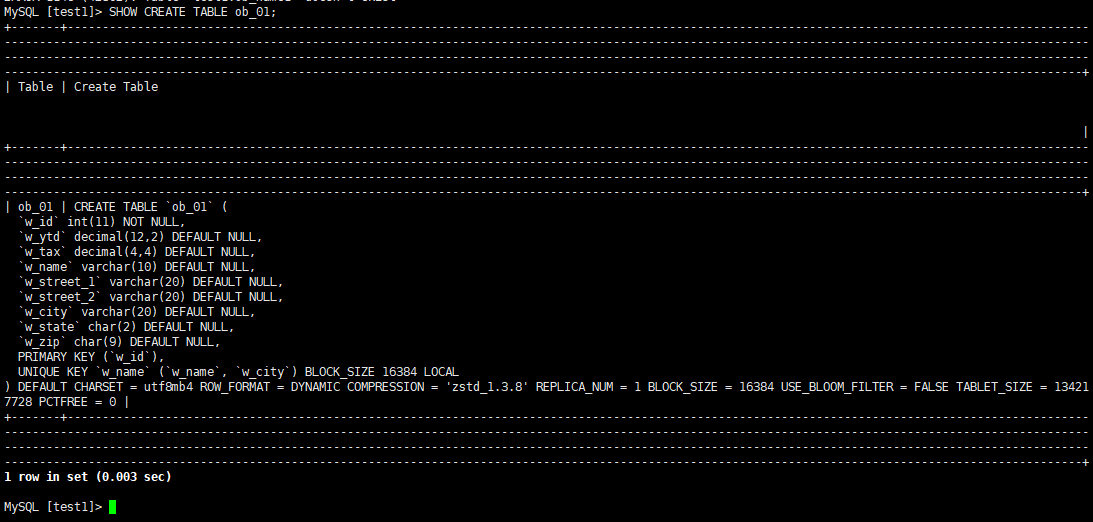
3、查看表 ob_01
使用 SHOW CREATE TABLE 语句查看建表语句。
MySQL [test1]> SHOW CREATE TABLE ob_01;
+-------+----------------------------------------------------------------------------------------------------------------------------------------------------------------------------------------------------------------------------------------------------------------------------------------------------------------------------------------------------------------------------------------------------------------------------------------------------------------------------------------------------------------------------------------------------------------------------------------------------------------------------------+
| Table | Create Table                                                                                                                                                                                                                                                                                                                                                                                                                                                                                                                                                                                                                     |
+-------+----------------------------------------------------------------------------------------------------------------------------------------------------------------------------------------------------------------------------------------------------------------------------------------------------------------------------------------------------------------------------------------------------------------------------------------------------------------------------------------------------------------------------------------------------------------------------------------------------------------------------------+
| ob_01 | CREATE TABLE `ob_01` (
  `w_id` int(11) NOT NULL,
  `w_ytd` decimal(12,2) DEFAULT NULL,
  `w_tax` decimal(4,4) DEFAULT NULL,
  `w_name` varchar(10) DEFAULT NULL,
  `w_street_1` varchar(20) DEFAULT NULL,
  `w_street_2` varchar(20) DEFAULT NULL,
  `w_city` varchar(20) DEFAULT NULL,
  `w_state` char(2) DEFAULT NULL,
  `w_zip` char(9) DEFAULT NULL,
  PRIMARY KEY (`w_id`),
  UNIQUE KEY `w_name` (`w_name`, `w_city`) BLOCK_SIZE 16384 LOCAL
) DEFAULT CHARSET = utf8mb4 ROW_FORMAT = DYNAMIC COMPRESSION = 'zstd_1.3.8' REPLICA_NUM = 1 BLOCK_SIZE = 16384 USE_BLOOM_FILTER = FALSE TABLET_SIZE = 134217728 PCTFREE = 0 |
+-------+----------------------------------------------------------------------------------------------------------------------------------------------------------------------------------------------------------------------------------------------------------------------------------------------------------------------------------------------------------------------------------------------------------------------------------------------------------------------------------------------------------------------------------------------------------------------------------------------------------------------------------+
1 row in set (0.003 sec)

MySQL [test1]>
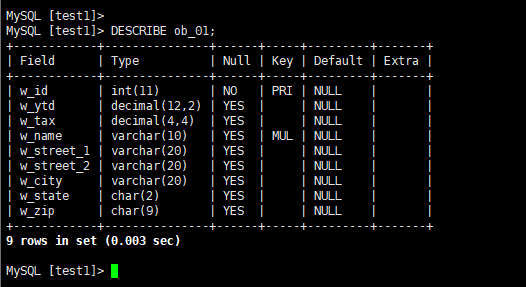
4、修改表 ob_01
使用 ALTER TABLE 语句来修改已存在的表的结构,包括修改表及表属性、新增列、修改列及属性、删除列等。
MySQL [test1]> DESCRIBE ob_01;
+------------+---------------+------+-----+---------+-------+
| Field      | Type          | Null | Key | Default | Extra |
+------------+---------------+------+-----+---------+-------+
| w_id       | int(11)       | NO   | PRI | NULL    |       |
| w_ytd      | decimal(12,2) | YES  |     | NULL    |       |
| w_tax      | decimal(4,4)  | YES  |     | NULL    |       |
| w_name     | varchar(10)   | YES  | MUL | NULL    |       |
| w_street_1 | varchar(20)   | YES  |     | NULL    |       |
| w_street_2 | varchar(20)   | YES  |     | NULL    |       |
| w_city     | varchar(20)   | YES  |     | NULL    |       |
| w_state    | char(2)       | YES  |     | NULL    |       |
| w_zip      | char(9)       | YES  |     | NULL    |       |
+------------+---------------+------+-----+---------+-------+
9 rows in set (0.003 sec)

MySQL [test1]>
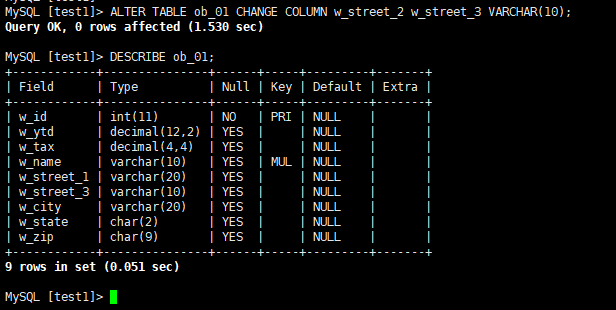
把表 ob_01 的字段 w_street_2 改名为 w_street_3,并同时修改其字段类型。
MySQL [test1]> ALTER TABLE ob_01 CHANGE COLUMN w_street_2 w_street_3 VARCHAR(10);
Query OK, 0 rows affected (1.530 sec)

MySQL [test1]> DESCRIBE ob_01;
+------------+---------------+------+-----+---------+-------+
| Field      | Type          | Null | Key | Default | Extra |
+------------+---------------+------+-----+---------+-------+
| w_id       | int(11)       | NO   | PRI | NULL    |       |
| w_ytd      | decimal(12,2) | YES  |     | NULL    |       |
| w_tax      | decimal(4,4)  | YES  |     | NULL    |       |
| w_name     | varchar(10)   | YES  | MUL | NULL    |       |
| w_street_1 | varchar(20)   | YES  |     | NULL    |       |
| w_street_3 | varchar(10)   | YES  |     | NULL    |       |
| w_city     | varchar(20)   | YES  |     | NULL    |       |
| w_state    | char(2)       | YES  |     | NULL    |       |
| w_zip      | char(9)       | YES  |     | NULL    |       |
+------------+---------------+------+-----+---------+-------+
9 rows in set (0.051 sec)

MySQL [test1]>
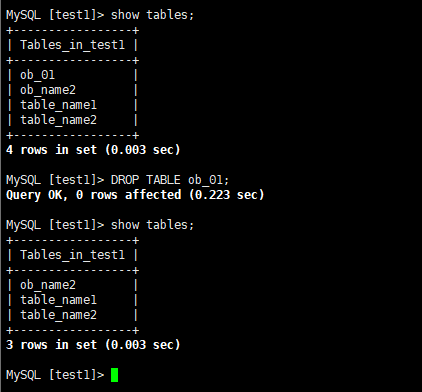
5、删除表 ob_01
使用 DROP TABLE 语句删除表。
MySQL [test1]> show tables;
+-----------------+
| Tables_in_test1 |
+-----------------+
| ob_01           |
| ob_name2        |
| table_name1     |
| table_name2     |
+-----------------+
4 rows in set (0.003 sec)

MySQL [test1]> DROP TABLE ob_01;
Query OK, 0 rows affected (0.223 sec)

MySQL [test1]> show tables;
+-----------------+
| Tables_in_test1 |
+-----------------+
| ob_name2        |
| table_name1     |
| table_name2     |
+-----------------+
3 rows in set (0.003 sec)

MySQL [test1]>
安装过程中的报错信息
磁盘空间不足,至少所需72G磁盘空间大小。
Check before start observer x
[WARN] OBD-1007: (127.0.0.1) The recommended number of open files is 655350 (Current value: 65536)
[WARN] (127.0.0.1) clog and data use the same disk (/)
[ERROR] (127.0.0.1) / not enough disk space. (Avail: 68.4G, Need: 72.0G)

Check before start obagent ok
See https://www.oceanbase.com/product/ob-deployer/error-codes .
boot failed!

