一、pytest简介
1、简单、易上手
2、支持参数化
3、具有很多第三方插件并且可以自定义扩展
4、测试过程中可将某些测试跳过(skip),或者预期失败的case标记失败
5、可生成html测试报告
6、方便和jenkins集成
二、安装
1、安装:在cmd窗口中输入:pip install -U pytest
2、检查:安装完成后,输入pytest -V 检验pytest是否安装成功
三、pytest编写case规则
1、测试文件以test_开头
2、测试类以Test开头,不能有__init__方法
3、测试函数以test_开头
四、运行测试用例
首先新建一个test_01.py文件,编写代码,新建一个测试类,添加几条case:
import pytest
class TestClass:
def test_one(self):
x = 'hello'
assert "h" in x
def test_two(self):
x = "python"
assert "ipython" == x
def test_three(self):
a = "ipython"
b = "hello ipython"
assert a in b
if __name__ == '__main__':
pytest.main(["-s", "test_class_01.py"])
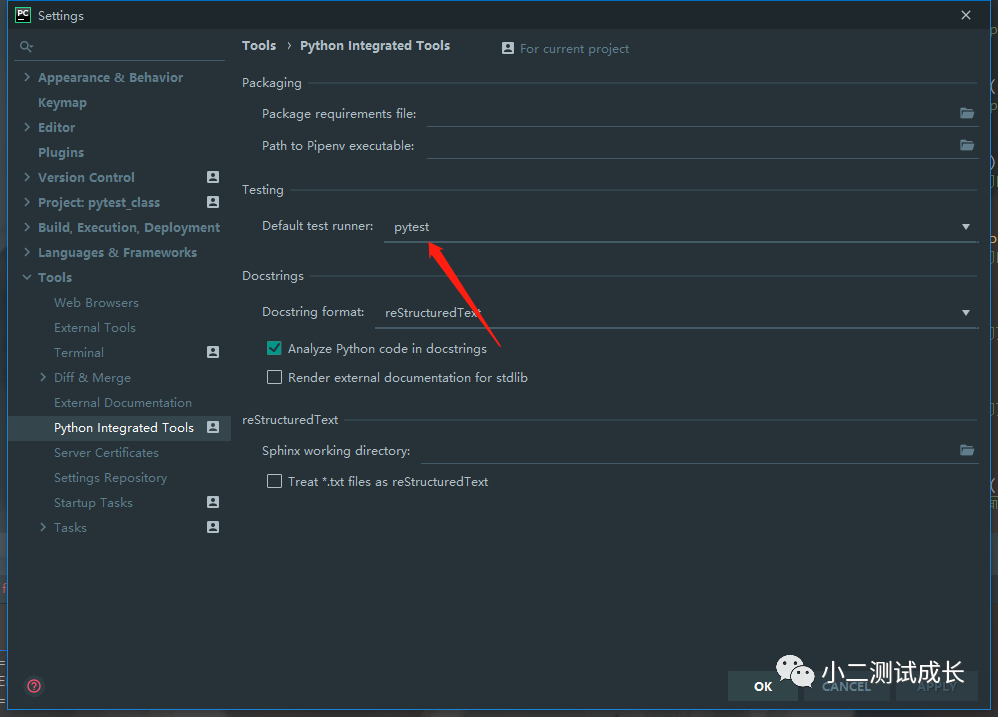
直接在ide中运行:
首先要修改一下配置(我用的是pycharm)
如图,把这里改成pytest
修改完成后,这里会多出几个三角
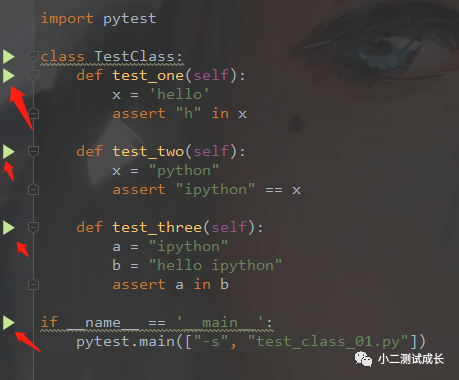
点击任意一个三角都会运行pytest
点击”class Testcase“右侧的三角或者”main“函数右侧的三角都会把所有用例执行一遍
点击”test“右侧的三角会执行当前用例
”main“函数中”-s“为运行参数,常用的运行参数说明:
运行参数 | 说明 | 举例 |
-s | 显示打印内容 | pytest pytest-demo.py -s 或者:pytest.main([’-s’,‘pytest-demo.py’]) |
:: | 指定测试用例运行 | pytest pytest-demo.py::test_01 或者:pytest.main([’-s’,‘pytest-demo.py::test01’]) |
-html路径/report.html | 生成xml/html格式测试报告(需要先安装pytest-html) | pytest pytest-demp.py --html-./report.html 或者:pytest.main([’-s’,‘pytest-demo.py’,’–html=./report.html’]) |
–maxfail=1 | 出现1个失败就终止测试 | pytest pytest-demo.py --maxfail=1 或者:pytest.main([’-s’,‘pytest-demo.py’,’–maxfail=1’]) |
-n | pytest-xdist多线程运行 (需要先安装pytest-xdist) | pytest pytest-demo.py -n 2 或者:pytest.main([’-s’,‘pytest-demo.py’,’-n=2’]) |
–reruns NUM | 重试运行测试用例(需要先安装pytest-rerunfailures) | pytest pytest-demo.py --reruns 2 |
还可以在cmd窗口运行:
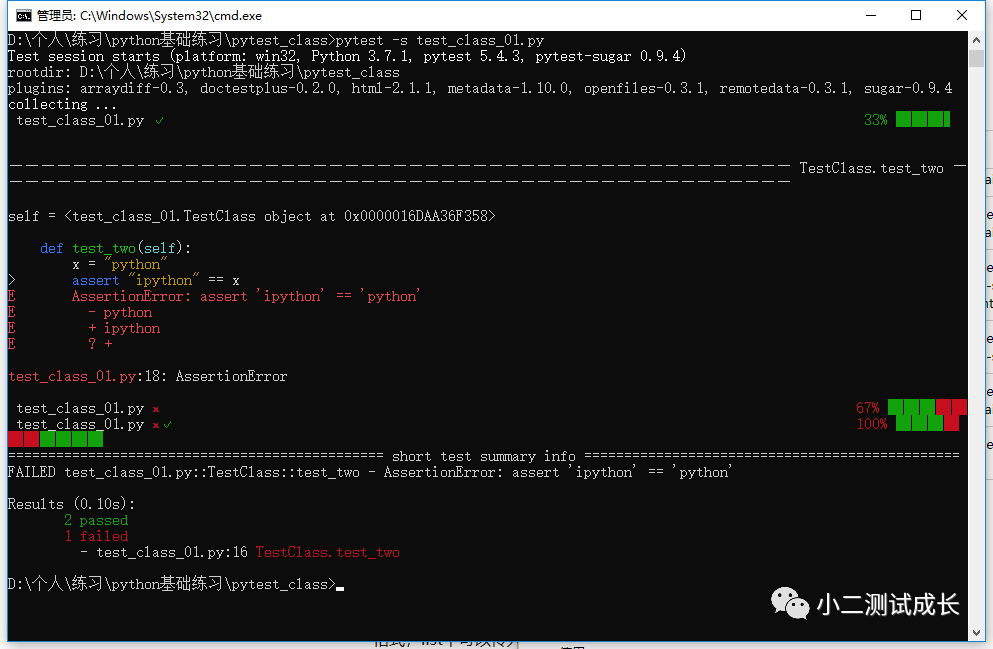
在pytest目录打开cmd进入解释器,输入pyest -s test_class_01.py执行测试用例查看结果
我们可以看到我这里的结果总共三条case,两条通过,一条失败
看到内些红红绿绿的进度条了没,那个是pytest插件--pytest-sugar,安装方法:pip install pyetst-sugar
五、pytest的setup和teardown函数
模块级:setup_model/teardown_model
运行于模块始末,全局的
函数级:setup_function/teardown_function
只对函数用例生效(不在类中)
类级:setup_class/teardown_class
只在类中前后运行一次
方法级:setup_method/teardown_method
开始于方法始末
import pytest
def setup_module():
print("模块开始")
def teardown_module():
print("模块结束")
def setup_fuction():
print("不在类中函数前")
def teardown_fuction():
print("不在类中函数后")
def test_fu_one():
print("不在类中方法1")
def test_fu_two():
print("不在类中方法2")
class TestClass:
@classmethod
def setup_class(cls):
print("类之前")
@classmethod
def teardown_class(cls):
print("类之后")
def setup_method(self):
print("方法前")
def teardown_method(self):
print("方法后")
def test_one(self):
x = 'hello'
assert "h" in x
def test_two(self):
x = "python"
assert "ipython" == x
def test_three(self):
a = "ipython"
b = "hello ipython"
assert a in b
if __name__ == '__main__':
pytest.main(["-s", "test_class_01.py"])
输出结果-->执行顺序:
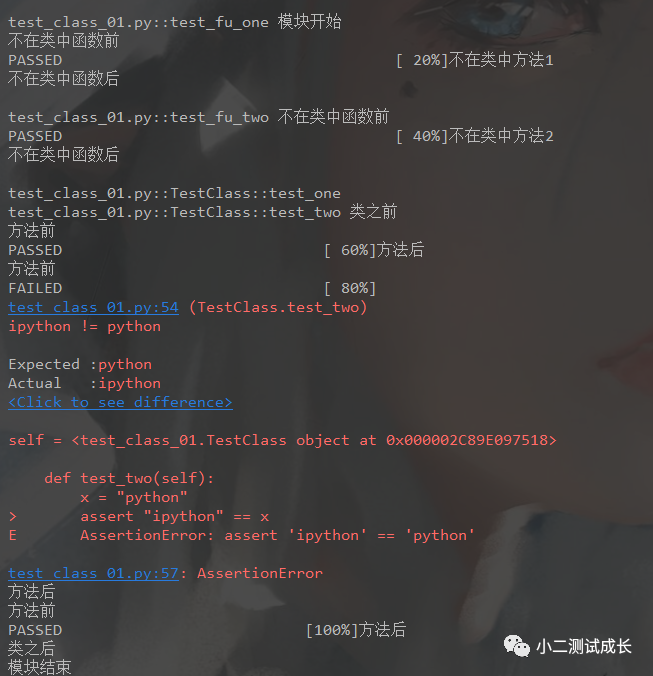
以上就是pytest的基础部分、后续会将pytest与appium结合使用。