测试环境配置
ES用户登录
开启ES用户登陆验证,生成ca证书
1. 为集群创建一个ca机构
elasticsearch-certutil ca依次输入回车(文件使用默认名),密码
2. 通过ca颁发证书
elasticsearch-certutil cert --ca elastic-stack-ca.p12 回车(文件使用默认名),密码上一步密码相同 elasticsearch-keystore add xpack.security.http.ssl.keystore.secure_passwordelasticsearch-keystore add xpack.security.transport.ssl.keystore.secure_password输入第一步输入的密码 elasticsearch-keystore add xpack.security.http.ssl.truststore.secure_passwordelasticsearch-keystore add xpack.security.transport.ssl.truststore.secure_password输入第一步输入的密码
3. 修改es的配置文件:elasticsearch.yml,添加如下配置
xpack.security.enabled: truexpack.security.transport.ssl.enabled: truexpack.security.transport.ssl.verification_mode: certificate xpack.security.transport.ssl.keystore.path: home/elasticsearch/elasticsearch-6.8.0/config/elastic-certificates.p12 xpack.security.transport.ssl.truststore.path: home/elasticsearch/elasticsearch-6.8.0/config/elastic-certificates.p12
4. 启动ES服务
./bin/elasticsearch -d
5. 执行设置用户名和密码的命令,ES有六个默认的用户
./bin/elasticsearch-setup-passwords interactive
设置密码在集群中任意一个elasticsearch节点执行完成即可,如果执行第二次,将会给出如下错误提示:

如果需要更新密码可以使用以下命令:
curl -H "Content-Type:application/json" -XPOST http://elastic:123456@192.168.43.139:9200/_xpack/security/user/elastic/_password -d '{ "password" : "qwer123" }'


ES角色管理
1. 查询ES角色详细权限
curl -XGET -u elastic:qwer123 -s http://@192.168.43.139:9200/_xpack/security/role/superuser?pretty
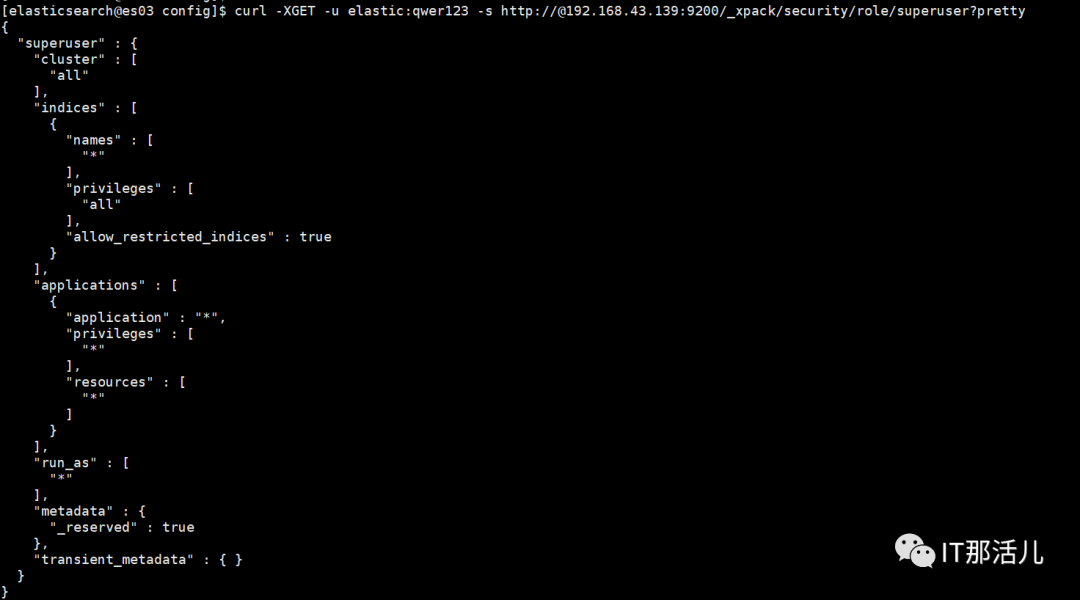
cluster:设置集群权限
indices:设置索引权限
applications:应用权限;包含application、privileges、resources属性
global:全局性的集群权限
run_as:赋予该role的用户拥有其他用户的权限
metadata:元数据
2. ES角色创建与更新
curl -XPOST -u elastic:qwer123 -s http://@192.168.43.139:9200/_xpack/security/role/IDS_ES -H "Content-Type: application/json" -d'{"cluster":["monitor","manage_index_templates","manage_ilm"],"indices":[{"names":["IDS_ES_*"],"privileges":["all"],"allow_restricted_indices": false}],"transient_metadata":{"enabled": true}}'

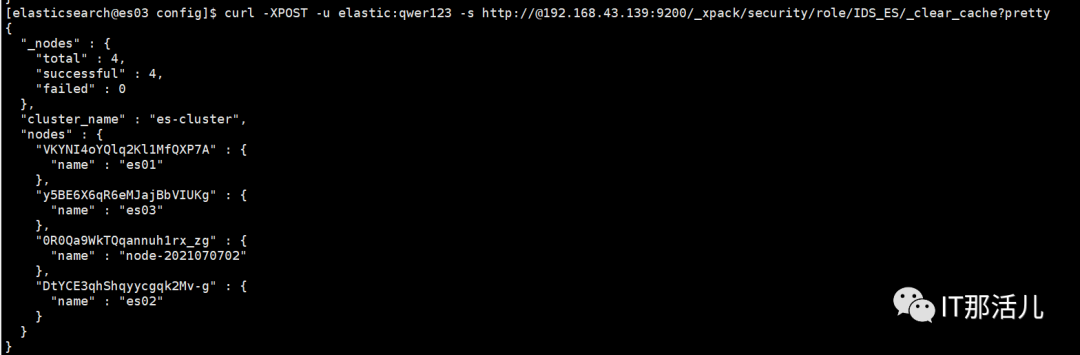
3. ES角色清理缓存
curl -XPOST -u elastic:qwer123 -s http://@192.168.43.139:9200/_xpack/security/role/IDS_ES/_clear_cache?pretty
4. ES删除角色
curl -XDELETE -u elastic:qwer123 -s http://@192.168.43.139:9200/_xpack/security/role/IDS_ES?pretty

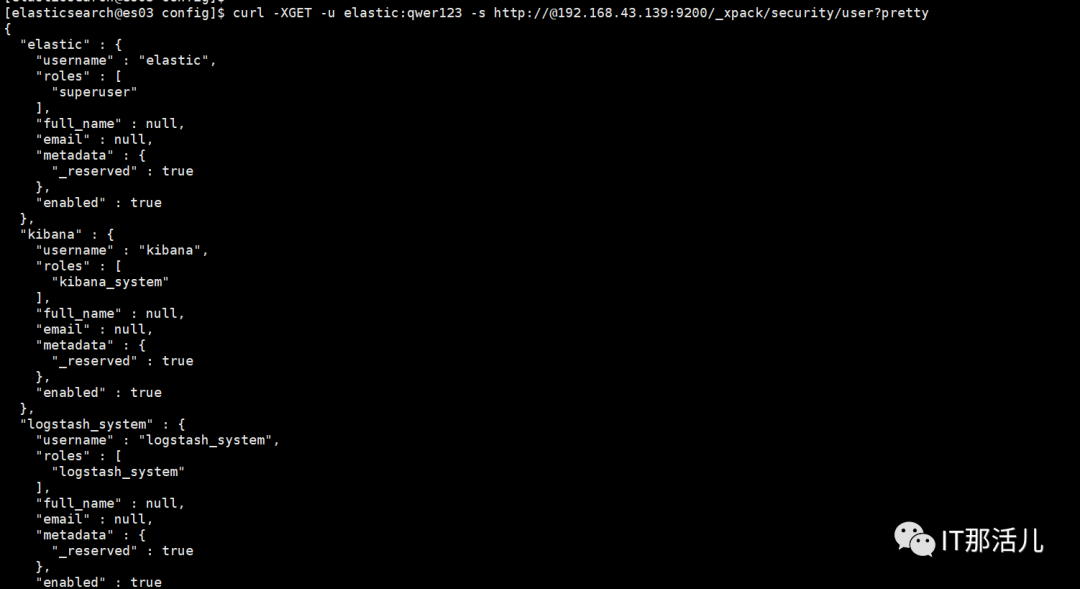
ES用户管理
curl -XGET -u elastic:qwer123 -s http://@192.168.43.139:9200/_xpack/security/user?pretty
2. 创建ES用户
curl -XPOST -u elastic:qwer123 -s http://@192.168.43.139:9200/_xpack/security/user/IDS_ES -H "Content-Type: application/json" -d '{ "password" : "Kms9852HTVdxjzUNXX", "full_name" : "", "email" : "", "roles" : [ "IDS_ES" ], "metadata" : { }}'

3. ES更新用户密码
curl -H "Content-Type:application/json" -XPOST http://elastic:123456@192.168.43.139:9200/_xpack/security/user/elastic/_password -d '{ "password" : "qwer123" }'
4. ES禁用用户
curl -XPOST -u elastic:qwer123 -s http://@192.168.43.139:9200/_xpack/security/user/IDS_ES/_disable
5. ES启用用户
curl -XPOST -u elastic:qwer123 -s http://@192.168.43.139:9200/_xpack/security/user/IDS_ES/_enable
6. ES用户删除
curl -XDELETE -u elastic:qwer123 -s http://@192.168.43.139:9200/_xpack/security/user/IDS_ES?pretty

http访问
ES禁用http访问,启用https访问
1) ./bin/elasticsearch-certutil ca # 生成elastic-stack-ca.p12文件
2) ./bin/elasticsearch-certutil cert --ca elastic-stack-ca.p12 # 生成elastic-certificates.p12文件,供elasticsearch使用
3) openssl pkcs12 -in elastic-stack-ca.p12 -out newfile.crt.pem -clcerts -nokeys # 生成newfile.crt.pem文件,供kibana使用,复制到对应目录下
4) ./bin/elasticsearch-certutil cert --pem elastic-stack-ca.p12 # 生成certificate-bundle.zip文件,包含ca/ca.crt,instance/instance.crt,instance/instance.key
Archive: certificate-bundle.zip
creating: ca/
inflating: ca/ca.crt
creating: instance/
inflating: instance/instance.crt
inflating: instance/instance.key
5)修改配置文件elasticsearch.yml,添加如下配置
#enable xpack
xpack.security.enabled: true
xpack.security.transport.ssl.enabled: true
# 下面的这几项 用于 集群间 加密通信
xpack.security.transport.ssl.verification_mode: certificate xpack.security.transport.ssl.keystore.path: home/elasticsearch/elasticsearch-6.8.0/config/elastic-certificates.p12 xpack.security.transport.ssl.truststore.path: home/elasticsearch/elasticsearch-6.8.0/config/elastic-certificates.p12 xpack.security.http.ssl.enabled: truexpack.security.http.ssl.keystore.path: /home/elasticsearch/elasticsearch-6.8.0/config/elastic-certificates.p12 xpack.security.http.ssl.truststore.path: /home/elasticsearch/elasticsearch-6.8.0/config/elastic-certificates.p12
6) 修改kibana配置文件,kibana.yml
elasticsearch.hosts: ["https://localhost:9200"] # 注意httpselasticsearch.ssl.verificationMode: noneelasticsearch.ssl.certificateAuthorities: ["/home/elasticsearch/kibana-6.8.2/config/newfile.crt.pem"]elasticsearch.username: "kibana"elasticsearch.password: "1io0K4VS7nkxpGwGwzHg"
7)重启elasticsearch服务,查询方式已改为https
curl -u elastic:qwer123 -k https://@192.168.43.139:9200/_cat/health?v

相关阅读: 刘能,公众号:IT那活儿ES常用基础操作命令及实践

更多精彩干货分享
点击下方名片关注
IT那活儿