前言:
(1)、在Centos8上安装Oracle 19c要求centos8的swap分区有4个G,如果小于4个G安装过程中需要增加swap分区。(2)、另centos8安装时要求boot分区不小于400M,否则centos8安装不成功。如果选择自动分区的话40G的硬盘boot会给1024M,swap会给3.96G,剩余的都给/(主目录),此处二雷,做个标记,以防后人采坑。
1.配置centos8的yum源(如果翻墙可以不用配置)
[root@oracledbhome]# cat etc/redhat-release 查看当前源
[root@oracledbhome]# cd /etc/yum.repos.d //查看配置文件
[root@oracledbhome]# CentOS-Base.repo //这是系统自带的yum源
[root@oracledbhome]# mkdir bak
[root@oracledbhome]# mv *.repo bak/
[root@oracledbhome]# wget http://mirrors.aliyun.com/repo/Centos-8.repo //下载匹配的源配置文件
[root@oracledbhome]# yum clean all
[root@oracledbhome]# yum makecache //生成缓存
2.下载安装包LINUX.X64_193000_db_home.zip
下载地址:https://www.oracle.com/technetwork/database/enterprise-edition/downloads/index.html
3.安装前准备工作
3.1创建组和用户
[root@oracledbhome]# groupadd -g 8023 oinstall
[root@oracledbhome]# groupadd -g 8024 dba
[root@oracledbhome]# groupadd -g 8025 oper
[root@oracledbhome]# useradd -u 8023 -g oinstall -G dba,oper oracle
3.2修改用户密码
[root@oracledbhome]# passwd oracle
3.3关闭防火墙、selinux
1、查看firewall服务状态
[root@oracledbhome]# systemctl status firewalld
//关闭防火墙
[root@oracledbhome]# systemctl stop firewalld.service
[root@oracledbhome]# systemctl disable firewalld.service
//关闭:将SELINUX设置为disabled
[root@oracledbhome]# vim /etc/selinux/config
# This filecontrols the state of SELinux on the system.
# SELINUX= cantake one of these three values:
# enforcing - SELinux security policy isenforced.
# permissive - SELinux prints warningsinstead of enforcing.
# disabled - No SELinux policy is loaded.
#SELINUX=enforcing
SELINUX=disabled
# SELINUXTYPE=can take one of these three values:
# targeted - Targeted processes areprotected,
# minimum - Modification of targeted policy.Only selected processes are protected.
# mls - Multi Level Security protection.
SELINUXTYPE=targeted
3.4创建工作的目录,并赋予相应的权限
[root@oracledbhome]# mkdir -p /u01/app/oracle/product/19.2.0/db_1
[root@oracledbhome]# chown -R oracle:oinstall /u01/
[root@oracledbhome]# chmod -R 775 /u01/
3.5配置Oracle的环境变量
[root@oracledbhome]# su oracle
[oracle@oracledbhome]$ cd ~
[oracle@oracledb~]$ vim .bash_profile
# .bash_profile
# Get thealiases and functions
if [ -f~/.bashrc ]; then
. ~/.bashrc
fi
# oracleenvironment startup
ORACLE_SID=orcl;
ORACLE_UNQNAME=orcl;
ORACLE_BASE=/u01/app/oracle;
ORACLE_HOME=$ORACLE_BASE/product/19.2.0/db_1;
NLS_DATE_FORMAT="YYYY:MM:DDHH24:MI:SS";
NLS_LANG=american_america.ZHS16GBK;
TNS_ADMIN=$ORACLE_HOME/network/admin;
ORA_NLS11=$ORACLE_HOME/nls/data;
PATH=$ORACLE_HOME/bin:$PATH
LD_LIBRARY_PATH=$ORACLE_HOME/lib
LD_LIBRARY_PATH=${LD_LIBRARY_PATH}:$ORACLE_HOME/oracm/lib
LD_LIBRARY_PATH=${LD_LIBRARY_PATH}:/lib:/usr/lib:/usr/local/lib
CLASSPATH=$ORACLE_HOME/JRE
CLASSPATH=${CLASSPATH}:$ORACLE_HOME/jlib
CLASSPATH=${CLASSPATH}:$ORACLE_HOME/rdbms/jlib
CLASSPATH=${CLASSPATH}:$ORACLE_HOME/network/jlib
THREADS_FLAG=native;
# export localvariables to global variables
exportORACLE_SID
export ORACLE_UNQNAME
exportORACLE_BASE
exportORACLE_HOME
exportNLS_DATE_FORMAT
export NLS_LANG
export TNS_ADMIN
export ORA_NLS11
export PATH
exportLD_LIBRARY_PATH
export CLASSPATH
exportTHREADS_FLAG
export TEMP=/tmp
exportTMPDIR=/tmp
# umask 022表示默认创建新文件权限为755,也就是 rxwr-xr-x(所有者全部权限,属组读写,其它人读写
umask 022
3.5.1、Linux重启后sqlplus无效
今oracle的环境变量,配置到了~/.bash_profile文件中。在虚拟机中,echo $ORACLE_HOME能正常显示环境变量,但是,用xshell每次重新连接,环境变量就会失效,需要重复手动执行 source ~/.bash_profile用图形界面登录时,系统会读取~/.bash_profile中的配置信息,所以环境变量可以生效。但是用命令行登录,例如xshell,系统加载的是~/.bashrc 中的配置信息。所以,我们把环境变量在~/.bashrc文件中,重新配置一次,问题解决
3.6修改内核参数
[oracle@oracledb~]$ exit //切换到root用户
exit
[root@oracledbhome]# vim /etc/sysctl.conf
# sysctlsettings are defined through files in
#/usr/lib/sysctl.d/, /run/sysctl.d/, and /etc/sysctl.d/.
#
# Vendorssettings live in /usr/lib/sysctl.d/.
# To override awhole file, create a new file with the same in
# /etc/sysctl.d/and put new settings there. To override
# only specificsettings, add a file with a lexically later
# name in/etc/sysctl.d/ and put new settings there.
#
# For moreinformation, see sysctl.conf(5) and sysctl.d(5).
fs.file-max =6815744
kernel.sem = 25032000 100 128
kernel.shmmni =4096
kernel.shmall =1073741824
kernel.shmmax =4398046511104
kernel.panic_on_oops= 1
net.core.rmem_default= 262144
net.core.rmem_max= 4194304
net.core.wmem_default= 262144
net.core.wmem_max= 1048576
fs.aio-max-nr =1048576
net.ipv4.ip_local_port_range= 9000 65500
[root@oracledbhome]# sysctl --system //使参数生效
3.7下面开始安装oracle依赖包
[root@oracledbhome]# dnf -y install binutils gcc gcc-c++ glibc glibc-devel ksh libaiolibaio-devel libgcc libgcc.i686 libstdc++ libstdc++-devel libXi libXtst libnslmake sysstat
4.解压下载的安装包到指定的目录
进入到Oracle用户下解压步骤2中下载的安装包到指定目录下(即我们创建的oracle目录) LINUX.X64_193000_db_home.zip
[root@oracledbhome]# cd /home/willwang/Documents
[root@oracledbsoftware]# su oracle
[oracle@oracledbsoftware]$ unzip LINUX.X64_193000_db_home.zip -d/u01/app/oracle/product/19.2.0/db_1/
5.安装Oracle 19c
5.1、执行./runInstaller提示系统不兼容
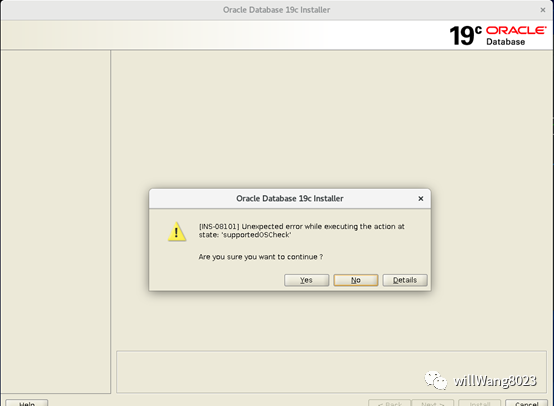
【解决办法】先执行修改系统版本(否则因OS版本不兼容导致错误):
[oracle@oracledb db_1]$ export CV_ASSUME_DISTID=RHEL7.6
5.2、进入oracle安装目录执行安装
[oracle@oracledbsoftware]$ cd /u01/app/oracle/product/19.2.0/db_1/
[oracle@oracledbdb_1]$ ./runInstaller
ERROR: Unable toverify the graphical display setup. This application requires X display. Makesure that xdpyinfo exist under PATH variable.
[oracle@oracledbdb_1]$ xdpyinfo
No protocolspecified
xdpyinfo: unable to open display ":0".
5.2、安装时提示“ERROR: Unable to verify the graphicaldisplay setup.”
切换root账号(不一定是root账号,可能是登录桌面的账号),执行命令xhost +,如下:
[oracle@oracledbdb_1]$ su root
密码:
[root@oracledbdb_1]# xhost +
access controldisabled, clients can connect from any host
[root@oracledbdb_1]# su oracle
[oracle@oracledbdb_1]$ xdpyinfo
name ofdisplay: :10.0
versionnumber: 11.0
vendorstring: The X.Org Foundation
vendor releasenumber: 12003000
X.Org version:1.20.3
maximum requestsize: 16777212 bytes
motion buffersize: 256
bitmap unit, bitorder, padding: 32, LSBFirst, 32
image byteorder: LSBFirst
number ofsupported pixmap formats: 6
supported pixmapformats:
depth 1, bits_per_pixel 1, scanline_pad 32
... ...
6.切换到安装目录,执行安装
[oracle@oracledbroot]$ cd /u01/app/oracle/product/19.2.0/db_1/
[oracle@oracledbdb_1]$ ./runInstaller
7.图形界面安装
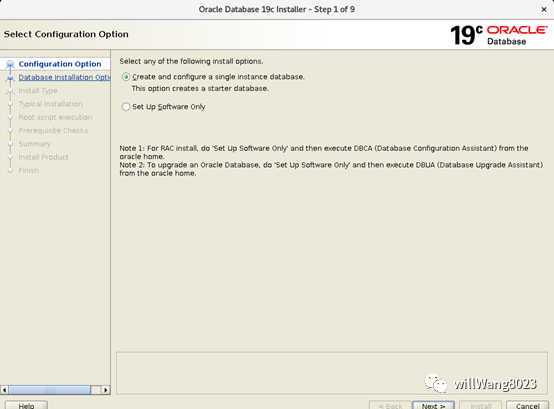
7.1、配置选项
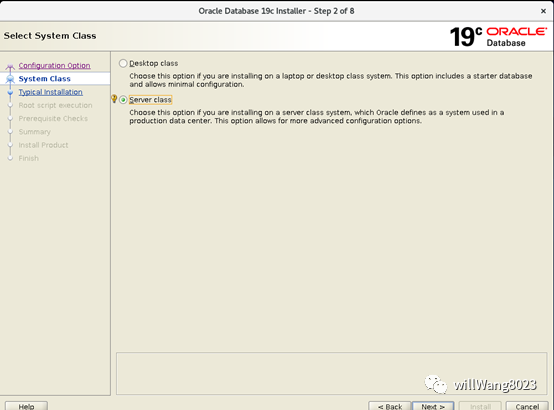
7.2、选择安装类型,桌面版还是服务器版
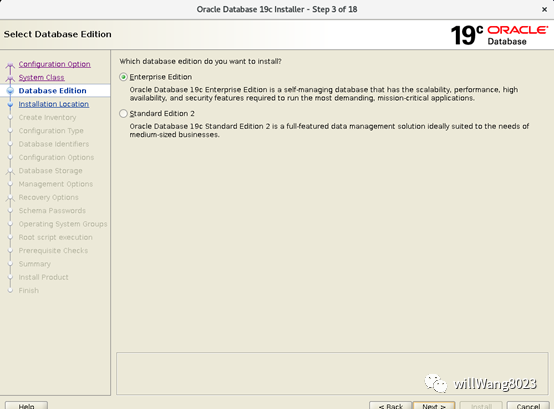
7.3、选择安装版本
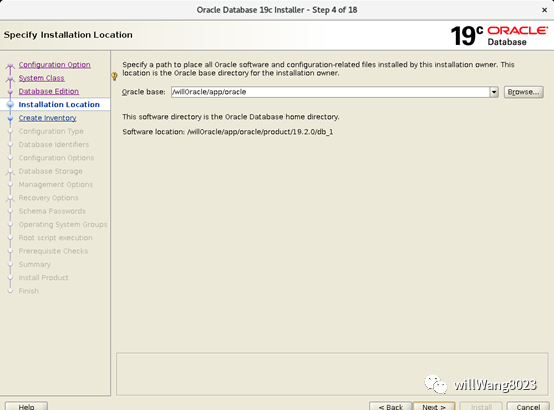
7.4、Oracle安装目录
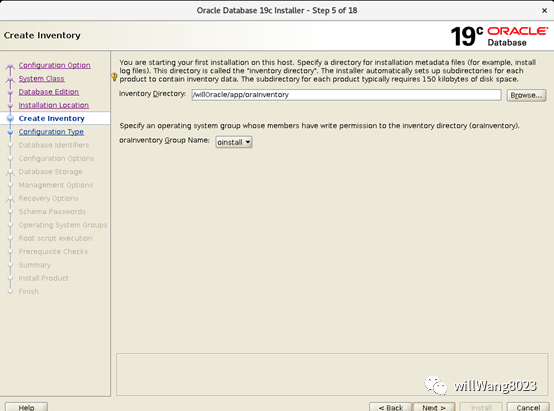
7.5、日志文件目录
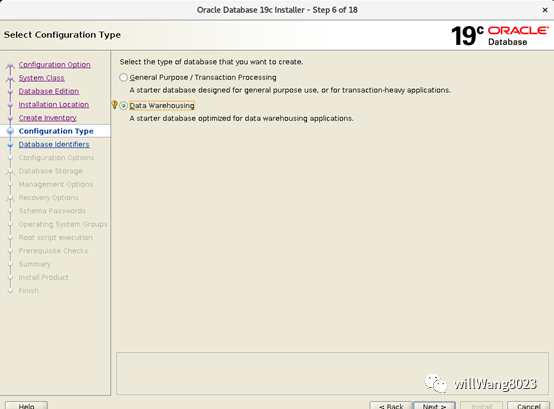
7.6、选择创建数据库类型,我选择创建为数据中心
7.7、创建默认数据库,可选创建为容器类型的数据库

7.8、设置自动内存大小

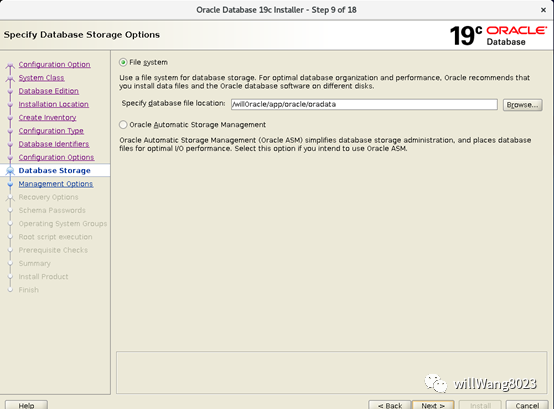
7.9、数据存放位置
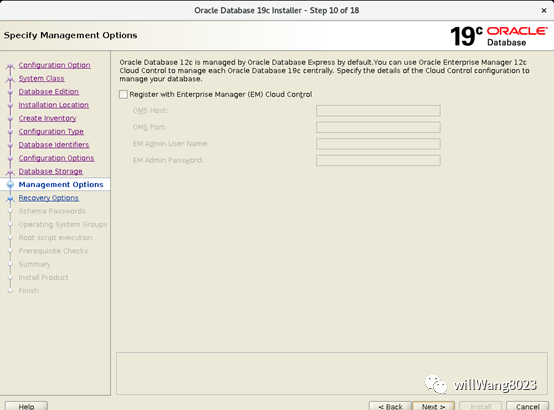
7.10、将该DB服务注册到云端管理,此处根据情况设置,我这里不设置
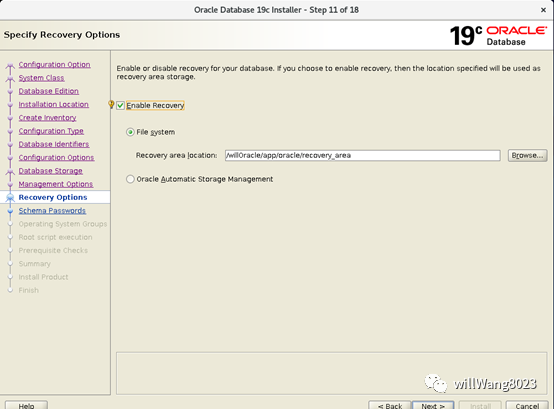
7.11、启用备份,并制定备份路径
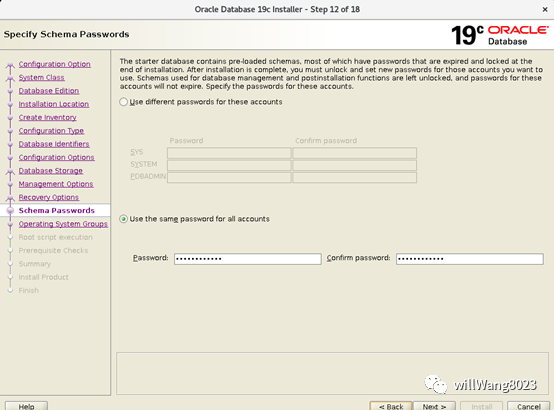
7.12、设置个用户使用的密码,可以单独设置不同的也可以设置使用相同的密码
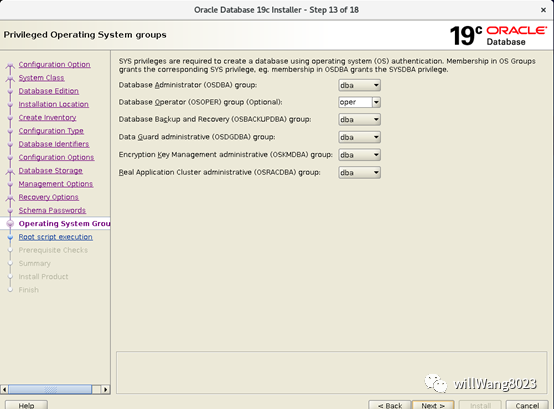
7.13、提示文件所属操作组
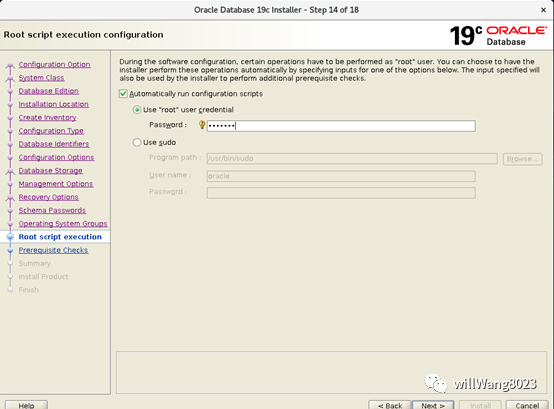
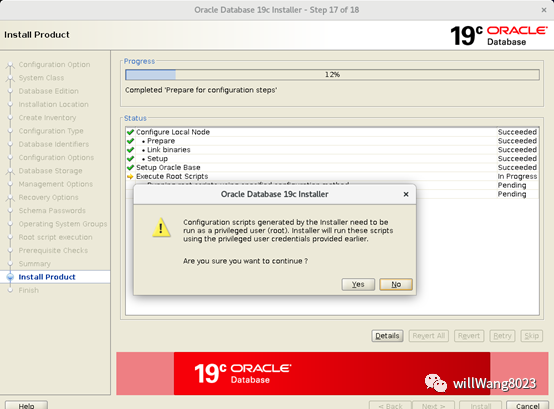
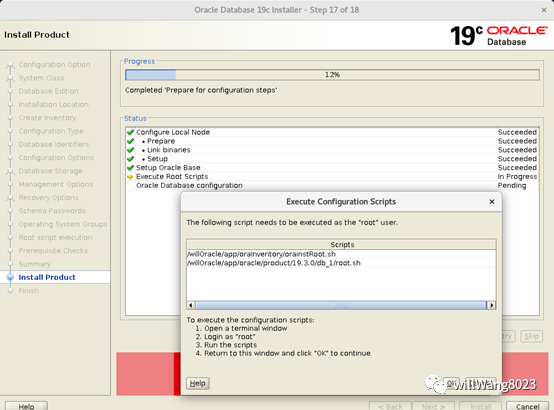
7.14、设置使用root用户执行安装脚本,可以不设置,不设置的话,安装过程中会提示让手动执行
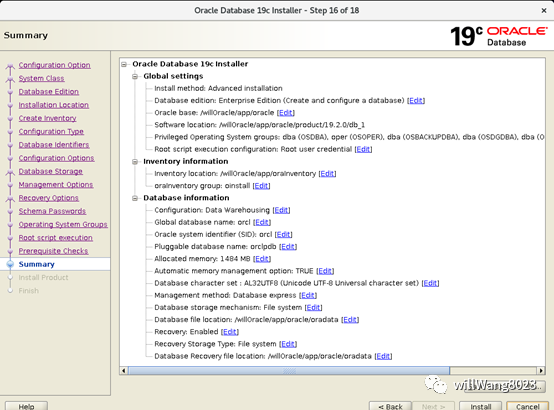
7.15、配置总览
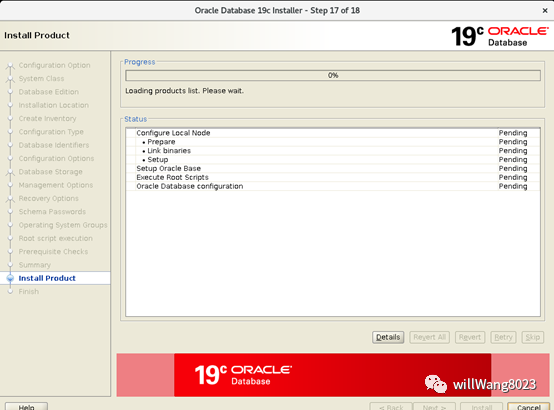
7.16、开始安装
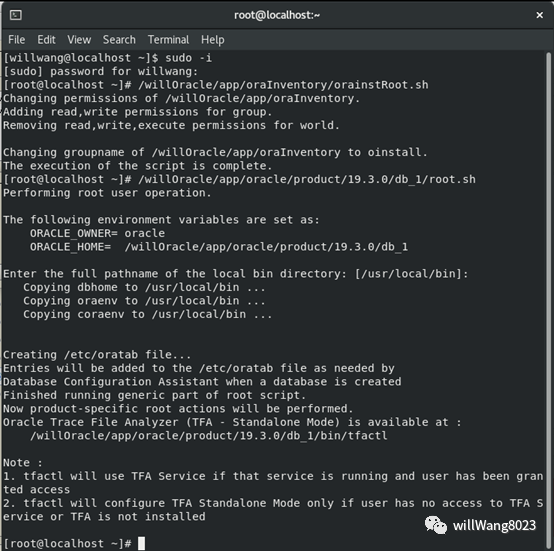
7.17、提示使用刚才配置的root账户执行两个脚本,(此处要选yes)
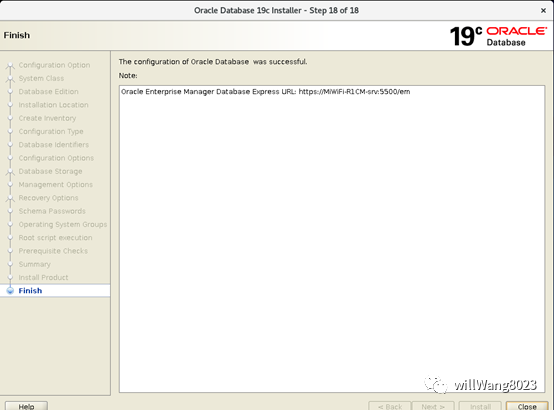
7.18、最后提示安装成功
8、使用dba权限连接Oralce
connect / as sysdba
8.1、Oracle创建用户
SQL> create user willWang identified bywwy520oracle;
ERROR:
ORA-65096: invalid common user or role name
Solutions:
Before creating the user run:
altersession set "_ORACLE_SCRIPT"=true;
9、navicat链接数据库
ERROR:
ORA-01045: user lacks CREATE SESSIONprivilege; logon denied
Solutions:
Since the error message indicated that theuser has no CREATE SESSION privilege, so we can just follow the instruction.
SQL>grant create session to willWang;
Grant succeeded.
【问题1】交换空间不足
如果centos上swap空间不足,配置预检阶段会报错,需要手动增加swap分区,swap分区增加是将当前创建的文件加到原来已有的swap分区上,可以使用free -m查看原来的swap分区有多大
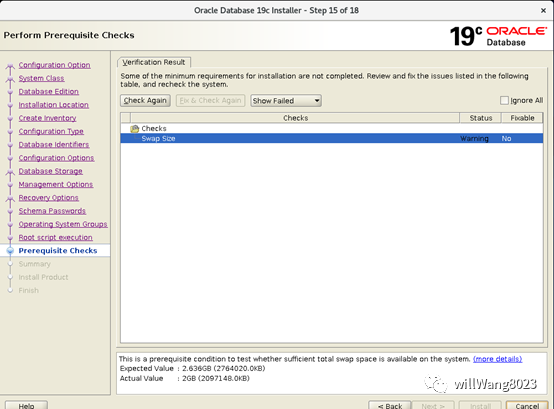
【解决】:使用dd命令创建一个swap分区
1)创建一个足够大的文件
[root@oracledb~]# dd if=/dev/zero of=/home/swap bs=1024 count=4096000
2048000+0records in
2048000+0records out
2097152000 bytes(2.1 GB, 2.0 GiB) copied, 6.07916 s, 345 MB/s
(count的值等于1024 x你想要的文件大小, 4096000是4G)
2)格式化刚才创建的分区为swap分区
[root@oracledb~]# mkswap /home/swap
mkswap:/home/swap: insecure permissions 0644, 0600 suggested.
Setting upswapspace version 1, size = 2 GiB (2097147904 bytes)
no label,UUID=c9e4416b-0a43-464b-a083-45aef0ed1ed6
3)启用swapon分区
[root@oracledb~]# swapon /home/swap
swapon:/home/swap: insecure permissions 0644, 0600 suggested.
4)free -m 查看已经扩容的了swap分区

5)为了能够让swap自动挂载,需要修改etc/fstab文件,用vi /etc/fstab
[root@oracledb~]# vim /etc/fstab
在文件末尾加上 /home/swap swap swap default 0 0
6)为防止重启系统失效,执行下面一段命令 echo "swapon /home/swap">> /etc/inittab
[root@oracledb~]# echo "swapon /home/swap" >>/etc/inittab
7)然后在看 vi 看下 /etc/inittab,最后一行是swapon /home/swap即可
【问题2】执行初始化数据字典脚本
如果没有设置installer使用root账户执行安装脚本,此处就手动执行,用root用户执行两个脚本(此处按照提示的路径执行)
【解决办法】按提示执行两个脚本即可,执行结果如下图