


用Publish创建博客(三)——插件开发
如想获得更好的阅读效果可以访问我的博客 www.fatbobman.com[1] 我的博客也是用Publish创建的。
我们不仅可以利用Publish内置的接口来开发插件进行扩展,同时还可以使用Publish套件中其他的优秀库(Ink、Plot、Sweep、Files、ShellOut等)来完成更多的创意。本文将通过几个实例(添加标签、增加属性、用代码生成内容、全文搜索、命令行部署)在展示不同扩展手段的同时向大家介绍Publish套件中其他的优秀成员。在阅读本文前,最好能先阅读用Publish创建博客(一)——入门[2]、用Publish创建博客(二)——主题开发[3]。对Publish有个基本了解。本文篇幅较长,你可以选择自己感兴趣的实战内容阅读。
基础
PublishingContext
在用Publish创建博客(一)——入门[4]中我们介绍过Publish有两个Content概念。其中PublishingContext
作为根容器包含了你网站项目的全部信息(Site
、Section
、Item
、Page
等)。在对Publish进行的大多数扩展开发时,都需要和PublishingContext
打交道。不仅通过它来获取数据,而且如果要对现有数据进行改动或者添加新的Item
、Page
时(在Content
中采用不创建markdown
文件的方式)也必须要调用其提供的方法。比如mutateAllSections
、addItem
等。
Pipeline中的顺序
Publish会逐个执行Pipeline中的Step
,因此必须要在正确的位置放置Step
和Plugin
。比如需要对网站的所有数据进行汇总,则该处理过程应该放置在addMarkdownFiles
(数据都被添加进Content
)之后;而如果想添加自己的部署(Deploy
),则应放置在生成所有文件之后。下面会通过例子具体说明。
热身
下面的代码,是以放置在
Myblog
(第一篇中创建,并在第二篇中进行了修改)项目里为例。
准备
请将
try Myblog().publish(withTheme: .foundation)
换成
try Myblog().publish(using: [.addMarkdownFiles(), //导入Content目录下的markdown文件,并解析添加到PublishingContent中.copyResources(), //将Resource内容添加到Output中.generateHTML(withTheme:.foundation ), //指定模板.generateRSSFeed(including: [.posts]), //生成RSS.generateSiteMap() //生成Site Map])
创建Step
我们先通过官方的一个例子了解一下Step
的创建过程。当前导航菜单的初始状态:

下面的代码将改变SectionID。
//当前的Section设置enum SectionID: String, WebsiteSectionID {// Add the sections that you want your website to contain here:case posts //rawValue 将影响该Section对应的Content的目录名。当前的目录为postscase about //如果改成 case abot = "关于" 则目录名为“关于”,所以通常会采用下方更改title的方法}//创建Stepextension PublishingStep where Site == Myblog {static func addDefaultSectionTitles() -> Self {//name为step名称,在执行该Step时在控制台显示.step(named: "Default section titles") { context in //PublishingContent实例context.mutateAllSections { section in //使用内置的修改方法switch section.id {case .posts:section.title = "文章" //修改后的title,将显示在上方的Nav中case .about:section.title = "关于"}}}}}
将Step
添加到main.swift
的pipeline
中:
.addMarkdownFiles(),.addDefaultSectionTitles(),.copyResources(),
添加该Step
后的导航菜单:

Pipeline中的位置
如果将addDefaultSectionTitles
放置在addMarkdownFiles
的前面,会发现posts
的title变成了

这是因为,当前的Content--posts
目录中有一个index.md
文件。addMarkdownFiles
会使用从该文件中解析的title
来设置posts
的Section.title
。解决的方法有两种:
1.向上面那样将addDefaultSectionTitles
放置在addMarkdownFiles
的后面2.删除掉index.md
等效的Plugin
在用Publish创建博客(一)——入门[5]中提过Step
和Plugin
在作用上是等效的。上面的代码用Plugin
的方式编写是下面的样子:
extension Plugin where Site == Myblog{static func addDefaultSectionTitles() -> Self{Plugin(name: "Default section titles"){context incontext.mutateAllSections { section inswitch section.id {case .posts:section.title = "文章"case .about:section.title = "关于"}}}}}
在Pipeline中
使用下面的方式添加:
.addMarkdownFiles(),.copyResources(),.installPlugin(.addDefaultSectionTitles()),
它们的效果完全一样。
实战1:添加Bilibili标签解析
Publish使用Ink[6]作为markdown
的解析器。Ink
作为Publish套件的一部分,着重点在markdown
到HTML
的高效转换。它让使用者可以通过添加modifier
的方式,对markdown
转换HTML
的过程进行定制和扩展。Ink
目前并不支持全部的markdonw
语法,太复杂的它不支持(而且语法支持目前是锁死的,如想扩充必须forkInk
代码,自行添加)。
在本例中我们尝试为如下markdown
的codeBlock
语法添加新的转义功能:

aid
为B站视频的aid
号码,danmu
为弹幕
开关
让我们首先创建一个Ink
的modifier
/*每个modifier对应一个markdown语法类型。目前支持的类型有: metadataKeys,metadataValues,blockquotes,codeBlocks,headingshorizontalLines,html,images,inlineCode,links,lists,paragraphs,tables*/var bilibili = Modifier(target: .codeBlocks) { html, markdown in// html为Ink默认的HTML转换结果,markdown为该target对应的原始内容// firstSubstring是Publish套件中的Sweep提供的快速配对方法.guard let content = markdown.firstSubstring(between: .prefix("```bilibili\n"), and: "\n```") else {return html}var aid: String = ""var danmu: Int = 1// scan也是Sweep中提供另一种配对获取方式,下面的代码是获取aid:和换行之间的内容content.scan(using: [Matcher(identifier: "aid: ", terminator: "\n", allowMultipleMatches: false) { match, _ inaid = String(match)},Matcher(identifiers: ["danmu: "], terminators: ["\n", .end], allowMultipleMatches: false) {match,_ indanmu = match == "true" ? 1 : 0},])//modifier的返回值为HTML代码,本例中我们不需要使用Ink的默认转换,直接全部重写//在很多的情况下,我们可能只是在默认转换的html结果上做出一定的修改即可return"""<div style="position: relative; padding: 30% 45% ; margin-top:20px;margin-bottom:20px"><iframe style="position: absolute; width: 100%; height: 100%; left: 0; top: 0;" src="https://player.bilibili.com/player.html?aid=\(aid)&page=1&as_wide=1&high_quality=1&danmaku=\(danmu)" frameborder="no" scrolling="no"></iframe></div>"""}
通常情况下,我们会将上面的modifier
包裹在一个Plugin
中,通过installPlugin
来注入,不过现在我们直接创建一个新的Step
专门来加载modifier
extension PublishingStep{static func addModifier(modifier:Modifier,modifierName name:String = "") -> Self{.step(named: "addModifier \(name)"){ context incontext.markdownParser.addModifier(modifier)}}}
现在就可以在main.swift
的Pipeline
中添加了
.addModifier(modifier: bilibili,modifierName: "bilibili"), //bilibili视频.addMarkdownFiles(),
modifier
在添加后并不会立即使用,当Pipeline执行到addMarkdownFiles
对markdown
文件进行解析时才会调用。因此modifier
的位置一定要放在解析动作的前面。
Ink
允许我们添加多个modifier
,即使是同一个target
。因此尽管我们上面的代码是占用了对markdown
的codeBlocks
的解析,但只要我们注意顺序,就都可以和平共处。比如下面:
.installPlugin(.highlightJS()), //语法高亮插件,也是采用modifier方式,对应的也是codeBlock.addModifier(modifier: bilibili), //在这种状况下,bilibili必须在highlightJS下方。
Ink
将按照modifier
的添加顺序来调用。添加该插件后的效果
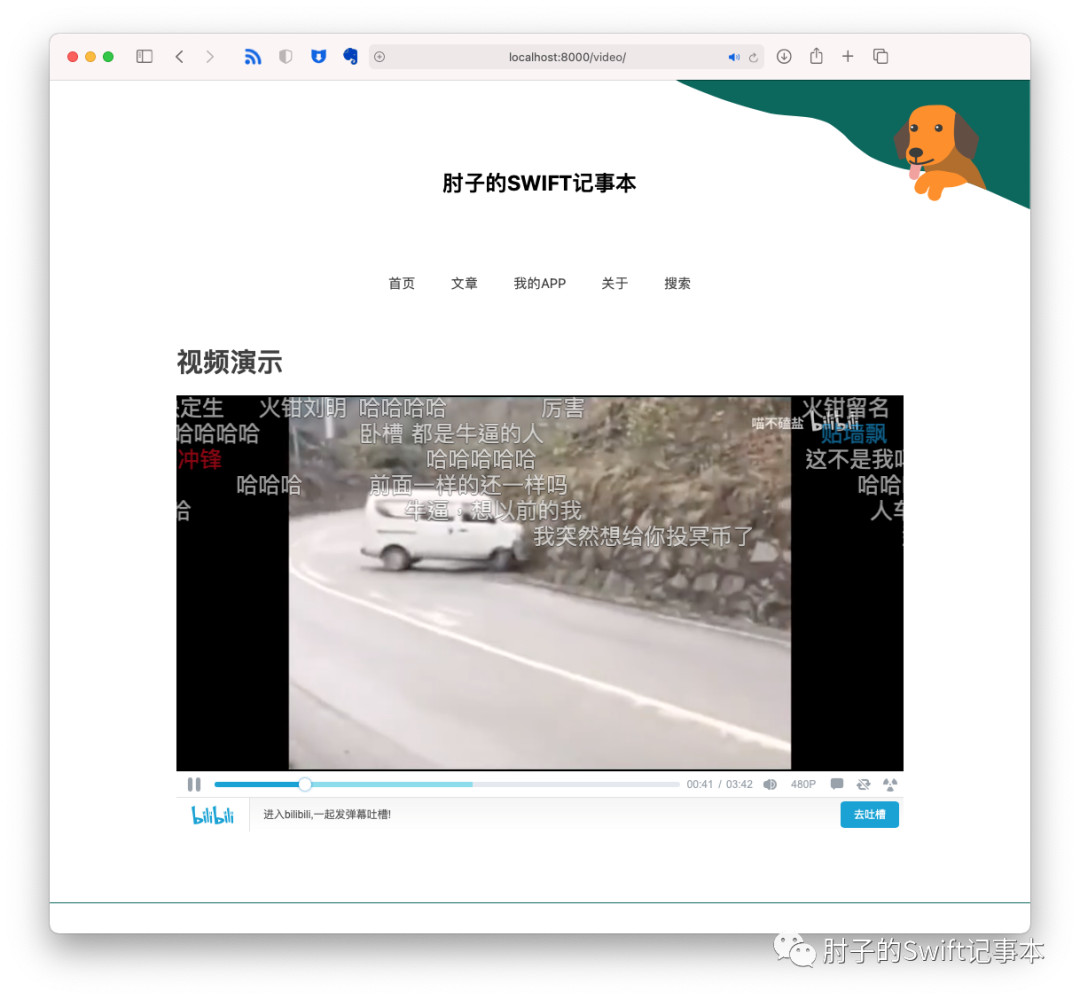
可以直接在https://www.fatbobman.com/video/查看演示效果。
上面代码在我提供的范例模板[7]中可以找到
通过modifier
扩展markdown
到HTML
的转义是Publish中很常见的一种方式。几乎所有的语法高亮、style
注入等都利用了这个手段。
实战2:为Tag添加计数属性
在Publish中,我们只能获取allTags
或者每个Item
的tags
,但并不提供每个tag
下到底有几个Item
。本例我们便为Tag
增加count
属性。
//由于我们并不想在每次调用tag.count的时候进行计算,所以一次性将所有的tag都提前计算好//计算结果通过类属性或结构属性来保存,以便后面使用struct CountTag{static var count:[Tag:Int] = [:]static func count<T:Website>(content:PublishingContext<T>){for tag in content.allTags{//将计算每个tag下对应的item,放置在count中count[tag] = content.items(taggedWith: tag).count}}}extension Tag{public var count:Int{CountTag.count[self] ?? 0}}
创建一个调用在Pipeline
中激活计算的Plugin
extension Plugin{static func countTag() -> Self{return Plugin(name: "countTag"){ content inreturn CountTag.count(content: content)}}}
在Pipeline
中加入
.installPlugin(.countTag()),
现在我们就可在主题中直接通过tag.count
来获取所需数据了,比如在主题方法makeTagListHTML
中:
.forEach(page.tags.sorted()) { tag in.li(.class(tag.colorfiedClass), //tag.colorfieldClass 也是通过相同手段增加的属性,在文章最后会有该插件的获取地址.a(.href(context.site.path(for: tag)),.text("\(tag.string) (\(tag.count))")))}
显示结果

实战3:将文章按月份汇总
在Publish创建博客(二)——主题开发[8]中我们讨论过目前Publish的主题支持的六种页面,其中有对Item
以及tag
的汇总页面。本例演示一下如何用代码创建主题不支持的其他页面类型。
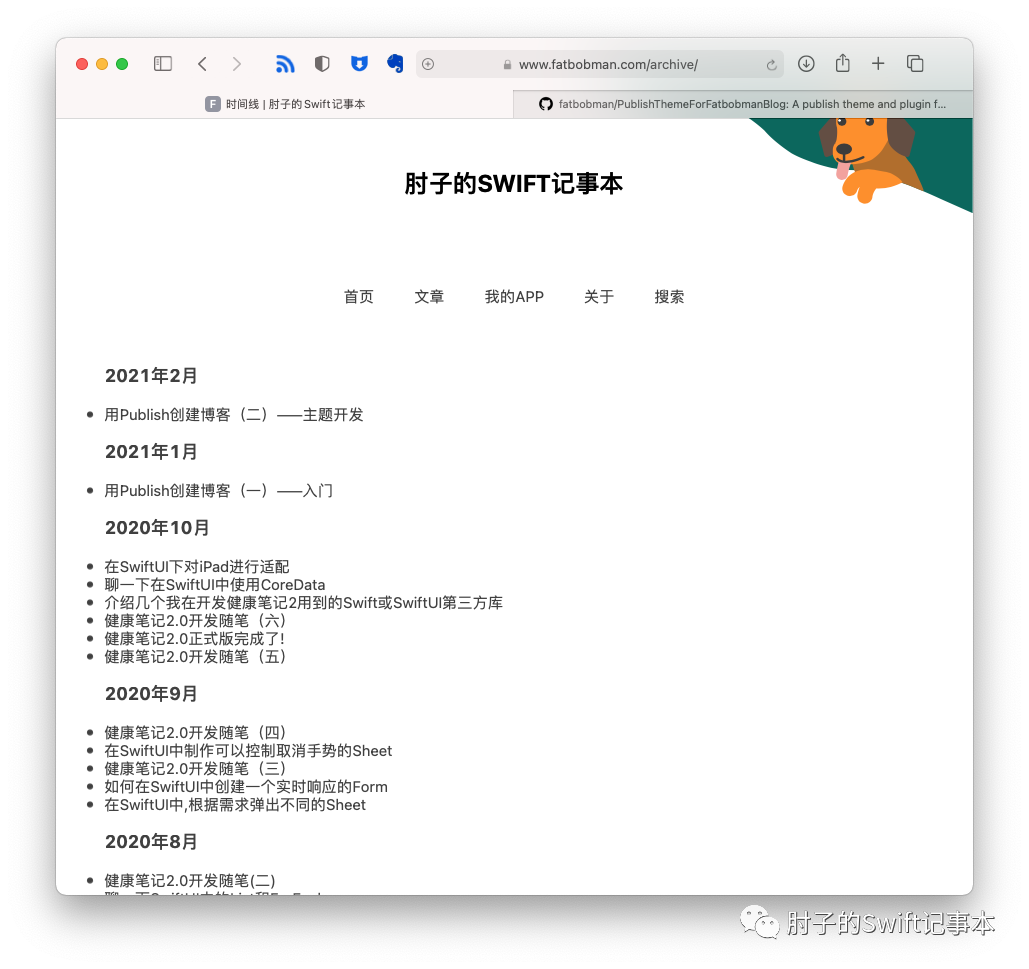
本例结束时,我们将让Publish能够自动生成如下的页面:
//创建一个Stepextension PublishingStep where Site == FatbobmanBlog{static func makeDateArchive() -> Self{step(named: "Date Archive"){ content invar doc = Content()/*创建一个Content,此处的Content是装载页面内容的,不是PublishingContextPublish在使用addMarkdownFiles导入markdown文件时,会为每个Item或Page创建Content由于我们是使用代码直接创建,所以不能使用markdown语法,必须直接使用HTML*/doc.title = "时间线"let archiveItems = dateArchive(items: content.allItems(sortedBy: \.date,order: .descending))//使用Plot生成HTML,第二篇文章有Plot的更多介绍let html = Node.div(.forEach(archiveItems.keys.sorted(by: >)){ absoluteMonth in.group(.h3(.text("\(absoluteMonth.monthAndYear.year)年\(absoluteMonth.monthAndYear.month)月")),.ul(.forEach(archiveItems[absoluteMonth]!){ item in.li(.a(.href(item.path),.text(item.title)))}))})//渲染成字符串doc.body.html = html.render()//本例中直接生成了Page,也可以生成Item,Item需在创建时指定SectionID以及Tagslet page = Page(path: "archive", content:doc)content.addPage(page)}}//对Item按月份汇总fileprivate static func dateArchive(items:[Item<Site>]) -> [Int:[Item<Site>]]{let result = Dictionary(grouping: items, by: {$0.date.absoluteMonth})return result}}extension Date{var absoluteMonth:Int{let calendar = Calendar.currentlet component = calendar.dateComponents([.year,.month], from: self)return component.year! * 12 + component.month!}}extension Int{var monthAndYear:(year:Int,month:Int){let month = self % 12let year = self / 12return (year,month)}}
由于该Step
需要对PublishingContent
中的所有Item
进行汇总,所以在Pipeline
中应该在所有内容都装载后再执行
.addMarkdownFiles(),.makeDateArchive(),
可以访问https://www.fatbobman.com/archive/查看演示。上面的代码可以在Github[9]下载。
实战4:给Publish添加搜索功能
谁不想让自己的Blog支持全文搜索呢?对于多数的静态页面来说(比如github.io),是很难依靠服务端来实现的。
下面的代码是在参照local-search-engine-in-Hexo[10]的方案实现的。local-search-engin
提出的解决方式是,将网站的全部需检索文章内容生成一个xml
或json
文件。用户搜索前,自动从服务端下载该文件,通过javascript代码在本地完成搜索工作。javascripte代码[11]使用的是hexo-theme-freemind
创建的。另外 Liam Huang的这篇博客[12]也给了我很大的帮助。
最后实现的效果是这样的:
创建一个Step
用来在Pipeline
的末端生成用于检索的xml
文件。
extension PublishingStep{static func makeSearchIndex(includeCode:Bool = true) -> PublishingStep{step(named: "make search index file"){ content inlet xml = XML(.element(named: "search",nodes:[//之所以将这个部分分开写,是因为有时候编译器对于复杂一点的DSL会TimeOut//提示编译时间过长。分开则完全没有问题。这种情况在SwiftUI中也会遇到.entry(content:content,includeCode: includeCode)]))let result = xml.render()do {try content.createFile(at: Path("/Output/search.xml")).write(result)}catch {print("Failed to make search index file error:\(error)")}}}}extension Node {//这个xml文件的格式是local-search-engin确定的,这里使用Plot把网站内容转换成xmlstatic func entry<Site: Website>(content:PublishingContext<Site>,includeCode:Bool) -> Node{let items = content.allItems(sortedBy: \.date)return .forEach(items.enumerated()){ index,item in.element(named: "entry",nodes: [.element(named: "title", text: item.title),.selfClosedElement(named: "link", attributes: [.init(name: "href", value: "/" + item.path.string)] ),.element(named: "url", text: "/" + item.path.string),.element(named: "content", nodes: [.attribute(named: "type", value: "html"),//为Item增加了htmlForSearch方法//由于我的Blog的文章中包含不少代码范例,所以让使用者选择是否在检索文件中包含Code。.raw("<![CDATA[" + item.htmlForSearch(includeCode: includeCode) + "]]>")]),.forEach(item.tags){ tag in.element(named:"tag",text:tag.string)}])}}}
我需要再称赞一下Plot[13],它让我非常轻松地完成了xml
的创建工作。
extension Item{public func htmlForSearch(includeCode:Bool = true) -> String{var result = body.htmlresult = result.replacingOccurrences(of: "]]>", with: "]>")if !includeCode {var search = truevar check = falsewhile search{check = false//使用Ink来获取配对内容result.scan(using: [.init(identifier: "<code>", terminator: "</code>", allowMultipleMatches: false, handler: { match,range inresult.removeSubrange(range)check = true})])if !check {search = false}}}return result}}
创建搜索框
和搜索结果容器
:
//里面的id和class由于要和javascript配合,需保持现状extension Node where Context == HTML.BodyContext {//显示搜索结果的Nodepublic static func searchResult() -> Node{.div(.id("local-search-result"),.class("local-search-result-cls"))}//显示搜索框的Nodepublic static func searchInput() -> Node{.div(.form(.class("site-search-form"),.input(.class("st-search-input"),.attribute(named: "type", value: "text"),.id("local-search-input"),.required(true)),.a(.class("clearSearchInput"),.href("javascript:"),.onclick("document.getElementById('local-search-input').value = '';"))),.script(.id("local.search.active"),.raw("""var inputArea = document.querySelector("#local-search-input");inputArea.onclick = function(){ getSearchFile(); this.onclick = null }inputArea.onkeydown = function(){ if(event.keyCode == 13) return false }""")),.script(.raw(searchJS) //完整的代码后面可以下载))}}
本例中,我将搜索功能设置在标签列表的页面中(更多信息查看主题开发[14]),因此在makeTagListHTML
中将上面两个Node
放到自己认为合适的地方。
由于搜索用的javascript需要用到jQuery
,所以在head
中添加了jQuery的引用(通过覆写了head
,当前只为makeTagListHTML
添加了引用)。
在Pipeline中加入
.makeSearchIndex(includeCode: false), //根据自己需要决定是否索引文章中的代码
完整的代码可以在Github[15]下载。
实战5:部署
最后这个实例略微有点牵强,主要是为了介绍Publish套件中的另外一员ShellOut[16]。
ShellOut
是一个很轻量的库,它的作用是方便开发者从Swift代码中调用脚本或命令行工具。在Publish中,使用publish deploy
进行Github部署的代码便使用了这个库。
import Foundationimport Publishimport ShellOutextension PublishingStep where Site == FatbobmanBlog{static func uploadToServer() -> Self{step(named: "update files to fatbobman.com"){ content inprint("uploading......")do {try shellOut(to: "scp -i ~/.ssh/id_rsa -r ~/myBlog/Output web@112.239.210.139:/var/www")//我是采用scp部署的,你可以用任何你习惯的方式}catch {print(error)}}}}
在main.swift
添加:
var command:String = ""if CommandLine.arguments.count > 1 {command = CommandLine.arguments[1]}try MyBlog().publish(.addMarkdownFiles(),....if(command == "--upload", .uploadToServer())]
执行 swift run MyBlog --upload
即可完成网站生成+上传(MyBlog为你的项目名称)
其他的插件资源
目前Publish的插件和主题在互联网上能够找到的并不很多,主要集中在Github的#publish-plugin[17]上。
其中使用量比较大的有:
•SplashPublishPlugin[18] 代码高亮•HighlightJSPublishPlugin[19] 代码高亮•ColorfulTagsPublishPlugin[20] 给Tag添加颜色
如果想在Github上分享你制作的plugin,请务必打上publish-plugin
标签以便于大家查找
最后
就在即将完成这篇稿件的时候,手机上收到了赵英俊
因病过世的新闻。英年早逝,令人唏嘘。回想到自己这些年经历的治疗过程,由衷地感觉平静、幸福的生活真好。
在使用Publish的这些天,让我找到了装修房子的感觉。虽然不一定做的多好,但网站能按自己的想法逐步变化真是乐趣无穷。
引用链接
[1]
www.fatbobman.com: http://www.fatbobman.com[2]
用Publish创建博客(一)——入门: https://www.fatbobman.com/posts/publish-1/[3]
用Publish创建博客(二)——主题开发: https://www.fatbobman.com/posts/publish-2/[6]
Ink: https://github.com/JohnSundell/Ink[7]
范例模板: https://github.com/fatbobman/PublishThemeForFatbobmanBlog[9]
Github: https://github.com/fatbobman/Archive_Article_By_Month_Publish_Plugin[10]
local-search-engine-in-Hexo: https://github.com/wzpan/hexo-generator-search[11]
javascripte代码: https://github.com/wzpan/hexo-theme-freemind/blob/master/source/js/search.js[12]
博客: https://liam.page/2017/09/21/local-search-engine-in-Hexo-site/[13]
Plot: https://github.com/JohnSundell/Plot[14]
主题开发: https://www.fatbobman.com/posts/publish-2/[15]
Github: https://github.com/fatbobman/local-search-engine-for-Publish[16]
ShellOut: https://github.com/JohnSundell/ShellOut[17]
Github的#publish-plugin: https://github.com/topics/publish-plugin?l=swift[18]
SplashPublishPlugin: https://github.com/JohnSundell/SplashPublishPlugin[19]
HighlightJSPublishPlugin: https://github.com/alex-ross/HighlightJSPublishPlugin[20]
ColorfulTagsPublishPlugin: https://github.com/Ze0nC/ColorfulTagsPublishPlugin
