


以下文章转自openGauss公众号。
链接如下:
https://mp.weixin.qq.com/s/8GciRGk1PJ4MczUUoALurQ
proxy实现分布式的核心原理是,使用netty捕获客户端(gsql或jdbc)的sql语句,通过抽象语法树解析sql,根据配置的分库分片规则,改写sql语句,使其路由到对应的数据库上并聚合多个sql的返回结果,再将结果通过netty返回给客户端,这样就完成了分库分片的全流程,如下图示:

二.ShardingSphere-proxy获取
为了能使proxy正常工作,需要向lib目录中增加openGauss的jdbc驱动,此驱动可以从maven中央仓库下载,坐标是:
<groupId>org.opengauss</groupId>
<artifactId>opengauss-jdbc</artifactId>
目前需要从master分支自行编译:
链接:https://github.com/apache/shardingsphere/tree/master
本示例为从openGauss分支上自己编译出包。
三. 搭建openGauss分布式环境
1> 解压二进制包
获取二进制包后,可以通过tar -zxvf命令进行解压,解压后的内容如下:

2> 替换为openGauss jdbc
进入到lib目录下,并且将原有的postgresql-42.2.5.jar删除,将opengauss-jdbc的jar放置在该目录下即可。
3> 修改server.yaml
进入conf目录, 该目录下已经有server.yaml文件的模板。该配置文件的主要作用是配置前端的认证数据库、用户名和密码, 以及连接相关的属性:包括分布式事务类型、sql日志等。
当然proxy还支持governance配置中心,它可以从配置中心读取配置或者永久保存配置,本次使用暂不涉及其使用。
server.yaml最简配置如下:
rules:- !AUTHORITYusers:- root@%:root- sharding@:shardingprovider:type: ALL_PRIVILEGES_PERMITTEDprops:max-connections-size-per-query: 1executor-size: 16 # Infinite by default.proxy-frontend-flush-threshold: 128 # The default value is 128.
server.yaml更多详细配置参考:
链接https://shardingsphere.apache.org/document/current/cn/user-manual/shardingsphere-proxy/configuration/
4> 修改config-sharding.yaml
进入conf目录,该目录下已经有config-sharding.yaml文件的模板。该文件主要作用是配置后端与openGauss数据库的连接属性,分库分表规则等。
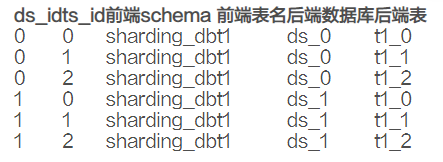
本次分片示例为,数据分两个库,表分为3片,数据库分片键为ds_id,值按2取余,表分片键为ts_id,值按3取余。
分库后插入数据分布如下:
config-sharding.yaml极简配置如下:
dataSources:ds_0:connectionTimeoutMilliseconds: 10000idleTimeoutMilliseconds: 10000maintenanceIntervalMilliseconds: 10000maxLifetimeMilliseconds: 1800000maxPoolSize: 200minPoolSize: 10password: Huawei@123url: jdbc:opengauss://90.90.44.171:44000/ds_0?serverTimezone=UTC&useSSL=false&connectTimeout=10username: testds_1:connectionTimeoutMilliseconds: 10000idleTimeoutMilliseconds: 10000maintenanceIntervalMilliseconds: 10000maxLifetimeMilliseconds: 1800000maxPoolSize: 200minPoolSize: 10password: Huawei@123url: jdbc:opengauss://90.90.44.171:44000/ds_1?serverTimezone=UTC&useSSL=false&connectTimeout=10username: testrules:- !SHARDINGdefaultDatabaseStrategy:none: nulldefaultTableStrategy:none: nullshardingAlgorithms:ds_t1_alg:props:algorithm-expression: ds_${ds_id % 2}type: INLINEts_t1_alg:props:algorithm-expression: ds_${ts_id % 3}type: INLINEtables:t1:actualDataNodes: ds_${0..1}.t1_${0..2}databaseStrategy:standard:shardingAlgorithmName: ds_t1_algshardingColumn: ds_idtableStrategy:standard:shardingAlgorithmName: ts_t1_algshardingColumn: ts_idschemaName: sharding_db
config-sharding.yaml更多详细配置参考
链接:https://shardingsphere.apache.org/document/current/cn/user-manual/shardingsphere-jdbc/configuration/yaml/
5> 启动ShardingSphere-proxy
进入bin目录,以上配置完成后,使用sh start.sh即可启动proxy服务,默认绑定3307端口。可以在启动脚本时使用sh start.sh 4000修改为4000端口。
四.环境验证
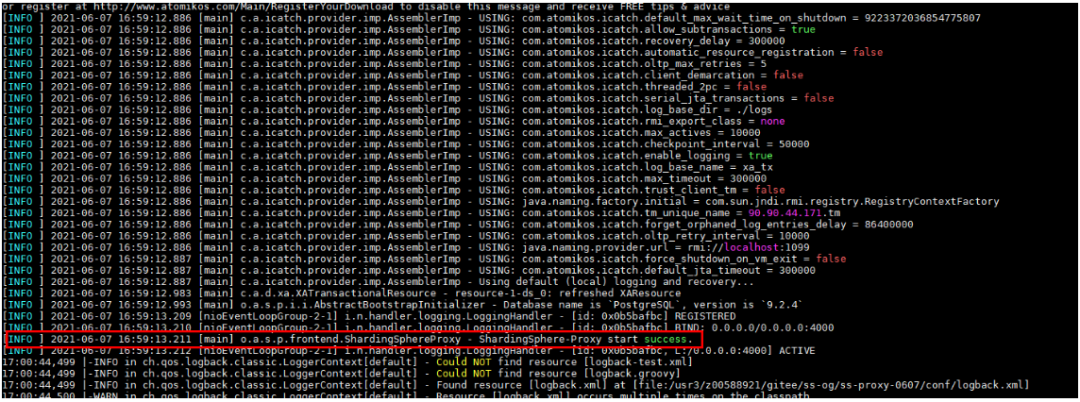
要想确认proxy是否正确启动,请查看logs/stdout.log日志,当存在提示成功启动日志后即成功。
在opengauss数据库上使用gsql -d sharding_db -h $proxy_ip -p 3307 -U sharding -W sharding -r即可连接数据库。
五.分布式数据库使用
上面的部署已经确认proxy环境可用了,那么连上gsql就可以对分布式数据进行操作了,默认已经使用gsql连接上终端了。
1> 新建表
在gsql终端中执行create table t1 (id int primary key, ds_id int, ts_id int, data varchar(100));即可创建表,它的语法不需要任何修改。
2> 增删改
增:insert into t1 values (0, 0, 0, 'aaa')
删:delete from t1 where id = 0
改:update t1 set data = 'ccc' where ds_id = 1;
以上语法不需要任何修改即可执行。
3> 查
select * from t1 即可获取所有的数据,在proxy中简单的select语句几乎不需要修改语法即可执行。
复杂的查询语法(如二次子查询)当前支持的不是很完整,可以持续向ShardingSphere社区提交issue来更新。
已经支持和未支持的SQL请参考:
链接:https://shardingsphere.apache.org/document/current/cn/features/sharding/use-norms/sql/
4> 事务
ShardingSphere事务使用方法与原来的方式一致,依然通过begin/commit/rollback来实现。
文章至此。
以下是个人微信公众号,欢迎关注:

近期热文
你可能也会对以下话题感兴趣。点击链接便可查看。
