


maskrcnn项目地址及安装
项目地址:
https://codechina.csdn.net/mirrors/facebookresearch/maskrcnn-benchmark
python环境需求:
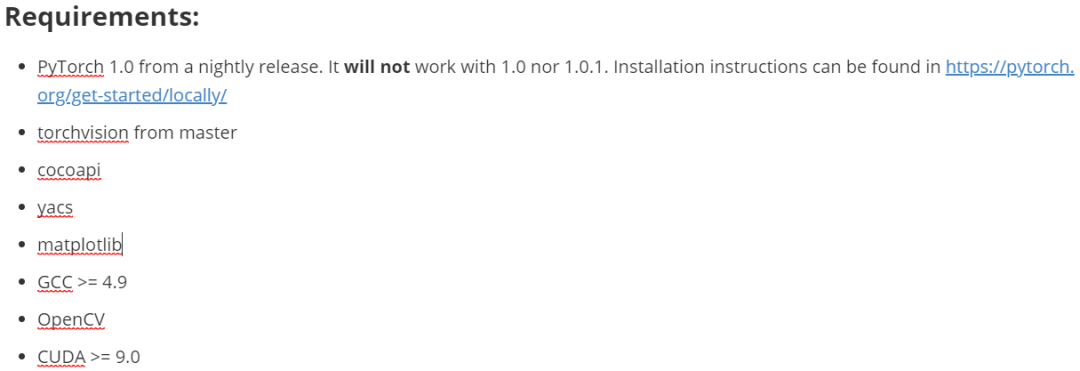
其中比较重要的是环境中已经搭建好了CUDA与cudnn且符合版本,且GCC版本也需要符合要求,我这里的环境已经全部符合要求,跳过。
代码:
python -m pip install ninja yacs cpython matplotlib tqdm opencv-python#这里opencv可能需要降低版本安装,不然可能导入cv导致内核崩溃#torch自行安装#以下仓库地址全部使用的国内镜像源地址加速git clone https://codechina.csdn.net/mirrors/cocodataset/cocoapi.gitcd cocoapi/PythonAPIpython setup.py build_ext installgit clone https://codechina.csdn.net/mirrors/mcordts/cityscapesscripts.gitcd cityscapesScripts/python setup.py build_ext installgit clone https://codechina.csdn.net/mirrors/nvidia/apexcd apexpython setup.py install --cuda_ext --cpp_extgit clone https://codechina.csdn.net/mirrors/facebookresearch/maskrcnn-benchmarkcd maskrcnn-benchmarkpython setup.py build develop
数据预处理与生成标注数据
标注数据原始格式:
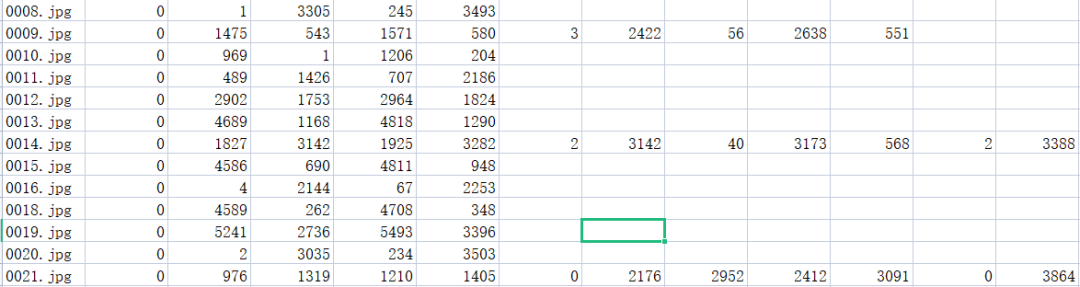
数据标注的格式为一个图片文件一行后面为图片中标注框以及标志类型
对标注数据进行转换:
import pandas as pddata = pd.read_csv('训练集标注.csv',header = None)data_t = data.fillna(0)res = data_t[[0,1,2,3,4,5]]it = 6while it<data_t.shape[1]-4:tmp = data_t[[0,it,it+1,it+2,it+3,it+4]]#ret = pd.DataFrame()ret = []for i in range(data_t.shape[0]):if tmp.loc[i][[it,it+1,it+2,it+3,it+4]].sum()!=0:#ret = pd.concat([ret,pd.DataFrame(tmp.loc[i][[0,it,it+1,it+2,it+3,it+4]].values)],1)#print(tmp.loc[i][[0,it,it+1,it+2,it+3,it+4]].values)ret.append(tmp.loc[i][[0,it,it+1,it+2,it+3,it+4]].values)#print(it,it+1,it+2,it+3,it+4)it+=5ret = pd.DataFrame(ret)res = pd.concat([res,ret],0)#print(pd.DataFrame(ret))res.columns = ['filename','type','X1','Y1','X4','Y4']res.index = np.arange(res.shape[0])#重建索引res.to_csv('flag.csv')
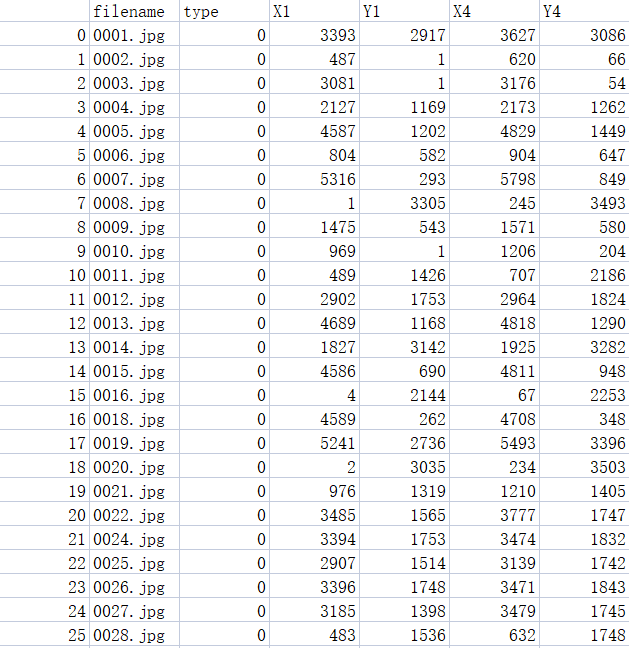
格式化之后的标注数据:
划分训练集与测试集:
import pandas as pdimport randomimport osimport shutilif not os.path.exists('trained/'):os.mkdir('trained/')if not os.path.exists('val/'):os.mkdir('val/')val_rate = 0.15img_path = './dataset/train/'img_list = os.listdir(img_path)#train = pd.read_csv('train_label_fix.csv')# print(img_list)random.shuffle(img_list)total_num = len(img_list)val_num = int(total_num*val_rate)train_num = total_num-val_numfor i in range(train_num):img_name = img_list[i]shutil.copy(img_path + img_name, 'trained/' + img_name)for j in range(val_num):img_name = img_list[j+train_num]shutil.copy(img_path + img_name, 'val/' + img_name)
转换为json格式标注数据:
import sysimport osimport jsonimport pandas as pdSTART_BOUNDING_BOX_ID = 1PRE_DEFINE_CATEGORIES = {}def convert(csv_path, img_path, json_file):"""csv_path : csv文件的路径img_path : 存放图片的文件夹json_file : 保存生成的json文件路径"""json_dict = {"images": [], "type": "instances", "annotations": [],"categories": []}bnd_id = START_BOUNDING_BOX_IDcategories = PRE_DEFINE_CATEGORIEScsv = pd.read_csv(csv_path)img_nameList = os.listdir(img_path)img_num = len(img_nameList)print("图片总数为{0}".format(img_num))for i in range(img_num):# for i in range(30):image_id = i+1img_name = img_nameList[i]if img_name == '60f3ea2534804c9b806e7d5ae1e229cf.jpg' or img_name == '6b292bacb2024d9b9f2d0620f489b1e4.jpg':continue# 可能需要根据具体格式修改的地方lines = csv[csv.filename == img_name]img = cv2.imread(os.path.join(img_path, img_name))height, width, _ = img.shapeimage = {'file_name': img_name, 'height': height, 'width': width,'id': image_id}print(image)json_dict['images'].append(image)for j in range(len(lines)):# 可能需要根据具体格式修改的地方category = str(lines.iloc[j]['type'])if category not in categories:new_id = len(categories)categories[category] = new_idcategory_id = categories[category]# 可能需要根据具体格式修改的地方xmin = int(lines.iloc[j]['X1'])ymin = int(lines.iloc[j]['Y1'])xmax = int(lines.iloc[j]['X4'])ymax = int(lines.iloc[j]['Y4'])# print(xmin, ymin, xmax, ymax)assert(xmax > xmin)assert(ymax > ymin)o_width = abs(xmax - xmin)o_height = abs(ymax - ymin)ann = {'area': o_width*o_height, 'iscrowd': 0, 'image_id':image_id, 'bbox': [xmin, ymin, o_width, o_height],'category_id': category_id, 'id': bnd_id, 'ignore': 0,'segmentation': []}json_dict['annotations'].append(ann)bnd_id = bnd_id + 1for cate, cid in categories.items():cat = {'supercategory': 'none', 'id': cid, 'name': cate}json_dict['categories'].append(cat)json_fp = open(json_file, 'w')json_str = json.dumps(json_dict, indent=4)json_fp.write(json_str)json_fp.close()csv_path = 'flag.csv'img_path = 'trained/'json_file = 'trained.json'convert(csv_path, img_path, json_file)#csv_path = 'train_label_fix.csv'img_path = 'val/'json_file = 'val.json'convert(csv_path, img_path, json_file)

将转换之后的标注框绘制在图片上面,查看转换是否有效且正确:
from pycocotools.coco import COCOimport skimage.io as ioimport matplotlib.pyplot as pltimport pylabimport cv2import osfrom skimage.io import imsaveimport numpy as nppylab.rcParams['figure.figsize'] = (8.0, 10.0)img_path = 'trained/'annFile = 'trained.json'img_list = os.listdir(img_path)if not os.path.exists('anno_image_coco/'):os.makedirs('anno_image_coco/')def draw_rectangle(coordinates, image, image_name):for coordinate in coordinates:left = np.rint(coordinate[0])right = np.rint(coordinate[1])top = np.rint(coordinate[2])bottom = np.rint(coordinate[3])# 左上角坐标, 右下角坐标cv2.rectangle(image,(int(left), int(right)),(int(top), int(bottom)),(0, 255, 0),2)imsave('anno_image_coco/'+image_name, image)coco = COCO(annFile)# display COCO categories and supercategoriescats = coco.loadCats(coco.getCatIds())nms = [cat['name'] for cat in cats]# print('COCO categories: \n{}\n'.format(' '.join(nms)))nms = set([cat['supercategory'] for cat in cats])# print('COCO supercategories: \n{}'.format(' '.join(nms)))for i in range(7):#转换七张即可imgIds = i+1img = coco.loadImgs(imgIds)[0]image_name = img['file_name']# print(img)# 加载并显示图片# I = io.imread('%s/%s' % (img_path, img['file_name']))# plt.axis('off')# plt.imshow(I)# plt.show()# catIds=[] 说明展示所有类别的box,也可以指定类别annIds = coco.getAnnIds(imgIds=img['id'], catIds=[], iscrowd=None)anns = coco.loadAnns(annIds)# print(anns)coordinates = []img_raw = cv2.imread(os.path.join(img_path, image_name))for j in range(len(anns)):coordinate = []coordinate.append(anns[j]['bbox'][0])coordinate.append(anns[j]['bbox'][1]+anns[j]['bbox'][3])coordinate.append(anns[j]['bbox'][0]+anns[j]['bbox'][2])coordinate.append(anns[j]['bbox'][1])# print(coordinate)coordinates.append(coordinate)# print(coordinates)draw_rectangle(coordinates, img_raw, image_name)
可以看到标注框大体符合预期:

编辑配置文件使用框架训练自己的数据集
按照官网提供的训练自己的数据集的方法,需要创建自己的数据集的dataset类,那么就按照官网的推荐来,尽量不要直接在项目的配置文件中将原本是coco数据集的路径改为自己的数据集路径,可能会发生许多意想不到的错误。
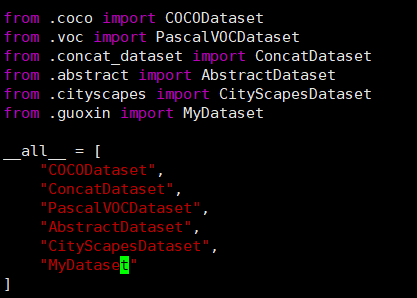
创建自己数据集的dataset类:
注意这个类自己命名保存为一个文件在项目根目录下面的maskrcnn_benchmark/data/datasets目录下面,在这个文件夹下面还有一个init文件:
接下来来实现自己的数据集的dataset类,实现这个类的关键为get_item函数返回image, boxlist, idx,官方给的模板是这样子的:
from maskrcnn_benchmark.structures.bounding_box import BoxListclass MyDataset(object):def __init__(self, ...):# as you would do normallydef __getitem__(self, idx):# load the image as a PIL Imageimage = ...# load the bounding boxes as a list of list of boxes# in this case, for illustrative purposes, we use# x1, y1, x2, y2 order.boxes = [[0, 0, 10, 10], [10, 20, 50, 50]]# and labelslabels = torch.tensor([10, 20])# create a BoxList from the boxesboxlist = BoxList(boxes, image.size, mode="xyxy")# add the labels to the boxlistboxlist.add_field("labels", labels)if self.transforms:image, boxlist = self.transforms(image, boxlist)# return the image, the boxlist and the idx in your datasetreturn image, boxlist, idxdef get_img_info(self, idx):# get img_height and img_width. This is used if# we want to split the batches according to the aspect ratio# of the image, as it can be more efficient than loading the# image from diskreturn {"height": img_height, "width": img_width}
我们实现起来这样子:
from maskrcnn_benchmark.structures.bounding_box import BoxListfrom PIL import Imageimport osimport jsonimport torchclass MyDataset(object):def __init__(self,ann_file=None, root=None, remove_images_without_annotations=None, transforms=None):# as you would do normallyself.transforms = transformsself.train_path = rootwith open(ann_file, 'r') as f:self.data = json.load(f)self.idxs = list(range(len(self.data['images']))) # 看要训练的图像有多少张,把id用个列表存储方便随机self.bbox_label = {}for anno in self.data['annotations']:bbox = anno['bbox']bbox[2] += bbox[0]bbox[3] += bbox[1]cate = anno['category_id']image_id = anno['image_id']if not image_id in self.bbox_label:self.bbox_label[image_id] = [[bbox], [cate]]else:self.bbox_label[image_id][0].append(bbox)self.bbox_label[image_id][1].append(cate)def __getitem__(self, idx):# load the image as a PIL Imageidx = self.idxs[idx % len(self.data['images'])]# if idx not in self.bbox_label: # 210, 262, 690, 855 have no bbox# idx += 1path = self.data['images'][idx]['file_name']#folder = 'restricted' if idx < 981 else 'normal'image = Image.open(os.path.join(self.train_path, path)).convert('RGB')# load the bounding boxes as a list of list of boxes# load the bounding boxes as a list of list of boxes# in this case, for illustrative purposes, we use# x1, y1, x2, y2 order.# boxes = [[0, 0, 10, 10], [10, 20, 50, 50]]# 注意下面的索引值一定改为+1,因为我们生成标注数据集的时候文件id的起始是从1开始的boxes = self.bbox_label[idx+1][0]category = self.bbox_label[idx+1][-1]# and labelslabels = torch.tensor(category)# create a BoxList from the boxesboxlist = BoxList(boxes, image.size, mode="xyxy")# add the labels to the boxlistboxlist.add_field("labels", labels)if self.transforms:image, boxlist = self.transforms(image, boxlist)# return the image, the boxlist and the idx in your datasetreturn image, boxlist, idxdef __len__(self):return len(self.data['images'])-1def get_img_info(self, idx):idx = self.idxs[idx % len(self.data['images'])]height = self.data['images'][idx]['height']width = self.data['images'][idx]['width']# get img_height and img_width. This is used if# we want to split the batches according to the aspect ratio# of the image, as it can be more efficient than loading the# image from diskreturn {"height": height, "width": width}
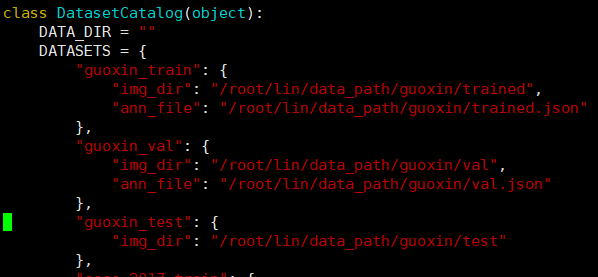
配置修改paths__catalog.py文件:
在框架的驱动函数中会在这个文件中寻找数据集的路径,这个文件在项目根目录下的maskrcnn_benchmark/config文件夹下面,在里面按照其他数据集的格式添加自己的数据集的路径(注意我将上面的data_dir改为了空):
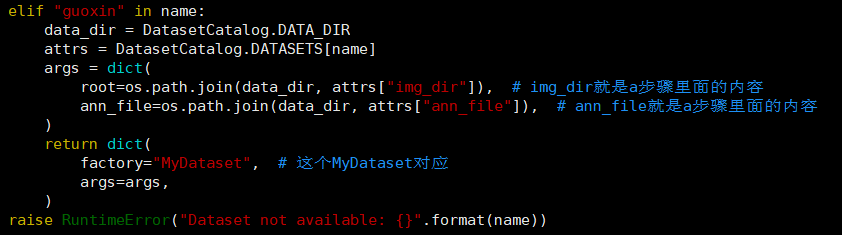
并在下面get函数中按照其他数据集分支的格式添加自己的数据集的elif分支:
配置修改对应的模型文件:
在项目的根目录下的configs文件夹下面有使用各个模型的配置文件:
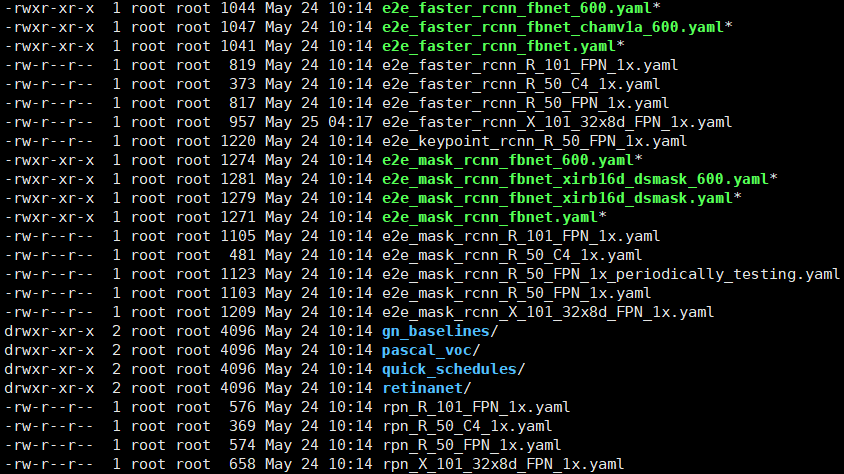
比如说我选择的是
e2e_faster_rcnn_X_101_32x8d_FPN_1x.yaml这个配置文件,我们进入配置文件进行修改:
MODEL:META_ARCHITECTURE: "GeneralizedRCNN"WEIGHT: "catalog://ImageNetPretrained/FAIR/20171220/X-101-32x8d"BACKBONE:CONV_BODY: "R-101-FPN"RPN:USE_FPN: TrueANCHOR_STRIDE: (4, 8, 16, 32, 64)PRE_NMS_TOP_N_TRAIN: 2000PRE_NMS_TOP_N_TEST: 1000POST_NMS_TOP_N_TEST: 1000FPN_POST_NMS_TOP_N_TEST: 1000ROI_HEADS:USE_FPN: TrueROI_BOX_HEAD:POOLER_RESOLUTION: 7POOLER_SCALES: (0.25, 0.125, 0.0625, 0.03125)POOLER_SAMPLING_RATIO: 2FEATURE_EXTRACTOR: "FPN2MLPFeatureExtractor"PREDICTOR: "FPNPredictor"NUM_CLASSES: 6# 类别数改为你想要预测的类别数+1,另外一个为背景RESNETS:BACKBONE_OUT_CHANNELS: 256STRIDE_IN_1X1: FalseNUM_GROUPS: 32WIDTH_PER_GROUP: 8DATASETS:TRAIN: ("guoxin_train",)# 这里与paths_cata_log文件中数据集的名字对应TEST: ("guoxin_val",)DATALOADER:SIZE_DIVISIBILITY: 32SOLVER:BASE_LR: 0.0025# 学习率推荐设置低一些,不然可能会报错WEIGHT_DECAY: 0.0001STEPS: (120000, 160000)MAX_ITER: 180000IMS_PER_BATCH: 1CHECKPOINT_PERIOD: 18000OUTPUT_DIR: "./weight/"
注意在项目根目录下的maskrcnn_benchmark/config文件夹下面defaults.py文件中可能会有些与模型配置文件中重名的配置,在运行时模型配置文件中配置会以模型配置文件为主。
模型训练
使用单GPU训练:
#在项目根目录下运行python tools/train_net.py --config-file configs/e2e_faster_rcnn_X_101_32x8d_FPN_1x.yaml
指定GPU:
#指定GPUIDCUDA_VISIBLE_DEVICES=3 python tools/train_net.py --config-file configs/e2e_faster_rcnn_X_101_32x8d_FPN_1x.yaml
多GPU训练:
export NGPUS=2python -m torch.distributed.launch --nproc_per_node=$NGPUS /tools/train_net.py --config-file configs/e2e_faster_rcnn_X_101_32x8d_FPN_1x.yaml MODEL.RPN.FPN_POST_NMS_TOP_N_TRAIN images_per_gpu x 1000
其他参考文章
https://huangqinjian.blog.csdn.net/article/details/89738867
https://blog.csdn.net/WhuNewbie/article/details/107702902
https://blog.csdn.net/hiudawn/article/details/88812979

图文&排版|林兆祥
审核|孙梦丹
凌云网络
