




前言
MyBatis 作为目前最常用的持久层框架之一,分析其源码,对我们的使用过程中可更好的运用它。本系列基于 mybatis-3.4.6
进行分析。MyBatis 的初始化工作就是解析主配置文件,映射配置文件以及注解信息。然后保存在 org.apache.ibatis.session.Configuration
,供后期执行数据请求的相关调用。Configuration
里有大量配置信息,在后面每涉及到一个相关配置,会进行详细的分析。
启动
    public static void main(String[] args) throws IOException {
        // 获取配置文件
        Reader reader = Resources.getResourceAsReader("mybatis-config.xml");
        // 通过 SqlSessionFactoryBuilder 构建 sqlSession 工厂
        SqlSessionFactory sqlSessionFactory = new SqlSessionFactoryBuilder().build(reader);
        // 获取 sqlSession 实例
        SqlSession sqlSession = sqlSessionFactory.openSession();

        reader.close();
        sqlSession.close();
    }
分析
SqlSessionFactoryBuilder 类
SqlSessionFactoryBuilder 的 build()
是Mybatis启动的初始化入口,使用builder模式加载配置文件。通过查看该类,使用方法重载,有以下9个方法: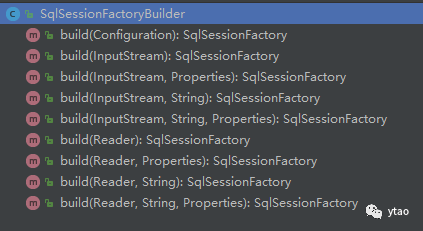
方法重载最终实现处理的方法源码如下:
    public SqlSessionFactory build(Reader reader, String environment, Properties properties) {
        try {
          // 实例化 XMLConfigBuilder,用于读取配置文件信息
          XMLConfigBuilder parser = new XMLConfigBuilder(reader, environment, properties);
          // 解析配置信息,保存到 Configuration
          return build(parser.parse());
        } catch (Exception e) {
          throw ExceptionFactory.wrapException("Error building SqlSession.", e);
        } finally {
          ErrorContext.instance().reset();
          try {
            reader.close();
          } catch (IOException e) {
            // Intentionally ignore. Prefer previous error.
          }
        }
      }
environment 是指定加载环境,默认值为 null。
properties 是属性配置文件,默认值为 null。同时读取配置文件既可字符流读取,也支持字节流读取。
    public SqlSessionFactory build(InputStream inputStream, String environment, Properties properties) {
        try {
          XMLConfigBuilder parser = new XMLConfigBuilder(inputStream, environment, properties);
          return build(parser.parse());
        } catch (Exception e) {
          throw ExceptionFactory.wrapException("Error building SqlSession.", e);
        } finally {
          ErrorContext.instance().reset();
          try {
            inputStream.close();
          } catch (IOException e) {
            // Intentionally ignore. Prefer previous error.
          }
        }
      }
实例化 XMLConfigBuilder 类
通过 SqlSessionFactoryBuilder 中 XMLConfigBuilderparser=newXMLConfigBuilder(reader,environment,properties)
, 分析 XMLConfigBuilder实例化过程。该类中有四个变量:
    private boolean parsed;
    private final XPathParser parser;
    private String environment;
    private final ReflectorFactory localReflectorFactory = new DefaultReflectorFactory();
parsed 是否解析,一次解析即可。用于标志配置文件只解析一次,
true
为已解析过。parser 解析配置的解析器
environment 加载环境,即
SqlSessionFactoryBuilder
中的environmentlocalReflectorFactory 用于创建和缓存
Reflector
对象,一个类对应一个Reflector
。因为参数处理、结果映射等操作时,会涉及大量的反射操作。DefaultReflectorFactory
实现类比较简单,这里不再进行讲解。
XMLConfigBuilder构建函数实现:
    public XMLConfigBuilder(Reader reader, String environment, Properties props) {
        this(new XPathParser(reader, true, props, new XMLMapperEntityResolver()), environment, props);
    }
实例化 XPathParser
对象
首先实例化 XPathParser
对象,里面定义了5个变量:
    private final Document document;
    private boolean validation;
    private EntityResolver entityResolver;
    private Properties variables;
    private XPath xpath;
document 保存document对象
validation xml解析时是否验证文档
entityResolver 加载dtd文件
variables 配置文件定义
的值 xpath Xpath对象,用于对XML文件节点的操作
XPathParser
对象构造函数有: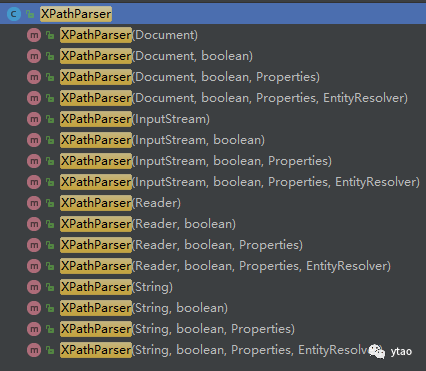
函数里面都处理了两件事:
    public XPathParser(Reader reader, boolean validation, Properties variables, EntityResolver entityResolver) {
        commonConstructor(validation, variables, entityResolver);
        this.document = createDocument(new InputSource(reader));
    }
初始化赋值,和创建
XPath
对象,用于对XML文件节点的操作。
    private void commonConstructor(boolean validation, Properties variables, EntityResolver entityResolver) {
        this.validation = validation;
        this.entityResolver = entityResolver;
        this.variables = variables;
        // 创建Xpath对象,用于对XML文件节点的操作
        XPathFactory factory = XPathFactory.newInstance();
        this.xpath = factory.newXPath();
    }
创建 Document
对象并赋值到document
变量, 这里属于Document创建的操作,不再详细讲述,不懂可以点击这里查看API (https://docs.oracle.com/javase/8/docs/api/org/w3c/dom/Document.html?is-external=true)
    private Document createDocument(InputSource inputSource) {
        // important: this must only be called AFTER common constructor
        try {
          // 实例化 DocumentBuilderFactory 对象,用于创建 DocumentBuilder 对象
          DocumentBuilderFactory factory = DocumentBuilderFactory.newInstance();
          // 是否校验文档
          factory.setValidating(validation);
          // 设置 DocumentBuilderFactory 的配置
          factory.setNamespaceAware(false);
          factory.setIgnoringComments(true);
          factory.setIgnoringElementContentWhitespace(false);
          factory.setCoalescing(false);
          factory.setExpandEntityReferences(true);
          // 创建 DocumentBuilder
          DocumentBuilder builder = factory.newDocumentBuilder();
          builder.setEntityResolver(entityResolver);
          builder.setErrorHandler(new ErrorHandler() {
            @Override
            public void error(SAXParseException exception) throws SAXException {
              throw exception;
            }

            @Override
            public void fatalError(SAXParseException exception) throws SAXException {
              throw exception;
            }

            @Override
            public void warning(SAXParseException exception) throws SAXException {
            }
          });
          // 加载文件
          return builder.parse(inputSource);
        } catch (Exception e) {
          throw new BuilderException("Error creating document instance.  Cause: " + e, e);
        }
    }
XMLConfigBuilder
构造函数赋值
    private XMLConfigBuilder(XPathParser parser, String environment, Properties props) {
        super(new Configuration());
        ErrorContext.instance().resource("SQL Mapper Configuration");
        this.configuration.setVariables(props);
        this.parsed = false;
        this.environment = environment;
        this.parser = parser;
    }
初始化父类
BaseBuilder
的值。将外部值赋值给对象。
将实例化的
XPathParser
赋值给parser
。
最后返回 XMLConfigBuilder
对象。
解析 XMLConfigBuilder 对象
通过 XMLConfigBuilder.parse()
解析配置信息,保存至 Configuration
。解析详解在后面文章中进行分析。
    public Configuration parse() {
        // 是否解析过配置文件
        if (parsed) {
          throw new BuilderException("Each XMLConfigBuilder can only be used once.");
        }
        // 标志解析过,定义为 true
        parsed = true;
        // 解析 configuration 节点中的信息
        parseConfiguration(parser.evalNode("/configuration"));
        return configuration;
    }
创建 SqlSessionFactory
DefaultSqlSessionFactory
实现了 SqlSessionFactory
接口。通过上面解析得到的 Configuration
,调用 SqlSessionFactoryBuilder.build(Configurationconfig)
创建一个 DefaultSqlSessionFactory
。
    public SqlSessionFactory build(Configuration config) {
        return new DefaultSqlSessionFactory(config);
    }
实例化 DefaultSqlSessionFactory
的过程,就是将 Configuration
传递给 DefaultSqlSessionFactory
成员变量 configuration
。
    public DefaultSqlSessionFactory(Configuration configuration) {
        this.configuration = configuration;
    }
创建 SqlSession
通过调用 SqlSessionFactory.openSession()
创建 SqlSession
。
    public interface SqlSessionFactory {
      // 默认创建
      SqlSession openSession();

      SqlSession openSession(boolean autoCommit);
      SqlSession openSession(Connection connection);
      SqlSession openSession(TransactionIsolationLevel level);

      SqlSession openSession(ExecutorType execType);
      SqlSession openSession(ExecutorType execType, boolean autoCommit);
      SqlSession openSession(ExecutorType execType, TransactionIsolationLevel level);
      SqlSession openSession(ExecutorType execType, Connection connection);

      Configuration getConfiguration();

    }
autoCommit 是否自动提交事务,
level 事务隔离级别(共5个级别), 可查看相关源码
connection 连接
execType 执行器的类型:
SIMPLE
(不做特殊处理),REUSE
(复用预处理语句),BATCH
(会批量执行)
因为上面 DefaultSqlSessionFactory
实现了 SqlSessionFactory
接口,所以进入到 DefaultSqlSessionFactory
查看 openSession()
。
    public SqlSession openSession() {
        return openSessionFromDataSource(configuration.getDefaultExecutorType(), null, false);
    }
openSession()
方法最终实现代码如下:
    private SqlSession openSessionFromDataSource(ExecutorType execType, TransactionIsolationLevel level, boolean autoCommit) {
        Transaction tx = null;
        try {
          // 获取configuration中的加载环境
          final Environment environment = configuration.getEnvironment();
          // 获取事务工厂
          final TransactionFactory transactionFactory = getTransactionFactoryFromEnvironment(environment);
          // 创建一个事务
          tx = transactionFactory.newTransaction(environment.getDataSource(), level, autoCommit);
          // 生成一个处理器,事务保存在处理器 BaseExecutor 中
          final Executor executor = configuration.newExecutor(tx, execType);
          // 实例化一个 DefaultSqlSession,DefaultSqlSession实现了SqlSession接口
          return new DefaultSqlSession(configuration, executor, autoCommit);
        } catch (Exception e) {
          // 异常情况下关闭事务
          closeTransaction(tx); // may have fetched a connection so lets call close()
          throw ExceptionFactory.wrapException("Error opening session.  Cause: " + e, e);
        } finally {
          // 充值错误实例上下文
          ErrorContext.instance().reset();
        }
    }
生成处理器 Configuration.newExecutor(Transactiontransaction,ExecutorTypeexecutorType)
:
    public Executor newExecutor(Transaction transaction, ExecutorType executorType) {
        // 默认为 ExecutorType.SIMPLE
        executorType = executorType == null ? defaultExecutorType : executorType;
        executorType = executorType == null ? ExecutorType.SIMPLE : executorType;
        Executor executor;
        if (ExecutorType.BATCH == executorType) {
          executor = new BatchExecutor(this, transaction);
        } else if (ExecutorType.REUSE == executorType) {
          executor = new ReuseExecutor(this, transaction);
        } else {
          executor = new SimpleExecutor(this, transaction);
        }
        if (cacheEnabled) {
          executor = new CachingExecutor(executor);
        }
        executor = (Executor) interceptorChain.pluginAll(executor);
        return executor;
    }
以 ExecutorType.SIMPLE
为例, BatchExecutor
, ReuseExecutor
同理: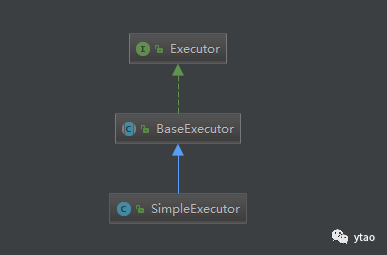 至此,mybatis的启动流程大致简单的介绍到这里,对mybatis的启动初始化有个大致了解。接下将会针对单独模块进行详细分析。
