


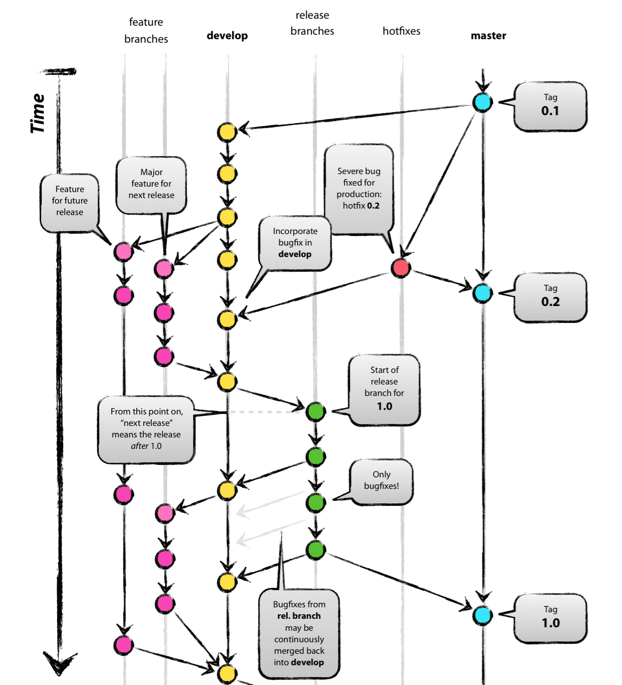
Git Flow 工作流
user@Debian:~$ sudo apt install git-flow # 安装git-flow
初始化
# 使用Git Flow
user@Debian:~/Project$ git flow init # 初始化

# 使用原生Git
user@Debian:~/Project$ git branch develop
user@Debian:~/Project$ git push -u origin develop
feature 分支
feature 分支用于添加新功能特性。
# 使用Git Flow
user@Debian:~/Project$ git flow feature start Feature-1 # 创建feature分支
user@Debian:~/Project$ git flow feature publish Feature-1 # 推送feature分支到远程
user@Debian:~/Project$ git flow feature pull origin Feature-1 # 拉取远程更新到feature分支
user@Debian:~/Project$ git flow feature finish Feature-1 # 完成feature分支,加入develop分支,并删除feature分支

# 使用原生Git
user@Debian:~/Project$ git checkout -b Feature-1 develop # 基于develop分支,创建并切换到feature分支
user@Debian:~/Project$ git push -u origin Feature-1
user@Debian:~/Project$ git pull origin develop
user@Debian:~/Project$ git checkout develop
user@Debian:~/Project$ git merge --no-ff Feature-1 # 将feature分支合并入develop分支;--no-ff是保存分支记录
user@Debian:~/Project$ git push origin develop
user@Debian:~/Project$ git branch -d Feature-1
user@Debian:~/Project$ git push origin --delete Feature-1 # 删除远程分支
release 分支
release 分支用于版本发布,可将改动合并入主分支和 develop 分支。
# 使用Git Flow
user@Debian:~/Project$ git flow release start Release-1
user@Debian:~/Project$ git flow release publish Release-1
user@Debian:~/Project$ git flow finish Release-1

# 使用原生Git
user@Debian:~/Project$ git checkout -b Release-1 develop
user@Debian:~/Project$ git checkout main
user@Debian:~/Project$ git merge --no-ff Release-1
user@Debian:~/Project$ git push origin main
user@Debian:~/Project$ git checkout develop
user@Debian:~/Project$ git merge --no-ff Release-1
user@Debian:~/Project$ git push origin develop
user@Debian:~/Project$ git branch -d Release-1
user@Debian:~/Project$ git push origin --delete Release-1
hotfix 分支
Q:hotfix 分支和 bugfix 分支有什么区别?
A:hotfix 分支基于主分支。bugfix 分支基于 develop 分支。
# 使用Git Flow
user@Debian:~/Project$ git flow hotfix start Hotfix-1
user@Debian:~/Project$ git flow hotfix finish Hotfix-1

# 使用原生Git
user@Debian:~/Project$ git checkout -b Hotfix-1 main
user@Debian:~/Project$ git checkout main
user@Debian:~/Project$ git merge --no-ff Hotfix-1
user@Debian:~/Project$ git push origin main
user@Debian:~/Project$ git checkout develop
user@Debian:~/Project$ git merge --no-ff Hotfix-1
user@Debian:~/Project$ git push origin develop
user@Debian:~/Project$ git branch -d Hotfix-1
user@Debian:~/Project$ git push origin --delete Hotfix-1
user@Debian:~/Project$ git tag -a V1.0 -m "New version" main # 打标签
user@Debian:~/Project$ git push --tags
持续集成[1]
GitHub Actions 官方市场[2]和awesome-actions[3]提供自动化持续集成脚本。
user@Debian:~/Project$ vi .github/workflows/build.yaml
# 工作流程名
name: build

# 触发条件
on:
    push:
        # 限定分支
        branches:
            - main

# 任务
jobs:
    # job_id
    job1:
        # 镜像平台
        runs-on: ubuntu-latest
        # 步骤
        steps:
            # 步骤描述
            - name: checkout main
              # 使用已有包
              uses: actions/checkout@v2
              # 改动分支
              with:
                  ref: main

    job2:
        # 执行顺序
        needs: job_1
        steps:
            - name: push remote
              # 步骤环境变量
              env:
                  TOKEN: ${{ secrets.TOKEN }}
                  REF: github.com/${{github.repository}}
                  EMAIL: user@email.com
                  NAME: ${{github.repository_owner}}
              # 执行步骤
              run: |
                  git config --global user.email "${EMAIL}"
                  git config --global user.name "${NAME}"
                  git init
                  git remote add origin https://${REF}
                  git branch -M main
                  git push --force --quiet "https://${TOKEN}@${REF}" main:main
Q:Github 的 Token 在哪里?
A:在Settings
-Develop settings
-Personal access tokens
中设置。
? Ask More...
持续集成: 自动化构建项目。
[2]GitHub Actions 官方市场: https://github.com/marketplace?type=actions
[3]awesome-actions: https://github.com/sdras/awesome-actions
文章转载自一纸旧时光,如果涉嫌侵权,请发送邮件至:contact@modb.pro进行举报,并提供相关证据,一经查实,墨天轮将立刻删除相关内容。
