



前提
spring-cache大家都用过,其中使用redis-cache大家也用过,至于如何使用怎么配置,本篇就不重点描述了。本篇主要解决2个问题,第一个问题使用redis做缓存时对每个key进行自定义的过期时间配置,第二个使用redis做缓存时
@Cacheable(value="value",key="#p0")
,最后生成的key会在value和p0中间的有(::)2个冒号,与redis的key名一个冒号间隔的风格不符。
本篇以spring-boot 2.1.2和 spirng 5.1.4为基础来讲解。RedisCacheManage在spring-data-redis 2.x中相对于1.x的变动很大,本篇即在2.x的版本中实现。
redis cache的过期时间
我们都知道redis的过期时间,是用它做缓存或者做业务操作的灵性。在使用 @Cacheable(value="value",key="#p0")
注解时即可。具体的使用方法参考网上。
RedisCacheManager
我们先来看看RedisCacheManager,RedisCacheWriter接口是对redis操作进行包装的一层低级的操作。defaultCacheConfig是redis的默认配置,在下一个选项卡中详细介绍。initialCacheConfiguration是对各个单独的缓存进行各自详细的配置(过期时间就是在此配置的),allowInFlightCacheCreation是否允许创建不事先定义的缓存,如果不存在即使用默认配置。RedisCacheManagerBuilder使用桥模式,我们可以用它构建RedisCacheManager。
public class RedisCacheManager extends AbstractTransactionSupportingCacheManager {

   private final RedisCacheWriter cacheWriter;
   private final RedisCacheConfiguration defaultCacheConfig;
   private final Map<String, RedisCacheConfiguration> initialCacheConfiguration;
   private final boolean allowInFlightCacheCreation;
   public static class RedisCacheManagerBuilder {}

}
AbstractTransactionSupportingCacheManager
AbstractTransactionSupportingCacheManager加入事务概念,将操作与事务绑定,包装了一层事务。
public abstract class AbstractTransactionSupportingCacheManager extends AbstractCacheManager {

   private boolean transactionAware = false;

   public void setTransactionAware(boolean transactionAware) {
      this.transactionAware = transactionAware;
   }

   public boolean isTransactionAware() {
      return this.transactionAware;
   }

   @Override
   protected Cache decorateCache(Cache cache) {
      return (isTransactionAware() ? new TransactionAwareCacheDecorator(cache) : cache);
   }

}
RedisCacheConfiguration
ttl是过期时间,cacheNullValues是否允许存null值,keyPrefix缓存前缀规则,usePrefix是否允许使用前缀。keySerializationPair缓存key序列化,valueSerializationPair缓存值序列化此处最好自己使用jackson的序列号替代原生的jdk序列化,conversionService做转换用的。
public class RedisCacheConfiguration {

   private final Duration ttl;
   private final boolean cacheNullValues;
   private final CacheKeyPrefix keyPrefix;
   private final boolean usePrefix;

   private final SerializationPair<String> keySerializationPair;
   private final SerializationPair<Object> valueSerializationPair;

   private final ConversionService conversionService;

}
RedisCacheManager
再来看看如何配置RedisCacheManager
RedisCacheAutoConfiguration
配置前通过 RedisAutoConfiguration
配置可以获取到redis相关配置包括redisTemplate,因为spring-boot2中redis使用Lettuce作为客户端,相关配置在 LettuceConnectionConfiguration
中。 在去加载CacheProperties和CustomCacheProperties配置。 通过RedisCacheManagerBuilder去构造RedisCacheManager,使用非加锁的redis缓存操作,redis默认配置使用的是cacheProperties中的redis,最后根据我们自定义的customCacheProperties阔以针对单个的key设置单独的redis缓存配置。
getDefaultRedisCacheConfiguration主要先通过RedisCacheConfiguration的默认创建方法 defaultCacheConfig
创建默认的配置,在通过getJackson2JsonRedisSerializer创建默认value格式化(使用jackson代替jdk序列化),然后通过redis缓存配置的是spring-cache的CacheProperties去修改配置项。
最后根据配置构建出RedisCacheConfiguration。
@Slf4j
@EnableCaching
@Configuration
@AutoConfigureAfter(RedisAutoConfiguration.class)
@EnableConfigurationProperties({CacheProperties.class, CustomCacheProperties.class})
@ConditionalOnClass({Redis.class, RedisCacheConfiguration.class})
public class RedisCacheAutoConfiguration {

    @Autowired
    private CacheProperties cacheProperties;

    @Bean
    public RedisCacheManager redisCacheManager(CustomCacheProperties customCacheProperties,
                                               RedisConnectionFactory redisConnectionFactory) {
        RedisCacheConfiguration defaultConfiguration = getDefaultRedisCacheConfiguration();
        RedisCacheManager.RedisCacheManagerBuilder builder = RedisCacheManager.RedisCacheManagerBuilder
                .fromCacheWriter(RedisCacheWriter.nonLockingRedisCacheWriter(redisConnectionFactory))
                .cacheDefaults(defaultConfiguration);

        Map<String, RedisCacheConfiguration> map = Maps.newHashMap();
        Optional.ofNullable(customCacheProperties)
                .map(p -> p.getCustomCache())
                .ifPresent(customCache -> {
                    customCache.forEach((key, cache) -> {
                        RedisCacheConfiguration cfg = handleRedisCacheConfiguration(cache, defaultConfiguration);
                        map.put(key, cfg);
                    });
                });
        builder.withInitialCacheConfigurations(map);
        return builder.build();
    }

    private RedisCacheConfiguration getDefaultRedisCacheConfiguration() {
        Redis redisProperties = cacheProperties.getRedis();
        RedisCacheConfiguration config = RedisCacheConfiguration.defaultCacheConfig();

        Jackson2JsonRedisSerializer<Object> jackson2JsonRedisSerializer = getJackson2JsonRedisSerializer();
        config = config.serializeKeysWith(SerializationPair.fromSerializer(new StringRedisSerializer()));
        config = config.serializeValuesWith(SerializationPair.fromSerializer(jackson2JsonRedisSerializer));
        config = handleRedisCacheConfiguration(redisProperties, config);
        return config;
    }

    private Jackson2JsonRedisSerializer getJackson2JsonRedisSerializer() {
        Jackson2JsonRedisSerializer jackson2JsonRedisSerializer = new Jackson2JsonRedisSerializer(Object.class);
        ObjectMapper om = new ObjectMapper();
        om.setVisibility(PropertyAccessor.GETTER, JsonAutoDetect.Visibility.ANY);
        om.enableDefaultTyping(ObjectMapper.DefaultTyping.NON_FINAL);
        om.setSerializationInclusion(Include.NON_NULL);
        om.configure(DeserializationFeature.FAIL_ON_UNKNOWN_PROPERTIES, false);
        jackson2JsonRedisSerializer.setObjectMapper(om);
        return jackson2JsonRedisSerializer;
    }

    private RedisCacheConfiguration handleRedisCacheConfiguration(Redis redisProperties,
                                                                  RedisCacheConfiguration config) {
        if (Objects.isNull(redisProperties)) {
            return config;
        }

        if (redisProperties.getTimeToLive() != null) {
            config = config.entryTtl(redisProperties.getTimeToLive());
        }
        if (redisProperties.getKeyPrefix() != null) {
            config = config.computePrefixWith(cacheName -> cacheName + redisProperties.getKeyPrefix());
        }
        if (!redisProperties.isCacheNullValues()) {
            config = config.disableCachingNullValues();
        }
        if (!redisProperties.isUseKeyPrefix()) {
            config = config.disableKeyPrefix();
        }
        return config;
    }

}
CustomCacheProperties
我们自定的缓存的配置,使用了现有的 CacheProperties.Redis
作为配置类。
@Data
@ConfigurationProperties(prefix = "damon.cache")
public class CustomCacheProperties {

    private Map<String, CacheProperties.Redis> customCache;

}
Redis
Redis的key配置,过期时间,是否允许缓存空值默认可以,key的前缀,是否允许使用key前缀
public static class  {

   private Duration timeToLive;

   private boolean cacheNullValues = true;

   private String keyPrefix;

   private boolean useKeyPrefix = true;

}
yml配置
再来看看配置项
spring.cache.redis就为当前redis-cache的默认配置
底下的damon.cache就为自定义配置(默认20秒),如下配置了 testA
和 testB
2个自定义key的过期时间(一个40秒,一个50秒)
spring:
  redis:
    host: localhost
    port: 6379
  cache:
    redis:
      time-to-live: 20s

damon:
  cache:
    custom-cache:
      testA:
        time-to-live: 40s
      testB:
        time-to-live: 50s
redis-cache的key名调整
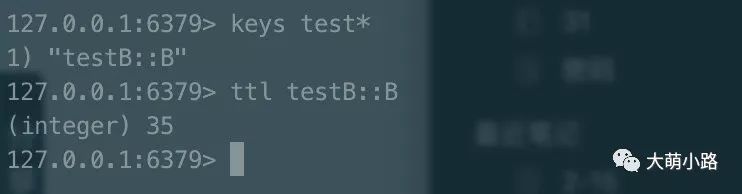
从上述我们可以看出使用后,缓存过期时间可以自定义配置了,但是key名中间有2个冒号。
RedisCache
RedisCache中的createCacheKey方法是生成redis的key,从中可以看出是否使用prefix,使用的话通过prefixCacheKey方法生成,借用了redisCache配置项来生成。
private final RedisCacheConfiguration cacheConfig;

protected String createCacheKey(Object key) {

   String convertedKey = convertKey(key);

   if (!cacheConfig.usePrefix()) {
      return convertedKey;
   }

   return prefixCacheKey(convertedKey);
}

private String prefixCacheKey(String key) {

   // allow contextual cache names by computing the key prefix on every call.
   return cacheConfig.getKeyPrefixFor(name) + key;
}
RedisCacheConfiguration
在redisCache配置项中使用getKeyPrefixFor方法来生成完整的redis的key名,通过 keyPrefix.compute来生成。
private final CacheKeyPrefix keyPrefix;

public String getKeyPrefixFor(String cacheName) {

   Assert.notNull(cacheName, "Cache name must not be null!");

   return keyPrefix.compute(cacheName);
}
CacheKeyPrefix
这里就看到我们使用处,而且看到了默认实现有2个冒号的实现。
其实是在RedisCacheConfiguration中有个默认实现方法,里面用的就是CacheKeyPrefix的默认实现。我们只有覆盖此处即可。
@FunctionalInterface
public interface CacheKeyPrefix {

//计算在redis中的缓存名

String compute(String cacheName);

//默认实现,中间用的就是::

 static CacheKeyPrefix simple() {
return name -> name + "::";
   }
}
总结
参考上文,使用 RedisCacheConfiguration
的 computePrefixWith(cacheName->cacheName+redisProperties.getKeyPrefix())
实现key调整。
题外话
我们再来聊聊spring-cache,实际上其实它就是把缓存的使用给抽象了,在对缓存的具体实现的过程中给抽出来。其实最重要的就是 Cache
和 CacheManager
2个接口,简单的实现如 SimpleCacheManager
。
