


配置openstack网络yum源
yum install https://buildlogs.centos.org/centos/7/cloud/x86_64/openstack-liberty/centos-release-openstack-liberty-1-3.el7.noarch.rpm
安装ovs程序包
[root@rs-1 ~]# yum install -y openvswitch[root@rs-1 ~]# systemctl start openvswitch
A.同一宿主机上同一ovs桥设备上的虚拟机测试其通信
创建一个虚拟机公用桥
[root@rs-1 ~]# ovs-vsctl add-br br-in
定义虚拟机网卡添加至网桥的脚本
[root@rs-1 ~]# cat etc/qemu-ifup#!/bin/bash#Bridge=br-inif [ -n "$1" ]; thenip link set $1 upovs-vsctl add-port $Bridge $1[ $? -eq 0 ] && exit 0 || exit 1elseecho "Error: no port specified."exit 1fi[root@rs-1 ~]# cat etc/ifdown#!/bin/bash#Bridge=br-inif [ -n "$1" ]; thenip link set $1 downsleep 1ovs-vsctl del-port $Bridge $1[ $? -eq 0 ] && exit 0 || exit 1elseecho "Error: no port specified."exit 1fi
注意:不定义指明ifdown脚本时,关闭虚拟机时不会将虚拟机网卡从桥设备上移除;
创建虚拟机并启动
[root@rs-1 ~]# wget https://launchpad.net/cirros/trunk/0.3.0/+download/cirros-0.3.0-x86_64-disk.img[root@rs-1 ~]# cp cirros-0.3.0-x86_64-disk.img images/cirros/test1.qcow2[root@rs-1 ~]# cp cirros-0.3.0-x86_64-disk.img images/cirros/test2.qcow2[root@rs-1 ~]# qemu-kvm -m 128 -cpu host -smp 2 -name vm1 -drive file=/images/cirros/test1.qcow2,if=virtio,media=disk -net nic,macaddr=52:54:00:12:34:57 -net tap,ifname=vif1.0,script=/etc/qemu-ifup,downscript=/etc/qemu-ifdown --nographic[root@rs-1 ~]# qemu-kvm -m 128 -cpu host -smp 2 -name vm1 -drive file=/images/cirros/test2.qcow2,if=virtio,media=disk -net nic,macaddr=52:54:00:12:34:68 -net tap,ifname=vif2.0,script=/etc/qemu-ifup,downscript=/etc/qemu-ifdown --nographicuser:cirrospassword: cubswin:)[root@rs-1 ~]# ovs-vsctl show17b97248-4c7a-48fe-8686-a893da298c2cBridge br-inPort "vif1.0"Interface "vif1.0"Port "vif2.0"Interface "vif2.0"ovs_version: "2.6.1"
配置虚拟机地址并测试虚拟机之间的通信
虚拟机vm1# ifconfig eth0 10.2.0.1/24 up虚拟机vm2# ifconfig eth0 10.2.0.2/24 up# ping 10.2.0.2PING 10.2.0.2 (10.2.0.2): 56 data bytes64 bytes from 10.2.0.2: seq=0 ttl=64 time=0.098 ms64 bytes from 10.2.0.2: seq=1 ttl=64 time=0.062 ms64 bytes from 10.2.0.2: seq=2 ttl=64 time=0.041 ms--- 10.2.0.2 ping statistics ---3 packets transmitted, 3 packets received, 0% packet lossround-trip min/avg/max = 0.041/0.067/0.098 ms
设置虚拟机VLAN ID
[root@rs-1 ~]# ovs-vsctl set port vif1.0 tag=10[root@rs-1 ~]# ovs-vsctl set port vif2.0 tag=10[root@rs-1 ~]# ovs-vsctl show17b97248-4c7a-48fe-8686-a893da298c2cBridge br-inPort "vif1.0"tag: 10Interface "vif1.0"Port "vif2.0"tag: 10Interface "vif2.0"ovs_version: "2.6.1"
B.创建同一宿主机上不同ovs桥设备上的虚拟机的通信
创建第三台虚拟机并添加至不同的br设备上
[root@rs-1 cirros]# ovs-vsctl add-br br-test[root@rs-1 ~]# cat etc/qemu-ifup2#!/bin/bash#Bridge=br-testif [ -n "$1" ]; thenip link set $1 upovs-vsctl add-port $Bridge $1[ $? -eq 0 ] && exit 0 || exit 1elseecho "Error: no port specified."exit 1fi[root@rs-1 ~]# cat etc/qemu-ifdown2#!/bin/bash#Bridge=br-testif [ -n "$1" ]; thenip link set $1 downsleep 1ovs-vsctl del-port $Bridge $1[ $? -eq 0 ] && exit 0 || exit 1elseecho "Error: no port specified."exit 1fi[root@rs-1 ~]# qemu-kvm -m 128 -cpu host -smp 2 -name vm3 -drive file=/images/cirros/test3.qcow2,if=virtio,media=disk -net nic,macaddr=52:54:00:12:34:70 -net tap,ifname=vif3.0,script=/etc/qemu-ifup2,downscript=/etc/qemu-ifdown2 --nographic[root@rs-1 ~]# ovs-vsctl show17b97248-4c7a-48fe-8686-a893da298c2cBridge br-testPort "vif3.0"Interface "vif3.0"Bridge br-inPort "vif1.0"tag: 10Interface "vif1.0"Port "vif2.0"tag: 10Interface "vif2.0"ovs_version: "2.6.1"
注意:此时vm3的所连接的桥设备与vm1、vm2属于不用的桥设备,因此vm3与vm1或者vm2不能通信
创建连接两个桥设备的一对网卡
[root@rs-1 ~]# ip link add s0 type veth peer name s1[root@rs-1 ~]# ip link set s0 up[root@rs-1 ~]# ip link set s1 up[root@rs-1 ~]# ovs-vsctl add-port br-in s0[root@rs-1 ~]# ovs-vsctl add-port br-test s1[root@rs-1 ~]# ovs-vsctl set port vif3.0 tag=10[root@rs-1 ~]# ovs-vsctl show17b97248-4c7a-48fe-8686-a893da298c2cBridge br-testPort "vif3.0"tag: 10Interface "vif3.0"Port "s1"Interface "s1"Bridge br-inPort "vif1.0"tag: 10Interface "vif1.0"Port "s0"Interface "s0"Port "vif2.0"tag: 10Interface "vif2.0"ovs_version: "2.6.1"补充一条一处VLAN ID的命令[root@rs-1 ~]# ovs-vsctl remove port vif3.0 tag 10至此,不同网桥上的虚拟机都可以互相通信;
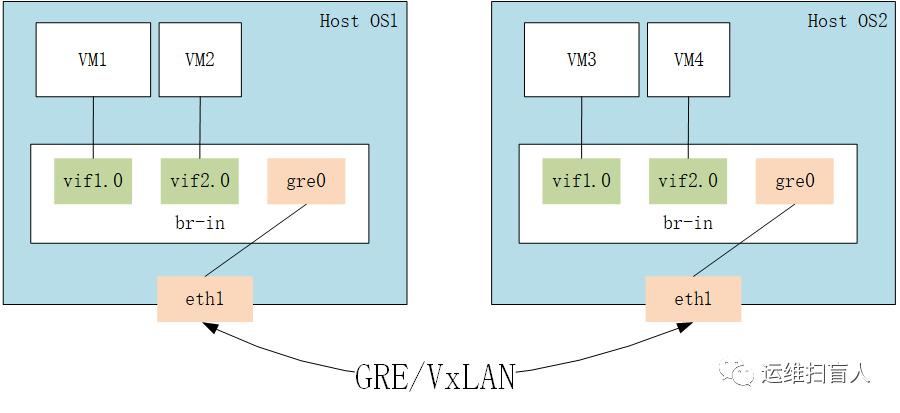
C.在两台不同的宿主机上创建虚拟机使其可通信
新建netns与连接netns与br-in的一对网卡
[root@rs-1 ~]# ip netns add r0[root@rs-1 ~]# ip link add sif0 type veth peer name rif0[root@rs-1 ~]# ip link set sif0 up[root@rs-1 ~]# ip link set rif0 up[root@rs-1 ~]# ip link set rif0 netns r0[root@rs-1 ~]# ovs-vsctl add-port br-in sif0[root@rs-1 ~]# ovs-vsctl show17b97248-4c7a-48fe-8686-a893da298c2cBridge br-inPort "vif1.0"tag: 10Interface "vif1.0"Port "sif0"Interface "sif0"Port "vif2.0"tag: 10Interface "vif2.0"ovs_version: "2.6.1"
设置netns的地址
[root@rs-1 ~]# ip netns exec r0 ip addr add 10.2.0.254/24 dev rif0[root@rs-1 ~]# ip netns exec r0 ip link set rif0 up
安装dnsmasq程序包并且在netns启动
[root@rs-1 ~]# yum install -y dnsmasq[root@rs-1 ~]# ip netns exec r0 dnsmasq -F 10.2.0.200,10.2.0.220,86400 -i rif0[root@rs-1 ~]# ip netns exec r0 ss -unlState Recv-Q Send-Q Local Address:Port Peer Address:PortUNCONN 0 0 *:67 *:*虚拟机自动获取地址:# udhcpc -Rudhcpc (v1.18.5) startedSending discover...Sending select for 10.2.0.207...Lease of 10.2.0.207 obtained, lease time 86400deleting routersroute: SIOCDELRT: No such processadding dns 10.2.0.254
隧道使用的私有地址(不能添加至桥设备上)
[root@rs-1 ~]# ifconfig ens34ens34: flags=4163<UP,BROADCAST,RUNNING,MULTICAST> mtu 1500inet 172.17.0.4 netmask 255.255.255.0 broadcast 172.17.0.255inet6 fe80::20c:29ff:feeb:3cda prefixlen 64 scopeid 0x20<link>ether 00:0c:29:eb:3c:da txqueuelen 1000 (Ethernet)RX packets 169 bytes 16283 (15.9 KiB)RX errors 0 dropped 0 overruns 0 frame 0TX packets 73 bytes 6940 (6.7 KiB)TX errors 0 dropped 0 overruns 0 carrier 0 collisions 0[root@rs-2 ~]# ifconfig ens34ens34: flags=4163<UP,BROADCAST,RUNNING,MULTICAST> mtu 1500inet 172.17.0.2 netmask 255.255.255.0 broadcast 172.17.0.255inet6 fe80::20c:29ff:fe66:b416 prefixlen 64 scopeid 0x20<link>ether 00:0c:29:66:b4:16 txqueuelen 1000 (Ethernet)RX packets 1011 bytes 88871 (86.7 KiB)RX errors 0 dropped 0 overruns 0 frame 0TX packets 6978 bytes 17458838 (16.6 MiB)TX errors 0 dropped 0 overruns 0 carrier 0 collisions 0
在ovs桥上面添加GRE端口,用于构建GRE隧道
[root@rs-1 ~]# ovs-vsctl add-port br-in gre0[root@rs-1 ~]# ovs-vsctl set interface gre0 type=gre options:remote_ip=172.17.0.2[root@rs-2 ~]# ovs-vsctl show5ee74deb-ffa7-4ecb-b5ab-c1475a41c1c3Bridge br-inPort br-inInterface br-intype: internalPort "gre0"Interface "gre0"type: greoptions: {remote_ip="172.17.0.4"}Port "vif1.0"Interface "vif1.0"ovs_version: "2.6.1"[root@rs-2 ~]# ovs-vsctl showf1cb4985-273a-4adb-8105-33dabc6ed6f4Bridge br-inPort "gre0"Interface "gre0"type: greoptions: {remote_ip="172.17.0.2"}Port br-inInterface br-intype: internalPort "vif1.0"Interface "vif1.0"ovs_version: "2.6.1"虚拟机vm1# ifconfig eth0 10.2.0.1/24 up虚拟机vm3# ifconfig eth0 10.2.0.2/24 up# ping 10.2.0.1PING 10.2.0.1 (10.2.0.1): 56 data bytes64 bytes from 10.2.0.1: seq=0 ttl=64 time=22.343 ms64 bytes from 10.2.0.1: seq=1 ttl=64 time=2.881 ms--- 10.2.0.1 ping statistics ---2 packets transmitted, 2 packets received, 0% packet loss至此,两台宿主机上的虚拟机可通过GRE隧道通信
抓包分析
[root@rs-1 ~]# tcpdump -i ens34 -nntcpdump: verbose output suppressed, use -v or -vv for full protocol decodelistening on ens34, link-type EN10MB (Ethernet), capture size 262144 bytes06:01:37.619227 IP 172.17.0.4 > 172.17.0.2: GREv0, length 102: IP 10.2.0.2 > 10.2.0.1: ICMP echo request, id 2049, seq 25, length 6406:01:37.621323 IP 172.17.0.2 > 172.17.0.4: GREv0, length 102: IP 10.2.0.1 > 10.2.0.2: ICMP echo reply, id 2049, seq 25, length 6406:01:38.657184 IP 172.17.0.4 > 172.17.0.2: GREv0, length 102: IP 10.2.0.2 > 10.2.0.1: ICMP echo request, id 2049, seq 26, length 6406:01:38.659972 IP 172.17.0.2 > 172.17.0.4: GREv0, length 102: IP 10.2.0.1 > 10.2.0.2: ICMP echo reply, id 2049, seq 26, length 64^C4 packets captured4 packets received by filter0 packets dropped by kernel
注意:本实例中netns只为应用dhcp服务;
使用vxlan连接不同宿主机上虚拟机,用于创建vxlan的网卡信息
[root@rs-1 ~]# ifconfig ens34ens34: flags=4163<UP,BROADCAST,RUNNING,MULTICAST> mtu 1500inet 172.17.0.100 netmask 255.255.255.0 broadcast 172.17.0.255inet6 fe80::20c:29ff:fea6:b425 prefixlen 64 scopeid 0x20<link>ether 00:0c:29:a6:b4:25 txqueuelen 1000 (Ethernet)RX packets 818 bytes 73383 (71.6 KiB)RX errors 0 dropped 0 overruns 0 frame 0TX packets 602 bytes 117856 (115.0 KiB)TX errors 0 dropped 0 overruns 0 carrier 0 collisions 0[root@rs-2 ~]# ifconfig ens34ens34: flags=4163<UP,BROADCAST,RUNNING,MULTICAST> mtu 1500inet 172.17.0.101 netmask 255.255.255.0 broadcast 172.17.0.255inet6 fe80::809e:d13d:635:fdaf prefixlen 64 scopeid 0x20<link>ether 00:0c:29:73:97:ea txqueuelen 1000 (Ethernet)RX packets 610 bytes 54385 (53.1 KiB)RX errors 0 dropped 0 overruns 0 frame 0TX packets 444 bytes 47291 (46.1 KiB)TX errors 0 dropped 0 overruns 0 carrier 0 collisions 0
在虚拟机所在桥设备上添加vxlan类型端口
[root@rs-1 ~]# ovs-vsctl add-port br-in vx0 -- set interface vx0 type=vxlan options:remote_ip=172.17.0.102[root@rs-1 ~]# ovs-vsctl show17b97248-4c7a-48fe-8686-a893da298c2cBridge br-inPort "vx0"Interface "vx0"type: vxlanoptions: {remote_ip="172.17.0.102"}Port br-inInterface br-intype: internalPort "sif0"Interface "sif0"Port "vif1.0"Interface "vif1.0"ovs_version: "2.6.1"[root@rs-2 ~]# ovs-vsctl add-port br-in vx0 -- set interface vx0 type=vxlan options:remote_ip=172.17.0.101[root@rs-2 ~]# ovs-vsctl showd3c25e49-df84-4351-865d-87ec12b77e53Bridge br-inPort br-inInterface br-intype: internalPort "vx0"Interface "vx0"type: vxlanoptions: {remote_ip="172.17.0.101"}Port "vif1.0"Interface "vif1.0"ovs_version: "2.6.1"
设置两台虚拟机的IP地址
# ifconfig eth0eth0 Link encap:Ethernet HWaddr 52:54:00:12:34:57inet addr:10.2.0.1 Bcast:10.255.255.255 Mask:255.0.0.0inet6 addr: fe80::5054:ff:fe12:3457/64 Scope:LinkUP BROADCAST RUNNING MULTICAST MTU:1500 Metric:1RX packets:35 errors:0 dropped:0 overruns:0 frame:0TX packets:115 errors:0 dropped:0 overruns:0 carrier:0collisions:0 txqueuelen:1000RX bytes:3118 (3.0 KiB) TX bytes:9470 (9.2 KiB)# ifconfig eth0eth0 Link encap:Ethernet HWaddr 52:54:00:12:34:69inet addr:10.2.0.2 Bcast:10.255.255.255 Mask:255.0.0.0inet6 addr: fe80::5054:ff:fe12:3469/64 Scope:LinkUP BROADCAST RUNNING MULTICAST MTU:1500 Metric:1RX packets:16 errors:0 dropped:0 overruns:0 frame:0TX packets:24 errors:0 dropped:0 overruns:0 carrier:0collisions:0 txqueuelen:1000RX bytes:1454 (1.4 KiB) TX bytes:2512 (2.4 KiB)
测试两台虚拟机的通信状态并抓包
# ping 10.2.0.1PING 10.2.0.1 (10.2.0.1): 56 data bytes64 bytes from 10.2.0.1: seq=0 ttl=64 time=5.571 ms64 bytes from 10.2.0.1: seq=1 ttl=64 time=2.653 ms64 bytes from 10.2.0.1: seq=2 ttl=64 time=2.417 ms--- 10.2.0.1 ping statistics ---3 packets transmitted, 3 packets received, 0% packet lossround-trip min/avg/max = 2.417/3.547/5.571 ms[root@rs-2 ~]# tcpdump -i ens34 -nn src host 172.17.0.101tcpdump: verbose output suppressed, use -v or -vv for full protocol decodelistening on ens34, link-type EN10MB (Ethernet), capture size 262144 bytes18:56:28.931566 IP 172.17.0.101.22 > 172.17.0.1.59131: Flags [.], ack 3163246967, win 296, length 018:56:28.931609 IP 172.17.0.101.22 > 172.17.0.1.59131: Flags [P.], seq 0:68, ack 1, win 296, length 6818:56:29.457048 IP 172.17.0.101.22 > 172.17.0.1.59131: Flags [P.], seq 68:120, ack 53, win 296, length 5218:56:29.460856 IP 172.17.0.101 > 172.17.0.102: ICMP echo request, id 3194, seq 1, length 6418:56:29.461254 IP 172.17.0.101.22 > 172.17.0.1.59131: Flags [P.], seq 120:236, ack 53, win 296, length 11618:56:29.461787 IP 172.17.0.101.22 > 172.17.0.1.59131: Flags [P.], seq 236:352, ack 53, win 296, length 11618:56:30.461555 IP 172.17.0.101 > 172.17.0.102: ICMP echo request, id 3194, seq 2, length 6418:56:30.462666 IP 172.17.0.101.22 > 172.17.0.1.59131: Flags [P.], seq 352:468, ack 53, win 296, length 11618:56:31.462592 IP 172.17.0.101 > 172.17.0.102: ICMP echo request, id 3194, seq 3, length 6418:56:31.463404 IP 172.17.0.101.22 > 172.17.0.1.59131: Flags [P.], seq 468:584, ack 53, win 296, length 11618:56:32.464056 IP 172.17.0.101 > 172.17.0.102: ICMP echo request, id 3194, seq 4, length 6418:56:32.465130 IP 172.17.0.101.22 > 172.17.0.1.59131: Flags [P.], seq 584:700, ack 53, win 296, length 11612 packets captured12 packets received by filter0 packets dropped by kernel
文章转载自运维扫盲人,如果涉嫌侵权,请发送邮件至:contact@modb.pro进行举报,并提供相关证据,一经查实,墨天轮将立刻删除相关内容。
