


==注:本文需要有一些aws 基础的同学们阅读==
什么是 Amazon EKS
Amazon Elastic Kubernetes Service (Amazon EKS) 是一项托管服务,可让您在 AWS 上轻松运行 Kubernetes,而无需支持或维护您自己的 Kubernetes 控制层面。Kubernetes 是一个用于实现容器化应用程序的部署、扩展和管理的自动化的开源系统。
Amazon EKS 跨多个可用区运行 Kubernetes 控制层面实例以确保高可用性。Amazon EKS 可以自动检测和替换运行状况不佳的控制层面实例,并为它们提供自动版本升级和修补。
Amazon EKS 还与许多 AWS 服务集成以便为您的应用程序提供可扩展性和安全性,包括:
用于容器镜像的 Amazon ECR
用于负载分配的 Elastic Load Balancing
用于身份验证的 IAM
用于隔离的 Amazon VPC
用于动态扩容的 AutoScaler
用于管理域名的 Route53
Amazon EKS 运行最新版本的开源 Kubernetes 软件,因此您可以使用 Kubernetes 社区的所有现有插件和工具。在 Amazon EKS 上运行的应用程序与在任何标准 Kubernetes 环境中运行的应用程序完全兼容,无论此类环境是在本地数据中心还是在公有云中运行都是如此。这意味着,您可以轻松地将任何标准 Kubernetes 应用程序迁移到 Amazon EKS,而无需进行任何代码修改。
什么是eksctl
eksctl是用于在EKS上创建集群的简单CLI工具,EKS是Amazon针对的是EC2上托管的Kubernetes服务。它由Goave编写,使用CloudFormation部署,由Weaveworks创建
使用eksctl
使用eksctl 去创建一个集群是一件非常简单的事情,需要做到下面几个规划
在AWS上创建一台EC2服务器(centos7)
创建一个EKS 需要的iam 权限
把该权限附加给这台EC2的机器上
在EC2服务器上安装一个AWS CLI
在EC2服务器安装eksctl命令
在EC2服务器安装kubectl 命令
在AWS上创建一个EC2(centos7)
略…..
创建一个角色附加EKS的iam权限
我并没有做到最小权限,如果遇到奇奇怪怪的权限问题,对IAM 不熟悉的话直接给Administrator做,后期我会抽出时间写一个最小权限的IAM
创建一个自定义的策略EKS-Administrator-Create-IAM
{
    "Version": "2012-10-17",
    "Statement": [
        {
            "Sid": "VisualEditor0",
            "Effect": "Allow",
            "Action": "iam:PassRole",
            "Resource": "*",
            "Condition": {
                "StringEquals": {
                    "iam:PassedToService": "eks.amazonaws.com"
                }
            }
        },
        {
            "Sid": "VisualEditor1",
            "Effect": "Allow",
            "Action": [
                "iam:CreateInstanceProfile",
                "iam:GetRole",
                "iam:PassRole",
                "iam:CreateRole",
                "iam:AttachRolePolicy",
                "iam:PutRolePolicy",
                "eks:*",
                "ssm:GetParameter",
                "iam:AddRoleToInstanceProfile",
                "eks:CreateCluster"
            ],
            "Resource": "*"
        },
        {
            "Sid": "SharedSecurityGroupRelatedPermissions",
            "Effect": "Allow",
            "Action": [
                "ec2:RevokeSecurityGroupIngress",
                "ec2:AuthorizeSecurityGroupEgress",
                "ec2:AuthorizeSecurityGroupIngress",
                "ec2:DescribeInstances",
                "ec2:RevokeSecurityGroupEgress",
                "ec2:DeleteSecurityGroup"
            ],
            "Resource": "*",
            "Condition": {
                "ForAnyValue:StringLike": {
                    "ec2:ResourceTag/eks": "*"
                }
            }
        },
        {
            "Sid": "EKSCreatedSecurityGroupRelatedPermissions",
            "Effect": "Allow",
            "Action": [
                "ec2:RevokeSecurityGroupIngress",
                "ec2:AuthorizeSecurityGroupEgress",
                "ec2:AuthorizeSecurityGroupIngress",
                "ec2:DescribeInstances",
                "ec2:RevokeSecurityGroupEgress",
                "ec2:DeleteSecurityGroup"
            ],
            "Resource": "*",
            "Condition": {
                "ForAnyValue:StringLike": {
                    "ec2:ResourceTag/eks:nodegroup-name": "*"
                }
            }
        },
        {
            "Sid": "LaunchTemplateRelatedPermissions",
            "Effect": "Allow",
            "Action": [
                "ec2:DeleteLaunchTemplate",
                "ec2:CreateLaunchTemplateVersion"
            ],
            "Resource": "*",
            "Condition": {
                "StringLike": {
                    "ec2:ResourceTag/eks:nodegroup-name": "*"
                }
            }
        },
        {
            "Sid": "AutoscalingRelatedPermissions",
            "Effect": "Allow",
            "Action": [
                "autoscaling:UpdateAutoScalingGroup",
                "autoscaling:DeleteAutoScalingGroup",
                "autoscaling:TerminateInstanceInAutoScalingGroup",
                "autoscaling:CompleteLifecycleAction",
                "autoscaling:PutLifecycleHook",
                "autoscaling:PutNotificationConfiguration"
            ],
            "Resource": "arn:aws:autoscaling:*:*:*:autoScalingGroupName/eks-*"
        },
        {
            "Sid": "AllowAutoscalingToCreateSLR",
            "Effect": "Allow",
            "Condition": {
                "StringEquals": {
                    "iam:AWSServiceName": "autoscaling.amazonaws.com"
                }
            },
            "Action": "iam:CreateServiceLinkedRole",
            "Resource": "*"
        },
        {
            "Sid": "AllowASGCreationByEKS",
            "Effect": "Allow",
            "Action": [
                "autoscaling:CreateOrUpdateTags",
                "autoscaling:CreateAutoScalingGroup"
            ],
            "Resource": "*",
            "Condition": {
                "ForAnyValue:StringEquals": {
                    "aws:TagKeys": [
                        "eks",
                        "eks:cluster-name",
                        "eks:nodegroup-name"
                    ]
                }
            }
        },
        {
            "Sid": "AllowPassRoleToIAM",
            "Effect": "Allow",
            "Action": "iam:PassRole",
            "Resource": "*",
            "Condition": {
                "StringEqualsIfExists": {
                    "iam:PassedToService": "iam.amazonaws.com"
                }
            }
        },
        {
            "Sid": "AllowPassRoleToAutoscaling",
            "Effect": "Allow",
            "Action": "iam:PassRole",
            "Resource": "*",
            "Condition": {
                "StringEqualsIfExists": {
                    "iam:PassedToService": "autoscaling.amazonaws.com"
                }
            }
        },
        {
            "Sid": "AllowPassRoleToEC2",
            "Effect": "Allow",
            "Action": "iam:PassRole",
            "Resource": "*",
            "Condition": {
                "StringEqualsIfExists": {
                    "iam:PassedToService": [
                        "ec2.amazonaws.com",
                        "ec2.amazonaws.com.cn"
                    ]
                }
            }
        },
        {
            "Sid": "PermissionsToManageResourcesForNodegroups",
            "Effect": "Allow",
            "Action": [
                "iam:GetRole",
                "ec2:CreateLaunchTemplate",
                "ec2:DescribeInstances",
                "iam:GetInstanceProfile",
                "ec2:DescribeLaunchTemplates",
                "autoscaling:DescribeAutoScalingGroups",
                "ec2:CreateSecurityGroup",
                "ec2:DescribeLaunchTemplateVersions",
                "ec2:RunInstances",
                "ec2:DescribeSecurityGroups",
                "ec2:GetConsoleOutput",
                "ec2:DescribeRouteTables",
                "ec2:DescribeSubnets"
            ],
            "Resource": "*"
        },
        {
            "Sid": "PermissionsToCreateAndManageInstanceProfiles",
            "Effect": "Allow",
            "Action": [
                "iam:CreateInstanceProfile",
                "iam:DeleteInstanceProfile",
                "iam:RemoveRoleFromInstanceProfile",
                "iam:AddRoleToInstanceProfile"
            ],
            "Resource": "arn:aws:iam::*:instance-profile/eks-*"
        },
        {
            "Sid": "PermissionsToManageEKSAndKubernetesTags",
            "Effect": "Allow",
            "Action": [
                "ec2:CreateTags",
                "ec2:DeleteTags"
            ],
            "Resource": "*",
            "Condition": {
                "ForAnyValue:StringLike": {
                    "aws:TagKeys": [
                        "eks",
                        "eks:cluster-name",
                        "eks:nodegroup-name",
                        "kubernetes.io/cluster/*"
                    ]
                }
            }
        }
    ]
}
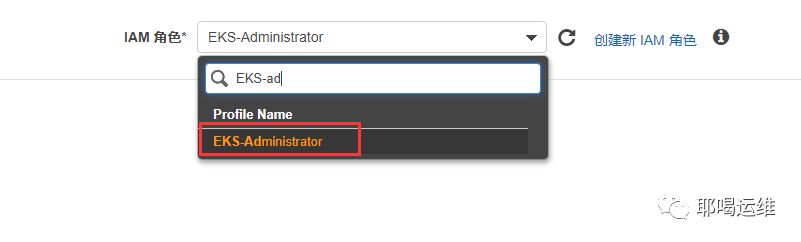
在IAM中创建一个角色 EKS-Administrator
给他附加策略
AmazonEC2FullAccess
AmazonEKSClusterPolicy
AmazonVPCFullAccess
AmazonEKSServicePolicy
AWSCloudFormationFullAccess
EKS-Administrator-Create-IAM
把该权限附加给这台EC2的机器上
官网写的是ack 的方式进行部署
我这里不推荐使用ack的方式进行部署,我选择直接附加IAM权限给我的EC2机器,这样比较安全
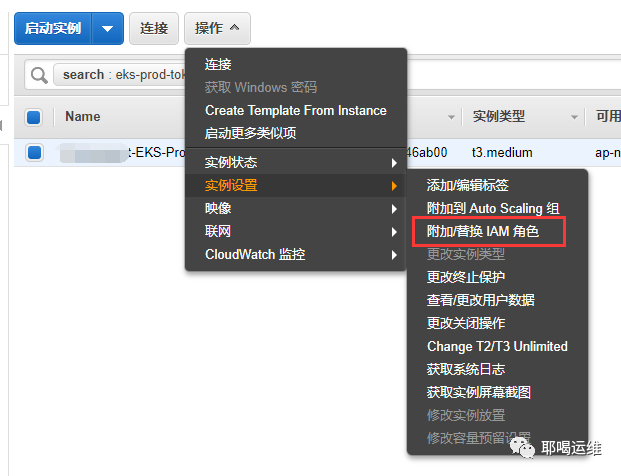
附加我们刚才创建的角色
在EC2服务器上安装一个AWS CLI
在EC2服务器上部署一个Python3
注:请自行百度
我使用自己编写的ansible-playbook安装
ansible-playbook init.yml
安装 AWS CLI 的版本 1.18.49 或更高版本
pip3 install awscli --upgrade --user
安装eksctl 命令
curl --silent --location "https://github.com/weaveworks/eksctl/releases/latest/download/eksctl_$(uname -s)_amd64.tar.gz" | tar xz -C /tmp
sudo mv /tmp/eksctl /usr/local/bin
eksctl version
注意:GitTag 版本应至少为 0.19.0。
如果不是,请查看终端输出中的任何安装或升级错误,或将步骤 1 中的地址替换为 "https://github.com/weaveworks/eksctl/releases/download/0.19.0/eksctl_$(uname -s)_amd64.tar.gz"
在EC2服务器安装kubectl 命令
从S3 上拉取版本
Kubernetes 1.16:

curl -o kubectl https://amazon-eks.s3.us-west-2.amazonaws.com/1.16.8/2020-04-16/bin/linux/amd64/kubectl
Kubernetes 1.15:

curl -o kubectl https://amazon-eks.s3.us-west-2.amazonaws.com/1.15.10/2020-02-22/bin/linux/amd64/kubectl
注意
您可以将此版本与 1.15.10 和 1.15.11 集群结合使用。

Kubernetes 1.14:

curl -o kubectl https://amazon-eks.s3.us-west-2.amazonaws.com/1.14.6/2019-08-22/bin/linux/amd64/kubectl
Kubernetes 1.13:

curl -o kubectl https://amazon-eks.s3.us-west-2.amazonaws.com/1.13.8/2019-08-14/bin/linux/amd64/kubectl
Kubernetes 1.12:

curl -o kubectl https://amazon-eks.s3.us-west-2.amazonaws.com/1.12.10/2019-08-14/bin/linux/amd64/kubectl
将执行权限应用于二进制文件
chmod +x ./kubectl
将二进制文件复制到您的 PATH 中的文件夹
cp ./kubectl /usr/local/bin
安装 kubectl 后,可以使用以下命令验证其版本
kubectl version --short --client
在EC2安装 aws-iam-authenticator
curl -o aws-iam-authenticator https://amazon-eks.s3.us-west-2.amazonaws.com/1.16.8/2020-04-16/bin/linux/amd64/aws-iam-authenticator
chmod +x ./aws-iam-authenticator
cp ./aws-iam-authenticator /usr/local/bin
aws-iam-authenticator help
使用eksctl 创建 EKS集群
使用命令创建eksctl集群
我是在东京区域创建了一个集群
在规划集群网络的时候给集群分配一个16网段的,并且不要跟公司内网冲突,为后期混合云做准备
创建Manager节点
eksctl create cluster --name nuclearport-tokyo-eks-prod-01 --without-nodegroup --vpc-cidr 10.233.0.0/16 --region ap-northeast-1
创建Worker节点
Worker节点有两种方式
managed nodegroups
unmanaged nodegroups
具体区别请查看
https://docs.aws.amazon.com/zh_cn/eks/latest/userguide/managed-node-groups.html
我这里使用的是unmanaged nodegroups,不喜欢被管理,后期会使用 Fargate 去当做EKS的worker节点(Fargate现在还不成熟)
创建一个安全组设置一些内网的规则,我这里是混合云,例如开放ssh,拿到对应的sg-id
定义一个yaml文件
apiVersion: eksctl.io/v1alpha5
kind: ClusterConfig

metadata:
  name: nuclearport-tokyo-eks-prod-01   ## eks cluster name
  region: ap-northeast-1    ## eks use region

nodeGroups:

  # 系统节点
  - name: system-1-a    ##worker nodegroup名字
    labels: { nodetype: system }  ## worker 节点的labels
    instanceType: m5.2xlarge   ##计划使用的EC2类型
    minSize: 1      ##autoscaling 最小值
    desiredCapacity: 1  ##autoscaling 常规值
    maxSize: 6 ##autoscaling 最大值
    volumeSize: 100 ##系统系统盘大小
    volumeType: gp2 ##系统盘类型
    availabilityZones: ["ap-northeast-1a"] ##nodegroup所在AZ
    privateNetworking: true ##是否使用私有网络
    securityGroups: ##是否使用自定义安全组
      withShared: true
      withLocal: true
      attachIDs: ["sg-xxxx", "sg-xxxx"]   ##自定义安全组的名字创建一个默认的安全组
    ssh:
      publicKeyName: 'xxxx'  ##可以ssh到worker的key名字
    tags:
      'Project': 'Devops' ##定义一个tag,计费使用
      'k8s.io/cluster-autoscaler/enabled': 'true'   ##定义自动扩容的tag
      'k8s.io/cluster-autoscaler/nuclearport-ohio-eks-prod': 'owned'    ##定义自动扩容的tag
    taints:
        uessystem: "true:NoSchedule"    ## 定义个污点
    iam:
      withAddonPolicies:    ##选择eks需要使用的iam权限
        #imageBuilder: true
        autoScaler: true
        externalDNS: true
        #certManager: true
        #appMesh: true
        ebs: true
        #fsx: true
        efs: true
        albIngress: true
        #xRay: true
        cloudWatch: true

 # worker节点(一个从0开始的弹性集群)
  - name: worker-1-a    ##worker nodegroup名字
    labels:
      nodetype: worker
      my-cool-label: pizza
    instanceType: c5.large   ##计划使用的EC2类型
    minSize: 0      ##autoscaling 最小值
    desiredCapacity: 0  ##autoscaling 常规值
    maxSize: 6 ##autoscaling 最大值
    volumeSize: 100 ##系统系统盘大小
    volumeType: gp2 ##系统盘类型
    availabilityZones: ["ap-northeast-1a"] ##nodegroup所在AZ
    privateNetworking: true
    securityGroups:
      withShared: true
      withLocal: true
      attachIDs: ["sg-xxxx"]
    ssh:
      publicKeyName: 'xxxxx'  ##可以ssh到worker的key名字
    tags:
      'Project': 'Devops' ##tag
      'k8s.io/cluster-autoscaler/enabled': 'true'
      'k8s.io/cluster-autoscaler/nuclearport-ohio-eks-prod': 'owned'
      k8s.io/cluster-autoscaler/node-template/label/my-cool-label: pizza
      k8s.io/cluster-autoscaler/node-template/taint/feaster: "true:NoSchedule"
    taints:
      useworker: "true:NoSchedule"
    iam:
      withAddonPolicies:
        #imageBuilder: true
        autoScaler: true
        externalDNS: true
        #certManager: true
        #appMesh: true
        ebs: true
        #fsx: true
        efs: true
        albIngress: true
        #xRay: true
        cloudWatch: true
使用命令创建nodegroup节点
eksctl create nodegroup --config-file create_nodegroup.yml
使用eksctl 创建一个指定的nodegroup节点
eksctl create nodegroup --config-file create_nodegroup.yml --include='worker-1-a'
如果要修改nodegroup节点机器型号需要做的就是
创建一个新的nodegroup
eksctl create nodegroup --config-file create_nodegroup.yml --include='worker-2-a'
排空老的nodegroup
当排空之后老的nodegroup 上的pod 会迁移到新的nodegroup上,等待迁移完成
eksctl drain nodegroup --cluster=<clusterName> --name=<nodegroupName>
删除老的nodegroup
eksctl delete nodegroup --cluster=<clusterName> --name=<nodegroupName>
