八,华为stp原理与配置
8.1实验:华为stp配置
8.1.1实验目的
理解stp的作用及工作原理。
掌握stp的选举过程。
掌握stp的基本配置。
掌握stp中的端口状态及计时器。
8.1.2实验拓扑

8.1.3实验要求
1)将LSW1设置为STP中的根桥,LSW2设置为次根桥。
2)查看stp运行状态。
3修改参数后查看stp变化。
8.1.4实验步骤
1)在交换机上配置stp
<Huawei>sys
Enter system view, return user view withCtrl+Z.
[Huawei]sysname LSW1
[LSW1]stp enable
[LSW1]stp mode stp
[LSW1]stp root primary
<Huawei>sys
Enter system view, return user view withCtrl+Z.
[Huawei]sysname LSW2
[LSW2]stp enable
[LSW2]stp mode stp
[LSW2]stp root secondary
[LSW2]
[LSW2]dis stp
-------[CIST Global Info][Mode STP]-------
CIST Bridge :4096 .4c1f-cca3-4fbd
Config Times :Hello 2s MaxAge 20s FwDly 15s MaxHop20
Active Times :Hello 2s MaxAge 20s FwDly 15s MaxHop20
CIST Root/ERPC :0 .4c1f-ccaf-4e81 1
CIST RegRoot/IRPC :4096 .4c1f-cca3-4fbd 0
CIST RootPortId :128.1
BPDU-Protection :Disabled
CIST Root Type :Secondary root
TC or TCN received :44
TC count per hello :0
STP Converge Mode :Normal
Time since last TC :0 days 0h:0m:38s
Number of TC :12
Last TC occurred :GigabitEthernet0/0/1
----[Port1(GigabitEthernet0/0/1)][FORWARDING]----
PortProtocol :Enabled
PortRole :Root Port
PortPriority :128
PortCost(Dot1T ) :Config=auto Active=1
Designated Bridge/Port :0.4c1f-ccaf-4e81 128.1
PortEdged :Config=default /Active=disabled
Point-to-point :Config=auto / Active=true
Transit Limit :147 packets/hello-time
[LSW1]dis stp
-------[CIST Global Info][Mode STP]-------
CIST Bridge :0 .4c1f-ccaf-4e81
Config Times :Hello 2s MaxAge 20s FwDly 15s MaxHop20
Active Times :Hello 2s MaxAge 20s FwDly 15s MaxHop20
CIST Root/ERPC :0 .4c1f-ccaf-4e81 / 0
CIST RegRoot/IRPC :0 .4c1f-ccaf-4e81 / 0
CIST RootPortId :0.0
BPDU-Protection :Disabled
CIST Root Type :Primary root
TC or TCN received :26
TC count per hello :0
STP Converge Mode :Normal
Time since last TC :0 days 0h:0m:1s
Number of TC :12
Last TC occurred :GigabitEthernet0/0/1
----[Port1(GigabitEthernet0/0/1)][FORWARDING]----
PortProtocol :Enabled
PortRole :Designated Port
PortPriority :128
PortCost(Dot1T ) :Config=auto / Active=1
Designated Bridge/Port :0.4c1f-ccaf-4e81 / 128.1
PortEdged :Config=default /Active=disabled
Point-to-point :Config=auto / Active=true
Transit Limit :147 packets/hello-time
在lsw3上查看端口在stp中的角色及状态
[LSW3]dis stp brief
MSTID Port Role STP State Protection
0 GigabitEthernet0/0/1 ROOT FORWARDING NONE
0 GigabitEthernet0/0/2 ALTE DISCARDING NONE
0 GigabitEthernet0/0/3 DESI FORWARDING NONE
可以看到stp规则中g0/0/2被阻塞,从而阻止环路产生
3)修改端口的cost值,再次查看stp变化。
分析:现在的环境是:lsw1是根桥,lsw2是次根桥,所有交换机cost值都为1,所阻塞的是lsw3的g0/0/2端口。现在我们将LSW2的G0/0/1的cost值人为改为20,再观察stp的变化
将LSW2的G0/0/1的端口cost设置为20
[LSW2]int gig 0/0/1
[LSW2-GigabitEthernet0/0/1]stp cost 20
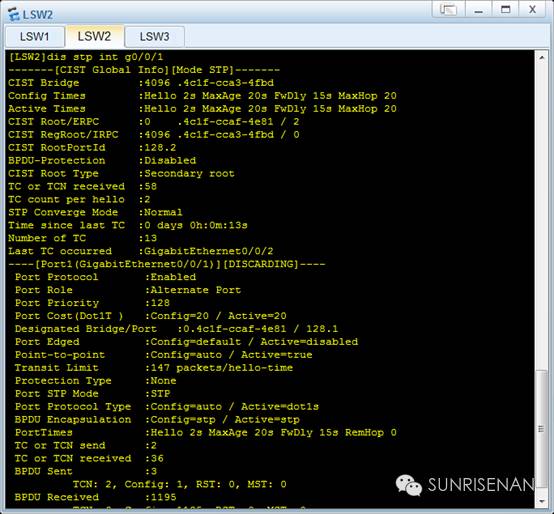
从上图可以看到,因为cost值得改变,导致stp的拓扑发生了改变----网络中阻塞的端口有LSW3的G0/0/2变成LSW2的G0/0/1。
通过实验,我们初步验证了桥的优先级,端口的cost等参数对stp计算的影响。
实验命令
Stp enable //在交换机上启用stp功能
Stp mode stp //设置stp的模式
Stp root {primary | secondary} //将交换机设置为主根桥或次根桥。
Interface gigabitethernet 0/0/1
Stp cost 20 //定义端口的cost值
Display stp brief //查看端口在stp的简要信息
Display stp interface gigabitethernet 0/0/1
//查看端口在stp的详细信息及端口在stp中的详细信息。
扫码关注!!!