


istio防故障利器,你知道几个
1限流
1.1什么是限流
举个例子,比如我们有个桶,桶里有两个开关,一个往外出水,一个网内注水,当出水的速度慢于注水的速度时,到一定时间水就会从桶里溢出。如果我们限制注水速率,就可以防止水从桶里溢出,这就是限流。
具体到软件层面,我们把请求速率看做是注水,把系统cpu,内存等资源看做是放水,当请求速率过快,消耗太多资源时系统就可能崩溃。软件限流就是限制tps或qps指标,以达到保护系统的目的,虽然可能部分用户无法服务,但是系统整体还是健康的,还可以对外部提供服务,不是整体挂掉。
1.2限流算法
1.2.1漏桶算法
就像一个漏斗以下,下面小,上面大。漏桶流出的速率被限制在比较小的范围,当漏桶满时,漏桶就会溢出,进来的请求就会被抛弃掉。特别是应对突发流量,漏桶的速率是恒定的,这样可以有效防止应突发流量导致系统崩溃。
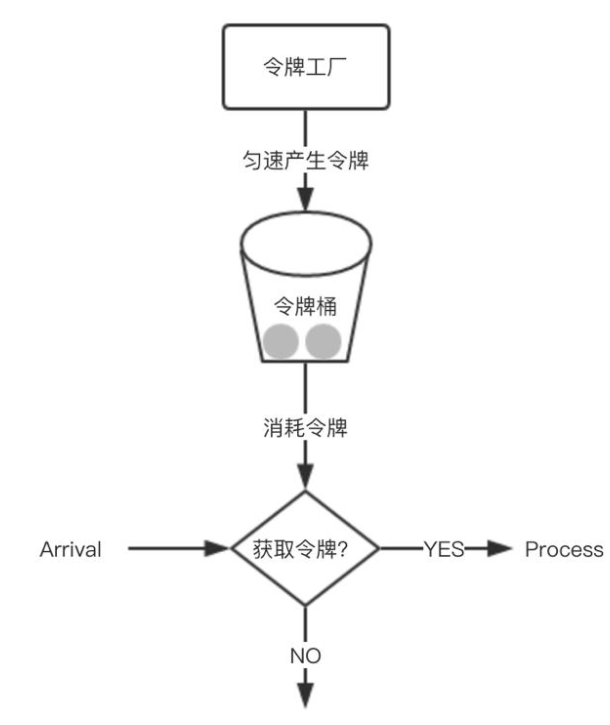
1.2.2令牌桶算法
令牌桶算法的原理,关键在令牌,它是指往桶里以一个不变的速率放入令牌,当有请求时,如果桶里有令牌,请求就消费一个令牌,请求继续进行;当请求到来,桶里没有令牌时,请求就会被抛弃掉,拒绝服务;当桶里的令牌满时,令牌就会被抛弃掉。
1.2.3计数器算法
计数器算法是指一段时间设置一个计数器,当有请求时计数器就加一,请求继续进行;在技术器时间范围内,当计数器数值超过指定值,请求就被拒绝;当时间范围结束,就重置计数器。技术器算法有个缺陷,就是如果计数器时间是1分钟,当前1秒来了大量请求,讲技术器用完了,后续59秒时间就没法提供服务。
1.2实操
1.2.1http
1.2.1.1单集群
istio部署和bookinfo实例部署大家自行完成,都看这种深度的文章了这个应该不是事。不会:

1.2.1.1.1集群内服务限流
1.2.1.1.1.1本地限流
cat <<EOF > envoyfilter-local-rate-limit.yaml
apiVersion: networking.istio.io/v1alpha3
kind: EnvoyFilter
metadata:
  name: filter-local-ratelimit-svc
spec:
  workloadSelector:
    labels:
      app: productpage
  configPatches:
    - applyTo: HTTP_FILTER
      match:
        listener:
          filterChain:
            filter:
              name: "envoy.filters.network.http_connection_manager"
      patch:
        operation: INSERT_BEFORE
        value:
          name: envoy.filters.http.local_ratelimit
          typed_config:
            "@type": type.googleapis.com/udpa.type.v1.TypedStruct
            type_url: type.googleapis.com/envoy.extensions.filters.http.local_ratelimit.v3.LocalRateLimit
            value:
              stat_prefix: http_local_rate_limiter
              token_bucket:
                max_tokens: 10
                tokens_per_fill: 10
                fill_interval: 60s
              filter_enabled:
                runtime_key: local_rate_limit_enabled
                default_value:
                  numerator: 100
                  denominator: HUNDRED
              filter_enforced:
                runtime_key: local_rate_limit_enforced
                default_value:
                  numerator: 100
                  denominator: HUNDRED
              response_headers_to_add:
                - append: false
                  header:
                    key: x-local-rate-limit
                    value: 'true'
EOF

kubectl apply -f envoyfilter-local-rate-limit.yaml -n istio
说明:本地限流需要通过EnvoyFilter来实现,他不会请求外部服务,在envoy内部实现支持,是一个令牌桶的算法。http filter的名称必须是envoy.filters.http.local_ratelimit,type和typeurl是固定的,stat_prefix可以随便改,表示生成stat的指标前缀。token_bucket配置令牌桶,max_tokens表示最大令牌数量,tokens_per_fill表示每次填充的令牌数量,fill_interval表示填充令牌的间隔。filter_enabled表示启用但不是强制,filter_enforced表示强制,可以配置百分比。response_headers_to_add修改响应头信息,append为false表示修改,true表示添加。runtime_key 运行时的key,具体有啥用不清楚。
执行压测:
[root@node01 45]# go-stress-testing -c 10 -n 10000 -u http://192.168.229.134:30945/productpage

 开始启动  并发数:10 请求数:10000 请求参数:
request:
 form:http
 url:http://192.168.229.134:30945/productpage
 method:GET
 headers:map[]
 data:
 verify:statusCode
 timeout:30s
 debug:false


─────┬───────┬───────┬───────┬────────┬────────┬────────┬────────┬────────┬────────┬────────
 耗时│ 并发数│ 成功数│ 失败数│   qps  │最长耗时│最短耗时│平均耗时│下载字节│字节每秒│ 错误码
─────┼───────┼───────┼───────┼────────┼────────┼────────┼────────┼────────┼────────┼────────
   1s│      7│      2│    761│    2.94│  124.68│    1.98│ 3406.97│  21,476│  21,470│200:2;429:761
   2s│     10│      5│   1636│    2.55│ 1788.46│    1.98│ 3928.11│  52,771│  26,383│200:5;429:1636
   3s│     10│      5│   2962│    1.70│ 1788.46│    1.04│ 5871.68│  76,639│  25,545│200:5;429:2962
   4s│     10│      5│   4459│    1.28│ 1788.46│    1.04│ 7810.78│ 103,585│  25,896│200:5;429:4459
429 Too Many Requests (太多请求)
当你需要限制客户端请求某个服务的数量,也就是限制请求速度时,该状态码就会非常有用
清理:
kubectl delete envoyfilter filter-local-ratelimit-svc -n istio
1.2.1.1.1.2全局限流
部署ratelimit
1创建cm
cat << EOF > ratelimit-config.yaml
apiVersion: v1
kind: ConfigMap
metadata:
  name: ratelimit-config
data:
  config.yaml: |
    domain: productpage-ratelimit
    descriptors:
      - key: PATH
        value: "/productpage"
        rate_limit:
          unit: minute
          requests_per_unit: 1
      - key: PATH
        rate_limit:
          unit: minute
          requests_per_unit: 100
EOF

kubectl apply -f ratelimit-config.yaml -n istio
说明: 这个configmap是限速服务用到的配置文件,他是envoy v3版本的限速格式。domain是域名,他会在envoyfilter中被引用,descriptors的PATH,表示请求的路径可以有多个值,rate_limit配置限速配额,这里productpage配了1分钟1个请求,其他url是1分钟100个请求
2创建限速服务deployment
cat << EOF > ratelimit-deploy.yaml
apiVersion: v1
kind: Service
metadata:
  name: redis
  labels:
    app: redis
spec:
  ports:
  - name: redis
    port: 6379
  selector:
    app: redis
---
apiVersion: apps/v1
kind: Deployment
metadata:
  name: redis
spec:
  replicas: 1
  selector:
    matchLabels:
      app: redis
  template:
    metadata:
      labels:
        app: redis
    spec:
      containers:
      - image: redis:alpine
        imagePullPolicy: Always
        name: redis
        ports:
        - name: redis
          containerPort: 6379
      restartPolicy: Always
      serviceAccountName: ""
---
apiVersion: v1
kind: Service
metadata:
  name: ratelimit
  labels:
    app: ratelimit
spec:
  ports:
  - name: http-port
    port: 8080
    targetPort: 8080
    protocol: TCP
  - name: grpc-port
    port: 8081
    targetPort: 8081
    protocol: TCP
  - name: http-debug
    port: 6070
    targetPort: 6070
    protocol: TCP
  selector:
    app: ratelimit
---
apiVersion: apps/v1
kind: Deployment
metadata:
  name: ratelimit
spec:
  replicas: 1
  selector:
    matchLabels:
      app: ratelimit
  strategy:
    type: Recreate
  template:
    metadata:
      labels:
        app: ratelimit
    spec:
      containers:
      - image: envoyproxy/ratelimit:6f5de117 # 2021/01/08
        imagePullPolicy: Always
        name: ratelimit
        command: ["/bin/ratelimit"]
        env:
        - name: LOG_LEVEL
          value: debug
        - name: REDIS_SOCKET_TYPE
          value: tcp
        - name: REDIS_URL
          value: redis:6379
        - name: USE_STATSD
          value: "false"
        - name: RUNTIME_ROOT
          value: /data
        - name: RUNTIME_SUBDIRECTORY
          value: ratelimit
        ports:
        - containerPort: 8080
        - containerPort: 8081
        - containerPort: 6070
        volumeMounts:
        - name: config-volume
          mountPath: /data/ratelimit/config/config.yaml
          subPath: config.yaml
      volumes:
      - name: config-volume
        configMap:
          name: ratelimit-config
EOF

kubectl apply -f ratelimit-deploy.yaml -n istio
创建了redis,和官方的一个ratelimit服务。
3创建envoy-filter
cat << EOF > envoyfilter-filter.yaml
apiVersion: networking.istio.io/v1alpha3
kind: EnvoyFilter
metadata:
  name: filter-ratelimit
  namespace: istio-system
spec:
  workloadSelector:
    # select by label in the same namespace
    labels:
      istio: ingressgateway
  configPatches:
    # The Envoy config you want to modify
    - applyTo: HTTP_FILTER
      match:
        context: GATEWAY
        listener:
          filterChain:
            filter:
              name: "envoy.filters.network.http_connection_manager"
              subFilter:
                name: "envoy.filters.http.router"
      patch:
        operation: INSERT_BEFORE
        # Adds the Envoy Rate Limit Filter in HTTP filter chain.
        value:
          name: envoy.filters.http.ratelimit
          typed_config:
            "@type": type.googleapis.com/envoy.extensions.filters.http.ratelimit.v3.RateLimit
            # domain can be anything! Match it to the ratelimter service config
            domain: productpage-ratelimit
            failure_mode_deny: true
            rate_limit_service:
              grpc_service:
                envoy_grpc:
                  cluster_name: rate_limit_cluster
                timeout: 10s
              transport_api_version: V3
    - applyTo: CLUSTER
      match:
        cluster:
          service: ratelimit.istio.svc.cluster.local
      patch:
        operation: ADD
        # Adds the rate limit service cluster for rate limit service defined in step 1.
        value:
          name: rate_limit_cluster
          type: STRICT_DNS
          connect_timeout: 10s
          lb_policy: ROUND_ROBIN
          http2_protocol_options: {}
          load_assignment:
            cluster_name: rate_limit_cluster
            endpoints:
            - lb_endpoints:
              - endpoint:
                  address:
                     socket_address:
                      address: ratelimit.istio.svc.cluster.local
                      port_value: 8081
EOF

kubectl apply -f envoyfilter-filter.yaml -n istio-system
这个envoyfilter作用在网关上面,配置了一个http过滤器envoy.filters.http.ratelimit,和一个cluster。http 过滤器的cluster地址指向cluster配置的地址,这里就是我们的ratelimit service所在的地址。domain是上面configmap的值一样,failure_mode_deny表示超过请求限值就拒绝,rate_limit_service配置ratelimit服务的地址(cluster),这里可以配置grpc类型的也可以配置http类型的。
4创建action envoyfilter
cat << EOF > envoyfilter-action.yaml
apiVersion: networking.istio.io/v1alpha3
kind: EnvoyFilter
metadata:
  name: filter-ratelimit-svc
  namespace: istio-system
spec:
  workloadSelector:
    labels:
      istio: ingressgateway
  configPatches:
    - applyTo: VIRTUAL_HOST
      match:
        context: GATEWAY
        routeConfiguration:
          vhost:
            name: "*:80"
            route:
              action: ANY
      patch:
        operation: MERGE
        # Applies the rate limit rules.
        value:
          rate_limits:
            - actions: # any actions in here
              - request_headers:
                  header_name: ":path"
                  descriptor_key: "PATH"
EOF

kubectl apply -f envoyfilter-action.yaml  -n istio-system
这个envoyfilter作用在入口网关处,给80端口的虚拟主机配置了一个rate_limits 动作,descriptor_key用于选择在configmap里配置的key。
压测:
[root@node01 ~]# go-stress-testing -c 10 -n 10000 -u http://192.168.229.134:30945/productpage

 开始启动  并发数:10 请求数:10000 请求参数:
request:
 form:http
 url:http://192.168.229.134:30945/productpage
 method:GET
 headers:map[]
 data:
 verify:statusCode
 timeout:30s
 debug:false


─────┬───────┬───────┬───────┬────────┬────────┬────────┬────────┬────────┬────────┬────────
 耗时│ 并发数│ 成功数│ 失败数│   qps  │最长耗时│最短耗时│平均耗时│下载字节│字节每秒│ 错误码
─────┼───────┼───────┼───────┼────────┼────────┼────────┼────────┼────────┼────────┼────────
   1s│     10│      1│   1051│    1.01│   55.51│    3.70│ 9914.38│   4,183│   4,176│200:1;429:1051
   2s│     10│      1│   1629│    0.50│   55.51│    3.70│19807.86│   4,183│   2,090│200:1;429:1629
   3s│     10│      1│   2154│    0.34│   55.51│    3.70│29829.63│   4,183│   1,393│200:1;429:2154
   4s│     10│      1│   2662│    0.25│   55.51│    3.70│39823.69│   4,183│   1,045│200:1;429:2662
   5s│     10│      1│   3166│    0.20│   58.63│    3.70│49865.16│   4,183│     836│200:1;429:3166
清理:
kubectl delete cm ratelimit-config -n istio
kubectl delete -f ratelimit-deploy.yaml -n istio
kubectl delete envoyfilter filter-ratelimit -n istio-system
kubectl delete envoyfilter filter-ratelimit-svc -n istio-system
1.2..1.1.2集群外服务限流
1.2.1.2.1.1本地限流
cat << EOF > se-baidu.yaml
apiVersion: networking.istio.io/v1alpha3
kind: ServiceEntry
metadata:
  name: baidu
spec:
  hosts:
    - www.baidu.com
  ports:
    - number: 80
      name: http-port
      protocol: HTTP
  resolution: DNS
EOF

kubectl apply -f se-baidu.yaml -n istio
说明,创建了访问百度的service entry
cat <<EOF > envoyfilter-local-rate-limit-http-outside.yaml
apiVersion: networking.istio.io/v1alpha3
kind: EnvoyFilter
metadata:
  name: filter-local-ratelimit-svc
spec:
  workloadSelector:
    labels:
      app: ratings
  configPatches:
    - applyTo: HTTP_FILTER
      match:
        context: SIDECAR_OUTBOUND
        listener:
          filterChain:
            filter:
              name: "envoy.filters.network.http_connection_manager"
              subFilter:
                name: "envoy.filters.http.router"
      patch:
        operation: INSERT_BEFORE
        value:
          name: envoy.filters.http.local_ratelimit
          typed_config:
            "@type": type.googleapis.com/udpa.type.v1.TypedStruct
            type_url: type.googleapis.com/envoy.extensions.filters.http.local_ratelimit.v3.LocalRateLimit
            value:
              stat_prefix: http_local_rate_limiter
              token_bucket:
                max_tokens: 1
                tokens_per_fill: 1
                fill_interval: 60s
              filter_enabled:
                runtime_key: local_rate_limit_enabled
                default_value:
                  numerator: 100
                  denominator: HUNDRED
              filter_enforced:
                runtime_key: local_rate_limit_enforced
                default_value:
                  numerator: 100
                  denominator: HUNDRED
              response_headers_to_add:
                - append: false
                  header:
                    key: x-local-rate-limit
                    value: 'true'
EOF

kubectl apply -f envoyfilter-local-rate-limit-http-outside.yaml -n istio
说明:SIDECAR_OUTBOUND表示对外发出请求起作用。本地限流需要通过EnvoyFilter来实现,他不会请求外部服务,在envoy内部实现支持,是一个令牌桶的算法。http filter的名称必须是envoy.filters.http.local_ratelimit,type和typeurl是固定的,stat_prefix可以随便改,表示生成stat的指标前缀。token_bucket配置令牌桶,max_tokens表示最大令牌数量,tokens_per_fill表示每次填充的令牌数量,fill_interval表示填充令牌的间隔。filter_enabled表示启用但不是强制,filter_enforced表示强制,可以配置百分比。response_headers_to_add修改响应头信息,append为false表示修改,true表示添加。runtime_key 运行时的key,具体有啥用不清楚。
kubectl exec -it -n istio ratings-v2-mysql-vm-66dc56449d-lk6gv /bin/bash

local_rate_limitednode@ratings-v2-mysql-vm-66dc56449d-lk6gv:/opt/microservices$ curl www.baidu.com -I
HTTP/1.1 429 Too Many Requests
x-local-rate-limit: true
content-length: 18
content-type: text/plain
date: Fri, 17 Sep 2021 23:20:13 GMT
server: envoy
进入ratings容器,对百度发请求,409错误,说明限流生效
清理:
kubectl delete se baidu -n istio
kubectl delete envoyfilter filter-local-ratelimit-svc -n istio
1.2.1.2.1.2全局限流
部署ratelimit
1创建cm
cat << EOF > ratelimit-config-outside-http.yaml
apiVersion: v1
kind: ConfigMap
metadata:
  name: ratelimit-config
data:
  config.yaml: |
    domain: productpage-ratelimit
    descriptors:
      - key: PATH
        value: "/"
        rate_limit:
          unit: minute
          requests_per_unit: 1
      - key: PATH
        value: "/aa"
        rate_limit:
          unit: minute
          requests_per_unit: 1
      - key: PATH
        rate_limit:
          unit: minute
          requests_per_unit: 100
EOF

kubectl apply -f ratelimit-config-outside-http.yaml -n istio
说明: 这个configmap是限速服务用到的配置文件,他是envoy v3版本的限速格式。domain是域名,他会在envoyfilter中被引用,descriptors的PATH,表示请求的路径可以有多个值,rate_limit配置限速配额,这里productpage配了1分钟1个请求,/aa一分钟1个请求,其他url是1分钟100个请求
2创建限速服务deployment
cat << EOF > ratelimit-deploy.yaml
apiVersion: v1
kind: Service
metadata:
  name: redis
  labels:
    app: redis
spec:
  ports:
  - name: redis
    port: 6379
  selector:
    app: redis
---
apiVersion: apps/v1
kind: Deployment
metadata:
  name: redis
spec:
  replicas: 1
  selector:
    matchLabels:
      app: redis
  template:
    metadata:
      labels:
        app: redis
    spec:
      containers:
      - image: redis:alpine
        imagePullPolicy: Always
        name: redis
        ports:
        - name: redis
          containerPort: 6379
      restartPolicy: Always
      serviceAccountName: ""
---
apiVersion: v1
kind: Service
metadata:
  name: ratelimit
  labels:
    app: ratelimit
spec:
  ports:
  - name: http-port
    port: 8080
    targetPort: 8080
    protocol: TCP
  - name: grpc-port
    port: 8081
    targetPort: 8081
    protocol: TCP
  - name: http-debug
    port: 6070
    targetPort: 6070
    protocol: TCP
  selector:
    app: ratelimit
---
apiVersion: apps/v1
kind: Deployment
metadata:
  name: ratelimit
spec:
  replicas: 1
  selector:
    matchLabels:
      app: ratelimit
  strategy:
    type: Recreate
  template:
    metadata:
      labels:
        app: ratelimit
    spec:
      containers:
      - image: envoyproxy/ratelimit:6f5de117 # 2021/01/08
        imagePullPolicy: Always
        name: ratelimit
        command: ["/bin/ratelimit"]
        env:
        - name: LOG_LEVEL
          value: debug
        - name: REDIS_SOCKET_TYPE
          value: tcp
        - name: REDIS_URL
          value: redis:6379
        - name: USE_STATSD
          value: "false"
        - name: RUNTIME_ROOT
          value: /data
        - name: RUNTIME_SUBDIRECTORY
          value: ratelimit
        ports:
        - containerPort: 8080
        - containerPort: 8081
        - containerPort: 6070
        volumeMounts:
        - name: config-volume
          mountPath: /data/ratelimit/config/config.yaml
          subPath: config.yaml
      volumes:
      - name: config-volume
        configMap:
          name: ratelimit-config
EOF

kubectl apply -f ratelimit-deploy.yaml -n istio
创建了redis,和官方的一个ratelimit服务。
cat << EOF > se-baidu.yaml
apiVersion: networking.istio.io/v1alpha3
kind: ServiceEntry
metadata:
  name: baidu
spec:
  hosts:
    - www.baidu.com
  ports:
    - number: 80
      name: http-port
      protocol: HTTP
  resolution: DNS
EOF

kubectl apply -f se-baidu.yaml -n istio
创建访问百度的serviceentry
创建envoy-filter
cat << EOF > envoyfilter-filter-outside-http.yaml
apiVersion: networking.istio.io/v1alpha3
kind: EnvoyFilter
metadata:
  name: filter-ratelimit
  namespace: istio
spec:
  workloadSelector:
    # select by label in the same namespace
    labels:
      app: ratings
  configPatches:
    - applyTo: HTTP_FILTER
      match:
        context: SIDECAR_OUTBOUND
        listener:
          filterChain:
            filter:
              name: "envoy.filters.network.http_connection_manager"
              subFilter:
                name: "envoy.filters.http.router"
      patch:
        operation: INSERT_BEFORE
        # Adds the Envoy Rate Limit Filter in HTTP filter chain.
        value:
          name: envoy.filters.http.ratelimit
          typed_config:
            "@type": type.googleapis.com/envoy.extensions.filters.http.ratelimit.v3.RateLimit
            # domain can be anything! Match it to the ratelimter service config
            domain: productpage-ratelimit
            failure_mode_deny: true
            rate_limit_service:
              grpc_service:
                envoy_grpc:
                  cluster_name: rate_limit_cluster
                timeout: 10s
              transport_api_version: V3
    - applyTo: CLUSTER
      match:
        cluster:
          service: ratelimit.istio.svc.cluster.local
      patch:
        operation: ADD
        # Adds the rate limit service cluster for rate limit service defined in step 1.
        value:
          name: rate_limit_cluster
          type: STRICT_DNS
          connect_timeout: 10s
          lb_policy: ROUND_ROBIN
          http2_protocol_options: {}
          load_assignment:
            cluster_name: rate_limit_cluster
            endpoints:
            - lb_endpoints:
              - endpoint:
                  address:
                     socket_address:
                      address: ratelimit.istio.svc.cluster.local
                      port_value: 8081
EOF

kubectl apply -f envoyfilter-filter-outside-http.yaml -n istio
这个envoyfilter作用在ratings上面,SIDECAR_OUTBOUND作用的对外流量上面,配置了一个http过滤器envoy.filters.http.ratelimit,和一个cluster。http 过滤器的cluster地址指向cluster配置的地址,这里就是我们的ratelimit service所在的地址。domain是上面configmap的值一样,failure_mode_deny表示超过请求限值就拒绝,rate_limit_service配置ratelimit服务的地址(cluster),这里可以配置grpc类型的也可以配置http类型的。
4创建action envoyfilter
cat << EOF > envoyfilter-action-outside-http.yaml
apiVersion: networking.istio.io/v1alpha3
kind: EnvoyFilter
metadata:
  name: filter-ratelimit-svc
  namespace: istio
spec:
  workloadSelector:
    labels:
      app: ratings
  configPatches:
    - applyTo: VIRTUAL_HOST
      match:
        context: SIDECAR_OUTBOUND
        routeConfiguration:
          vhost:
            name: "www.baidu.com:80"
            route:
              action: ANY
      patch:
        operation: MERGE
        # Applies the rate limit rules.
        value:
          rate_limits:
            - actions: # any actions in here
              - request_headers:
                  header_name: ":path"
                  descriptor_key: "PATH"
EOF

kubectl apply -f envoyfilter-action-outside-http.yaml   -n istio
host是我们配置的百度的地址(www.baidu.com:80),这个envoyfilter作用在ratings处,给80端口的虚拟主机配置了一个rate_limits 动作,descriptor_key用于选择在configmap里配置的key。
kubectl exec -it -n istio ratings-v2-mysql-vm-66dc56449d-lk6gv /bin/bash

node@ratings-v2-mysql-vm-66dc56449d-lk6gv:/opt/microservices$ curl www.baidu.com/ -I
HTTP/1.1 429 Too Many Requests
x-envoy-ratelimited: true
date: Fri, 17 Sep 2021 23:51:33 GMT
server: envoy
transfer-encoding: chunked
进入rating容器,向百度发请求,409错误,说明限流成功
清理:
kubectl delete cm ratelimit-config -n istio
kubectl delete -f ratelimit-deploy.yaml -n istio
kubectl delete envoyfilter filter-ratelimit -n istio
kubectl delete envoyfilter filter-ratelimit-svc -n istio
1.2.1.2多集群
1.2.1.2.1准备集群

这里多集群安装我们不在展开,不懂得可以看我之前的文章。
集群1
128,129,130
集群2
131,132,133

两个网络联通
128。129.130
route add -net 172.21.1.0 netmask 255.255.255.0 gw 192.168.229.131
route add -net 172.21.2.0 netmask 255.255.255.0 gw 192.168.229.133
route add -net 172.21.0.0 netmask 255.255.255.0 gw 192.168.229.132
route add -net 10.69.0.0 netmask 255.255.0.0 gw 192.168.229.131

131,132,133
route add -net 172.20.0.0 netmask 255.255.255.0 gw 192.168.229.128
route add -net 172.20.1.0 netmask 255.255.255.0 gw 192.168.229.129
route add -net 172.20.2.0 netmask 255.255.255.0 gw 192.168.229.130
route add -net 10.68.0.0 netmask 255.255.0.0 gw 192.168.229.128


cluster1:
生成istio安装operator文件
cat <<EOF > cluster1.yaml
apiVersion: install.istio.io/v1alpha1
kind: IstioOperator
spec:
  profile: demo
  values:
    global:
      meshID: mesh1
      multiCluster:
        clusterName: cluster1
      network: network1
  meshConfig:
    accessLogFile: /dev/stdout
    enableTracing: true
  components:
    egressGateways:
    - name: istio-egressgateway
      enabled: true
EOF


生成istio安装operator文件
cat <<EOF > cluster2.yaml
apiVersion: install.istio.io/v1alpha1
kind: IstioOperator
spec:
  profile: demo
  values:
    global:
      meshID: mesh1
      multiCluster:
        clusterName: cluster2
      network: network1
  meshConfig:
    accessLogFile: /dev/stdout
    enableTracing: true
  components:
    egressGateways:
    - name: istio-egressgateway
      enabled: true
EOF

把部署文件传到cluster2
scp cluster2.yaml root@192.168.229.131:/root


cluster1:
生成访问apiserver secret
 istioctl x create-remote-secret --name=cluster1  --server=https://192.168.229.128:6443 > remote-secret-cluster1.yaml
 传输secret到cluster2
scp remote-secret-cluster1.yaml root@192.168.229.131:/root

cluster2
生成访问apiserver secret
 istioctl x create-remote-secret --name=cluster2  --server=https://192.168.229.131:6443 > remote-secret-cluster2.yaml
  传输secret到cluster2
 scp remote-secret-cluster2.yaml root@192.168.229.128:/root

 cluster1
 应用secret
 kubectl apply -f remote-secret-cluster2.yaml

 部署集群
 istioctl install  -f cluster1.yaml


  cluster2:
  应用secret
  kubectl apply -f remote-secret-cluster1.yaml
  部署集群
istioctl install  -f cluster2.yaml

 cluster1:
  重启pod
 kubectl rollout restart deploy -n istio
 kubectl rollout restart deploy -n istio-system

 cluster2:
   重启pod
 kubectl rollout restart deploy -n istio
 kubectl rollout restart deploy -n istio-system
清理:
cluster1:

kubectl delete secret istio-remote-secret-cluster2 -n istio-system
istioctl x uninstall -f cluster1.yaml

reboot

cluster2:

kubectl delete secret istio-remote-secret-cluster1 -n istio-system
istioctl x uninstall -f cluster2.yaml

reboot
1.2.1.2.2集群内本地限流
多集群只演示集群内本地限流其他是一样的
cat <<EOF > envoyfilter-local-rate-limit-multi-http.yaml
apiVersion: networking.istio.io/v1alpha3
kind: EnvoyFilter
metadata:
  name: filter-local-ratelimit-svc
spec:
  workloadSelector:
    labels:
      app: productpage
  configPatches:
    - applyTo: HTTP_FILTER
      match:
        listener:
          filterChain:
            filter:
              name: "envoy.filters.network.http_connection_manager"
      patch:
        operation: INSERT_BEFORE
        value:
          name: envoy.filters.http.local_ratelimit
          typed_config:
            "@type": type.googleapis.com/udpa.type.v1.TypedStruct
            type_url: type.googleapis.com/envoy.extensions.filters.http.local_ratelimit.v3.LocalRateLimit
            value:
              stat_prefix: http_local_rate_limiter
              token_bucket:
                max_tokens: 10
                tokens_per_fill: 10
                fill_interval: 60s
              filter_enabled:
                runtime_key: local_rate_limit_enabled
                default_value:
                  numerator: 100
                  denominator: HUNDRED
              filter_enforced:
                runtime_key: local_rate_limit_enforced
                default_value:
                  numerator: 100
                  denominator: HUNDRED
              response_headers_to_add:
                - append: false
                  header:
                    key: x-local-rate-limit
                    value: 'true'
EOF

kubectl apply -f envoyfilter-local-rate-limit-multi-http.yaml -n istio
说明:本地限流需要通过EnvoyFilter来实现,他不会请求外部服务,在envoy内部实现支持,是一个令牌桶的算法。http filter的名称必须是envoy.filters.http.local_ratelimit,type和typeurl是固定的,stat_prefix可以随便改,表示生成stat的指标前缀。token_bucket配置令牌桶,max_tokens表示最大令牌数量,tokens_per_fill表示每次填充的令牌数量,fill_interval表示填充令牌的间隔。filter_enabled表示启用但不是强制,filter_enforced表示强制,可以配置百分比。response_headers_to_add修改响应头信息,append为false表示修改,true表示添加。runtime_key 运行时的key,具体有啥用不清楚。
开启压测:
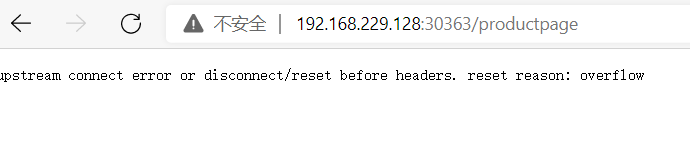
[root@node01 45]# go-stress-testing -c 10 -n 10000 -u http://192.168.229.128:30363/productpage

 开始启动  并发数:10 请求数:10000 请求参数:
request:
 form:http
 url:http://192.168.229.128:30363/productpage
 method:GET
 headers:map[]
 data:
 verify:statusCode
 timeout:30s
 debug:false


─────┬───────┬───────┬───────┬────────┬────────┬────────┬────────┬────────┬────────┬────────
 耗时│ 并发数│ 成功数│ 失败数│   qps  │最长耗时│最短耗时│平均耗时│下载字节│字节每秒│ 错误码
─────┼───────┼───────┼───────┼────────┼────────┼────────┼────────┼────────┼────────┼────────
   1s│      0│      0│      0│    0.00│    0.00│    0.00│    0.00│        │        │
   2s│      7│     16│      6│   15.25│ 1453.38│    4.56│  655.73│  71,950│  35,974│200:16;429:6
   3s│      7│     17│      6│   14.30│ 1453.38│    4.56│  699.44│  76,133│  25,376│200:17;429:6
   4s│     10│     34│     24│   14.30│ 3207.96│    2.71│  699.46│ 154,262│  38,559│200:34;429:24
   5s│     10│     78│     68│   16.03│ 3207.96│    2.71│  623.67│ 370,054│  74,009│200:78;429:68
   6s│     10│    160│    150│   26.98│ 3207.96│    2.71│  370.66│ 770,420│ 128,402│200:160;429:150
   7s│     10│    238│    228│   34.53│ 3207.96│    2.71│  289.60│1,148,994│ 164,131│200:238;429:228
发现多集群和单集群的配置是一样,同样生效
1.2.2tcp
1.2.2.1单集群
1.2.2.1.1集群内服务限流
1.2.2.1.1.1本地限流
部署mysql
cat << EOF > mysql.yaml
apiVersion: v1
kind: Secret
metadata:
  name: mysql-credentials
type: Opaque
data:
  rootpasswd: cGFzc3dvcmQ=
---
apiVersion: v1
kind: Service
metadata:
  name: mysqldb
  labels:
    app: mysqldb
    service: mysqldb
spec:
  ports:
  - port: 3306
    name: tcp
  selector:
    app: mysqldb
---
apiVersion: apps/v1
kind: Deployment
metadata:
  name: mysqldb-v1
  labels:
    app: mysqldb
    version: v1
spec:
  replicas: 1
  selector:
    matchLabels:
      app: mysqldb
      version: v1
  template:
    metadata:
      labels:
        app: mysqldb
        version: v1
    spec:
      containers:
      - name: mysqldb
        image: docker.io/istio/examples-bookinfo-mysqldb:1.16.2
        imagePullPolicy: IfNotPresent
        ports:
        - containerPort: 3306
        env:
          - name: MYSQL_ROOT_PASSWORD
            valueFrom:
              secretKeyRef:
                name: mysql-credentials
                key: rootpasswd
        args: ["--default-authentication-plugin","mysql_native_password"]
        volumeMounts:
        - name: var-lib-mysql
          mountPath: /var/lib/mysql
      volumes:
      - name: var-lib-mysql
        emptyDir: {}
EOF

kubectl apply -f mysql.yaml -n istio
说明:部署了mysql服务,ratings获取数据时会请求这个服务
部署mysql版ratings
cat << EOF > ratings-mysql.yaml
apiVersion: apps/v1
kind: Deployment
metadata:
  name: ratings-v2-mysql
  labels:
    app: ratings
    version: v2-mysql
spec:
  replicas: 1
  selector:
    matchLabels:
      app: ratings
      version: v2-mysql
  template:
    metadata:
      labels:
        app: ratings
        version: v2-mysql
    spec:
      containers:
      - name: ratings
        image: docker.io/istio/examples-bookinfo-ratings-v2:1.16.2
        imagePullPolicy: IfNotPresent
        env:
          # ratings-v2 will use mongodb as the default db backend.
          # if you would like to use mysqldb then you can use this file
          # which sets DB_TYPE = 'mysql' and the rest of the parameters shown
          # here and also create the # mysqldb service using bookinfo-mysql.yaml
          # NOTE: This file is mutually exclusive to bookinfo-ratings-v2.yaml
          - name: DB_TYPE
            value: "mysql"
          - name: MYSQL_DB_HOST
            value: mysqldb
          - name: MYSQL_DB_PORT
            value: "3306"
          - name: MYSQL_DB_USER
            value: root
          - name: MYSQL_DB_PASSWORD
            value: password
        ports:
        - containerPort: 9080
        securityContext:
          runAsUser: 1000
EOF

kubectl apply -f ratings-mysql.yaml -n istio
部署了mysql版的ratings,是指了env变量。
cat <<EOF > envoyfilter-local-rate-limit-mysql-inside.yaml
apiVersion: networking.istio.io/v1alpha3
kind: EnvoyFilter
metadata:
  name: filter-local-ratelimit-svc
spec:
  workloadSelector:
    labels:
      app: mysqldb
      version: v1
  configPatches:
    - applyTo: NETWORK_FILTER
      match:
        listener:
          portNumber: 3306
          filterChain:
            filter:
              name: "envoy.filters.network.tcp_proxy"
      patch:
        operation: INSERT_BEFORE
        value:
          name: envoy.filters.network.local_ratelimit
          typed_config:
            "@type": type.googleapis.com/udpa.type.v1.TypedStruct
            type_url: type.googleapis.com/envoy.extensions.filters.network.local_ratelimit.v3.LocalRateLimit
            value:
              stat_prefix: tcp_local_rate_limiter
              token_bucket:
                max_tokens: 1
                tokens_per_fill: 1
                fill_interval: 60s
              runtime_enabled:
                runtime_key: tcp_rate_limit_enabled
                default_value: true
EOF

kubectl apply -f envoyfilter-local-rate-limit-mysql-inside.yaml -n istio
注意这里applyTo的是NETWORK_FILTER,因为mysql是tcp服务,不是http服务,filter的名字是envoy.filters.network.local_ratelimit,type_url也是固定的不要写错。token_bucket配置了访问限速的令牌数量及其填充速度。我们设置的filter在envoy.filters.network.tcp_proxy前面,所以是INSERT_BEFORE。
清理:
kubectl delete -f  mysql.yaml -n istio
kubectl delete -f ratings-mysql.yaml -n istio
kubectl delete envoyfilter filter-local-ratelimit-svc -n istio
1.2.2.1.1.2全局限流
略,还在研究,后续补上
1.2.2.1.2集群外服务限流
1.2.2.1.2.1本地限流
部署rating-v2
cat << EOF > bookinfo-ratings-v2-mysql-vm.yaml
apiVersion: apps/v1
kind: Deployment
metadata:
  name: ratings-v2-mysql-vm
  labels:
    app: ratings
    version: v2-mysql-vm
spec:
  replicas: 1
  selector:
    matchLabels:
      app: ratings
      version: v2-mysql-vm
  template:
    metadata:
      labels:
        app: ratings
        version: v2-mysql-vm
    spec:
      containers:
      - name: ratings
        image: docker.io/istio/examples-bookinfo-ratings-v2:1.16.2
        imagePullPolicy: IfNotPresent
        env:
          # This assumes you registered your mysql vm as
          # istioctl register -n vm mysqldb 1.2.3.4 3306
          - name: DB_TYPE
            value: "mysql"
          - name: MYSQL_DB_HOST
            value: mysql.vm.demo
          - name: MYSQL_DB_PORT
            value: "3306"
          - name: MYSQL_DB_USER
            value: root
          - name: MYSQL_DB_PASSWORD
            value: root
        ports:
        - containerPort: 9080
        securityContext:
          runAsUser: 1000
EOF


kubectl apply -f bookinfo-ratings-v2-mysql-vm.yaml -n istio
在vm上部署mysql,这个略过,有需要文档的同学,可以加我微信,因为有点复杂
创建serviceentry
cat << EOF > se-mysql.yaml
apiVersion: networking.istio.io/v1beta1
kind: ServiceEntry
metadata:
  name: mysql-se
spec:
  hosts:
  - mysql.vm.demo
  addresses:
  - 192.168.229.12
  location: MESH_INTERNAL
  ports:
  - number: 3306
    name: mysql
    protocol: TCP
    targetPort: 3306
  resolution: STATIC
  workloadSelector:
    labels:
      app: mysql
      type: vm
EOF

kubectl apply -f se-mysql.yaml -n vm
这里创建了一个访问我们部署的虚拟机服务mysql的serviceentry
coredns配置加上解析记录
apiVersion: v1
data:
  Corefile: |
    .:53 {
        errors
        health {
            lameduck 5s
        }
        hosts {
            192.168.229.11  httpd.vm.demo
            192.168.229.12  mysql.vm.demo
            fallthrough
        }
        ready
        kubernetes cluster.local in-addr.arpa ip6.arpa {
            pods insecure
            fallthrough in-addr.arpa ip6.arpa
            ttl 30
        }
        prometheus :9153
        forward . /etc/resolv.conf {
            max_concurrent 1000
        }
        cache 30
        reload
        loadbalance
    }
kind: ConfigMap
添加192.168.229.12 mysql.vm.demo这一段
重启coredns
kubectl rollout restart -n kube-system deployment coredns
执行压测
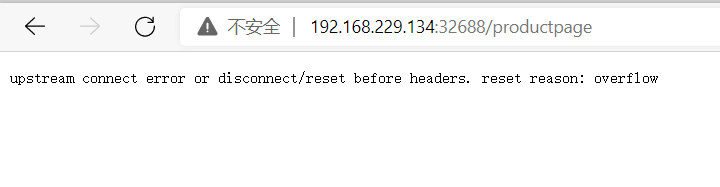
go-stress-testing -c 1 -n 10000 -u http://192.168.229.134:32688/productpage
[root@node01 ~]# go-stress-testing -c 1 -n 10000 -u  http://192.168.229.134:32688/productpage

 开始启动  并发数:1 请求数:10000 请求参数:
request:
 form:http
 url:http://192.168.229.134:32688/productpage
 method:GET
 headers:map[]
 data:
 verify:statusCode
 timeout:30s
 debug:false


─────┬───────┬───────┬───────┬────────┬────────┬────────┬────────┬────────┬────────┬────────
 耗时│ 并发数│ 成功数│ 失败数│   qps  │最长耗时│最短耗时│平均耗时│下载字节│字节每秒│ 错误码
─────┼───────┼───────┼───────┼────────┼────────┼────────┼────────┼────────┼────────┼────────
   1s│      1│     18│      0│   18.20│   91.36│   17.66│   54.94│  87,270│  87,264│200:18
   2s│      1│     37│      0│   19.11│   91.40│   13.13│   52.34│ 178,723│  89,351│200:37
   3s│      1│     54│      0│   18.42│   97.80│   13.13│   54.30│ 260,814│  86,928│200:54
   4s│      1│     72│      0│   18.22│   97.80│   13.13│   54.88│ 349,080│  87,258│200:72
   5s│      1│     90│      0│   18.17│  103.04│   12.98│   55.04│ 436,350│  87,264│200:90
   6s│      1│    111│      0│   18.59│  103.04│   12.98│   53.80│ 538,165│  89,686│200:111
   7s│      1│    132│      0│   18.91│  103.04│   12.98│   52.89│ 638,984│  91,279│200:132
   8s│      1│    150│      0│   18.88│  103.04│   12.30│   52.95│ 727,250│  90,905│200:150
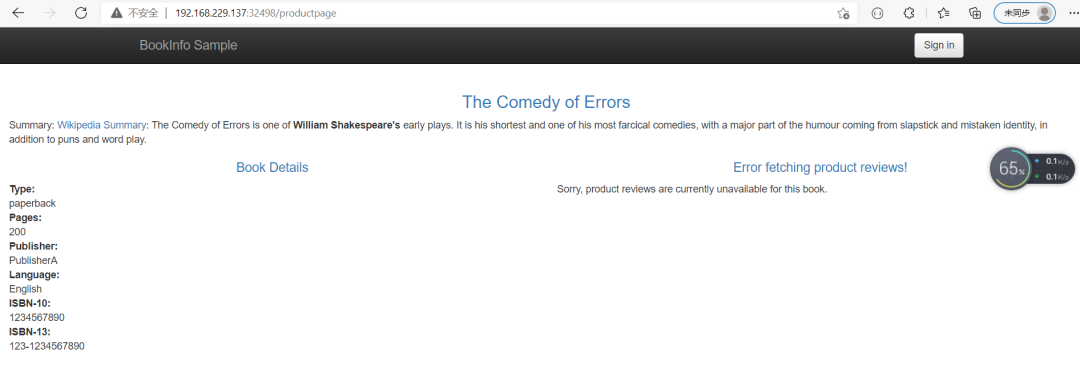
没有限流之前压测都是200的返回结果
cat <<EOF > envoyfilter-local-rate-limit-mysql-vm-outside.yaml
apiVersion: networking.istio.io/v1alpha3
kind: EnvoyFilter
metadata:
  name: filter-local-ratelimit-svc
spec:
  workloadSelector:
    labels:
      app: ratings
  configPatches:
    - applyTo: NETWORK_FILTER
      match:
        context: SIDECAR_OUTBOUND
        listener:
          portNumber: 3306
          filterChain:
            filter:
              name: "envoy.filters.network.tcp_proxy"
      patch:
        operation: INSERT_BEFORE
        value:
          name: envoy.filters.network.local_ratelimit
          typed_config:
            "@type": type.googleapis.com/udpa.type.v1.TypedStruct
            type_url: type.googleapis.com/envoy.extensions.filters.network.local_ratelimit.v3.LocalRateLimit
            value:
              stat_prefix: tcp_local_rate_limiter
              token_bucket:
                max_tokens: 10
                tokens_per_fill: 10
                fill_interval: 60s
              runtime_enabled:
                runtime_key: tcp_rate_limit_enabled
                default_value: true
EOF

kubectl apply -f envoyfilter-local-rate-limit-mysql-vm-outside.yaml -n istio
部署envoyfilter使限流生效,作用在ratings服务上面,而且是出口流量SIDECAR_OUTBOUND,network filter名称必须事envoy.filters.network.local_ratelimit,type _url也是固定的。token_bucket设置令牌桶。
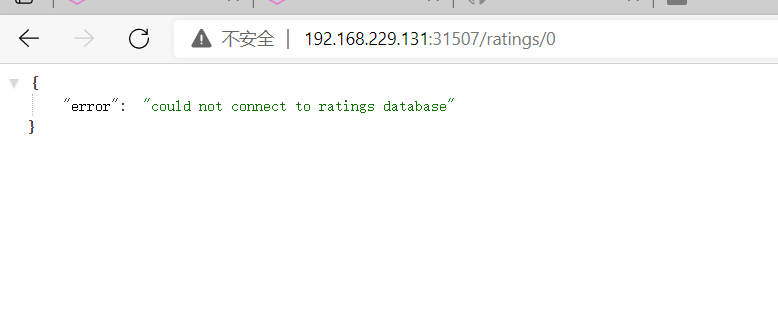
这里无法连接数据库,说明数据库被限流了,ratings无法连接vm mysql服务。
清理:
kubectl delete envoyfilter filter-local-ratelimit-svc -n istio
kubectl delete se mysql-se -n vm
1.2.2.1.2.2全局限流
略,还在研究,后续补上
1.2.2.2多集群
1.2.2.2.1集群准备
同上
1.2.2.2.2集群内本地限流
cluster1,cluster2部署mysql
cat << EOF > mysql.yaml
apiVersion: v1
kind: Secret
metadata:
  name: mysql-credentials
type: Opaque
data:
  rootpasswd: cGFzc3dvcmQ=
---
apiVersion: v1
kind: Service
metadata:
  name: mysqldb
  labels:
    app: mysqldb
    service: mysqldb
spec:
  ports:
  - port: 3306
    name: tcp
  selector:
    app: mysqldb
---
apiVersion: apps/v1
kind: Deployment
metadata:
  name: mysqldb-v1
  labels:
    app: mysqldb
    version: v1
spec:
  replicas: 1
  selector:
    matchLabels:
      app: mysqldb
      version: v1
  template:
    metadata:
      labels:
        app: mysqldb
        version: v1
    spec:
      containers:
      - name: mysqldb
        image: docker.io/istio/examples-bookinfo-mysqldb:1.16.2
        imagePullPolicy: IfNotPresent
        ports:
        - containerPort: 3306
        env:
          - name: MYSQL_ROOT_PASSWORD
            valueFrom:
              secretKeyRef:
                name: mysql-credentials
                key: rootpasswd
        args: ["--default-authentication-plugin","mysql_native_password"]
        volumeMounts:
        - name: var-lib-mysql
          mountPath: /var/lib/mysql
      volumes:
      - name: var-lib-mysql
        emptyDir: {}
EOF

kubectl apply -f mysql.yaml -n istio
说明:部署了mysql服务,ratings获取数据时会请求这个服务
cluster1,cluster2部署mysql版ratings
cat << EOF > ratings-mysql.yaml
apiVersion: apps/v1
kind: Deployment
metadata:
  name: ratings-v2-mysql
  labels:
    app: ratings
    version: v2-mysql
spec:
  replicas: 1
  selector:
    matchLabels:
      app: ratings
      version: v2-mysql
  template:
    metadata:
      labels:
        app: ratings
        version: v2-mysql
    spec:
      containers:
      - name: ratings
        image: docker.io/istio/examples-bookinfo-ratings-v2:1.16.2
        imagePullPolicy: IfNotPresent
        env:
          # ratings-v2 will use mongodb as the default db backend.
          # if you would like to use mysqldb then you can use this file
          # which sets DB_TYPE = 'mysql' and the rest of the parameters shown
          # here and also create the # mysqldb service using bookinfo-mysql.yaml
          # NOTE: This file is mutually exclusive to bookinfo-ratings-v2.yaml
          - name: DB_TYPE
            value: "mysql"
          - name: MYSQL_DB_HOST
            value: mysqldb
          - name: MYSQL_DB_PORT
            value: "3306"
          - name: MYSQL_DB_USER
            value: root
          - name: MYSQL_DB_PASSWORD
            value: password
        ports:
        - containerPort: 9080
        securityContext:
          runAsUser: 1000
EOF

kubectl apply -f ratings-mysql.yaml -n istio
部署了mysql版的ratings,是指了env变量。
cat <<EOF > envoyfilter-local-rate-limit-mysql-inside.yaml
apiVersion: networking.istio.io/v1alpha3
kind: EnvoyFilter
metadata:
  name: filter-local-ratelimit-svc
spec:
  workloadSelector:
    labels:
      app: mysqldb
      version: v1
  configPatches:
    - applyTo: NETWORK_FILTER
      match:
        listener:
          portNumber: 3306
          filterChain:
            filter:
              name: "envoy.filters.network.tcp_proxy"
      patch:
        operation: INSERT_BEFORE
        value:
          name: envoy.filters.network.local_ratelimit
          typed_config:
            "@type": type.googleapis.com/udpa.type.v1.TypedStruct
            type_url: type.googleapis.com/envoy.extensions.filters.network.local_ratelimit.v3.LocalRateLimit
            value:
              stat_prefix: tcp_local_rate_limiter
              token_bucket:
                max_tokens: 1
                tokens_per_fill: 1
                fill_interval: 60s
              runtime_enabled:
                runtime_key: tcp_rate_limit_enabled
                default_value: true
EOF

cluster1,cluster2:
kubectl apply -f envoyfilter-local-rate-limit-mysql-inside.yaml -n istio
注意这里applyTo的是NETWORK_FILTER,因为mysql是tcp服务,不是http服务,filter的名字是envoy.filters.network.local_ratelimit,type_url也是固定的不要写错。token_bucket配置了访问限速的令牌数量及其填充速度。我们设置的filter在envoy.filters.network.tcp_proxy前面,所以是INSERT_BEFORE。
多集群集群内本地限流,需要在每个istiod里面增加ratelimit配置
清理:
kubectl delete envoyfilter filter-local-ratelimit-svc -n istio
2熔断
2.1什么是熔断
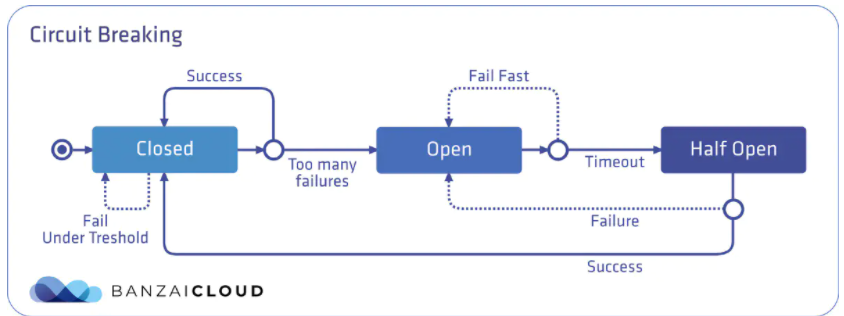
熔断机制其实是参考了我们日常生活中的保险丝的保护机制,当电路超负荷运行时,保险丝会自动的断开,从而保证电路中的电器不受损害。而服务治理中的熔断机制,指的是在发起服务调用的时候,如果被调用方返回的错误率超过一定的阈值,那么后续的请求将不会真正发起请求,而是在调用方直接返回错误 ,这时服务就降级了,熔断器处于半开放状态,上游服务收到保护,当过了一段时间开关就会闭上,如果请求正常了,就取消熔断,如果这时还有错误,就继续熔断。常用的熔断工具,比较著名的有spring cloud的hystrix,还有就是今天的主角,不侵入代码的istio熔断机制。
2.2实操
2.2.1单集群
2.2.1.1集群内服务熔断
cat << EOF > dr-productpage-outlierDetection.yaml
apiVersion: networking.istio.io/v1beta1
kind: DestinationRule
metadata:
  name: productpage
spec:
  host: productpage.istio.svc.cluster.local
  subsets:
  - name: v1
    labels:
      version: v1
  trafficPolicy:
    connectionPool:
      tcp:
        maxConnections: 1
        connectTimeout: 30ms
      http:
        maxRequestsPerConnection: 1
        http1MaxPendingRequests: 1
    outlierDetection:
      consecutive5xxErrors: 1
      interval: 5s
      baseEjectionTime: 5s
      maxEjectionPercent: 100
      #minHealthPercent: 0
EOF

kubectl apply -f dr-productpage-outlierDetection.yaml  -n istio
熔断是通过dr进行配置的,需要配置connectionPool和outlierDetection,connectionPool用来配置连接池,可以配tcp和http。这里我们配置了每秒tcp的连接最大值是1个,连接超时时间是30毫秒;http每个连接的请求最大是1个,等待队列的http1.1版本请求最大值是1个。consecutive5xxErrors表示连续的错误数两,interval表示检测间隔,baseEjectionTime表示发生熔断后熔断多少时间,maxEjectionPercent表示最大可熔断端点百分比。
压测:
[root@node01 45]# go-stress-testing -c 10 -n 10000 -u http://192.168.229.134:32688/productpage

 开始启动  并发数:10 请求数:10000 请求参数:
request:
 form:http
 url:http://192.168.229.134:32688/productpage
 method:GET
 headers:map[]
 data:
 verify:statusCode
 timeout:30s
 debug:false


─────┬───────┬───────┬───────┬────────┬────────┬────────┬────────┬────────┬────────┬────────
 耗时│ 并发数│ 成功数│ 失败数│   qps  │最长耗时│最短耗时│平均耗时│下载字节│字节每秒│ 错误码
─────┼───────┼───────┼───────┼────────┼────────┼────────┼────────┼────────┼────────┼────────
   1s│      8│      0│    768│    0.00│   30.69│    1.66│    0.00│  62,208│  62,143│503:768
   2s│     10│      2│   1276│    1.53│ 1345.12│    1.66│ 6520.36│ 113,714│  56,593│200:2;503:1276
   3s│     10│      4│   1632│    1.69│ 2322.02│    1.66│ 5913.51│ 150,916│  50,174│200:4;503:1632
   4s│     10│      4│   2030│    1.33│ 2322.02│    1.66│ 7520.60│ 183,154│  45,782│200:4;503:2030
   5s│     10│     19│   2505│    4.48│ 2709.81│    1.32│ 2233.79│ 294,354│  58,868│200:19;503:2505
   6s│     10│     39│   3059│    7.64│ 2709.81│    1.32│ 1308.43│ 436,860│  72,792│200:39;503:3059
压测报了大量503错误,具体原因是overflow,说明断路器生效了。
2.2.1.2集群外服务熔断
部署rating-v2
cat << EOF > bookinfo-ratings-v2-mysql-vm.yaml
apiVersion: apps/v1
kind: Deployment
metadata:
  name: ratings-v2-mysql-vm
  labels:
    app: ratings
    version: v2-mysql-vm
spec:
  replicas: 1
  selector:
    matchLabels:
      app: ratings
      version: v2-mysql-vm
  template:
    metadata:
      labels:
        app: ratings
        version: v2-mysql-vm
    spec:
      containers:
      - name: ratings
        image: docker.io/istio/examples-bookinfo-ratings-v2:1.16.2
        imagePullPolicy: IfNotPresent
        env:
          # This assumes you registered your mysql vm as
          # istioctl register -n vm mysqldb 1.2.3.4 3306
          - name: DB_TYPE
            value: "mysql"
          - name: MYSQL_DB_HOST
            value: mysql.vm.demo
          - name: MYSQL_DB_PORT
            value: "3306"
          - name: MYSQL_DB_USER
            value: root
          - name: MYSQL_DB_PASSWORD
            value: root
        ports:
        - containerPort: 9080
        securityContext:
          runAsUser: 1000
EOF


kubectl apply -f bookinfo-ratings-v2-mysql-vm.yaml -n istio
在vm上部署mysql,这个略过,有需要文档的同学,可以加我微信,因为有点复杂
cat << EOF > se-mysql.yaml
apiVersion: networking.istio.io/v1beta1
kind: ServiceEntry
metadata:
  name: mysql-se
spec:
  hosts:
  - mysql.vm.demo
  addresses:
  - 192.168.229.12
  location: MESH_INTERNAL
  ports:
  - number: 3306
    name: mysql
    protocol: TCP
    targetPort: 3306
  resolution: STATIC
  workloadSelector:
    labels:
      app: mysql
      type: vm
EOF

kubectl apply -f se-mysql.yaml -n vm
创建了连接vm mysql的serviceentry
cat << EOF > dr-mysql-outlierDetection.yaml
apiVersion: networking.istio.io/v1beta1
kind: DestinationRule
metadata:
  name: mysql
spec:
  host: mysql.vm.demo
  trafficPolicy:
    connectionPool:
      tcp:
        maxConnections: 1
        connectTimeout: 30ms
      http:
        maxRequestsPerConnection: 1
        http1MaxPendingRequests: 1
    outlierDetection:
      consecutive5xxErrors: 1
      interval: 5s
      baseEjectionTime: 5s
      maxEjectionPercent: 100
      #minHealthPercent: 0
EOF

kubectl apply -f dr-mysql-outlierDetection.yaml  -n vm
熔断是通过dr进行配置的,需要配置connectionPool和outlierDetection,connectionPool用来配置连接池,可以配tcp和http。这里我们配置了每秒tcp的连接最大值是1个,连接超时时间是30毫秒;http每个连接的请求最大是1个,等待队列的http1.1版本请求最大值是1个。consecutive5xxErrors表示连续的错误数两,interval表示检测间隔,baseEjectionTime表示发生熔断后熔断多少时间,maxEjectionPercent表示最大可熔断端点百分比。
注意这里的host是serviceentry的host mysql.vm.demo
开启压测:
go-stress-testing -c 10 -n 100000 -u http://192.168.229.134:32688/ratings/0
访问url:

开启压测后发生熔断,然后请求也面提示连不上db,所以熔断成功
2.2.2多集群
2.2.2.1集群准备
同上
2.2.2.2集群内服务熔断
cat << EOF > dr-productpage-outlierDetection.yaml
apiVersion: networking.istio.io/v1beta1
kind: DestinationRule
metadata:
  name: productpage
spec:
  host: productpage.istio.svc.cluster.local
  subsets:
  - name: v1
    labels:
      version: v1
  trafficPolicy:
    connectionPool:
      tcp:
        maxConnections: 1
        connectTimeout: 30ms
      http:
        maxRequestsPerConnection: 1
        http1MaxPendingRequests: 1
    outlierDetection:
      consecutive5xxErrors: 1
      interval: 5s
      baseEjectionTime: 5s
      maxEjectionPercent: 100
      #minHealthPercent: 0
EOF

cluster1,cluster2:
kubectl apply -f dr-productpage-outlierDetection.yaml  -n istio
熔断是通过dr进行配置的,需要配置connectionPool和outlierDetection,connectionPool用来配置连接池,可以配tcp和http。这里我们配置了每秒tcp的连接最大值是1个,连接超时时间是30毫秒;http每个连接的请求最大是1个,等待队列的http1.1版本请求最大值是1个。consecutive5xxErrors表示连续的错误数两,interval表示检测间隔,baseEjectionTime表示发生熔断后熔断多少时间,maxEjectionPercent表示最大可熔断端点百分比。
压测:
[root@node01 45]# go-stress-testing -c 10 -n 10000 -u http://192.168.229.128:30363/productpage

 开始启动  并发数:10 请求数:10000 请求参数:
request:
 form:http
 url:http://192.168.229.128:30363/productpage
 method:GET
 headers:map[]
 data:
 verify:statusCode
 timeout:30s
 debug:false


─────┬───────┬───────┬───────┬────────┬────────┬────────┬────────┬────────┬────────┬────────
 耗时│ 并发数│ 成功数│ 失败数│   qps  │最长耗时│最短耗时│平均耗时│下载字节│字节每秒│ 错误码
─────┼───────┼───────┼───────┼────────┼────────┼────────┼────────┼────────┼────────┼────────
   1s│     10│      7│   1083│    7.38│  490.79│    2.09│ 1354.15│ 122,988│ 122,961│200:7;503:1083
   2s│     10│     21│   2241│   10.89│  490.79│    1.91│  918.42│ 284,332│ 142,157│200:21;503:2241
   3s│     10│     39│   3217│   13.42│  490.79│    1.91│  744.99│ 450,662│ 150,208│200:39;503:3217
   4s│     10│     58│   4347│   14.94│  490.79│    1.91│  669.23│ 633,637│ 158,408│200:58;503:4347
   5s│     10│     79│   5375│   16.33│  490.79│    1.10│  612.23│ 818,724│ 163,742│200:79;503:5375
   6s│     10│     97│   6362│   16.69│  490.79│    1.10│  599.28│ 985,941│ 164,308│200:97;503:6362
   7s│     10│    116│   7448│   17.09│  490.79│    1.10│  585.19│1,166,356│ 166,621│200:116;503:7448
   8s│     10│    134│   8286│   17.22│  490.79│    1.10│  580.85│1,321,508│ 165,000│200:134;503:8286
   9s│     10│    153│   9369│   17.48│  490.79│    1.10│  572.11│1,501,680│ 166,847│200:153;503:9369
  10s│     10│    176│  10547│   18.10│  490.79│    1.10│  552.58│1,709,275│ 170,924│200:176;503:10547
  11s│     10│    199│  11712│   18.59│  490.79│    1.10│  537.83│1,914,817│ 174,072│200:199;503:11712
  12s│     10│    219│  12884│   18.75│  490.79│    1.10│  533.27│2,106,389│ 175,526│200:219;503:12884
  13s│     10│    240│  14001│   19.01│  490.79│    1.10│  526.11│2,297,677│ 176,737│200:240;503:14001
  14s│     10│    263│  14381│   19.45│  490.79│    1.10│  514.11│2,440,638│ 174,329│200:263;503:14381
  15s│     10│    287│  14702│   19.91│  490.79│    1.10│  502.33│2,582,995│ 172,187│200:287;503:14702
  16s│     10│    312│  15019│   20.39│  490.79│    1.10│  490.48│2,729,215│ 170,544│200:312;503:15019
  17s│     10│    333│  15268│   20.57│  490.79│    1.10│  486.03│2,852,199│ 167,751│200:333;503:15268
  18s│     10│    358│  15574│   20.97│  490.79│    1.10│  476.86│2,999,524│ 166,621│200:358;503:15574
多集群熔断和单集群差不多,区别是每个istiod都需要配置限流规则
3跨地域负载均衡
3.1什么是跨地域负载均衡
跨地域负载均衡是指将应用部署在多个istio集群中,这些istio集群成为一个联邦,并且在不同的地域上。同样的服务在多个istio集群中名称空间一样服务名称一样,这样就是1个cluster,就可以对这些服务配置负载均衡策略,就像在同一个集群中负载均衡一样。
3.2实操
3.2.1准备工作

部署istio联邦,这里不多介绍,想了解的去看我之前的文章
三个网络联通
集群1
137,138,139
集群2
140,141,142
集群3
143,144,145

网络联通
137,138,139
route add -net 172.21.2.0 netmask 255.255.255.0 gw 192.168.229.142
route add -net 172.21.0.0 netmask 255.255.255.0 gw 192.168.229.141
route add -net 172.21.1.0 netmask 255.255.255.0 gw 192.168.229.140

route add -net 172.22.2.0 netmask 255.255.255.0 gw 192.168.229.145
route add -net 172.22.0.0 netmask 255.255.255.0 gw 192.168.229.144
route add -net 172.22.1.0 netmask 255.255.255.0 gw 192.168.229.143

route add -net 10.70.0.0 netmask 255.255.0.0 gw 192.168.229.143
route add -net 10.69.0.0 netmask 255.255.0.0 gw 192.168.229.140

140,141,142
route add -net 172.20.2.0 netmask 255.255.255.0 gw 192.168.229.139
route add -net 172.20.0.0 netmask 255.255.255.0 gw 192.168.229.138
route add -net 172.20.1.0 netmask 255.255.255.0 gw 192.168.229.137

route add -net 172.22.2.0 netmask 255.255.255.0 gw 192.168.229.145
route add -net 172.22.0.0 netmask 255.255.255.0 gw 192.168.229.144
route add -net 172.22.1.0 netmask 255.255.255.0 gw 192.168.229.143

route add -net 10.70.0.0 netmask 255.255.0.0 gw 192.168.229.143
route add -net 10.68.0.0 netmask 255.255.0.0 gw 192.168.229.137


143,144,145
route add -net 172.21.2.0 netmask 255.255.255.0 gw 192.168.229.142
route add -net 172.21.0.0 netmask 255.255.255.0 gw 192.168.229.141
route add -net 172.21.1.0 netmask 255.255.255.0 gw 192.168.229.140

route add -net 172.20.2.0 netmask 255.255.255.0 gw 192.168.229.139
route add -net 172.20.0.0 netmask 255.255.255.0 gw 192.168.229.138
route add -net 172.20.1.0 netmask 255.255.255.0 gw 192.168.229.137

route add -net 10.69.0.0 netmask 255.255.0.0 gw 192.168.229.140
route add -net 10.68.0.0 netmask 255.255.0.0 gw 192.168.229.137


cluster1:
生成istio operator部署文件
 cat <<EOF > cluster1.yaml
apiVersion: install.istio.io/v1alpha1
kind: IstioOperator
spec:
  profile: demo
  values:
    global:
      meshID: mesh1
      multiCluster:
        clusterName: cluster1
      network: network1
  meshConfig:
    accessLogFile: /dev/stdout
    enableTracing: true
  components:
    egressGateways:
    - name: istio-egressgateway
      enabled: true
EOF

这里我设置的cluster1东西向网关的ip试192.168.229.100
如果用的是loadblance,可以用下面命令获取
#  export DISCOVERY_ADDRESS=$(kubectl  -n istio-system get svc istio-eastwestgateway  -o jsonpath='{.status.loadBalancer.ingress[0].ip}')
然后替换remotePilotAddress

生成istio operator部署文件
cat <<EOF > cluster2.yaml
apiVersion: install.istio.io/v1alpha1
kind: IstioOperator
spec:
  profile: demo
  values:
    global:
      meshID: mesh1
      multiCluster:
        clusterName: cluster2
      network: network1
      remotePilotAddress: 192.168.229.100
  meshConfig:
    accessLogFile: /dev/stdout
    enableTracing: true
  components:
    egressGateways:
    - name: istio-egressgateway
      enabled: true
EOF

传输部署文件到cluster2
scp cluster2.yaml root@192.168.229.140:/root


这里我设置的cluster1东西向网关的ip试192.168.229.100
如果用的是loadblance,可以用下面命令获取
#  export DISCOVERY_ADDRESS=$(kubectl  -n istio-system get svc istio-eastwestgateway  -o jsonpath='{.status.loadBalancer.ingress[0].ip}')
然后替换remotePilotAddress

生成istio operator部署文件
cat <<EOF > cluster3.yaml
apiVersion: install.istio.io/v1alpha1
kind: IstioOperator
spec:
  profile: demo
  values:
    global:
      meshID: mesh1
      multiCluster:
        clusterName: cluster3
      network: network1
      remotePilotAddress: 192.168.229.100
  meshConfig:
    accessLogFile: /dev/stdout
    enableTracing: true
  components:
    egressGateways:
    - name: istio-egressgateway
      enabled: true
EOF

传输部署文件到cluster3
scp cluster3.yaml root@192.168.229.143:/root


部署istio
istioctl install -f cluster1.yaml

生成东西向网关
 /root/istio-1.11.2/samples/multicluster/gen-eastwest-gateway.sh --mesh mesh1 --cluster cluster1 --network network1 |  istioctl  install  -y -f -


配置东西向网关ip
 kubectl patch svc  -n istio-system istio-eastwestgateway -p '{"spec":{"externalIPs":["192.168.229.100"]}}'

  暴露istiod
  kubectl apply  -n istio-system -f  /root/istio-1.11.2/samples/multicluster/expose-istiod.yaml


 cluster2:
 生成访问apiserver secret
 istioctl x create-remote-secret --name=cluster2  --server=https://192.168.229.140:6443 > remote-secret-cluster2.yaml

 传输secret到cluster1
 scp remote-secret-cluster2.yaml root@192.168.229.137:/root


 cluster3:
 生成访问apiserver secret
 istioctl x create-remote-secret --name=cluster3  --server=https://192.168.229.143:6443 > remote-secret-cluster3.yaml

 传输secret到cluster1
 scp remote-secret-cluster3.yaml root@192.168.229.137:/root

 cluster1
 应用secret
  kubectl apply -f remote-secret-cluster2.yaml
   kubectl apply -f remote-secret-cluster3.yaml


 cluster2:
 部署istio
 istioctl install  -f cluster2.yaml

 cluster3:
 部署istio
 istioctl install  -f cluster3.yaml

 cluster1:
 重启pod
 kubectl rollout restart deploy -n istio
 kubectl rollout restart deploy -n istio-system

 cluster2:
 重启pod
 kubectl rollout restart deploy -n istio
 kubectl rollout restart deploy -n istio-system

 cluster3:
 重启pod
 kubectl rollout restart deploy -n istio
 kubectl rollout restart deploy -n istio-system
清理:
cluster1:

kubectl delete secret istio-remote-secret-cluster2 -n istio-system
kubectl delete secret istio-remote-secret-cluster3 -n istio-system
kubectl delete vs istiod-vs -n istio-system
kubectl delete gw istiod-gateway -n istio-system
istioctl x uninstall -f cluster1.yaml

reboot


cluster2:

istioctl x uninstall -f cluster2.yaml

reboot


cluster3:

istioctl x uninstall -f cluster3.yaml

reboot
给多集群打标签
failure-domain.beta.kubernetes.io/region=us-east-1
failure-domain.beta.kubernetes.io/zone=us-east-1c
topology.kubernetes.io/region
topology.kubernetes.io/zone
topology.istio.io/subzone`
地域由如下三元组在网格中定义了地理位置:
Region Zone Sub-zone
cluster1
137,138,139
kubectl label node 192.168.229.137 topology.kubernetes.io/region=us-central1 --overwrite
kubectl label node 192.168.229.137 topology.kubernetes.io/zone=z1 --overwrite
kubectl label node 192.168.229.137 topology.istio.io/subzone=sz01 --overwrite

kubectl label node 192.168.229.138 topology.kubernetes.io/region=us-central1 --overwrite
kubectl label node 192.168.229.138 topology.kubernetes.io/zone=z1 --overwrite
kubectl label node 192.168.229.138 topology.istio.io/subzone=sz01 --overwrite

kubectl label node 192.168.229.139 topology.kubernetes.io/region=us-central1 --overwrite
kubectl label node 192.168.229.139 topology.kubernetes.io/zone=z1 --overwrite
kubectl label node 192.168.229.139 topology.istio.io/subzone=sz01 --overwrite

cluster2
140,141,142
kubectl label node 192.168.229.140 topology.kubernetes.io/region=us-central2 --overwrite
kubectl label node 192.168.229.140 topology.kubernetes.io/zone=z2 --overwrite
kubectl label node 192.168.229.140 topology.istio.io/subzone=sz02 --overwrite

kubectl label node 192.168.229.141 topology.kubernetes.io/region=us-central2 --overwrite
kubectl label node 192.168.229.141 topology.kubernetes.io/zone=z2 --overwrite
kubectl label node 192.168.229.141 topology.istio.io/subzone=sz02 --overwrite

kubectl label node 192.168.229.142 topology.kubernetes.io/region=us-central2 --overwrite
kubectl label node 192.168.229.142 topology.kubernetes.io/zone=z2 --overwrite
kubectl label node 192.168.229.142 topology.istio.io/subzone=sz02 --overwrite

cluster3
143,144,145
kubectl label node 192.168.229.143 topology.kubernetes.io/region=us-central3 --overwrite
kubectl label node 192.168.229.143 topology.kubernetes.io/zone=z3 --overwrite
kubectl label node 192.168.229.143 topology.istio.io/subzone=sz03 --overwrite

kubectl label node 192.168.229.144 topology.kubernetes.io/region=us-central3 --overwrite
kubectl label node 192.168.229.144 topology.kubernetes.io/zone=z3 --overwrite
kubectl label node 192.168.229.144 topology.istio.io/subzone=sz03 --overwrite

kubectl label node 192.168.229.145 topology.kubernetes.io/region=us-central3 --overwrite
kubectl label node 192.168.229.145 topology.kubernetes.io/zone=z3 --overwrite
kubectl label node 192.168.229.145 topology.istio.io/subzone=sz03 --overwrite


显示标签
cluster1
[root@node01 twonetwork]# kubectl get node --show-labels
NAME              STATUS                     ROLES    AGE   VERSION   LABELS
192.168.229.137   Ready                      master   23h   v1.21.0   beta.kubernetes.io/arch=amd64,beta.kubernetes.io/os=linux,kubernetes.io/arch=amd64,kubernetes.io/hostname=192.168.229.137,kubernetes.io/os=linux,kubernetes.io/region=us-central1,kubernetes.io/role=master,topology.istio.io/subzone=sz01,topology.kubernetes.io/zone=z1
192.168.229.138   Ready,SchedulingDisabled   master   23h   v1.21.0   beta.kubernetes.io/arch=amd64,beta.kubernetes.io/os=linux,kubernetes.io/arch=amd64,kubernetes.io/hostname=192.168.229.138,kubernetes.io/os=linux,kubernetes.io/region=us-central1,kubernetes.io/role=master,topology.istio.io/subzone=sz01,topology.kubernetes.io/zone=z1
192.168.229.139   Ready                      node     23h   v1.21.0   beta.kubernetes.io/arch=amd64,beta.kubernetes.io/os=linux,kubernetes.io/arch=amd64,kubernetes.io/hostname=192.168.229.139,kubernetes.io/os=linux,kubernetes.io/region=us-central1,kubernetes.io/role=node,topology.istio.io/subzone=sz01,topology.kubernetes.io/zone=z1

cluster2
[root@node01 ~]# kubectl get node --show-labels
NAME              STATUS   ROLES    AGE   VERSION   LABELS
192.168.229.140   Ready    master   47h   v1.21.0   beta.kubernetes.io/arch=amd64,beta.kubernetes.io/os=linux,kubernetes.io/arch=amd64,kubernetes.io/hostname=192.168.229.140,kubernetes.io/os=linux,kubernetes.io/region=us-central2,kubernetes.io/role=master,topology.istio.io/subzone=sz02,topology.kubernetes.io/zone=z2
192.168.229.141   Ready    master   47h   v1.21.0   beta.kubernetes.io/arch=amd64,beta.kubernetes.io/os=linux,kubernetes.io/arch=amd64,kubernetes.io/hostname=192.168.229.141,kubernetes.io/os=linux,kubernetes.io/region=us-central2,kubernetes.io/role=master,topology.istio.io/subzone=sz02,topology.kubernetes.io/zone=z2
192.168.229.142   Ready    node     47h   v1.21.0   beta.kubernetes.io/arch=amd64,beta.kubernetes.io/os=linux,kubernetes.io/arch=amd64,kubernetes.io/hostname=192.168.229.142,kubernetes.io/os=linux,kubernetes.io/region=us-central2,kubernetes.io/role=node,topology.istio.io/subzone=sz02,topology.kubernetes.io/zone=z2

cluster3
[root@node01 ~]# kubectl get node --show-labels
NAME              STATUS   ROLES    AGE   VERSION   LABELS
192.168.229.143   Ready    master   47h   v1.21.0   beta.kubernetes.io/arch=amd64,beta.kubernetes.io/os=linux,kubernetes.io/arch=amd64,kubernetes.io/hostname=192.168.229.143,kubernetes.io/os=linux,kubernetes.io/region=us-central3,kubernetes.io/role=master,topology.istio.io/subzone=sz03,topology.kubernetes.io/zone=z3
192.168.229.144   Ready    master   47h   v1.21.0   beta.kubernetes.io/arch=amd64,beta.kubernetes.io/os=linux,kubernetes.io/arch=amd64,kubernetes.io/hostname=192.168.229.144,kubernetes.io/os=linux,kubernetes.io/region=us-central3,kubernetes.io/role=master,topology.istio.io/subzone=sz03,topology.kubernetes.io/zone=z3
192.168.229.145   Ready    node     47h   v1.21.0   beta.kubernetes.io/arch=amd64,beta.kubernetes.io/os=linux,kubernetes.io/arch=amd64,kubernetes.io/hostname=192.168.229.145,kubernetes.io/os=linux,kubernetes.io/region=us-central3,kubernetes.io/role=node,topology.istio.io/subzone=sz03,topology.kubernetes.io/zone=z3
3.2.2集群内服务跨地域负载均衡
cat << EOF > dr-productpage-distribute-inside.yaml
apiVersion: networking.istio.io/v1alpha3
kind: DestinationRule
metadata:
  name: productpage
spec:
  host: productpage.istio.svc.cluster.local
  subsets:
  - name: v1
    labels:
      version: v1
  trafficPolicy:
    loadBalancer:
      localityLbSetting:
        enabled: true
        distribute:
        - from: "us-central1/z1/*"
          to:
            "us-central3/z3/*": 100
        - from: "us-central2/z2/*"
          to:
            "us-central3/z3/*": 10
            "us-central1/z1/*": 90
        - from: "us-central3/z3/*"
          to:
            "us-central1/z1/*": 10
            "us-central2/z2/*": 10
            "us-central3/z3/*": 80
    outlierDetection:
      consecutive5xxErrors: 1
      interval: 5m
      baseEjectionTime: 15m
EOF

kubectl apply -f  dr-productpage-distribute-inside.yaml -n istio
这里创建了productpage的dr,localityLbSetting表示使用按地理位置的负载均衡。enabled设置为true表示启用。distribute用来配置负载分布规则。from是连接productpage这个微服务的downstream所在的区域信息,to表示upstream的区域信息。*表示任意。这里我们配置了三条规则,分别是当流量来自us-central1/z1/*, 连接到us-central3/z3/* productpage实例百分百的流量;当请求来自us-central2/z2/*,10%连接us-central3/z3/* ,90% 连接us-central1/z1/*;当请求来自us-central3/z3/*,10%连接us-central1/z1/*上的实例,10%连接us-central2/z2/*上的实例,80%连接us-central3/z3/*上的实例。
cluster1:
只有集群三的endpoint了
[root@node01 45]# istioctl pc endpoint -n istio-system istio-ingressgateway-949f94c95-6rg7k |grep productpage
172.22.1.237:9080                HEALTHY     OK                outbound|9080|v1|productpage.istio.svc.cluster.local
172.22.1.237:9080                HEALTHY     OK                outbound|9080||productpage.istio.svc.cluster.local
打开三个集群productpage的日志
cluster1:访问:http://192.168.229.137:32498/productpage
cluster1:
kubectl logs -f -n istio productpage-v1-764d799766-rdlj9
没有日志
cluster2:
kubectl logs -f -n istio productpage-v1-6b746f74dc-v9fv9
没有日志
cluster3:
kubectl logs -f -n istio productpage-v1-6b746f74dc-d5xfm
有日志
规则1生效
cluster2:访问:http://192.168.229.143:32050/productpage
cluster1:
kubectl logs -f -n istio productpage-v1-764d799766-rdlj9
有日志
cluster2:
kubectl logs -f -n istio productpage-v1-6b746f74dc-v9fv9
有日志
cluster3:
kubectl logs -f -n istio productpage-v1-6b746f74dc-d5xfm
有日志
规则3生效
清理:
kubectl delete dr productpage -n istio
3.2.3集群外服务跨地域负载均衡
3.2.3.1部署两个httpd服务的vm
比较复杂,有需要的同学可以加我微信联系我,略
3.2.3.1实操
kubectl apply -f se-httpd.yaml -n vm-httpd
cat << EOF > se-httpd.yaml
apiVersion: networking.istio.io/v1beta1
kind: ServiceEntry
metadata:
  name: httpd-se
spec:
  hosts:
  - httpd.vm.demo
  addresses:
  - 192.168.229.11
  location: MESH_INTERNAL
  ports:
  - number: 80
    name: http-httpd
    protocol: TCP
    targetPort: 80
  resolution: STATIC
  workloadSelector:
    labels:
      app: httpd
      type: vm
EOF


kubectl apply -f se-httpd.yaml -n vm-httpd
创建访问虚拟机服务的serviceentry
cat << EOF > dr-httpd-distribute-outside.yaml
apiVersion: networking.istio.io/v1alpha3
kind: DestinationRule
metadata:
  name: httpd
spec:
  host: httpd.vm.demo
  trafficPolicy:
    loadBalancer:
      localityLbSetting:
        enabled: true
        distribute:
        - from: "us-central1/z1/*"
          to:
            "us-central2/z2/*": 100
        - from: "us-central2/z2/*"
          to:
            "us-central2/z2/*": 10
            "us-central1/z1/*": 90
    outlierDetection:
      consecutive5xxErrors: 1
      interval: 5m
      baseEjectionTime: 15m
EOF

kubectl apply -f  dr-httpd-distribute-outside.yaml -n istio
这里创建了productpage的dr,localityLbSetting表示使用按地理位置的负载均衡。enabled设置为true表示启用。distribute用来配置负载分布规则。from是连接productpage这个微服务的downstream所在的区域信息,to表示upstream的区域信息。*表示任意。这里我们配置了三条规则.
进入ratings容器,访问httpd.vm.demo
[root@node01 locality]# kubectl exec -it -n istio ratings-v1-fbdbfdc5b-dbz9g -- /bin/bash
node@ratings-v1-fbdbfdc5b-dbz9g:/opt/microservices$ curl httpd.vm.demo
146 welcome
node@ratings-v1-fbdbfdc5b-dbz9g:/opt/microservices$ curl httpd.vm.demo
147 welcome
node@ratings-v1-fbdbfdc5b-dbz9g:/opt/microservices$ curl httpd.vm.demo
147 welcome
node@ratings-v1-fbdbfdc5b-dbz9g:/opt/microservices$ curl httpd.vm.demo
146 welcome
node@ratings-v1-fbdbfdc5b-dbz9g:/opt/microservices$ curl httpd.vm.demo
147 welcome
node@ratings-v1-fbdbfdc5b-dbz9g:/opt/microservices$ curl httpd.vm.demo
146 welcome
4跨地域failover
4.1什么是跨地域failover
istio微服务部署在多个数据中心中,这些数据中心可能在不同地域,当某一地istio集群挂掉时自动将流量切换至另一地,这就是跨地域failover。跨地域failover主要用来容灾,如地震等因数导致的某地服务局部不可用或整体不可用。我这里介绍的failover包括集群内的服务的failover,还有就是集群外的服务的failover。可以对集群外服务标注locolity属性,来实现failover。
4.2实操
4.2.1集群内服务failover
cat << EOF > dr-productpage-failover.yaml
apiVersion: networking.istio.io/v1alpha3
kind: DestinationRule
metadata:
  name: productpage
spec:
  host: productpage.istio.svc.cluster.local
  subsets:
  - name: v1
    labels:
      version: v1
  trafficPolicy:
    loadBalancer:
      localityLbSetting:
        enabled: true
        failover:
        - from: us-central1
          to: us-central2
        - from: us-central2
          to: us-central1
        - from: us-central3
          to: us-central1
    outlierDetection:
      consecutive5xxErrors: 1
      interval: 5m
      baseEjectionTime: 15m
EOF

kubectl apply -f dr-productpage-failover.yaml -n istio
这里创建了productpage的dr,localityLbSetting表示使用按地理位置的负载均衡。enabled设置为true表示启用。failover表示故障恢复配置。from表示来自哪里的故障,to表示重新连接到哪里。这里我们配置了三条规则,当cluster1有故障时恢复到cluster2,当cluster2有故障时恢复到cluster3,当cluster3有故障时恢复到cluster1.这里我们能容忍两个集群故障。
down掉cluster2
访问:http://192.168.229.137:32498/productpage
局部失败,productpage微服务因为有failover所以没报错,reviews微服务没有failover,所以cluster2 down掉,因为是轮训的当请求cluster2是就会失败
下面,我们把details,reviews ,ratings也加上failover
cat << EOF > dr-reviews-failover.yaml
apiVersion: networking.istio.io/v1alpha3
kind: DestinationRule
metadata:
  name: reviews
spec:
  host: reviews.istio.svc.cluster.local
  trafficPolicy:
    loadBalancer:
      localityLbSetting:
        enabled: true
        failover:
        - from: us-central1
          to: us-central2
        - from: us-central2
          to: us-central1
        - from: us-central3
          to: us-central1
    outlierDetection:
      consecutive5xxErrors: 1
      interval: 5m
      baseEjectionTime: 15m
EOF

kubectl apply -f dr-reviews-failover.yaml -n istio
配置reviews的failover
cat << EOF > dr-details-failover.yaml
apiVersion: networking.istio.io/v1alpha3
kind: DestinationRule
metadata:
  name: details
spec:
  host: details.istio.svc.cluster.local
  trafficPolicy:
    loadBalancer:
      localityLbSetting:
        enabled: true
        failover:
        - from: us-central1
          to: us-central2
        - from: us-central2
          to: us-central1
        - from: us-central3
          to: us-central1
    outlierDetection:
      consecutive5xxErrors: 1
      interval: 5m
      baseEjectionTime: 15m
EOF

kubectl apply -f dr-details-failover.yaml -n istio
配置details的failover
cat << EOF > dr-reviews-failover.yaml
apiVersion: networking.istio.io/v1alpha3
kind: DestinationRule
metadata:
  name: ratings
spec:
  host: ratings.istio.svc.cluster.local
  trafficPolicy:
    loadBalancer:
      localityLbSetting:
        enabled: true
        failover:
        - from: us-central1
          to: us-central2
        - from: us-central2
          to: us-central1
        - from: us-central3
          to: us-central1
    outlierDetection:
      consecutive5xxErrors: 1
      interval: 5m
      baseEjectionTime: 15m
EOF

kubectl apply -f dr-reviews-failover.yaml -n istio
配置ratings的failover
不在报错,因为虽然cluster2 down掉了,但是每个微服务都有failover
4.2.2集群外服务failover
4.2.2.1部署两个httpd服务的vm
比较复杂,有需要的同学可以加我微信联系我,略
3.2.2.2实操
kubectl apply -f se-httpd.yaml -n vm-httpd
cat << EOF > se-httpd.yaml
apiVersion: networking.istio.io/v1beta1
kind: ServiceEntry
metadata:
  name: httpd-se
spec:
  hosts:
  - httpd.vm.demo
  addresses:
  - 192.168.229.11
  location: MESH_INTERNAL
  ports:
  - number: 80
    name: http-httpd
    protocol: TCP
    targetPort: 80
  resolution: STATIC
  workloadSelector:
    labels:
      app: httpd
      type: vm
EOF


kubectl apply -f se-httpd.yaml -n vm-httpd
创建访问虚拟机服务的serviceentry
cat << EOF > dr-httpd-locality-failover.yaml
apiVersion: networking.istio.io/v1alpha3
kind: DestinationRule
metadata:
  name: dr-httpd
spec:
  host: httpd.vm.demo
  trafficPolicy:
    loadBalancer:
      localityLbSetting:
        enabled: true
        failover:
        - from: us-central1/z1/sz01
          to: us-central2/z2/sz02
        - from: us-central2/z2/sz02
          to: us-central1/z1/sz01
    outlierDetection:
      consecutive5xxErrors: 1
      interval: 1s
      baseEjectionTime: 1m

kubectl apply -f dr-httpd-locality-failover.yaml -n vm-httpd
设置failover
访问:先是两个集群都在,然后down掉一个vm,他就连到另一个vm上去了
[root@node01 locality]# kubectl exec -it -n istio ratings-v1-fbdbfdc5b-dbz9g -- /bin/bash
node@ratings-v1-fbdbfdc5b-dbz9g:/opt/microservices$ curl httpd.vm.demo
146 welcome
node@ratings-v1-fbdbfdc5b-dbz9g:/opt/microservices$ curl httpd.vm.demo
146 welcome
node@ratings-v1-fbdbfdc5b-dbz9g:/opt/microservices$ curl httpd.vm.demo
147 welcome
node@ratings-v1-fbdbfdc5b-dbz9g:/opt/microservices$ curl httpd.vm.demo
147 welcome
node@ratings-v1-fbdbfdc5b-dbz9g:/opt/microservices$ curl httpd.vm.demo
146 welcome
node@ratings-v1-fbdbfdc5b-dbz9g:/opt/microservices$ curl httpd.vm.demo
146 welcome
node@ratings-v1-fbdbfdc5b-dbz9g:/opt/microservices$ curl httpd.vm.demo
147 welcome
node@ratings-v1-fbdbfdc5b-dbz9g:/opt/microservices$ curl httpd.vm.demo
147 welcome
node@ratings-v1-fbdbfdc5b-dbz9g:/opt/microservices$ curl httpd.vm.demo
curl: (56) Recv failure: Connection reset by peer
node@ratings-v1-fbdbfdc5b-dbz9g:/opt/microservices$ curl httpd.vm.demo
147 welcome
node@ratings-v1-fbdbfdc5b-dbz9g:/opt/microservices$ curl httpd.vm.demo
147 welcome
node@ratings-v1-fbdbfdc5b-dbz9g:/opt/microservices$ curl httpd.vm.demo
147 welcome
node@ratings-v1-fbdbfdc5b-dbz9g:/opt/microservices$ curl httpd.vm.demo
147 welcome
node@ratings-v1-fbdbfdc5b-dbz9g:/opt/microservices$ curl httpd.vm.demo
147 welcome
node@ratings-v1-fbdbfdc5b-dbz9g:/opt/microservices$ curl httpd.vm.demo
147 welcome
