Seata做为alibaba的组件之一,负责在微服务架构中实现分布式事务。之前写过一篇关于seata分布式事务的文章,但并没有应用于真实的生产环境。此次开发全国核检测APP,使用seata进行分布式事务的管理,主要是在支付、订单即关于现金业务的地方大多使用分布式事务。因为订单微服务与支付微服务分别进行部署,所以,必须要使用分布式事务。
在以下的配置中,使用的Seata的AT模式。
1、首先你需要确定的事
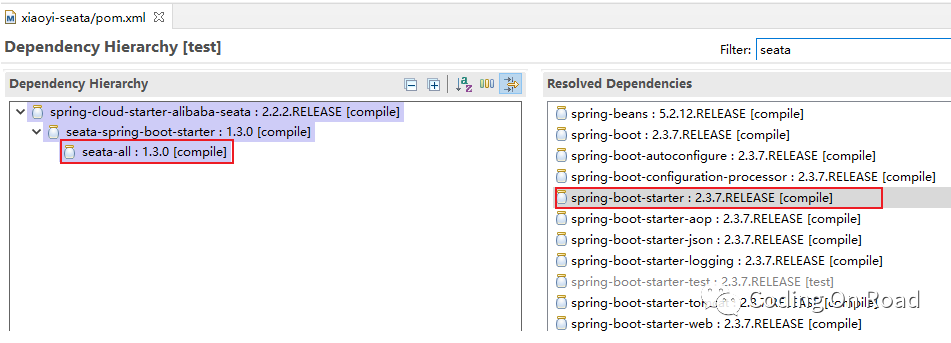
1)、如果你所依赖的是spring boot starter 2.3.x则建议使用seata1.3.x。获取版本对应关系,请通过https://start.aliyun.com创建一个springboot项目,并添加nacos,nacos-config,seata依赖,并查看其版本依赖。
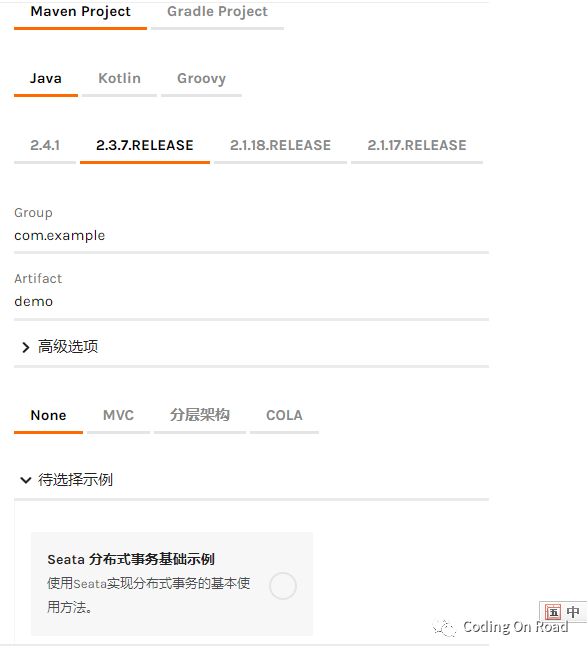
选择所有依赖以后,查看2.3.x依赖的seata的版本,可见使用spring starter 2.3.x时,依赖的seata为1.3.0
2)、如果使用nacos做为seata的配置和注册中心,除了添加nacos-discovery依赖之外必须要添加nacos-config的依赖。因为在项目启动时,seata需要从nacos中读取seata的配置信息。
<!-- seata的依赖,通过查看,spring-starter-2.3.7使用的是seata1.3.0 -->
<dependency>
    <groupId>com.alibaba.cloud</groupId>
    <artifactId>spring-cloud-starter-alibaba-nacos-config</artifactId>
</dependency>
<dependency>
    <groupId>com.alibaba.cloud</groupId>
    <artifactId>spring-cloud-starter-alibaba-seata</artifactId>
</dependency>
<!--seata事务配置完成-->
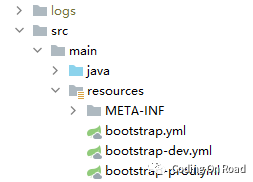
3)、由于在项目启动时,就会自动读取nacos配置中心的数据,所以,建议使用bootstrap.yml做为配置文件。因为从读取顺序上讲,boostrap.yml最先读取。
2、开始配置
步1、搭建nacos环境
一般情况下,如果只有一台nacos服务器,在启动时可以选择使用standalone模式,即:nacos/bin/startup.bat -m standalone。但在本质上,一台主机,也可以模拟一个集群,只需要修改nacos/conf/cluster.conf即可。本处修改如下:
192.168.0.177:35848(我项目中,使用的端口为35848,可根据你的实际情况进行修改)。
修改nacos/conf/application.properties文件,配置为使用mysql数据库:
server.servlet.contextPath=/nacos
server.port=35848
spring.datasource.platform=mysql
db.num=1
db.url.0=jdbc:mysql://127.0.0.1:3306/nacos2?characterEncoding=utf8&connectTimeout=1000&socketTimeout=3000&autoReconnect=true&useUnicode=true&useSSL=false&serverTimezone=Asia/Shanghai
db.user.0=root
db.password.0=123456
将nacos/conf/nacos-mysql.sql文件中的SQL语句,在连接的数据库上创建表表。
现在就可以启动nacos了,执行nacos/bin/startup.bat
"nacos is starting with cluster"

         ,--.
       ,--.'|

   ,--,:  : |                                           Nacos 1.4.1
,`--.'`|  ' :                       ,---.               Running in cluster mode, All function modules
|   :  :  | |                      '   ,'\   .--.--.    Port: 35848
:   |   \ | :  ,--.--.     ,---.        |       '   Pid: 4928
|   : '  '; |        \        \.   ; ,. :|  :  `./   Console: http://192.168.0.177:35848/nacos/index.html
'   ' ;.    ;.--.  .-. |      ''   | |: :|  :  ;_
|   | | \   | \__\/: . ..    '  '   | .; : \  \    `.      https://nacos.io
'   : |  ; .' ," .--.; |'   ; :__|   :    |  `----.   \
|   | '`--'      ,.  |'   | '.'|\   \      `--'
'   : |     ;  :   .'   \   :    : `----'  '--'.
;   |.'     |  ,     .-./\   \              `--'---'
'---'        `--`---'     `----'

2021-02-05 08:28:44,347 INFO The server IP list of Nacos is [192.168.0.177:35848]
2021-02-05 08:28:53,691 INFO Nacos started successfully in cluster mode. use external storage
步2、配置seata
将seata-server-1.3.0.zip解压到任意目录下(建议没有中文没有空格的目录)。
1)修改seata/conf/file.conf如下,以下配置,为服务seata的server,即server所使用的本个表,seata有三个角色:server(服务器),tm(事务管理中心),client(客户端)。
其他的都删除即可,只配置db即可,建议给seata设置一个独立的数据库:
## transaction log store, only used in seata-server
store {
  ## store mode: file、db、redis
  mode = "db"
  ## database store property
  db {
    ## the implement of javax.sql.DataSource, such as DruidDataSource(druid)/BasicDataSource(dbcp)/HikariDataSource(hikari) etc.
    datasource = "druid"
    ## mysql/oracle/postgresql/h2/oceanbase etc.
    dbType = "mysql"
    driverClassName = "com.mysql.cj.jdbc.Driver"
    url = "jdbc:mysql://127.0.0.1:3306/seata13?characterEncoding=UTF-8&serverTimeZone=Asia/Shanghai"
    user = "root"
    password = "123456"
    minConn = 5
    maxConn = 30
    globalTable = "global_table"
    branchTable = "branch_table"
    lockTable = "lock_table"
    queryLimit = 100
    maxWait = 5000
  }
}
2)配置seata的注册中心和配置中心,修改seata/conf/registry.conf文件,如下:
#删除其他没有用的配置即可,只需要保留nacos的配置,其中registry为注册中心,config为配置中心
registry {
  # file 、nacos 、eureka、redis、zk、consul、etcd3、sofa
  type = "nacos"
  nacos {
    application = "seata-server"
    serverAddr = "127.0.0.1:35848"
    group = "SEATA_GROUP"
    namespace = "public"
    cluster = "default"
    username = "nacos"
    password = "nacos"
  }
}
config {
  # file、nacos 、apollo、zk、consul、etcd3
  type = "nacos"
  nacos {
    serverAddr = "127.0.0.1:35848"
    namespace = "public"
    group = "SEATA_GROUP"
    username = "nacos"
    password = "nacos"
  }
}
3)创建seata server所需要的表,下载seata-1.3.0的源代码,在script/server/db/mysql.sql中找到需要执行的sql在file.conf中指定的数据库中,创建上述的表,主要是三个表,请自行查看myhsql.sql中的表结构。
4)将所有配置导入到nacos
在script/config-center中修改config.txt文件,由于这儿我们配置的是db模式,所以其他没有用的模式可以直接删除:
#注意,如果直接使用此文件,请将所有#注释行删除后再导入到nacos
transport.type=TCP
transport.server=NIO
transport.heartbeat=true
transport.enableClientBatchSendRequest=false
transport.threadFactory.bossThreadPrefix=NettyBoss
transport.threadFactory.workerThreadPrefix=NettyServerNIOWorker
transport.threadFactory.serverExecutorThreadPrefix=NettyServerBizHandler
transport.threadFactory.shareBossWorker=false
transport.threadFactory.clientSelectorThreadPrefix=NettyClientSelector
transport.threadFactory.clientSelectorThreadSize=1
transport.threadFactory.clientWorkerThreadPrefix=NettyClientWorkerThread
transport.threadFactory.bossThreadSize=1
transport.threadFactory.workerThreadSize=default
transport.shutdown.wait=3
#注意其中的xiaoyi_tx_group,此值为唯一的事务分组,在client端,即在springboot项目中,必须设置的
#seata.tx-service-group=xiaoyi_tx_group相同
service.vgroupMapping.xiaoyi_tx_group=default
#后期我在启动时,将使用38091端口,做为seata的端口,默认端口为8091,另,建议配置的服务地为ip路由地址而非127.0.0.1
service.default.grouplist=192.168.0.177:38091
service.enableDegrade=false
service.disableGlobalTransaction=false
client.rm.asyncCommitBufferLimit=10000
client.rm.lock.retryInterval=10
client.rm.lock.retryTimes=30
client.rm.lock.retryPolicyBranchRollbackOnConflict=true
client.rm.reportRetryCount=5
client.rm.tableMetaCheckEnable=false
client.rm.sqlParserType=druid
client.rm.reportSuccessEnable=false
client.rm.sagaBranchRegisterEnable=false
client.tm.commitRetryCount=5
client.tm.rollbackRetryCount=5
client.tm.degradeCheck=false
client.tm.degradeCheckAllowTimes=10
client.tm.degradeCheckPeriod=2000
#只保留了db模式,其他模式全部删除即可
store.mode=db
store.db.datasource=druid
store.db.dbType=mysql
store.db.driverClassName=com.mysql.cj.jdbc.Driver
store.db.url=jdbc:mysql://192.168.0.177:3306/seata13?useUnicode=true&serverTimezone=Asia/Shanghai
store.db.user=root
store.db.password=123456
store.db.minConn=5
store.db.maxConn=30
store.db.globalTable=global_table
store.db.branchTable=branch_table
store.db.queryLimit=100
store.db.lockTable=lock_table
store.db.maxWait=5000
server.recovery.committingRetryPeriod=1000
server.recovery.asynCommittingRetryPeriod=1000
server.recovery.rollbackingRetryPeriod=1000
server.recovery.timeoutRetryPeriod=1000
server.maxCommitRetryTimeout=-1
server.maxRollbackRetryTimeout=-1
server.rollbackRetryTimeoutUnlockEnable=false
client.undo.dataValidation=true
client.undo.logSerialization=jackson
client.undo.onlyCareUpdateColumns=true
server.undo.logSaveDays=7
server.undo.logDeletePeriod=86400000
client.undo.logTable=undo_log
client.log.exceptionRate=100
transport.serialization=seata
transport.compressor=none
metrics.enabled=false
metrics.registryType=compact
metrics.exporterList=prometheus
metrics.exporterPrometheusPort=9898
5) 现在我们将上面的所有导入到nacos的配置中
在windows上,打开git命令行窗口,此窗口可以执行.sh的文件,执行如下:
进入script/config-center/nacos中执行查看帮助:
admin@DESKTOP-0SUC7JT MINGW64 e/downloads/seata-1.3.0/script/config-center/nacos
$ ./nacos-config.sh -?
 USAGE OPTION: ./nacos-config.sh [-h host] [-p port] [-g group] [-t tenant] [-u username] [-w password]
其中 -t tenant为指定命名空间。
#建议,不要指定-t参数,建议使用默认public命名空间即可,以下只是为了将代码放到这儿再执行一次。如果导入一个指定的命名空间,请先在nacos上创建这个命名空间:
admin@DESKTOP-0SUC7JT MINGW64 e/downloads/seata-1.3.0/script/config-center/nacos
$ ./nacos-config.sh -h 192.168.0.177 -p 35848 -t seata -u nacos -w nacos2020
set nacosAddr=192.168.0.177:35848
set group=SEATA_GROUP
Set transport.type=TCP successfully
Set transport.server=NIO successfully
Set transport.heartbeat=true successfully
Set transport.enableClientBatchSendRequest=false successfully
Set transport.threadFactory.bossThreadPrefix=NettyBoss successfully
Set transport.threadFactory.workerThreadPrefix=NettyServerNIOWorker successfully
Set transport.threadFactory.serverExecutorThreadPrefix=NettyServerBizHandler successfully
Set transport.threadFactory.shareBossWorker=false successfully
Set transport.threadFactory.clientSelectorThreadPrefix=NettyClientSelector successfully
Set transport.threadFactory.clientSelectorThreadSize=1 successfully
Set transport.threadFactory.clientWorkerThreadPrefix=NettyClientWorkerThread successfully
Set transport.threadFactory.bossThreadSize=1 successfully
Set transport.threadFactory.workerThreadSize=default successfully
=========================================================================
 Complete initialization parameters,  total-count:66 ,  failure-count:0
=========================================================================
 Init nacos config finished, please start seata-server.
注意,导入完成以后,必须要对store.db.url值的url进行一次修改,因为导入时&符号后台的参数将不会保存到nacos上,所以需要修改一下:jdbc:mysql://192.168.0.177:3306/seata13?useUnicode=true&serverTimezone=Asia/Shanghai&characterEncoding=UTF-8
6)现在就可以启动seata了
由于上面的配置中,指定了seata的端口,所以启动时请添加-p 38091端口参数
seata-server.bat -p 380917)现在查看一下nacos中的所有服务,应该会发现seata-server已经注册进来了
| 服务名 | 分组名称 | 集群数目 | 实例数 | 健康实例数 | 触发保护阈值 | 操作 |
|---|---|---|---|---|---|---|
| seata-server | SEATA_GROUP | 1 | 1 | 1 | false |
步3、开发项目并使用seata分布式事务
这儿需要添加的主要配置包括:
1)、nacos-config 用于让seata读取配置中心的数据。
2)、nacos-discovery 用于将自己的项目注册到nacos中心。
3)、starter-alibaba-seata用于依赖seata。
主要的依赖如下,其他的依赖略。
<!-- seata的依赖,通过查看,spring-starter-2.3.7使用的是seata1.3.0 -->
<dependency>
    <groupId>com.alibaba.cloud</groupId>
    <artifactId>spring-cloud-starter-alibaba-nacos-config</artifactId>
</dependency>
<dependency>
    <groupId>com.alibaba.cloud</groupId>
    <artifactId>spring-cloud-starter-alibaba-seata</artifactId>
</dependency>
 <dependency>
            <groupId>com.alibaba.cloud</groupId>
            <artifactId>spring-cloud-starter-alibaba-nacos-discovery</artifactId>
        </dependency>
完整的配置文,bootstrap.yml如下:
server:
  port: 6200
  servlet:
    encoding:
      charset: UTF-8
spring:
  application:
    name: xiaoyi-detect
  profiles:
    active: dev
  cloud:
    nacos:
      discovery:
        namespace: public
        group: DEFAULT_GROUP
        server-addr: localhost:35848
        username: nacos
        password: nacos2020
      #注意,由于依赖的nacos-config,如果这儿不配置,将默认为localhost:8848,所,即便是本项目没有从nacos上读取配置,也需要配置此项目
      config:
        namespace: public
        group: DEFAULT_GROUP
        server-addr: localhost:35848
        username: nacos
        password: nacos2020
  datasource:
    driver-class-name: com.mysql.cj.jdbc.Driver
    hikari:
      maximum-pool-size: 10
      minimum-idle: 3
    password: wang@907
    type: com.zaxxer.hikari.HikariDataSource
    url: jdbc:mysql://localhost:57732/detect?characterEncoding=UTF-8&serverTimezone=Asia/Shanghai
    username: wang@907
  jackson:
    date-format: yyyy-MM-dd HH:mm:ss
    time-zone: GMT+08
  redis:
    database: 1
    host: localhost
    password: xiaoyi@907()!@
    port: 47387
  servlet:
    multipart:
      max-file-size: 10MB
      max-request-size: 100MB
#openfeign配置
feign:
  hystrix:
    #开启熔断能力,必须要开启此能力
    enabled: true
  client:
    config:
      default:
        connect-timeout: 10000
        readTimeout: 600000
mybatis:
  configuration:
    call-setters-on-nulls: true
  type-aliases-package: com.xiaoyi.**.entity,com.xiaoyi.**.form
swagger:
  enabled: false
validate:
  permission:
    enabled: true
  token:
    enabled: true
#seata的相关配置
seata:
  enabled: true
  application-id: ${spring.application.name}
  #指定与seata导入的配置相同的事务名称
  tx-service-group: xiaoyi_tx_group
  enable-auto-data-source-proxy: true
  config:
    type: nacos
    nacos:
      server-addr: 127.0.0.1:35848
      username: nacos
      password: nacos2020
      namespace: public
      group: SEATA_GROUP
#建议将日志配置放到最后
logging:
  file:
    name: ./logs/${spring.application.name}.log
    path: ./logs
  level:
    root: INFO
    com.xiaoyi: debug
    com.alibaba.nacos: warn
    org.mybatis: debug
开发AOP切面:
package com.xiaoyi.config.aop.tx;
import com.google.common.base.Throwables;
import com.xiaoyi.common.lang.XiaoYiException;
import io.seata.core.context.RootContext;
import io.seata.core.exception.TransactionException;
import io.seata.core.model.GlobalStatus;
import io.seata.tm.api.GlobalTransaction;
import io.seata.tm.api.GlobalTransactionContext;
import lombok.extern.slf4j.Slf4j;
import org.apache.commons.lang3.StringUtils;
import org.aspectj.lang.JoinPoint;
import org.aspectj.lang.Signature;
import org.aspectj.lang.annotation.AfterThrowing;
import org.aspectj.lang.annotation.Aspect;
import org.aspectj.lang.annotation.Before;
import org.aspectj.lang.annotation.Pointcut;
import org.aspectj.lang.reflect.MethodSignature;
import org.springframework.beans.BeansException;
import org.springframework.context.ApplicationContext;
import org.springframework.context.ApplicationContextAware;
import org.springframework.stereotype.Component;
/**
* 分布式事务切面处理
*
* @author wj
* @since 1.0 2021-02-04
*/
@Slf4j
@Aspect
@Component
public class TransactionAop implements ApplicationContextAware {
private String applicationName;
@Pointcut("execution(* com.xiaoyi..*Service.*(..)) && @annotation(io.seata.spring.annotation.GlobalTransactional)")
public void cut() {
}
@Before(value = "cut()")
public void before(JoinPoint jp) throws TransactionException {
log.info(applicationName + "-----------------开始事务拦截-----------------");
Signature signature = jp.getSignature();
if (signature instanceof MethodSignature) {
MethodSignature ms = (MethodSignature) signature;
String name = ms.getMethod().getName();
log.info(applicationName + ",拦截到的方法名为:" + name);
}
GlobalTransaction tx = GlobalTransactionContext.getCurrentOrCreate();
// 参数说明:第一个为超时时间,第二个参数可以任意名称,但必须要保证所有的分布式微服务中,使用同一个名称,以便于保证事务的唯一性
tx.begin(1000*7, "tx1");
log.info(applicationName + ",开始事或当前事务ID为:" + tx.getXid());
}
@AfterThrowing(value = "cut()", throwing = "e")
public void afterThrowing(Throwable e) throws TransactionException {
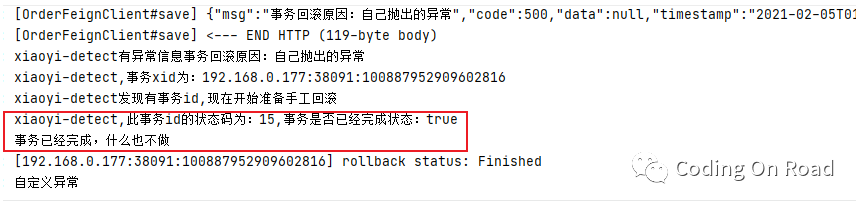
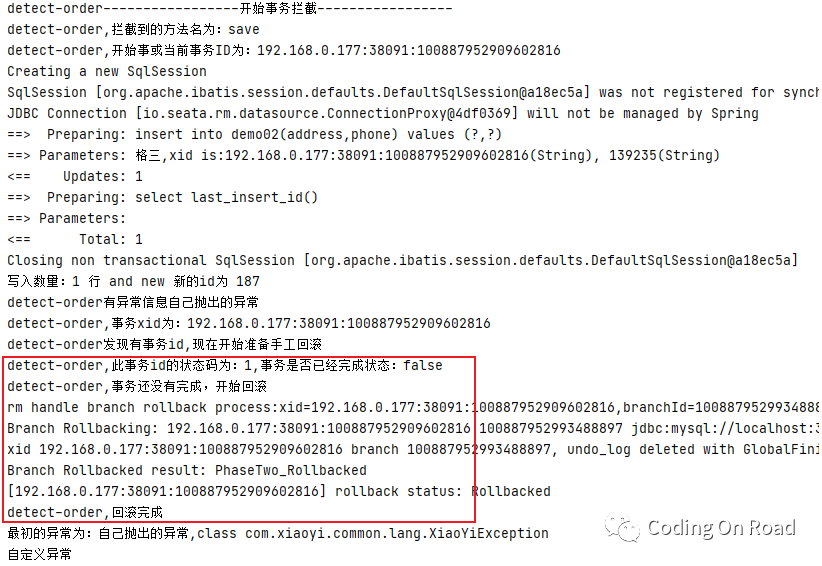
log.info(applicationName + "有异常信息" + e.getMessage());
String xid = RootContext.getXID();
log.info(applicationName + ",事务xid为:" + xid);
if (io.seata.common.util.StringUtils.isNotEmpty(xid)) {
log.info(applicationName + "发现有事务id,现在开始准备手工回滚");
int code = GlobalTransactionContext.reload(xid).getStatus().getCode();
boolean finished = code == GlobalStatus.Finished.getCode();
log.info(applicationName + ",此事务id的状态码为:" + code + ",事务是否已经完成状态:" + finished);
if (!finished) {
log.info(applicationName + ",事务还没有完成,开始回滚");
GlobalTransactionContext.reload(xid).rollback();
log.info(applicationName + ",回滚完成");
//获取到最初的异常
Throwable rootCause = Throwables.getRootCause(e);
log.info("最初的异常为:" + rootCause.getMessage() + "," + rootCause.getClass());
throw new XiaoYiException("事务回滚原因:" + rootCause.getMessage());
} else {
log.info("事务已经完成,什么也不做");
}
}
}
@Override
public void setApplicationContext(ApplicationContext applicationContext) throws BeansException {
String name = applicationContext.getEnvironment().getProperty("spring.application.name", "");
if (StringUtils.isNotBlank(name)) {
this.applicationName = name;
} else {
this.applicationName = "无名项目";
}
log.info("项目名称:{}", name);
}
}
测试事务 测试过程如下,
分别创建三个微服务 detect - >调用 Order - > 调用Pay。经测试,事务已经很好的控制:
以下是detect项目中的service,它通过feign调用了order:
package com.xiaoyi.detect.api.demo01.service;

import com.xiaoyi.common.lang.XiaoYiException;
import com.xiaoyi.common.vo.AjaxResult;
import com.xiaoyi.detect.api.demo01.mapper.Demo01Mapper;
import com.xiaoyi.detect.feign.clients.OrderFeignClient;
import io.seata.core.context.RootContext;
import io.seata.spring.annotation.GlobalTransactional;
import lombok.extern.slf4j.Slf4j;
import org.springframework.beans.factory.annotation.Autowired;
import org.springframework.stereotype.Service;

@Slf4j
@Service
public class Demo01Service {
    @Autowired
    private Demo01Mapper demo01Mapper;
    @Autowired
    private OrderFeignClient orderFeignClient;
    @GlobalTransactional
    public void save(String name, Integer age) {
        String xid = RootContext.getXID();
        log.info("事务ID为:{}", xid);
        String addr = name;
        AjaxResult save = orderFeignClient.save(addr, "139" + age);//调用feign
        if(!save.isSuccess()){
            throw new XiaoYiException(save.getMsg());
        }
        log.info("调用order的结果为:"+save);
        name += ",事务ID为:" + xid;
        int rows = demo01Mapper.save(name, age);
        log.info("写入数量 {} 行", rows);
    }
}
以下是order中的service,它又调用了pay:
package com.xiaoyi.order.api.demo02.service;

import com.xiaoyi.common.lang.XiaoYiException;
import com.xiaoyi.common.vo.AjaxResult;
import com.xiaoyi.order.api.demo02.entity.Demo02;
import com.xiaoyi.order.api.demo02.mapper.Demo02Mapper;
import com.xiaoyi.order.feign.clients.pay.wechatpay.WechatPayFeignClient;
import io.seata.core.context.RootContext;
import io.seata.spring.annotation.GlobalTransactional;
import lombok.extern.slf4j.Slf4j;
import org.springframework.beans.factory.annotation.Autowired;
import org.springframework.stereotype.Service;
@Service
@Slf4j
public class Demo02Service {
    @Autowired
    private Demo02Mapper demo02Mapper;

    @Autowired
    private WechatPayFeignClient wechatPayFeignClient;

    @GlobalTransactional
    public boolean save(Demo02 demo){
        String xid =  RootContext.getXID();
        demo.setAddress(demo.getAddress()+",xid is:"+xid);
        int rows = demo02Mapper.insert(demo);
        log.info("写入数量:{} 行 and new 新的id为 {}",rows,demo.getId());
        if(demo.getPhone().endsWith("5")){
            throw new XiaoYiException("Order模块自己抛出的异常");
        }
        AjaxResult result = wechatPayFeignClient.save(demo.getAddress(),demo.getPhone());
        log.info("调用pay的结果:"+result);
        if(!result.isSuccess()){
            throw new XiaoYiException(result.getMsg());
        }
        return rows>0;
    }
}
pay中的代码:
package com.xiaoyi.pay.api.demo03.service;
import com.xiaoyi.common.lang.XiaoYiException;
import com.xiaoyi.pay.api.demo03.entity.Demo03;
import com.xiaoyi.pay.api.demo03.mapper.Demo03Mapper;
import io.seata.spring.annotation.GlobalTransactional;
import lombok.extern.slf4j.Slf4j;
import org.springframework.beans.factory.annotation.Autowired;
import org.springframework.stereotype.Service;
@Slf4j
@Service
public class Demo03Service {
    @Autowired
    private Demo03Mapper demo03Mapper;
    @GlobalTransactional
    public void save(Demo03 demo03){
        demo03Mapper.save(demo03);
        log.info("保存demo03成功,生成的id为:"+demo03.getId());
        if(demo03.getMobile().endsWith("9")){
            throw new XiaoYiException("在Pay模块中故意抛出的异常");
        }
    }
}
步4、测试运行
数据回滚过程分析
如果上一个微服务中分布式事务已经被回滚,则在调用方事务控制中,什么也不需要做: