


Query创建
通过调用SqlQueryManager的createQuery方法创建
提交查询任务
在queryExecution中start方法代码如下
1 创建QuenedExecution
2 入队列
3 开始执行
analyzeQuery方法分析
planDistributionplan方法分析
Query创建和QueryExecution提交
Task创建和提交
查询总流程图: 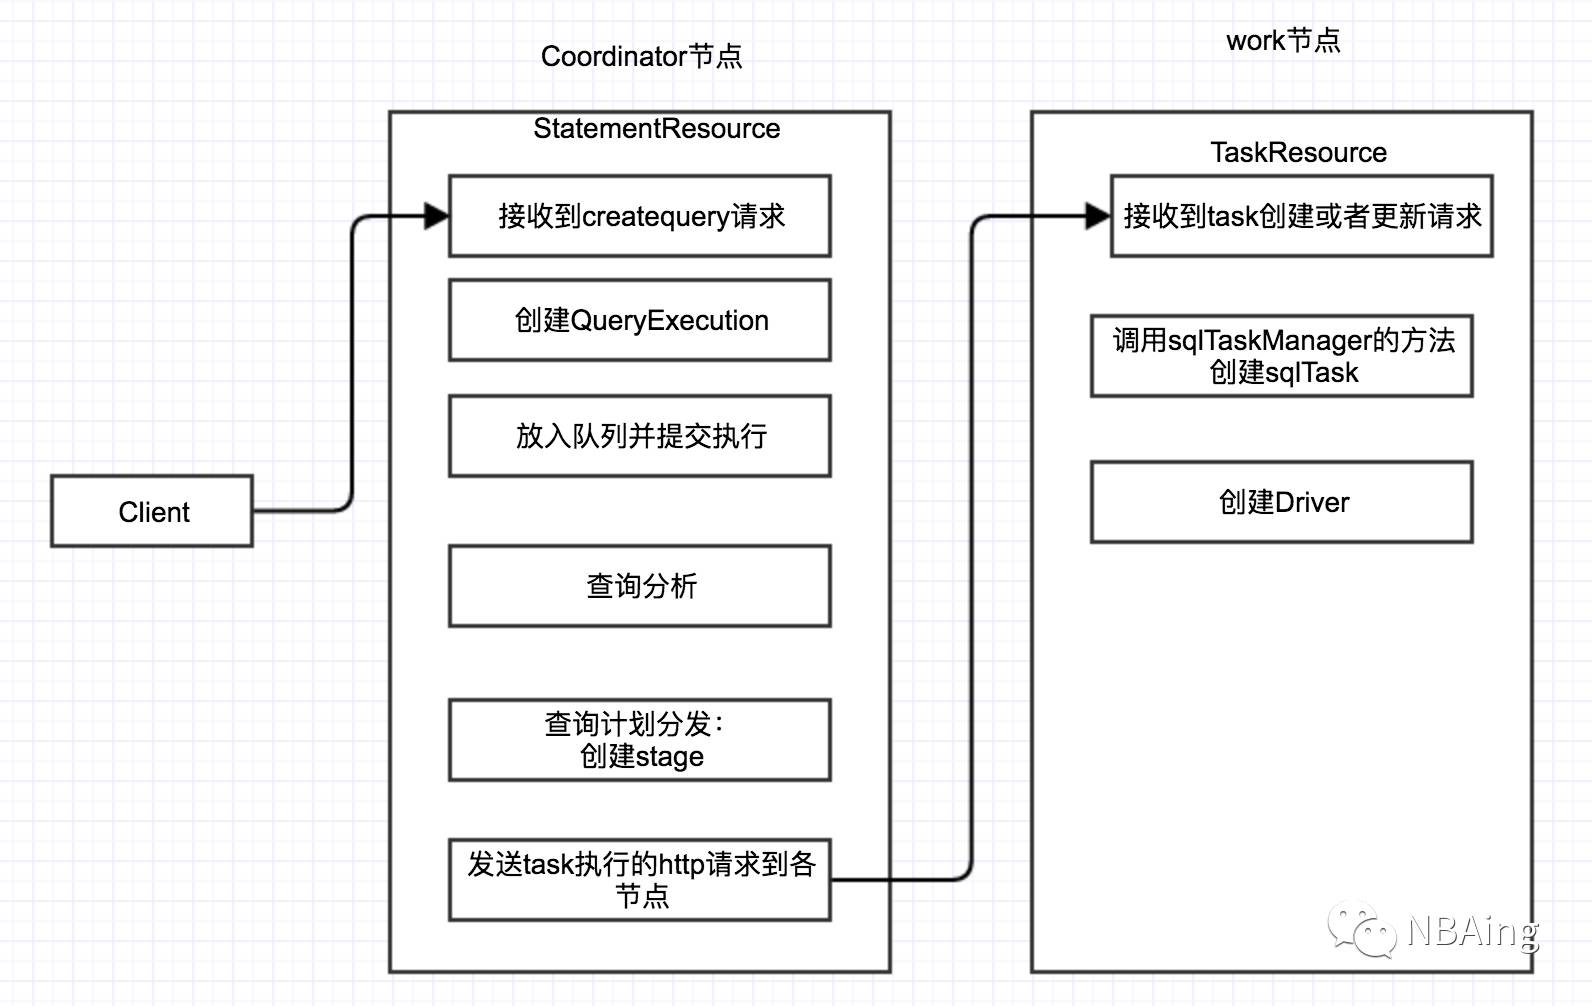
1. Query创建
statementResource在接收到查询请求后,会通过调用createQuery方法来响应,每调用一次该方法,构造一个driver,如果有多个stage,会发送多次http请求,进行driver创建。其中一个driver使用若干个operator处理一个split:
    @POST
    @Produces(MediaType.APPLICATION_JSON)    public Response createQuery(
            String statement,
            @Context HttpServletRequest servletRequest,
            @Context UriInfo uriInfo)            throws InterruptedException
    {
        assertRequest(!isNullOrEmpty(statement), "SQL statement is empty");
        Session session = createSessionForRequest(servletRequest, accessControl, sessionPropertyManager, queryIdGenerator.createNextQueryId());
        ExchangeClient exchangeClient = exchangeClientSupplier.get(deltaMemoryInBytes -> { });
        Query query = new Query(session, statement, queryManager, exchangeClient);//主要是调用sqlQueryManager的createQuery方法
        queries.put(query.getQueryId(), query);        return getQueryResults(query, Optional.empty(), uriInfo, new Duration(1, MILLISECONDS));//获取查询结果
    }
1.Query创建和QueryExecution提交
1. 通过调用SqlQueryManager的createQuery方法创建:
            Statement wrappedStatement = sqlParser.createStatement(query);
            statement = unwrapExecuteStatement(wrappedStatement, sqlParser, session);//创建statement
queryExecution = queryExecutionFactory.createQueryExecution(queryId, query, session, statement, parameters);//创建QueryExecution
queueManager.submit(statement, queryExecution, queryExecutor);//提交QueryExecution,也就是提交查询任务
2. 提交查询任务,
2.1 创建QuenedExecution
把QueryExecution转换成QuenedExecution:
queues.get(0).enqueue(createQueuedExecution(queryExecution, queues.subList(1, queues.size()), executor));
2.2 入队列
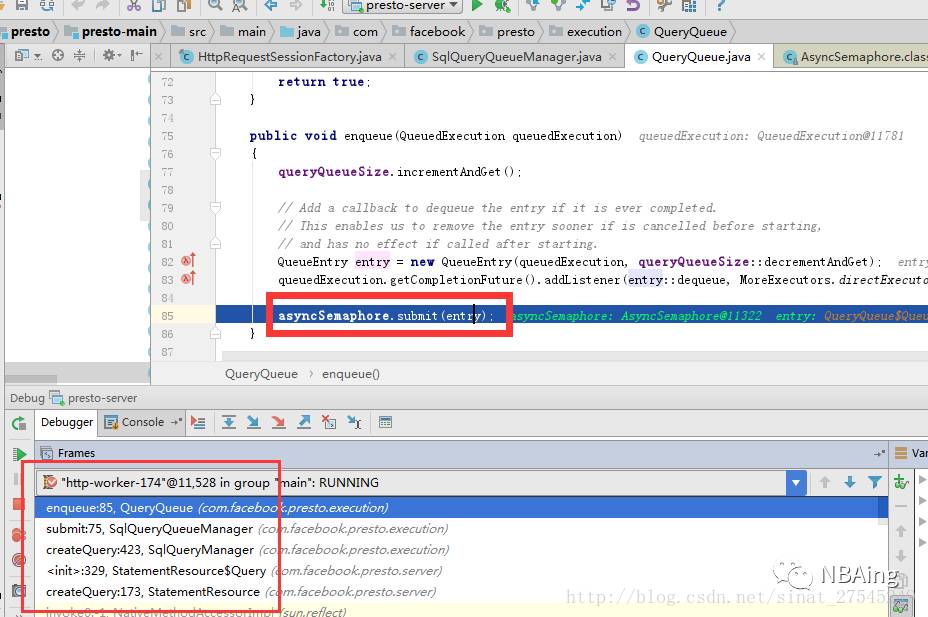
使用信号量通知队列中有任务,可以提交执行。
2.3 开始执行
即QueryExecution后,在QuenedExecution中实际开始执行,代码如下:
   public void start()
    {        // Only execute if the query is not already completed (e.g. cancelled)        if (listenableFuture.isDone()) {            return;
        }        if (nextQueues.isEmpty()) {
            executor.execute(() -> {                try (SetThreadName ignored = new SetThreadName("Query-%s", queryExecution.getQueryId())) {
                    queryExecution.start(); //在这里开始执行
                }
            });
        }        else {            nextQueues.get(0).enqueue(new QueuedExecution(queryExecution, nextQueues.subList(1, nextQueues.size()), executor, listenableFuture));
        }
    }
3. 在queryExecution中,start方法代码如下:
   public void start()
    {        try (SetThreadName ignored = new SetThreadName("Query-%s", stateMachine.getQueryId())) {            try {                // transition to planning
                if (!stateMachine.transitionToPlanning()) {                    // query already started or finished
                    return;
                }                // analyze query
                PlanRoot plan = analyzeQuery();//查询分析,随后详细分析
                // plan distribution of query
                planDistribution(plan);//计划query的分发,随后详细分析
                // transition to starting
                if (!stateMachine.transitionToStarting()) {                    // query already started or finished
                    return;
                }                // if query is not finished, start the scheduler, otherwise cancel it
                SqlQueryScheduler scheduler = queryScheduler.get();                if (!stateMachine.isDone()) {
                    scheduler.start();
                }
            }            catch (Throwable e) {
                fail(e);
                Throwables.propagateIfInstanceOf(e, Error.class);
            }
        }
    }
1.analyzeQuery()方法分析
2.planDistribution(plan)方法分析
最重要的代码块,创建调度器,这其中会创建多个stage:
// build the stage execution objects (this doesn't schedule execution)
        SqlQueryScheduler scheduler = new SqlQueryScheduler(
                stateMachine,
                locationFactory,
                outputStageExecutionPlan,
                nodePartitioningManager,
                nodeScheduler,
                remoteTaskFactory,
                stateMachine.getSession(),
                plan.isSummarizeTaskInfos(),
                scheduleSplitBatchSize,
                queryExecutor,
                rootOutputBuffers,
                nodeTaskMap,
                executionPolicy);
创建stage:
List<SqlStageExecution> stages = createStages(                Optional.empty(),                new AtomicInteger(),
                locationFactory,
                plan.withBucketToPartition(Optional.of(new int[1])),
                nodeScheduler,
                remoteTaskFactory,
                session,
                splitBatchSize,
                partitioningHandle -> partitioningCache.computeIfAbsent(partitioningHandle, handle -> nodePartitioningManager.getNodePartitioningMap(session, handle)),
                executor,
                nodeTaskMap,
                stageSchedulers,
                stageLinkages);
2.Task创建和提交
1) TaskResource接收到http请求后,会调用createOrUpdateTask方法,调用栈如下: 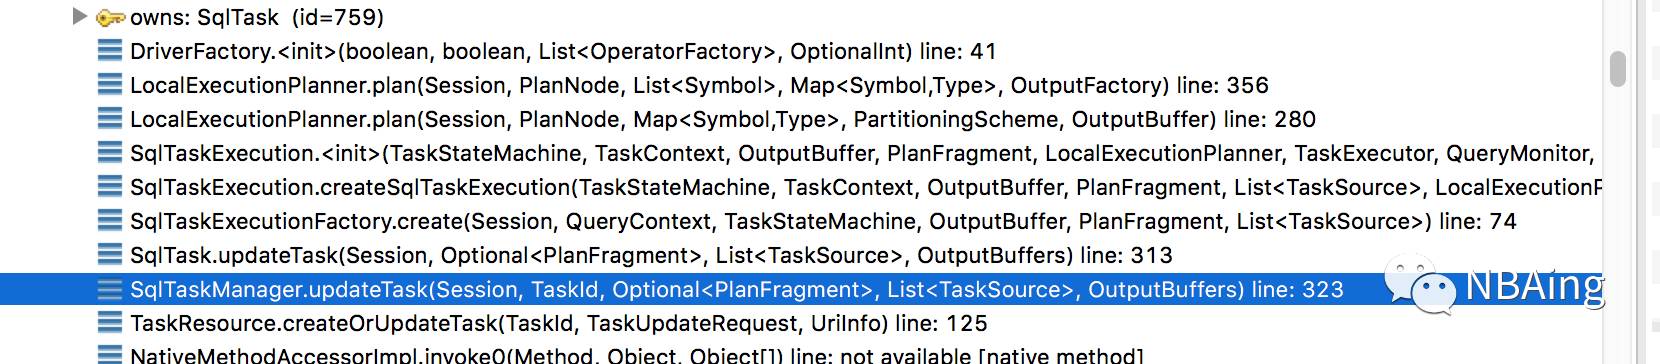
代码如下:
    @POST
    @Path("{taskId}")
    @Consumes(MediaType.APPLICATION_JSON)
    @Produces(MediaType.APPLICATION_JSON)
    public Response createOrUpdateTask(@PathParam("taskId") TaskId taskId, TaskUpdateRequest taskUpdateRequest, @Context UriInfo uriInfo)
    {
        requireNonNull(taskUpdateRequest, "taskUpdateRequest is null");
        Session session = taskUpdateRequest.getSession().toSession(sessionPropertyManager);
        TaskInfo taskInfo = taskManager.updateTask(session,
                taskId,
                taskUpdateRequest.getFragment(),//原始sql解析后的子sql,由协调节点下发而来
                taskUpdateRequest.getSources(),//task的数据源,是个List<TaskSource>,说明一个task对应了多个split要进行处理
                taskUpdateRequest.getOutputIds());
        if (shouldSummarize(uriInfo)) {
            taskInfo = taskInfo.summarize();
        }
        return Response.ok().entity(taskInfo).build();
    }
2) sqlTaskManager管理多个task,没一个task对应一个SqlTask对象和一个taskid,在构造SqlTaskManager时全部创建好。调用sqlTaskManager的updateTask的代码如下:
 @Override
    public TaskInfo updateTask(Session session, TaskId taskId, Optional<PlanFragment> fragment, List<TaskSource> sources, OutputBuffers outputBuffers)
    {
        requireNonNull(session, "session is null");
        requireNonNull(taskId, "taskId is null");
        requireNonNull(fragment, "fragment is null");
        requireNonNull(sources, "sources is null");
        requireNonNull(outputBuffers, "outputBuffers is null");        if (resourceOvercommit(session)) {            // TODO: This should have been done when the QueryContext was created. However, the session isn't available at that point.
            queryContexts.getUnchecked(taskId.getQueryId()).setResourceOvercommit();
        }
        SqlTask sqlTask = tasks.getUnchecked(taskId);
        sqlTask.recordHeartbeat();        return sqlTask.updateTask(session, fragment, sources, outputBuffers);
    }
3) SqlTask中调用updateTask方法:
public TaskInfo updateTask(Session session, Optional<PlanFragment> fragment, List<TaskSource> sources, OutputBuffers outputBuffers)
    {        try {            // The LazyOutput buffer does not support write methods, so the actual
            // output buffer must be established before drivers are created (e.g.
            // a VALUES query).
            outputBuffer.setOutputBuffers(outputBuffers);            // assure the task execution is only created once
            SqlTaskExecution taskExecution;
            synchronized (this) {                // is task already complete?
                TaskHolder taskHolder = taskHolderReference.get();                if (taskHolder.isFinished()) {                    return taskHolder.getFinalTaskInfo();
                }
                taskExecution = taskHolder.getTaskExecution();                if (taskExecution == null) {
                    checkState(fragment.isPresent(), "fragment must be present");
                    taskExecution = sqlTaskExecutionFactory.create(session, queryContext, taskStateMachine, outputBuffer, fragment.get(), sources);//一个task对应多个split源,多个split源最终由TaskExecution对象完成执行
                    taskHolderReference.compareAndSet(taskHolder, new TaskHolder(taskExecution));
                    needsPlan.set(false);
                }
            }            if (taskExecution != null) {
                taskExecution.addSources(sources);
            }
        }
4) 创建SqlTaskExecution,SqlTaskExecution的构造函数如下:
创建多个driverFactory,每个对应处理一个split
LocalExecutionPlan localExecutionPlan = planner.plan(
                        taskContext.getSession(),
                        fragment.getRoot(),
                        fragment.getSymbols(),
                        fragment.getPartitioningScheme(),
                        outputBuffer);
                driverFactories = localExecutionPlan.getDriverFactories();
需要重点分析plan方法,该方法属于LocalExecutionPlanner,返回一个本地执行计划LocalExecutionPlan对象,方法源码如下:
    public LocalExecutionPlan plan(
            Session session,
            PlanNode plan,//从协调节点发送过来的fragment中获取,这里是outputNode,
            Map<Symbol, Type> types,//fragment中的symbols,记录了相关的字段和字段类型
            PartitioningScheme partitioningScheme, //来自fragment,具体什么作用还不清楚
            OutputBuffer outputBuffer) //用于构造输出
    {        List<Symbol> outputLayout = partitioningScheme.getOutputLayout();        if (partitioningScheme.getPartitioning().getHandle().equals(FIXED_BROADCAST_DISTRIBUTION) ||
                partitioningScheme.getPartitioning().getHandle().equals(SINGLE_DISTRIBUTION) ||
                partitioningScheme.getPartitioning().getHandle().equals(COORDINATOR_DISTRIBUTION)) {            //什么情况下走这个流程是不是很清楚,
            return plan(session, plan, outputLayout, types, new TaskOutputFactory(outputBuffer));
        }
    }
如果不走上边的流程,最后调用私有的plan方法,代码如下:
 return plan(
                session,
                plan,
                outputLayout,
                types,                new PartitionedOutputFactory(partitionFunction, partitionChannels, partitionConstants, nullChannel, outputBuffer, maxPagePartitioningBufferSize));
LocalExecutionPlanner的plan方法代码如下:
  public LocalExecutionPlan plan(Session session,
            PlanNode plan,
            List<Symbol> outputLayout,
            Map<Symbol, Type> types,
            OutputFactory outputOperatorFactory)
    {
        LocalExecutionPlanContext context = new LocalExecutionPlanContext(session, types);
        PhysicalOperation physicalOperation = plan.accept(new Visitor(session), context);
        Function<Page, Page> pagePreprocessor = enforceLayoutProcessor(outputLayout, physicalOperation.getLayout());
        List<Type> outputTypes = outputLayout.stream()                .map(types::get)                .collect(toImmutableList()); /从输入的types参数中获取信息,转化成输出需要的类型
        DriverFactory driverFactory = new DriverFactory(
                context.isInputDriver(),
                true,
                ImmutableList.<OperatorFactory>builder()                        .addAll(physicalOperation.getOperatorFactories())                        .add(outputOperatorFactory.createOutputOperator(context.getNextOperatorId(), plan.getId(), outputTypes, pagePreprocessor))                        .build(),
                context.getDriverInstanceCount());
        context.addDriverFactory(driverFactory);
        addLookupOuterDrivers(context);
        // notify operator factories that planning has completed
        context.getDriverFactories().stream()                .map(DriverFactory::getOperatorFactories)                .flatMap(List::stream)                .filter(LocalPlannerAware.class::isInstance)                .map(LocalPlannerAware.class::cast)                .forEach(LocalPlannerAware::localPlannerComplete);
        return new LocalExecutionPlan(context.getDriverFactories());
    }
