上篇分享HDP3.1.4对照2.6.x的新特性,本篇文字整体分享下HDP3.1.4+Ambari2.7.4集群部署。各位看官走着~

1.软件介绍
首先简单介绍下本次大数据集群需要安装的几个组件:
1.1 Ambari
Ambari是一种基于Web的工具,支持Apache Hadoop集群的创建 、管理和监控。
Ambari已支持大多数Hadoop组件,包括HDFS、MapReduce、Hive、Pig、 Hbase、Zookeeper、Sqoop和Hcatalog等。Apache Ambari 支持HDFS、MapReduce、Hive、Pig、Hbase、Zookeepr、Sqoop和Hcatalog等的集中管理。也是5个顶级hadoop管理工具之一。
Ambari 自身也是一个分布式架构的软件,主要由两部分组成:Ambari Server 和 Ambari Agent。简单来说,用户通过 Ambari Server 通知 Ambari Agent 安装对应的软件;Agent 会定时地发送各个机器每个软件模块的状态给 Ambari Server,最终这些状态信息会呈现在 Ambari 的 GUI,方便用户了解到集群的各种状态,并进行相应的维护。
1.2 HDP
HDP是hortonworks的软件栈,里面包含了hadoop生态系统的所有软件项目,比如HBase,Zookeeper,Hive,Pig等等。
1.3 HDP-UTILS
HDP-UTILS是工具类库。
2.匹配软件版本
通过以下网址可以查询Ambari和HDP各个版本支持情况,输入相应的版本,可下载版本匹配报告。(本案例为Ambari2.7.4+HDP3.1.4,皆为当前次新版本)
https://supportmatrix.hortonworks.com/
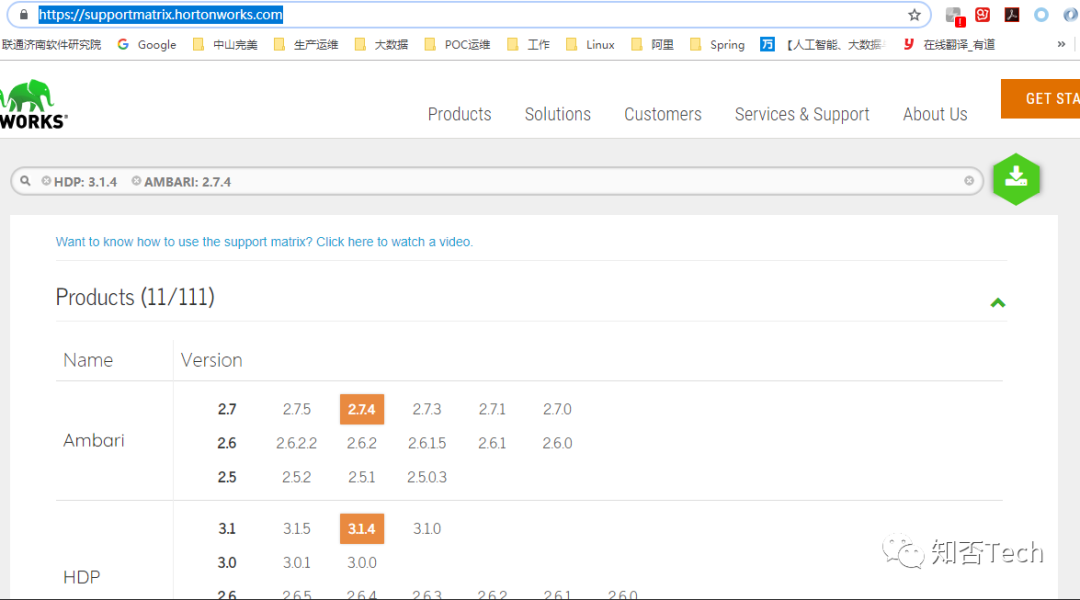
本次匹配报告:
Support Matrix
Supported with HDP-3.1.4 Ambari-2.7.4
Products
Ambari 2.7.4
HDP 3.1.4
DP Platform 1.2.3
DSS 1.6.0
SRM 1.0.0
DAS 1.4.1, 1.3.0
DAS-Lite 1.4.1, 1.3.0
SmartSense 1.5.1
HDP Search 5.0.0
Operating Systems
RHEL 7.7, 7.6, 7.5, 7.4, 7.3, 7.2
CentOS 7.7, 7.6, 7.5, 7.4, 7.3, 7.2
Oracle 7.6, 7.5, 7.4, 7.3, 7.2
Amazon Linux 2
Ubuntu 18.04, 16.04, 14.04
Debian 9
SUSE 12 SP4, 12 SP3, 12 SP2
Databases
OracleDB 12c1, 11gr21
PostgreSQL 10.7, 10.5, 10.2, 9.6
MySQL 5.72
MariaDB 10.2
1 Not supported with Druid
2 Use of an existing MySQL 5.7 database is only supported with the default, InnoDB engine.
Browsers
Chrome 57.0.2987, 56.0.2924.87
Edge 38
Firefox 52, 51
Internet Explorer 11, 10
Safari 10.0.3, 10.0.1
JDK
OpenJDK JDK81
OracleJDK JDK82
1 Open JDK does not run on SLES 11
2 Minimum JDK 1.8.0_77
Processor
IBM Power Systems Power 8, Power 9
x86 x86-64
Generated on Mar 10 2020 @ 14:29:10(GMT) at https://supportmatrix.hortonworks.com
© 2011–2018, Hortonworks, Inc.
3.环境信息
3.1环境信息列表
环境 | 版本 |
Linux | CentOS7.4*7(英文系统) |
Ambari | 2.7.4 |
HDP | 3.1.4 |
HDP-UTILS | 1.1.0.22 |
MySQL | aliyun RDS |
OracleJDK8 | 1.8.0_141 |
3.2介质下载
Ambari下载地址:
https://docs.cloudera.com/HDPDocuments/Ambari-2.7.4.0/bk_ambari-installation/content/ambari_repositories.html
HDP下载库地址:
https://docs.cloudera.com/HDPDocuments/Ambari-2.7.4.0/bk_ambari-installation/content/hdp_314_repositories.html
Ambari | http://public-repo-1.hortonworks.com/ambari/centos7/2.x/updates/2.7.4.0/ambari-2.7.4.0-centos7.tar.gz |
HDP | http://public-repo-1.hortonworks.com/HDP/centos7/3.x/updates/3.1.4.0/HDP-3.1.4.0-centos7-rpm.tar.gz |
HDP-UTILS | http://public-repo-1.hortonworks.com/HDP-UTILS-1.1.0.22/repos/centos7/HDP-UTILS-1.1.0.22-centos7.tar.gz |
3.3集群信息及规划
基础环境准备:准备了7台物理机,
71-74,规划为namenode,因为HDP3.1.4可支持namenode联邦,故规划可扩展4NN,且规划nn71为ambari-server节点
10.172.54.71 nn7110.172.54.72 nn7210.172.54.73 nn7310.172.54.74 nn7410.172.54.75 dn7510.172.54.76 dn7610.172.54.77 dn77
节点名称 | 局域网ip | 服务 | 内存 | 磁盘 |
nn71 | 10.172.54.71 | Ambari/HDP/AmbariServer/ | 250G | 500G+60T |
| nn72 | 10.172.54.72 | Compute node/DataNode | 250G | 500G+60T |
nn73 | 10.172.54.73 | Compute node/DataNode | 250G | 500G+60T |
nn74 | 10.172.54.74 | Compute node/DataNode | 250G | 500G+60T |
dn75 | 10.172.54.75 | Compute node/DataNode | 250G | 500G+60T |
dn76 | 10.172.54.76 | Compute node/DataNode | 250G | 500G+60T |
dn77 | 10.172.54.77 | Compute node/DataNode | 250G | 500G+60T |
4.基础环境准备
4.1磁盘挂载(所有节点)
#查看磁盘挂载情况[root@07b14d001 deployer]# lsblk[root@07b14d001 deployer]# df -h
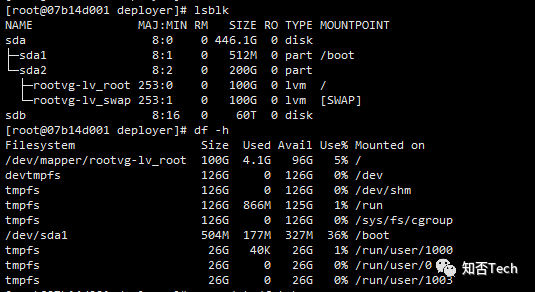
规划sdb划为/data盘
物理机挂盘:
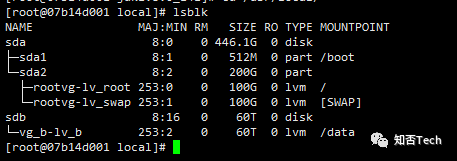
#!/bin/bash#pvcreate dev/sdbpvsvgcreate vg_b dev/sdbvgslvcreate -n lv_b -l +100%FREE vg_blvsmkfs.ext4 dev/vg_b/lv_bmkdir -p datamount -t ext4 dev/vg_b/lv_b datagrep "lv_b" etc/fstabif [[ "$?" != "0" ]];thenecho '/dev/vg_b/lv_b data ext4 defaults 0 0' >> etc/fstabfidf -hT
挂盘后:
4.2调整系统语言&时区(所有节点)
#修改系统语言为英文echo 'export LANG=en_US.UTF-8' >> ~/.bashrc#重新登录logout#修改时区cp usr/share/zoneinfo/Asia/Shanghai etc/localtime
4.3JDK安装(所有节点)
mkdir -p usr/local/javatar xvf home/deployer/jdk1.8.0_141.tar.gz -C usr/local/java/vim etc/profileexport JAVA_HOME=/usr/local/java/jdk1.8.0_141export JRE_HOME=${JAVA_HOME}/jreexport CLASSPATH=.:${JAVA_HOME}/lib:${JRE_HOME}/libexport PATH=${JAVA_HOME}/bin:$PATHsource etc/profile[root@nn71 root]$ java -versionjava version "1.8.0_141"Java(TM) SE Runtime Environment (build 1.8.0_141-b15)Java HotSpot(TM) 64-Bit Server VM (build 25.141-b15, mixed mode)You have new mail in var/spool/mail/root[unicom@nn71 root]$

4.4创建运维用户(所有节点)
创建Ambari维护用户并赋权,用于后期日常维护(每台机器
[root@07b14d001 yum.repos.d]# groupadd unicom[root@07b14d001 yum.repos.d]# useradd -g unicom -d home/unicom unicom[root@07b14d001 yum.repos.d]# echo "*****" | passwd --stdin unicomChanging password for user unicom.passwd: all authentication tokens updated successfully.[root@07b14d001 yum.repos.d]# cp etc/sudoers etc/sudoers_bak[root@07b14d001 yum.repos.d]# echo " unicom ALL=(ALL) NOPASSWD:ALL" >> etc/sudoers[root@07b14d001 yum.repos.d]#
4.5规划及修改hostname(所有节点)
[root@07b14d001 yum.repos.d]# vim etc/hosts127.0.0.1 localhost localhost.localdomain localhost4 localhost4.localdomain4::1 localhost localhost.localdomain localhost6 localhost6.localdomain610.172.54.71 nn71.hdp71.unicom nn7110.172.54.72 nn72.hdp71.unicom nn7210.172.54.73 nn73.hdp71.unicom nn7310.172.54.74 nn74.hdp71.unicom nn7410.172.54.75 dn75.hdp71.unicom dn7510.172.54.76 dn76.hdp71.unicom dn7610.172.54.77 dn77.hdp71.unicom dn77#同步集群其他节点scp etc/hosts root@{target_host}:/etc/hosts#修改hostname,重连生效[root@master ~]# vi etc/sysconfig/network# Created by anacondaNETWORKING=yesHOSTNAME=nn71[root@07b14d001 yum.repos.d]# hostnamectl set-hostname nn71#重启网络[root@nn71 ~]# systemctl restart network
4.6关闭禁用防火墙
[root@nn71 ~]# systemctl stop firewalld[root@nn71 ~]# systemctl disable firewalld
4.7挂载CentOSyum源
挂载http CentOS7.4 yum源,需安装httpd并挂源(主节点配置,其他节点访问)
部署环境无网络环境,有些必须的包无法下载,所以要创建需搭建CentOS7操作系统的yum源
mkdir -p tmp/CentOS-7mount -t auto dev/cdrom tmp/CentOS-7/cp -Rf tmp/CentOS-7 var/www/html/#修改repo文件:cd etc/yum.repos.d/mkdir -p bakmv *.repo bak/cp bak/CentOS-Base.repo .vi CentOS-Base.repo#修改repo文件:[base]name=CentOS-$releasever - Basebaseurl=http://10.172.54.71/CentOS-7enabled=1gpgcheck=0#挂源后,执行命令yum clean all && yum repolist#将repo文件拷贝至其他主机
4.8、时间同步ntp(所有节点)
检查是否安装

如未安装需要装一下
yum install ntp -y#设置开机启动[root@nn71 ~]# systemctl enable ntpd
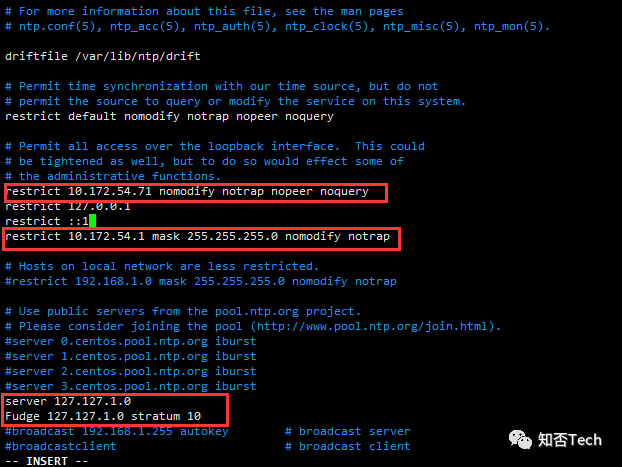
[root@nn71 ~]# vim etc/ntp.conf1)修改所有节点的/etc/ntp.conf【命令】vi etc/ntp.conf【内容】restrict 10.172.54.71 nomodify notrap nopeer noquery 当前节点IP地址restrict 10.172.54.1 mask 255.255.255.0 nomodify notrap 集群所在网段的网关(Gateway),子网掩码(Genmask)2)选择一个主节点,修改其/etc/ntp.conf【命令】vi etc/ntp.conf【内容】在server部分添加一下部分,并注释掉server 0 ~ nserver 127.127.1.0Fudge 127.127.1.0 stratum 103)主节点以外,继续修改/etc/ntp.conf【命令】vi etc/ntp.conf【内容】在server部分添加如下语句,将server指向主节点。server 10.172.54.71Fudge 10.172.54.71 stratum 10
server修改前:
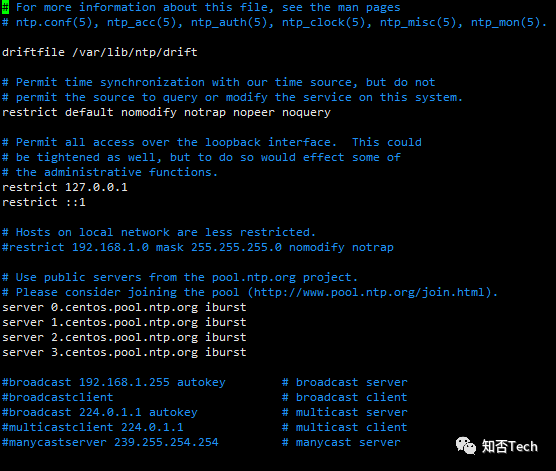
Server修改后:
#重启生效
systemctl restart ntpd
以上为一般ntpServer+client配置方法
本次案例使用的已有ntpServer
[root@nn71 ~]# vim etc/ntp.confrestrict 10.172.54.71 nomodify notrap nopeer noqueryrestrict 127.0.0.1restrict ::1restrict 10.172.54.1 mask 255.255.255.0 nomodify notrap#注意:ntp加固设置,防止 DDOS攻击disable monitorserver 10.xxx.0.1 preferserver 10.xxx.0.13server 10.xxx.0.1 preferserver 10.xxx.0.13#重启ntp[root@nn71 ~]# systemctl restart ntpd#查看状态[root@nn71 ~]#ntpq -p#设置ntp开机启动[root@nn71 ~]# systemctl enable ntpd

4.9、关闭安全增强 SELinux和THP(所有节点)
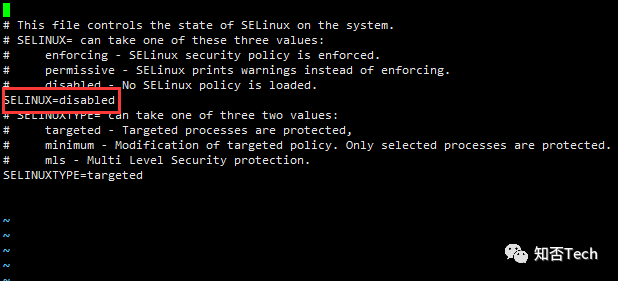
4.9.1、关闭SELinux
#暂时禁用SELinuxsetenforce 0#禁用selinux(永久):vi etc/selinux/configSELINUX=disabled
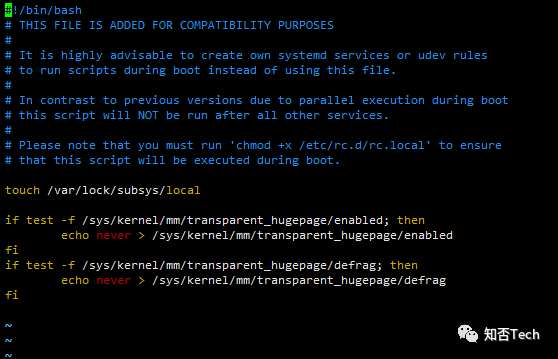
4.9.2、关闭THP
关闭THP并给予文件权限, 禁用后对cpu的性能提升有帮助
[root@nn71 ~]# vim etc/rc.d/rc.local#增加红色部分#!/bin/bash# THIS FILE IS ADDED FOR COMPATIBILITY PURPOSES## It is highly advisable to create own systemd services or udev rules# to run scripts during boot instead of using this file.## In contrast to previous versions due to parallel execution during boot# this script will NOT be run after all other services.## Please note that you must run 'chmod +x etc/rc.d/rc.local' to ensure# that this script will be executed during boot.touch var/lock/subsys/localif test -f sys/kernel/mm/transparent_hugepage/enabled; thenecho never > sys/kernel/mm/transparent_hugepage/enabledfiif test -f sys/kernel/mm/transparent_hugepage/defrag; thenecho never > sys/kernel/mm/transparent_hugepage/defragfi#赋权可执行[root@nn71 ~]# chmod +x etc/rc.d/rc.local
4.10、设置umask
集群所有主机设置umask,设置用户创建目录默认权限
echo umask 0022 >> etc/profile
4.11、设置ulimit和nproc
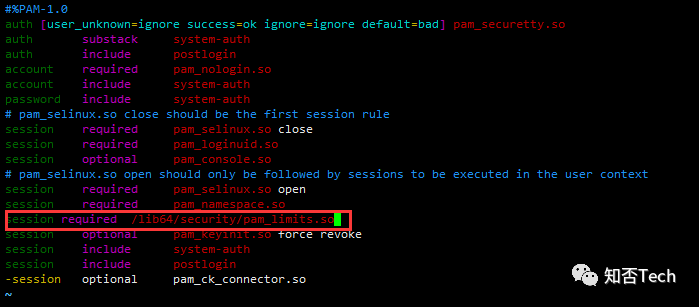
Hadoop会在同一时间使用很多的文件句柄.大多数linux系统使用的默认值1024是不能满足的
vim etc/pam.d/login#32位系统session required lib/security/pam_limits.so#64位系统(本案例)session required lib64/security/pam_limits.so
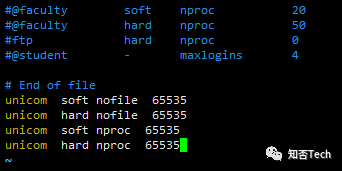
打开文件打开最大限制(所有节点)
vim /etc/security/limits.confunicom soft nofile 65535unicom hard nofile 65535unicom soft nproc 65535unicom hard nproc 65535或:echo "unicom soft nofile 65535" >> /etc/security/limits.confecho "unicom hard nofile 65535" >> /etc/security/limits.confecho "unicom soft nproc 65535" >> /etc/security/limits.confecho "unicom hard nproc 65535" >> /etc/security/limits.conf
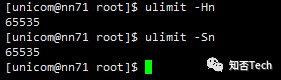
检查设置:
[root@nn71 ~]# su unicom[unicom@nn71 root]$ ulimit -Hn65535[unicom@nn71 root]$ ulimit -Sn65535[unicom@nn71 root]$
4.12、设置无密码登录
设置ssh无密码登录(unicom用户)
Ambari Server与Ambari Agent服务器之间需要配置 ssh无密互访,Ambari Server通过SSH公钥授权远程登录其他主机。配置步骤如下:
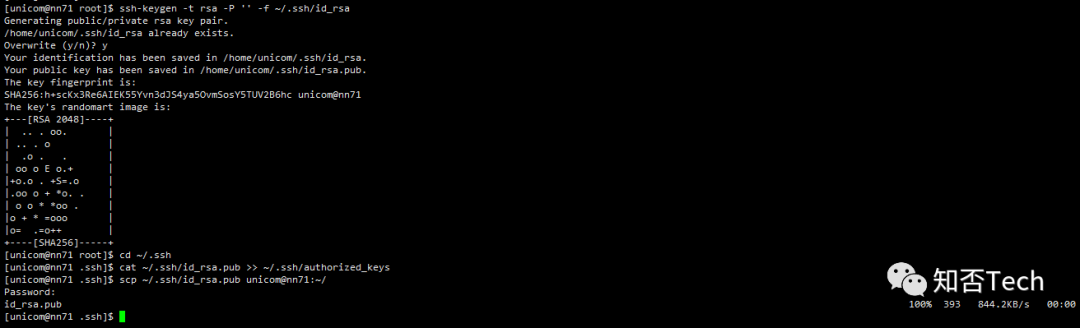
1.集群每台主机产生ssh登录认证密钥对id_rsa , id_rsa.pub秘钥文件
ssh-keygen -t rsa -P '' -f ~/.ssh/id_rsa
2:配置ssh无密登录:
2.1:Ambari server主机执行如下指令:
cd ~/.sshcat ~/.ssh/id_rsa.pub >> ~/.ssh/authorized_keys
2.2:将Ambari Server生成的公钥文件id_rsa.pub拷贝至集群其他Ambari Agent主机(target_hosts):
scp ~/.ssh/id_rsa.pub unicom@{target_hosts}:~/
2.3:Agent主机分别执行下面命令:
cat ~/id_rsa.pub >> ~/.ssh/authorized_keys
3:所有主机设置文件目录权限:
chmod 700 ~/.sshchmod 600 ~/.ssh/authorized_keys

Ambari Server主机分别执行ssh unicom@{target.host}, 进行免密码登录检查。
4.12、软件包挂源(server节点挂源,其他节点拷贝repo)
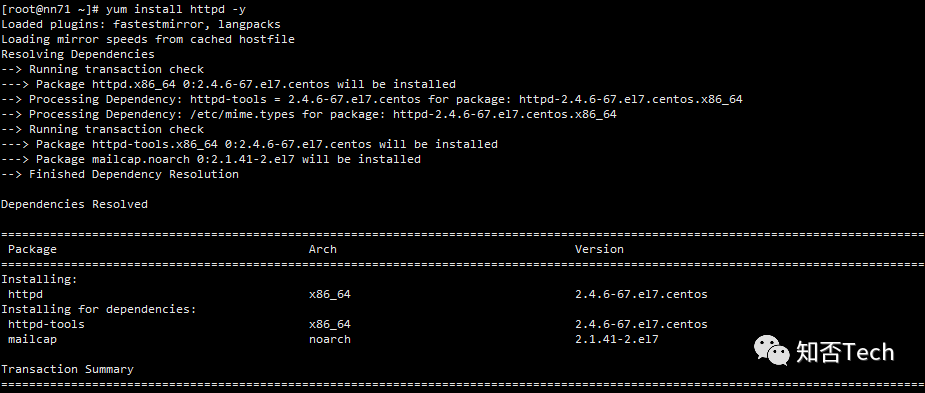
因为离线安装,需配置http yum源,如未安装httpd服务,此处也可安装
[root@nn71 ~]# yum install httpd -y[root@nn71 ~]# yum install yum-utils createrepo yum-plugin-priorities wget
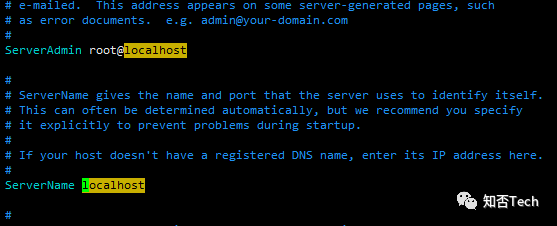
修改httpd默认配置(此处若考虑数据安全,可用ng做端口转发)
vi /etc/httpd/conf/httpd.conf1)修改 DocumentRoot为"/var/www/html"2)修改 <Directory "/var/www/html">节:添加Options Indexes FollowSymLinks3)修改“#ServerName www.example.com:80”去掉“#,改为ServerName localhost4)删除默认页面:rm -f /etc/httpd/conf.d/welcome.conf /var/www/error/noindex.html#设置httpd开启自启systemctl enable httpdsystemctl restart httpd
验证httpd配置修改:http://10.172.54.71/

将ambari-2.7.4.0-centos7.tar.gz、HDP-3.1.4.0-centos7-rpm.tar.gz、HDP-UTILS-1.1.0.22-centos7.tar.gz解压至/var/www/html
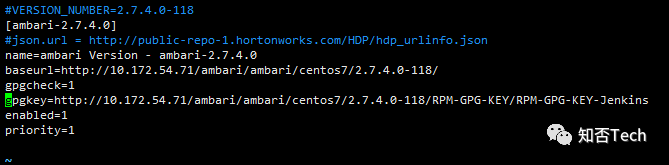
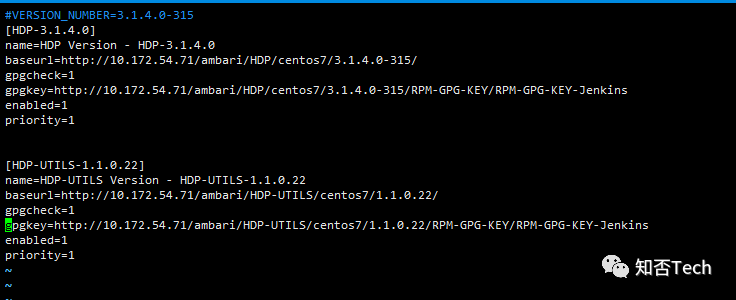
#本案例为考虑跟磁盘容量问题,将介质解压至/data目录下,再使用软连接的方式链到/var/www/html下mkdir ambaritar zxvf ambari-2.7.4.0-centos7.tar.gz -C ambari/tar zxvf HDP-3.1.4.0-centos7-rpm.tar.gz -C ambaritar zxvf HDP-UTILS-1.1.0.22-centos7.tar.gz -C ambariln -s /data/yum/ambari /var/www/html/ambari#配置repo文件[root@nn71 centos7]# vim /var/www/html/ambari/ambari/centos7/2.7.4.0-118/ambari.repo#VERSION_NUMBER=2.7.4.0-118[ambari-2.7.4.0]#json.url = http://public-repo-1.hortonworks.com/HDP/hdp_urlinfo.jsonname=ambari Version - ambari-2.7.4.0baseurl=http://10.172.54.71/ambari/ambari/centos7/2.7.4.0-118/gpgcheck=1gpgkey=http://10.172.54.71/ambari/ambari/centos7/2.7.4.0-118/RPM-GPG-KEY/RPM-GPG-KEY-Jenkinsenabled=1priority=1[root@nn71 centos7]# cp /var/www/html/ambari/ambari/centos7/2.7.4.0-118/ambari.repo /etc/yum.repos.d/[root@nn71 centos7]# vim /var/www/html/ambari/HDP/centos7/3.1.4.0-315/hdp.repo#VERSION_NUMBER=3.1.4.0-315[HDP-3.1.4.0]name=HDP Version - HDP-3.1.4.0baseurl=http://10.172.54.71/ambari/HDP/centos7/3.1.4.0-315/gpgcheck=1gpgkey=http://10.172.54.71/ambari/HDP/centos7/3.1.4.0-315/RPM-GPG-KEY/RPM-GPG-KEY-Jenkinsenabled=1priority=1[HDP-UTILS-1.1.0.22]name=HDP-UTILS Version - HDP-UTILS-1.1.0.22baseurl=http://10.172.54.71/ambari/HDP-UTILS/centos7/1.1.0.22/gpgcheck=1gpgkey=http://10.172.54.71/ambari/HDP-UTILS/centos7/1.1.0.22/RPM-GPG-KEY/RPM-GPG-KEY-Jenkinsenabled=1priority=1cp /var/www/html/ambari/HDP/centos7/3.1.4.0-315/hdp.repo /etc/yum.repos.d/
再将repo文件拷贝至其他节点,并移至/etc/yum.repos.d下
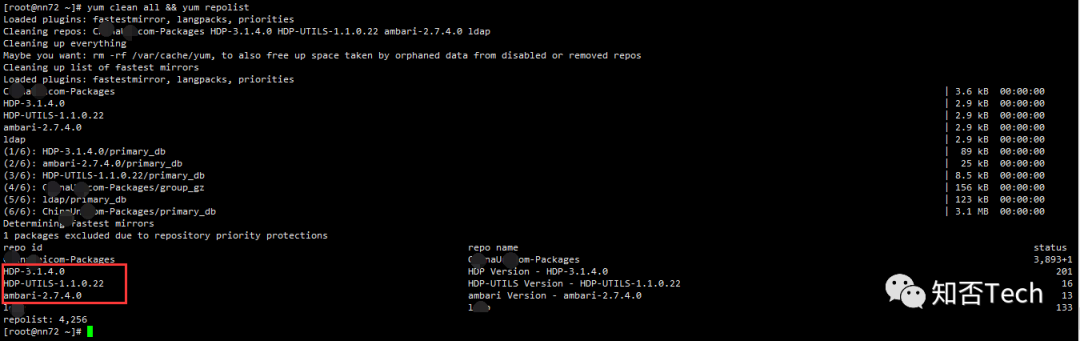
[root@nn71 yum.repos.d]# scp ambari.repo unicom@10.172.54.72:/home/unicom/Password:ambari.repo 100% 341 631.2KB/s 00:00[root@nn71 yum.repos.d]# scp hdp.repo unicom@10.172.54.72:/home/unicom/Password:hdp.repo 100% 510 994.4KB/s 00:00100% 510 1.0MB/s 00:00[root@dn75 ~]# cp /home/unicom/hdp.repo /etc/yum.repos.d/[root@dn75 ~]# cp /home/unicom/ambari.repo /etc/yum.repos.d/[root@dn75 ~]# yum clean all && yum repolist
至此离线yum源配置完毕
4.13、删除snappy包(server节点)
卸载并删除snappy冲突包(Ambari Server节点,本案例为nn71)
原因:删除CentOS7操作系统中的snappy包,这是因为大数据集群安装过程中会安装snappy软件,但用于安装大数据集群的节点安装的操作系统已安装snappy软件,且版本比安装大数据集群需要的高,所以会导致大数据集群安装失败。
[root@nn71 ~]# yum list installed | grep snappysnappy.x86_64 1.1.0-3.el7 @anaconda[root@nn71 ~]# yum -y remove snappyLoaded plugins: fastestmirror, langpacks, prioritiesResolving Dependencies#查看当前yum源除HDP外是否有其他snappy版本[root@nn71 ~]# yum list |grep snappysnappy.i686 1.1.0-3.el7 HDP-UTILS-1.1.0.22snappy.x86_64 1.1.0-3.el7 HDP-UTILS-1.1.0.22snappy-devel.i686 1.1.0-3.el7 HDP-UTILS-1.1.0.22snappy-devel.x86_64 1.1.0-3.el7 HDP-UTILS-1.1.0.22

4.14、安装MySql服务
(本案例使用阿里云专有云RDS,并未使用开源Mysql,如需Mysql可自行安装)
需要为安装组件ambari、ranger、hive、hbase等建立数据库并建立对应用户。以下为rds建立的用户名同名数据库:
ambari71hbase71ranger71hive71
5.安装Ambari2.7.4
5.1、安装ambari-server
[unicom@nn71 root]$ sudo yum install ambari-serverLoaded plugins: fastestmirror, langpacks, prioritiesLoading mirror speeds from cached hostfile1 packages excluded due to repository priority protectionsResolving Dependencies--> Running transaction check---> Package ambari-server.x86_64 0:2.7.4.0-118 will be installed--> Processing Dependency: postgresql-server >= 8.1 for package: ambari-server-2.7.4.0-118.x86_64--> Running transaction check---> Package postgresql-server.x86_64 0:9.2.21-1.el7 will be installed--> Processing Dependency: postgresql-libs(x86-64) = 9.2.21-1.el7 for package: postgresql-server-9.2.21-1.el7.x86_64--> Processing Dependency: postgresql(x86-64) = 9.2.21-1.el7 for package: postgresql-server-9.2.21-1.el7.x86_64--> Processing Dependency: libpq.so.5()(64bit) for package: postgresql-server-9.2.21-1.el7.x86_64--> Running transaction check---> Package postgresql.x86_64 0:9.2.21-1.el7 will be installed---> Package postgresql-libs.x86_64 0:9.2.21-1.el7 will be installed--> Finished Dependency ResolutionDependencies Resolved===============================================================================================================================================================================================Package Arch Version Repository Size===============================================================================================================================================================================================Installing:ambari-server x86_64 2.7.4.0-118 ambari-2.7.4.0 370 MInstalling for dependencies:postgresql x86_64 9.2.21-1.el7 CentiOS7.4 3.0 Mpostgresql-libs x86_64 9.2.21-1.el7 CentiOS7.4 233 kpostgresql-server x86_64 9.2.21-1.el7 CentiOS7.4 3.8 MTransaction Summary===============================================================================================================================================================================================Install 1 Package (+3 Dependent packages)Total download size: 377 MInstalled size: 470 MIs this ok [y/d/N]: yDownloading packages:(1/4): postgresql-libs-9.2.21-1.el7.x86_64.rpm | 233 kB 00:00:00(2/4): postgresql-9.2.21-1.el7.x86_64.rpm | 3.0 MB 00:00:00(3/4): postgresql-server-9.2.21-1.el7.x86_64.rpm | 3.8 MB 00:00:00warning: /var/cache/yum/x86_64/7/ambari-2.7.4.0/packages/ambari-server-2.7.4.0-118.x86_64.rpm: Header V4 RSA/SHA1 Signature, key ID 07513cad: NOKEY======= ] 101 MB/s | 363 MB 00:00:00 ETAPublic key for ambari-server-2.7.4.0-118.x86_64.rpm is not installed(4/4): ambari-server-2.7.4.0-118.x86_64.rpm | 370 MB 00:00:03-----------------------------------------------------------------------------------------------------------------------------------------------------------------------------------------------Total 97 MB/s | 377 MB 00:00:03Retrieving key from http://10.172.54.71/ambari/ambari/centos7/2.7.4.0-118/RPM-GPG-KEY/RPM-GPG-KEY-JenkinsImporting GPG key 0x07513CAD:Userid : "Jenkins (HDP Builds) <jenkin@hortonworks.com>"Fingerprint: df52 ed4f 7a3a 5882 c099 4c66 b973 3a7a 0751 3cadFrom : http://10.172.54.71/ambari/ambari/centos7/2.7.4.0-118/RPM-GPG-KEY/RPM-GPG-KEY-JenkinsIs this ok [y/N]: yRunning transaction checkRunning transaction testTransaction test succeededRunning transactionInstalling : postgresql-libs-9.2.21-1.el7.x86_64 1/4Installing : postgresql-9.2.21-1.el7.x86_64 2/4Installing : postgresql-server-9.2.21-1.el7.x86_64 3/4Installing : ambari-server-2.7.4.0-118.x86_64 4/4Verifying : postgresql-libs-9.2.21-1.el7.x86_64 1/4Verifying : postgresql-server-9.2.21-1.el7.x86_64 2/4Verifying : ambari-server-2.7.4.0-118.x86_64 3/4Verifying : postgresql-9.2.21-1.el7.x86_64 4/4Installed:ambari-server.x86_64 0:2.7.4.0-118Dependency Installed:postgresql.x86_64 0:9.2.21-1.el7 postgresql-libs.x86_64 0:9.2.21-1.el7 postgresql-server.x86_64 0:9.2.21-1.el7Complete!
5.2、初始化ambari-server数据库连接配置
配置mysql连接器jar
#下载并拷贝mysql-connector-java的jar包cp /home/unicom/mysql-connector-java-5.1.46.jar /usr/share/javaln -s /usr/share/java/mysql-connector-java-5.1.46.jar /usr/share/java/mysql-connector-java.jar
初始化ambari-server数据库连接配置
[unicom@nn71 java]$ sudo ambari-server setup --jdbc-db=mysql --jdbc-driver=/usr/share/java/mysql-connector-java.jarUsing python /usr/bin/pythonSetup ambari-serverCopying /usr/share/java/mysql-connector-java.jar to /var/lib/ambari-server/resources/mysql-connector-java.jarIf you are updating existing jdbc driver jar for mysql with mysql-connector-java.jar. Please remove the old driver jar, from all hosts. Restarting services that need the driver, will automatically copy the new jar to the hosts.JDBC driver was successfully initialized.Ambari Server 'setup' completed successfully.
5.3、ambari-server setup
[unicom@nn71 ~]$ sudo ambari-server setupUsing python /usr/bin/pythonSetup ambari-serverChecking SELinux...SELinux status is 'disabled'Customize user account for ambari-server daemon [y/n] (n)? yEnter user account for ambari-server daemon (root):unicomAdjusting ambari-server permissions and ownership...Checking firewall status...Checking JDK...[1] Oracle JDK 1.8 + Java Cryptography Extension (JCE) Policy Files 8[2] Custom JDK==============================================================================Enter choice (1): 2WARNING: JDK must be installed on all hosts and JAVA_HOME must be valid on all hosts.WARNING: JCE Policy files are required for configuring Kerberos security. If you plan to use Kerberos,please make sure JCE Unlimited Strength Jurisdiction Policy Files are valid on all hosts.Path to JAVA_HOME: /usr/local/java/jdk1.8.0_141/Validating JDK on Ambari Server...done.Check JDK version for Ambari Server...JDK version found: 8Minimum JDK version is 8 for Ambari. Skipping to setup different JDK for Ambari Server.Checking GPL software agreement...GPL License for LZO: https://www.gnu.org/licenses/old-licenses/gpl-2.0.en.htmlEnable Ambari Server to download and install GPL Licensed LZO packages [y/n] (n)? nCompleting setup...Configuring database...Enter advanced database configuration [y/n] (n)? yConfiguring database...==============================================================================Choose one of the following options:[1] - PostgreSQL (Embedded)[2] - Oracle[3] - MySQL / MariaDB[4] - PostgreSQL[5] - Microsoft SQL Server (Tech Preview)[6] - SQL Anywhere[7] - BDB==============================================================================Enter choice (1): 3Hostname (localhost): 10.238.9.244Port (3306):Database name (ambari): ambari71Username (ambari): ambari71Enter Database Password (bigdata):Re-enter password:Configuring ambari database...Should ambari use existing default jdbc /usr/share/java/mysql-connector-java.jar [y/n] (y)? yConfiguring remote database connection properties...WARNING: Before starting Ambari Server, you must run the following DDL directly from the database shell to create the schema: /var/lib/ambari-server/resources/Ambari-DDL-MySQL-CREATE.sqlProceed with configuring remote database connection properties [y/n] (y)? yExtracting system views...ambari-admin-2.7.4.0.118.jar....Ambari repo file contains latest json url http://public-repo-1.hortonworks.com/HDP/hdp_urlinfo.json, updating stacks repoinfos with it...Adjusting ambari-server permissions and ownership...Ambari Server 'setup' completed successfully.[unicom@nn71 ~]$
5.4、执行ambari初始化sql
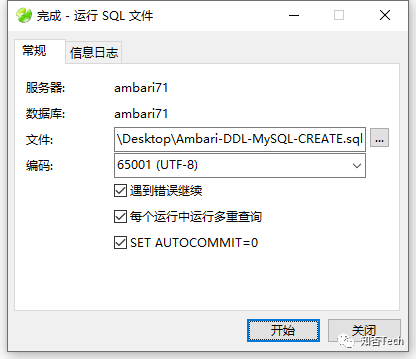
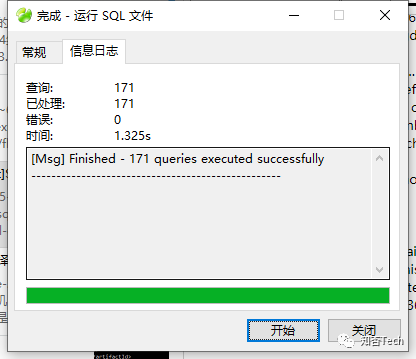
查看是否初始化表成功
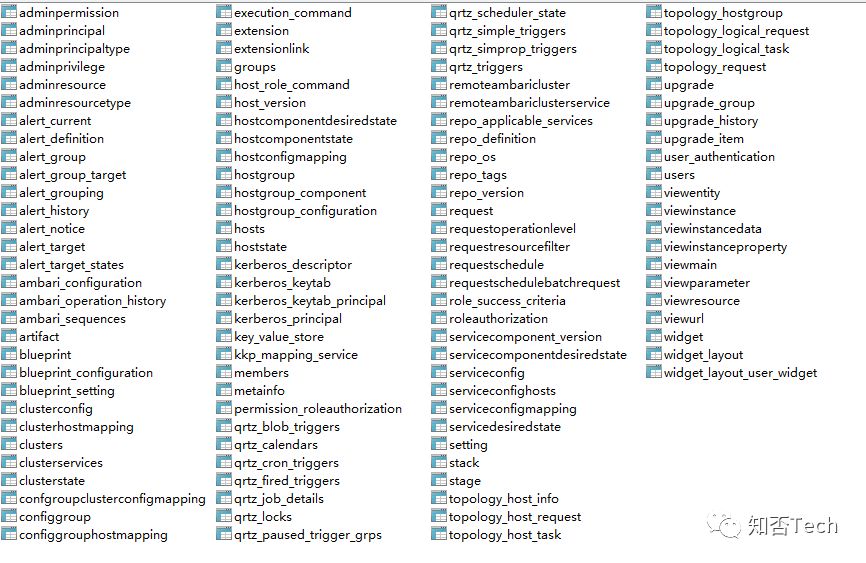
至此,ambari-server安装完成。
6、启动ambari server
[unicom@nn71 root]$ sudo ambari-server startUsing python /usr/bin/pythonStarting ambari-serverAmbari Server running with administrator privileges.Organizing resource files at /var/lib/ambari-server/resources...Ambari database consistency check started...Server PID at: /var/run/ambari-server/ambari-server.pidServer out at: /var/log/ambari-server/ambari-server.outServer log at: /var/log/ambari-server/ambari-server.logWaiting for server start.....................Server started listening on 8080DB configs consistency check: no errors and warnings were found.Ambari Server 'start' completed successfully.
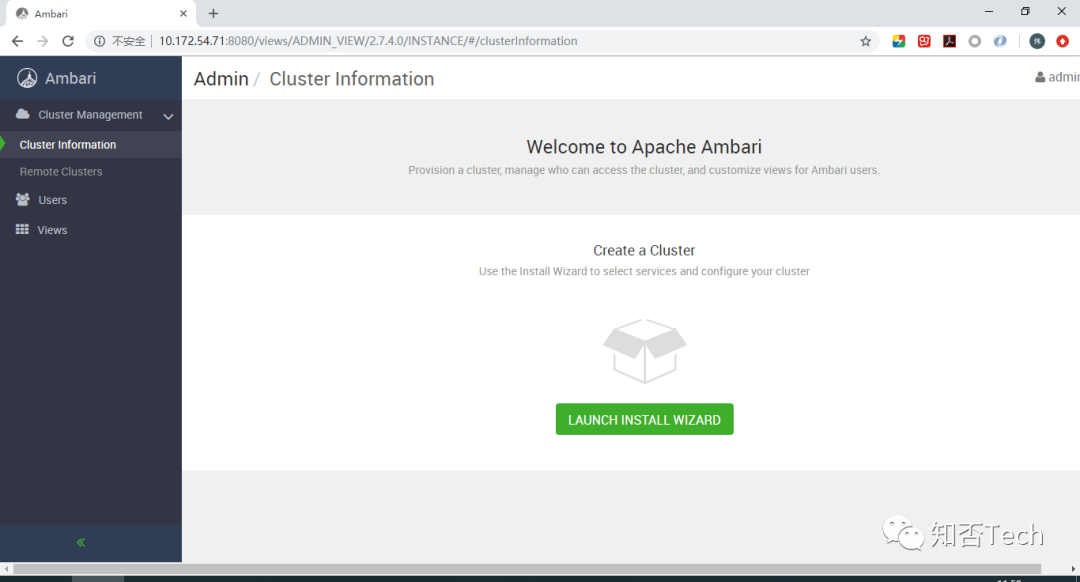
浏览器访问ambari-server主机8080端口,得劲~

默认用户名密码:admin/admin,开心不~
因篇幅过大,HDP3.1.4集群搭建下篇再聊~
纯手打,希望对刚刚接触大数据或想自己搭建大数据集群的你有所帮助~