


Tekton 是一个基于 Kubernetes 的云原生 CI/CD 开源框架,Tekton 的前身是 Knative 的子项目 build-pipeline,现在是 CD 基金会的项目。Tekton 抽象了底层实现,功能强大而灵活,让每个人都能更轻松地进行 CI/CD。
Tekton 关键的资源对象
Tekton 提供了多种 Kubernetes CRD 资源对象,使用 Kubernetes 声明式风格来定义 CI/CD,主要有以下几个资源对象:
PipelineResource:定义 Task 的输入输出资源,比如源码地址、镜像仓库地址等
Task:定义任务模版,可以有多个 Step,每个 Step 表示一个动作,比如编译源码、构建镜像等,每个 Step 由一个 Container 来执行。
TaskRun:是 Task 的实际执行。一个 TaskRun 控制一个 Pod,Task 中的 Step 对应 Pod 中的 Container。
Pipeline:由一个或多个 Task 组成,定义一个完整的流水线。
PipelineRun:与 task 和 taskRun 的关系类似,pipelineRun 也是代表 pipeline 的一次实际运行。
Tekton 安装
Tekton 提供了 Operator ,可以在 Kubernetes 集群上轻松安装、升级和管理 Pipelines, Dashboard, Triggers
$ kubectl apply -f https://storage.googleapis.com/tekton-releases/operator/latest/release.yaml
# all 安装清单是 pipelines, triggers , dashboard 组件
$ kubectl apply -f https://raw.githubusercontent.com/tektoncd/operator/main/config/crs/kubernetes/config/all/operator_v1alpha1_config_cr.yaml
查看
tekton-operator    tekton-operator-8c9c44b6-vvtcc                       1/1     Running     0          24h
tekton-pipelines   tekton-dashboard-59d7b97b9f-8fmst                    1/1     Running     0          24h
tekton-pipelines   tekton-operator-proxy-webhook-56c8d77bcd-6bsnb       1/1     Running     0          24h
tekton-pipelines   tekton-pipelines-controller-7f6fb87656-9pkrc         1/1     Running     0          24h
tekton-pipelines   tekton-pipelines-webhook-86cd649b94-cqqpt            1/1     Running     0          24h
tekton-pipelines   tekton-triggers-controller-68554d875c-gltdb          1/1     Running     0          24h
tekton-pipelines   tekton-triggers-core-interceptors-66fb9db589-b8dfr   1/1     Running     0          24h
tekton-pipelines   tekton-triggers-webhook-d8f7d59d-4qlv9               1/1     Running     0          24h
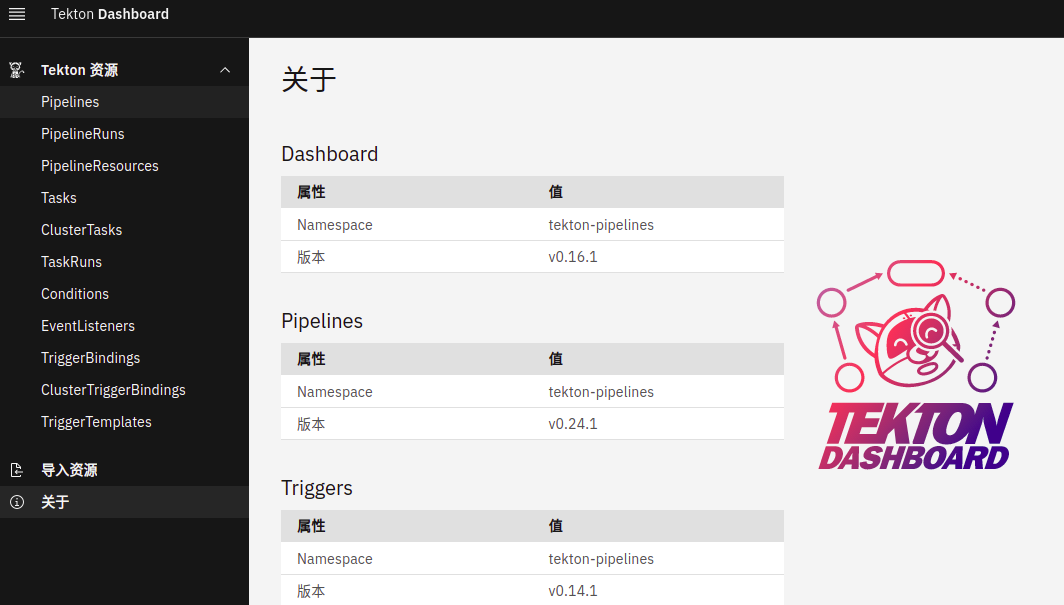
可以使用 Ingress 来访问 Tekton 的 Dashboard ,也可以使用 NodePort
---
apiVersion: networking.k8s.io/v1
kind: Ingress
metadata:
  name: tekton-dashboard
  namespace: tekton-pipelines
  annotations:
    kubernetes.io/ingress.class: nginx
    ingress.kubernetes.io/force-ssl-redirect: "true"
    kubernetes.io/tls-acme: "true"
spec:
  rules:
  - host: "xxx.xxx.xxx"
    http:
      paths:
      - pathType: Prefix
        path: "/"
        backend:
          service:
            name: tekton-dashboard
            port:
              number: 9097
  tls:
   - secretName: tekton-dashboard-cert
可以安装 Tekton CLI 工具, 更方便,比如 TaskRun ,tkn task start 就可以,而无需 kubectl 创建 TaskRun 资源对象。
$ wget https://github.com/tektoncd/cli/releases/download/v0.19.0/tkn_0.19.0_Linux_x86_64.tar.gz
$ tar -zxvf tkn_0.19.0_Linux_x86_64.tar.gz
$ mv tkn /usr/local/bin/
运行第一个 Tekton 流水线
创建 hello Task
# cat task-hello.yaml
apiVersion: tekton.dev/v1beta1
kind: Task
metadata:
  name: hello
spec:
  steps:
    - name: hello
      image: ubuntu
      command:
        - echo
      args:
        - "Hello World!"
# kubectl create -f  task-hello.yaml
task.tekton.dev/hello created
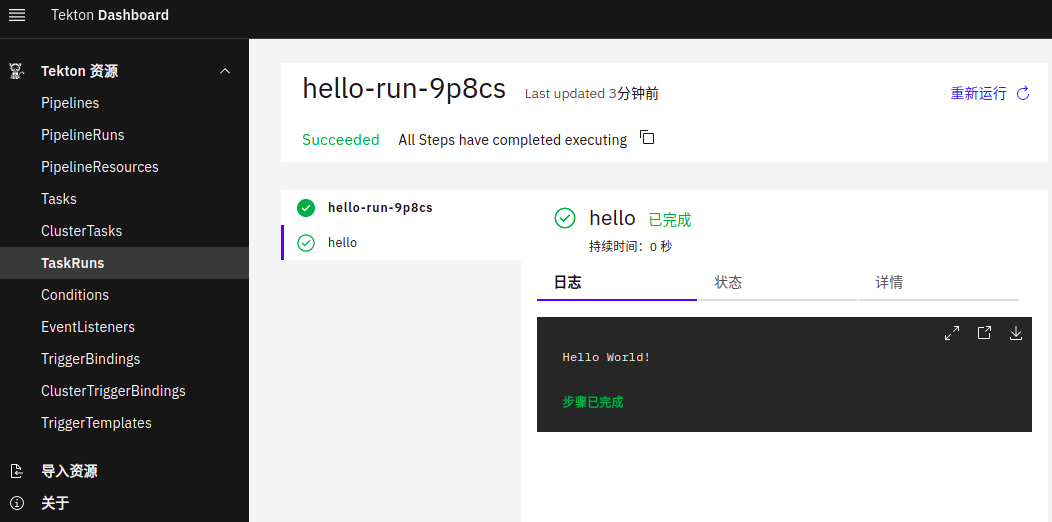
运行 hello Task
# tkn task start hello
TaskRun started: hello-run-9p8cs

In order to track the TaskRun progress run:
tkn taskrun logs hello-run-9p8cs -f -n default
# 或
# cat taskRun-hello.yaml
apiVersion: tekton.dev/v1beta1
kind: TaskRun
metadata:
  generateName: hello-run-
spec:
  taskRef:
    name: hello
# kubectl create -f taskRun-hello.yaml
可以在 dashboard 或使用 kubectl 查看
$ kubectl get po
NAME                                             READY   STATUS      RESTARTS   AGE
hello-run-9p8cs-pod-2zvs8                        0/1     Completed   0          3m42s
创建 goodbye Task
$ cat task-goodbye.yaml
apiVersion: tekton.dev/v1beta1
kind: Task
metadata:
  name: goodbye
spec:
  steps:
    - name: goodbye
      image: ubuntu
      script: |
        #!/bin/bash
        echo "Goodbye World!"
$ kubectl create -f  task-goodbye.yaml
task.tekton.dev/goodbye created
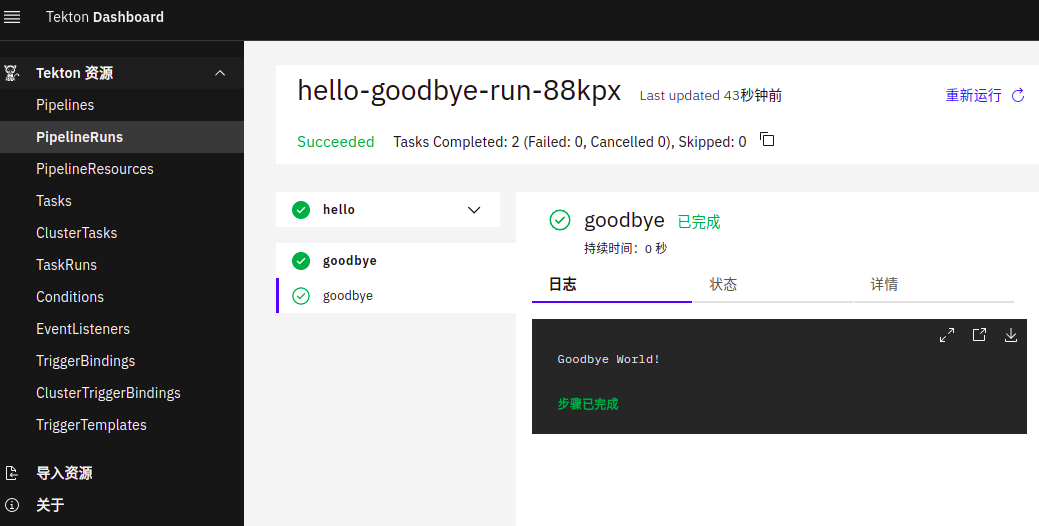
创建 Pipeline ,把 hello Task 和 goodbye Task 组成到一起
$ cat pipeline-hello-goodbye.yaml
apiVersion: tekton.dev/v1beta1
kind: Pipeline
metadata:
  name: hello-goodbye
spec:
  tasks:
  - name: hello
    taskRef:
      name: hello
  - name: goodbye
    runAfter:
     - hello
    taskRef:
      name: goodbye
$ kubectl create -f  pipeline-hello-goodbye.yaml
pipeline.tekton.dev/hello-goodbye created
运行 Pipeline
$ cat pipelineRun-hello-goodbye.yaml
apiVersion: tekton.dev/v1beta1
kind: PipelineRun
metadata:
  generateName: hello-goodbye-run-
spec:
  pipelineRef:
    name: hello-goodbye
$ kubectl create -f pipelineRun-hello-goodbye.yaml
pipelinerun.tekton.dev/hello-goodbye-run-88kpx created
查看
Go Pipeline example
以 Go 项目为例来创建一个流水线,在流水线中运行应用程序的单元测试、构建镜像并推送到 Docker 仓库。

1、PipelineResource 对象,定义输入的信息
apiVersion: tekton.dev/v1alpha1
kind: PipelineResource
metadata:
  name: github-tekton-examples
  namespace: default
spec:
  type: git
  params:
    - name: url
      value: https://github.com/prodanlabs/tekton-examples
    - name: revision
      value: main
2、git 仓库的用户密码,在实际的环境中项目应该都是私有需要验证的。
apiVersion: v1
kind: Secret
metadata:
  name: github-auth
  annotations:
    tekton.dev/git-0: https://github.com
type: kubernetes.io/basic-auth
stringData:
  username: {username}
  password: {password}
3、PipelineResource 对象,定义输出的信息
apiVersion: tekton.dev/v1alpha1
kind: PipelineResource
metadata:
  name: docker-registry-tekton-examples
  namespace: default
spec:
  type: image
  params:
    - name: url
      value: docker.io/prodan/tekton-examples
4、镜像仓库的用户密码,在实际的环境中项目应该都是私有需要验证的。
apiVersion: v1
kind: Secret
metadata:
  name: docker-registry-auth
  namespace: default
  annotations:
    tekton.dev/docker-0: https://index.docker.io/v1/
type: kubernetes.io/basic-auth
stringData:
  username: {docker-hub-uaser}
  password: {docker-hub-password}
5、创建 ServiceAccount
apiVersion: v1
kind: ServiceAccount
metadata:
  name: pipeline-sa
secrets:
  - name: docker-registry-auth
  - name: github-auth
6、创建 go 单元测试任务
apiVersion: tekton.dev/v1beta1
kind: Task
metadata:
  name: go-test
  annotations:
    tekton.dev/tags: go-run-test
spec:
  resources:
    inputs:
      - name: source-repo
        type: git
  steps:
    - name: go-run-test
      image: golang:1.15-alpine
      workingDir: /workspace/source-repo
      env:
      - name: CGO_ENABLED
        value: "0"
      command: ["go"]
      args: ["test"]
7、创建 image tag 任务,获取 git 提交的 head 作为镜像的 tag。通过 results 把结果传递给其他 Task。当然,可以也可以把这步合并到其他 Task 。
apiVersion: tekton.dev/v1beta1
kind: Task
metadata:
  name: image-tag
  annotations:
    tekton.dev/tags: git-commit-head
spec:
  resources:
    inputs:
      - name: source-repo
        type: git
  results:
    - name: git-commit-head
      description: The precise commit SHA that was fetched by this Task
  steps:
    - name: git-commit-head
      image: gcr.io/tekton-releases/github.com/tektoncd/pipeline/cmd/git-init:v0.24.3
      script: |
        #!/usr/bin/env sh
        cd /workspace/source-repo/
        RESULT_SHA="$(git rev-parse --short HEAD | tr -d '\n')"
        echo -n "$RESULT_SHA" > $(results.git-commit-head.path)
8、编译、构建镜像和上传镜像。不推荐使用 docker 构建镜像。
apiVersion: tekton.dev/v1beta1
kind: Task
metadata:
  name: build-and-push
  annotations:
    tekton.dev/tags: build-and-push
spec:
  params:
    - name: pathToDockerFile
      type: string
      description: The path to the dockerfile to build
      default: /workspace/source-repo/Dockerfile
    - name: imageTag
      description: Tag to apply to the built image
      type: string
    - name: pathToContext
      type: string
      description: |
        The build context used by Kaniko
        (https://github.com/GoogleContainerTools/kaniko#kaniko-build-contexts)
      default: $(resources.inputs.source-repo.path)
  resources:
    inputs:
      - name: source-repo
        type: git
    outputs:
      - name: builtImage
        type: image
  steps:
    - name: build-and-push
      image: gcr.io/kaniko-project/executor:latest
      env:
        - name: DOCKER_CONFIG
          value: /tekton/home/.docker
      args:
        - --context=$(params.pathToContext)
        - --dockerfile=$(params.pathToDockerFile)
        - --destination=$(resources.outputs.builtImage.url):$(params.imageTag)
9、创建流水线,把上面的任务连起来
---
apiVersion: tekton.dev/v1beta1
kind: Pipeline
metadata:
  name: go-pipeline
spec:
  resources:
    - name: source-repo
      type: git
    - name: builtImage
      type: image
  tasks:
    # 运行应用测试
    - name: go-test
      taskRef:
        name: go-test
      resources:
        inputs:
          - name: source-repo      # Task 输入名称
            resource: source-repo  # Pipeline 资源名称
    - name: image-tag
      taskRef:
        name: image-tag
      resources:
        inputs:
          - name: source-repo      # Task 输入名称
            resource: source-repo  # Pipeline 资源名称
      runAfter:
        - go-test                  # go-test 任务执行之后
    - name: build-and-push
      params:
        - name: imageTag
          value: $(tasks.image-tag.results.git-commit-head) # 注入参数
      taskRef:
        name: build-and-push
      resources:
        inputs:
          - name: source-repo      # Task 输入名称
            resource: source-repo  # Pipeline 资源名称
        outputs:
          - name: builtImage
            resource: builtImage
      runAfter:
        - image-tag                # image-tag 任务执行之后
10、运行流水线
apiVersion: tekton.dev/v1beta1
kind: PipelineRun
metadata:
  name: run-pipeline-go
spec:
  serviceAccountName: pipeline-sa
  pipelineRef:
    name: go-pipeline
  resources:
    - name: source-repo
      resourceRef:
        name: github-tekton-examples
    - name: builtImage
      resourceRef:
        name: docker-registry-tekton-examples
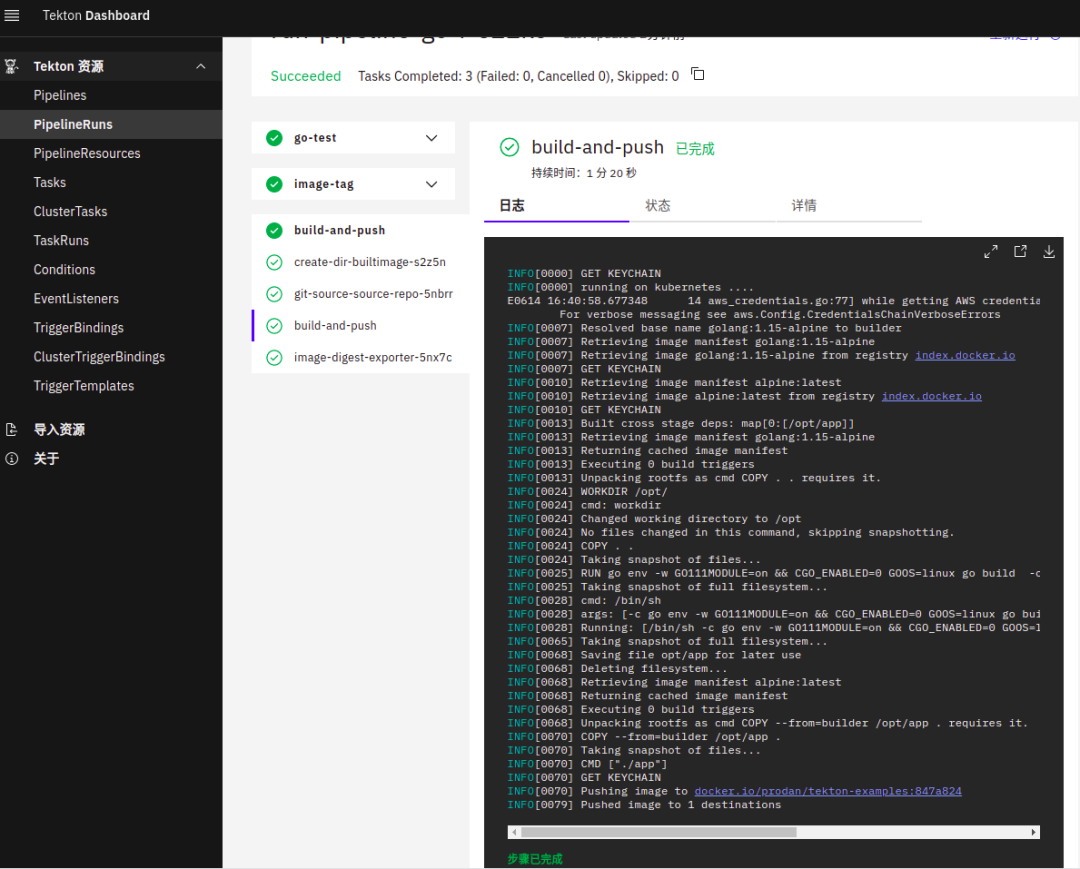
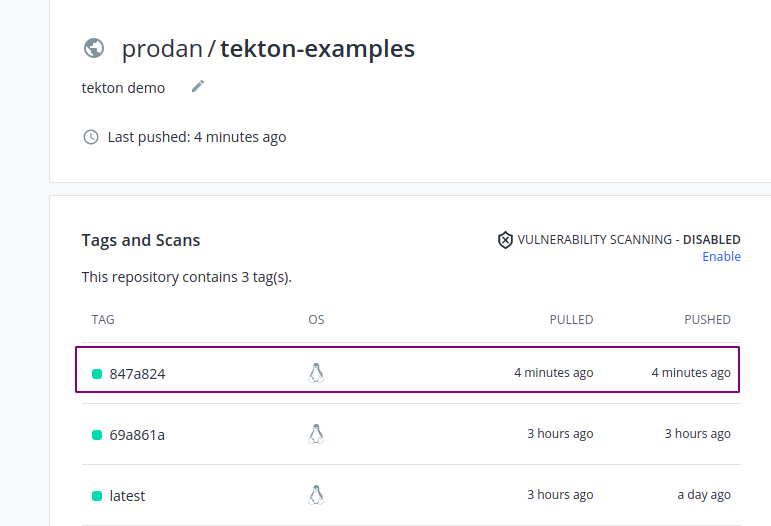
11、查看 docker 仓库
小结
最近一段时间在做 CI/CD 的选型,目前比较倾向的方案是 Tekton CI + Argo CD 。完整的 CI/CD 一般都是在开发测试环境中,在实际的生成环境中,大都是通过 CD 把通过测试的镜像更新到生产环境。Tekton trigger 等功能后续更新...
文中示例项目的地址:
https://github.com/prodanlabs/tekton-examples
