


一. 前言二. 变化迁移的变化源码的变化三. 基本使用四. 源码解析@ConfigurationPropertiesConfigurationPropertiesBindingPostProcessorafterPropertiesSet()关于validator关于propertySourcespostProcessBeforeInitialization()bind()getBinder()Binderbind()bindObject()Part 1: 寻找属性和匹配过程Part 2: 绑定过程bindBean()JavaBeanBinderbind()五. 总结
一. 前言
开发中, 时常会有获取某个属性资源文件的场景, 尤其是在多个Profile不同配置时
<!-- more -->
熟悉Spring的可能知道:
来自spring-beans的
@Value
能够完成这一功能我们经常在xml中配置的
PropertyPlaceholderConfigurer
及其父类就是来负责解析属性的
想要了解它的解析过程, 可以从
PropertyPlaceholderConfigurer#postProcessBeanFactory()
入手
@Value
用起来很方便, 而在Spring Boot中, 提供了一种更为优雅的配置绑定方式: @ConfigurationProperties
通过配合该注解来完成属性资源文件到Bean属性的绑定.
之前我很好奇为什么引入rabbit依赖后, 没有配置任何属性源而直接启动就能连接到, Spring Boot的Auto Configuration特性是怎么把连接的配置属性绑定进去的呢
在spring-boot-autoconfigure
源码中, 能看到大量@ConfigurationProperties
案例的运用, 例如我们熟悉的:
RedisPropertiesJpaPropertiesRabbitPropertiesetc...
这次源码分析我选用的版本是Spring Boot 2.0.8.RELEASE, 而网上的源码分析大都是基于1.x版本
二. 变化
迁移的变化
在Spring Boot 2.x中, 对配置属性绑定有了一些变化, 例如Relaxed Binding(宽松绑定)的约束, 以及新的Binder API
关于Relaxed Binding, 如果是1.x迁移2.x, 这部分内容的变化并不会造成很大麻烦
但如果你之前的配置使用了驼峰或过于"宽松"的写法, 那在初始化时校验就会收到报错的, 不信可以试试
具体变化可以参见wiki: Configuration Property Binding
源码的变化
除了功能方面, 相较1.x版本, 代码部分在2.x有了较大的重构, 重写了整个绑定过程. 个人感觉相比1.x好看了
接口和绑定阶段职责的变化后面的源码部分会体现
有意思的是代码风格也有很大变化:
很多地方都可以看到用Stream流编程和链式的写法, 怪不得要以Java 8为基线
不少地方都使用了Java 8中的函数接口
所以看Spring Boot 2.x/Spring Framework 5的源码需要对函数式编程, lambda, Stream流有一些了解
Tip: 需要注意的是在进行源码调试中, 可能会有些不便
比如Stream的惰性求值特性, 也就是中间操作会在终止条件调用时候才执行
后面源码中能看到return结果中的allMatch()
和findFirst()
就是终止条件中的短路操作!
好在我们可以善用IDE的Evaluate Expression功能来查看
包括调试中, 如果我们想只关注自己配置的属性, 也可以使用IDE的debug condition功能, 很方便!
三. 基本使用
@ConfigurationProperties
的使用极为简单, 以下三步
属性配置文件
custom:
  name: thank
  age: 18
  address[0]: 上海
  address[1]: 北京
属性配置类
@Data
@Component
@ConfigurationProperties(prefix = "custom")
public class CustomProperties {

  private String name;

  private Integer age;

  private List<String> address;
}
简单验证
@Test
public void testBean() {
    ConfigurableApplicationContext applicationContext
        = SpringApplication.run(CacheApplication.class);
    CustomProperties bean = applicationContext.getBean(CustomProperties.class);
    System.out.println(bean.toString());
}
四. 源码解析
源码重点关注的部分是spring-boot-xx模块的, 涉及到Spring Framework部分的源码则不做太多说明
@ConfigurationProperties
首先来看下@ConfigurationProperties
的源码, 我去掉了注释部分
@Target({ ElementType.TYPE, ElementType.METHOD })
@Retention(RetentionPolicy.RUNTIME)
@Documented
public @interface ConfigurationProperties {

   @AliasFor("prefix")
   String value() default "";

   @AliasFor("value")
   String prefix() default "";

   boolean ignoreInvalidFields() default false;

   boolean ignoreUnknownFields() default true;
}
简单说明:
value() & prefiex()
: 前面示例已经使用过, 用来解析属性文件中的前缀可以看到上面打有
@AliasFor
, 所以你用哪个都没问题ignoreInvalidFields()
: 是否忽略无效的字段, 默认为falsee.g. 有一个
age=xxx
的配置, 无法将该值绑定到Bean中的Integer age
上, 是选择忽略(true)还是抛出异常(false)ignoreUnknownFields()
: 是否忽略未知的字段, 默认为truee.g. 有一个在Bean中不存在的属性, 是选择忽略(true)还是抛出异常(false)
使用方式可以说简单了, 那么会有两个疑问:
Spring是如何发现我们打有
@ConfigurationProperties
注解的bean的?是如何将属性资源文件中的值绑定到Bean中的?
ConfigurationPropertiesBindingPostProcessor
在@ConfigurationProperties
源码上可以看到@see中标明了以下两个类:
@see ConfigurationPropertiesBindingPostProcessor
@see EnableConfigurationProperties
一个处理类和一个Enable模块中的配置属性绑定模块注解
从字面意思看, 我们应该从这个处理类去寻找答案
进入该处理类ConfigurationPropertiesBindingPostProcessor
来看看它的图:

相比Spring Boot 1.x版本, 继承结构简化清晰了好多
看到了几个常见接口, 能大概挑一下非重点:
ApplicationContextAware: 方便获取上应用下文信息
Ordered: 方法
getOrder()
指定优先级, 可以理解为用来处理处理器的调用顺序
重点是看到了BeanPostProcessor和InitializingBean, 一定能猜到容器bean初始化实例时会调用一个初始方法, 和另外两个前后回调方法
所以重点关注以下三个Override方法:
BeanPostProcessor:
postProcessBeforeInitialization()InitializingBean:
afterPropertiesSet()BeanPostProcessor: postProcessAfterInitialization()
这里与Spring 4.x不同的是在5.x中BeanPostProcessor
的两个回调方法声明都使用了default method,
所以在这里postProcessAfterInitialization()
也就是后置并未做任何事情, 可以忽略
afterPropertiesSet()
源码如下:
@Override
public void afterPropertiesSet() throws Exception {
    this.beanFactoryMetadata = this.applicationContext.getBean(
        ConfigurationBeanFactoryMetadata.BEAN_NAME,
        ConfigurationBeanFactoryMetadata.class
    );
    this.configurationPropertiesBinder =
        new ConfigurationPropertiesBinder(this.applicationContext, VALIDATOR_BEAN_NAME);
}
可以看到这里做了两个初始化:
beanFactoryMetadata
: 初始化了工厂Bean的元数据信息configurationPropertiesBinder
: 从字面翻译感觉它一定与配置属性绑定有关该类在1.x版本是没有的, 但原理类似
此时需要看一眼ConfigurationPropertiesBinder
的构造函数
ConfigurationPropertiesBinder(ApplicationContext applicationContext, String validatorBeanName) {
    this.applicationContext = applicationContext;
    this.propertySources = new PropertySourcesDeducer(applicationContext).getPropertySources();
    this.configurationPropertiesValidator =
        getConfigurationPropertiesValidator(applicationContext, validatorBeanName);
    this.jsr303Present =
        ConfigurationPropertiesJsr303Validator.isJsr303Present(applicationContext);
}
可以看到只是将propertySources
, validator
封装在内
关于validator
这里看到一个jsr303XXX, 如果不清楚JSR-303, 但是你一定熟悉Hibernate-validator
不要跟ORM产生联系, 其是JSR-303规范的实现
所以也能大概明白它的作用: 即在绑定阶段对@ConfigurationProperties
Bean中的属性做校验
前面的简单示例中没有加valid, 其实用法与我们以前校验Form实体没什么两样, 在配置属性中标记valid注解即可:
@Data
@Component
@Validated
@ConfigurationProperties(value = "custom")
public class CustomProperties {

    private String name;

    @Min(0) @Max(30)
    private Integer age;

    @Email(message = "Not Email!")
    private String email;
}
需要注意的是, 2.x的@Valid在hibernate-validator已经被标记为
@Deprecated
, 用javax.validation的吧!
校验部分与配置属性绑定并无太大联系, 在此时不用太关注, 所以后面Validation相关的源码就刻意跳过!
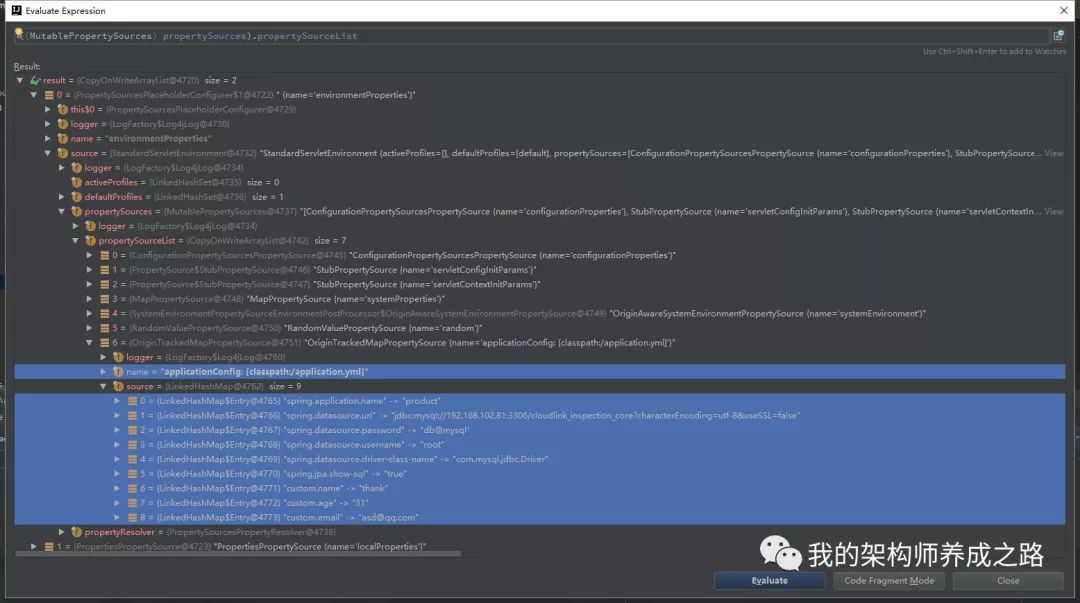
关于propertySources
看到propertySources
是不是很眼熟? 以及Environment
这两个spring-core中提供的接口及其实现完成了系统属性, 环境配置, 属性资源配置的解析
可以在propertySources
构造完成后打一个断点观察下
如图: 它正确的加载了默认的配置文件application.yml
及我们定义的几个属性custom.xxx
当然, 可以结合@PropertySources
自己指定资源文件的位置. 这仍是spring-core的东西, 不说了
postProcessBeforeInitialization()
看完afterPropertiesSet()
, 按照顺序, 自然来到了postProcessBeforeInitialization()
中
@Override
public Object postProcessBeforeInitialization(Object bean, String beanName)
    throws BeansException {
    ConfigurationProperties annotation = getAnnotation(
        bean, beanName, ConfigurationProperties.class
    );
    if (annotation != null) {
        bind(bean, beanName, annotation);
    }
    return bean;
}
该方法很简单, 就是调用一个getAnnotation()
方法, 找出有ConfigurationProperties
声明的bean, 执行bind()
操作
该部分处理一定是被循环调用的, 具体的调用时机在这里:
AbstractAutowireCapableBeanFactory#initializeBean
--> applyBeanPostProcessorsBeforeInitialization()
回到getAnnotation()
方法, 它的源码如下:
private <A extends Annotation> A getAnnotation(Object bean, String beanName, Class<A> type) {
    A annotation = this.beanFactoryMetadata.findFactoryAnnotation(beanName, type);
    if (annotation == null) {
        annotation = AnnotationUtils.findAnnotation(bean.getClass(), type);
    }
    return annotation;
}
可以看到会先从工厂bean中开始寻找起, 看到beanFactoryMetadata
了吗, 前面提到过
在ConfigurationBeanFactoryMetadata
中有一个这样的集合:
Map<String, FactoryMetadata> beansFactoryMetadata
在回调方法postProcessBeanFactory()
中, 完成对配置元数据进行处理, 这里的处理仅是对那个Map做put操作
无论是否工厂方式创建的bean, 最终都会调用工具类AnnotationUtils
, 反射得到注解ConfigurationProperties
信息
Then return it
基于以上, Spring已经找到了标记@ConfigurationProperties
的配置bean了
但是还没有发现属性绑定阶段相关的信息
bind()
接着往下看, 进入bind()
, 猜想它一定负责绑定阶段
private void bind(Object bean, String beanName, ConfigurationProperties annotation) {
    ResolvableType type = getBeanType(bean, beanName);
    Validated validated = getAnnotation(bean, beanName, Validated.class);
    Annotation[] annotations = (validated != null)
            ? new Annotation[] { annotation, validated }
            : new Annotation[] { annotation };
    Bindable<?> target = Bindable.of(type)
        .withExistingValue(bean).withAnnotations(annotations);
    try {
        this.configurationPropertiesBinder.bind(target);
    }
    catch (Exception ex) {
        throw new ConfigurationPropertiesBindException(beanName, bean, annotation, ex);
    }
}
同样, 略过Validate的部分, 可以看到使用链式设置属性包装出一个Bindable
对象, 包含了以下内容:
type: 使用Spring提供的泛型操作API获取到该bean的泛型信息
后面的绑定阶段需要根据属性的类型来判断使用什么方式转换(e.g. String, Collections...)
bean: 该bean, 例如我们自己配置的
customPropertiesannotations: 包含注解
@ConfigurationProperties
和@Validated
的信息
进入ConfigurationPropertiesBinder#bind(Bindable<?> target)
public void bind(Bindable<?> target) {
    ConfigurationProperties annotation = target.getAnnotation(ConfigurationProperties.class);
    Assert.state(annotation != null, () -> "Missing @ConfigurationProperties on " + target);
    List<Validator> validators = getValidators(target);
    BindHandler bindHandler = getBindHandler(annotation, validators); // 看这里
    getBinder().bind(annotation.prefix(), target, bindHandler); // 看这里
}
这里的getBindHandler()
, 字面意思是返回一个绑定的处理器
进入源码可以看到, 就是根据注解ConfigurationProperties
里前面说过的那两个属性来选择的:
IgnoreErrorsBindHandler: 设置
ignoreInvalidFields = true
时: 忽略无效的属性NoUnboundElementsBindHandler:
ignoreUnknownFields = false
时: 忽略不存在的的属性IgnoreTopLevelConverterNotFoundBindHandler: 默认情况使用的
除了以上三个, 你可能还会看见ValidationBindHandler
, 是对绑定对象执行Valid的处理器, 同样略过
查看这几个处理器的继承结构可以看出, 他们有共同的接口BindHandler
其中的不同主要体现在: onStart, onSuccess, onFailure, onFinish这几个阶段的回调方法上不同的覆盖行为上
getBinder()
接下来看到getBinder()
, 还记得之前的afterPropertiesSet()
中做了哪些内容的初始化吧
结合它的构造函数, 来看下Binder
是怎么构造出来的
private Binder getBinder() {
    if (this.binder == null) {
        this.binder = new Binder(
                getConfigurationPropertySources(),
                getPropertySourcesPlaceholdersResolver(),
                getConversionService(),
                getPropertyEditorInitializer());
    }
    return this.binder;
}
至此, 我们见到了Binder
, Bindable
, 接下来还会见到BindResult
, 这都是Spring Boot 2.x中Binder API中的东西
所以对比过1.x源码你会发现, 这里是最大的变化
文档中说明了: 一个
Binder
采用一个Bindable
并返回一个BindResult
接下来你也会发现, Bindable
在整个绑定过程中, 贯穿始终!
回到这个getBinder()
方法, 解释下涉及到的几个接口:
ConfigurationPropertySources
: 这也是Spring Boot 2.x中加入的, 所以相较之前版本, 2.x开始使用ConfigurationPropertySource
作为配置属性源进行属性绑定, 而非之前的propertySources通过前面携带配置属性信息的
propertySources
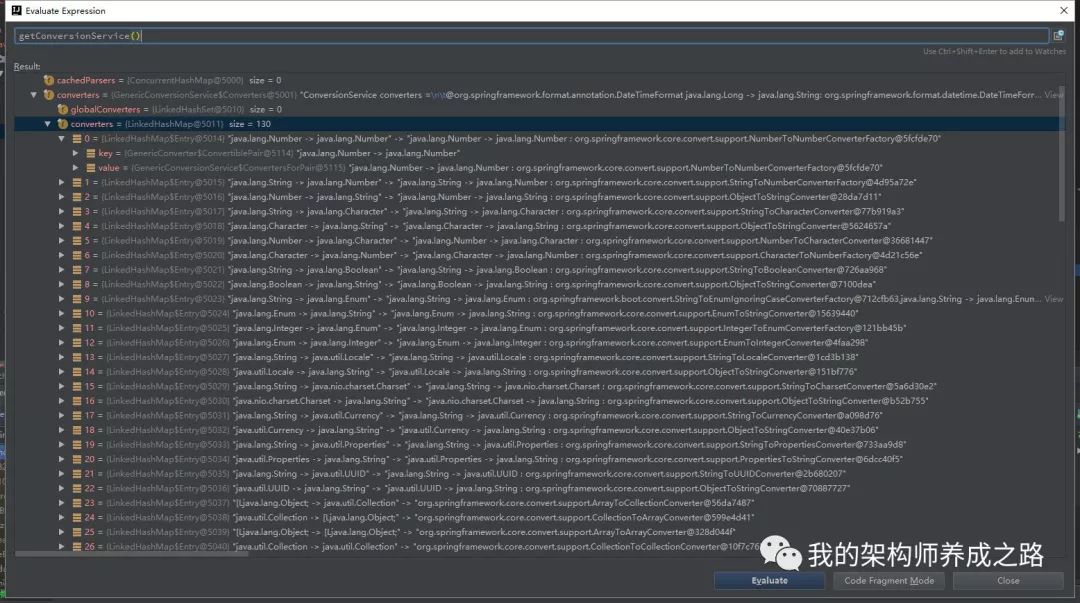
对象而来它返回的是一个Iterable container, 通过注释也说明了, 他会展开嵌套的属性ConversionService
: 这也是spring-core中的, 很容易想到, 在对资源文件和属性bean之间绑定属性时需要这样一个提供类型转换功能的转换器
大致看一下:
  /**
 * Add converters useful for most Spring Boot applications.
 * @param registry the registry of converters to add to (must also be castable to
 * ConversionService, e.g. being a {@link ConfigurableConversionService})
 * @throws ClassCastException if the given ConverterRegistry could not be cast to a
 * ConversionService
 */
public static void addApplicationConverters(ConverterRegistry registry) {
    addDelimitedStringConverters(registry);
    registry.addConverter(new StringToDurationConverter());
    registry.addConverter(new DurationToStringConverter());
    registry.addConverter(new NumberToDurationConverter());
    registry.addConverter(new DurationToNumberConverter());
    registry.addConverterFactory(new StringToEnumIgnoringCaseConverterFactory());
}

/**
 * Add converters to support delimited strings.
 * @param registry the registry of converters to add to (must also be castable to
 * ConversionService, e.g. being a {@link ConfigurableConversionService})
 * @throws ClassCastException if the given ConverterRegistry could not be cast to a
 * ConversionService
 */
public static void addDelimitedStringConverters(ConverterRegistry registry) {
    ConversionService service = (ConversionService) registry;
    registry.addConverter(new ArrayToDelimitedStringConverter(service));
    registry.addConverter(new CollectionToDelimitedStringConverter(service));
    registry.addConverter(new DelimitedStringToArrayConverter(service));
    registry.addConverter(new DelimitedStringToCollectionConverter(service));
}
最终会调用多个类型转换服务
Binder
接下来, 可以进入Binder#bind()
了
bind()
里面的构造函数很多, 我们着重来看这个
public <T> BindResult<T> bind(ConfigurationPropertyName name, Bindable<T> target, BindHandler handler) {
    Assert.notNull(name, "Name must not be null");
    Assert.notNull(target, "Target must not be null");
    handler = (handler != null) ? handler : BindHandler.DEFAULT;
    Context context = new Context();
    T bound = bind(name, target, handler, context, false);
    return BindResult.of(bound);
}
这里还不是真正的绑定阶段, 但有两个点需要说明:
参数:
ConfigurationPropertyName
: 是对前面传入的配置前缀prefix
进行一些基本校验和处理e.g.分割
.
连接的前缀注释中也提醒了:
they must be lower-case and must start with an alpha-numeric character返回值:
BindResult
: 可以简单的看下它的源码, 里面有of()
,get()
,isBound()
,orElse()
等是不是想起了Guava或Java 8中的
Optional<T>
, 没错, 他们的作用基本一样, 强制让调用方考虑处理绑定结果为null
的情况Context
: 在这里是绑定上下文, 由前面说过的BindHandler
使用public interface BindContext {
/**
* Return the current depth of the binding. Root binding starts with a depth of
* {@code 0}. Each subsequent property binding increases the depth by {@code 1}.
* @return the depth of the current binding
*/
int getDepth();
/**
* Return an {@link Iterable} of the {@link ConfigurationPropertySource sources} being
* used by the {@link Binder}.
* @return the sources
*/
Iterable<ConfigurationPropertySource> getSources();
/**
* Return the {@link ConfigurationProperty} actually being bound or {@code null} if
* the property has not yet been determined.
* @return the configuration property (may be {@code null}).
*/
ConfigurationProperty getConfigurationProperty();
}
这里的绑定上下文中就提供前面说过的ConfigurationPropertySource Iterable Container
跟着代码往下, 看Binder中的下一个构造函数:
protected final <T> T bind(ConfigurationPropertyName name, Bindable<T> target,
                           BindHandler handler, Context context, boolean allowRecursiveBinding) {
    context.clearConfigurationProperty();
    try {
        if (!handler.onStart(name, target, context)) {
            return null;
        }
        Object bound = bindObject(name, target, handler, context,allowRecursiveBinding);
        return handleBindResult(name, target, handler, context, bound);
    }
    catch (Exception ex) {
        return handleBindError(name, target, handler, context, ex);
    }
}
看到onStart了吗, 这里就有一个BindHandler
回调接口中的一个方法, 也就是绑定开始但还未完成阶段
接下来在Binder
中, 会陆续看到其它几个阶段的方法
再来看返回, 是通过handleBindResult()
和handleBindError()
来处理的.
点开这两个handleBindXXX()能看到在里面进行了onSuccess, onFinish, onFailure的调用, 代码不贴
bindObject()
重点来看bindObject()
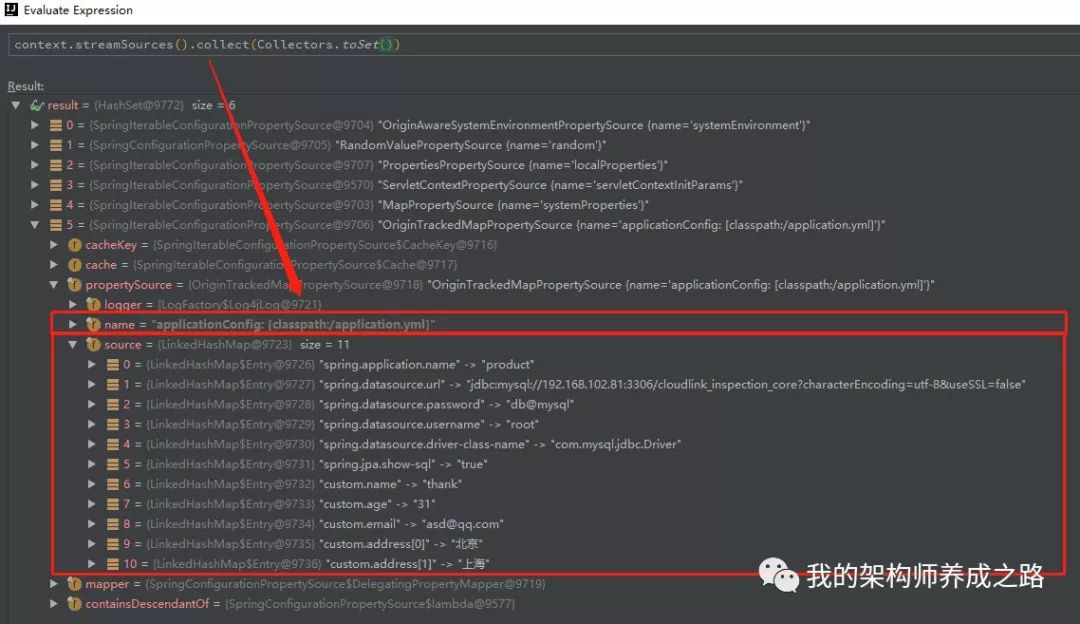
private <T> Object bindObject(ConfigurationPropertyName name, Bindable<T> target, BindHandler handler, Context context, boolean allowRecursiveBinding) {
    ConfigurationProperty property = findProperty(name, context); // Part 1
    if (property == null && containsNoDescendantOf(context.streamSources(), name)) { // Part 1
        return null;
    }
    AggregateBinder<?> aggregateBinder = getAggregateBinder(target, context);
    if (aggregateBinder != null) {
        return bindAggregate(name, target, handler, context, aggregateBinder); // Part 2
    }
    if (property != null) {
        try {
            return bindProperty(target, context, property); // Part 2
        }
        catch (ConverterNotFoundException ex) {
            // We might still be able to bind it as a bean
            Object bean = bindBean(name, target, handler, context, allowRecursiveBinding);
            if (bean != null) {
                return bean;
            }
            throw ex;
        }
    }
    return bindBean(name, target, handler, context, allowRecursiveBinding); // Part 2
}
这里过程比较多, 可以分为2个部分来看
Part 1: 寻找属性和匹配过程
开头的findProperty()
和一个匹配方法:containsNoDescendantOf()
, 它们的参数都有context
还记得吧? 上面说过了-->提供绑定的上下文信息
这里在debug时候可以利用IDE的Evaluate Expression功能来验证判断的逻辑:
Part 2: 绑定过程
接下来是bindXXX
这三个私有方法:
bindAggregate()
: 从注释上看出, 主要是负责处理Map, Collections, Array的绑定策略, 及完成多层属性的递归bindProperty()
: 是返回属性值的过程(其中包含类型转换)例如属性资源文件中配置的
name=thank
->java.lang.String thankbindBean()
: 会继续调用另外一个私有的重载函数bindBean()
bindBean()
重点看看这个方法
private Object bindBean(ConfigurationPropertyName name, Bindable<?> target, BindHandler handler, Context context, boolean allowRecursiveBinding) {
    if (containsNoDescendantOf(context.streamSources(), name)
        || isUnbindableBean(name, target, context)) {
        return null;
    }
    BeanPropertyBinder propertyBinder =
        (propertyName, propertyTarget) -> bind(
            name.append(propertyName), propertyTarget, handler, context, false);
    Class<?> type = target.getType().resolve(Object.class);
    if (!allowRecursiveBinding && context.hasBoundBean(type)) {
        return null;
    }
    return context.withBean(type, () -> {
        Stream<?> boundBeans = BEAN_BINDERS.stream()
            .map((b) -> b.bind(name, target, context, propertyBinder));
        return boundBeans.filter(Objects::nonNull).findFirst().orElse(null);
    });
}
里面又调用了上层的Binder.bind()
, 递归完成绑定
终止条件是上面提到过的containsNoDescendantOf()
和另外一个判断isUnbindableBean()
关注一下最终的返回结果, 是调用了另外一个类: JavaBeanBinder
的bind
方法
JavaBeanBinder
JavaBeanBinder
是哪来的呢? 在Binder
的静态方法中, 已经定义好了, 并被添加到一个不可变集合中
public class Binder {

   private static final List<BeanBinder> BEAN_BINDERS;

   static {
      List<BeanBinder> binders = new ArrayList<>();
      binders.add(new JavaBeanBinder());
      BEAN_BINDERS = Collections.unmodifiableList(binders);
   }

   //...
}
bind()
进入JavaBeanBinder#bind()
之后看到继续调用了另一个私有的重载方法
private <T> boolean bind(BeanPropertyBinder propertyBinder, Bean<T> bean, BeanSupplier<T> beanSupplier) {
    boolean bound = false;
    for (Map.Entry<String, BeanProperty> entry : bean.getProperties().entrySet()) {
        bound |= bind(beanSupplier, propertyBinder, entry.getValue());
    }
    return bound;
}
里面会迭代该配置bean中的所有属性, 调试模式下随便取一个来看看:
0 = {LinkedHashMap$Entry@7470} "name" ->
  key = "name"
  value = {JavaBeanBinder$BeanProperty@7475}
    name = "name"
    declaringClassType = {ResolvableType@7481} "com.example.cache.config.CustomProperties"
    getter = {Method@7482} "public java.lang.String com.example.cache.config.CustomProperties.getName()"
    setter = {Method@7483} "public void com.example.cache.config.CustomProperties.setName(java.lang.String)"
    field = {Field@7484} "private java.lang.String com.example.cache.config.CustomProperties.name"
1 = {LinkedHashMap$Entry@7471} "age" ->
2 = {LinkedHashMap$Entry@7472} "email" ->
没错, 配置bean中: 的属性名, Setter和Getter 该有的都有了
下面来到JavaBeanBinder
的最后一个重载方法
private <T> boolean bind(BeanSupplier<T> beanSupplier,
                         BeanPropertyBinder propertyBinder, BeanProperty property) {
    String propertyName = property.getName();
    ResolvableType type = property.getType();
    Supplier<Object> value = property.getValue(beanSupplier);
    Annotation[] annotations = property.getAnnotations();
    Object bound = propertyBinder.bindProperty(
        propertyName, Bindable.of(type).withSuppliedValue(value).withAnnotations(annotations)
    );
    if (bound == null) {
        return false;
    }
    if (property.isSettable()) {
        property.setValue(beanSupplier, bound);
    }
    else if (value == null || !bound.equals(value.get())) {
        throw new IllegalStateException("No setter found for property: " + property.getName());
    }
    return true;
}
这里就比较简单了, 分步拿到了配置Bean属性的定义和值:
field: 即propertyName, e.g.
name属性类型: type, e.g.
java.lang.Stringgetter and setter
e.g.
public void com.example.cache.config.CustomProperties.setName(java.lang.String)以及调用
propertyBinder.bindProperty()
拿到了资源属性文件中的属性值bound该方法的作用前面也提到过(e.g.
thank
)
然后调用了属性的setValue()
方法: 执行property.setValue(beanSupplier, bound);
至此, 看到了调用属性的set方法, 终于可以放心了!
从ConfigurationPropertiesBindingPostProcessor
开始到调用setter结束, 完整的调用栈如下:
bind:85, JavaBeanBinder {org.springframework.boot.context.properties.bind}
bind:62, JavaBeanBinder {org.springframework.boot.context.properties.bind}
bind:54, JavaBeanBinder {org.springframework.boot.context.properties.bind}
lambda$null$5:341, Binder {org.springframework.boot.context.properties.bind}
apply:-1, 1445225850 {org.springframework.boot.context.properties.bind.Binder$$Lambda$267}
accept:193, ReferencePipeline$3$1 {java.util.stream}
tryAdvance:1351, ArrayList$ArrayListSpliterator {java.util}
forEachWithCancel:126, ReferencePipeline {java.util.stream}
copyIntoWithCancel:498, AbstractPipeline {java.util.stream}
copyInto:485, AbstractPipeline {java.util.stream}
wrapAndCopyInto:471, AbstractPipeline {java.util.stream}
evaluateSequential:152, FindOps$FindOp {java.util.stream}
evaluate:234, AbstractPipeline {java.util.stream}
findFirst:464, ReferencePipeline {java.util.stream}
lambda$bindBean$6:342, Binder {org.springframework.boot.context.properties.bind}
get:-1, 2008619427 {org.springframework.boot.context.properties.bind.Binder$$Lambda$266}
withIncreasedDepth:441, Binder$Context {org.springframework.boot.context.properties.bind}
withBean:427, Binder$Context {org.springframework.boot.context.properties.bind}
access$400:381, Binder$Context {org.springframework.boot.context.properties.bind}
bindBean:339, Binder {org.springframework.boot.context.properties.bind}
bindObject:278, Binder {org.springframework.boot.context.properties.bind}
bind:221, Binder {org.springframework.boot.context.properties.bind}
bind:210, Binder {org.springframework.boot.context.properties.bind}
bind:192, Binder {org.springframework.boot.context.properties.bind}
bind:82, ConfigurationPropertiesBinder {org.springframework.boot.context.properties}
bind:107, ConfigurationPropertiesBindingPostProcessor {org.springframework.boot.context.properties}
postProcessBeforeInitialization:93, ConfigurationPropertiesBindingPostProcessor {org.springframework.boot.context.properties}
有兴趣debug的可以按照调用栈的顺序由下至上来参考
五. 总结
总体阅读下来, 相较1.x版本封装度更高, 而且代码风格大量java 8中的写法, 确实给阅读带来了些麻烦, 但是优秀的封装能明显感觉到职责更加明确
顺着源码读下来, 有意略过了很多细节, 例如:
Validator结合配置Bean怎么进行属性验证的?
2.x中的宽松绑定约束是在什么地方体现的?
等等
重心还是放在了如何发现我们的属性配置Bean以及如何将属性资源文件中的值绑定到属性配置Bean中这两点
所以只是针对以上两点知其然, 初步窥探了ConfigurationProperties
的黑盒
