


1、以viewModelScope为例,我们先来看一下简单的使用样例,如下:
viewModelScope.launch(Dispatchers.Main) {val result = withContext(Dispatchers.IO) {searchRepository.getWebSites()}if (result is Result.Success) {emitArticleUiState(showHot = true, showWebSites = result.data)}}
上面代码可以看到通过viewModelScope开启一个基于UI线程的协程,然后协程里面又可以通过withContext切换线程。等等!协程?线程?,协程和线程还有关系,不是说线程可以创建多个协程吗?答案我们一步步揭晓
2、协程里的线程
在上面样例中我们是不是注意到了一个特别的对象:Dispatchers.IO,切换环境都是通过这个指定的,那我们就从这个入手吧,先来看一下它的本质:
@JvmStaticpublic val IO: CoroutineDispatcher = DefaultScheduler.IOval IO = blocking(systemProp(IO_PARALLELISM_PROPERTY_NAME, 64.coerceAtLeast(AVAILABLE_PROCESSORS)))public fun blocking(parallelism: Int = BLOCKING_DEFAULT_PARALLELISM): CoroutineDispatcher {require(parallelism > 0) { "Expected positive parallelism level, but have $parallelism" }return LimitingDispatcher(this, parallelism, TaskMode.PROBABLY_BLOCKING)}private class LimitingDispatcher(val dispatcher: ExperimentalCoroutineDispatcher,val parallelism: Int,override val taskMode: TaskMode) : ExecutorCoroutineDispatcher(), TaskContext, Executor {private val queue = ConcurrentLinkedQueue<Runnable>()private val inFlightTasks = atomic(0)override val executor: Executorget() = thisoverride fun execute(command: Runnable) = dispatch(command, false)override fun close(): Unit = error("Close cannot be invoked on LimitingBlockingDispatcher")override fun dispatch(context: CoroutineContext, block: Runnable) = dispatch(block, false)private fun dispatch(block: Runnable, fair: Boolean) {var taskToSchedule = blockwhile (true) {// Commit in-flight tasks slotval inFlight = inFlightTasks.incrementAndGet()// Fast path, if parallelism limit is not reached, dispatch task and returnif (inFlight <= parallelism) {dispatcher.dispatchWithContext(taskToSchedule, this, fair)return}// Parallelism limit is reached, add task to the queuequeue.add(taskToSchedule)if (inFlightTasks.decrementAndGet() >= parallelism) {return}taskToSchedule = queue.poll() ?: return}}
把主要代码都拿出来了,我们顺着上面顺序可以发现最后走到了queue.add(taskToSchedule),是不是有点线程池的既视感了!我们接着往下分析,上面只是介绍了添加任务的过程,即把任务包装成一个Runnable,然后把它丢到一个队列中去,这个设计和线程池是异曲同工的
open class ExperimentalCoroutineDispatcher(private val corePoolSize: Int,private val maxPoolSize: Int,private val idleWorkerKeepAliveNs: Long,private val schedulerName: String = "CoroutineScheduler") : ExecutorCoroutineDispatcher() {constructor(corePoolSize: Int = CORE_POOL_SIZE,maxPoolSize: Int = MAX_POOL_SIZE,schedulerName: String = DEFAULT_SCHEDULER_NAME) : this(corePoolSize, maxPoolSize, IDLE_WORKER_KEEP_ALIVE_NS, schedulerName)@Deprecated(message = "Binary compatibility for Ktor 1.0-beta", level = DeprecationLevel.HIDDEN)constructor(corePoolSize: Int = CORE_POOL_SIZE,maxPoolSize: Int = MAX_POOL_SIZE) : this(corePoolSize, maxPoolSize, IDLE_WORKER_KEEP_ALIVE_NS)override val executor: Executorget() = coroutineScheduler// This is variable for test purposes, so that we can reinitialize from clean stateprivate var coroutineScheduler = createScheduler()override fun dispatch(context: CoroutineContext, block: Runnable): Unit =try {coroutineScheduler.dispatch(block)} catch (e: RejectedExecutionException) {DefaultExecutor.dispatch(context, block)}...}
上面是它的类定义,有核心池大小、最大池大小,是不是看的越来越像线程池了,继续看coroutineScheduler,因为最终是通过它来分发的:
private fun createScheduler() = CoroutineScheduler(corePoolSize, maxPoolSize, idleWorkerKeepAliveNs, schedulerName)internal class CoroutineScheduler( private val corePoolSize: Int, private val maxPoolSize: Int, private val idleWorkerKeepAliveNs: Long = IDLE_WORKER_KEEP_ALIVE_NS, private val schedulerName: String = DEFAULT_SCHEDULER_NAME) : Executor, Closeable {...}
internal fun dispatchWithContext(block: Runnable, context: TaskContext, fair: Boolean) {try {coroutineScheduler.dispatch(block, context, fair)} catch (e: RejectedExecutionException) {// Context shouldn't be lost here to properly invoke before/after taskDefaultExecutor.enqueue(coroutineScheduler.createTask(block, context))}}fun dispatch(block: Runnable, taskContext: TaskContext = NonBlockingContext, fair: Boolean = false) {trackTask() // this is needed for virtual time supportval task = createTask(block, taskContext)// try to submit the task to the local queue and act depending on the resultwhen (submitToLocalQueue(task, fair)) {ADDED -> returnNOT_ADDED -> {// try to offload task to global queueif (!globalQueue.addLast(task)) {// Global queue is closed in the last step of close/shutdown -- no more tasks should be acceptedthrow RejectedExecutionException("$schedulerName was terminated")}requestCpuWorker()}else -> requestCpuWorker() // ask for help}}
submitToLocalQueue就是任务的分发了,我们接着看它的分发过程:
private fun submitToLocalQueue(task: Task, fair: Boolean): Int {val worker = currentWorker() ?: return NOT_ADDED/** This worker could have been already terminated from this thread by close/shutdown and it should not* accept any more tasks into its local queue.*/if (worker.state === WorkerState.TERMINATED) return NOT_ADDEDvar result = ADDEDif (task.mode == TaskMode.NON_BLOCKING) {/** If the worker is currently executing blocking task and tries to dispatch non-blocking task, it's one the following reasons:* 1) Blocking worker is finishing its block and resumes non-blocking continuation* 2) Blocking worker starts to create non-blocking jobs* First use-case is expected (as recommended way of using blocking contexts),* so we add non-blocking task to local queue, but also request CPU worker to mitigate second case*/if (worker.isBlocking) {result = ADDED_REQUIRES_HELP} else {/** If thread is not blocking, then it's just tries to finish its* local work in order to park (or grab another blocking task), do not add non-blocking tasks* to its local queue if it can't acquire CPU*/val hasPermit = worker.tryAcquireCpuPermit()if (!hasPermit) {return NOT_ADDED}}}val noOffloadingHappened = if (fair) {worker.localQueue.addLast(task, globalQueue)} else {worker.localQueue.add(task, globalQueue)}if (noOffloadingHappened) {// When we're close to queue capacity, wake up anyone to steal work// Note: non-atomic bufferSize here is Ok (it is just a performance optimization)if (worker.localQueue.bufferSize > QUEUE_SIZE_OFFLOAD_THRESHOLD) {return ADDED_REQUIRES_HELP}return result}return ADDED_REQUIRES_HELP}
可以看到最终走到了worker.localQueue.add(task, globalQueue),那这里的worker又是什么呢?
private fun currentWorker(): Worker? = (Thread.currentThread() as? Worker)?.takeIf { it.scheduler == this }
优先考虑当前线程,即添加到当前线程的队列里面(如果当前线程与目标线程不一样,比如UI线程和异步线程,那会直接跳过当前线程),不过有几个条件限制,即当前线程非阻塞状态才行
如果当前线程阻塞,那么添加到globalQueue里面,同时调用requestCpuWorker,这个函数就是线程池的基本使用了,corePoolSize内的线程始终保活,再多的话就进入等待队列,即globalQueue
3、总结
经过上面简单分析,我们基本了解了协程里面的线程到底是怎么回事了,它其实就是把当前任务分发到线程池里面执行(UI线程只有一个),withContext和async都是这种原理,只不过withContext = async.await,即如果要并发就用async,要顺序执行就用withContext
补充:
协程和线程使用场景?
从源码来看,协程其实是帮我们封装了一个线程池并且提供了方便的线程切换API,所以使用协程和线程本质上是一样的,但是协程多了一套挂起机制,这个是线程所没有的特性
个人使用来看,协程和kotlin配合是非常默契的,特别使用到Jetpack那套框架,基本不会去手动创建线程池和线程,一路都是协程来切换异步线程和UI线程
非常适合协程的场景?
既然适合协程,肯定是用到了它的特性,首先是挂起机制,通常我们写带回调的函数需要处理同步问题,一般是使用锁等工具,但是使用协程挂起机制就很方便了,直接等到回调返回再继续往下执行,代码逻辑很清晰也不用担心同步问题和阻塞UI线程问题
协程不阻塞线程原理
前面介绍了协程具体执行任务的过程,那我们平时听到的不阻塞线程又是什么原因呢
fun main(args: Array<String>) = runBlocking<Unit> {launch(Dispatchers.Unconfined) {println("${Thread.currentThread().name} : launch start")async(Dispatchers.Default) {println("${Thread.currentThread().name} : async start")delay(100)println("${Thread.currentThread().name} : async end")}.await()println("${Thread.currentThread().name} : launch end")}}
internal suspend fun awaitInternal(): Any? {// fast-path -- check state (avoid extra object creation)while (true) { // lock-free loop on stateval state = this.stateif (state !is Incomplete) {// already complete -- just return resultif (state is CompletedExceptionally) { // Slow path to recover stacktracerecoverAndThrow(state.cause)}return state.unboxState()}if (startInternal(state) >= 0) break // break unless needs to retry}return awaitSuspend() // slow-path}private suspend fun awaitSuspend(): Any? = suspendCoroutineUninterceptedOrReturn { uCont ->/** Custom code here, so that parent coroutine that is using await* on its child deferred (async) coroutine would throw the exception that this child had* thrown and not a JobCancellationException.*/val cont = AwaitContinuation(uCont.intercepted(), this)cont.disposeOnCancellation(invokeOnCompletion(ResumeAwaitOnCompletion(this, cont).asHandler))cont.getResult()}
上面代码最关键的地方在于AwaitContinuation,看一下它的定义:
private class AwaitContinuation<T>(delegate: Continuation<T>,private val job: JobSupport) : CancellableContinuationImpl<T>(delegate, MODE_CANCELLABLE) {override fun getContinuationCancellationCause(parent: Job): Throwable {val state = job.state/** When the job we are waiting for had already completely completed exceptionally or* is failing, we shall use its root/completion cause for await's result.*/if (state is Finishing) state.rootCause?.let { return it }if (state is CompletedExceptionally) return state.causereturn parent.getCancellationException()}protected override fun nameString(): String ="AwaitContinuation"}
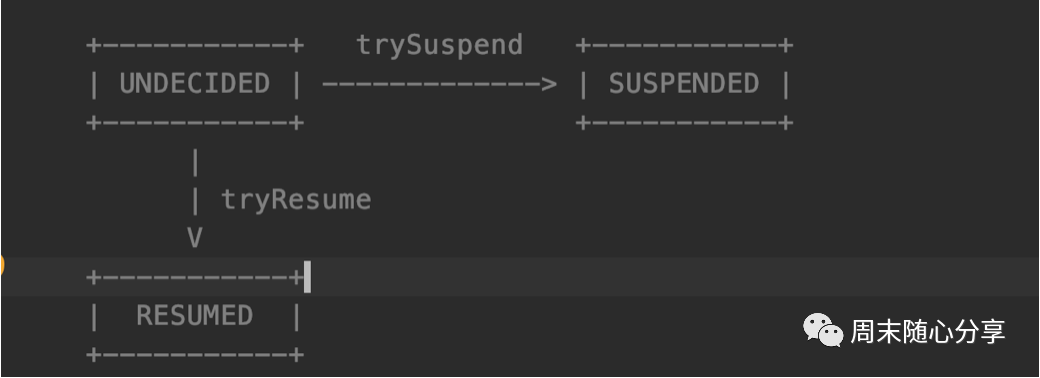
private fun trySuspend(): Boolean {_decision.loop { decision ->when (decision) {UNDECIDED -> if (this._decision.compareAndSet(UNDECIDED, SUSPENDED)) return trueRESUMED -> return falseelse -> error("Already suspended")}}}private fun tryResume(): Boolean {_decision.loop { decision ->when (decision) {UNDECIDED -> if (this._decision.compareAndSet(UNDECIDED, RESUMED)) return trueSUSPENDED -> return falseelse -> error("Already resumed")}}}
按照上面说法,简单来说就是遇到挂起状态时会将指令寄存器里的数据保存起来放到一个回调函数里面,这样当前线程就能继续执行接下来任务,即所谓不阻塞线程原理,当我们调用tryResume时候,协程会invoke之前保存的回调函数,让指令寄存器切换到之前的状态来继续执行剩下的任务,有点像so注入原理(^_^)
总结
Android使用Kotlin作为官方开发语言后,协程的使用得到了很大的推广,因为协程结合kotlin实在太方便了,代码看起来也更加清晰,因此对它的了解也变的重要了,当然不了解的情况下也可以使用,但是一旦遇到性能等其他比较疑惑的问题时就会变得迷茫,所以这篇文章主要为大家了解协程基本原理提供一个渠道
不过注意的是这边介绍的Kotlin协程并不是真正意义上的协程,只是因为Java底层不支持协程,所以通过封装线程池来创建一个伪协程供业务使用,不过这种伪协程反而结合了线程池优势,使Kotlin取代了Java线程池的使用,使用起来还是很方便的
好了,今天的分享就到这了,下周继续~
