


互联网是一个危险的地方,尤其是如果您不加密数据或没有适当的安全性。有几种方法可以保护您的数据。都处于不同的水平。您应该始终具有强大的防火墙策略,数据加密和强大的密码策略。保护数据的另一种方法是使用VPN连接访问数据。
虚拟专用网络(VPN)是一种连接方法,用于为专用和公用网络增加安全性和隐私性,从而保护您的数据。
OpenVPN是功能齐全的开源SSL VPN解决方案,可确保通信安全。它可用于远程访问或不同服务器或数据中心之间的通信。它可以安装在本地或云中的不同操作系统中,并可以配置许多安全选项。
在此文中,我们将创建一个VPN连接来访问云中的数据库。有多种方法可以实现此目标,具体取决于您的基础结构以及要用于此任务的硬件资源。
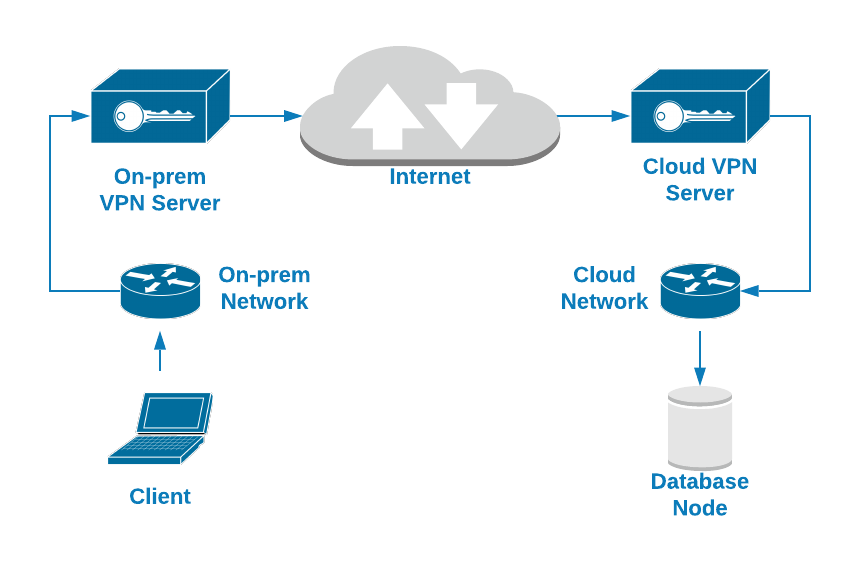
例如,您可以创建两个VM,一个在本地,另一个在云中,它们可以成为通过对等VPN连接将本地网络连接到数据库云网络的桥梁。
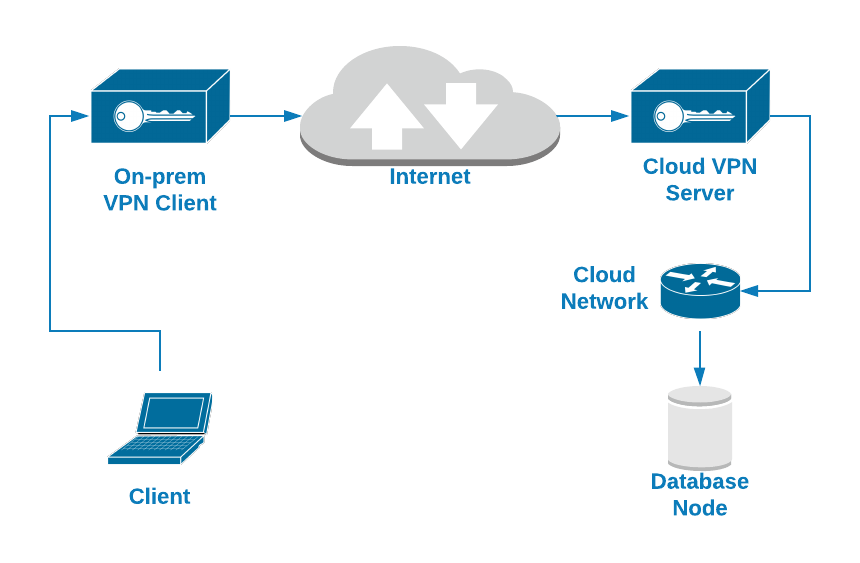
另一个更简单的选择是使用本地计算机中配置的VPN客户端连接连接到数据库节点中安装的VPN服务器。在这种情况下,我们将使用第二个选项。您将看到如何在云中运行的数据库节点中配置OpenVPN服务器,并且可以使用VPN客户端访问它。
对于数据库节点,我们将使用具有以下配置的Amazon EC2实例:
- 操作系统:Ubuntu Server 18.04
- 公用IP地址:18.224.138.210
- 专用IP地址:172.31.30.248/20
- 打开的TCP端口:22,3306,1194
如何在Ubuntu Server 18.04上安装OpenVPN
第一项任务是在数据库节点中安装OpenVPN服务器。实际上,所使用的数据库技术并不重要,因为我们正在网络层上工作,但是出于配置VPN连接后进行测试的目的,我们正在运行Percona Server 8.0。
因此,让我们从安装OpenVPN软件包开始。
$ apt install openvpn easy-rsa
由于OpenVPN使用证书对流量进行加密,因此您将需要EasyRSA来完成此任务。它是一个CLI实用程序,用于创建根证书颁发机构,请求和签名证书,包括子CA和证书吊销列表。
注意:有一个新的EasyRSA版本可用,但是为了专注于OpenVPN安装,让我们使用Ubuntu 18.04存储库atm中的EasyRSA版本(EasyRSA版本2.2.2-2)。
前面的命令将为OpenVPN配置创建目录/ etc / openvpn /,并使用EasyRSA脚本和配置创建目录/ usr / share / easy-rsa /。
为了简化此任务,让我们在OpenVPN目录中创建一个指向EasyRSA路径的符号链接(或者您可以复制它):
$ ln -s /usr/share/easy-rsa /etc/openvpn/
现在,您需要配置EasyRSA并创建证书。转到EasyRSA位置并为“ vars”文件创建备份:
$ cd /etc/openvpn/easy-rsa

$ cp vars vars.bak
编辑此文件,然后根据您的信息更改以下几行:
$ vi vars

export KEY_COUNTRY="US"

export KEY_PROVINCE="CA"

export KEY_CITY="SanFrancisco"

export KEY_ORG="Fort-Funston"

export KEY_EMAIL="me@myhost.mydomain"

export KEY_OU="MyOrganizationalUnit"
然后,创建一个指向openssl文件的新符号链接:
$ cd /etc/openvpn/easy-rsa

$ ln -s openssl-1.0.0.cnf openssl.cnf
现在,应用vars文件:
$ cd /etc/openvpn/easy-rsa

$ . vars
注意:如果您运行./clean-all,我将在/ etc / openvpn / easy-rsa / keys上执行rm -rf
运行全部脚本:
$ ./clean-all
并创建Diffie-Hellman密钥(DH):
$ ./build-dh

Generating DH parameters, 2048 bit long safe prime, generator 2

This is going to take a long time

.....................................................................................................................................................................+
最后一个操作可能需要花费几秒钟的时间,完成后,您将在EasyRSA目录的“ keys”目录中拥有一个新的DH文件。
$ ls /etc/openvpn/easy-rsa/keys

dh2048.pem
现在,让我们创建CA证书。
$ ./build-ca

Generating a RSA private key

..+++++

...+++++

writing new private key to 'ca.key'

-----

You are about to be asked to enter information that will be incorporated

into your certificate request.

What you are about to enter is what is called a Distinguished Name or a DN.

There are quite a few fields but you can leave some blank

For some fields there will be a default value,

If you enter '.', the field will be left blank.

...
这将创建ca.crt(公共证书)和ca.key(私有密钥)。连接到VPN的所有服务器都需要公用证书。
$ ls /etc/openvpn/easy-rsa/keys

ca.crt  ca.key
现在您已经创建了CA,让我们创建服务器证书。在这种情况下,我们将其称为“ openvpn-server”:
$ ./build-key-server openvpn-server

Generating a RSA private key

.......................+++++

........................+++++

writing new private key to 'openvpn-server.key'

-----

You are about to be asked to enter information that will be incorporated

into your certificate request.

What you are about to enter is what is called a Distinguished Name or a DN.

There are quite a few fields but you can leave some blank

For some fields there will be a default value,

If you enter '.', the field will be left blank.

...

Certificate is to be certified until Dec 23 22:44:02 2029 GMT (3650 days)

Sign the certificate? [y/n]:y


1 out of 1 certificate requests certified, commit? [y/n]y


Write out database with 1 new entries

Data Base Updated
这将为OpenVPN服务器创建CRT,CSR和密钥文件:
$ ls /etc/openvpn/easy-rsa/keys

openvpn-server.crt  openvpn-server.csr openvpn-server.key
现在,您需要创建客户端证书,并且过程非常相似:
$ ./build-key openvpn-client-1

Generating a RSA private key

.........................................................................................+++++

.....................+++++

writing new private key to 'openvpn-client-1.key'

-----

You are about to be asked to enter information that will be incorporated

into your certificate request.

What you are about to enter is what is called a Distinguished Name or a DN.

There are quite a few fields but you can leave some blank

For some fields there will be a default value,

If you enter '.', the field will be left blank.

...

Certificate is to be certified until Dec 24 01:45:39 2029 GMT (3650 days)

Sign the certificate? [y/n]:y


1 out of 1 certificate requests certified, commit? [y/n]y


Write out database with 1 new entries

Data Base Updated
这将为OpenVPN客户端创建CRT,CSR和密钥文件:
$ ls /etc/openvpn/easy-rsa/keys

openvpn-client-1.csr  openvpn-client-1.crt openvpn-client-1.key
至此,您已经准备好所有证书。下一步将创建服务器和客户端OpenVPN配置。
配置OpenVPN服务器
如前所述,OpenVPN安装将创建/ etc / openvpn目录,您将在其中添加服务器和客户端角色的配置文件,并且在/ usr / share / doc / openvpn /中每个都有一个示例配置文件。examples / sample-config-files /,因此您可以在上述位置复制文件并根据需要进行修改。
在这种情况下,我们将仅使用服务器配置文件,因为它是OpenVPN服务器:
$ cp /usr/share/doc/openvpn/examples/sample-config-files/server.conf.gz /etc/openvpn/

$ gunzip /etc/openvpn/server.conf.gz
现在,让我们看一个基本的服务器配置文件:
$ cat /etc/openvpn/server.conf

port 1194

# Which TCP/UDP port should OpenVPN listen on?

proto tcp

# TCP or UDP server?

dev tun

# "dev tun" will create a routed IP tunnel,"dev tap" will create an ethernet tunnel.

ca /etc/openvpn/easy-rsa/keys/ca.crt

# SSL/TLS root certificate (ca).

cert /etc/openvpn/easy-rsa/keys/openvpn-server.crt

# Certificate (cert).

key /etc/openvpn/easy-rsa/keys/openvpn-server.key

# Private key (key). This file should be kept secret.

dh /etc/openvpn/easy-rsa/keys/dh2048.pem

# Diffie hellman parameters.

server 10.8.0.0 255.255.255.0

# Configure server mode and supply a VPN subnet.

push "route 172.31.16.0 255.255.240.0"

# Push routes to the client to allow it to reach other private subnets behind the server.

keepalive 20 120

# The keepalive directive causes ping-like messages to be sent back and forth over the link so that each side knows when the other side has gone down.

cipher AES-256-CBC

# Select a cryptographic cipher.

persist-key

persist-tun

# The persist options will try to avoid accessing certain resources on restart that may no longer be accessible because of the privilege downgrade.

status /var/log/openvpn/openvpn-status.log

# Output a short status file.

log /var/log/openvpn/openvpn.log

# Use log or log-append to override the default log location.

verb 3

# Set the appropriate level of log file verbosity.
注意:根据您的环境更改证书路径。
然后,使用创建的配置文件启动OpenVPN服务:
$ systemctl start openvpn@server
检查服务是否在正确的端口中侦听:
$ netstat -pltn |grep openvpn

tcp        0 0 0.0.0.0:1194            0.0.0.0:* LISTEN   20002/openvpn
最后,在OpenVPN服务器中,您需要在sysctl.conf文件中添加IP转发行以允许VPN通信:
$ echo "net.ipv4.ip_forward=1" >> /etc/sysctl.conf
并运行:
$ sysctl -p

net.ipv4.ip_forward = 1
现在,让我们看看如何配置一个OpenVPN客户端以连接到这个新的VPN。
配置OpenVPN客户端
在上一点中,我们提到了OpenVPN示例配置文件,并且我们使用了服务器示例文件,所以现在让我们做同样的事情,但是使用客户端配置文件。
从/ usr / share / doc / openvpn / examples / sample-config-files /中的相应位置复制文件client.conf,并根据需要进行更改。
$ cp /usr/share/doc/openvpn/examples/sample-config-files/client.conf /etc/openvpn/
您还需要以前创建的以下证书来配置VPN客户端:
ca.crt

openvpn-client-1.crt

openvpn-client-1.key
因此,将这些文件复制到本地计算机或VM。您需要在VPN客户端配置文件中添加此文件位置。
现在,让我们看一个基本的客户端配置文件:
$ cat /etc/openvpn/client.conf

client

# Specify that we are a client

dev tun

# Use the same setting as you are using on the server.

proto tcp

# Use the same setting as you are using on the server.

remote 18.224.138.210 1194

# The hostname/IP and port of the server.

resolv-retry infinite

# Keep trying indefinitely to resolve the hostname of the OpenVPN server.

nobind

# Most clients don't need to bind to a specific local port number.

persist-key

persist-tun

# Try to preserve some state across restarts.

ca /Users/sinsausti/ca.crt

cert /Users/sinsausti/openvpn-client-1.crt

key /Users/sinsausti/openvpn-client-1.key

# SSL/TLS parms.

remote-cert-tls server

# Verify server certificate.

cipher AES-256-CBC

# Select a cryptographic cipher.

verb 3

# Set log file verbosity.
注意:根据您的环境更改证书路径。
您可以使用此文件从不同的操作系统(例如Linux,macOS或Windows)连接到OpenVPN服务器。
在此示例中,我们将使用应用程序Tunnelblick从macOS客户端进行连接。Tunnelblick是macOS上用于OpenVPN的免费开放源代码图形用户界面。它提供了对OpenVPN客户端的轻松控制。它带有所有必需的软件包,例如OpenVPN,EasyRSA和tun / tap驱动程序。
由于OpenVPN配置文件具有.tblk,.ovpn或.conf扩展名,所以Tunnelblick可以读取所有文件。
要安装配置文件,请将其拖放到菜单栏的Tunnelblick图标上或“ VPN详细信息”窗口的“配置”选项卡中的配置列表中。
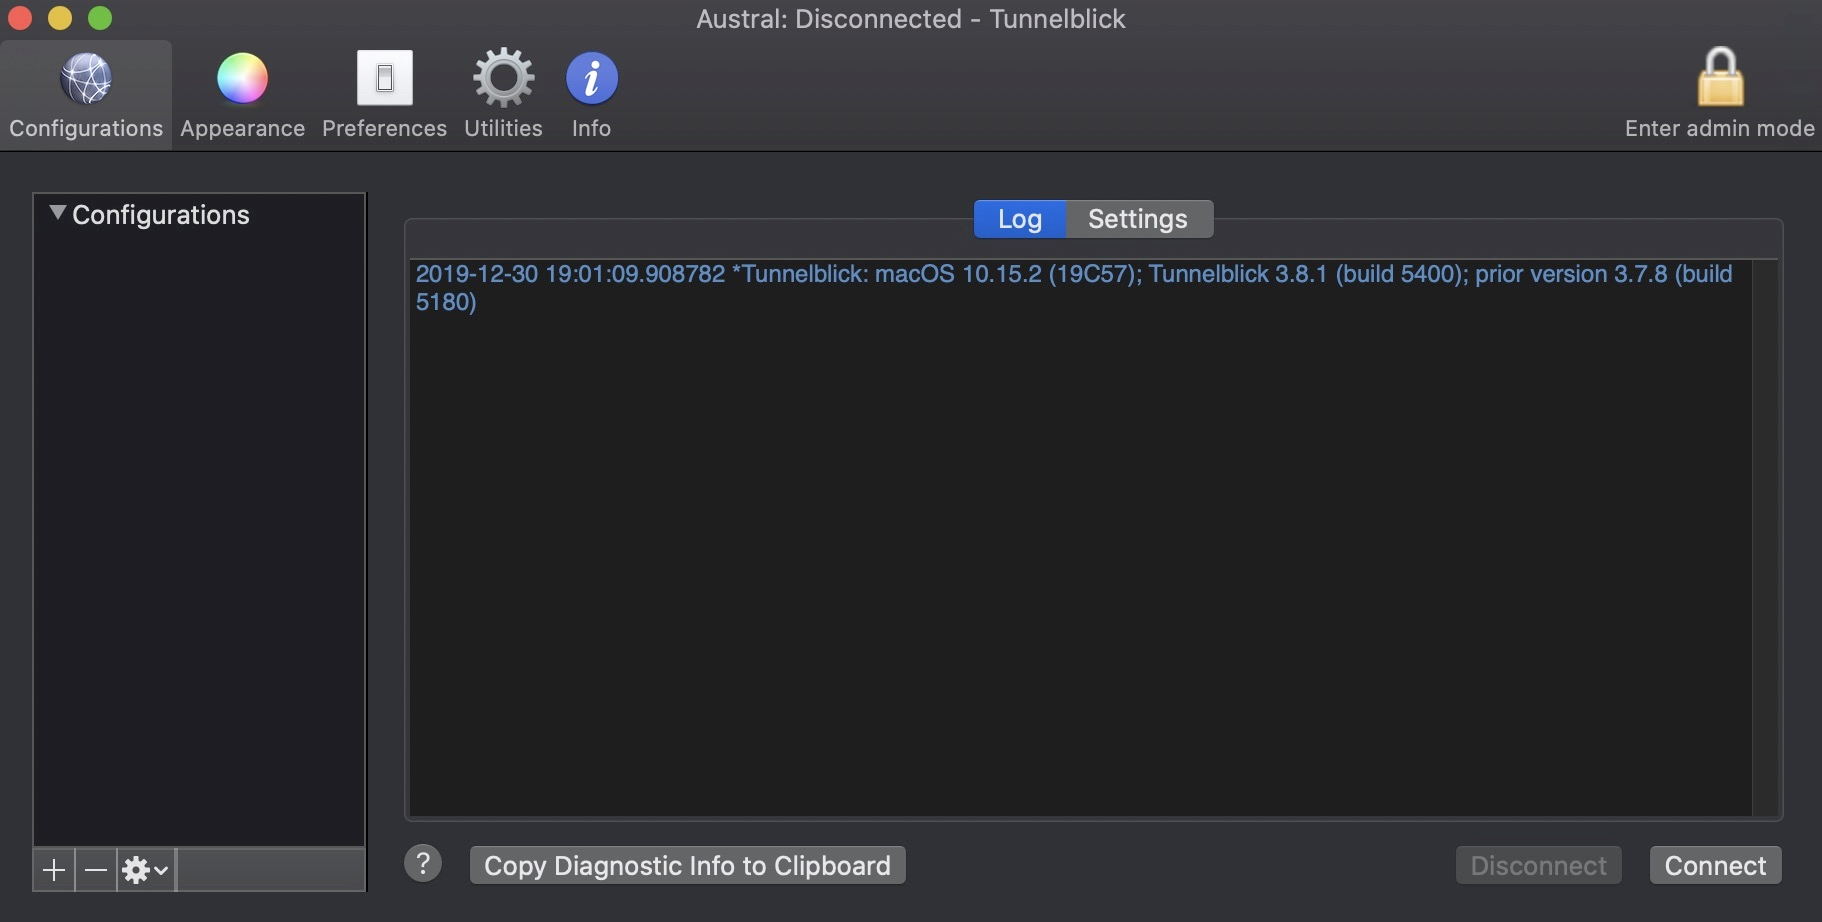
然后,按“连接”。
现在,您的客户端计算机中应该有一些新路由:
$ netstat -rn # or route -n on Linux OS

Destination        Gateway Flags        Netif Expire

10.8.0.1/32        10.8.0.5 UGSc         utun5

10.8.0.5           10.8.0.6 UH           utun5

172.31.16/20       10.8.0.5 UGSc         utun5
如您所见,通过VPN接口有一条到本地数据库网络的路由,因此您应该能够使用私有数据库IP地址访问数据库服务。
$ mysql -p -h172.31.30.248

Enter password:

Welcome to the MySQL monitor.  Commands end with ; or \g.

Your MySQL connection id is 13

Server version: 8.0.18-9 Percona Server (GPL), Release '9', Revision '53e606f'


Copyright (c) 2000, 2019, Oracle and/or its affiliates. All rights reserved.


Oracle is a registered trademark of Oracle Corporation and/or its

affiliates. Other names may be trademarks of their respective

owners.


Type 'help;' or '\h' for help. Type '\c' to clear the current input statement.


mysql>
工作正常 现在,您可以使用VPN连接到数据库节点来保护流量。
结论
如果要通过Internet,本地或混合环境访问数据,则必须保护数据。您必须知道如何加密和保护您的远程访问。
如您所见,使用OpenVPN,您可以通过使用自签名证书的加密连接,使用本地网络访问远程数据库。因此,OpenVPN看起来是完成此任务的绝佳选择。这是一个开源解决方案,安装/配置非常简单。我们使用了基本的OpenVPN服务器配置,因此您可以在OpenVPN官方文档中查找更复杂的配置以改进您的OpenVPN服务器。
