


TSF Service Mesh 基于开源Istio构建,Envoy作为Istio的数据面板实现了微服务功能代理,同时支持服务间调用链关系的跟踪与观测。本文对Envoy调用链实现原理进行深入分析,最后介绍了TSF Mesh结合实际需求对envoy调用链功能所做的扩展。
1 调用链原理介绍
1.1 简介
Envoy通过调用链的传递和上报实现了服务调用的可跟踪性,Envoy的调用链支持多种后端tracing server,如LightStep,Zipkin和Jaeger等,遵循open tracing规范。我们本次只研究zipkin tracing。
Envoy的调用链是通过在代理间传递tracing头来实现的,调用链相关的头如下:
x-request-id
  envoy会为所有的外部请求(请求中没有x-request-id头)生成x-request-id(36bytes的uuid)头,用于标识一条调用链上的所有请求,用于统一日志输出等。
x-b3-traceid
  用于标识一条调用链上的所有调用,64bit
x-b3-spanid
  用于标识当前调用,64bit
x-b3-parentspanid
  用于标识前一次调用,64bit
x-b3-sampled
  用于标识本次调用是否上报,标识为1标识不上报,标识为0或header不存在则上报,需要在整个调用链中传递下去
x-b3-flags
  用于传递某个选项的编码,如Debug被编码为1
x-client-traceid
  用于外部传入traceid,用于将外部传递过来的x-request-id做一次标准化
x-envoy-force-trace
  用于强制一条调用上报,同时会返回当前被改动的x-request-id
1.2 简单example
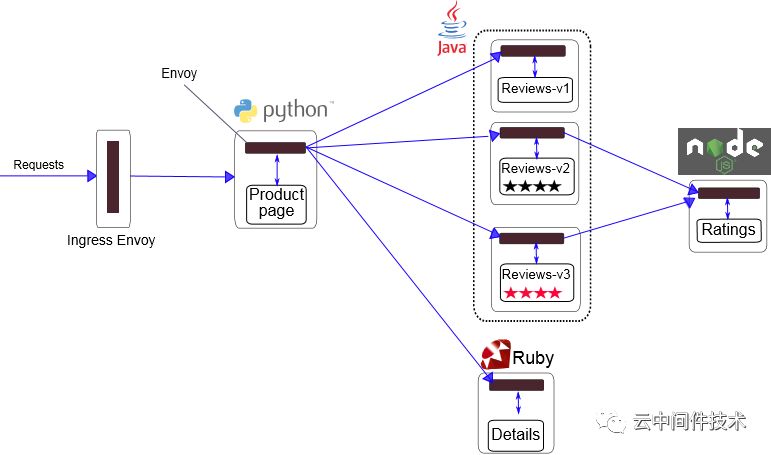
这个是一个图书信息系统,分成productpage, reviews, details和ratings四大模块,可能会有如下的调用关系
1 productpage -> reviews -> ratings
2 productpage -> details
我们分析第2种调用关系,productpage -> details
。
1) 外部请求访问productpage,请求进入网关并将请求转发给后端的productpage服务
2) productpage服务的envoy收到请求后,会生成x-request-id,x-b3-traceid和x-b3-spanid头,并填充到请求中,转发给本地的productpage服务。
3) 本地的productpage服务收到请求后,在调用details服务时,要将收到的调用链相关头填充到请求header里,发起调用
4) productpage服务的envoy收到请求后,根据过来的x-b3-spanid填充x-b3-parentspanid,并生成新的x-b3-spanid,将trace头填充到请求中,发给details服务的envoy
5) details服务的envoy收到请求后,将trace头填充到请求中,发给本地的details服务
6) details回应后,details服务的envoy会上报本次SERVER调用信息,productpage服务的envoy会上报本次CLIENT调用信息
7) productpage回应后,productpage服务的envoy会上报本次SERVER调用信息
远端的zipkin会收到三条调用信息,根据三条信息的traceid确定一条调用链,再根据spanid和parent-spanid确定前后调用关系,然后形成完成的调用链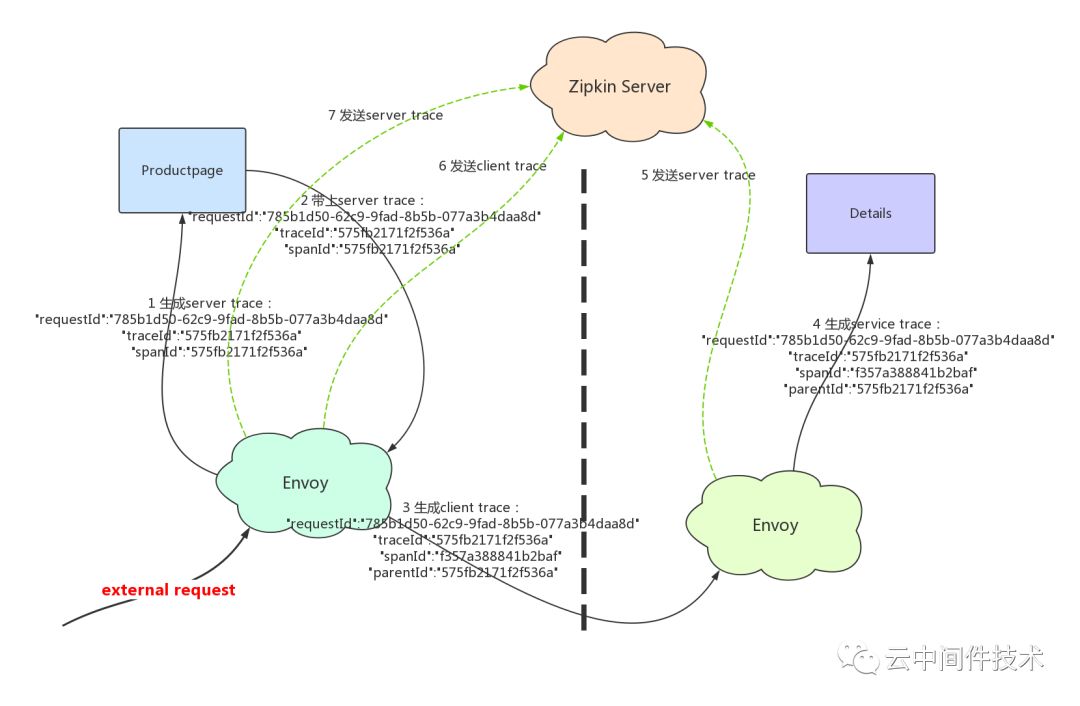
2 调用链初始化过程
//在主线程初始化时根据静态的bootstrap配置,创建tracer
void MainImpl::initialize() {
  initializeTracers(bootstrap.tracing(), server);
}
void MainImpl::initializeTracers(const envoy::config::trace::v2::Tracing& configuration, Instance& server) {
  // 获取配置的tracing server类型
  std::string type = configuration.http().name();
  // 生成tracer driver的配置
  Json::ObjectSharedPtr driver_config = MessageUtil::getJsonObjectFromMessage(configuration.http().config());
  // 根据配置的后端tracing server类型创建不同的http tracer
  auto& factory = Config::Utility::getAndCheckFactory<TracerFactory>(type);
  http_tracer_ = factory.createHttpTracer(*driver_config, server);
}
// 根据配置创建http tracer
Tracing::HttpTracerPtr ZipkinTracerFactory::createHttpTracer(const Json::Object& json_config, Server::Instance& server) {
  Envoy::Runtime::RandomGenerator& rand = server.random();
  // 根据driver配置创建tracer driver
  Tracing::DriverPtr zipkin_driver(new Zipkin::Driver(json_config, server.clusterManager(),
                                                      server.stats(), server.threadLocal(),
                                                      server.runtime(), server.localInfo(), rand));
  return Tracing::HttpTracerPtr(new Tracing::HttpTracerImpl(std::move(zipkin_driver), server.localInfo()));
}
// tracing driver初始化,创建用于输出trace的reporter
Driver::Driver() {
  // 获取trace server的节点集群
  Upstream::ThreadLocalCluster* cluster = cm_.get(config.getString("collector_cluster"));
  cluster_ = cluster->info();
  // 创建tracer
  tls_->set([this, collector_endpoint, &random_generator, trace_id_128bit](
                Event::Dispatcher& dispatcher) -> ThreadLocal::ThreadLocalObjectSharedPtr {
    TracerPtr tracer(new Tracer(local_info_.clusterName(), local_info_.address(), random_generator, trace_id_128bit));
    tracer->setReporter(ReporterImpl::NewInstance(std::ref(*this), std::ref(dispatcher), collector_endpoint));
    return ThreadLocal::ThreadLocalObjectSharedPtr{new TlsTracer(std::move(tracer), *this)};
  });
}
3 调用链生成过程解析
// 外部过来的请求每次协议解析完后,envoy会为当前请求生成对应的span
void ConnectionManagerImpl::ActiveStream::decodeHeaders() {
  traceRequest();
}
void ConnectionManagerImpl::ActiveStream::traceRequest() {
  // 根据请求中的x-envoy-force-trace和x-client-traceid判断是否需否需要上报
  Tracing::Decision tracing_decision = Tracing::HttpTracerUtility::isTracing(request_info_, *request_headers_);
  // 生成本次调用span
  active_span_ = connection_manager_.tracer_.startSpan(*this, *request_headers_, request_info_, tracing_decision);
  // 为span填充相关请求信息
  active_span_->injectContext(*request_headers_);
}
// 在每次请求结束时,会填充span的响应信息,并将span写到span buffer中,然后定时定量上报
ConnectionManagerImpl::ActiveStream::~ActiveStream() {
  Tracing::HttpTracerUtility::finalizeSpan(*active_span_, request_headers_.get(), request_info_, *this);
}
void HttpTracerUtility::finalizeSpan() {
  // 填充span信息
  ...
  // 后将span插入待输出span buffer中
  span.finishSpan();
}
void ZipkinSpan::finishSpan() { span_.finish(); }
void Span::finish() {
  SpanContext context(*this);
  if (auto t = tracer()) {
    t->reportSpan(std::move(*this));
  }
}
// 将span插入输出buffer(std::vector<Span> span_buffer_)
void ReporterImpl::reportSpan(const Span& span) {
  span_buffer_.addSpan(span);
}
4 如何填充调用span
一条调用span中包含的信息如下:
class Span {
private:
  uint64_t trace_id_; / traceid
  std::string name_;  // span名
  uint64_t id_;       // spanid
  absl::optional<uint64_t> parent_id_; // parentspanid
  bool sampled_;                       // 是否要上报
  absl::optional<int64_t> timestamp_;  // 时间戳
  absl::optional<int64_t> duration_;   // 请求延时
  int64_t monotonic_start_time_;       // 请求起始时间戳
  TracerInterface* tracer_;  // 上报span的tracer
};
// 生成一条span
Tracing::SpanPtr Driver::startSpan() {
  // 获取上报span用的tracer
  Tracer& tracer = *tls_->getTyped<TlsTracer>().tracer_;
  // 根据请求是否带上了trace头来构造span信息
  SpanPtr new_zipkin_span;
  if (request_headers.XB3TraceId() && request_headers.XB3SpanId()) {
    uint64_t trace_id(0);
    uint64_t span_id(0);
    uint64_t parent_id(0);
    SpanContext context(trace_id, span_id, parent_id, sampled);
    new_zipkin_span = tracer.startSpan(config, request_headers.Host()->value().c_str(), start_time, context);
  } else {
    new_zipkin_span = tracer.startSpan(config, request_headers.Host()->value().c_str(), start_time);
  }
  // 生成span
  ZipkinSpanPtr active_span(new ZipkinSpan(*new_zipkin_span, tracer));
  return std::move(active_span);
}
// 创建全新的span
SpanPtr Tracer::startSpan(const Tracing::Config& config, const std::string& span_name, SystemTime timestamp) {
  SpanPtr span_ptr(new Span());
  span_ptr->setName(span_name);
  uint64_t random_number = random_generator_.random();
  span_ptr->setId(random_number);
  span_ptr->setTraceId(random_number);
  span_ptr->setTracer(this);
  return span_ptr;
}
// 根据parent span信息创建新的span
SpanPtr Tracer::startSpan(const Tracing::Config& config, const std::string& span_name, SystemTime timestamp, SpanContext& previous_context) {
  SpanPtr span_ptr(new Span());
  span_ptr->setName(span_name);
  if (config.operationName() == Tracing::OperationName::Egress) {
    // 如果是外发流量,即本地访问外部服务的流量,则生成新的spanid
    uint64_t random_number = random_generator_.random();
    span_ptr->setId(random_number);
    // parent-spanid用上一次的spanid
    span_ptr->setParentId(previous_context.id());
  } else {
    // 如果是入流量,即外部服务访问本地服务的流量,则保持spanid不变,parent-spanid用上一次的parent-spanid
    span_ptr->setId(previous_context.id());
    if (previous_context.parent_id()) {
      span_ptr->setParentId(previous_context.parent_id());
    }
  }
  // 保持相同的traceid
  span_ptr->setTraceId(previous_context.trace_id());
  span_ptr->setTracer(this);
  return span_ptr;
}
//根据请求中的header填充span
void ZipkinSpan::injectContext(Http::HeaderMap& request_headers) {
  // Set the trace-id and span-id headers properly, based on the newly-created span structure.
  request_headers.insertXB3TraceId().value(span_.traceIdAsHexString());
  request_headers.insertXB3SpanId().value(span_.idAsHexString());
  // Set the parent-span header properly, based on the newly-created span structure.
  if (span_.isSetParentId()) {
    request_headers.insertXB3ParentSpanId().value(span_.parentIdAsHexString());
  }
}
5 如何输出调用信息
// 创建定时器,定期上报调用信息
ReporterImpl::ReporterImpl(Driver& driver, Event::Dispatcher& dispatcher, const std::string& collector_endpoint) {
  flush_timer_ = dispatcher.createTimer([this]() -> void {
    driver_.tracerStats().timer_flushed_.inc();
    flushSpans();
    enableTimer();
  });
  enableTimer();
}
// 创建定时器,默认周期5s
void ReporterImpl::enableTimer() {
  const uint64_t flush_interval =
      driver_.runtime().snapshot().getInteger("tracing.zipkin.flush_interval_ms", 5000U);
  flush_timer_->enableTimer(std::chrono::milliseconds(flush_interval));
}
// 根据配置的刷新数量(默认5)和刷新间隔(默认5s),将调用信息输出到Zipkin server
void ReporterImpl::flushSpans() {
  // 将span信息格式化成json
  const std::string request_body = span_buffer_.toStringifiedJsonArray();
  // 构造http请求
  Http::MessagePtr message(new Http::RequestMessageImpl());
  message->headers().insertMethod().value().setReference(Http::Headers::get().MethodValues.Post);
  message->headers().insertPath().value(collector_endpoint_);
  message->headers().insertHost().value(driver_.cluster()->name());
  message->headers().insertContentType().value().setReference(Http::Headers::get().ContentTypeValues.Json);
  Buffer::InstancePtr body(new Buffer::OwnedImpl());
  body->add(request_body);
  message->body() = std::move(body);
  // 异步发送http请求
  const uint64_t timeout = driver_.runtime().snapshot().getInteger("tracing.zipkin.request_timeout", 5000U);
  driver_.clusterManager().httpAsyncClientForCluster(driver_.cluster()->name()).send(std::move(message), *this, std::chrono::milliseconds(timeout));
  // 清除所有spans
  span_buffer_.clear();
}
6 创建本地文件输出tracer
前文介绍了Envoy中调用链的原理以及详细过程,可以看到调用链log是直接通过网络发到远端的,在实际运营过程中有时需要先将log打到本地然后异步的采集走,一方面是防止网络抖动log丢失,另外一方面可以更好地控制log的发送速率。因此TSF Mesh 在开源基础上做了扩展实现,支持创建本地文件输出tracer,使其按规定格式打印到本地,如有类似调用关系:user(192.168.0.1:8079) -> shop(192.168.0.2:8080/get),则输出格式如下:
{
    "traceId":"e4531568dabb29ec",
    "name":"http:/sayhi",
    "id":"e4531568dabb29ec",
    "kind":"CLIENT",
    "timestamp":1541629187466843,
    "duration":100,
    "localEndpoint":{
        "ipv4":"192.168.0.1",
        "serviceName":"user"
    },
    "remoteEndpoint":{
        "ipv4":"192.168.0.2",
        "port":8080,
        "serviceName":"shop"
    },
    "tags":{
        "remoteInterface":"/get",
        "resultStatus":"200",
        "http.method":"GET",
        "url":"http://shop/get"
    }
}
{
    "traceId":"7ac78718eb1d0d92",
    "name":"http:/sayhi",
    "id":"7ac78718eb1d0d92",
    "kind":"SERVER",
    "timestamp":1541572126013695,
    "duration":100,
    "localEndpoint":{
        "ipv4":"",
        "port":0,
        "serviceName":"192.168.0.2"
    },
    "remoteEndpoint":{
        "ipv4":"192.168.0.1",
    },
    "tags":{
        "localInterface":"/get",
        "resultStatus":"200",
        "http.method":"GET",
        "url":"http://shop/get"
    }
}
因为需求的格式基本跟zipkin上报的格式一致,所以通过改造原生zipkin driver来实现一个local driver
新增tracer: envoy.local
class TracerNameValues {
public:
  // Lightstep tracer
  const std::string Lightstep = "envoy.lightstep";
  // Zipkin tracer
  const std::string Zipkin = "envoy.zipkin";
  // Dynamic tracer
  const std::string DynamicOt = "envoy.dynamic.ot";
  // Local tracer
  const std::string Local = "envoy.local";
};
local tracer在bootstrap配置文件中的配置如下:
tracing:
  http:
    config:
      collector_endpoint: /data/tsf_apm/trace/logs/trace_log.log
    name: envoy.local
新增local::Driver
Driver::Driver() {
  // 保持原有的collector_endpoint不变,从里面获取本地文件的输出路径
  const std::string collector_endpoint =
      config.getString("collector_endpoint", ZipkinCoreConstants::get().DEFAULT_COLLECTOR_ENDPOINT);
  tls_->set([this, collector_endpoint, &random_generator, trace_id_128bit](
                Event::Dispatcher& dispatcher) -> ThreadLocal::ThreadLocalObjectSharedPtr {
    TracerPtr tracer(new Tracer(local_info_.clusterName(), local_info_.address(), random_generator));
    tracer->setReporter(ReporterImpl::NewInstance(std::ref(*this), std::ref(dispatcher), collector_endpoint));
    return ThreadLocal::ThreadLocalObjectSharedPtr{new TlsTracer(std::move(tracer), *this)};
  });
}
新增local::Reporter
ReporterImpl::ReporterImpl(Driver& driver, Event::Dispatcher& dispatcher, const std::string& collector_endpoint) {
  // 根据配置的文件路径,调用envoy的日志系统生成日志项
  file_ = driver_.logManager().createAccessLog(collector_endpoint_);
  // 复用原有的输出逻辑
  flush_timer_ = dispatcher.createTimer([this]() -> void {
    driver_.tracerStats().timer_flushed_.inc();
    flushSpans();
    enableTimer();
  });
  enableTimer();
}
// 输出span到本地
void ReporterImpl::flushSpans() {
  driver_.tracerStats().spans_sent_.add(span_buffer_.pendingSpans());
  const std::string request_body = span_buffer_.toStringifiedJsonArray();
  file_->write(request_body);
  span_buffer_.clear();
}
总结:本文分析了Istio数据面板Envoy的调用链实现原理以及TSF Service Mesh 结合实际需求所做的一个简单扩展。
7 参考
https://www.envoyproxy.io/
https://www.cncf.io/
https://opentracing.io/
https://istio.io/docs/examples/bookinfo/
