




点击上方 云原生CTO,选择 设为星标
优质文章,每日送达


「【只做懂你de云原生干货知识共享】」
Tekton Pipelines 入门第 1 部分 — 容器镜像构建和推送
Tekton 是一个用于创建 CI/CD 系统的开源项目。允许开发人员跨云提供商和本地系统构建、测试和部署。
在第 1 部分中,我将通过实际的日常任务解决基本管道。在下一部分中,我将介绍 Tekton 触发器。分成两部分有望将复杂性降至最低。
Tekton 站点和Tekton GitHub 项目中都有大量文档。
Tekton 站点:http://tekton.dev/
Tekton GitHub:https://github.com/tektoncd/pipeline
但是,当您准备将它用于实际任务时,它仍然令人困惑,也许一个确切的真实日常示例会有所帮助,当我开始使用 Tekton 时,我希望有一个简单的示例来向我展示。
简单示例
我为 「Tekton Pipelines」 创建了一个非常简单的示例。
这些示例包含创建管道所需的最少实体。最好先关注它们,您可以通过「https://github.com/yossicohn/tekton-pipelines/blob/main/Part-1-pipelines/simple-example/README.md」
阅读那里的 README.md将引导您逐步完成实施。
我们会怎样做?
本文将尝试描述 Tekton 流程中的不同实体和概念。
我们会从上到下,意思是:Pipelinerun ➨ Pipeline ➨Task
,而在旅途中,我们将遇到的事情进行一遍。
我们的任务:
「1. 拉取私有 git 仓库」
「2. 构建容器镜像」
「3. 将镜像推送到私有容器镜像仓库」
显然,我们将使用 Tekton 作为 CI 框架来定义和执行步骤。
我们将使用Kaniko进行容器镜像构建和镜像推送到镜像仓库。
注意,在本文中,我假设读者对 Kubernetes 有基本的了解,而且我不会参考安装 Tekton 的阶段,因为您可以在Tekton 的安装指南中了解它。
Tekton安装指南:https://github.com/tektoncd/pipeline/blob/main/docs/install.md
让我们开始吧!
Tekton 定义了作为其管道构建块的 Kubernetes 资源。
以下是我们将使用的资源和一些基本定义供您掌握。
● Pipeline
● Tasks
● Pipeline Resources
● Workspace
● Result
● Parameters
通过以下模式,您可以了解实体及其之间的关系。
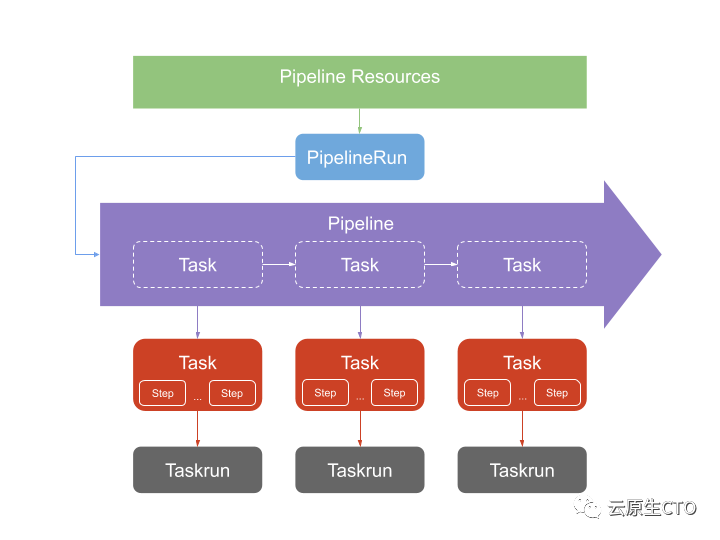
图片来自:https://technologists.dev/posts/tekton-jx-pipelines/
对一些实体的基本熟悉:
Pipeline
Pipeline定义了Tasks要执行的有序系列以及每个的相应输入和输出Task。您可以使用该属性指定一个的输出是否Task用作下一个的输入。提供与相同的变量替换。
Task
Task定义了一系列steps以所需顺序运行并完成一定数量的构建工作。每个都Task作为 Kubernetes 集群上的 Pod 运行,每个都step作为自己的容器。
Pipeline Resources
Pipeline Resources在管道中是一组对象,这些对象将用作 a 的输入Task并且可以由 a 输出Task。
Task可以有多个输入和输出。例如:Task的输入可以是包含您的应用程序代码的 GitHub 源。
Task的输出可以是您的应用程序容器镜像(已构建),然后可以将其部署在集群中。
Task输出的另一个示例可以是要上传到存储桶的 jar 文件。
Workspaces
Pipeline可用于Workspaces显示如何通过其Tasks. 例如,TaskA 可能将源存储库克隆到 a 上Workspace,TaskB 可能编译它在该 中找到的代码Workspace。有Pipeline's责任确保Workspace这两个Tasks使用相同,更重要的Workspace是,它们访问的顺序是正确的。
您可以在此处阅读有关工作区的更多信息「https://tekton.dev/docs/pipelines/workspaces/#using-workspaces-in-tasks」
Results
任务可以发出一个字符串结果,用户可以查看该结果并将其传递给pipeline中的其他任务。
这些results具有广泛的潜在用途。要定义Task's结果,请使用该results字段。每个results条目中Task'sYAML对应于该文件Task应存储的结果。这些文件应该被创建Task的/tekton/results目录中。如果Task有一个results字段,则目录本身会自动创建,但它有责任Task生成其内容。
您可以在此处阅读有关结果的更多信息
「https://tekton.dev/vault/pipelines-v0.15.2/pipelines/#using-results」
Parameters
您可以指定要Task在执行时提供给的参数,例如编译标志或工件名称。Parameters被传递到Task从其对应的TaskRun
Parameters被传递到Pipeline从其对应的PipelineRun并且可以替换在每个Task中指定的模板值Pipeline。
我们的pipeline
在我们的示例中,我们将有一个pipeline,该pipeline将通过拉取、构建镜像并将其推送到容器镜像仓库来完成。
pipeline将由 2 个任务组成:
「git-pull-source-and-get-sha」 — 将拉出 git 存储库,并从 git 上次提交 sha1 中定义j镜像推送标签
「build-docker-image-from-source」 — 将使用Kaniko构建容器镜像并将其推送到 DockerHub 私有镜像仓库(我们还将展示 AWS ECR 的使用情况)
您可以在下面通过pipeline.yaml The Pipeline看到 Pipeline 定义,其中包含以下引用:
「PipelineResources」 — 命名为i 的Git 和 Image 资源nput-git,output-image
「tasks」 -通过task-ref元素下的任务元素 ,我们将使用:
-build-docker-image-from-source
-git-pull-source-and-get-sha
「workspaces」——我们将使用一个工作区来共享我们的 git 源。
本例中的工作空间是一个 localhost 卷(由pipelinerun.yaml 我们稍后引用的定义),但我们可以使用其他PVC’s
我们的管道定义:
● 任务使用的管道资源
● 包含的任务要使用的结果
● 传递给任务的参数
● 工作区传递给任务
注意,结果使用的一个例子:
“$(tasks.pipeline-git-source.results.dockerfile-path)”
这样我们就得到了从任务pipeline-git-source 中通过 名称传播的结果 dockerfile-path 所有有关的定义Workspace(卷),Parameters,ServiceAccount和PipelineResources是在发现Pipelinerun其使用的pipeline.yaml
apiVersion: tekton.dev/v1beta1
kind: Pipeline
metadata:
name: pipeline-build-push-image
spec:
resources:
- name: input-git
type: git
- name: output-image
type: image
results:
- name: dockerfile-path
description: the Dockerfile path
value: "$(tasks.pipeline-git-source.results.dockerfile-path)"
- name: image-url
description: the image url
value: "$(tasks.pipeline-git-source.results.push-image-url)"
- name: path-to-context
description: the Dockerfile Context path
value: "$(tasks.pipeline-git-source.results.path-to-context)"
params:
- name: dockerfile-path
- name: path-to-context
- name: image-url
workspaces:
- name: shared-data
tasks:
- name: pipeline-git-source
taskRef:
name: git-pull-source-and-get-sha
workspaces:
- name: shared-data
workspace: shared-data
resources:
inputs:
- name: docker-source
resource: input-git
outputs:
- name: builtImage
resource: output-image
- name: build-container-image-and-push
taskRef:
name: build-docker-image-from-source
runAfter:
- pipeline-git-source
params:
- name: dockerfile-path
value: "$(tasks.pipeline-git-source.results.dockerfile-path)"
- name: image-url
value: "$(tasks.pipeline-git-source.results.push-image-url)"
- name: path-to-context
value: "$(tasks.pipeline-git-source.results.path-to-context)"
workspaces:
- name: shared-data
workspace: shared-data
resources:
outputs:- name: builtImageresources: out-image
在以下架构中,您可以看到实体关系
● Pipeline——由 PODS(Pod per Task)体现
● task——表现为一个 POD
● Steps——在Task POD中表现为Containers
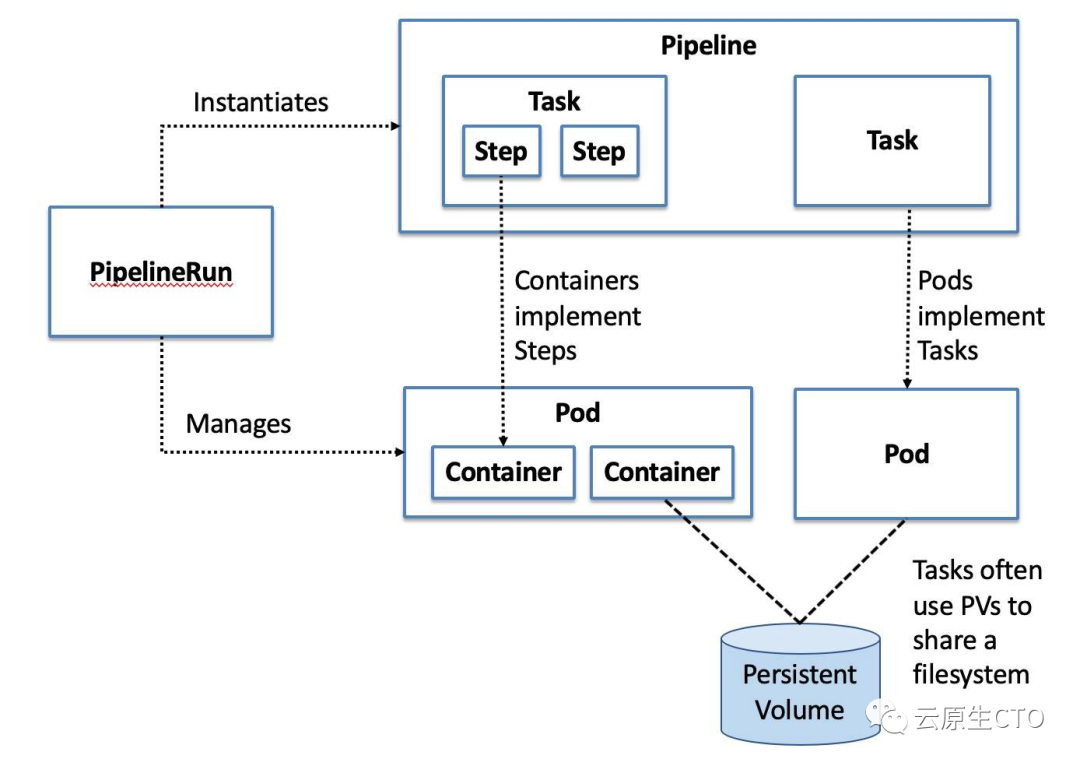
图片来自:https : developer.ibm.com/devpractices/devops/articles/introduction-to-tekton-architecture-and-design/
Pipeline流水线
apiVersion: tekton.dev/v1beta1
kind: PipelineRun
metadata:
  name: pipelinerun-build-push-image
spec:
  resources:
    - name: input-git
      resourceRef:
        name: go-api-skeleton-git
    - name: output-image
      resourceRef:
        name: go-api-skeleton-image
  workspaces:
  - name: shared-data
    volumeClaimTemplate:
      spec:
        accessModes:
        - ReadWriteOnce
        resources:
          requests:
            storage: 1Gi
  serviceAccountName: git-serviceaccount
  pipelineRef:
    name: pipeline-build-push-image
  params:
    - name: dockerfile-path
      value: "./Dockerfile"
    - name: image-url
      value: "yossicohn/app"
    - name: path-to-context
      value: "workspace/shared-data"
您可以看到使用的已定义资源,这样我们就可以注入不同的资源,使pipeline表现为模板。pipelinerun.yaml pipeline.yamlPipeline
在这里,我们定义了PipelineResources在这种情况下是:
● Input Resource (type git) —用于将 git 存储库定义为资源go-api-skeleton-git
● 输出资源(类型镜像)——go-api-skeleton-image 用于将容器仓库定义为资源
● workspace— 一个卷声明,它被命名为shared-data 并引用自pipeline
● ServiceAccount —我们用它来定义管道凭证
● 参数—parameters注入pipeline的
运行pipeline
要运行pipeline,我们需要在 kubernetes 集群中创建资源。
要按照说明进行操作,最好将 repo 和 cd 克隆到part-1-pipelines 中。
在https://github.com/yossicohn/tekton-pipelines/blob/main/Part-1-pipelines/README.md
的第 1 部分 README.md 中,您可以获得有关如何创建secret和pipeline资源。
要显示示例,您可以参考我的私有 GitHub 存储库yossicohn/go-api-skeleton和我的私有 DockerHub 镜像仓库。
创建pipeline
https://github.com/yossicohn/tekton-pipelines/blob/main/Part-1-pipelines/pipeline.yaml
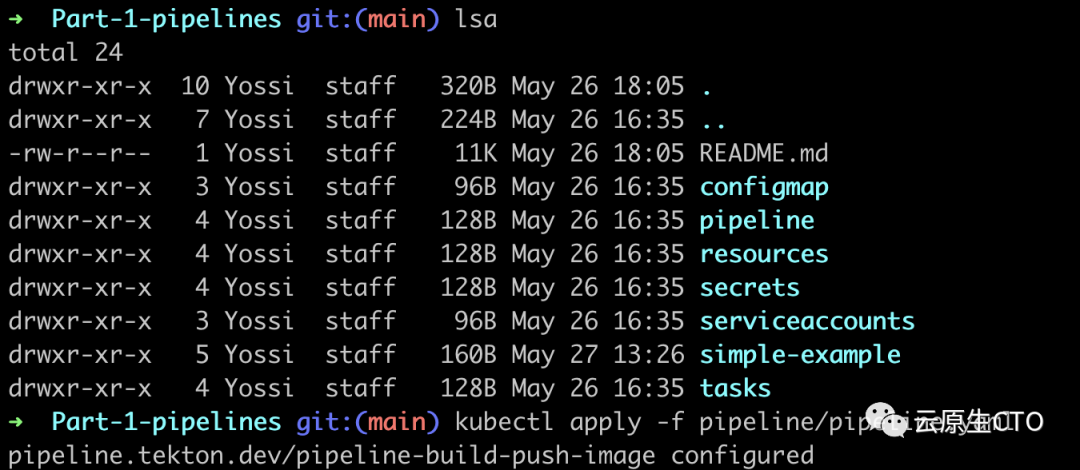
创建 PipelineResources
创建两个资源,git 和 image 注意,需要更新资源以引用自己的资源!

创建task
创建上面定义的 2 个任务。

创建secret
准备好secret yaml 文件后,按照 README.md 中的指示,我们可以创建它们(这样我们将定义 git SSH secret和容器仓库secret)
您可以在任务 yaml 文件中看到secret的用法. 通过 docker-registry 类型的 k8s 密钥创建身份验证
kubectl create secret docker-registry regcred \
--docker-server=https://index.docker.io/v1/ \
--docker-username=<username> \
--docker-password=<password> \
--docker-email=<user@email.com>
为 git SSH 凭证创建密钥
apiVersion: v1
type: kubernetes.io/ssh-auth
data:
  config: <config base64>
  ssh-privatekey: <private key base64>
kind: Secret
metadata:
  creationTimestamp: null
  annotations:
    tekton.dev/git-0: github.com # Described below
  name: ssh-key-secret
最后,我们需要创建 Pipelinerun
kubectl apply -f pipeline/pipelinerun.yaml
Pipelinerun通过 Tekton CLI(也在自述文件中引用)获取列表和日志

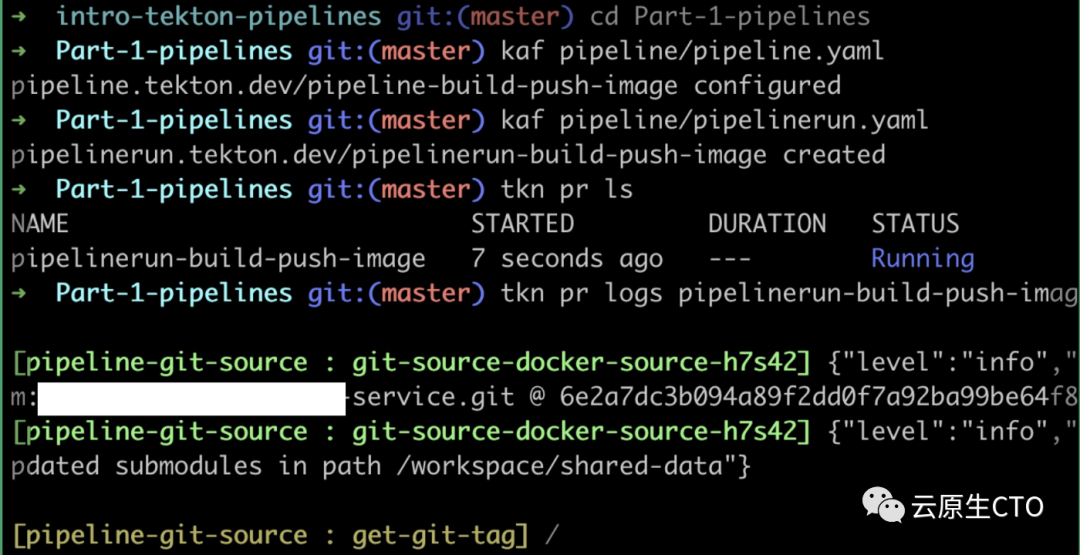
请注意,关于Workspace
workspace卷将自动创建并取决于您正在运行的基础设施(对于 Minikube/Kind,您将拥有hostpath卷,而在 AWS 等中,您将获得一个预置的块设备)
概括
在本部分中,我们参考了 Tekton Pipeline,并了解了如何使用它来构建pipeline。
在下一部分中,我们将参考 Tekton 触发器,并了解我们如何使用触发器和 Github 触发器来触发管道。
