1. 介绍
Spring Boot 提供了对 Redis 集成的组件包:spring-boot-starter-data-redis
,spring-boot-starter-data-redis
依赖于spring-data-redis
和 lettuce
。Spring Boot 1.0 默认使用的是 Jedis 客户端,2.0 替换成 Lettuce,但如果你从 Spring Boot 1.5.X 切换过来,几乎感受不大差异,这是因为 spring-boot-starter-data-redis
为我们隔离了其中的差异性。
Lettuce 是一个可伸缩线程安全的 Redis 客户端,多个线程可以共享同一个 RedisConnection,它利用优秀 netty NIO 框架来高效地管理多个连接。
2. 添加依赖
修改pom.xml
<!--redis 开始部分 -->
<dependency>
    <groupId>org.springframework.boot</groupId>
    <artifactId>spring-boot-starter-data-redis</artifactId>
</dependency>
<!-- lettuce pool 缓存连接池 -->
<dependency>
    <groupId>org.apache.commons</groupId>
    <artifactId>commons-pool2</artifactId>
</dependency>
<!--redis 结束部分 -->
3. 添加配置
修改application.yaml
server:
  port: 8080
spring:
  datasource:
    ...
  # Redis配置
  redis:
    # Redis数据库索引(默认为0
    database: 0
    # Redis服务器地址
    host: 127.0.0.1
    # 端口
    port: 6379
    # 链接超时时间 单位 ms(毫秒)
    timeout: 3000
    # Redis 线程池设置
    lettuce:
      pool:
        # 连接池最大连接数(使用负值表示没有限制) 默认 8
        max-active: 8
        # 连接池最大阻塞等待时间(使用负值表示没有限制) 默认 -1
        max-wait: -1
        # 连接池中的最大空闲连接 默认 8
        max-idle: 8
        # 连接池中的最小空闲连接 默认 0
        min-idle: 0
4. 自定义 RedisTemplate
默认情况下的模板只能支持 RedisTemplate<String,String>
,只能存入字符串,很多时候,我们需要自定义 RedisTemplate ,设置序列化器,这样我们可以很方便的操作实例对象。
创建: LettuceRedisConfig.java
package com.hui.javalearn.config;

import org.springframework.boot.autoconfigure.AutoConfigureAfter;
import org.springframework.boot.autoconfigure.data.redis.RedisAutoConfiguration;
import org.springframework.context.annotation.Bean;
import org.springframework.context.annotation.Configuration;
import org.springframework.data.redis.connection.lettuce.LettuceConnectionFactory;
import org.springframework.data.redis.core.RedisTemplate;
import org.springframework.data.redis.serializer.GenericJackson2JsonRedisSerializer;
import org.springframework.data.redis.serializer.StringRedisSerializer;

import java.io.Serializable;

/**
 * 基于Lettuce操作redis的客户端
 * @author liuqh
 */
@Configuration
@AutoConfigureAfter(RedisAutoConfiguration.class)
public class LettuceRedisConfig {

    /**
     * 自定义序列化类
     * @param connectionFactory
     * @return
     */
    @Bean
    public RedisTemplate<String, Serializable> redisTemplate(LettuceConnectionFactory connectionFactory){
        RedisTemplate<String, Serializable> redisTemplate = new RedisTemplate<>();
        // 设置value的序列化规则和 key的序列化规则
        redisTemplate.setKeySerializer(new StringRedisSerializer());
        redisTemplate.setValueSerializer(new GenericJackson2JsonRedisSerializer());

        redisTemplate.setConnectionFactory(connectionFactory);
        return redisTemplate;
    }
}
5. 使用
package com.hui.javalearn;

import com.hui.javalearn.model.UserModel;
import org.junit.jupiter.api.Test;
import org.springframework.beans.factory.annotation.Autowired;
import org.springframework.boot.test.context.SpringBootTest;
import org.springframework.data.redis.core.RedisTemplate;
import org.springframework.data.redis.core.StringRedisTemplate;
import org.springframework.data.redis.core.ValueOperations;

import java.io.Serializable;

@SpringBootTest
public class TestRedis {

    @Autowired
    private StringRedisTemplate stringRedisTemplate;

    @Autowired
    private RedisTemplate<String, Serializable> serializableRedisTemplate;

    /**
     * 测试字符串操作
     */
    @Test
    void testString(){
        String key = "java-str";
        String value = "hello-word";
        stringRedisTemplate.opsForValue().set(key,value);
        String s = stringRedisTemplate.opsForValue().get(key);
        System.out.println(s);
    }

    /**
     * 测试对象序列化
     */
    @Test
    void testSerializable(){
        String key = "java-obj";
        ValueOperations<String, Serializable> stringSerializableValueOperations = serializableRedisTemplate.opsForValue();
        // 具体实体类
        UserModel userModel = new UserModel();
        userModel.setPhone("17600000000");
        userModel.setNickName("张三");
        stringSerializableValueOperations.set(key,userModel);
        UserModel cacheUserModel = (UserModel)stringSerializableValueOperations.get(key);
        if (cacheUserModel != null){
            System.out.println("nickName:" + cacheUserModel.getNickName() + " phone:" + cacheUserModel.getPhone());
        }
    }
}
6. 使用Spring Cache 集成Redis
Spring Cache
具备相当的好的灵活性,不仅能够使用 SpEL(Spring Expression Language)
来定义缓存的key
和各种condition
,还提供开箱即用的缓存临时存储方案,也支持和主流的专业缓存例如EHCache
、Redis
、Guava
的集成。
我使用的Springboot版本为2.3.3,不需要再单独添加依赖
spring-boot-starter-cache
,直接使用相关注解就行。
6.1 添加缓存管理器
修改: LettuceRedisConfig.java
package com.hui.javalearn.config;

import org.springframework.boot.autoconfigure.AutoConfigureAfter;
import org.springframework.boot.autoconfigure.data.redis.RedisAutoConfiguration;
import org.springframework.cache.CacheManager;
import org.springframework.cache.annotation.EnableCaching;
import org.springframework.context.annotation.Bean;
import org.springframework.context.annotation.Configuration;
import org.springframework.data.redis.cache.RedisCacheConfiguration;
import org.springframework.data.redis.cache.RedisCacheManager;
import org.springframework.data.redis.connection.RedisConnectionFactory;
import org.springframework.data.redis.connection.lettuce.LettuceConnectionFactory;
import org.springframework.data.redis.core.RedisTemplate;
import org.springframework.data.redis.serializer.GenericJackson2JsonRedisSerializer;
import org.springframework.data.redis.serializer.RedisSerializationContext;
import org.springframework.data.redis.serializer.StringRedisSerializer;

import java.io.Serializable;
import java.time.Duration;

/**
 * 基于Lettuce操作redis的客户端
 * @author liuqh
 */
@Configuration
@AutoConfigureAfter(RedisAutoConfiguration.class)
@EnableCaching
public class LettuceRedisConfig {

    /**
     * 缓存管理器
     * 说明:会创建一个切面(aspect)并触发Spring缓存注解的切点(pointcut),
     * 根据类或者方法所使用的注解以及缓存的状态,这个切面会从缓存中获取数据,将数据添加到缓存之中或者从缓存中移除某个值。
     * @param redisConnectionFactory
     * @return
     */
    @Bean
    public CacheManager cacheManager(RedisConnectionFactory redisConnectionFactory){
        RedisCacheConfiguration redisCacheConfiguration = RedisCacheConfiguration.defaultCacheConfig();
        RedisCacheConfiguration defaultCacheConfig = redisCacheConfiguration
                // 设置缓存管理器管理的缓存的默认过期时间(1小时)
                .entryTtl(Duration.ofHours(1))
                // 设置 key为string序列化
                .serializeKeysWith(RedisSerializationContext.SerializationPair.fromSerializer(new StringRedisSerializer()))
                // 设置value为json序列化
                .serializeValuesWith(RedisSerializationContext.SerializationPair.fromSerializer(new GenericJackson2JsonRedisSerializer()))
                // 不缓存空值
                .disableCachingNullValues();

        // 构造一个Redis缓存管理器
        return  RedisCacheManager.builder(redisConnectionFactory)
                // 缓存配置
                .cacheDefaults(defaultCacheConfig)
                .build();
    }


    /**
     * 自定义序列化模板
     * @param connectionFactory
     * @return
     */
    @Bean
    public RedisTemplate<String, Serializable> redisTemplate(LettuceConnectionFactory connectionFactory){
        // 创建一个模板类
        RedisTemplate<String, Serializable> redisTemplate = new RedisTemplate<>();
        // 设置value的序列化规则和 key的序列化规则
        redisTemplate.setKeySerializer(new StringRedisSerializer());
        redisTemplate.setValueSerializer(new GenericJackson2JsonRedisSerializer());
        // redis连接工厂 储存到模板类中
        redisTemplate.setConnectionFactory(connectionFactory);
        return redisTemplate;
    }
}
6.2 使用
步骤一: 在SerivceImpl使用相关注解
我的UserServiceImpl.java
部分代码
....
    /**
     * 测试缓存对象
     * @param phone
     * @return
     */
    @Override
    // 空值的时候不缓存
    @Cacheable(cacheNames = "userService-cache",key = "'phone_'+#phone",unless = "#result == null")
    public UserModel searchUserByPhone(String phone) {
        log.info("没有走缓存-->" + phone);
        return userDao.selectByPhone(phone);
    }

    /**
     * 测试缓存字符串
     * @param string
     * @return
     */
    @Override
    @Cacheable(cacheNames = "userService-cache",key = "'str'+#string")
    public String returnString(String string) {
        SimpleDateFormat simpleDateFormat = new SimpleDateFormat("yyy-MM-dd HH:mm:ss");
        String format = simpleDateFormat.format(new Date());
        return "string==> " + format;
    }
....
步骤二: 在单元测试中使用
编写单元测试: TestRedis.java
package com.hui.javalearn;

import com.hui.javalearn.service.UserService;
import org.junit.jupiter.api.Test;
import org.springframework.beans.factory.annotation.Autowired;
import org.springframework.boot.test.context.SpringBootTest;

@SpringBootTest
public class TestRedis {

    @Autowired
    private UserService userService;

    /**
     * 测试SpringCache
     */
    @Test
    void testCacheMethod() {
        userService.searchUserByPhone("176000000");
        userService.searchUserByPhone("176000000");
        userService.searchUserByPhone("1760000411");
        userService.searchUserByPhone("1760000411");

        System.out.println(userService.returnString("a"));
        System.out.println(userService.returnString("a"));
        System.out.println(userService.returnString("b"));
        System.out.println(userService.returnString("b"));
    }
}
redis缓存情况
127.0.0.1:6379> keys *
1) "userService-cache::strb"
2) "userService-cache::stra"
3) "userService-cache::phone_1760000411"
6.3 Spring Cache 注解
| 注解 | 作用 |
|---|---|
| @Cacheable | 将方法的结果缓存起来,下一次方法执行参数相同时,将不执行方法,返回缓存中的结果 |
| @CacheEvict | 移除指定缓存 |
| @CachePut | 标记该注解的方法总会执行,根据注解的配置将结果缓存 |
| @Caching | 可以指定相同类型的多个缓存注解,例如根据不同的条件 |
| @CacheConfig | 类级别注解,可以设置一些共通的配置,@CacheConfig(cacheNames=“user”), 代表该类下的方法均使用这个cacheN |
7.踩坑
7.1 @Cacheable不起作用
为了图测试方便,我直接在当前类里面定义一个方法:cacheMethod
,发现 @Cacheable不起作用,后来查资料发现不能这么用。
下面是我当时的错误使用代码:
package com.hui.javalearn;

import org.junit.jupiter.api.Test;
import org.springframework.boot.test.context.SpringBootTest;
import org.springframework.cache.annotation.Cacheable;
import org.springframework.cache.annotation.EnableCaching;

import java.text.SimpleDateFormat;
import java.util.Date;

@SpringBootTest
public class TestRedis {

    @Test
    void testCacheMethod(){
        System.out.println(cacheMethod("a"));
        System.out.println(cacheMethod("b"));
    }

    @Cacheable(cacheNames = "cache-name", key = "'KEY_'+#str")
    public String cacheMethod(String str){
        SimpleDateFormat simpleDateFormat = new SimpleDateFormat("yyyy-MM-dd HH:mm:ss");
        String format = simpleDateFormat.format(new Date());
        return "cache: " +str + " Time: " + format;
    }
}
原因: 因为@Cacheable 是使用AOP 代理实现的 ,通过创建内部类来代理缓存方法,这样就会导致一个问题:类内部的方法调用类内部的缓存方法不会走代理,而不走代理,就不能正常创建缓存。
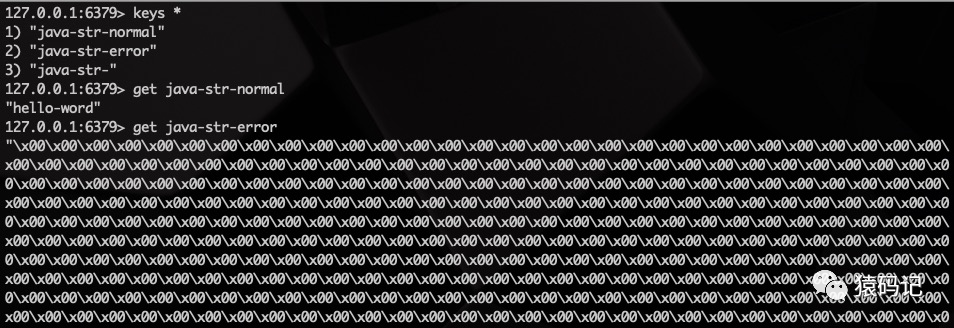
7.2 set后,出现很多\x00
代码如下
package com.hui.javalearn;


import org.junit.jupiter.api.Test;
import org.springframework.beans.factory.annotation.Autowired;
import org.springframework.boot.test.context.SpringBootTest;
import org.springframework.data.redis.core.RedisTemplate;
import org.springframework.data.redis.core.StringRedisTemplate;
import org.springframework.data.redis.core.ValueOperations;
import java.util.concurrent.TimeUnit;

@SpringBootTest
public class TestRedis {

    @Autowired
    private StringRedisTemplate stringRedisTemplate;

    /**
     * 测试字符串操作
     */
    @Test
    void testString() {
        String key = "java-str-";
        String value = "hello-word";
        stringRedisTemplate.opsForValue().set(key, value);
        // 这个结果会出现很多\x00
        stringRedisTemplate.opsForValue().set(key+"error", value,3600);
        stringRedisTemplate.opsForValue().set(key+"normal", value,3600, TimeUnit.SECONDS);
        System.out.println("o");
    }
}
存储结果