


题图由 Pexels 在 Pixabay 上发布
------------------------
Nornir3 vs Nornir2,就好比 Python3 vs Python2。虽然都是一个东西,但是又有一些差异,无法直接互操作。
第一个区别,安装 Nornir2 的时候,程序会自动把所有的插件安装好。而 Nornir3 仅默认安装核心插件,例如 SimpleInventory ,threaded。需要使用者自己手工安装插件。
大部分的插件都可以在 nornir.tech 找到:
https://nornir.tech/nornir/plugins/
安装/注册插件有很多种方法,可以写一个 setuptools 或者 poetry 脚本来安装,也可以从 GitHub 上面把插件项目的 Package 复制到本地然后 import,再用 path.to 来注册。好消息是现在基本上所有的插件都可以用 pip(或者 pip3,取决于你的环境变量)来自动化地安装注册。
pip install nornir_napalmpip install nornir_netmikopip install nornir_utilspip install nornir_jinja2
安装上述几个插件的同时,相关的依赖包也会被自动安装。
还有一些插件,比如 ncclient,在 Nornir2 被支持,但 Nornir3 没有。
其实有一个插件 nornir_netconf ,但看上去开发者在 6 个月前停止开发了。下面是项目地址,作者写好了 README,但是还没 merge,也没放到 PyPI 上去。
https://github.com/nornir-automation/nornir_netconf/tree/first
但是 Nornir3 可以使用一个更强大的 Netconf connections 插件: nornir_scrapli。安装的时候注意要用中横线,而不是下划线:
pip install nornir-scrapli
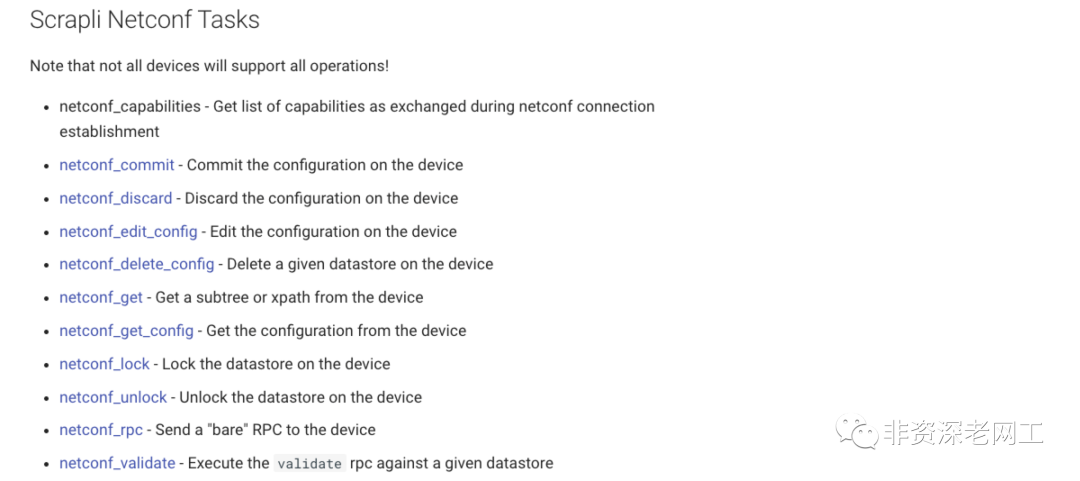
scrapli 看上去是 netmiko 和 ncclient 的组合体,不仅支持 SSH,还支持 Telnet 和 Netconf。
这些是和 netmiko 对标的功能:

这些是和 ncclient 对标的功能:
第 2 个区别,在 config file 里面,对于线程数量的定义的位置变了。
Nornir 原生支持多线程,默认 20 个线程,所以其性能比 Ansible 高出两个量级。如果要修改 Nornir2 的线程数量,需要在 config file 里面修改 core.num_workers 选项的值。
---core:num_workers: 100inventory:plugin: nornir.plugins.inventory.simple.SimpleInventoryoptions:host_file: "inventory/hosts.yaml"group_file: "inventory/groups.yaml"defaults_file: "inventory/defaults.yaml"
Nornir3 把 num_workers 从 core 里面拎出来,在 config file 中新增了 runner 部分,同样默认 20 个线程。下面是多线程的写法:
---inventory:plugin: SimpleInventoryoptions:host_file: "inventory/hosts.yaml"group_file: "inventory/groups.yaml"defaults_file: "inventory/defaults.yaml"runner:plugin: threadedoptions:num_workers: 100
下面是单线程的写法:
---inventory:plugin: SimpleInventoryoptions:host_file: "inventory/hosts.yaml"group_file: "inventory/groups.yaml"defaults_file: "inventory/defaults.yaml"runner:plugin: serial
可以看到,Inventory plugin 的写法也变得简单了。这算是第 3 个区别吧。
其他的版本差异:Nornir3 移除了 core.deserializer,config file 不能再直接配置 jinja2 而需要采用 nornir_jinja2 插件,logging.file 改成 logging.log_file,还有一些其他的小改动:
https://nornir.readthedocs.io/en/v3.1.0/upgrading/2_to_3.html
接下来,咱们写一个简单的 Nornir3 demo。按我自己的经验,初学者在学习 Nornir 的时候,最大的疑惑是 Inventory 文件怎么写。最关键的是 platform、connection_options、transport 都应该怎么写。
比如上一篇《初识Nornir》,我将一台 Nexus 93180YC 的 platform 写成了 nxos_ssh:
sw_93180:hostname: 10.75.**.**platform: nxos_sshtransport: sshgroups:- devnet
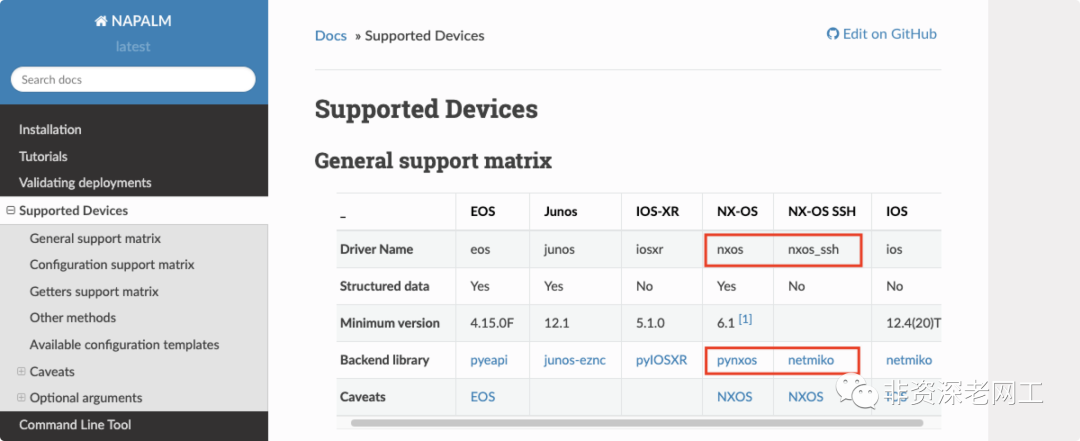
那为什么是 nxos_ssh 而不是 nxos 呢?原因是我分别选择了 napalm 和 netmiko 作为 connection_options:
devnet:username: adminpassword: ***connection_options:napalm:extras: {}
根据 NAPALM 的文档,nxos 和 nxos_ssh 底层所采用的框架是不一样的。nxos 的底层是 pynxos,而 nxos_ssh 的底层是 netmiko。
所以我的经验是,先根据你想要的数据格式和自己的熟悉程度选择合适的 connection_options(即连接设备的工具,napalm / netmiko scrapli);然后再根据相关工具的文档,确定 platform(nxos nxos_ssh ios)以及使用哪种协议 transport(ssh netconf telnet)。
如果选择 Scrapli,platform 有哪些选项呢?通过查询 Scrapli 的源代码,可以看到它支持以下几种 platform,key 和 value 是等价的,用哪个都行。
PLATFORM_MAP = {"ios": "cisco_iosxe","nxos": "cisco_nxos","iosxr": "cisco_iosxr","eos": "arista_eos","junos": "juniper_junos",}
写一个 hosts.yaml 文件:
---sw_93180:hostname: 10.5.7.14platform: nxostransport: sshgroups:- devnetcsrv:hostname: 10.5.7.24platform: iostransport: sshgroups:- devnet
再写一个 groups.yaml 文件:
---devnet:username: adminpassword: adminconnection_options:scrapli:port: 22extras:ssh_config_file: Trueauth_strict_key: False
再写一个 demo.py:
from nornir import InitNornirfrom nornir_utils.plugins.functions import print_resultfrom nornir_scrapli.tasks import send_commandnr = InitNornir(config_file='config.yaml')lldp_neighbors = nr.run(task=send_command,command='show lldp neighbors')print_result(lldp_neighbors)
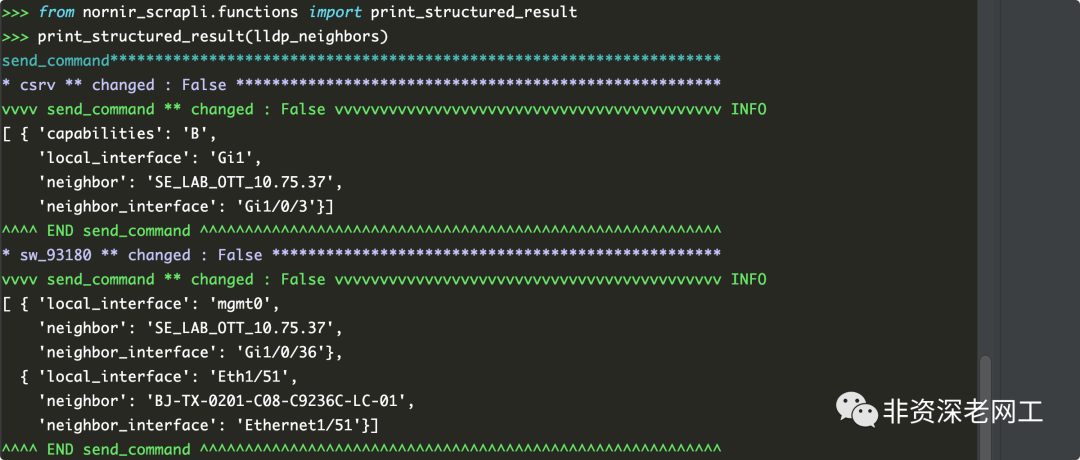
如果我们用 nornir_utils 插件的 print_result() 来打印 output,会得到一个 string 文本:

但如果使用 Scrapli 提供的 print_structured_result() 就可以得到一个结构化数据了(如果可以成功 parse 的话。默认使用 TextFSM,也可以选择 Genie):
更妙的是,作为一个 Scrapli 对象,response 可以直接调用函数,这样就不需要 print_result() 了,而且功能也更加丰富。改写 demo.py 如下:
from nornir import InitNornirfrom nornir_scrapli.tasks import send_commandfrom pprint import pprintnr = InitNornir(config_file='config.yaml')lldp_neighbors = nr.run(task=send_command,command='show lldp neighbors')for key in lldp_neighbors.keys():print()print('Host {} 命令执行时间:'.format(key))pprint(lldp_neighbors[key].scrapli_response.elapsed_time)print()print('命令输出结果:')pprint(lldp_neighbors[key].scrapli_response.textfsm_parse_output()[0])print('-' * 80)
执行脚本,返回以下结果:
Host sw_93180 命令执行时间:0.126486命令输出结果:{'local_interface': 'mgmt0','neighbor': 'SE_LAB_OTT_10.75.37','neighbor_interface': 'Gi1/0/36'}--------------------------------------------------------------------------------Host csrv 命令执行时间:0.149602命令输出结果:{'capabilities': 'B','local_interface': 'Gi1','neighbor': 'SE_LAB_OTT_10.75.37','neighbor_interface': 'Gi1/0/3'}--------------------------------------------------------------------------------
