


安装很简单:
1. tar zxvf keepalived-1.1.20.tar.gz
2. cd keepalived-1.1.20
3. ./configure --prefix=/
4. Make
5. make install
修改一下 /etc/keepalived/keepalived.conf 这个配置文件就可以用了,以下是我的环境,192.168.10.141和192.168.10.142是两个VIP,可以在两台服务器之间飘动:

主机的配置:
gobal\_defs {
        notification\_email {
                failover@firewall.loc
        }
        notification\_email\_from Alexandre.Cassen@firewall.loc
                smtp\_server 192.168.0.48
                smtp\_connect\_timeout 10
                router\_id nginx
}
vrrp_instance VI_141 {
state BACKUP
interface eth0
virtual_router_id 141
priority 50
advert_int 1
authentication {
auth_type PASS
auth_pass 141
}
virtual_ipaddress {
192.168.10.141/26 dev eth0
}
}
vrrp_instance VI_142 {
state BACKUP
interface eth0
virtual_router_id 142
priority 100
advert_int 1
authentication {
auth_type PASS
auth_pass 142
}
virtual_ipaddress {
192.168.10.142/26 dev eth0
}
}
备机的配置
global_defs {
notification_email {
failover@firewall.loc
}
notification_email_from Alexandre.Cassen@firewall.loc
smtp_server 10.168.0.48
smtp_connect_timeout 10
router_id nginx
}
vrrp_instance VI_141 {
state BACKUP
interface eth0
virtual_router_id 141
priority 100
advert_int 1
authentication {
auth_type PASS
auth_pass 141
}
virtual_ipaddress {
192.168.10.141/26 dev eth0
}
}
vrrp_instance VI_142 {
state BACKUP
interface eth0
virtual_router_id 142
priority 50
advert_int 1
authentication {
auth_type PASS
auth_pass 142
}
virtual_ipaddress {
192.168.10.142/26 dev eth0
}
}
提示:主机和备机的配置文件是一样的,仔细看一下priority的值;
使用以下命令即可将keepalived加入linux的服务中:
chkconfig --add keepalived
查看是否生效命令
Chkconfig --list
简单验真方式:通过启、停keepalived服务即可观察到VIP的飘动。
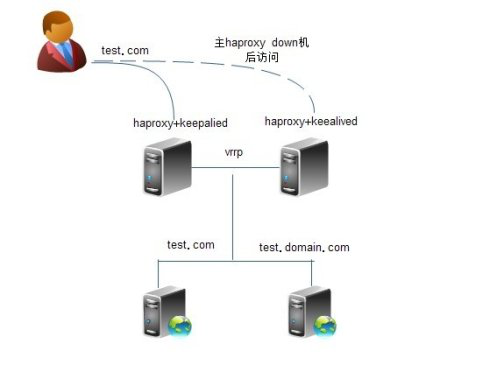
再来一个举例:haproxy+keepalived实现高可用负载均衡
环境描述:
haproxy keepalived 主:192.168.1.192
haproxy keepalived 备:192.168.1.193
vip:192.168.1.200
web:192.168.1.187:80 192.168.1.187:8000
一:安装过程,在192.168.1.192上:
keepalived的安装:
#tar -zxvf keepalived-1.1.17.tar.gz
#ln -s /usr/src/kernels/2.6.18-128.el5-i686/ /usr/src/linux
#cd keepalived-1.1.17
#./configure --prefix=/ --mandir=/usr/local/share/man/ --with-kernel-dir=/usr/src/kernels/2.6.18-128.el5-i686/
#make && make install
#cd /etc/keepalived/
#mv keepalived.conf keepalived.conf.default
#vi keepalived.conf
! Configuration File for keepalived
vrrp_script chk_http_port {
script “/etc/keepalived/check_haproxy.sh”
interval 2
weight 2
global_defs {
router_id LVS_DEVEL
}
vrrp_instance VI_1 {
state MASTER #192.168.1.193上改为BACKUP
interface eth0
virtual_router_id 51
priority 150 #192.168.1.193上改为120
advert_int 1
authentication {
auth_type PASS
auth_pass 1111
}
track_script {
chk_http_port
}
virtual_ipaddress {
192.168.1.200
}
}
}
#vi /etc/keepalived/check_haproxy.sh
#!/bin/bash
A=`ps -C haproxy --no-header |wc -l`
if [ $A -eq 0 ];then
/usr/local/haproxy/sbin/haproxy -f /usr/local/haproxy/conf/haproxy.cfg
sleep 3
if [ `ps -C haproxy --no-header |wc -l` -eq 0 ];then
/etc/init.d/keepalived stop
fi
fi
#chmod 755 /etc/keepalived/check_haproxy.sh
haproxy的安装(主备都一样):
#tar -zxvf haproxy-1.4.9.tar.gz
#cd haproxy-1.4.9
#make TARGET=linux26 PREFIX=/usr/local/haproxy install
#cd /usr/local/haproxy/
#mkdir conf logs
#cd conf
#vi haproxy.cfg
global
log 127.0.0.1 local3 info
maxconn 4096
user nobody
group nobody
daemon
nbproc 1
pidfile /usr/local/haproxy/logs/haproxy.pid
defaults
maxconn 2000
contimeout 5000
clitimeout 30000
srvtimeout 30000
mode http
log global
log 127.0.0.1 local3 info
stats uri /admin?stats
option forwardfor
frontend http_server
bind :80
log global
default_backend info_cache
acl test hdr_dom(host) -i test.domain.com
use_backend cache_test if test
backend info_cache
#balance roundrobin
balance source
option httpchk HEAD /haproxy.txt HTTP/1.1\r\nHost:192.168.1.187
server inst2 192.168.1.187:80 check inter 5000 fall 3
backend cache_test
balance roundrobin
#balance source
option httpchk HEAD /haproxy.txt HTTP/1.1\r\nHost:test.domain.com
server inst1 192.168.1.187:8000 check inter 5000 fall 3
二:再两台机器上都分别启动:
/etc/init.d/keepalived start (这条命令会自动把haproxy启动)
三:测试:
1.再两台机器上分别执行ip add
主: eth0: <broadcast,multicast,up,lower_up style=“overflow-wrap: break-word;”>mtu 1500 qdisc pfifo_fast qlen 1000
link/ether 00:0c:29:98💿c0 brd ff:ff:ff:ff:ff:ff
inet 192.168.1.192/24 brd 192.168.1.255 scope global eth0
inet 192.168.1.200/32 scope global eth0
inet6 fe80::20c:29ff:fe98:cdc0/64 scope link
valid_lft forever preferred_lft forever
备: eth0: <broadcast,multicast,up,lower_up style=“overflow-wrap: break-word;”>mtu 1500 qdisc pfifo_fast qlen 1000
link/ether 00:0c:29:a6:0c:7e brd ff:ff:ff:ff:ff:ff
inet 192.168.1.193/24 brd 255.255.255.254 scope global eth0
inet6 fe80::20c:29ff:fea6:c7e/64 scope link
valid_lft forever preferred_lft forever
2.停掉主上的haproxy,3秒后keepalived会自动将其再次启动
3.停掉主的keepalived,备机马上接管服务
备: eth0: <broadcast,multicast,up,lower_up style=“overflow-wrap: break-word;”>mtu 1500 qdisc pfifo_fast qlen 1000
link/ether 00:0c:29:a6:0c:7e brd ff:ff:ff:ff:ff:ff
inet 192.168.1.193/24 brd 255.255.255.254 scope global eth0
inet 192.168.1.200/32 scope global eth0
inet6 fe80::20c:29ff:fea6:c7e/64 scope link
valid_lft forever preferred_lft forever
4.更改hosts
192.168.1.200 test.com
192.168.1.200 test.domain.com
通过IE测试,可以发现
test.com的请求发向了192.168.1.187:80
test.domain.com的请求发向了192.168.1.187:8000
