


请求头的Accept字段
1.1、详解
关于 spring boot 的full 和 lite 模式
1.1.1、处理请求映射
1.2、DispatcherServlet的加载
2.1、自定义HanderMapping
2.1、数据响应
2.1.1、响应json
2.2、SpringMVC 在非异步情况下支持的返回值类型
3.1、MediaType 内容协商
3.2、HttpMessageConverter消息转换器
4.1、内容协商的参数指定
4.2、自定义MessageConverter
4.3、实现基于参数的自定义内容格式
0、思考
最近自己做了一个小的电商系统,到后期引入了sentinel、seata等阿里组件之后,浏览器访问接口,返回的数据类型全部从json变为了xml。当定义接口类型为application/json
数据返回时,还是没有效果。于是找了下资料。翻看了下spring boot 的官方文档。里面有介绍关于Spring mvc 的响应数据类型,与客户端接受类型。其中采用的内容协商的方式进行最终敲定返回的数据类型的样式。
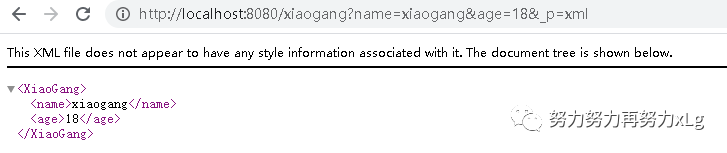
这里有个前驱知识点,在浏览器的访问接口时,返回的数据时xml格式的,但是当我使用postman调用接口时,返回的并是json数据。那么原因是为什么呢?
请求头的Accept字段
在浏览器中发送请求的请求头Accept
字段包含了非常丰富的类型。
Accept: text/html,application/xhtml+xml,application/xml;q=0.9,image/avif,image/webp,image/apng,*/*;q=0.8,application/signed-exchange;v=b3;q=0.9
其中定义的类型后面的q 代表的是权重。所以在浏览器中支持的众多响应数据类型中xml 是优先于*/*
,所以可以理解为在服务端调用请求时,spring boot 会根据服务端和自己能支持的类型就行协商,最后拿着双重数据最后敲定当前请求返回的类型为什么。
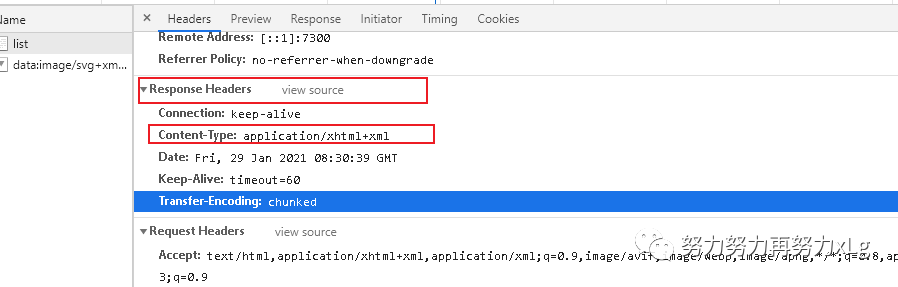
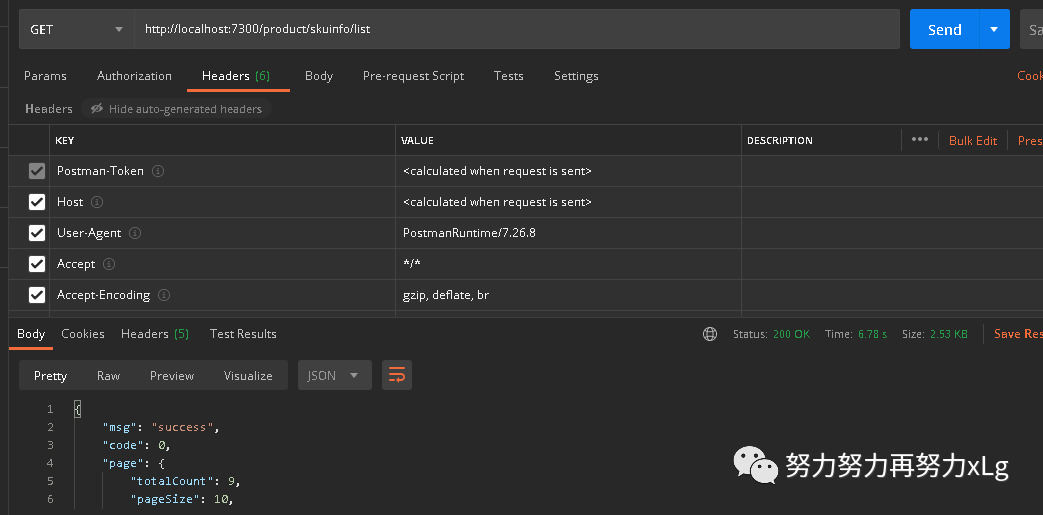
在PostMan的请求中,Accept
字段被指定为application/json
,所以返回的数据类型为json数据。
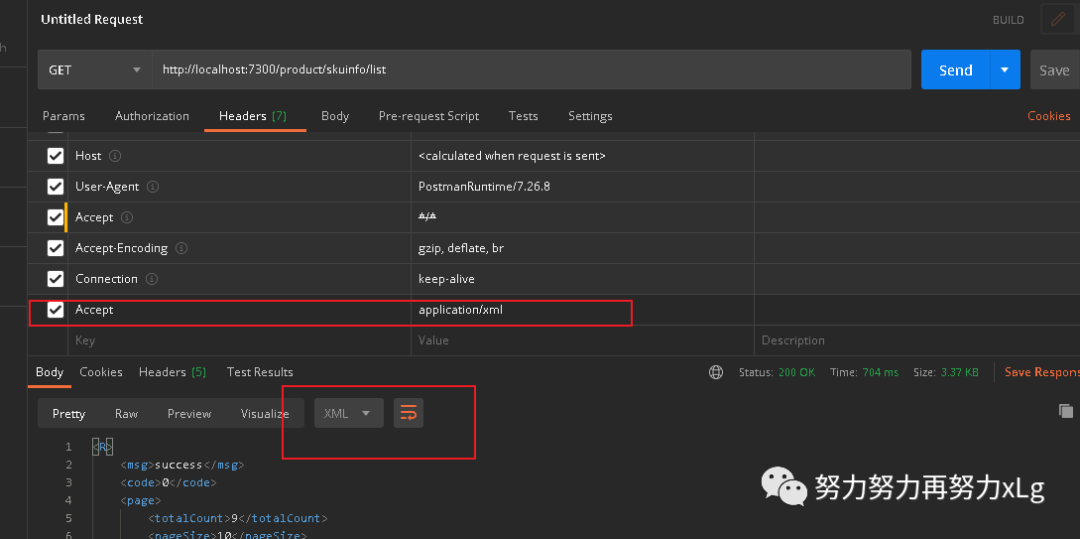
尝试添加一个 Accept
字段为xml,返回的数据并是xml格式了
1、Spring Boot 中的 请求处理流程
Spring Boot 是集成Spring mvc的。整体的请求处理原理是离不开Spring Mvc 的。在SpringBoot 的应用中,web 开发全都依赖于请求的映射,那么Spring Boot 是如何处理这些映射的呢?
关于Spring MVC 的自动配置,不懂的朋友可以猜测,关于Spring mvc 的配置。则是MvcAutoConfiguration
。
真实的配置项为 WebMvcAutoConfiguration
,一起来研究一下这个配置项。工作中大量使用的类
1.1、详解
@Configuration(proxyBeanMethods = false) // lite 模式,取消对类的代理,Spring Boot 2 的新特性
@ConditionalOnWebApplication(type = Type.SERVLET) // web 模式为SERVLET
@ConditionalOnClass({ Servlet.class, DispatcherServlet.class, WebMvcConfigurer.class })  该类初始化的前提条件需要这三个类存在
@ConditionalOnMissingBean(WebMvcConfigurationSupport.class)  如果WebMvcConfigurationSupport不存在
@AutoConfigureOrder(Ordered.HIGHEST_PRECEDENCE + 10)  初始化顺序
@AutoConfigureAfter({ DispatcherServletAutoConfiguration.class, TaskExecutionAutoConfiguration.class,
      ValidationAutoConfiguration.class })  在该三个配置类之后初始化
public class WebMvcAutoConfiguration {
关于 spring boot 的full 和 lite 模式
配置 类组件之间无依赖关系用Lite模式加速容器启动过程,减少判断
配置类组件之间有依赖关系,方法会被调用得到之前单实例组件,用Full模式
该自动配置类,自动配置了DispatcherServlet
,MultipartResolver
等MVC中重要主组件。(这里就不多做解释了)
1.1.1、处理请求映射
在传统的表单请求中,表单的method 只支持两种方式get
,post
,那么表单怎么支持更多类型的请求呢?在源码中有做具体的说明和实现。
我们进入到WebMvcAutoConfiguration
配置类,第一个bean
对象就是
	@Bean
	@ConditionalOnMissingBean(HiddenHttpMethodFilter.class)
	@ConditionalOnProperty(prefix = "spring.mvc.hiddenmethod.filter", name = "enabled", matchIfMissing = false)
	public OrderedHiddenHttpMethodFilter hiddenHttpMethodFilter() {
		return new OrderedHiddenHttpMethodFilter();
	}
一个隐藏的http请求过路器。
public class OrderedHiddenHttpMethodFilter extends HiddenHttpMethodFilter implements OrderedFilter {

    public class HiddenHttpMethodFilter extends OncePerRequestFilter {


	@Override
	protected void doFilterInternal(HttpServletRequest request, HttpServletResponse response, FilterChain filterChain)
			throws ServletException, IOException {

		HttpServletRequest requestToUse = request;

		if ("POST".equals(request.getMethod()) && request.getAttribute(WebUtils.ERROR_EXCEPTION_ATTRIBUTE) == null) {
			String paramValue = request.getParameter(this.methodParam);
			if (StringUtils.hasLength(paramValue)) {
				String method = paramValue.toUpperCase(Locale.ENGLISH);
				if (ALLOWED_METHODS.contains(method)) {
					requestToUse = new HttpMethodRequestWrapper(request, method);
				}
			}
		}

		filterChain.doFilter(requestToUse, response);
	}
当表单中有隐藏的 _method
属性时,会被过路器拦截下来,进行请求的增强其中定义了一个
_method
字段,用来判断提交的请求中是否存在该字段,用于支持更多的表单提交方式。<form action="/requestTest" method="post">
<input type="submit" value="REST-POST 提交">
</form>
<form action="/requestTest" method="get">
<input type="submit" value="REST-GET 提交">
</form>
<form action="/requestTest" method="post">
<input type="hidden" name="_method" value="DELETE">
<input type="submit" value="REST-DELETE 提交">
</form>
<form action="/requestTest" method="post">
<input type="hidden" name="_method" value="PUT">
<input type="submit" value="REST-PUT 提交">
</form>
<form action="/requestTest" method="post">
<input type="hidden" name="_method" value="HEAD">
<input type="submit" value="REST-HEAD 提交">
</form>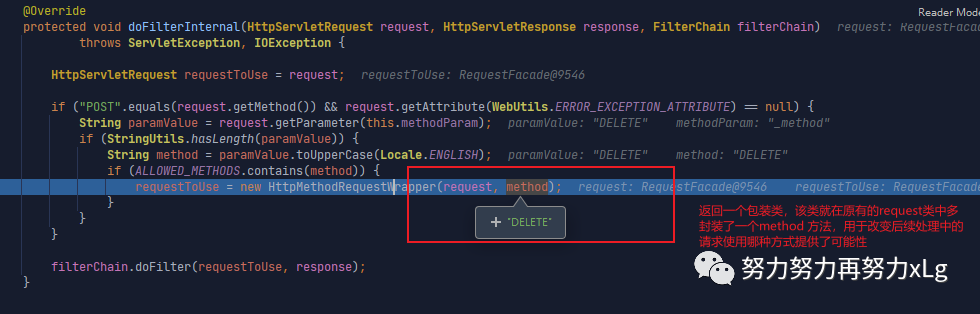
image-20210129220236424 也可以看出来该请求必须是以post 的方式进来,才会进行增强。如果
_method
属性封装在get
请求中,就没有作用了自定义该过滤器,实现自定义属性名。好玩的Spring 家
    <form action="/requestTest" method="post">
        <input type="hidden" name="_G" value="PUT">
        <input type="submit" value="REST-PUT 提交 -- 自定义的methodParam">
    </form>
private final static String METHOD_PARAM = "_G";
@Bean
public HiddenHttpMethodFilter hiddenHttpMethodFilter() {
final HiddenHttpMethodFilter hiddenHttpMethodFilter = new HiddenHttpMethodFilter();
hiddenHttpMethodFilter.setMethodParam(METHOD_PARAM);
return hiddenHttpMethodFilter;
}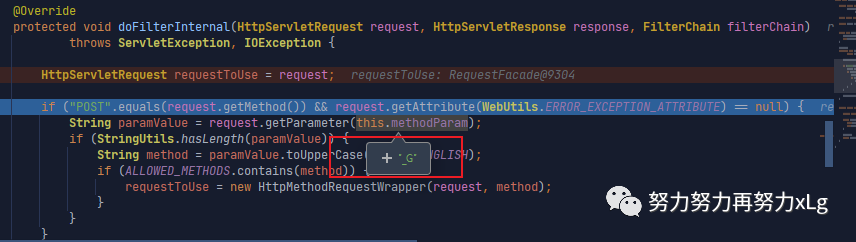
image-20210129221212022 在前面的方法签名中有说到,当该组件在容器中不存在时,Spring才会自动初始化它。那么只需要在容器中加入该组件,就可以实现自定义的拦截方式 这样就实现了自定义的属性加载了,SpringBoot 中绝大多数可配置类,都可以这样来操作。
貌似跟主题扯得有点远了。
下面就请求的路径进入正题。
用过MVC的都知道,一个请求的进入,第一个就要进入
DispatcherServlet
,那么SpringBoot在无xml配置的情况下是怎么配置该类的呢?
1.2、DispatcherServlet的加载
在自动配置类的WebMvcAotuConfiguretion
的签名中,标明了该类的初始需要在DispatcherServletAutoConfiguration.class, TaskExecutionAutoConfiguration.class,ValidationAutoConfiguration.class
三个类中。
@AutoConfigureOrder(Ordered.HIGHEST_PRECEDENCE)
@Configuration(proxyBeanMethods = false)
@ConditionalOnWebApplication(type = Type.SERVLET)
@ConditionalOnClass(DispatcherServlet.class)
@AutoConfigureAfter(ServletWebServerFactoryAutoConfiguration.class)
public class DispatcherServletAutoConfiguration {
该类就是用来初始化
DispatcherServlet
.@Bean(name = DEFAULT_DISPATCHER_SERVLET_BEAN_NAME)
public DispatcherServlet dispatcherServlet(WebMvcProperties webMvcProperties) {
DispatcherServlet dispatcherServlet = new DispatcherServlet();
dispatcherServlet.setDispatchOptionsRequest(webMvcProperties.isDispatchOptionsRequest());
dispatcherServlet.setDispatchTraceRequest(webMvcProperties.isDispatchTraceRequest());
dispatcherServlet.setThrowExceptionIfNoHandlerFound(webMvcProperties.isThrowExceptionIfNoHandlerFound());
dispatcherServlet.setPublishEvents(webMvcProperties.isPublishRequestHandledEvents());
dispatcherServlet.setEnableLoggingRequestDetails(webMvcProperties.isLogRequestDetails());
return dispatcherServlet;
}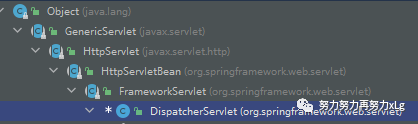
image-20210129222720151 protected void doDispatch(HttpServletRequest request, HttpServletResponse response) throws Exception {
HttpServletRequest processedRequest = request;
HandlerExecutionChain mappedHandler = null;
boolean multipartRequestParsed = false;
WebAsyncManager asyncManager = WebAsyncUtils.getAsyncManager(request);
try {
ModelAndView mv = null;
Exception dispatchException = null;
try {
processedRequest = checkMultipart(request);
multipartRequestParsed = (processedRequest != request);
// Determine handler for the current request.
mappedHandler = getHandler(processedRequest); // 获取请求映射关系
if (mappedHandler == null) {
noHandlerFound(processedRequest, response);
return;
}
// Determine handler adapter for the current request.
HandlerAdapter ha = getHandlerAdapter(mappedHandler.getHandler()); // 确定当前请求的适配器
// Process last-modified header, if supported by the handler.
String method = request.getMethod();
boolean isGet = "GET".equals(method);
if (isGet || "HEAD".equals(method)) { // 下面会判断请求是否被篡改
long lastModified = ha.getLastModified(request, mappedHandler.getHandler());
if (new ServletWebRequest(request, response).checkNotModified(lastModified) && isGet) {
return;
}
}
if (!mappedHandler.applyPreHandle(processedRequest, response)) { // 执行请求前的拦截器
return;
}
// Actually invoke the handler.
mv = ha.handle(processedRequest, response, mappedHandler.getHandler()); // 真正的指定请求方法
if (asyncManager.isConcurrentHandlingStarted()) {
return;
}
applyDefaultViewName(processedRequest, mv);
mappedHandler.applyPostHandle(processedRequest, response, mv); // 执行请求后的拦截器
}
catch (Exception ex) {
dispatchException = ex;
}
catch (Throwable err) {
// As of 4.3, we're processing Errors thrown from handler methods as well,
// making them available for @ExceptionHandler methods and other scenarios.
dispatchException = new NestedServletException("Handler dispatch failed", err);
}
processDispatchResult(processedRequest, response, mappedHandler, mv, dispatchException);
}
catch (Exception ex) {
triggerAfterCompletion(processedRequest, response, mappedHandler, ex);
}
catch (Throwable err) {
triggerAfterCompletion(processedRequest, response, mappedHandler,
new NestedServletException("Handler processing failed", err));
}
finally {
if (asyncManager.isConcurrentHandlingStarted()) {
// Instead of postHandle and afterCompletion
if (mappedHandler != null) {
mappedHandler.applyAfterConcurrentHandlingStarted(processedRequest, response);
}
}
else {
// Clean up any resources used by a multipart request.
if (multipartRequestParsed) {
cleanupMultipart(processedRequest);
}
}
}
}这就是 DispatcherServlet
加载的时机,我们知道,在Spring MVC中每一个请求都是需要指定DispatcherServlet
中的doDispatch
方法的Spring MVC 默认有五个类型的请求映射处理器
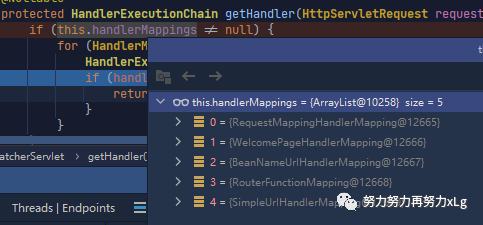
RequestMappingHandlerMapping:保存了所有@RequestMapping 和handler的映射规则
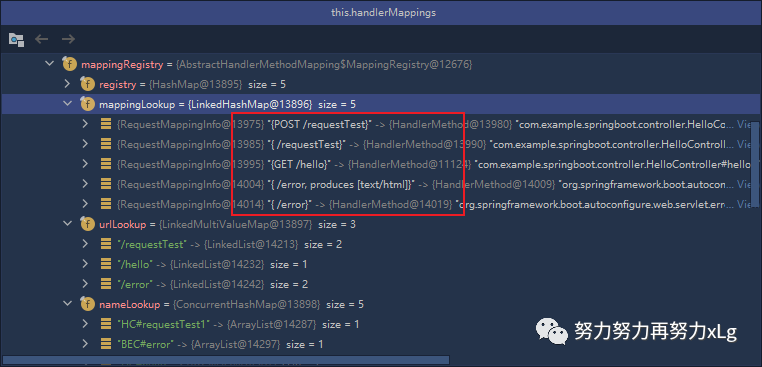
其中还有一个比较有意思的就是Spring Boot 的自动配置的欢迎页的映射 WelcomePageHandlerMapping
,当访问/
时,Sprng MVC 会以转发的方式访问index页面

在这个环节中,Spring MVC 就会匹配上相关的请求映射,然后返回对应的HandlerExecutionChain
,之后就会胡浩去该handler 的适配器,然后执行调用前的拦截器,再使用反射调用真正的请求方法,最后调用请求后的拦截器。实现一整套MVC的请求闭环。
上面的源码可以看出,最为重要的就是
handerMapping
了。首先就要确定请求的映射关系,如果不存在映射关系就会报错了。尝试自定义一个handerMapping 呢?首先我们看看Spring Boot 为我们提供的HanderMapping 是怎么定义的呢?
@Bean
@Primary
@Override
public RequestMappingHandlerMapping requestMappingHandlerMapping(
      @Qualifier("mvcContentNegotiationManager") ContentNegotiationManager contentNegotiationManager,
      @Qualifier("mvcConversionService") FormattingConversionService conversionService,
      @Qualifier("mvcResourceUrlProvider") ResourceUrlProvider resourceUrlProvider) {
   // Must be @Primary for MvcUriComponentsBuilder to work
   return super.requestMappingHandlerMapping(contentNegotiationManager, conversionService,
         resourceUrlProvider);
}
		@Bean
		public WelcomePageHandlerMapping welcomePageHandlerMapping(ApplicationContext applicationContext,
				FormattingConversionService mvcConversionService, ResourceUrlProvider mvcResourceUrlProvider) {
			WelcomePageHandlerMapping welcomePageHandlerMapping = new WelcomePageHandlerMapping(
					new TemplateAvailabilityProviders(applicationContext), applicationContext, getWelcomePage(),
					this.mvcProperties.getStaticPathPattern());
			welcomePageHandlerMapping.setInterceptors(getInterceptors(mvcConversionService, mvcResourceUrlProvider));
			welcomePageHandlerMapping.setCorsConfigurations(getCorsConfigurations());
			return welcomePageHandlerMapping;
		}
.... 等
2.1、自定义HanderMapping
定义一个需求, 在多版本同时支持的情况下,有些老款为升级的软件不支持新版本的心特性,但是又不能停止对这些老用户的支持,所以就需要将版本分离开来,但是为了开发的快速简便,就需要自定义HanderMapping来处理请求了, 根据请求头中的Api-Version 字段来确定当前版本具体使用哪个版本的接口
思路:
在请求路径的处,添加标识版本的注解,用于规定规则。 定义自定义的handlerMapping,用于处理请求映射关系。
@Target(ElementType.METHOD)
@Retention(RetentionPolicy.RUNTIME)
public @interface ApiVersion {
     String version();
}

    @ApiVersion(version = "v1")
    @RequestMapping("/api/test")
    public String test() {
        log.info(">>>>>>>>>>>>>>> v1 version running <<<<<<<<<<<<<<<<<<<<<<<");
        return "v1";
    }

    @ApiVersion(version = "v2")
    @RequestMapping("/api/test")
    public String test2() {
        log.info(">>>>>>>>>>>>>>> v2 version running <<<<<<<<<<<<<<<<<<<<<<<");
        return "v2";
    }
自定义HandlerMapping
public class CustomRequestMappingHandlerMapping extends RequestMappingHandlerMapping {
    @Override
    protected RequestCondition<?> getCustomMethodCondition(Method method) {
        final ApiVersion annotation = AnnotationUtils.findAnnotation(method, ApiVersion.class);
        return getApiVersionAnnotation(annotation);
    }

    @Override
    protected RequestCondition<?> getCustomTypeCondition(Class<?> handlerType) {
        final ApiVersion annotation = AnnotationUtils.findAnnotation(handlerType, ApiVersion.class);
        return getApiVersionAnnotation(annotation);
    }

    /**
     * 容器在加载会加载所有请求映射的信息{@link RequestMappingHandlerMapping#createRequestMappingInfo(java.lang.reflect.AnnotatedElement)}
     * 机会调用该方法,获取所有的请求
     *
     * @param version
     * @return
     */
    private RequestCondition<?> getApiVersionAnnotation(ApiVersion version) {
        return version != null ? new ApiVersionCondition(version.version()) : null;
    }
}
设置请求映射的匹配规则
/**
 * 定义 请求映射的规则
 *
 * @author by Mr. Li 2021/1/30 17:31
 */

public class ApiVersionCondition implements RequestCondition<ApiVersionCondition> {

    /*一般版本号为:v1 v0.1 v0.01 这种格式*/
    @Getter
    private String apiVersion;

    public ApiVersionCondition(String apiVersion) {
        this.apiVersion = apiVersion;
    }

    /**
     * 合并
     *
     * @param other
     * @return
     */
    @Override
    public ApiVersionCondition combine(ApiVersionCondition other) {
        return new ApiVersionCondition(other.getApiVersion());
    }

    /**
     * 获取 匹配的 条件
     * 所有的请求都会进入判断
     *
     * @param request 请求
     * @return ApiVersionCondition
     */
    @Override
    public ApiVersionCondition getMatchingCondition(HttpServletRequest request) {
        final String header = request.getHeader("Api-Version");
        // 截取版本号
        if (StrUtil.isNotBlank(header)) {
            final Integer integer = splitVersion(header);
            if (integer >= splitVersion(this.apiVersion)) // 如果请求的版本号大于等于配置版本号, 则满足
                return this;
        }
        // 查看当前请求参数中是否存在版本参数
        final String requestURI = request.getRequestURI();
        final String[] split = requestURI.split("/");
        for (String s : split) {
            if (s.startsWith("v")) {
                // 请求参数中存在版本指定
                final Integer integer = splitVersion(s);
                if (integer >= splitVersion(this.apiVersion)) // 如果请求的版本号大于等于配置版本号, 则满足
                {
                    //TODO 将版本信息设置到请求头中
                    return this;
                }
            }
        }
        return null;
    }

    private Integer splitVersion(String apiVersion) {
        final String sub = StrUtil.sub(apiVersion, 1, apiVersion.length());
        return Convert.toInt(Convert.toDouble(sub) * 100);
    }

    @Override
    public int compareTo(ApiVersionCondition other, HttpServletRequest request) {
        // 优先匹配最新的版本号
        return (splitVersion(other.getApiVersion()) - splitVersion(this.apiVersion));
    }

    public static void main(String[] args) {
        String apiVersion = "v0.01";
        apiVersion = StrUtil.sub(apiVersion, 1, apiVersion.length());
        System.out.println(apiVersion);
        System.out.println(Convert.toDouble(apiVersion));
    }
}
最后将自定义的映射关系注册到MVC的注册表中
/**
 * 将自定义的mapping 配置注册到 mvc 容器中
 *
 * @author by Mr. Li 2021/1/30 16:41
 */
@Component
public class CustomWebMvcRegistrations implements WebMvcRegistrations {
    @Override
    public RequestMappingHandlerMapping getRequestMappingHandlerMapping() {
        final CustomRequestMappingHandlerMapping customRequestMappingHandlerMapping = new CustomRequestMappingHandlerMapping();
        customRequestMappingHandlerMapping.setOrder(0);
        return customRequestMappingHandlerMapping;
    }
}
在容器启动时,就会加载好所有的请求映射关系 再当每一个请求进入时,都会进行逐一的判断,进行条件映射。
2、整个MVC解析的流程
在整个访问的过程有请求和响应两个过程。SpringBoot 对这一系列的过程都做了增强。比如:请求数据的处理中,对rest请求风格的支持,对参数注解的支持,其中还支持对POJO的封装和解码,整个流程完成后,就到了数据的响应,响应数据的过程就要对响应的数据做要求。这之间服务端需要知道客户端支持哪些数据类型,并且明确自己支持的类型,然后进行协商之后,返回最佳类型。(这里终于说回到了正题,整个数据的响应中,内容的协商是至关重要的。其中涉及到了Spring Boot 读数据的万能转码对响应类型的支持)
2.1、数据响应
首先MVC的数据响应,分两种情况,一是响应具体的页面,二是返回数据。这里就不深究视图的解析了,比较简单。这里讨论一下返回数据的处理。
2.1.1、响应json
在如今前后端分离的大环境下,后端大多情况都是返回json数据的。
        <dependency>
            <groupId>org.springframework.boot</groupId>
            <artifactId>spring-boot-starter-web</artifactId>
        </dependency>
<!-- 我们会发现SpringBoot 会自动导入json 依赖 -->
    <dependency>
      <groupId>org.springframework.boot</groupId>
      <artifactId>spring-boot-starter-json</artifactId>
      <version>2.3.8.RELEASE</version>
      <scope>compile</scope>
    </dependency>
在web场景会自动引入json依赖。(spring-boot-starter-json 是内部集成的,所以Spring Boot 是默认自动返回json数据的) 底层的json
然后在需要返回json类型的接口上标注 ResponseBody
注解,就可以实现返回json
数据了。
所以在SpringBoot 环境下开发web 返回json数据就非常的简单方便了。我们来看看其实现原理呢?
首先定位到调用代理方法的地方
// Actually invoke the handler.
mv = ha.handle(processedRequest, response, mappedHandler.getHandler());
重点看一下该方法
@Override
	protected ModelAndView handleInternal(HttpServletRequest request,
			HttpServletResponse response, HandlerMethod handlerMethod) throws Exception {

		ModelAndView mav;
		checkRequest(request);

		// Execute invokeHandlerMethod in synchronized block if required.
		if (this.synchronizeOnSession) {
			HttpSession session = request.getSession(false);
			if (session != null) {
				Object mutex = WebUtils.getSessionMutex(session);
				synchronized (mutex) {
					mav = invokeHandlerMethod(request, response, handlerMethod);
				}
			}
			else {
				// No HttpSession available -> no mutex necessary
				mav = invokeHandlerMethod(request, response, handlerMethod);
			}
		}
		else {
			// No synchronization on session demanded at all...
			mav = invokeHandlerMethod(request, response, handlerMethod); // 真正的执行请求方法
		}

		if (!response.containsHeader(HEADER_CACHE_CONTROL)) {
			if (getSessionAttributesHandler(handlerMethod).hasSessionAttributes()) {
				applyCacheSeconds(response, this.cacheSecondsForSessionAttributeHandlers);
			}
			else {
				prepareResponse(response);
			}
		}

		return mav;
	}
	@Nullable
	protected ModelAndView invokeHandlerMethod(HttpServletRequest request,
			HttpServletResponse response, HandlerMethod handlerMethod) throws Exception {

		ServletWebRequest webRequest = new ServletWebRequest(request, response);
		try {
			WebDataBinderFactory binderFactory = getDataBinderFactory(handlerMethod);
			ModelFactory modelFactory = getModelFactory(handlerMethod, binderFactory);

			ServletInvocableHandlerMethod invocableMethod = createInvocableHandlerMethod(handlerMethod);
			if (this.argumentResolvers != null) { // 参数解析器,用于处理请求方法的所有参数
				invocableMethod.setHandlerMethodArgumentResolvers(this.argumentResolvers);
			}
			if (this.returnValueHandlers != null) {// 返回值解析器 < 这里是重点哦
				invocableMethod.setHandlerMethodReturnValueHandlers(this.returnValueHandlers);
			}
			invocableMethod.setDataBinderFactory(binderFactory);
			invocableMethod.setParameterNameDiscoverer(this.parameterNameDiscoverer);

			ModelAndViewContainer mavContainer = new ModelAndViewContainer();
			mavContainer.addAllAttributes(RequestContextUtils.getInputFlashMap(request));
			modelFactory.initModel(webRequest, mavContainer, invocableMethod);
			mavContainer.setIgnoreDefaultModelOnRedirect(this.ignoreDefaultModelOnRedirect);

			AsyncWebRequest asyncWebRequest = WebAsyncUtils.createAsyncWebRequest(request, response);
			asyncWebRequest.setTimeout(this.asyncRequestTimeout);

			WebAsyncManager asyncManager = WebAsyncUtils.getAsyncManager(request);
			asyncManager.setTaskExecutor(this.taskExecutor);
			asyncManager.setAsyncWebRequest(asyncWebRequest);
			asyncManager.registerCallableInterceptors(this.callableInterceptors);
			asyncManager.registerDeferredResultInterceptors(this.deferredResultInterceptors);

			if (asyncManager.hasConcurrentResult()) {
				Object result = asyncManager.getConcurrentResult();
				mavContainer = (ModelAndViewContainer) asyncManager.getConcurrentResultContext()[0];
				asyncManager.clearConcurrentResult();
				LogFormatUtils.traceDebug(logger, traceOn -> {
					String formatted = LogFormatUtils.formatValue(result, !traceOn);
					return "Resume with async result [" + formatted + "]";
				});
				invocableMethod = invocableMethod.wrapConcurrentResult(result);
			}

			invocableMethod.invokeAndHandle(webRequest, mavContainer); // 经过一系列的设置之后,指定请求方法
			if (asyncManager.isConcurrentHandlingStarted()) {
				return null;
			}

			return getModelAndView(mavContainer, modelFactory, webRequest);
		}
		finally {
			webRequest.requestCompleted();
		}
	}
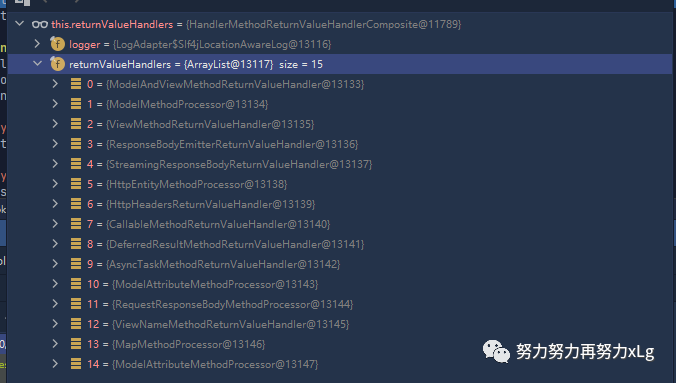
我们将重点放到,返回值的解析器上。
image-20210131001234548 这里可以看到Spring MVC 为我们准备了15种的返回类型。后面会进行一一比对,返回正确的类型
invocableMethod.invokeAndHandle(webRequest, mavContainer);
–>执行请求方法
public void invokeAndHandle(ServletWebRequest webRequest, ModelAndViewContainer mavContainer,
Object... providedArgs) throws Exception {
Object returnValue = invokeForRequest(webRequest, mavContainer, providedArgs); // 指定请求方法
setResponseStatus(webRequest);
if (returnValue == null) {
if (isRequestNotModified(webRequest) || getResponseStatus() != null || mavContainer.isRequestHandled()) {
disableContentCachingIfNecessary(webRequest);
mavContainer.setRequestHandled(true);
return;
}
}
else if (StringUtils.hasText(getResponseStatusReason())) {
mavContainer.setRequestHandled(true);
return;
}
mavContainer.setRequestHandled(false);
Assert.state(this.returnValueHandlers != null, "No return value handlers");
try {
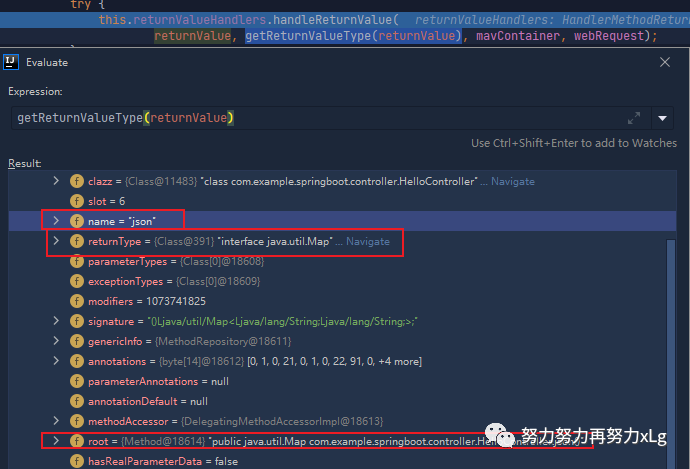
this.returnValueHandlers.handleReturnValue(
returnValue, getReturnValueType(returnValue), mavContainer, webRequest); // 确认返回值类型
}
catch (Exception ex) {
if (logger.isTraceEnabled()) {
logger.trace(formatErrorForReturnValue(returnValue), ex);
}
throw ex;
}
}
	@Nullable
	public Object invokeForRequest(NativeWebRequest request, @Nullable ModelAndViewContainer mavContainer,
			Object... providedArgs) throws Exception {

		Object[] args = getMethodArgumentValues(request, mavContainer, providedArgs);
		if (logger.isTraceEnabled()) {
			logger.trace("Arguments: " + Arrays.toString(args));
		}
		return doInvoke(args); // 通过反射调用请求方法
	}
下一步就是对返回值类型进行确定
这里就是最关键的方法进行返回值的确定
	@Override
	public void handleReturnValue(@Nullable Object returnValue, MethodParameter returnType,
			ModelAndViewContainer mavContainer, NativeWebRequest webRequest) throws Exception {

		HandlerMethodReturnValueHandler handler = selectHandler(returnValue, returnType);// 根据放回值,和返回值的类型
		if (handler == null) {
			throw new IllegalArgumentException("Unknown return value type: " + returnType.getParameterType().getName());
		}
		handler.handleReturnValue(returnValue, returnType, mavContainer, webRequest);
	}
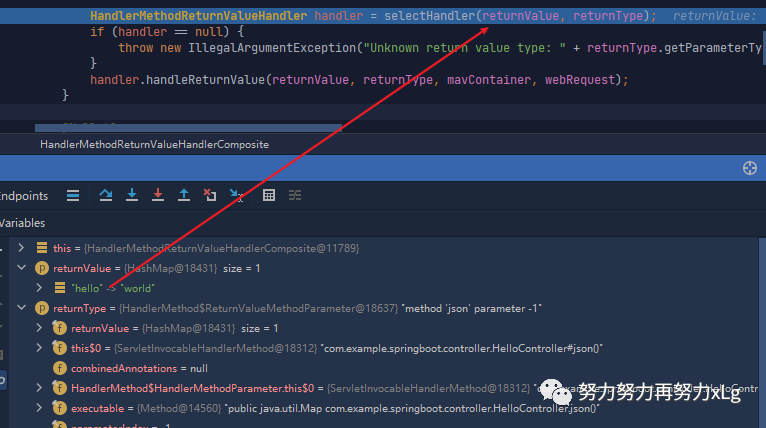
用于类型的确定,关键的方法就是 selectHandler
。
	@Nullable
	private HandlerMethodReturnValueHandler selectHandler(@Nullable Object value, MethodParameter returnType) {
		boolean isAsyncValue = isAsyncReturnValue(value, returnType); // 判断是否为异步的返回值处理器
		for (HandlerMethodReturnValueHandler handler : this.returnValueHandlers) {
			if (isAsyncValue && !(handler instanceof AsyncHandlerMethodReturnValueHandler)) {
				continue;
			}
			if (handler.supportsReturnType(returnType)) {
				return handler;
			}
		}
		return null;
	}
这里Spring MVC 会遍历所有的返回值类型进行对比确定当前请求的返回值类型
2.2、SpringMVC 在非异步情况下支持的返回值类型
ModelAndView
Model
View
ResponseEntity
ResponseBodyEmitter
StreamingResponseBody
HttpEntity
HttpHeaders
Callable
DeferredResult
ListenableFuture
CompletionStage
WebAsyncTask
有 @ModelAttribute 且为对象类型的
@ResponseBody 注解 ---> RequestResponseBodyMethodProcessor;
最后我们终于确定了使用 @ResponseBody
使用RequestResponseBodyMethodProcessor
进行处理该方法最后会将返回数据处理成如下格式
@Override
public void handleReturnValue(@Nullable Object returnValue, MethodParameter returnType,
      ModelAndViewContainer mavContainer, NativeWebRequest webRequest)
      throws IOException, HttpMediaTypeNotAcceptableException, HttpMessageNotWritableException {

   mavContainer.setRequestHandled(true);
   ServletServerHttpRequest inputMessage = createInputMessage(webRequest);
   ServletServerHttpResponse outputMessage = createOutputMessage(webRequest);

   // Try even with null return value. ResponseBodyAdvice could get involved.
   writeWithMessageConverters(returnValue, returnType, inputMessage, outputMessage); // 使用消息转换器进行写出操作
}
3、MessageConverters消息转换器
protected <T> void writeWithMessageConverters(@Nullable T value, MethodParameter returnType,
ServletServerHttpRequest inputMessage, ServletServerHttpResponse outputMessage)
throws IOException, HttpMediaTypeNotAcceptableException, HttpMessageNotWritableException {
Object body;
Class<?> valueType;
Type targetType;
if (value instanceof CharSequence) { // 判断是否为字节类型
body = value.toString();
valueType = String.class;
targetType = String.class;
}
else {
body = value;
valueType = getReturnValueType(body, returnType);
targetType = GenericTypeResolver.resolveType(getGenericType(returnType), returnType.getContainingClass());
}
if (isResourceType(value, returnType)) { // 判断是否为字节流数据
outputMessage.getHeaders().set(HttpHeaders.ACCEPT_RANGES, "bytes");
if (value != null && inputMessage.getHeaders().getFirst(HttpHeaders.RANGE) != null &&
outputMessage.getServletResponse().getStatus() == 200) {
Resource resource = (Resource) value;
try {
List<HttpRange> httpRanges = inputMessage.getHeaders().getRange();
outputMessage.getServletResponse().setStatus(HttpStatus.PARTIAL_CONTENT.value());
body = HttpRange.toResourceRegions(httpRanges, resource);
valueType = body.getClass();
targetType = RESOURCE_REGION_LIST_TYPE;
}
catch (IllegalArgumentException ex) {
outputMessage.getHeaders().set(HttpHeaders.CONTENT_RANGE, "bytes */" + resource.contentLength());
outputMessage.getServletResponse().setStatus(HttpStatus.REQUESTED_RANGE_NOT_SATISFIABLE.value());
}
}
}
MediaType selectedMediaType = null; // 从这里开始就设计到了MediaType类型,即内容协商
MediaType contentType = outputMessage.getHeaders().getContentType();
boolean isContentTypePreset = contentType != null && contentType.isConcrete();
if (isContentTypePreset) { // 这里会判断请求是否已经被处理过,处理过就是用前面处理过的内容类型
if (logger.isDebugEnabled()) {
logger.debug("Found 'Content-Type:" + contentType + "' in response");
}
selectedMediaType = contentType;
}
else {
HttpServletRequest request = inputMessage.getServletRequest();
List<MediaType> acceptableTypes = getAcceptableMediaTypes(request); // 首先会获取内容协商的类型(确定内容协商的类型是从哪里确定的)
List<MediaType> producibleTypes = getProducibleMediaTypes(request, valueType, targetType); // 获取
if (body != null && producibleTypes.isEmpty()) {
throw new HttpMessageNotWritableException(
"No converter found for return value of type: " + valueType);
}
List<MediaType> mediaTypesToUse = new ArrayList<>();
for (MediaType requestedType : acceptableTypes) {
for (MediaType producibleType : producibleTypes) {
if (requestedType.isCompatibleWith(producibleType)) {
mediaTypesToUse.add(getMostSpecificMediaType(requestedType, producibleType));
}
}
}
if (mediaTypesToUse.isEmpty()) {
if (body != null) {
throw new HttpMediaTypeNotAcceptableException(producibleTypes);
}
if (logger.isDebugEnabled()) {
logger.debug("No match for " + acceptableTypes + ", supported: " + producibleTypes);
}
return;
}
MediaType.sortBySpecificityAndQuality(mediaTypesToUse); // 对协商出来的类型进行排序
for (MediaType mediaType : mediaTypesToUse) {
if (mediaType.isConcrete()) {
selectedMediaType = mediaType;
break;
}
else if (mediaType.isPresentIn(ALL_APPLICATION_MEDIA_TYPES)) {
selectedMediaType = MediaType.APPLICATION_OCTET_STREAM;
break;
}
}
if (logger.isDebugEnabled()) {
logger.debug("Using '" + selectedMediaType + "', given " +
acceptableTypes + " and supported " + producibleTypes);
}
}
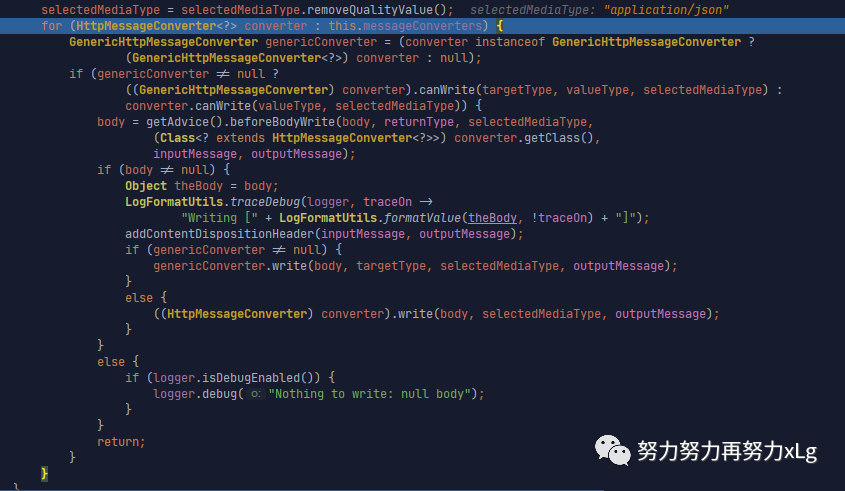
if (selectedMediaType != null) {
selectedMediaType = selectedMediaType.removeQualityValue();
for (HttpMessageConverter<?> converter : this.messageConverters) {
GenericHttpMessageConverter genericConverter = (converter instanceof GenericHttpMessageConverter ?
(GenericHttpMessageConverter<?>) converter : null);
if (genericConverter != null ?
((GenericHttpMessageConverter) converter).canWrite(targetType, valueType, selectedMediaType) :
converter.canWrite(valueType, selectedMediaType)) {
body = getAdvice().beforeBodyWrite(body, returnType, selectedMediaType,
(Class<? extends HttpMessageConverter<?>>) converter.getClass(),
inputMessage, outputMessage);
if (body != null) {
Object theBody = body;
LogFormatUtils.traceDebug(logger, traceOn ->
"Writing [" + LogFormatUtils.formatValue(theBody, !traceOn) + "]");
addContentDispositionHeader(inputMessage, outputMessage);
if (genericConverter != null) {
genericConverter.write(body, targetType, selectedMediaType, outputMessage);
}
else {
((HttpMessageConverter) converter).write(body, selectedMediaType, outputMessage);
}
}
else {
if (logger.isDebugEnabled()) {
logger.debug("Nothing to write: null body");
}
}
return;
}
}
}
if (body != null) {
Set<MediaType> producibleMediaTypes =
(Set<MediaType>) inputMessage.getServletRequest()
.getAttribute(HandlerMapping.PRODUCIBLE_MEDIA_TYPES_ATTRIBUTE);
if (isContentTypePreset || !CollectionUtils.isEmpty(producibleMediaTypes)) {
throw new HttpMessageNotWritableException(
"No converter for [" + valueType + "] with preset Content-Type '" + contentType + "'");
}
throw new HttpMediaTypeNotAcceptableException(this.allSupportedMediaTypes);
}
}
确定返回值和目标值的类型

从第39行就涉及到了 MediaType
内容协商类型
3.1、MediaType 内容协商
内容协商是Springmvc 对返回值类型,服务端和客户端支持类型进行协商,最终敲定返回值类型。
浏览器(客户端)的访问支持的类型
image-20210129170653745 其中 类型后面的q 是权重。 */*
是支持所有类型(但是权重会低于其他明确写好的类型)。浏览器默认会以请求头的方式(Accept字段),告诉服务端,它能接受的内容类型 获取到服务端支持的所有类型
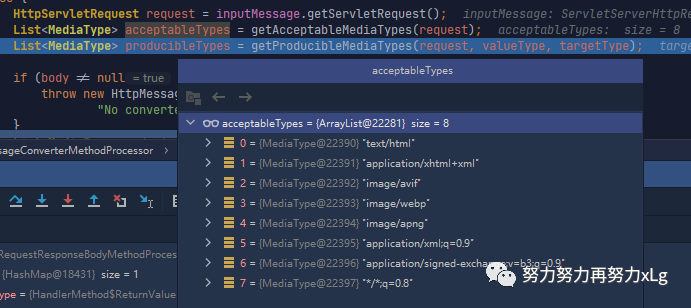
image-20210131010912090 获取到当前请求所有可支持的生成类型
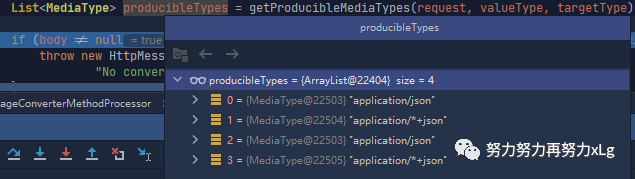
image-20210131011130656 
image-20210131011438275 所以此次遍历需要32遍 此处的循环遍历就是内容协商的过程,一个嵌套的循环遍历。大概意思就是匹配出最佳内容类型,然后添加到
mediaTypesToUse最后协商出四种支持的类型
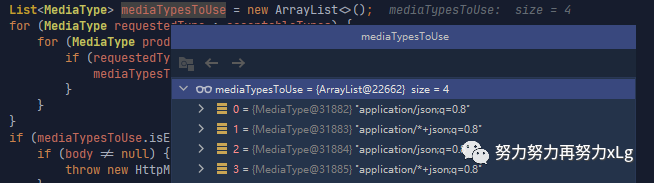
image-20210131011705696 这里就是内容协商的原理,服务器会根据自己的能力,协商出自己需要生成什么样的内容额类型 根据权重对协商出来的类型进行排序
MediaType.sortBySpecificityAndQuality(mediaTypesToUse);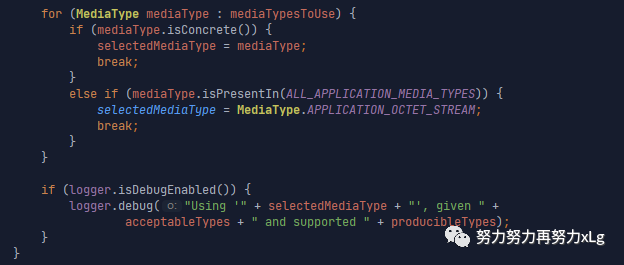
image-20210131012313126 最后确定了内容类型类
application/json;q=0.8还会在控制台打印一段日志:Using 'application/json;q=0.8', given [text/html, application/xhtml+xml, image/avif, image/webp, image/apng, application/xml;q=0.9, application/signed-exchange;v=b3;q=0.9, /;q=0.8] and supported [application/json, application/+json, application/json, application/+json]
在确定了内容类型之后,会根据类型匹配Spring 容器中所有的消息转换器,用于确定使用什么类型的消息转换器来转换对应内容类型的消息转换器
3.2、HttpMessageConverter消息转换器
可以看到又要经过一段循环遍历,来确定消息转换类型(Spring 中很多地方都是这种设计模式,首先先规定好协议,然后在在协议中确定自己需要使用的类型)
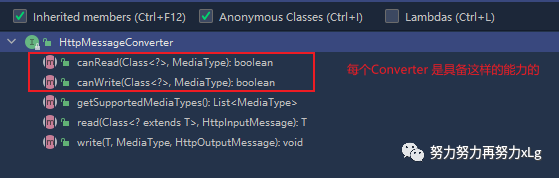
在所有的Converter中是需要Converter具备一定的能力的。比喻说Json的Converter是否具备将数据以json格式读取,又是否可以以json格式写出呢?
系统中默认的消息转换器
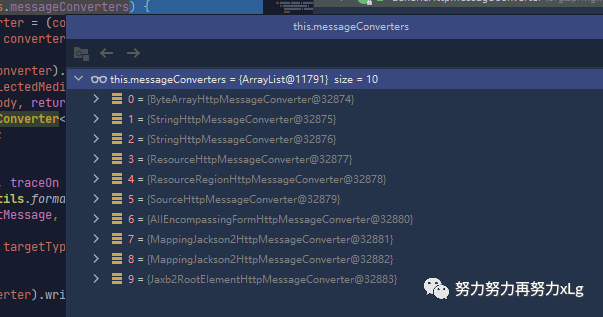
image-20210131013359845 程序会进入到判断中,将当前类型强转成各个转换器,然后判断是否可读可写。
各个转换器的当前转换情况:
0 - 只支持Byte类型的
1 - String
2 - String
3 - Resource
4 - ResourceRegion
5 - DOMSource.*class * SAXSource.class) \ StAXSource.**class **StreamSource.**class **Source.class
6 - MultiValueMap
7 - true
8 - true
9 - 支持注解方式xml处理的
在
Jackson
中,没有任何判断会直接返回true,表明,如果前面的判断都没有通过,则所有的数据将都有Json转换器进行操作
在判断成功后,确定好消息转换器,会将消息以确定好的类型转换好,再响应出去。
@Override
public final void write(final T t, @Nullable final Type type, @Nullable MediaType contentType,
HttpOutputMessage outputMessage) throws IOException, HttpMessageNotWritableException {
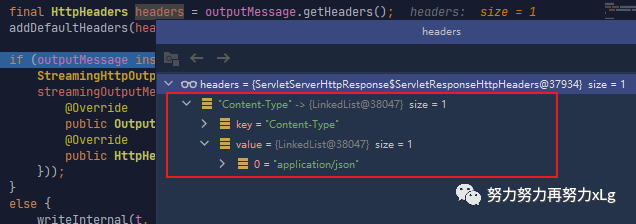
final HttpHeaders headers = outputMessage.getHeaders(); // 获取响应头
addDefaultHeaders(headers, t, contentType); // 这里以application/json 为例
if (outputMessage instanceof StreamingHttpOutputMessage) {
StreamingHttpOutputMessage streamingOutputMessage = (StreamingHttpOutputMessage) outputMessage;
streamingOutputMessage.setBody(outputStream -> writeInternal(t, type, new HttpOutputMessage() {
@Override
public OutputStream getBody() {
return outputStream;
}
@Override
public HttpHeaders getHeaders() {
return headers;
}
}));
}
else {
writeInternal(t, type, outputMessage);
outputMessage.getBody().flush();
}
}
确定好响应数据的类型。
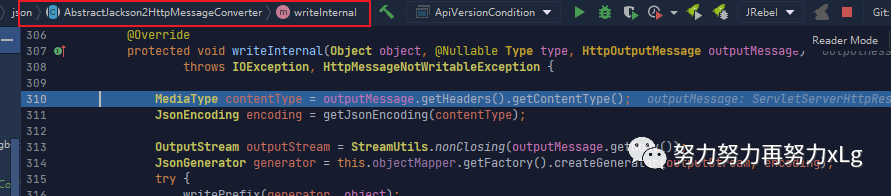
image-20210131014513172 @Override
protected void writeInternal(Object object, @Nullable Type type, HttpOutputMessage outputMessage)
throws IOException, HttpMessageNotWritableException {
MediaType contentType = outputMessage.getHeaders().getContentType();
JsonEncoding encoding = getJsonEncoding(contentType);//确定 编码
OutputStream outputStream = StreamUtils.nonClosing(outputMessage.getBody());
JsonGenerator generator = this.objectMapper.getFactory().createGenerator(outputStream, encoding); // 获取一个json工程
try {
writePrefix(generator, object);
Object value = object;
Class<?> serializationView = null;
FilterProvider filters = null;
JavaType javaType = null;
if (object instanceof MappingJacksonValue) {
MappingJacksonValue container = (MappingJacksonValue) object;
value = container.getValue();
serializationView = container.getSerializationView();
filters = container.getFilters();
}
if (type != null && TypeUtils.isAssignable(type, value.getClass())) {
javaType = getJavaType(type, null);
}
ObjectWriter objectWriter = (serializationView != null ?
this.objectMapper.writerWithView(serializationView) : this.objectMapper.writer());
if (filters != null) {
objectWriter = objectWriter.with(filters);
}
if (javaType != null && javaType.isContainerType()) {
objectWriter = objectWriter.forType(javaType);
}
SerializationConfig config = objectWriter.getConfig();
if (contentType != null && contentType.isCompatibleWith(MediaType.TEXT_EVENT_STREAM) &&
config.isEnabled(SerializationFeature.INDENT_OUTPUT)) {
objectWriter = objectWriter.with(this.ssePrettyPrinter);
}
objectWriter.writeValue(generator, value);
writeSuffix(generator, object);
generator.flush();
generator.close();
}
catch (InvalidDefinitionException ex) {
throw new HttpMessageConversionException("Type definition error: " + ex.getType(), ex);
}
catch (JsonProcessingException ex) {
throw new HttpMessageNotWritableException("Could not write JSON: " + ex.getOriginalMessage(), ex);
}
}题外话,难怪国内外大部分公司底层的json都不会使用fastJson,人家这里json的处理方式在使用完之后,肯定会关闭。FastJson有特别多地方对象使用不当,导致内存泄漏的情况。
上述方法就是数据转换成了json类型了
以上整个消息的转换分析完了,(避开了后面的视图解析部分。)
整个消息转换的过程就是使用了
1、得到MappingJackson2HttpMessageConverter可以将对象写为json 2、利用MappingJackson2HttpMessageConverter将对象转为json再写出去 1、内容协商(浏览器默认会以请求头的方式告诉服务器他能接受什么样的内容类型) 2、服务器最终根据自己自身的能力,决定服务器能生产出什么样内容类型的数据, 3、SpringMVC会挨个遍历所有容器底层的 HttpMessageConverter ,看谁能处理? \1. 利用 MessageConverters 进行处理 将数据写为json 1、返回值处理器判断是否支持这种类型返回值 supportsReturnType
2、返回值处理器调用 handleReturnValue 进行处理
3、RequestResponseBodyMethodProcessor 可以处理返回值标了@ResponseBody 注解的。
进入到 org.springframework.http.converter.json.AbstractJackson2HttpMessageConverter
将数据转换成json数据,并且写出这里对消息转换做个拓展,因为消息转换支持那么多的类型,所以可以尝试返回resource类型试试,
    /**
     * Resource 接口的实现类
     * 前提是 返回json数据
     * 整个请求的逻辑就是
     * 先确定内容类型 application/json---> 再确定 消息转换器 为:MappingJackson2HttpMessageConverter ---> 消息转换器再最后确定写出的类型
     * 看是否为 Resource类型的转换器
     *
     * @return
     */
    @GetMapping("/file")
    public FileSystemResource file() {
        return null;
    }
4、内容协商详解
假设现在有一个需求。返回的数据类型为xml类型。怎么办呢?
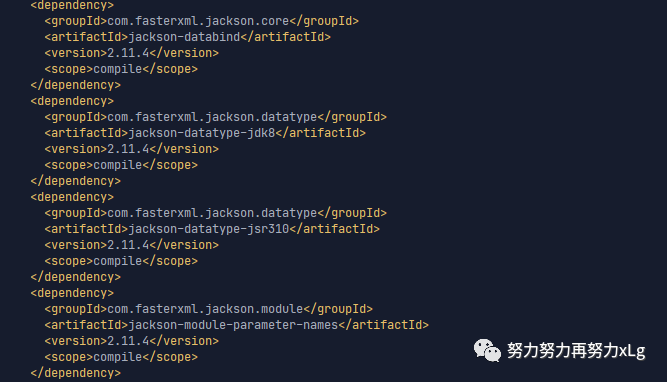
前面有说到,只需要引入一个依赖就行了
 <dependency>
            <groupId>com.fasterxml.jackson.dataformat</groupId>
            <artifactId>jackson-dataformat-xml</artifactId>
</dependency>
只需要这么一个依赖,再浏览器发送的请求,及时你的接口标注的是返回json数据,在于浏览器进行内容协商时,也会被确定为xml格式,因为在浏览器的Accept
字段中,xml的权重要高一些。加了该以来之后。再来看看源码呢?
在进入到内容协商之前,会进行内容且上类型的原来策略
后面会说到其他策略来简单实现内容输出格式的指定 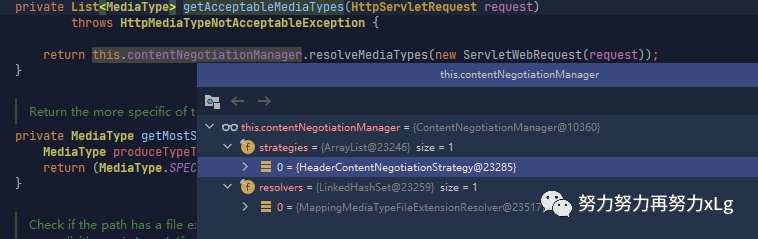
image-20210131143917090 默认是从请求头中获取的。
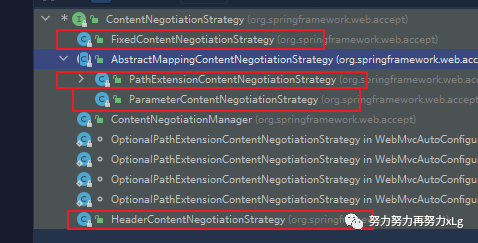
image-20210131145048547 其实在内容协商策略中,支持非常多的策略的。默认是使用请求头的方式
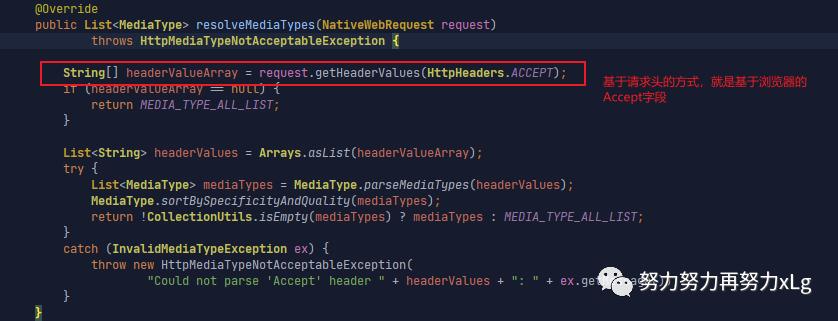
image-20210131144351876 再获取服务端能够支持的内容协商类型
在进行具体的内容协商
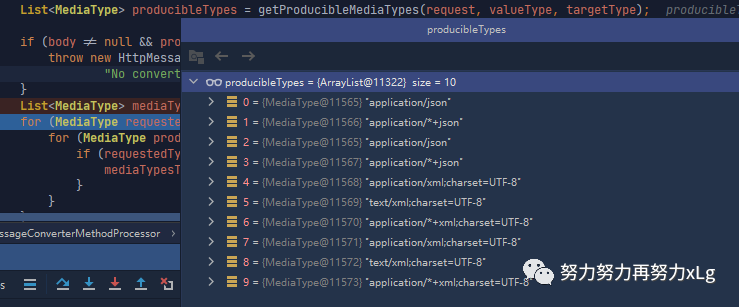
image-20210131021424378 在加入依赖之后,服务器支持的类型多了6中,均是处理xml的
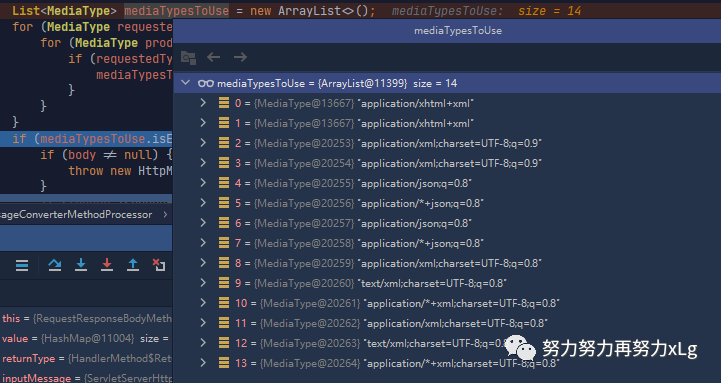
image-20210131133026859 最后经过了80次循环之后,确定出服务端和客户端的协商支持类型有14个(都是json 与xml类型)
MediaType.sortBySpecificityAndQuality(mediaTypesToUse); // 进行权重的排序

			for (MediaType mediaType : mediaTypesToUse) {
				if (mediaType.isConcrete()) {
					selectedMediaType = mediaType; // 确定出最终的内容类型
					break;
				}
				else if (mediaType.isPresentIn(ALL_APPLICATION_MEDIA_TYPES)) {
					selectedMediaType = MediaType.APPLICATION_OCTET_STREAM;
					break;
				}
			}
image-20210131133626407
虽然在返回类型中会有冗余,比喻说xml类型就有两个,但是只要在匹配中,匹配到第一个就直接break了,所以只会保证只有一个能处理的内容解析器
进行消息转换器的选择。
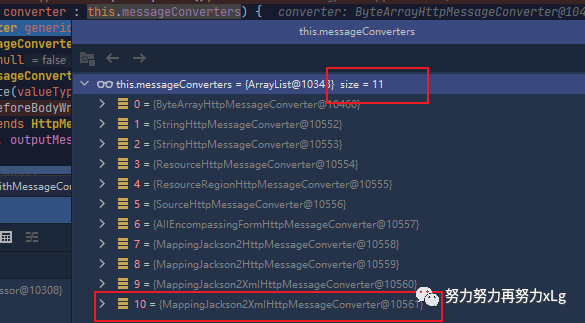
image-20210131021225029 这里就会多了一个处理xml的转换器,最后也就确定了使用该转换器来读写xml文件。

image-20210131133932349
这里有一个疑问,Spring MVC为什么要徒增一个便利循环,去协商返回的内容类型。直接根据客户端需要的内容类型,返回指定的类型不行吗?
答案肯定是不行的啊,因为客户端需要指定的内容,服务端也要衡量自己的能力,是否支持这种内容啊。如果不支持,就得报错了!
4.1、内容协商的参数指定
我们在签弄清楚了,SpringMVC的内容协商的大致流程,那么现在就有一个问题,如果使用PostMan发送请求,可以非常轻易的修改Accept
字段来实现输出类型的敲定,但是浏览器却做不到啊。
很显然,Spring 也想到了这一点,提供了基于参数的指定类型的进行内容协商。
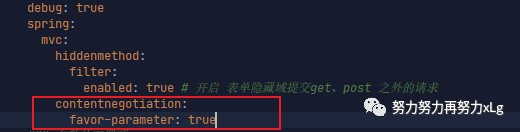
在配置文件中开启基于参数的内容协商策略。

只需要在请求路径中,带上formart字段就可以轻松实现指定输出类型。
http://localhost:8080/json?format=xml
可以发现在使用请求路径带参后,在内容协商策略中就会多出一个基于参数的内容协商解析器
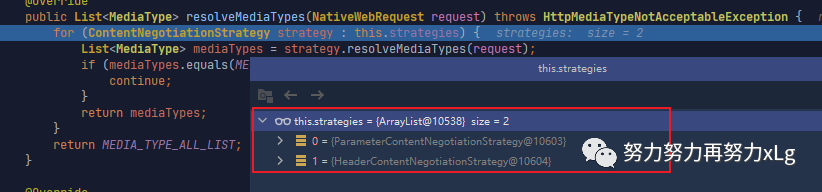
并且 内容协商策略管理器中也是存在两个

从参数可以看出,路径内容协商,是基于
format
字段的,并且只支持两种类型格式:json\xml
。在两个策略中,由于
ParameterContentNegotiationStrategy
是优先遍历的。所以他会先从请求参数中获取fromat
字段@Override
public List<MediaType> resolveMediaTypes(NativeWebRequest webRequest)
throws HttpMediaTypeNotAcceptableException {
return resolveMediaTypeKey(webRequest, getMediaTypeKey(webRequest));
}
protected String getMediaTypeKey(NativeWebRequest request) {
return request.getParameter(getParameterName());
}
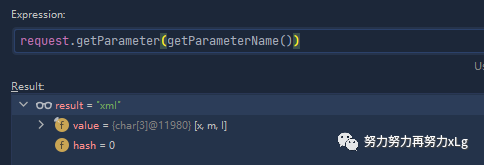
根据返回的类型就可以确定需要返回的内容协商类型了

image-20210131150705531 这里有返回确定的返回类型就会直接返回了。所以不会便利到基于请求头的方式 然后就带着返回的内容类型,进行最佳内容类型的匹配。所以最后一定会返回
xml
的类型
4.2、自定义MessageConverter
可能由于业务的需求,需要返回自定义的内容类型,这个时候就需要进行自定义的消息转换器的。
在消息转换器接口中,定义的最重要的两点就是需要对内容可读并且可写,这样的消息转换器才是有用的。
实现多协议数据兼容。json、xml、x-xiaogang
0、@ResponseBody 响应数据出去 调用 RequestResponseBodyMethodProcessor 处理
1、Processor 处理方法返回值。通过 MessageConverter 处理
2、所有 MessageConverter 合起来可以支持各种媒体类型数据的操作(读、写)
3、内容协商找到最终的 messageConverter;
可以看出,最终的返回结果都是基于messageConverter
的,它负责内容读写。
需求
浏览器发请求返回的是xml数据 【application/xml】 —>Jackson2xmlConverter ajax发请求时,返回的是json数据【application/jsonl】 —>Jackson2jsonConverter App发送请求时,返回的是X-xiaogang 自定义类型数据 【application/X-xiaogang】 —>xxxxxConverter 如果在以前的处理中,可能会根据这三种需求开发三个接口,进行不同的请求映射。那么现在只需要通过内容协商,就可以搞定以上的需求了。
针对上述需求,就需要自定义的messageConverter
来处理我们自定义的内容类型
实现步骤
首先需要自定义一个 Converter
,并且加入到底层的系统中,进行统一管理系统底层统计出所有的 converter
方便后续的内容类型协商根据指定的类型,只用最佳的 converter
进行数据的读写
首先先确定系统默认的Converter 是怎么加载进容器的。
首先进入到
WebMvcAutoConfiguretion
中
image-20210131152535785 该内部类也是一个配置类,它给我们配置了
@Override
public void configureMessageConverters(List<HttpMessageConverter<?>> converters) {
   this.messageConvertersProvider
         .ifAvailable((customConverters) -> converters.addAll(customConverters.getConverters()));
}
相当于,在系统一启动时,所有的Converter就被配置好了。
converter是通过
customConverters.getConverters()
获取的。该方法是org.springframework.boot.autoconfigure.http.HttpMessageConverters
同构构造器构造的。
image-20210131153050962 一层层的点进去,就会发现所有的内置converter的定义
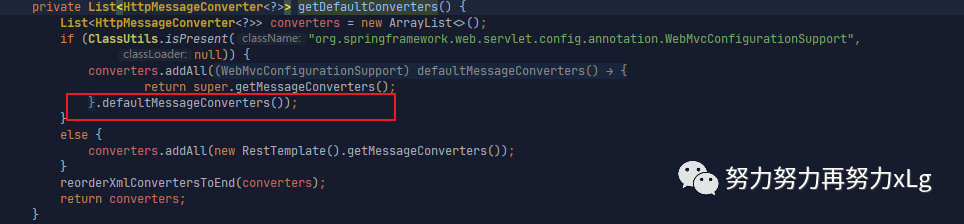
image-20210131153138144 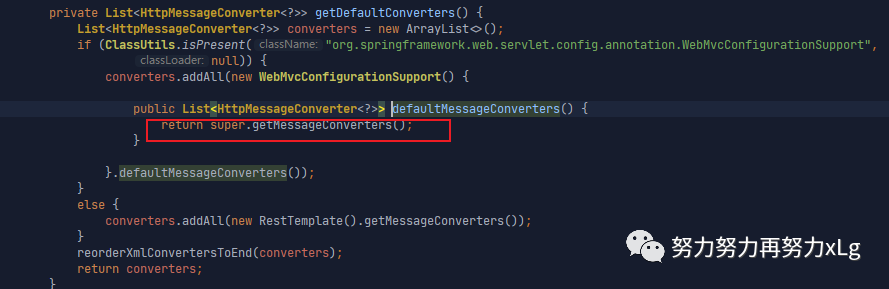
image-20210131153224458 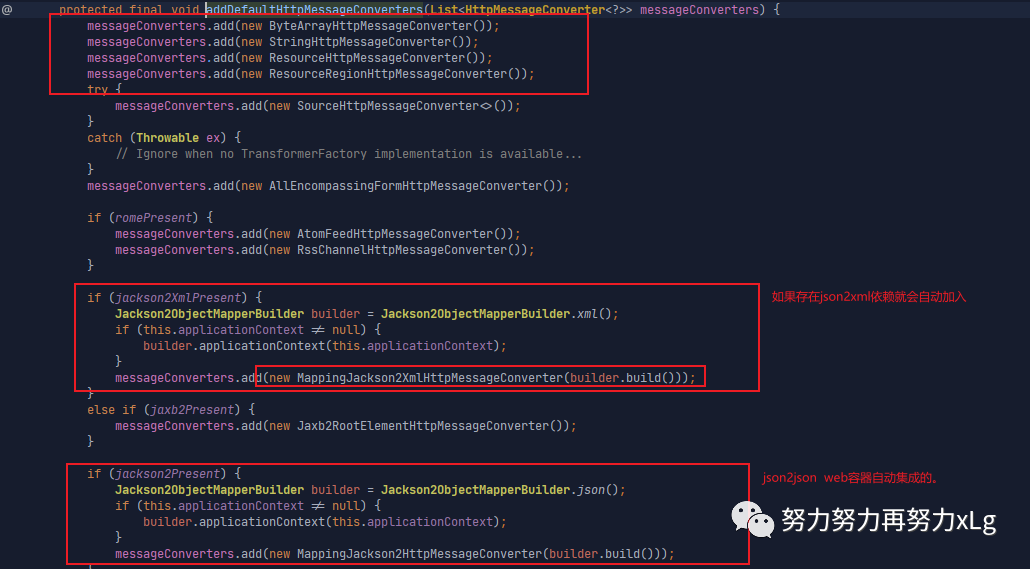
image-20210131153426383 所以到这一步就真正的确定了,为什么加入json2json/json2xml的依赖之后会自动加入到converter阵容中了。 该方法 org.springframework.web.servlet.config.annotation.WebMvcConfigurationSupport#addDefaultHttpMessageConverters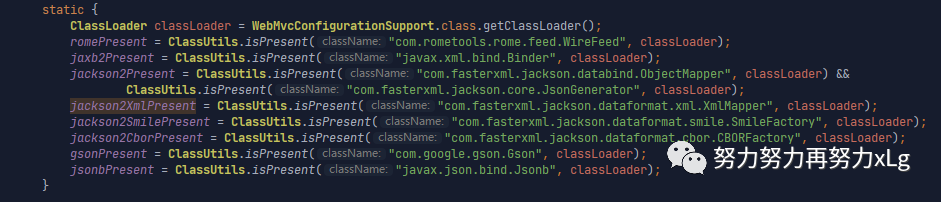
image-20210131153631271 用于判断以上是否存在,存在则会自动导入 那么确定了,SpringMVC中所有的converter添加的过程之后,怎么添加自定义的cnverter呢?
在上面源码的入口处,我们看到的配置类是实现了 org.springframework.web.servlet.config.annotation.WebMvcConfigurer
,其实,在SpringMVC开发中,在官方文档中也有提到过,只要想定制化Spring Mvc的功能,唯一的入口就是org.springframework.web.servlet.config.annotation.WebMvcConfigurer
。通过它可以自定义非常多的功能。
    @Bean
    public WebMvcConfigurer webMvcConfigurer() {
        return new WebMvcConfigurer() {

            /**
             *  这个是 覆盖 原容器中WebMvcConfigurer configureMessageConverters 的功能
             * @param converters converters
             */
            @Override
            public void configureMessageConverters(List<HttpMessageConverter<?>> converters) {

            }

            /**
             * 对原容器中 MessageConverter 进行增强,扩展
             * @param converters converters
             */
            @Override
            public void extendMessageConverters(List<HttpMessageConverter<?>> converters) {
                log.debug(">>>>>>>>>>>>>> add custom converter <<<<<<<<<<<<<<<<<<<<<");
                converters.add(new XiaoGangMessageConverter());
            }
        };
    }

// 自定义converter
public class XiaoGangMessageConverter implements HttpMessageConverter<XiaoGang> {
    private final String xiaogangFormat = "application/X-xiaogang";

    /**
     * 都不支持读
     * 读,就是在接口处使用类似于@RequestBody注解,将数据读取进来的
     *
     * @param clazz     clazz
     * @param mediaType 内容协商类型
     * @return boolean
     */
    @Override
    public boolean canRead(Class<?> clazz, MediaType mediaType) {
        return false;
    }

    @Override
    public boolean canWrite(Class<?> clazz, MediaType mediaType) {
        return clazz.isAssignableFrom(XiaoGang.class);
    }

    /**
     * 返回该converter 支持的类型
     *
     * @return List<MediaType>
     */
    @Override
    public List<MediaType> getSupportedMediaTypes() {
        return MediaType.parseMediaTypes(xiaogangFormat);
    }

    /**
     * @param clazz        XiaoGang
     * @param inputMessage inputMessage
     * @return XiaoGang
     * @throws IOException                     io
     * @throws HttpMessageNotReadableException HttpMessageNotReadableException
     */
    @Override
    public XiaoGang read(Class<? extends XiaoGang> clazz, HttpInputMessage inputMessage) throws IOException, HttpMessageNotReadableException {
        return null;
    }

    @Override
    public void write(XiaoGang xiaoGang, MediaType contentType, HttpOutputMessage outputMessage) throws IOException, HttpMessageNotWritableException {
        // 自定义 协议
        String data = xiaoGang.getName() + ";" + xiaoGang.getAge() + ";" + "Date:" + LocalDate.now();

        // 将数据写入
        final OutputStream body = outputMessage.getBody();
        body.write(data.getBytes(StandardCharsets.UTF_8));
    }
}
分析一下源码流程。
第一步根据请求头策略,确定好内容协商返回的数据格式。
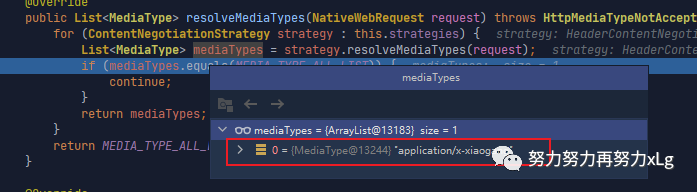
image-20210131160702067 进行内容协商
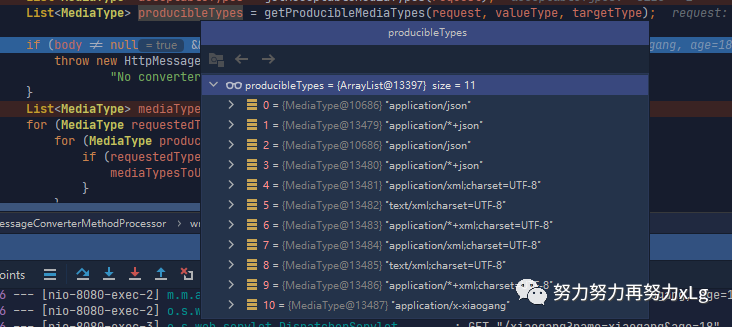
image-20210131160825941 获取到服务端可以支持的所有类型,可以看到我们自定义的添加成功了。 后面就是进行一些列的循环遍历,获取最佳匹配。 successful
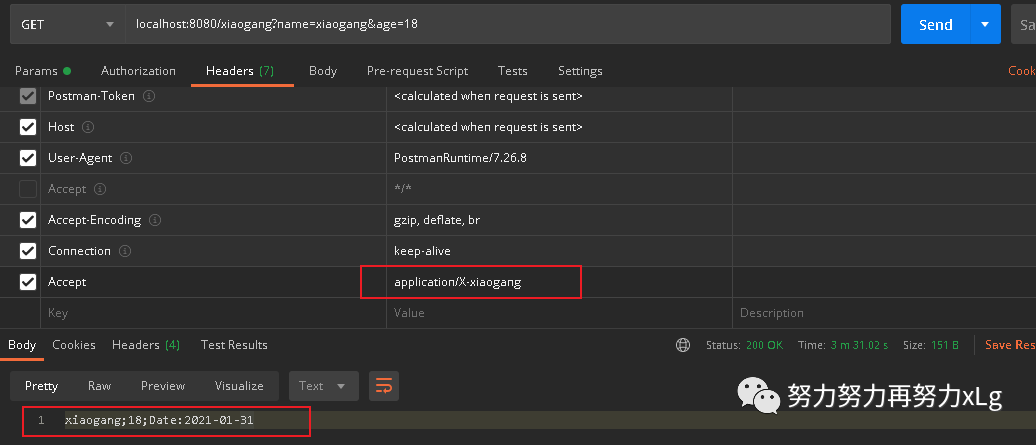
image-20210131160936440 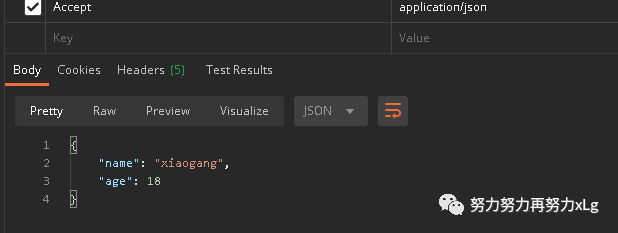
image-20210131161254889 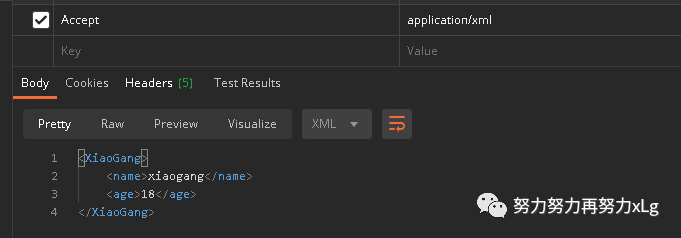
image-20210131161313967
4.3、实现基于参数的自定义内容格式
上面实现了基于请求头的方式,返回自定义格式。那么能不能实现基于请求参数来实现呢?
需求
基于请求参数,来返回指定内容类型
ex:http://localhost:8080/xiaogang?formart=xg
返回 application/x-xiaogang 类型的数据
思考
在前面撕源码的时候看到,基于请求参数的方式,是
org.springframework.web.accept.ParameterContentNegotiationStrategy
来实现的。其中写死了支持的类型只有json/xml
两种方式。那么可不可以对其增强呢?
答案肯定是肯定的鸭。
我们可以自定义的添加内容协商策略,用于满足我们自定义的需求。
    @Bean
    public WebMvcConfigurer webMvcConfigurer() {
        return new WebMvcConfigurer() {


            /**
             *  添加一个自定义的内容协商策略
             * @param configurer configurer
             */
            @Override
            public void configureContentNegotiation(ContentNegotiationConfigurer configurer) {
                // 添加基于请求参数的 媒体类型
                //(Map<String, MediaType> mediaTypes 参数,说明了,我们可以进行自定义的映射关系
                Map<String, MediaType> mediaTypes = new HashMap<>();
                mediaTypes.put("json", MediaType.APPLICATION_JSON);
                mediaTypes.put("xml", MediaType.APPLICATION_XML);
                mediaTypes.put("xg", MediaType.parseMediaType(XiaoGangMessageConverter.xiaogangFormat));
                final ParameterContentNegotiationStrategy parameterStrategy = new ParameterContentNegotiationStrategy(mediaTypes);
                parameterStrategy.setParameterName("_p"); // 还可以更改 参数名称
                // 自定义 策略之后,会导致原来默认添加进入的策略会丢失。所以这里需要手动设置一下。
                // 基于这种特性,我们可以完全自己手写一个ContentNegotiationStrategy
                final HeaderContentNegotiationStrategy headerStrategy = new HeaderContentNegotiationStrategy();

                configurer.strategies(Arrays.asList(parameterStrategy, headerStrategy));
            }
只需要对策略进行自定义设置,就可以简单实现

http://localhost:8080/xiaogang?name=xiaogang&age=18&_p=xg


5、问题解决
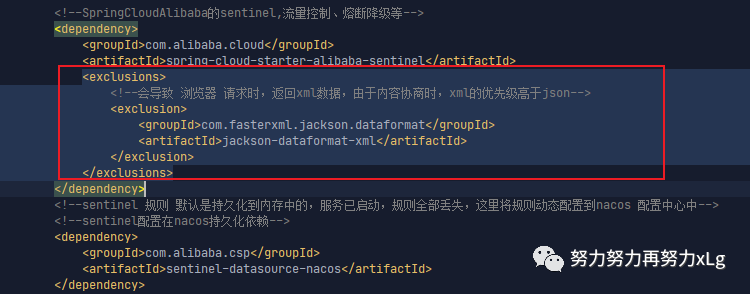
基本知道原理之后,在整个项目中查找xml依赖包。进行问题定位。
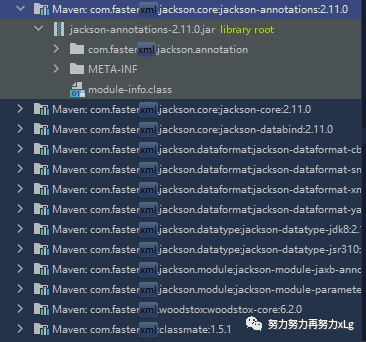
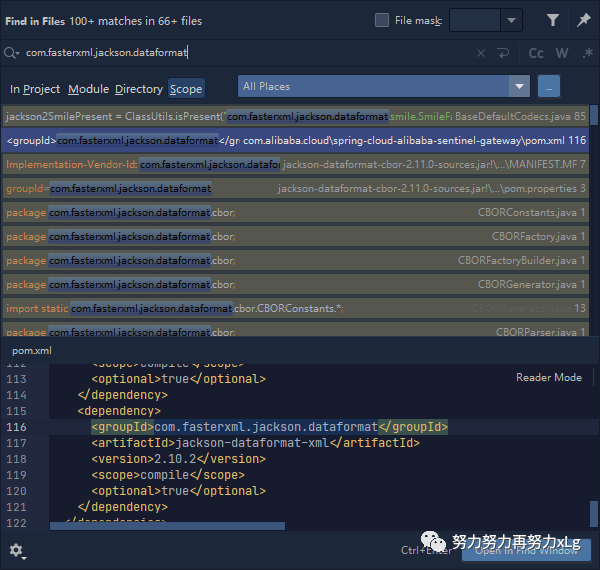
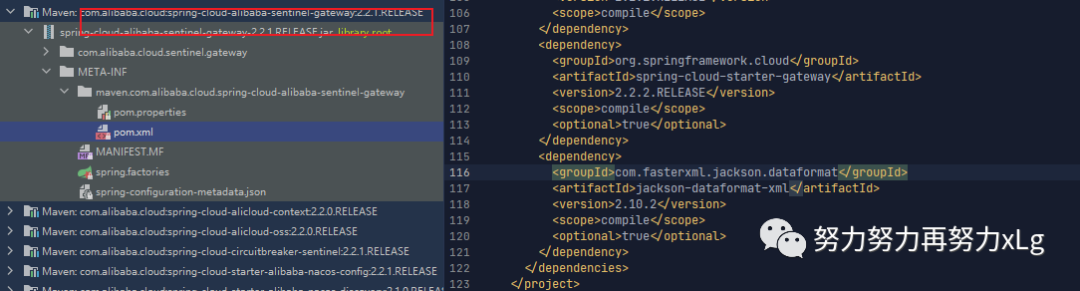
发现该依赖是Sentinel 导入的。果然!!!
测试

image-20210131165352833
成就感爆炸!!!!
