nginx负载均衡+反向代理实验
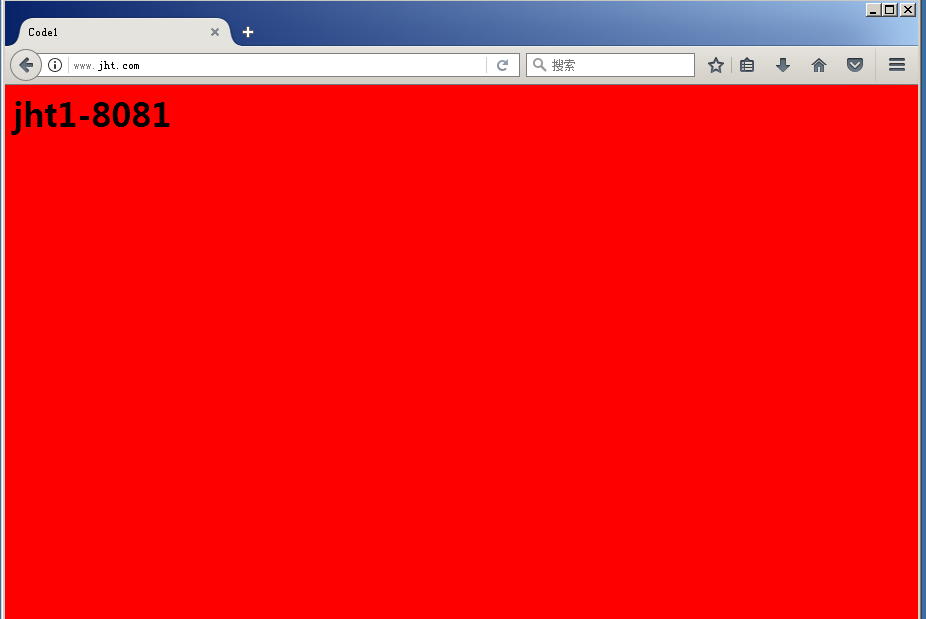
实验要求:通过北京的本地代理服务器浏览远程的上海web服务器,在浏览器输入www.jht.com依次出现红、黄、绿三种图案来区分负载均衡现象。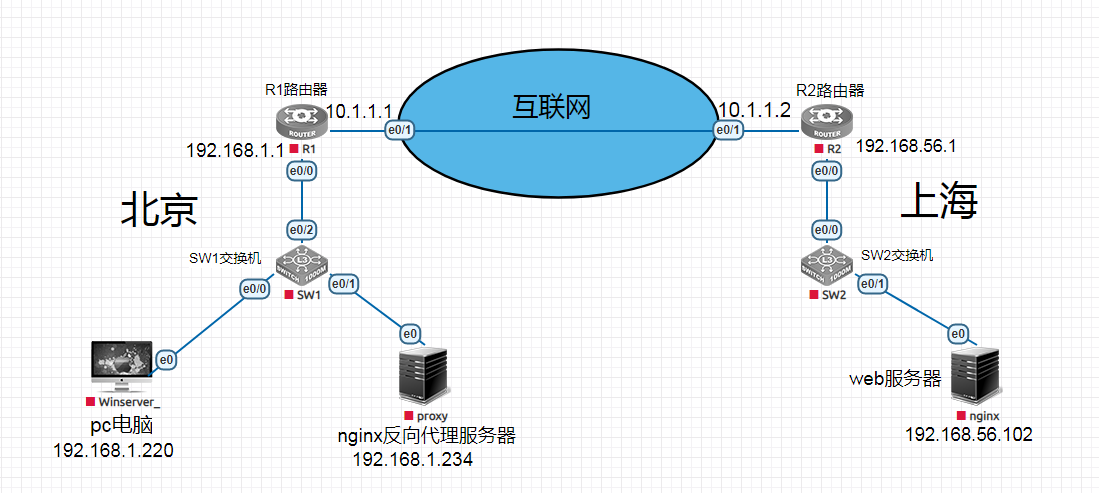
R1路由器配置
interface Ethernet0/0
ip address 192.168.1.1 255.255.255.0
ip nat inside
no sh
interface Ethernet0/1
ip address 10.1.1.1 255.255.255.0
ip nat outside
no sh
access-list 1 permit 192.168.1.0 0.0.0.255
ip nat inside source list 1 interface Ethernet0/1 overload
R2路由器配置,将nginx服务器的8081、8082、8083端口映射出去。
interface Ethernet0/0
ip address 192.168.56.1 255.255.255.0
ip nat inside
no sh
interface Ethernet0/1
ip address 10.1.1.2 255.255.255.0
ip nat outside
no sh
ip nat inside source static tcp 192.168.56.102 8081 10.1.1.2 8081 extendable
ip nat inside source static tcp 192.168.56.102 8082 10.1.1.2 8082 extendable
ip nat inside source static tcp 192.168.56.102 8083 10.1.1.2 8083 extendable
二、nginx服务器配置
1、安装nginx
//基本安装包
[root@Nginx ~]# yum install -y gcc gcc-c++ autoconf pcre pcre-devel make automake wget httpd-tools vim tree
配置Nginx官方Yum源
[root@Nginx ~]# vi /etc/yum.repos.d/nginx.repo
[nginx]
name=nginx repo
baseurl=http://nginx.org/packages/centos/6/$basearch/
gpgcheck=0
enabled=1
//安装Nginx
[root@Nginx ~]# yum install nginx -y
//查看Nginx当前版本
[root@Nginx ~]# nginx -v
nginx version: nginx/1.12.2
2、创建相应的目录,并创建对应 html文件
[root@Nginx ~]# mkdir /soft/{code1,code2,code3} -p
[root@Nginx ~]# cat /soft/code1/index.html
<html>
<title> Code1</title>
<body bgcolor="red">
<h1> jht1-8081 </h1>
</body>
</html>
[root@Nginx ~]# cat /soft/code2/index.html
<html>
<title> Coder2</title>
<body bgcolor="blue">
<h1> jht1-8082</h1>
</body>
</html>
[root@Nginx ~]# cat /soft/code3/index.html
<html>
<title> Coder3</title>
<body bgcolor="green">
<h1> jht1-8083</h1>
</body>
</html>
3、建立对应的releserver.conf配置文件
[root@Nginx ~]# cat /etc/nginx/conf.d/releserver.conf
server {
listen 8081;
root /soft/code1;
index index.html;
}
server {
listen 8082;
root /soft/code2;
index index.html;
}
server {
listen 8083;
root /soft/code3;
index index.html;
}
三、代理服务器配置
1、安装nginx
//基本安装包
[root@Nginx ~]# yum install -y gcc gcc-c++ autoconf pcre pcre-devel make automake wget httpd-tools vim tree
配置Nginx官方Yum源
[root@Nginx ~]# vim /etc/yum.repos.d/nginx.repo
[nginx]
name=nginx repo
baseurl=http://nginx.org/packages/centos/6/$basearch/
gpgcheck=0
enabled=1
//安装Nginx
[root@Nginx ~]# yum install nginx -y
//查看Nginx当前版本
[root@Nginx ~]# nginx -v
nginx version: nginx/1.12.2
2、配置 Nginx 反向代理
[root@Nginx ~]# cat /etc/nginx/conf.d/proxy.conf
upstream node {
server 10.1.1.2:8081;
server 10.1.1.2:8082;
server 10.1.1.2:8083;
}
server {
server_name www.jht.com;
index index.html
listen 80;
location / {
proxy_pass http://node;
}
}
3.使用浏览器器验证