


今天给大家讲讲nginx优化的一些措施,我们都知道,nginx是个非常优秀的web服务,随着现代移动互联网的普及和大数据高性能的发展趋势,nginx web服务在企业级越来越重要。那这么重要的nginx如何能学好?优化比如少不了的。
优化方法论
主要从三个方面来优化:
1、从软件方面优化
- 增大cpu利用率
- 增大内存利用率
- 增大磁盘IO利用率
- 增大网络带宽的利用率
2、增大硬件规格
- 网卡:万兆
- 磁盘:固态
- CPU:更多的核心,更大的缓存,更优的架构
- 内存:更快的访问速度
3、超出硬件性能上限后使用DNS
- DNS轮训
如何增大nginx使用CPU的有效时长?
这里的关键字是有效和时长
1、能够使用全部CPU资源
- master-worker多进程架构- worker进程数应大于等于CPU核数
nginx本身就是master-worker多进程架构
2、Nginx进程间不做无用功浪费CPU资源
- worker进程不应该在繁忙时,主动让出CPU- - worker进程应该等于CPU核心数- worker进程不应该调用一些API接口导致进程主动让出CPU- - 拒绝类似的第三方模块,因为调用基本都是同步的。如restry
3、不被其他进程争抢资源
- 提升优先级占用cpu时长- 减少操作系统上耗资源的非nginx进程
为什么一个cpu就可以同时运行多个进程?
1、宏观上并行,微观上串行
- cpu把进程的运行时间分割成一段一段的时间片- os调度系统依次选择每个进程,最多执行时间片指定的时长
2、阻塞API引发的时间片内主动让出cpu
- 速度不一致引发阻塞API- - 硬件执行速度不一致,例如cpu和磁盘- 业务场景产生的阻塞API- - 例如同步读取网络报文
如何减少进程间切换?
1、worker进程尽可能处于R状态
- R状态的进程数大于cpu核心数,负载急速升高
2、尽可能减少进程间切换
- 减少主动切换:阻塞API导致工作没完成- 减少被动切换:时间片耗尽- - 增大进程优先级
3、绑定cpu
- 绑定worker到指定cpuworker_cpu_affinity cpumask;worker_cpu_affinity auto;自动选择一个空闲的cpu绑定worker进程
优化进程执行cpu时间片大小?
- Nice静态优先级 (-20 -- 19)- - worker-priority number # default 0- Priority动态优先级 0-139
O1调度算法:CFS
- 优先级动态调整- - cpu密集型- - io密集型
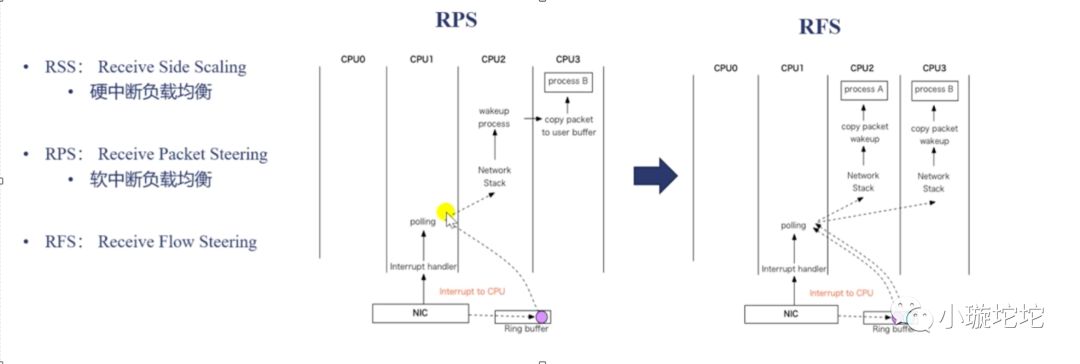
多队列网卡对多核cpu的优化:
提升cpu缓存命中率:worker_cpu_affinity
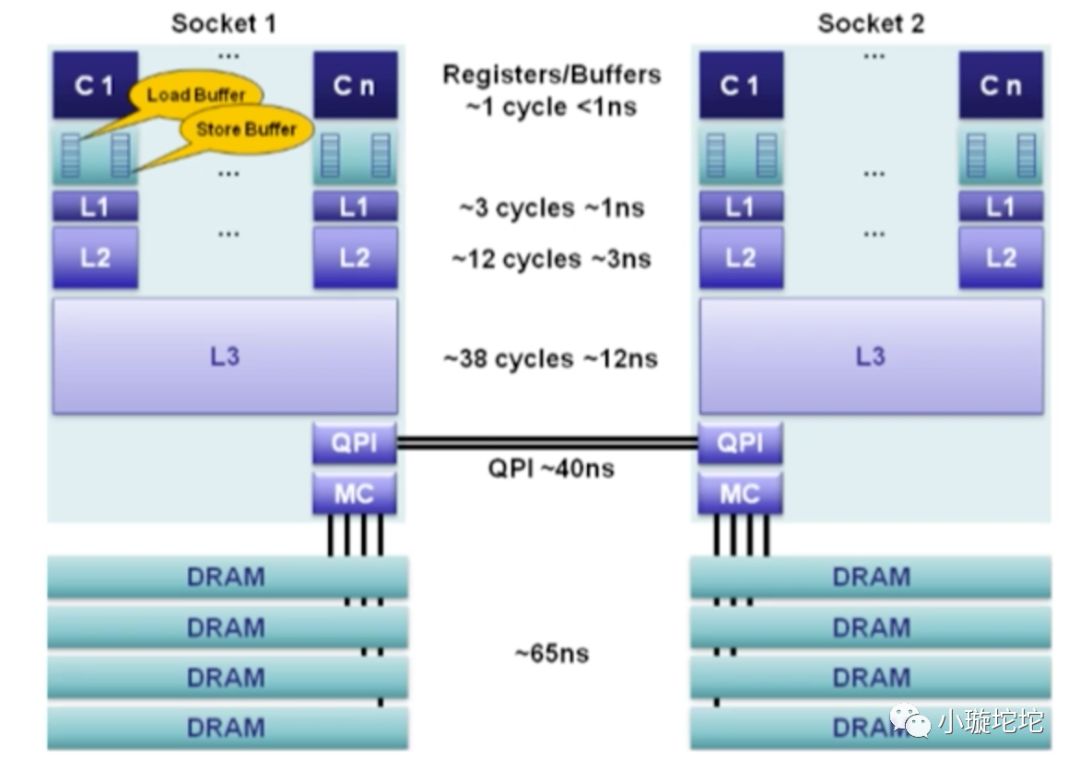
CPU分L1,L2,L3级缓存,并且他们的速率是不一样的,越接近CPU访问的速度越快,而且CPU是不能直接访问DRAM的,只能通过L3,L2 ,L1层层copy到CPU,而且缓存越来越小,那么如何查看缓存大小呢?
[root@bjdfkjy-46-124 ~]# cat sys/devices/system/cpu/cpu0/cache/index0/size32K[root@bjdfkjy-46-124 ~]# cat sys/devices/system/cpu/cpu0/cache/index1/size32K[root@bjdfkjy-46-124 ~]# cat sys/devices/system/cpu/cpu0/cache/index2/size256K[root@bjdfkjy-46-124 ~]# cat sys/devices/system/cpu/cpu0/cache/index3/size20480K
而index3是共享缓存。
NUMA架构(非一致性内存访问)
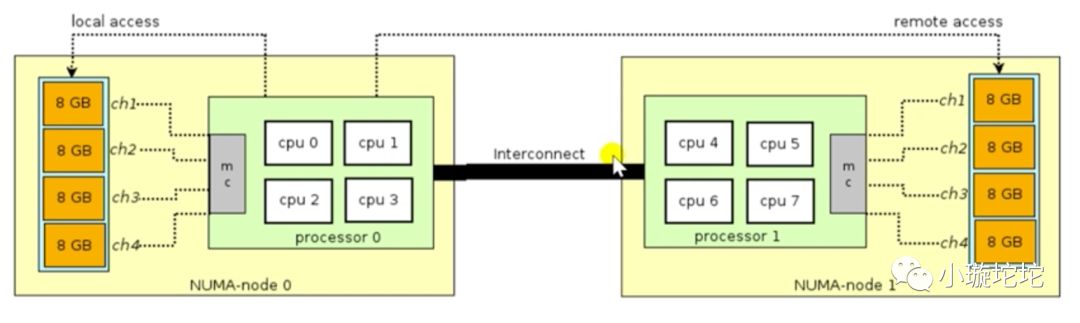
什么是NUMA架构呢?其实我们服务器基本都是多核cpu的,那这么多cpu从内存拿数据的时候会不会出现争抢或者各个cpu核心都拿到同样的数据呢?为了解决冲突的问题,NUMA架构就出现了。原理也很简单,比如我们的cpu是2个,每个cpu是4核,内存是64G,因为总线是速度跟cpu是没法比的,通常总线连接部分内存为某个或某几个cpu核心使用,如上图,如此就避免了cpu访问同一份资源的情况。
NUMA(Non-Uniform Memory Access,非一致性内存访问)和SMP(Symmetric Multi-Processor,对称多处理器系统)是两种不同的CPU硬件体系架构。
SMP的主要特征是共享,所有的CPU共享使用全部资源,例如内存、总线和I/O,多个CPU对称工作,彼此之间没有主次之分,平等地访问共享的资源,这样势必引入资源的竞争问题,从而导致它的扩展内力非常有限。
NUMA技术将CPU划分成不同的组(Node),每个Node由多个CPU组成,并且有独立的本地内存、I/O等资源。Node之间通过互联模块连接和沟通,因此除了本地内存外,每个CPU仍可以访问远端Node的内存,只不过效率会比访问本地内存差一些,我们用Node之间的距离(Distance,抽象的概念)来定义各个Node之间互访资源的开销。
我们用命令来看一下
yum -y install numactl.x86_64 //安装tools[root@bjdfkjy-46-124 ~]# numactl --hardwareavailable: 1 nodes (0)node 0 cpus: 0 1 2 3 4 5 6 7 8 9 10 11 12 13 14 15 16 17 18 19 20 21 22 23 24 25 26 27 28 29 30 31node 0 size: 257838 MBnode 0 free: 244478 MBnode distances:node 00: 10# 命中率[root@bjdfkjy-46-124 ~]# numastatnode0numa_hit 13355256739numa_miss 0numa_foreign 0interleave_hit 117447local_node 13355256739other_node 0
从上得到,命中率很高。
现在贴一下工作中经常用的nginx配置选项说明
定义Nginx运行的用户和用户组user appuser appuser;#nginx进程数,建议设置为等于CPU总核心数worker_processes auto;#钱包原配置,开启利用多核CPU来提升nginx性能worker_cpu_affinity auto;#指当一个nginx进程打开的最多文件描述符数目#建议 worker_rlimit_nofile 204800;worker_rlimit_nofile 65535;#全局错误日志定义类型,[ debug | info | notice | warn | error | crit ]error_log /apps/logs/nginx/error.log error;#工作模式及连接数上限events {#参考事件模型,use [ kqueue | rtsig | epoll | dev/poll | select | poll ];#epoll模型是Linux 2.6以上版本内核中的高性能网络I/O模型,如果跑在FreeBSD上面,就用kqueue模型use epoll;#单个后台worker process进程的最大并发链接数#建议 worker_connections 102400;worker_connections 65535;}#设定http服务器,利用它的反向代理功能提供负载均衡支持http {#文件扩展名与文件类型映射表include mime.types;#默认文件类型default_type application/octet-stream;#默认编码charset utf-8;#设定日志格式#log_format main "$remote_addr\t$remote_user\t[$time_local]\t$request_method\t$host\t$request_uri\t"# "$request_time\t$status\t$body_bytes_sent\t'$http_referer'\t"# "'$http_user_agent'\t'$http_x_forwarded_for'\t$upstream_addr\t$upstream_response_time\t$upstream_status\t";#日志流格式#log_format stream_log "$remote_addr\t$remote_user\t[$time_local]\t$request_method\t$host\t$request_uri\t"# "$request_time\t$status\t$body_bytes_sent\t'$http_referer'\t"# "'$http_user_agent'\t'$http_x_forwarded_for'\t$upstream_addr\t$upstream_response_time\t3";# 日志格式添加字段 request_method request_uri body_bytes_sent upstream_statuslog_format main '{{nginx}} $remote_addr - $remote_user [$time_local] ' '$request_method ' '$host "$request" $status $bytes_sent $request_time ' '$request_uri ' '$body_bytes_sent ' '"$http_referer" "$http_user_agent" ' ' "$http_x_forwarded_for"' ' JSESSIONID=$cookie_JSESSIONID ' "'upstream_addr: $upstream_addr' 'ups_resp_time: $upstream_response_time' 'request_time: $request_time'" ' upstream_status: $upstream_status';log_format download '$remote_addr - $remote_user [$time_local] ' '"$request" $status $bytes_sent $request_time $request_length ' '"$http_referer" "$http_user_agent" ' '"$http_range" "$sent_http_content_range"';#实时日志收集json格式日志include json_log_format.conf;#成功日志access_log /apps/logs/nginx/access.log main;#指定 nginx 是否调用 sendfile 函数(zero copy 方式)来输出文件,对于普通应用,#必须设为 on,如果用来进行下载等应用磁盘IO重负载应用,可设置为 off,以平衡磁盘与网络I/O处理速度,降低系统的uptime.sendfile on;#长连接超时时间,单位是秒#建议 keepalive_timeout 60;keepalive_timeout 900;#服务器名称哈希表的最大值(默认512)[hash%size]server_names_hash_max_size 1024;#服务器名字的hash表大小#建议 server_names_hash_bucket_size 256;server_names_hash_bucket_size 512;#客户请求头缓冲大小#建议 client_header_buffer_size 4k;client_header_buffer_size 16k;#如果header过大,它会使用large_client_header_buffers来读取#建议 large_client_header_buffers 4 256k;large_client_header_buffers 4 64k;#建议 client_header_timeout 1m;client_header_timeout 3m;#建议 client_body_timeout 1m;client_body_timeout 3m;#建议 send_timeout 1m;send_timeout 3m;#防止网络阻塞tcp_nopush on;tcp_nodelay on;#允许客户端请求的最大单文件字节数#建议 client_max_body_size 50m;client_max_body_size 100M;#缓冲区代理缓冲用户端请求的最大字节数client_body_buffer_size 50m;#nginx跟后端服务器连接超时时间(代理连接超时)proxy_connect_timeout 30;#后端服务器数据回传时间(代理发送超时)proxy_send_timeout 30;#连接成功后,后端服务器响应时间(代理接收超时)proxy_read_timeout 30;#设置代理服务器(nginx)保存用户头信息的缓冲区大小proxy_buffer_size 4k;#proxy_buffers缓冲区,网页平均在32k以下的话,这样设置proxy_buffers 8 32k;#高负荷下缓冲大小(proxy_buffers*2)proxy_busy_buffers_size 64k;#设定缓存文件夹大小,大于这个值,将从upstream服务器传proxy_temp_file_write_size 256k;#proxy_temp_file_write_size 64k;proxy_intercept_errors on;#客户端放弃请求,nginx也放弃对后端的请求#proxy_ignore_client_abort on;#代理缓存头信息最大长度[设置头部哈希表的最大值,不能小于你后端服务器设置的头部总数]proxy_headers_hash_max_size 512;#设置头部哈希表大小(默认64)[这将限制头部字段名称的长度大小,如果你使用超过64个字符的头部名可以加大这个值。]proxy_headers_hash_bucket_size 256;#变量哈希表的最大值(默认值)variables_hash_max_size 512;#为变量哈希表制定关键字栏的大小(默认64)variables_hash_bucket_size 128;#开启gzip压缩输出gzip on;#最小压缩文件大小#建议 gzip_min_length 1k;gzip_min_length 1100;#压缩缓冲区#建议 gzip_buffers 4 16k;gzip_buffers 4 8k;#压缩等级#建议 gzip_comp_level 9;gzip_comp_level 3;#压缩版本(默认1.1,前端如果是squid2.5请使用1.0)gzip_http_version 1.0;#压缩类型,默认就已经包含textml#添加钱包原类型 application/x-httpd-php image/jpeggzip_types text/plain application/x-javascript application/json application/javascript text/css application/xml text/javascript application/x-httpd-php image/jpeg image/gif image/png;#添加钱包原配置output_buffers 1 32k;postpone_output 1460;gzip_vary on;#钱包原配置proxy_temp_path /apps/soft/nginx/cache/proxy_temp;proxy_cache_path /apps/soft/nginx/cache/proxy_cache levels=1:2 keys_zone=one:200m inactive=1d max_size=2g;#钱包原配置limit_req_zone $binary_remote_addr $uri zone=two:3m rate=1r/s;limit_req_zone $binary_remote_addr $request_uri zone=three:10m rate=20r/s;#map模块使用map_hash_max_size 102400;map_hash_bucket_size 256;#check 模块check_shm_size 10M;#Tengine Config#concat on;#trim on;#trim_css off;#trim_js off;server_tokens off;#footer "<!-- $remote_addr $server_addr $upstream_addr -->";#rewrite_log on;fastcgi_intercept_errors on;#include other config fileinclude ../conf.d/*.conf;include /apps/soft/nginx/conf.d/upstream/*.conf;include /apps/soft/nginx/conf.d/vhost/qianbao.com/*.conf;include /apps/soft/nginx/conf.d/vhost/haodaibao.com/*.conf;include /apps/soft/nginx/conf.d/vhost/qianbaoeco.cn/*.conf;include /apps/soft/nginx/conf.d/vhost/qianbao-inc.com/*.conf;include /apps/soft/nginx/conf.d/vhost/qianbaocard.com/*.conf;#屏蔽不加主机域名的默认请求#server {# listen *:80 default;# server_name _ "";# return 444;#}#Nginx状态监测模块配置req_status_zone server "$server_name,$server_addr:$server_port" 10M;req_status server;server {listen 127.0.0.1:80;server_name 127.0.0.1;access_log /apps/logs/nginx/nginx_status/status_access.log main;location /status {req_status_show;access_log /apps/logs/nginx/nginx_status/status_access.log main;allow 127.0.0.1;deny all;}location /stub_status {stub_status on;access_log /apps/logs/nginx/nginx_status_stub/status_stub_access.log main;allow 127.0.0.1;deny all;}location /check_status {check_status;access_log /apps/logs/nginx/nginx_status_check/status_access_check.log main;allow 127.0.0.1;deny all;}}}
另外重点介绍下高性能web server的一个模块,尤其是做统计分析系统的时候web操作上报日志的情况
Module ngx_http_empty_gif_modulelocation = /_.gif {empty_gif;error_page 405 =200 $request_uri; # after add}
可用预打点服务器,目的是上报信息,利用nginx自身的日志统计实现pv,uv的统计,而且不需要返回任何信息(实际上是返回header等信息)。尤其是高并发的情况下,利用nginx这个模块,极大程度减少网络开销,实现高性能web server。
