


主要围绕下面几点介绍
概念
应用场景(对比其他语言)
和filter,拦截器,传统的pipeline模式的区别(用forEach代替不了么?)
在java中如何实现中间件模式(附源码)
中间件的概念
首先它是一种设计模式,一种功能的封装方式,就是封装在程序中处理复杂业务逻辑的功能。
说概念很难理解,结合应用场景比较好说明
比如在http请求中往往会涉及很多动作, IP筛选, 查询字符串传递, 请求体解析, cookie信息处理, 权限校验, 日志记录 ,会话管理中间件(session), gzip压缩中间件(如compress) ,错误处理等
aspnetcore中处理http请求的也是用的中间件模式, 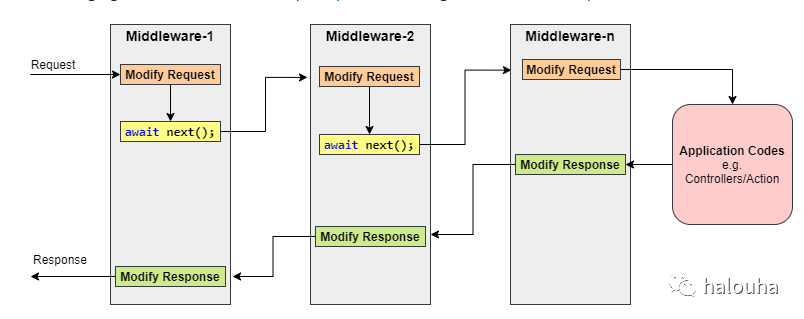
微软官方文档介绍:https://docs.microsoft.com/en-us/aspnet/core/fundamentals/middleware/?view=aspnetcore-5.0
nodejs中封装以上http请求细节处理的方法里面用到的就是中间件模式。比如主流的nodejs框架 express ,koa 等
以koa框架为例 middleware的构成是用use方法添加, 下面的代码中添加了一个 日志中间件,一个在response的header中添加'X-Response-Time'(记录请求处理时长)的中间件
const Koa = require('koa');
const app = new Koa();

// logger

app.use(async (ctx, next) => {
  await next();//进入下一个中间件
  const rt = ctx.response.get('X-Response-Time');
  //记录日志
  console.log(`${ctx.method} ${ctx.url} - ${rt}`);
});

// x-response-time

app.use(async (ctx, next) => {
  const start = Date.now();
  await next();//进入下一个中间件
  const ms = Date.now() - start;
  //记录请求时长
  ctx.set('X-Response-Time', `${ms}ms`);
});

// response

app.use(async ctx => {
  ctx.body = 'Hello World';
});
app.listen(3000);
理解下意思:
程序启动监听了并提供3000端口提供web服务
你在浏览器输入http://localhost:3000并回车
首先进入第一个logger中间件
logger中间件首先调用了next() 进入了下一个 x-response-time中间件
记录当前的时间 调用next() 进入了 reponse中间件,返回 helloword
回到x-response-time中间件记录时长
回到logger中间件记录日志
请求结束
仔细注意看:
中间件有一个next()函数,如果不调用next函数,请求就在这个中间件中终止了
这点也是中间件相比filter或者传统的pipeline对比最大的不同点(控制权交给了中间件本身)
filter的话 一旦开始走过滤器逻辑,要么全部走完
//java伪代码

for (Filter filter : myFilters){
  filter.excute(xx)
}

//要么是在组织调用的地方加判断
for (Filter filter : myFilters){
  bool continueRun = filter.excute(xx)
  if(!continueRun) break;
}
每个filter都是独立执行的,在流程上无法过多干预,没有中间件模式灵活:
用极少的操作就能得到一个插件,用最简单的方法就能将新的过滤器和处理程序扩展到现有的系统上。
中间件模式运行示意图:
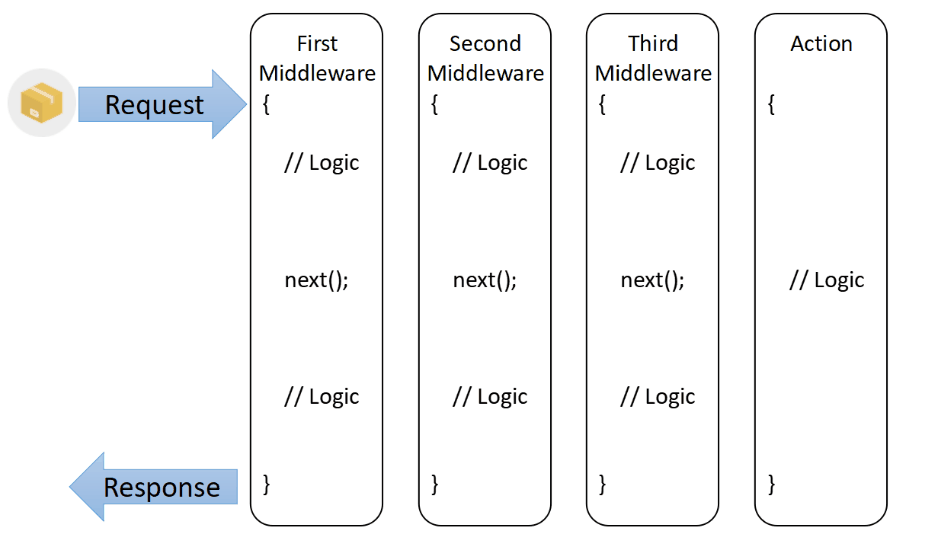
有点类似于【娃娃里面的娃娃】

在java中如何实现中间件模式
中间件模式中,最基础的组成部分就是 中间件管理器,我们可以用它来组织和执行中间件的函数,如图所示:
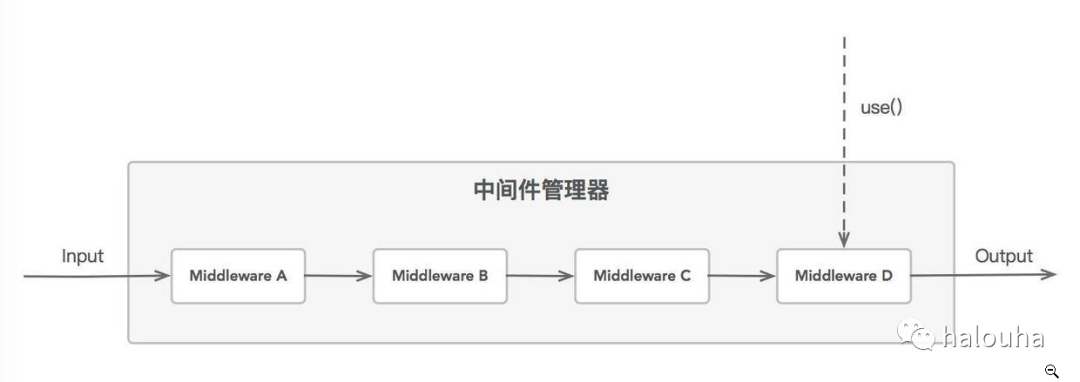
要实现中间件模式
可以通过use()函数来注册新的中间件
每个中间件的调用参数都是一致的
每个中间件按照注册的顺序被依次调用
每个中间件都有权停止进一步处理
下面我们动手封装下
我们定义一个中间件函数式接口
@FunctionalInterface
public interface Middleware {
     void excute(MiddlewareContext ctx, MiddlewareNext next);
}
有2个参数
中间件执行的上下文
下一个中间件执行委托
/**
 * 中间件方法的参数
 * 上下文
 */
public class MiddlewareContext {
    private final Map<String,Object> contextMapObjectCache;

    public MiddlewareContext() {
        contextMapObjectCache = new HashMap<>();
    }
    public <T> void set(String key,T value) {
        contextMapObjectCache.put(key,value);
    }
    public <T> T get(String key){
        if(contextMapObjectCache.containsKey(key)){
            return (T)contextMapObjectCache.get(key);
        }
        return null;
    }
}
//下一个中间件委托
@FunctionalInterfacepublic interface MiddlewareNext {
void excute();
}
中间件管理器
/**
 * 中间件管理器
 */
public class MiddlewareBuilder {
    private final List<Middleware> middlewareList;

    public MiddlewareBuilder() {
        this.middlewareList = new ArrayList<>();
    }

    public MiddlewareBuilder use(Middleware middleware) {
        this.middlewareList.add(middleware);
        return this;
    }

    public Consumer<MiddlewareContext> build(){
        MiddlewarePipeline pipeline = null;
        Collections.reverse(middlewareList);
        for (Middleware middleware : middlewareList) {
            pipeline = pipeline == null ? new MiddlewarePipeline(middleware) : pipeline.addHandler(middleware);
        }
        return pipeline::excute;
    }

    private static class MiddlewarePipeline {
        private final Middleware currentHandler;
        public MiddlewarePipeline(Middleware currentHandler) {
            this.currentHandler = currentHandler;
        }
        public MiddlewarePipeline addHandler(Middleware newHandler) {
            return new MiddlewarePipeline((input, next1) -> {
                MiddlewareNext next2 = () -> currentHandler.excute(input, next1);
                newHandler.excute(input, next2);
            });
        }
        public void excute(MiddlewareContext ctx){
            this.currentHandler.excute(ctx,()->{});
        }
    }
}
以上总共代码不超过60行实现了java中间件模式的封装,
对比nodejs或者c#中使用方式基本保持一致,代码高度简洁。
使用中间件
//创建一个中间件构造器
MiddlewareBuilder app = new MiddlewareBuilder();
//添加中间件app.use((ctx, next) -> {
System.out.println("middle-1--->start");
next.excute(); //进入下一个中间件
System.out.println("middle-1--->end");
});
//添加中间件app.use((ctx, next) -> {
System.out.println("middle-2--->start");
long startTime = System.currentTimeMillis();
next.excute(); //进入下一个中间件
long rt = (System.currentTimeMillis() - startTime);
ctx.set("X-Response-Time", rt);
System.out.println("middle-2--->end");
});
//添加中间件app.use((ctx, next) -> {
System.out.println("middle-3--->start");
ctx.set("body", "Hello World");
System.out.println("middle-3--->end");
});
//执行中间件
app.build().accept(new MiddlewareContext());
执行结果,符合预期:
middle-1--->start
middle-2--->start
middle-3--->start
middle-3--->end
middle-2--->end
middle-1--->end
在实际项目中还可以进一步结合spring的特性来封装一个Middleware注解
新增一个spring后置处理器
@Component
public class MiddlewarePointAnnotationProcessor implements BeanPostProcessor {
    private final ConfigurableListableBeanFactory configurableBeanFactory;

    @Autowired
    public MiddlewarePointAnnotationProcessor(ConfigurableListableBeanFactory beanFactory) {
        this.configurableBeanFactory = beanFactory;
    }

    @Override
    public Object postProcessBeforeInitialization(Object bean, String beanName) throws BeansException {
        this.scanAnnotation(bean, beanName);
        return bean;
    }

    @Override
    public Object postProcessAfterInitialization(Object bean, String beanName) throws BeansException {
        return bean;
    }

    protected void scanAnnotation(Object bean, String beanName) {
        this.configureFieldInjection(bean);
    }

    private void configureFieldInjection(Object bean) {
        Class<?> managedBeanClass = bean.getClass();
        ReflectionUtils.FieldCallback fieldCallback =
                new MiddlewarePointFieldCallback(configurableBeanFactory, bean);
        ReflectionUtils.doWithFields(managedBeanClass, fieldCallback);
    }
}
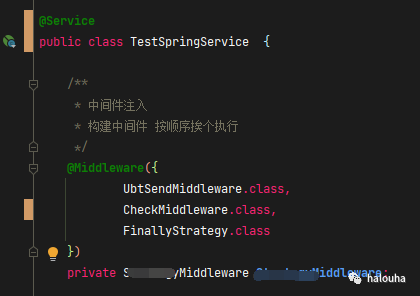
在springboot中使用的时候就更加方便了如下图:

我是正东,学的越多不知道也越多。这个公众号是我的实验小天地,我会分享一些我开源的工具(欢迎你来提意见),好玩好用的新技术。如果你也和我一样喜欢折腾技术请关注 !
