


开源之夏公众号持续面向社区和学生征稿,欢迎大家分享项目经验开源心得!
投稿方式:
E-mail :summer@iscas.ac.cn
or 关注公众号,后台回复“投稿”。
本期分享JustAuth社区吴豪琪同学的项目经验:开发 JFinal、Blade、ActFramework 集成 JustAuthPlus 的 Demo
各位参与开源的导师、同学们,大家好,我是来自四川成都的一名准大三学生,怀着忐忑的心情在大二暑假前向 JustAuth(https://justauth.wiki/)社区提交了简历,很荣幸成功参与进人生中的第一次开源软件计划。下面由我简单分享一下此次的开源项目经验。
JustAuth开源社区, 致力于为开源的授权/身份认证技术开发、布道。以开源之名,赋能开发者。名下开源项目 JustAuth 深受开发者喜欢,在 Gitee(https://gitee.com/yadong.zhang/JustAuth)和 Github(https://github.com/justauth/JustAuth)中的累计关注量近 19K,并荣获 Gitee GVP 称号,目前已有多个企业(中文在线、北京市公园管理中心、前海人寿等)、组织和开源项目(Shiro Action、sika、七腾智能、BladeX、GUNS、MaxKey、mica)正在使用 JustAuth 完成极速的第三方登录集成。
JustAuth 致力于让开发者们脱离繁琐的第三方登录SDK,简化登录开发过程,做到开箱即用
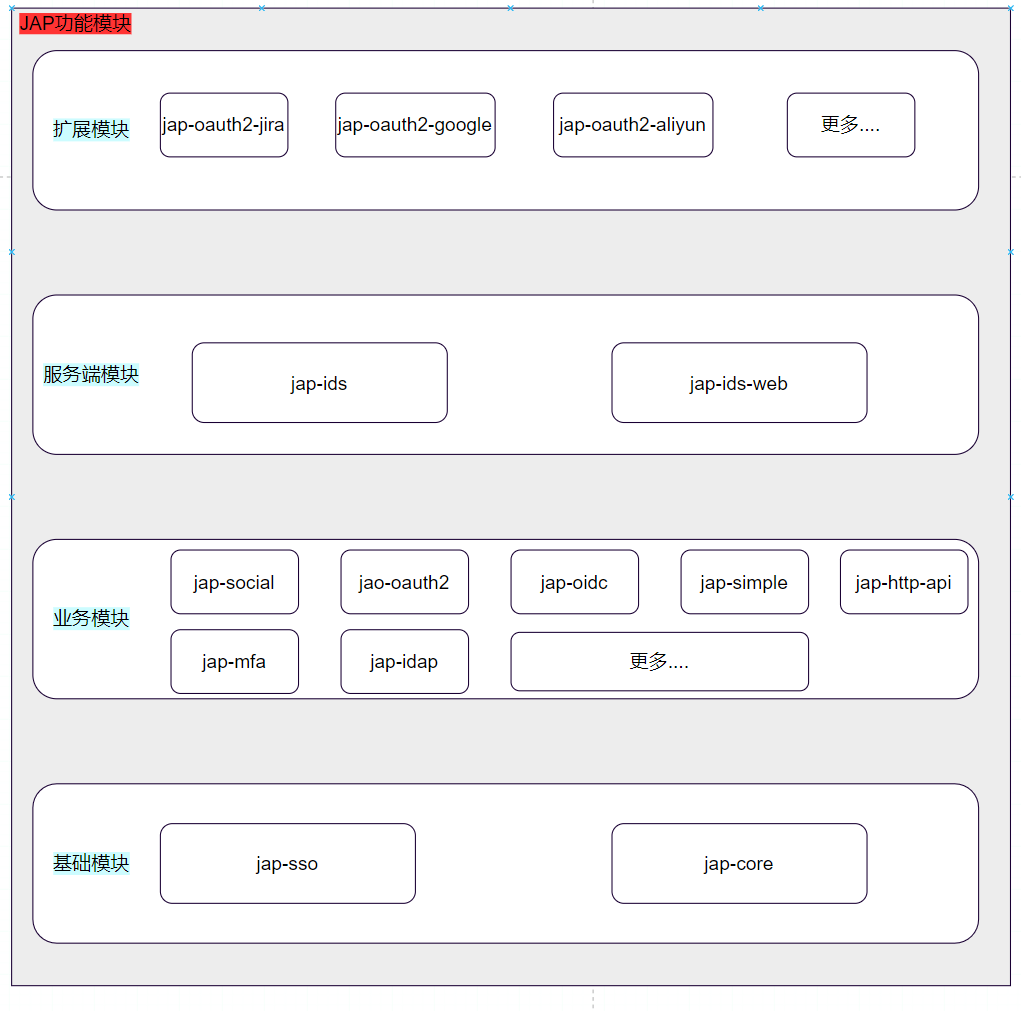
1. 什么是OAuth2.0? 2. 什么是OIDC? 3. 什么是令牌Token? 4. 什么是CSRF? 5. 什么是PKCE?有何作用? 6. JAP如何做到开箱用,如何简化开发者开发设计? ------------------------------------------------ 等等,以上这些都是基础程序员必须需要了解和掌握的基础知识。
The OAuth 2.0 authorization framework enables a third-party application to obtain limited access to an HTTP service, either on behalf of a resource owner by orchestrating an approval interaction between the resource owner and the HTTP service, or by allowing the third-party application to obtain access on its own behalf.This specification replaces and obsoletes the OAuth 1.0 protocol described in RFC 5849.
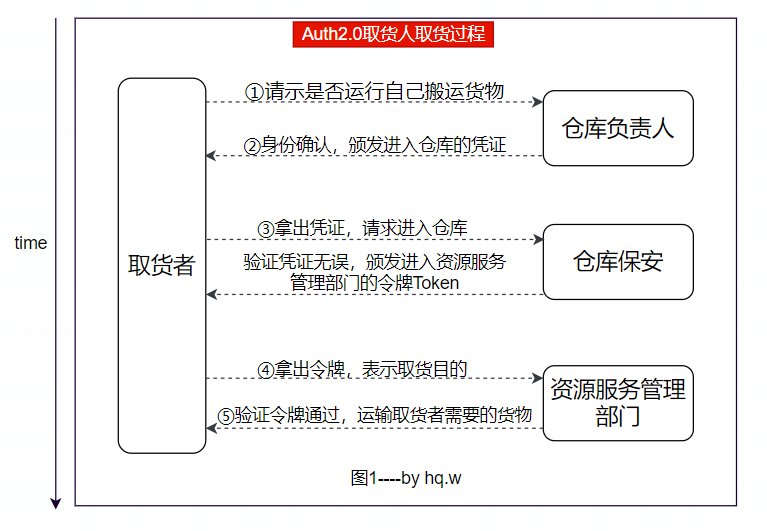
client:An application making protected resource requests on behalf of the resource owner and with its authorization.关键字:一个应用程序、资源请求、已被资源所有者授权。例如“取货人”,需要向仓库负责人请示:是否自己有任务去仓库取货。 resource owners:An entity capable of granting access to a protected resource. When the resource owner is a person, it is referred to as an end-user.关键字:接收授权请求,授权entity ,访问保护资源。例如“仓库负责人”,需要对取货人的请示进行验证:验证这个取货者是否是在帮工名册上,是否安全,若完成检查,则仓库负责人给取货人颁发一个凭证Authorization Grant 。 authorization server:The server issuing access tokens to the client after successfully authenticating the resource owner and obtaining authorization.关键字:接收Authorization Grant,颁发令牌Token。例如“仓库保安”,收到从取货人拿出的Authorization Grant,验证无误后,让其取货者找资源服务管理部门(该部门管理货物的搬运)。 resource server:The server hosting the protected resources, capable of accepting and responding to protected resource requests using access tokens.关键字:接受使用来自”仓库保安“(授权服务器)令牌Token的访问,资源请求。例如“资源服务管理部门”,取货者拿出令牌,该资源服务部门验证收到Token的有效性和安全性后,给取货者运输货物。 tips:这里请注意凭证、令牌的使用对象和作用对象。 另外,我以图例作为补充,帮助你了解这4段文字的具体含义:
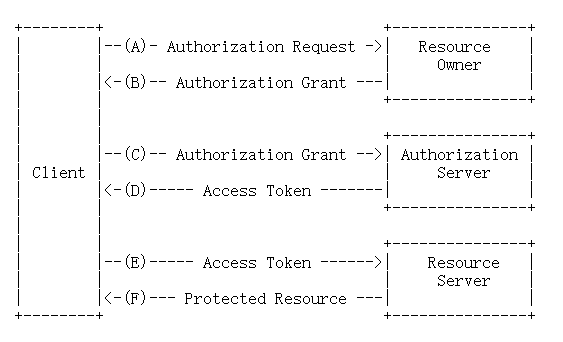
官方示例图: 这里简单介绍什么是令牌Token?
简单来说就是用户第一次登录,服务器生成的一个字符串,以此作为客户端在进行请求的一个标志。而在以后的的请求数据,客户端只需要带上这个Token即可,不再需要每次带上用户名和密码。 Token的使用方式? 可以是你设备的MAC地址(设备唯一标识符,用于数据链路层的MAC子层)也可以是session值。 这里不展开细讲。你只需要知道,这是一个用于安全的字符串,以保证客户端和服务端的通信安全。
Authorization Code Implicit Resource Owner Password Credentials Client Credentials

https://gitee.com/oauth/authorize:是指用于对第三方应用进行授权的Authorization Endpoint response_type=code:指进行code模式的OAuth2.0授权 redirect_uri:用于授权成功或者失败后的跳转地址 client_id:指备份应用的ID scope:请求的授权范围 state:表示安全标志位,用来保证不是伪造的请求,始终在请求授权和响应授权的URL中作为参数; 这里简单介绍什么是伪造?即什么是CSRF? CSRF(XSRF)又称跨站请求伪造,属于一种授权攻击行为,导致最终用户的受保护资源被攻击者使用。通常是针对客户端的重定向redirect_uri发起攻击,注入攻击者自己的授权码或访问令牌。 简单点说就是攻击者使用你的信息去访问并使用受保护资源,导致受害者出现重大损失。因此为了实现CSRF保护,客户端应该使用“state”请求参数在发起授权请求时向授权服务器传送该值,并授权成功后返回同一个status值,以保证是真正的双方在进行通信。
http://127.0.0.1:8091/oauth/code?code=c54b4dc9b5559a37ef9a24a0e76f92aa31beee666ba64a3a4f1bebc20f1cab21&state=bcf3c0a682877e15a0dd4d590aea8781
private static AccessToken getAccessTokenOfAuthorizationCodeMode(HttpServletRequest request, OAuthConfig oAuthConfig) throws JapOauth2Exception {String state = request.getParameter("state");Oauth2Util.checkState(state, oAuthConfig.getClientId(), oAuthConfig.isVerifyState());String code = request.getParameter("code");Map<String, String> params = new HashMap<>(6);params.put("grant_type", Oauth2GrantType.authorization_code.name());params.put("code", code);params.put("client_id", oAuthConfig.getClientId());params.put("client_secret", oAuthConfig.getClientSecret());if (StrUtil.isNotBlank(oAuthConfig.getCallbackUrl())) {params.put("redirect_uri", oAuthConfig.getCallbackUrl());}if (Oauth2ResponseType.code == oAuthConfig.getResponseType() && oAuthConfig.isEnablePkce()) {params.put(PkceParams.CODE_VERIFIER, PkceHelper.getCacheCodeVerifier(oAuthConfig.getClientId()));}Kv tokenInfo = Oauth2Util.request(oAuthConfig.getAccessTokenEndpointMethodType(), oAuthConfig.getTokenUrl(), params);Oauth2Util.checkOauthResponse(tokenInfo, "Oauth2Strategy failed to get AccessToken.");if (!tokenInfo.containsKey("access_token")) {throw new JapOauth2Exception("Oauth2Strategy failed to get AccessToken." + tokenInfo.toString());}return mapToAccessToken(tokenInfo);}
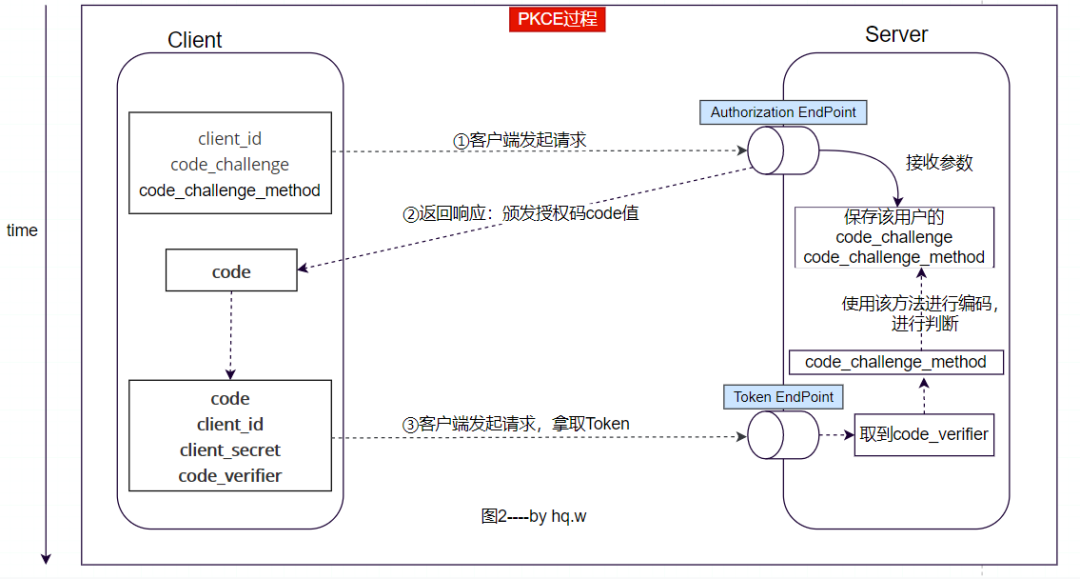
这里简单介绍什么是PKCE? ==发生时间:官方示例图中的C步。== 全称:Proof Key for Code Exchange。PKCE是对Authorization Code模式更进一步的安全措施,属于一种密码学手段,保证即使在C步code等被第三方截取,也无法获取用户保护资源,达到CSRF保护。
客户端:而请求参数code_challenge的得到方式是:客户端在请求code之前,准备随机生成一段字符串,保存于code_verifier变量,然后再将该字符串通过SHA256哈希和URL-Safe的base编码得到打值,存进code_challenge。才开始向授权服务器端发起请求code。 授权服务器端:通过请求去保存code_challenge和编码处理方法。在客户端拿到code后,再使用code_verifier等作为参数请求授权服务器端。授权服务器端最终使用code_verifier按照code_challenge_method方式进行编码处理,将处理得到的值与请求code时传递的code_challenge进行比较。 tips:就算攻击者拿到code_challenge (不能逆推得到code_verifier)、code等值,也不能逆推拿到code_verifier。
若不同:说明在请求code时,遭受CSRF攻击,但被授权服务器端发现,用户受保护资源未被泄露。 若相同:说明此次换取token令牌的通信,未被攻击,客户端成功拿到令牌。 下面给出图例:
private JapUser getUserInfo(OAuthConfig oAuthConfig, AccessToken accessToken) throws JapOauth2Exception {Map<String, String> params = new HashMap<>(6);params.put("access_token", accessToken.getAccessToken());Kv userInfo = Oauth2Util.request(oAuthConfig.getUserInfoEndpointMethodType(), oAuthConfig.getUserinfoUrl(), params);Oauth2Util.checkOauthResponse(userInfo, "Oauth2Strategy failed to get userInfo with accessToken.");JapUser japUser = this.japUserService.createAndGetOauth2User(oAuthConfig.getPlatform(), userInfo, accessToken);if (ObjectUtil.isNull(japUser)) {return null;}return japUser;}

<dependency><groupId>com.fujieid</groupId><artifactId>jap-oauth2</artifactId><version>1.0.2</version></dependency>
//OAuth2.0需要的各个配置(相应的接口、授权类型等)private static OAuthConfig config = new OAuthConfig();//OAuth2.0 授权策略类,用于接收重定向redirect_uri和接收code换取token,拿到用户信息等,属于JAP验证授权的最外部接口。private Oauth2Strategy oauth2Strategy = new Oauth2Strategy(japUserService, new JapConfig());@ActionKey("/oauth/code/getData")public void getBaseData(){//获取参数,这里是为了方便测试者以页面通用的方式进行输入,而不是修改源代码。但参数clientSecret等一般很重要,实际开发下不会这样使用String clientId = this.getRequest().getParameter("clientId");String clientSecrect = this.getRequest().getParameter("clientSecret");String redirectURI = this.getRequest().getParameter("redirectURI");config.setPlatform("gitee").setState(UuidUtils.getUUID()).setClientId(clientId).setClientSecret(clientSecrect).setCallbackUrl(redirectURI).setAuthorizationUrl("https://gitee.com/oauth/authorize").setTokenUrl("https://gitee.com/oauth/token").setUserinfoUrl("https://gitee.com/api/v5/user").setScopes(new String[]{"user_info"}).setResponseType(Oauth2ResponseType.code).setGrantType(Oauth2GrantType.authorization_code).setUserInfoEndpointMethodType(Oauth2EndpointMethodType.GET);this.renderAuth();}
@ActionKey("/oauth/code")public void renderAuth() {String code = this.getRequest().getParameter("code");JapResponse japResponse = oauth2Strategy.authenticate(config, this.getRequest(), this.getResponse());if (!japResponse.isSuccess()) {renderJson("/?error=" + URLUtil.encode(japResponse.getMessage()));}if (japResponse.isRedirectUrl()) {renderJson(RetKit.ok("toAuth",(String)japResponse.getData()));} else {JapUser japUser = (JapUser) japResponse.getData();renderJson(RetKit.ok("userInfos",japUser));}}
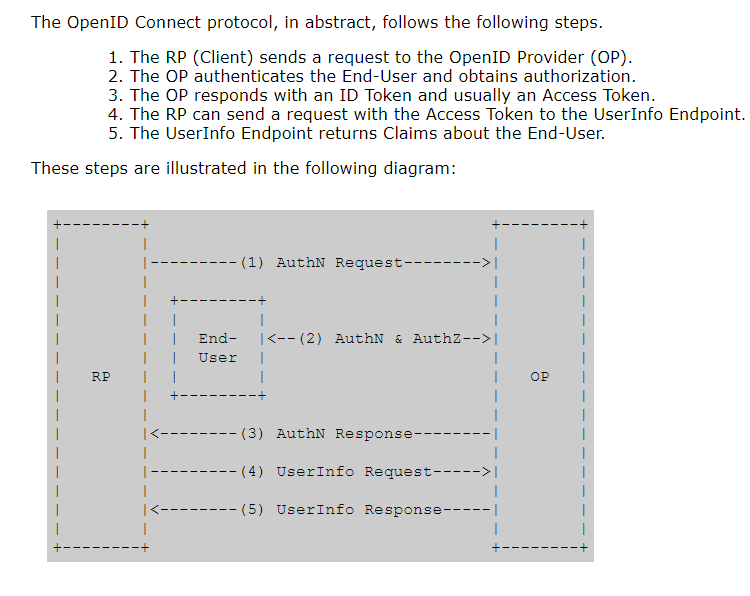
OpenID Connect 1.0 is a simple identity layer on top of the OAuth 2.0 [RFC6749] protocol. It enables Clients to verify the identity of the End-User based on the authentication performed by an Authorization Server, as well as to obtain basic profile information about the End-User in an interoperable and REST-like manner.
前面几个步骤和OAuth2.0大致相同,但在认证请求时的参数需要scope必须包含OpenID字段。 当Client向授权服务器使用code向其Token EndPoint请求Token时,Token EndPoint接口返回ID Token和Access Token。 Client校验ID Token,并从中提取用户的身份标识符(End-User分配的唯一标识符)后,向资源服务器的UserInfo EndPoint接口请求用户信息资源,返回End-User的Claims。
<dependency><groupId>com.fujieid</groupId><artifactId>jap-oidc</artifactId><version>1.0.1</version></dependency>
private OidcStrategy oidcStrategy = new OidcStrategy(japUserService, new JapConfig());private static OidcConfig config = new OidcConfig();@ActionKey("/oidc/getData")public void getBaseData(){//获取参数,这里是为了方便测试者以页面通用的方式进行输入,而不是修改源代码。但参数clientSecret等一般很重要,实际开发下不会这样使用String clientId = this.getRequest().getParameter("clientId");String clientSecrect = this.getRequest().getParameter("clientSecret");String redirectURI = this.getRequest().getParameter("redirectURI");// 配置 OIDC 的 Issue 链接config.setIssuer("https://oauth.aliyun.com").setPlatform("aliyun").setState(UuidUtils.getUUID()).setClientId(clientId).setClientSecret(clientSecrect).setCallbackUrl(redirectURI).setScopes(new String[]{"aliuid","openid","profile"}).setResponseType(Oauth2ResponseType.code).setGrantType(Oauth2GrantType.authorization_code);logger.info("拿到参数,开始准备重定向授权页面");this.renderAuth();}@ActionKey("/oidc/auth")public void renderAuth() {JapResponse japResponse = oidcStrategy.authenticate(config, this.getRequest(), this.getResponse());if (!japResponse.isSuccess()) {System.out.println(japResponse.getMessage());renderText("/?error=" + URLUtil.encode(japResponse.getMessage()));}if (japResponse.isRedirectUrl()) {renderJson(RetKit.ok("toAuth",(String)japResponse.getData()));logger.info("授权成功");} else {JapUser japUser = (JapUser) japResponse.getData();Map<String,String> userInfos = new HashMap<>();userInfos.put("token",japUser.getToken());userInfos.put("username",japUser.getUsername());userInfos.put("userId",japUser.getUserId());userInfos.put("password",japUser.getPassword());renderJson(RetKit.ok("userInfos",userInfos));}}
参考文献:


文章转载自开源之夏,如果涉嫌侵权,请发送邮件至:contact@modb.pro进行举报,并提供相关证据,一经查实,墨天轮将立刻删除相关内容。
