1. Laravel 虚拟开发环境 Homestead
2.下载安装Download Vagrant
3.下载安装VirtualBox
4.安装 Homestead Vagrant Box
4.1 vagrant box add laravel/homestead 4.2安装 Homestead
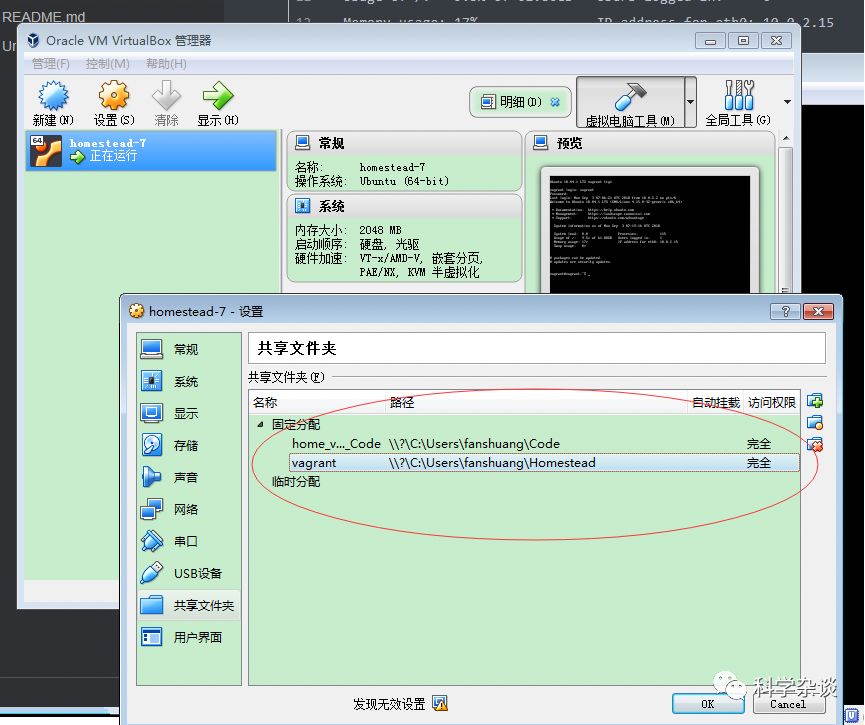
4.2.1 Homestead.yaml :共享⽂文件夹配置#
4.2.2 Homestead.yaml 站点配置#5. 启动虚拟机
5.1 SSH 登录 Homestead 虚拟机中:
5.2 php
5.3 nginx
5.4 mysql -uhomestead -p 密码为 secret 5.5 laravel 应⽤用
6. virtualBox界⾯面看到
CentOS7.4 或Windows 7 +
Virtual Box : ubuntu-18.04 php7+ nginx+ mysql+ Laravel5.5
https://app.vagrantup.com/boxes/search
vagrant box add "CentOS 6.3 x86_64 minimal" CentOS-6.3-x86_64-minimal.box
1. Laravel 虚拟开发环境 Homestead参考⽹网址 https://laravel-china.org/docs/laravel/5.5/homestead/1285
2.下载安装Download Vagrant
https://www.vagrantup.com/downloads.html https://releases.hashicorp.com/vagrant/2.1.4/vagrant_2.1.4_x86_64.rpm输⼊入vagrant -v验证安装是否成功,如果出现版本信息表示成功。http://www.vagrantbox.es/
3.下载安装VirtualBox
下载地址:https://www.virtualbox.org/wiki/DownloadsLinux: https://www.virtualbox.org/wiki/Linux_Downloads
在启动 Homestead 环境之前,你必须先安装 VirtualBox 5.1/VMWare/Parallels 以及 Vagrant。 上述软件均针对不不同操作系统提供了了易易于使⽤用的可视化安装包。
若要使⽤用 VMware 提供器器,你需要同时购买 VMware Fusion/Workstation 以及 VMware Vagrant插件。尽管 VMware 不不是免费的,但 VMware 可以提供更更快的共享⽂文件夹性能。
若要使⽤用 Parallels 提供器器,你需要安装 Parallels Vagrant 插件。这是免费的。
4.安装 Homestead Vagrant Box
4.1 vagrant box add laravel/homestead
当安装完 VirtualBox/VMware 以及 Vagrant 后,你可以在终端使⽤用下⾯面的命令将laravel/homestead Box 添加到 Vagrant 中安装。下载 Box 需要⼏几分钟的时间,具体取决于你的
互联⽹网连接速度:
vagrant box add laravel/homestead
#box中的镜像⽂文件被放到了了 当前⽤用户的 ~/.vagrant.d/boxes 下⾯面#windows:
#cd C:\Users\XX\.vagrant.d\boxes\laravel-VAGRANTSLASH-
homestead\6.3.0\virtualbox\
# ubuntu-18.04-amd64-disk001.vmdk
# Vagrantfile如果上⾯面的命令运⾏行行失败,请确保你的 Vagrant 是最新版本的 。
{tip} 国内⽹网络的下载速度不不是⼀一般的慢。可另寻解决之道。
4.2安装 Homestead
你可以简单使⽤用 Git 克隆隆代码库来安装 Homestead。建议将代码库克隆隆到⽤用户「home」⽬目录下的
Homestead ⽂文件夹中。这样 Homestead Box 就可以作为所有 Laravel 项⽬目的主机:
cd ~
git clone https://github.com/laravel/homestead.git Homestead
由于 Homestead 的 master 分⽀支并不不是稳定分⽀支,你应该⽤用打过标签的稳定版本。你可以在Github 发⾏行行⻚页⾯面 上找到最新的稳定版本。
cd Homestead
// Clone the desired release...
git checkout v6.1.0
克隆 Homestead 代码库后,从 Homestead 目录中运行 bash init.sh
命令来创建 Homesstead.yaml
配置文件。 Homesstead.yaml
文件会被放置在你的 Homestead 目录中:
// Mac / Linux...
bashinit.sh

// Windows...
init.bat
4.2.1 Homestead.yaml
:共享文件夹配置#
我们可以通过 folders
来指明本机要映射到 Homestead 虚拟机上的文件夹。
map
对应的是我们本机的文件夹,格式例如:E:/Homestead/Code,以开发者实际项目目录为准。to
对应的是 Homestead 上的文件夹。
为了后续课程讲解,请统一配置如下:
folders:
  - map: ~/Code
    to: /home/vagrant/Code
folders:  #设置文件夹机映射关系
  - map: /Users/codingLady/Code   #需要映射到虚拟机的本地机器的文件夹
    to: /home/vagrant/Code        #需要映射到虚拟机中哪个的文件夹
默认 Homestead
会将我们本机的 ~/Code
文件夹映射到 /home/vagrant/Code
文件夹上。现在我们本机还没有 ~/Code
文件夹,让我们来创建一个:
> cd~
> mkdirCode
执行成功后,同样的,我们可以通过 explorer .
命令在文件夹中打开此目录:
4.2.2 Homestead.yaml
站点配置#
站点配置允许你在主机里,通过域名来访问虚拟机里的 Laravel 应用。如下面 sites
配置所示,将 homestead.test
映射到一个 Laravel 项目的 public
目录上。这一行配置,会命令 Homestead 为我们新建一个 Nginx 站点,并且把 Web Root 配置到指定目录下。Laravel 应用的 Nginx 站点 Web Root 配置,默认就是在根目录下的 public
目录。
sites:
  - map: homestead.test
    to: /home/vagrant/Code/Laravel/public

sites:  #设置域名和网站的映射关系
  - map: blogA.app                        #网站域名
    to: /home/vagrant/Code/blogA/public   #Laravel项目对应index.php的位置,以虚拟机的路径表示
目前 Laravel
项目并不存在。这里先统一配置为以上,请不用着急,在后续的章节中,我们会创建该 Laravel
项目。
另外,主机里直接访问虚拟机站点,必须通过绑定 hosts
来实现。接下来我们利用 hosts
文件绑定 homestead.test
到虚拟机 IP 192.168.10.10
上。hosts
文件的完整路径为 C:\Windows\System32\Drivers\etc\hosts
,可使用下面命令打开:
> atom C:/Windows/System32/Drivers/etc/hosts如果你没有集成
atom
命令的话, 请使用编辑器直接打开文件,文件路径在C:\Windows\System32\Drivers\etc\hosts
。
在 hosts
文件的最后面加入以下一行:
192.168.10.10 homestead.test至此站点就配置好了,等我们在后面章节创建 Laravel
项目后,即可通过浏览器访问 homestead.test
站点。
5. 启动虚拟机
在命令中输入 vagrant
,能看到 Vagrant 为我们提供了一些便利的命令行,下面简单介绍一下 Vagrant 常用的一些命令行的使用:
| 命令行 | 说明 |
|---|---|
| vagrant box add laravel/homestead | 安装 Homestead Vagrant Box |
| vagrant init | 初始化 vagrant |
| vagrant up | 启动 vagrant |
| vagrant up --provision | ②若修改了配置项,需要执行的命令 |
| vagrant halt | 关闭 vagrant |
| vagrant ssh | vagrant up --provision通过 SSH 登录 vagrant(需要先启动 vagrant) |
| vagrant provision | 重新应用更改 vagrant 配置 |
| vagrant destroy | 删除 vagrant(删除安装目录) |
让我们开始启动 Homestead:
> cd~/Homestead && vagrant up

安装路径: E:\laravel.Homestead\homestead-7\ubuntu-18.04-amd64-disk001.vmdk
VirtualBox的默认路径 : 管理-》全设定:常规 (配置默认路径E:\laravel.Homestead)
第一次启动时,Vagrant 会做以下这几件事情:
以导入的 Homestead 虚拟机盒子为模板,新建一台虚拟机;
并按照
Homestead.yaml
里的配置信息,对这台新建的虚拟机进行配置;配置完成后启动虚拟机。
5.1 SSH 登录 Homestead 虚拟机中:
成功启动后,还是在 ~/Homestead
目录中,通过以下命令来 SSH 登录 Homestead 虚拟机中:
> cd~/Homestead/
> vagrant ssh
在我们登录成功后,你能看到类似于如下图的界面,现在我们在该终端界面中输入的所有命令都将运行在 Homestead 虚拟机上。
$ vagrant ssh
Welcome to Ubuntu 18.04.1 LTS (GNU/Linux 4.15.0-32-generic x86_64)

* Documentation: https://help.ubuntu.com
* Management:     https://landscape.canonical.com
* Support:       https://ubuntu.com/advantage

System information as of Mon Sep 3 06:50:40 UTC 2018

System load: 0.18             Processes:           113
Usage of /:   9.5% of 61.80GB   Users logged in:     0
Memory usage: 17%               IP address for eth0: 10.0.2.15
Swap usage:   0%


0 packages can be updated.
0 updates are security updates.


Last login: Mon Sep 3 06:50:19 2018 from 10.0.2.2
vagrant@vagrant:~$ t
在虚拟机界面下可以输入退出虚拟机:
$ exit最后尝试关闭 Homestead:
> vagrant halt////////////////////////////////////////////////////////////////////////////
5.2 php
vagrant@homestead:/etc/php$ ps-ef| grepphp-fpm
root      9787    1 011:19 ?        00:00:00 php-fpm: master process (/etc/php/5.6/fpm/php-fpm.conf)
vagrant   9807 9787 011:19 ?        00:00:00 php-fpm: pool www
vagrant   9808 9787 011:19 ?        00:00:00 php-fpm: pool www
root      9825    1 011:19 ?        00:00:00 php-fpm: master process (/etc/php/7.0/fpm/php-fpm.conf)
vagrant   9873 9825 011:20 ?        00:00:00 php-fpm: pool www
vagrant   9874 9825 011:20 ?        00:00:00 php-fpm: pool www
root      9885    1 011:20 ?        00:00:00 php-fpm: master process (/etc/php/7.1/fpm/php-fpm.conf)
vagrant   9917 9885 011:20 ?        00:00:00 php-fpm: pool www
vagrant   9918 9885 011:20 ?        00:00:00 php-fpm: pool www
vagrant  1374311927 014:12 pts/1    00:00:00 grep--color=auto php-fpm
vagrant@homestead:/etc/php$
如果是设置的 fastcgi_pass unix:/var/run/php5-fpm.sock, fpm 配置文件不需要修改, 如果是监听 9000端口就需要修改 fpm 配置文件 vim/etc/php5/fpm/pool.d/www.conf。

// 注释掉 sock 添加监听 9000端口
;listen =/run/php/php7.0-fpm.sock
listen =127.0.0.1:9000
fpm 配置文件修改之后, 需要重启 fpm 才能生效 servicephp5-fpm start
, 如果想要检测 9000端口是否开启成功运行 netstat -tln.

vagrant@ubuntu-xenial:~$ sudo/etc/init.d/nginx restart
[ ok ] Restarting nginx (via systemctl): nginx.service.

配置完后,我们来运行一个文件!
5.3 nginx
#切换到root用户
vagrant@homestead:~$ sudosu
root@homestead:/home/vagrant#
root@homestead:/home/vagrant# service nginx restart #重启 nginx
root@homestead:/home/vagrant# service nginx resstart
Usage: nginx {start|stop|restart|reload|force-reload|status|configtest|rotate|upgrade}
root@homestead:/home/vagrant# service nginx restart
root@homestead:/home/vagrant# ps -ef | grep nginx
root     10582    1 011:30 ?        00:00:00 nginx: master process /usr/sbin nginx -gdaemon on; master_process on;
vagrant  1058510582 011:30 ?        00:00:00 nginx: worker process
root     1059110232 011:30 pts/0    00:00:00 grep--color=auto nginx
root@homestead:/home/vagrant#

/etc/nginx/nginx.conf

root@homestead:/etc/nginx/conf.d# ls -tl
lrwxrwxrwx 1root root 38Aug 2101:37 nginx.conf -> /home/vagrant/.config/nginx/nginx.conf

vagrant@homestead:/etc/nginx/sites-enabled$ ls-lt
total 0
lrwxrwxrwx 1root root 40Sep  411:18 homestead.app -> /etc/nginx/sites-available/homestead.app
vagrant@homestead:/etc/nginx/sites-enabled$

vagrant@homestead:~/Code/public$ catindex.php
<?php
phpinfo();
?>vagrant@homestead:~/Code/public$

#浏览器输入 http://192.168.10.10/
5.4 mysql -uhomestead -p 密码为 secret
mysql -uhomestead -p
密码为 secret
show databases;
5.5 laravel 应用
$laravel new blog

$php artisan serve
http://localhost:8000

vagrant@homestead:~/Code/blog$ laravel-V
Laravel Installer 2.0.1
vagrant@homestead:~/Code/blog$ php-v
PHP 7.2.9-1+ubuntu18.04.1+deb.sury.org+1(cli) (built: Aug 19201807:16:54) ( NTS )
Copyright (c) 1997-2018The PHP Group
Zend Engine v3.2.0, Copyright (c) 1998-2018Zend Technologies
  with Zend OPcache v7.2.9-1+ubuntu18.04.1+deb.sury.org+1, Copyright (c) 1999-2018, by Zend Technologies
  with blackfire v1.22.0~linux-x64-non_zts72, https://blackfire.io, by Blackfire
vagrant@homestead:~/Code/blog$
6. virtualBox界⾯面看到