


今天没空写设计模式啦,先用之前的文章充数啦。
实现消息队列的中间件有很多种,RabbitMQ,RockerMQ等,redis也可以实现消息队列。
redis有五种数据类型:String(字符),Hash(哈希),List(有序列表),Set(集合),Zset(有序集合)。
从数据类型上来看,对list的pop和push操作即可实现消息队列,而set是无序集合,无法控制队列先进先出,不适合做队列,有序集合zset因为其有score权重,适合做优先级队列。
下面先讲list实现消息队列,由于redis内部对key的操作进行了处理,所以不需要担心并发问题:
首先了解下redis list数据类型的四种基本操作

pop入队列,push出队列,通过lpop+lpush或rpop+rpush可以实现先进后出,通过lpop+rpush或rpop+lpush可以实现后进先出。
对redis的操作和连接可以参考上一节,本文在上一节项目开发基础上,使用jedis对redis操作。
定义队列的基本操作接口,方便后续扩展,包括推入、推入、队列长度,代码如下:
package com.example.redisdemo.Utils;

public interface QueueUtils {

    /**
     * 将value放入队列中
     *
     * @param queueName
     * @param value
     */
    boolean put(String queueName, Object value);


    /**
     * 获取总数
     *
     * @param queueName
     * @return
     */
    long count(String queueName);

    /**
     * 弹出消息
     *
     * @return zhong.kaijie     2016年5月6日
     */
    Object pop(String key);

}
使用list的操作对其实现,我们采取lpush+rpop,因为队列一般都是要求先进先出的,代码如下:
package com.example.redisdemo.Utils;

import org.springframework.beans.factory.annotation.Autowired;
import org.springframework.stereotype.Component;
import redis.clients.jedis.Jedis;
@Component
public class QueueUtilsRedisListImpl implements QueueUtils {

    @Autowired
    Jedis jedis;
    @Override
    public boolean put( String key, Object value) {
        try {
            jedis.lpush(key, value.toString());
        } catch (Exception e) {
            e.printStackTrace();
            return false;
        }
        return true;
    }

    @Override
    public long count(String key) {
        return jedis.llen(key);
    }

    @Override
    public Object pop(String key) {
        return jedis.rpop(key);
    }
}
为方便,上面忽略了很多捕获异常等操作。
定义一组http接口,用于推入、推出、计算队列长度,也可以使用restful风格,此处统一用get参数设置。
package com.example.redisdemo;

import com.example.redisdemo.Utils.QueueUtils;
import com.example.redisdemo.Utils.RedisLockUtils;
import org.springframework.beans.factory.annotation.Autowired;
import org.springframework.boot.SpringApplication;
import org.springframework.boot.autoconfigure.SpringBootApplication;
import org.springframework.web.bind.annotation.RequestMapping;
import org.springframework.web.bind.annotation.RequestParam;
import org.springframework.web.bind.annotation.RestController;

@SpringBootApplication
@RestController
@RequestMapping("")
public class RedisdemoApplication {

    @Autowired
    RedisLockUtils redisLockUtils;
    @Autowired
    QueueUtils queueUtils;

    public static void main(String[] args) {
        SpringApplication.run(RedisdemoApplication.class, args);
    }

    @RequestMapping("push")
    public String push(@RequestParam String key, @RequestParam String value) {
        return String.valueOf(queueUtils.put(key, value));
    }

    @RequestMapping("pop")
    public String pop(@RequestParam String key) {
        return String.valueOf(queueUtils.pop(key));
    }

    @RequestMapping("len")
    public String len(@RequestParam String key) {
        return String.valueOf(queueUtils.count(key));
    }
}
测试,使用ie网页、postman或soapui等工具进行测试,将数据推入、推出队列:
http://localhost:8080/push?key=testqueue&value=hello
http://localhost:8080/push?key=testqueue&value=world
http://localhost:8080/push?key=testqueue&value=redis
http://localhost:8080/push?key=testqueue&value=list
http://localhost:8080/push?key=testqueue&value=queue
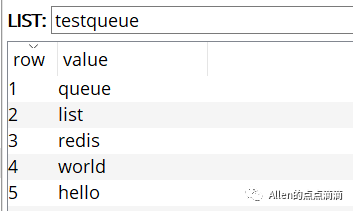
通过redis-cli命令或桌面工具可以看下该list内部内容及长度:
127.0.0.1:6379> lindex testqueue 1
"list"
127.0.0.1:6379> lindex testqueue 0
"queue"
127.0.0.1:6379> llen testqueue
(integer) 5
访问获取队列长度:
http://localhost:8080/len?key=testqueue
下面一步步将队列元素推出队列:
http://localhost:8080/pop?key=testqueue
分别按顺序得到输出:
hello world redis list queue
全部推出后,查看该list已经不存在:
127.0.0.1:6379> exists testqueue
(integer) 0
以上便是使用redis list数据类型简单实现消息队列,实际项目应用中,可以考虑将异步任务、工作流等信息置于队列(pop),同时起线程对队列进行消费(push)。
很多时候事务的处理具备优先级,需要使用到优先级队列,此时便可以使用zset实现。
同样我们实现上述的QueueUtils接口:
package com.example.redisdemo.Utils;

import org.springframework.beans.factory.annotation.Autowired;
import org.springframework.stereotype.Component;
import redis.clients.jedis.Jedis;

import java.util.Map;
import java.util.Set;

@Component
public class QueueUtilsRedisPriorityImpl implements QueueUtils {
    @Autowired
    Jedis jedis;

    @Override
    public boolean put(String key, Object value) {
        Map<String, String> map = (Map<String, String>) value;
        String priority = map.get("priority");
        String content = map.get("value");
        long result=jedis.zadd(key, Double.valueOf(priority), content);
        if(result>0) {
            return true;
        }else{
            return false;
        }
    }

    @Override
    public long count(String key) {
        return jedis.zcard(key);
    }

    @Override
    public Object pop(String key) {
        Set<String> result = jedis.zrange(key, 0, 0);
        jedis.zremrangeByRank(key, 0, 0);
        if(result.size()>0){
            for(String s:result){
                return s;
            }
        }else{
            return null;
        }
        return null;
    }
}
原有主启动类中增加相关接口,并指定QueueUtils的注入beanid:
package com.example.redisdemo;

import com.example.redisdemo.Utils.QueueUtils;
import com.example.redisdemo.Utils.RedisLockUtils;
import org.springframework.beans.factory.annotation.Autowired;
import org.springframework.beans.factory.annotation.Qualifier;
import org.springframework.boot.SpringApplication;
import org.springframework.boot.autoconfigure.SpringBootApplication;
import org.springframework.web.bind.annotation.RequestMapping;
import org.springframework.web.bind.annotation.RequestParam;
import org.springframework.web.bind.annotation.RestController;

import java.util.HashMap;
import java.util.Map;

@SpringBootApplication
@RestController
@RequestMapping("")
public class RedisdemoApplication {

    @Autowired
    @Qualifier("queueUtilsRedisPriorityImpl")
    QueueUtils queueUtils;

    public static void main(String[] args) {
        SpringApplication.run(RedisdemoApplication.class, args);
    }

    @RequestMapping("push")
    public String push(@RequestParam String key, @RequestParam String value) {
        return String.valueOf(queueUtils.put(key, value));
    }

    @RequestMapping("pop")
    public String pop(@RequestParam String key) {
        return String.valueOf(queueUtils.pop(key));
    }

    @RequestMapping("len")
    public String len(@RequestParam String key) {
        return String.valueOf(queueUtils.count(key));
    }

    @RequestMapping("zpush")
    public String zpush(@RequestParam String key, @RequestParam String value,@RequestParam String priority) {
        Map<String, String> map = new HashMap<>();
        map.put("value", value);
        map.put("priority", priority);
        return String.valueOf(queueUtils.put(key, map));
    }

    @RequestMapping("zpop")
    public String zpop(@RequestParam String key) {
        return String.valueOf(queueUtils.pop(key));
    }

    @RequestMapping("zlen")
    public String zlen(@RequestParam String key) {
        return String.valueOf(queueUtils.count(key));
    }
}
为了区分出优先级,我们按照之前的put顺序,但是其优先级无序设定:
http://localhost:8080/zpush?key=testqueue&value=hello&priority=1
http://localhost:8080/zpush?key=testqueue&value=world&priority=100
http://localhost:8080/zpush?key=testqueue&value=redis&priority=10
http://localhost:8080/zpush?key=testqueue&value=zset&priority=30
http://localhost:8080/zpush?key=testqueue&value=queue&priority=30
查看redis数据库中该key状态:

查看队列长度为5:
http://localhost:8080/zlen?key=testqueue
按优先级推出队列:
http://localhost:8080/zpop?key=testqueue
结果会按优先级输出(从低到高):
hello redis queue zset world
如果想要按优先级从高到低,在put时,至于zset的权重priority取反即可(*(-1))。
同样有个问题,zset是基于hash表实现的,那么,是否允许重复的元素的?准备的说是是否存在重复的value。
答案是否定的,不允许出现重复value,但是可以出现相同的score(上述测试可以看出),重复value的问题可以自行测试(结果是新的score覆盖旧的score,jedis返回的结果是0而非1)。
同样使用redis实现消息队列,准备来说是消息通知的方式还有redis发布订阅,但是存在一个重要问题,即是如果没有订阅者,发布者发布消息无效,也无法持久化消息到数据库,优点是订阅者者可以有多个,接收发布者的同一条消息。
在上述的队列实现中,我们队列中存放的都是String类型数据,具备很大局限性,如果是复杂数据类型(复杂dto,数组,二进制数据),应该如何实现?将会在后续在本文基础上实现。
