


最近的工作,需要基于Apollo做一套可以支持实时修改系统配置信息的参数校验框架。
Apollo的源码不久前曾经研究过,不过那时候写的笔记不知道放到哪了。因此,今天写篇文章,记录下Apollo的源码和相关核心逻辑。
1. 依赖包引入
<dependency>
    <groupId>com.ctrip.framework.apollo</groupId>
    <artifactId>red-apollo-client</artifactId>
</dependency>
由于我在parent工程中增加了<dependencyManangement>
配置,因此在工程中就不用再指定版本号了。
2. 包结构
apollo-client包结构如下:
凡是和Spring Boot集成的包,首先要找的一定是/META-INF中的spring.factories文件。apollo-client中的该文件信息如下:
org.springframework.boot.autoconfigure.EnableAutoConfiguration=\
com.ctrip.framework.apollo.spring.boot.ApolloAutoConfiguration
org.springframework.context.ApplicationContextInitializer=\
com.ctrip.framework.apollo.spring.boot.ApolloApplicationContextInitializer
org.springframework.boot.env.EnvironmentPostProcessor=\
com.ctrip.framework.apollo.spring.boot.ApolloApplicationContextInitializer
核心类有两个:
ApolloAutoConfiguration:这个从名字就很好理解,它是基于Spring Boot的AutoConfiguration配置类。一般情况下,和模块功能相关的bean对象的实例化过程,都会由这个类负责。
ApolloApplicationContextInitializer:实现了ApplicationContextInitializer和EnvironementPostProcessor两个接口。
Spring Boot启动过程,会先调用EnvironmentPostProcessor.postProcessEnvironment方法,再调用ApplicationContextInitializer.initialize方法。也就是Spring Boot优先准备环境,再初始化容器。
3. 测试准备
一般Spring Boot应用可以直接使用@SpringBootTest注解进行测试,但这样加载的bean对象太多了,最好先编写一些测试辅助代码,便于对Apollo框架进行测试。
使用@RunWith(SpringRunner.class)进行单元测试和使用@SpringBootTest进行单元测试的最大区别,是前者的EnvironmentPostProcessor.postProcessEnvironment方法是不会被调用的。因此,我们需要继承ApolloApplicationContextInitializer
完成部分逻辑的重写:
/**
 * @author jingxuan
 * @date 2021/1/16 2:42 下午
 */
public class JUnitApolloApplicationContextInitializer extends ApolloApplicationContextInitializer {
    public void initialize(ConfigurableApplicationContext context) {
        ConfigurableEnvironment environment = context.getEnvironment();
        RandomValuePropertySource.addToEnvironment(environment);
        this.postProcessEnvironment(environment, null);

        super.initialize(context);
    }
}
这个类首先向Environment中添加了RandomValuePropertySource 对象,这个对象是Spring Boot应用启动时由框架自动添加的,但JUnit测试框架启动时却没有添加。由于apollo框架需要使用到这个对象,所以需要先手动创建一个。
另外就是在调用ApolloApplicationContextInitializer.initialize方法之前,先调用了ApolloApplicationContextInitializer.postProcessEnvironment方法,这样单元测试执行的逻辑就和Spring Boot应用执行的逻辑一样了。
有了这个类之后,我们可以通过如下的方式编写仅和apollo相关的测试案例:
@RunWith(SpringRunner.class)
@TestPropertySource(properties = {"apollo.bootstrap.enabled=true", "app.id=risk-insight"})
@ContextConfiguration(initializers = JUnitApolloApplicationContextInitializer.class)
@ImportAutoConfiguration({
        ApolloAutoConfiguration.class,
        ConfigurationPropertiesAutoConfiguration.class,
        PropertyPlaceholderAutoConfiguration.class,
        ApolloJsonValueTest.ApolloJsonValueConfiguration.class
})
public class ApolloJsonValueTest {
    @Configuration
    static class ApolloJsonValueConfiguration {
        @Bean
        User user() {
            return new User("jingxuan");
        }
    }

    static class User {
        @Getter @Setter
        protected String userName;
        @Getter @Setter
        @ApolloJsonValue("${apollo.junit.test.address:{}}")
        protected Address address;
        public User(String userName) {
            this.userName = userName;
        }
    }

    static class Address {
        @Getter @Setter
        protected String city;
        @Getter @Setter
        protected String province;
    }

    @Autowired(required = false)
    User user;

    @Test
    public void shouldInitUserBeanWithApolloJsonProperty() {
        assertThat(user, is(notNullValue()));
        assertThat(user.getAddress(), is(notNullValue()));
        assertThat(user.getAddress().getCity(), is("Shanghai"));
        assertThat(user.getAddress().getProvince(), is("Shanghai"));
    }
}
这段代码的主要部分简单解释下:
@RunWith(SpringRunner.class):Spring框架JUnit测试时的注解 @TestPropertySource:注册两个inline类型的和apollo相关的配置属性 @ContextConfiguration:指定使用前面编写的ApplicationContextInitializer类加载ApplicationContext @ImportAutoConfiguration:指定需要加载的配置类,和apollo直接相关的是ApolloAutoConfiguration类,其余的部分是Spring Boot框架自带的,这里略过不介绍了。
4. 源码解析(一)
简单的就以上面给的测试类debug下框架。
首先是触发ApolloApplicationContextInitializer.postProcessEnvironment方法,初始化相关的环境变量。
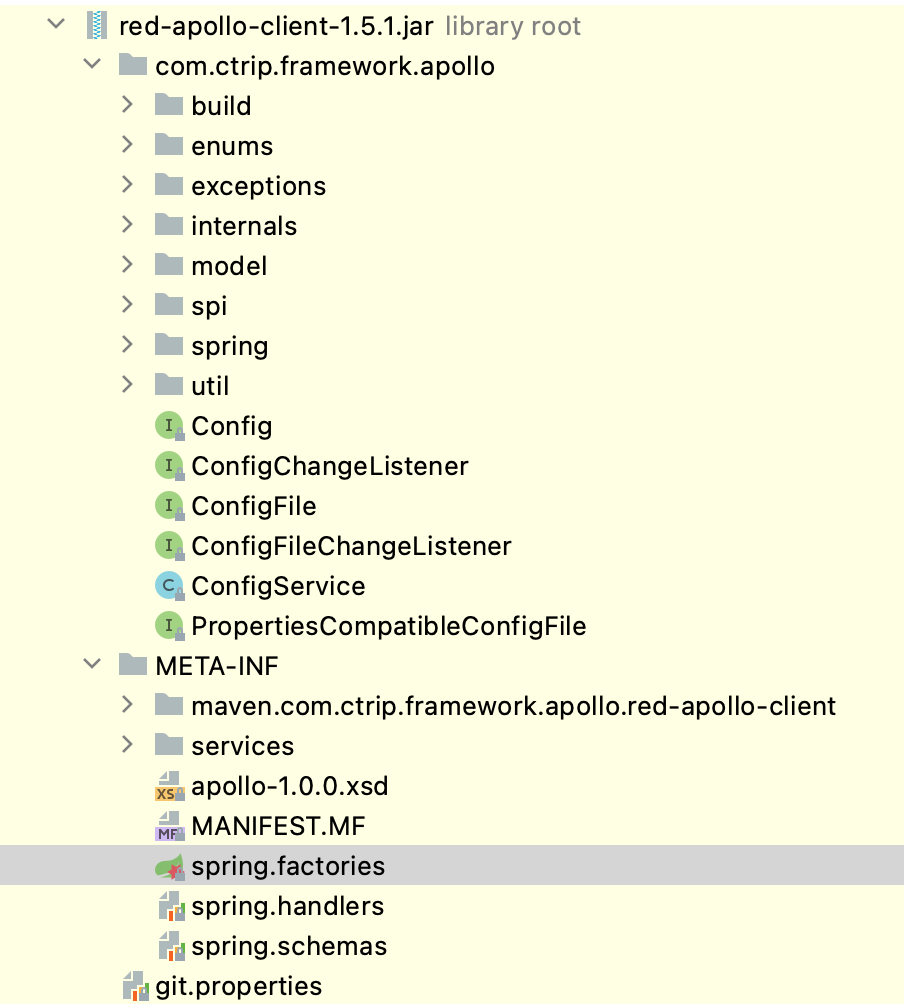
第一步,执行的是这段代码:
  void initializeSystemProperty(ConfigurableEnvironment environment) {
    for (String propertyName : APOLLO_SYSTEM_PROPERTIES) {
      fillSystemPropertyFromEnvironment(environment, propertyName);
    }
  }
APOLLO_SYSTEM_PROPERTIES的内容如下:
fillSystemPropertyFromEnvironment方法的作用是将Envionment中相同名称的配置写入到系统环境变量中。
所以在Spring Boot中规定的可以用来做系统属性配置的地方,只要配置了这些属性值,就会通过这段代码,被写入到系统环境变量中。
第二步,根据参数APOLLO_BOOTSTRAP_EAGER_LOAD_ENABLED判断是否需要提前初始化apollo。这个APOLLO_BOOTSTRAP_EAGER_LOAD_ENABLED参数默认是false,也就是不会提前初始化。
public void postProcessEnvironment(ConfigurableEnvironment configurableEnvironment, SpringApplication springApplication) {
    ...
    Boolean eagerLoadEnabled = configurableEnvironment.getProperty(PropertySourcesConstants.APOLLO_BOOTSTRAP_EAGER_LOAD_ENABLED, Boolean.class, false);
    //EnvironmentPostProcessor should not be triggered if you don't want Apollo Loading before Logging System Initialization
    if (!eagerLoadEnabled) {
      return;
    }
    Boolean bootstrapEnabled = configurableEnvironment.getProperty(PropertySourcesConstants.APOLLO_BOOTSTRAP_ENABLED, Boolean.class, false);
    if (bootstrapEnabled) {
      initialize(configurableEnvironment);
    }
  }
在完成ApolloApplicationContextInitializer.postProcessEnvironment方法的执行后,会继续执行 ApolloApplicationContextInitializer.initialize方法。
第一步,判断是否需要初始化apollo框架:
  public void initialize(ConfigurableApplicationContext context) {
    ConfigurableEnvironment environment = context.getEnvironment();

    String enabled = environment.getProperty(PropertySourcesConstants.APOLLO_BOOTSTRAP_ENABLED, "false");
    if (!Boolean.valueOf(enabled)) {
      logger.debug("Apollo bootstrap config is not enabled for context {}, see property: ${{}}", context, PropertySourcesConstants.APOLLO_BOOTSTRAP_ENABLED);
      return;
    }
    logger.debug("Apollo bootstrap config is enabled for context {}", context);

    initialize(environment);
  }
常量APOLLO_BOOTSTRAP_ENABLED对应的key值是apollo.bootstrap.enabled。
第二步,判断是否已经初始化了。因为在前面有一个eagerLoadEnabled的开关设置,所以肯定是需要增加这层校验的。
    if (environment.getPropertySources().contains(PropertySourcesConstants.APOLLO_BOOTSTRAP_PROPERTY_SOURCE_NAME)) {
      //already initialized
      return;
    }
第三步,获取系统配置的namespaces列表,namespaces在apollo中用于对配置信息进行结构化管理。
    String namespaces = environment.getProperty(PropertySourcesConstants.APOLLO_BOOTSTRAP_NAMESPACES, ConfigConsts.NAMESPACE_APPLICATION);
    logger.debug("Apollo bootstrap namespaces: {}", namespaces);
    List<String> namespaceList = NAMESPACE_SPLITTER.splitToList(namespaces);
第四步,初始化到apollo服务器的连接并首次拉取配置文件,将配置作为一个PropertySource加载到Environment中,位置是在random之后。这也就是为什么我们一定要在Environment中实例化random属性源的原因了。
    CompositePropertySource composite = new CompositePropertySource(PropertySourcesConstants.APOLLO_BOOTSTRAP_PROPERTY_SOURCE_NAME);
    for (String namespace : namespaceList) {
      Config config = ConfigService.getConfig(namespace);

      composite.addPropertySource(configPropertySourceFactory.getConfigPropertySource(namespace, config));
    }

    environment.getPropertySources().addAfter("random",composite);
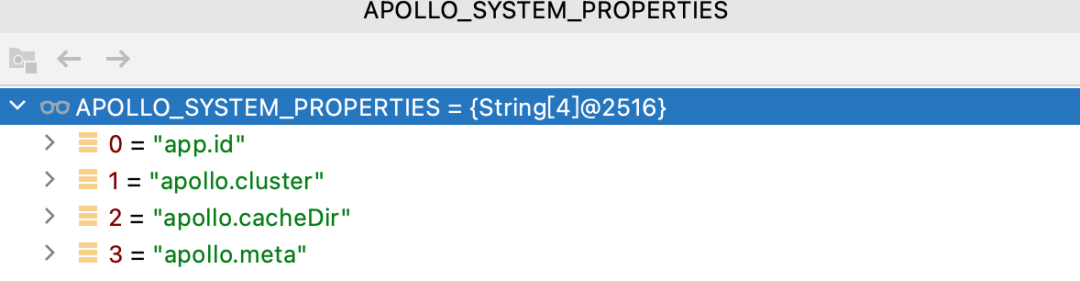
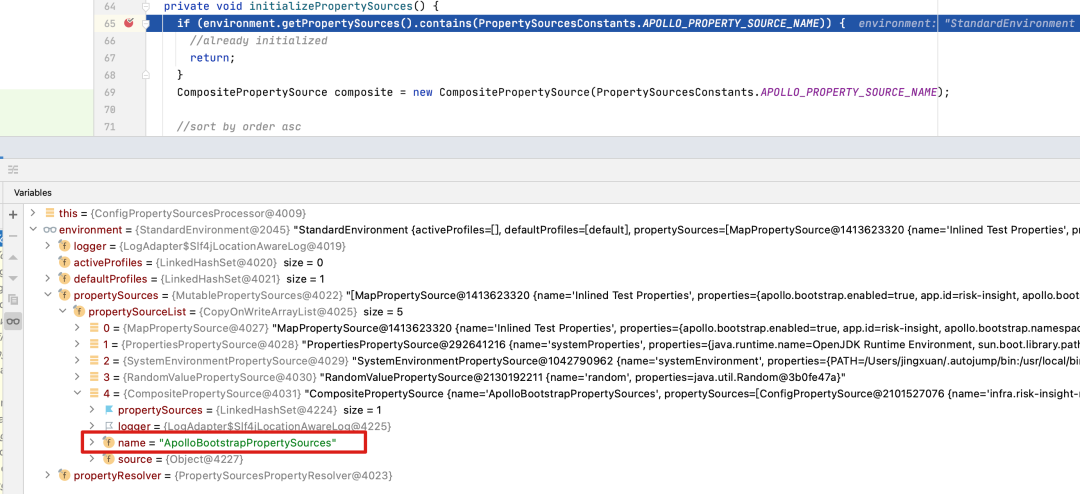
下面这张图是生成的CompositePropertySource对象结构:
主要关注几点:
PropertySource的名称叫:ApolloBoostrapPropertySources 内部保存的属性源是一个列表,名称叫:propertySources 列表中每个元素对应一个namespace,类型是ConfigPropertrySource 元素中的m_configProperties中是服务器端属性配置的全量集合。
到这里如果一切正常的话,apollo-client就已经和apollo服务端建立连接了。
5. ApolloAutoConfiguration
现在需要详细介绍下ApolloAutoConfiguration这个类。
这个类的代码很短,直接贴一下:
@Configuration
@ConditionalOnProperty(PropertySourcesConstants.APOLLO_BOOTSTRAP_ENABLED)
@ConditionalOnMissingBean(PropertySourcesProcessor.class)
public class ApolloAutoConfiguration {

  @Bean
  public ConfigPropertySourcesProcessor configPropertySourcesProcessor() {
    return new ConfigPropertySourcesProcessor();
  }
}
类定义上的注解比较正常,都是Spring Boot中常用到的,不过多解释了。
代码中可以看出来,主要就是创建了一个ConfigPropertySourcesProcessor类。
6. ConfigPropertySourcesProcessor
首先看下这个类的定义:
public class ConfigPropertySourcesProcessor extends PropertySourcesProcessor
    implements BeanDefinitionRegistryPostProcessor
BeanDefinitionRegistryPostProcessor:这是Spring框架中定义的接口,其方法postProcessBeanDefinitionRegistry会在BeanFactory对象创建完成后,bean对象实例化前被调用
7. PropertySourcesProcessor
PropertySourcesProcessor这个是apollo中创建的类,类定义如下:
public class PropertySourcesProcessor implements BeanFactoryPostProcessor, EnvironmentAware, PriorityOrdered
BeanFactoryPostProcessor:这也是Spring框架中定义的接口,其方法postProcessBeanFactory在BeanFactory对象创建完成,bean对象实例化之前被调用。
EnvironmentAware:这个简单,就是用来注入Spring的Environment对象的
PriorityOrdered:排序用的,不过多解释。
准确来说,BeanDefinitionRegistryPostProcessor.postProcessBeanDefinitionRegistry是作用在BeanDefinitionRegistry对象上的,而BeanFactoryPostProcessor.postProcessBeanFactory是作用在ConfigurableListableBeanFactory对象上的。不过由于Spring框架中实际这两个接口都会由一个类型为DefaultListableBeanFactory的类实现。调用顺序是先调用BeanDefinitionRegistryPostProcessor.postProcessBeanDefinitionRegistry,之后再调用BeanFactoryPostProcessor.postProcessBeanFactory。所以,上面的这种说法也没错。
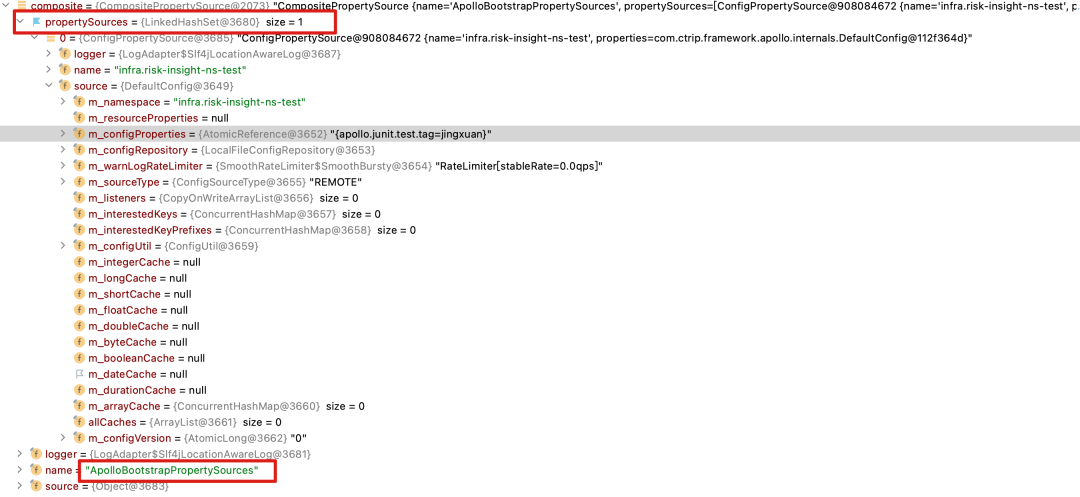
DefaultListableBeanFactory类的继承链:
8. 源码解析(二)
ApolloAutoConfiguration会创建ConfigPropertySourcesProcessor对象,这个前面代码已经展示过了,不过多解释。
之后,ConfigPropertySourcesProcessor.postProcessBeanDefinitionRegistry会被调用:
  @Override
  public void postProcessBeanDefinitionRegistry(BeanDefinitionRegistry registry) throws BeansException {
    helper.postProcessBeanDefinitionRegistry(registry);
  }
helper是DefaultConfigPropertySourcesProcessorHelper类型的对象,它的如下方法会被执行:
  public void postProcessBeanDefinitionRegistry(BeanDefinitionRegistry registry) throws BeansException {
    Map<String, Object> propertySourcesPlaceholderPropertyValues = new HashMap<>();
    // to make sure the default PropertySourcesPlaceholderConfigurer's priority is higher than PropertyPlaceholderConfigurer
    propertySourcesPlaceholderPropertyValues.put("order", 0);

    BeanRegistrationUtil.registerBeanDefinitionIfNotExists(registry, PropertySourcesPlaceholderConfigurer.class.getName(),
        PropertySourcesPlaceholderConfigurer.class, propertySourcesPlaceholderPropertyValues);
    BeanRegistrationUtil.registerBeanDefinitionIfNotExists(registry, ApolloAnnotationProcessor.class.getName(),
        ApolloAnnotationProcessor.class);
    BeanRegistrationUtil.registerBeanDefinitionIfNotExists(registry, SpringValueProcessor.class.getName(),
        SpringValueProcessor.class);
    BeanRegistrationUtil.registerBeanDefinitionIfNotExists(registry, ApolloJsonValueProcessor.class.getName(),
        ApolloJsonValueProcessor.class);

    processSpringValueDefinition(registry);
  }
这段方法的逻辑:
第一步:注册PropertySourcesPlaceholderConfigurer对象,这是个Spring框架中的类,用于处理bean中和属性相关的placeholder,不多解释;
第二步:注册ApolloAnnotationProcessor对象,这是apollo中用于处理注解的处理器。简单解释下:
首先看下类继承关系:
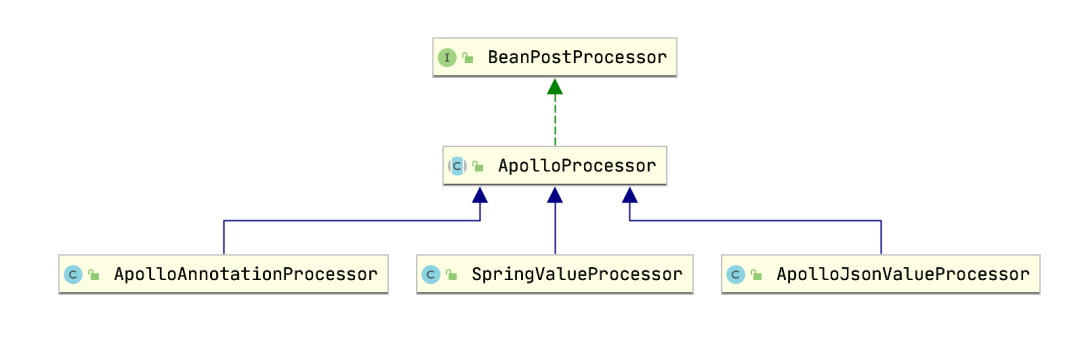
BeanPostProcessor接口,说明这些对象在每一个bean被实例化的时候都有可能会被调用
再来看下ApolloProcessor这个关键类:
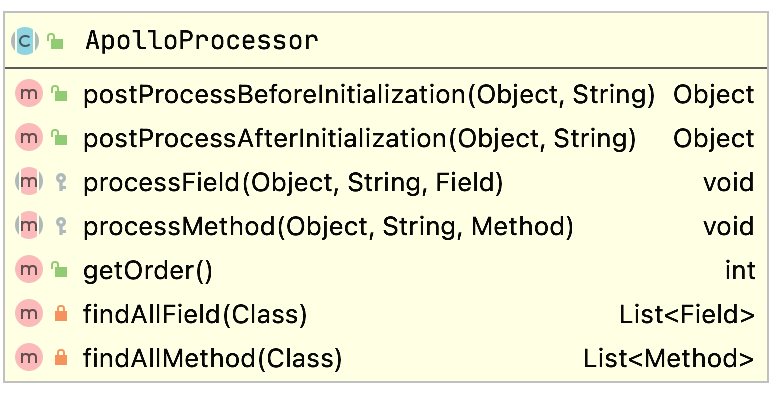
前两个方法来源自BeanPostProcessor,Spring框架在所有bean实例化时都会触发调用这两个方法;
中间两个方法看名字,是用来处理每一个bean对象的每一个属性和方法。
综合来看,ApolloProcessor可以根据需要,对bean中每一个方法和属性进行处理。
现在再来看ApolloAnnotationProcessor就好理解了,给出其processField方法的实现:
  @Override
  protected void processField(Object bean, String beanName, Field field) {
    ApolloConfig annotation = AnnotationUtils.getAnnotation(field, ApolloConfig.class);
    if (annotation == null) {
      return;
    }

    Preconditions.checkArgument(Config.class.isAssignableFrom(field.getType()),
        "Invalid type: %s for field: %s, should be Config", field.getType(), field);

    String namespace = annotation.value();
    Config config = ConfigService.getConfig(namespace);

    ReflectionUtils.makeAccessible(field);
    ReflectionUtils.setField(field, bean, config);
  }
它对bean对象中使用@ApolloConfig注解进行标注的属性,进行了值注入。
那processMethod方法肯定是对方法进行处理了,不多解释。
第三步:注册SpringValueProcessor对象,它是用来处理Bean对象中的@Value注解的。
第四步:注册ApolloJsonValueProcessor对象,它是用来处理Bean对象中的@ApolloJsonValue注解的。
第五步:看起来是给处理流程打补丁的,手动触发执行一次SpringValueDefinitionProcessor.postProcessBeanDefinitionRegistry方法。
到这里,BeanDefinitionRegistryPostProcessor.postProcessBeanDefinitionRegistry的逻辑就执行完了,其中具体的细节不过多介绍,想了解的需要自己去阅读源代码,但整个大框架基本就这些。
此后,按照Spring框架的生命周期,会执行到BeanFactoryPostProcessor.postProcessBeanFactory方法,代码如下:
  public void postProcessBeanFactory(ConfigurableListableBeanFactory beanFactory) throws BeansException {
    initializePropertySources();
    initializeAutoUpdatePropertiesFeature(beanFactory);
  }
initializePropertySources的方法源码如下:
 private void initializePropertySources() {
    if (environment.getPropertySources().contains(PropertySourcesConstants.APOLLO_PROPERTY_SOURCE_NAME)) {
      //already initialized
      return;
    }
    CompositePropertySource composite = new CompositePropertySource(PropertySourcesConstants.APOLLO_PROPERTY_SOURCE_NAME);

    //sort by order asc
    ImmutableSortedSet<Integer> orders = ImmutableSortedSet.copyOf(NAMESPACE_NAMES.keySet());
    Iterator<Integer> iterator = orders.iterator();

    while (iterator.hasNext()) {
      int order = iterator.next();
      for (String namespace : NAMESPACE_NAMES.get(order)) {
        Config config = ConfigService.getConfig(namespace);

        composite.addPropertySource(configPropertySourceFactory.getConfigPropertySource(namespace, config));
      }
    }

    // clean up
    NAMESPACE_NAMES.clear();

    // add after the bootstrap property source or to the first
    if (environment.getPropertySources()
        .contains(PropertySourcesConstants.APOLLO_BOOTSTRAP_PROPERTY_SOURCE_NAME)) {

      // ensure ApolloBootstrapPropertySources is still the first
      ensureBootstrapPropertyPrecedence(environment);

      environment.getPropertySources()
          .addAfter(PropertySourcesConstants.APOLLO_BOOTSTRAP_PROPERTY_SOURCE_NAME, composite);
    } else {
      environment.getPropertySources().addAfter(RANDOM_PROPERTY_SOURCE_NAME,composite);
    }
  }
第一步:判断是否已经加载过APOLLO_PROPERTY_SOURCE_NAME配置信息,这个APOLLO_PROPERTY_SOURCE_NAME的值是ApolloPropertySources。
这里很容易产生疑惑,因为这段代码好像见过。没错,在ApolloApplicationContextInitializer中有过相似的处理,不过名称其实是不一样的。那个地方处理的名字叫ApolloBootstrapPropertySources,多了个Bootstrap,说明是在不同阶段加载的属性。
第二步:加载NAMESPACE_NAMES中所有的配置信息到CompositePropertySource中;
第三步:将新创建的CompositePropertySource加入Environment中,位置在ApolloBootstrapPropertySources之后。
initializeAutoUpdatePropertiesFeature这个方法的作用是开启配置的自动更新特性,源代码如下:
  private void initializeAutoUpdatePropertiesFeature(ConfigurableListableBeanFactory beanFactory) {
    if (!configUtil.isAutoUpdateInjectedSpringPropertiesEnabled() ||
        !AUTO_UPDATE_INITIALIZED_BEAN_FACTORIES.add(beanFactory)) {
      return;
    }

    AutoUpdateConfigChangeListener autoUpdateConfigChangeListener = new AutoUpdateConfigChangeListener(
        environment, beanFactory);

    List<ConfigPropertySource> configPropertySources = configPropertySourceFactory.getAllConfigPropertySources();
    for (ConfigPropertySource configPropertySource : configPropertySources) {
      configPropertySource.addChangeListener(autoUpdateConfigChangeListener);
    }
  }
AutoUpdateConfigChangeListener这个类用于监听apollo服务器端的配置更改的,如果有配置更改,则该类的onChange方法会被触发。
在apollo中可以查看一个名为springValueRegistry的对象,以确认哪些值的更新会触发刷新操作,这个springValueRegistry是使用Guice维护的一个单例。
代码如下:
this.springValueRegistry = SpringInjector.getInstance(SpringValueRegistry.class);
好了,如果上面这些你都看懂了的话,apollo框架的任何细节对于你来说都不会再是秘密了。整体而言,我觉得在国内的开源框架中,apollo整体的代码质量算是比较高的了。
