


上一篇我们讲了Spring Integration的基础概念,今天来讲一下它如何使用
注意:本示例是基于注解的spring boot构建,SpringBoot的版本对应的是2.1.9.REALEASE。
第一种:普通方式的配置
CommonConfig 类里的send() 是发送方,receive() 是接收方。
@SpringBootApplication@EnableIntegration //启用spring Integration基础设施的主要配置注解@IntegrationComponentScan //配置扫描组件public class SpringbootApplication {public static void main(String[] args) {ConfigurableApplicationContext run = SpringApplication.run(SpringbootApplication.class, args);}@Bean("commonChannel")public QueueChannel commonChannel(){return new QueueChannel();}}
/*** 普通配置*/@Componentpublic class CommonConfig {/**** InboundChannelAdapter:--> 表明一个方法具有produce一个消息的能力* --> 定义到方法上表明此方法的返回值会被当做一个消息的载体* --> 方法不建议接收任何参数* @return*/@InboundChannelAdapter(value = "commonChannel",poller = {@Poller})public String send() {return "hello";}/*** ServiceActivator: --> 定义一个具备消息处理能力的注解* --> 接受一个参数(Message)类型或者期望的载体类型* --> inputChannel* --> outputChannel(返回值)* @param msg*/@ServiceActivator(inputChannel = "commonChannel",poller = {@Poller})public void receive(String msg){System.out.println(msg);}}
运行结果

同样可以多参数配置
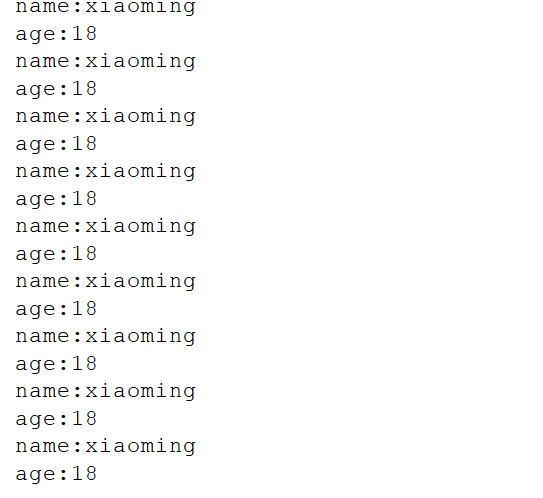
@Componentpublic class MultiParameter {@InboundChannelAdapter(value = "commonChannel",poller = {@Poller})public Map<String, Object> send() {Map<String,Object> map=new HashMap<>();map.put("name","xiaoming");map.put("age","18");return map;}@ServiceActivator(inputChannel = "commonChannel",poller = {@Poller})public void receive(Map<String,Object> map){System.out.println("name:"+map.get("name"));System.out.println("age:"+map.get("age"));}}
运行结果
第二种:路由方式
这里配置一个入口通道,当消息进入入口后,通过判断payload.type参数的值。如果是1,则进入A通道;如果是2,则进入B通道。
进入通道中分别进入两者的接收方法中。
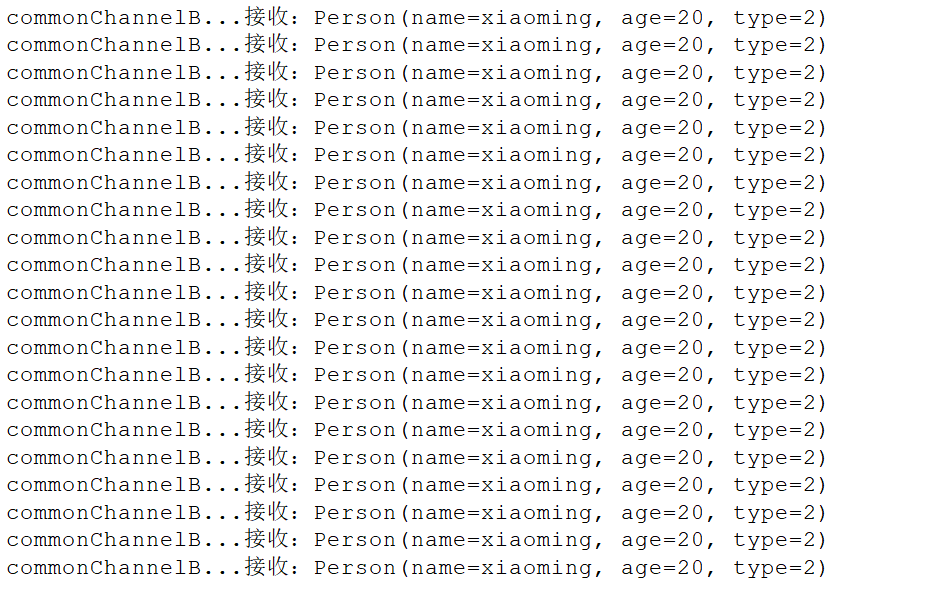
@Componentpublic class Routing {//A通道接收方法@ServiceActivator(inputChannel = "channelA",poller = {@Poller})public void receiveA(Person person){System.out.println("commonChannelA...接收:"+person.toString());}//B通道接收方法@ServiceActivator(inputChannel = "channelB",poller = {@Poller})public void receiveB(Person person){System.out.println("commonChannelB...接收:"+person.toString());}//入口通道@InboundChannelAdapter(value = "routingChannel",poller = {@Poller})public Person send() {Person p=new Person();p.setName("xiaoming");p.setAge("20");p.setType("2"); //参数的值可以改变使用的通道return p;}}
在SpringbootApplication 类中写入以下代码
@Bean@Router(inputChannel = "routingChannel",poller = {@Poller})public ExpressionEvaluatingRouter router(){ExpressionEvaluatingRouter router=newExpressionEvaluatingRouter("payload.type");router.setChannelMapping("1","channelA");router.setChannelMapping("2","channelB");return router;}@Bean("channelA")public QueueChannel channelA(){return new QueueChannel();}@Bean("channelB")public QueueChannel channelB(){return new QueueChannel();}//注入入口通道@Bean("routingChannel")public QueueChannel routingChannel(){return new QueueChannel();}
type的值如果是1,则进入A通道;如果是2,则进入B通道。
第三种:网关方式
配置了一个网关接口类,当调用这个接口的方法时,就会进入网关配置的通道
@Component@MessagingGatewaypublic interface MessageGateway {//发送@Gateway(requestChannel = "gateWayChannel")void send(Person person);}
@Componentpublic class GateWay {//接收@ServiceActivator(inputChannel = "gateWayChannel",poller = {@Poller})public void gateWayChannel(Person person){System.out.println("gateWayChannel...接收:"+person.toString());}}
//修改SpringbootApplication类如下@SpringBootApplication@EnableIntegration //启用spring Integration基础设施的主要配置注释@IntegrationComponentScan //配置扫描Integration组件public class SpringbootApplication {public static void main(String[] args) {ConfigurableApplicationContext run = SpringApplication.run(SpringbootApplication.class, args);MessageGateway bean = run.getBean(MessageGateway.class);Person person = new Person();person.setName("xiaoming");person.setAge("18");person.setType("1");bean.send(person);}@Bean("gateWayChannel")public QueueChannel routingChannel() {return new QueueChannel();}}
运行结果

文章转载自产教Code,如果涉嫌侵权,请发送邮件至:contact@modb.pro进行举报,并提供相关证据,一经查实,墨天轮将立刻删除相关内容。
