



如何使用schedule来做定时任务:
1.首先在springmvc.xml配置文件上加上约束文档:
xmlns:task="http://www.springframework.org/schema/task"http://www.springframework.org/schema/task http://www.springframework.org/schema/task/spring-task-4.0.xsd
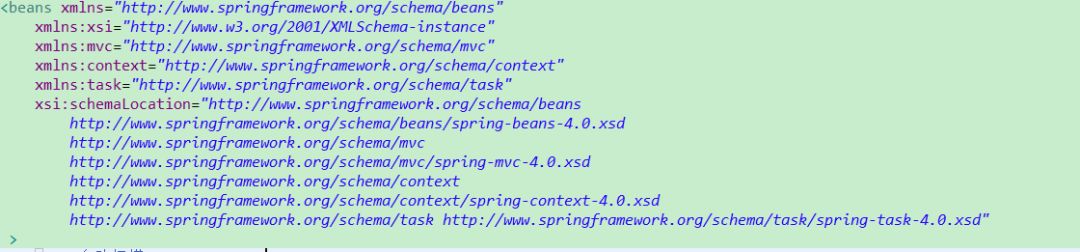
要注意添加的时候要对应好,不然解析的时候会出现问题。
2.开启注解配置,扫描对应的类,开启定时任务,配置任务调度器
<!-- 自动扫描controller --><context:component-scan base-package="com.jobs.controller"/><!-- 开启定时 --><task:annotation-driven/><!-- 任务调度器 --><task:scheduler id="scheduler" pool-size="10" /><!--开启注解调度支持 @Scheduled --><task:annotation-driven executor="scheduler" proxy-target-class="true"/>
这里配置容易出现的问题
Configuration problem: Only one AsyncAnnotationBeanPostProcessor may exist within the context.
这是因为定时配置重复了,把开启定时的那一行删去就好了。
3.注释设置定时任务
@Scheduled(cron = "0/2 * * * * ?")public void getdata() {System.out.println("aa");}
注意这个类一定要被springmvc那个扫描能扫到啊!
@Scheduled(cron = "0/2 * * * * ?")不懂的话请自行百度。
出现问题:发现定时器没有执行,需要请求才能执行:
这是因为servlet采取懒加载机制,只有在调用的时候才会去加载。
解决办法:
修改web.xml
在创建servlet的过程中加上设置load-on-startup>=1;
<servlet><servlet-name>springmvc</servlet-name><servlet-class>org.springframework.web.servlet.DispatcherServlet</servlet-class><init-param><param-name>contextConfigLocation</param-name><param-value>classpath:config/springmvc.xml</param-value></init-param><load-on-startup>1</load-on-startup></servlet>
load-on-startup=1的作用请自行百度。
给大家安利一个公众号,纯干货,下边是部分文章截取,以及二维码,大家快点盘他:


如果大家觉得讲的文章没看明白,没关系,加他微信:

文章转载自大学生IT学习之家,如果涉嫌侵权,请发送邮件至:contact@modb.pro进行举报,并提供相关证据,一经查实,墨天轮将立刻删除相关内容。
