


部署规划
这一节介绍 OceanBase 集群三节点手动部署方法,需要通过中控机直接远程登录到 OceanBase 节点上部署启动 observer 进程,并在中控机上部署 obproxy 进程。
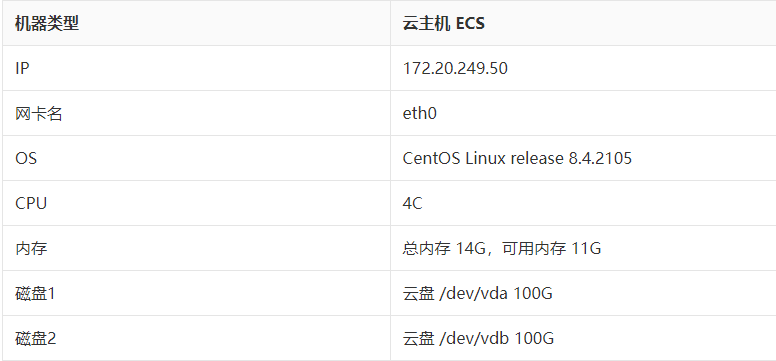
- 机器信息如下:
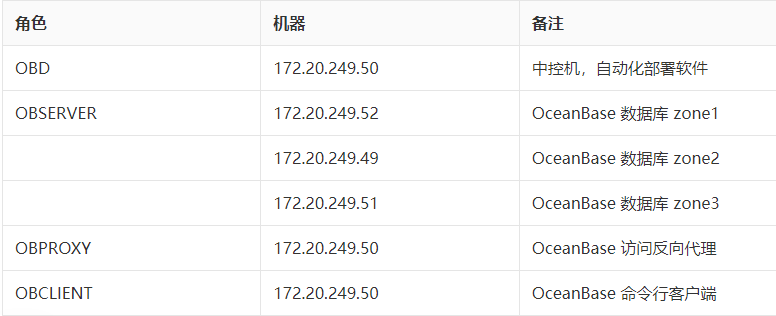
- 机器划分如下:
部署之前首先要初始化服务器环境,这个请参考前面章节《如何初始化服务器环境》。
- 机器三节点之间时间同步检查
检查本机和目标节点时间误差常用命令是: clockdiff 。 示例:
[admin@obce02 oceanbase]$ sudo clockdiff 172.20.249.52
[sudo] password for admin:
.
host=172.20.249.52 rtt=750(187)ms/0ms delta=0ms/0ms Sun Sep 12 14:52:24 2021
[admin@obce02 oceanbase]$ sudo clockdiff 172.20.249.51
.
host=172.20.249.51 rtt=750(187)ms/0ms delta=0ms/0ms Sun Sep 12 14:52:30 2021
可能会有些机器使用 clockdiff 会报错。此时可以换下面命令判断时间同步误差。
[admin@obce02 oceanbase]$ ping -T tsandaddr 172.20.249.52 -c 2
PING 172.20.249.52 (172.20.249.52) 56(124) bytes of data.
64 bytes from 172.20.249.52: icmp_seq=1 ttl=64 time=0.161 ms
TS: 172.20.249.49 24851014 absolute
172.20.249.52 -1172.20.249.52 0172.20.249.49 1
64 bytes from 172.20.249.52: icmp_seq=2 ttl=64 time=0.172 ms
TS: 172.20.249.49 24852054 absolute
172.20.249.52 -1172.20.249.52 0172.20.249.49 1
三节点时间同步误差如果超过 50ms,则后面初始化集群一定会失败。 这里还要留意节点的时间误差可能有个缓慢递增的特点,也许当前集群还能正常工作,一天后由于节点时间误差扩大到 50ms 以外,该节点就掉线了。
安装 OceanBase 软件包
手动部署,需要安装 OceanBase 的 OBSERVER 软件 。
[admin@obce02 ~]$ ls -lrth /tmp/oceanbase-ce-*.rpm
-rw-r--r-- 1 admin admin 45M Sep 12 13:36 /tmp/oceanbase-ce-3.1.0-3.el8.x86_64.rpm
[admin@obce02 ~]$ sudo rpm -ivh /tmp/oceanbase-ce-*.rpm
warning: /tmp/oceanbase-ce-3.1.0-3.el8.x86_64.rpm: Header V4 RSA/SHA1 Signature, key ID e9b4a7aa: NOKEY
Verifying... ################# [100%]
Preparing... ################# [100%]
Updating / installing...
1:oceanbase-ce-libs-3.1.0-3.el8 ################# [ 50%]
2:oceanbase-ce-3.1.0-3.el8 ################# [100%]
软件包默认安装目录是 : /home/admin/oceanbase 。目录结构如下:
[admin@obce01 ~]$ tree oceanbase
oceanbase
├── bin
│ ├── import_time_zone_info.py
│ └── observer
├── etc
│ └── timezone_V1.log
└── lib
├── libaio.so -> libaio.so.1.0.1
├── libaio.so.1 -> libaio.so.1.0.1
├── libaio.so.1.0.1
├── libmariadb.so -> libmariadb.so.3
└── libmariadb.so.3
提示:您也可以对 RPM 包直接解压到指定目录,就不用安装到默认目录。
(可选)清理目录和数据
第一次部署不需要执行这步。
这步主要是用于后面安装部署失败后,需要清空目录和数据重新部署。
kill -9 `pidof observer`
/bin/rm -rf ~/oceanbase/store/obdemo/*/*
检查目录结构,跟下面一致。
tree ~/oceanbase/store/ /data/ /redo/
输出:
[admin@obce02 ~]$ tree ~/oceanbase/store/ /data/ /redo/
/home/admin/oceanbase/store/
└── obdemo
├── clog -> /redo/obdemo/clog
├── etc2 -> /redo/obdemo/etc2
├── etc3 -> /data/obdemo/etc3
├── ilog -> /redo/obdemo/ilog
├── slog -> /redo/obdemo/slog
└── sstable -> /data/obdemo/sstable
/data/
└── obdemo
├── etc3
└── sstable
/redo/
└── obdemo
├── clog
├── etc2
├── ilog
└── slog
15 directories, 0 files
初始化数据目录
这一步只用于第一次部署时执行。如果是重复部署,目录已经创建的情况下,不需要再执行这一步。 手动部署时,OceanBase 节点上的相关目录都需要手动创建。
su - admin
mkdir -p ~/oceanbase/store/obdemo /data/obdemo/{sstable,etc3} /redo/obdemo/{clog,ilog,slog,etc2}
for f in {clog,ilog,slog,etc2}; do ln -s /redo/obdemo/$f ~/oceanbase/store/obdemo/$f ; done
for f in {sstable,etc3}; do ln -s /data/obdemo/$f ~/oceanbase/store/obdemo/$f; done
备注意:
- 首先创建工作目录下的总数据目录 ~/oceanbase/store/obdemo 、 数据文件目录 /data/obdemo 和日志相关目录 /redo/obdemo 。 注意,跟使用 OBD 自动化部署的 OceanBase 节点目录稍微有点不一样的地方是我在目录里加入了集群名标识(obdemo)。
- 第二个不一样的地方是在 ~/oceanbase/store/obdemo 是真实的目录,下面的子目录是映射到其他两个文件系统路径(指 /data/ 和 /redo/)。生产环境要求这两个文件系统尽可能是两块独立的物理盘,或者最低要求是两个独立的逻辑盘。
我们看一下初始化后的目录结构。这个目录结构很重要,有时候进程 observer 启动失败就跟目录结构和权限不对有关。
[admin@obce02 ~]$ tree ~/oceanbase/store/ /data/ /redo/
/home/admin/oceanbase/store/
└── obdemo
├── clog -> /redo/obdemo/clog
├── etc2 -> /redo/obdemo/etc2
├── etc3 -> /data/obdemo/etc3
├── ilog -> /redo/obdemo/ilog
├── slog -> /redo/obdemo/slog
└── sstable -> /data/obdemo/sstable
/data/
└── obdemo
├── etc3
└── sstable
/redo/
└── obdemo
├── clog
├── etc2
├── ilog
└── slog
15 directories, 0 files
启动 OBSERVER 进程
每个机器的启动参数大部分一样,只有少数不一样,需要特别留意。
- 172.20.249.52
su - admin
echo 'export LD_LIBRARY_PATH=$LD_LIBRARY_PATH:~/oceanbase/lib' >> ~/.bash_profile
. ~/.bash_profile
cd ~/oceanbase && bin/observer -i eth0 -p 2881 -P 2882 -z zone1 -d ~/oceanbase/store/obdemo -r '172.20.249.52:2882:2881;172.20.249.49:2882:2881;172.20.249.51:2882:2881' -c 20210912 -n obdemo -o "memory_limit=8G,cache_wash_threshold=1G,__min_full_resource_pool_memory=268435456,system_memory=3G,memory_chunk_cache_size=128M,cpu_count=16,net_thread_count=4,datafile_size=50G,stack_size=1536K,config_additional_dir=/data/obdemo/etc3;/redo/obdemo/etc2" -d ~/oceanbase/store/obdemo
- 172.20.249.49
su - admin
echo 'export LD_LIBRARY_PATH=$LD_LIBRARY_PATH:~/oceanbase/lib' >> ~/.bash_profile
. ~/.bash_profile
cd ~/oceanbase && bin/observer -i eth0 -p 2881 -P 2882 -z zone2 -d ~/oceanbase/store/obdemo -r '172.20.249.52:2882:2881;172.20.249.49:2882:2881;172.20.249.51:2882:2881' -c 20210912 -n obdemo -o "memory_limit=8G,cache_wash_threshold=1G,__min_full_resource_pool_memory=268435456,system_memory=3G,memory_chunk_cache_size=128M,cpu_count=16,net_thread_count=4,datafile_size=50G,stack_size=1536K,config_additional_dir=/data/obdemo/etc3;/redo/obdemo/etc2" -d ~/oceanbase/store/obdemo
- 172.20.249.51
su - admin
echo 'export LD_LIBRARY_PATH=$LD_LIBRARY_PATH:~/oceanbase/lib' >> ~/.bash_profile
. ~/.bash_profile
cd ~/oceanbase && bin/observer -i eth0 -p 2881 -P 2882 -z zone3 -d ~/oceanbase/store/obdemo -r '172.20.249.52:2882:2881;172.20.249.49:2882:2881;172.20.249.51:2882:2881' -c 20210912 -n obdemo -o "memory_limit=8G,cache_wash_threshold=1G,__min_full_resource_pool_memory=268435456,system_memory=3G,memory_chunk_cache_size=128M,cpu_count=16,net_thread_count=4,datafile_size=50G,stack_size=1536K,config_additional_dir=/data/obdemo/etc3;/redo/obdemo/etc2" -d ~/oceanbase/store/obdemo
如果三个节点机型都一致,那么启动参数里只有一个参数不一样,就是 -z 指定该节点是哪个 zone 。三个 zone 的三个节点初始化为一个三副本集群。后面 -o 参数不是必须的。这里主要是测试机器内存不足,所以需要指定一些影响内存的参数。如果您机器内存足够(如大于64G),则可以不需要 -o 参数部分。
检查三个节点进程启动正常,主要看端口监听是否正常。在中控机上批量查询:
[admin@obce00 oceanbase-ce]$ for OceanBase in $IPS;do echo $ob; ssh $ob "netstat -ntlp"; done
172.20.249.52
(Not all processes could be identified, non-owned process info
will not be shown, you would have to be root to see it all.)
Active Internet connections (only servers)
Proto Recv-Q Send-Q Local Address Foreign Address State PID/Program name
tcp 0 0 0.0.0.0:22 0.0.0.0:* LISTEN -
tcp 0 0 0.0.0.0:2881 0.0.0.0:* LISTEN 10084/bin/observer
tcp 0 0 0.0.0.0:2882 0.0.0.0:* LISTEN 10084/bin/observer
172.20.249.49
(Not all processes could be identified, non-owned process info
will not be shown, you would have to be root to see it all.)
Active Internet connections (only servers)
Proto Recv-Q Send-Q Local Address Foreign Address State PID/Program name
tcp 0 0 0.0.0.0:2881 0.0.0.0:* LISTEN 10213/bin/observer
tcp 0 0 0.0.0.0:2882 0.0.0.0:* LISTEN 10213/bin/observer
tcp 0 0 0.0.0.0:22 0.0.0.0:* LISTEN -
172.20.249.51
(Not all processes could be identified, non-owned process info
will not be shown, you would have to be root to see it all.)
Active Internet connections (only servers)
Proto Recv-Q Send-Q Local Address Foreign Address State PID/Program name
tcp 0 0 0.0.0.0:2881 0.0.0.0:* LISTEN 10103/bin/observer
tcp 0 0 0.0.0.0:2882 0.0.0.0:* LISTEN 10103/bin/observer
tcp 0 0 0.0.0.0:22 0.0.0.0:* LISTEN -
集群自举(初始化)
当 OceanBase 集群三个节点都正常启动,并且监听正常时,连接到任一节点(通过 2881 端口直连),进行自举(bootstrap 集群初始化)操作。 初始密码是空。
mysql -h 172.20.249.49 -u root -P 2881 -p -c -A
set session ob_query_timeout=1000000000; alter system bootstrap ZONE 'zone1' SERVER '172.20.249.52:2882', ZONE 'zone2' SERVER '172.20.249.49:2882', ZONE 'zone3' SERVER '172.20.249.51:2882' ;
输出:
[admin@obce00 ~]$ mysql -h 172.20.249.49 -u root -P 2881 -p -c -A
Enter password:
Welcome to the MariaDB monitor. Commands end with ; or \g.
Your MySQL connection id is 3221225472
Server version: 5.7.25 OceanBase 3.1.0 (r3-b20901e8c84d3ea774beeaca963c67d7802e4b4e) (Built Aug 10 2021 08:10:38)
Copyright (c) 2000, 2018, Oracle, MariaDB Corporation Ab and others.
Type 'help;' or '\h' for help. Type '\c' to clear the current input statement.
MySQL [(none)]> set session ob_query_timeout=1000000000; alter system bootstrap ZONE 'zone1' SERVER '172.20.249.52:2882', ZONE 'zone2' SERVER '172.20.249.49:2882', ZONE 'zone3' SERVER '172.20.249.51:2882' ;
Query OK, 0 rows affected (0.001 sec)
Query OK, 0 rows affected (28.839 sec)
MySQL [(none)]> Bye
[admin@obce00 ~]$ mysql -h 172.20.249.49 -u root@sys -P 2881 -p -c -A
Enter password:
Welcome to the MariaDB monitor. Commands end with ; or \g.
Your MySQL connection id is 3221751629
Server version: 5.7.25 OceanBase 3.1.0 (r3-b20901e8c84d3ea774beeaca963c67d7802e4b4e) (Built Aug 10 2021 08:10:38)
Copyright (c) 2000, 2018, Oracle, MariaDB Corporation Ab and others.
Type 'help;' or '\h' for help. Type '\c' to clear the current input statement.
MySQL [(none)]> show databases;
+--------------------+
| Database |
+--------------------+
| oceanbase |
| information_schema |
| mysql |
| SYS |
| LBACSYS |
| ORAAUDITOR |
| test |
+--------------------+
7 rows in set (0.016 sec)
通常来说,只要严格按照前面步骤设置目录结构和权限、启动参数,集群自举都能成功。如果不成功,常见原因如下:
- 集群节点之间时间同步延时超过 50ms 。
- 集群节点之间网络延时超过 100ms 。
- 集群节点上 OBSERVER 相关目录结构不对或者目录权限不对。
- 集群节点上进程 observer 启动参数写的不对。注意隐含参数的名字(如__min_full_resource_pool_memory )、参数 -d 的目录是否正确、参数 -z
- 跟 IP 的对应关系、 参数中多了空格或分隔符错误(有的是 , ,有的是;)。
- 集群节点可用内存低于进程 observer 启动参数 memory_limit 值。
设置相关密码
- 集群管理员(root@sys)密码默认集群管理员(root@sys)的密码是空的,这里需要设置一个密码。
alter user root identified by '4S9wDbSr' ;
- OBPROXY 用户(proxyro)密码默认 OBPROXY 连接 OceanBase 集群使用用户 proxyro 。这个用户不存在,需要创建。
grant select on oceanbase.* to proxyro identified by 'SWoLCQRH' ;
安装 OBPROXY 软件包
手动部署,需要安装 OceanBase 的 OBPROXY 软件 。
sudo rpm -ivh /tmp/obproxy-3.1.0-1.el8.x86_64.rpm
社区版的 OBPROXY 软件默认安装到 /home/admin/obproxy-版本号 下。
[admin@obce00 ~]$ tree ~/obproxy-3.1.0/
/home/admin/obproxy-3.1.0/
└── bin
├── obproxy
└── obproxyd.sh
1 directory, 2 files
目前社区版的 OBPROXY 安装后的文件还是很简单的,后面可能会微调。
启动 OBPROXY 进程
启动 OBPROXY 进程也推荐在软件安装目录,进程 pbproxy 会在该目录下生成目录 etc 保存 OBPROXY 的运行参数,以及目录 log 保存运行日志。
cd ~/obproxy-3.1.0/ && bin/obproxy -r "172.20.249.52:2881;172.20.249.49:2881;172.20.249.51:2881" -p 2883 -o "enable_strict_kernel_release=false,enable_cluster_checkout=false,enable_metadb_used=false" -c obdemo
输出:
[admin@obce00 obproxy-3.1.0]$ cd ~/obproxy-3.1.0/ && bin/obproxy -r "172.20.249.52:2881;172.20.249.49:2881;172.20.249.51:2881" -p 2883 -o "enable_strict_kernel_release=false,enable_cluster_checkout=false,enable_metadb_used=false" -c obdemo
bin/obproxy -r 172.20.249.52:2881;172.20.249.49:2881;172.20.249.51:2881 -p 2883 -o enable_strict_kernel_release=false,enable_cluster_checkout=false,enable_metadb_used=false -c obdemo
rs list: 172.20.249.52:2881;172.20.249.49:2881;172.20.249.51:2881
listen port: 2883
optstr: enable_strict_kernel_release=false,enable_cluster_checkout=false,enable_metadb_used=false
cluster_name: obdemo
[admin@obce00 obproxy-3.1.0]$ ps -ef|grep obproxy
admin 38206 1 2 15:11 ? 00:00:00 bin/obproxy -r 172.20.249.52:2881;172.20.249.49:2881;172.20.249.51:2881 -p 2883 -o enable_strict_kernel_release=false,enable_cluster_checkout=false,enable_metadb_used=false -c obdemo
admin 38229 28904 0 15:11 pts/2 00:00:00 grep --color=auto obproxy
[admin@obce00 obproxy-3.1.0]$
- 检查 OBPROXY 监听正常
进程 obproxy 默认会监听2个端口:2883 和 2884 。
[admin@obce00 obproxy-3.1.0]$ netstat -ntlp |grep obproxy
(Not all processes could be identified, non-owned process info
will not be shown, you would have to be root to see it all.)
tcp 0 0 0.0.0.0:2883 0.0.0.0:* LISTEN 38206/bin/obproxy
tcp 0 0 0.0.0.0:2884 0.0.0.0:* LISTEN 38206/bin/obproxy
- 登录 OBPROXY 修改密码
登录用户名:root@proxysys, 端口:2883 ,初始密码:空。
mysql -h 172.20.249.50 -u root@proxysys -P 2883 -p
MySQL [(none)]> show proxyconfig like '%sys_password%';
+-----------------------+-------+--------------------------------+-------------+---------------+
| name | value | info | need_reboot | visible_level |
+-----------------------+-------+--------------------------------+-------------+---------------+
| observer_sys_password | | password for observer sys user | false | SYS |
| obproxy_sys_password | | password for obproxy sys user | false | SYS |
+-----------------------+-------+--------------------------------+-------------+---------------+
2 rows in set (0.000 sec)
修改 OBPROXY 用户密码是通过修改参数的方式,命令是:alter proxyconfig set 。
alter proxyconfig set obproxy_sys_password = 'wPhGddup' ;
同时还需要修改 OBPROXY 连接 OceanBase 集群用户 proxyro 的密码。这样 OBPROXY 才能跟 OceanBase 集群正常连接。这个密码就是前面 OceanBase 集群初始化后创建的用户 proxyro 的密码。
alter proxyconfig set observer_sys_password = 'SWoLCQRH' ;
退出,通过 OBPROXY 连接 OceanBase 集群看看, 如果能查看所有会话,则说明 OBPROXY 部署成功。
mysql -h172.20.249.50 -uroot@sys#obdemo -P2883 -p4S9wDbSr -c -A oceanbase
输出:
[admin@obce00 obproxy-3.1.0]$ mysql -h172.20.249.50 -uroot@sys#obdemo -P2883 -p4S9wDbSr -c -A oceanbase
Welcome to the MariaDB monitor. Commands end with ; or \g.
Your MySQL connection id is 5
Server version: 5.6.25 OceanBase 3.1.0 (r3-b20901e8c84d3ea774beeaca963c67d7802e4b4e) (Built Aug 10 2021 08:10:38)
Copyright (c) 2000, 2018, Oracle, MariaDB Corporation Ab and others.
Type 'help;' or '\h' for help. Type '\c' to clear the current input statement.
MySQL [oceanbase]> show processlist;
+------+--------+------+---------------------+-----------+-------------+-------------------+-------------------+-------+-------+
| Id | Tenant | User | Host | db | trans_count | svr_session_count | state | tid | pid |
+------+--------+------+---------------------+-----------+-------------+-------------------+-------------------+-------+-------+
| 5 | sys | root | 172.20.249.50:41524 | oceanbase | 0 | 1 | MCS_ACTIVE_READER | 38206 | 38206 |
+------+--------+------+---------------------+-----------+-------------+-------------------+-------------------+-------+-------+
1 row in set (0.000 sec)
MySQL [oceanbase]> show full processlist;
+------------+---------+--------+---------------------+-----------+---------+------+--------+-----------------------+---------------+------+--------------+
| Id | User | Tenant | Host | db | Command | Time | State | Info | Ip | Port | Proxy_sessid |
+------------+---------+--------+---------------------+-----------+---------+------+--------+-----------------------+---------------+------+--------------+
| 3222013775 | root | sys | 172.20.249.50:57436 | oceanbase | Query | 0 | ACTIVE | show full processlist | 172.20.249.51 | 2881 | 4 |
| 3221751633 | proxyro | sys | 172.20.249.50:49344 | oceanbase | Sleep | 2 | SLEEP | NULL | 172.20.249.49 | 2881 | 3 |
+------------+---------+--------+---------------------+-----------+---------+------+--------+-----------------------+---------------+------+--------------+
2 rows in set (0.022 sec)
