


其实这次本打算说一说AbsoluteLayout布局,不过由于AbsoluteLayout已经被放弃,从实用角度出发,在这里我们也跳过AbsoluteLayout。这次主要说一说FrameLayout和GridLayout。
FrameLayout:见名思意,框架布局,也叫帧布局。此布局非常简答,在帧布局中所有的控件都是以层叠的方式进行展示,就是后一个层叠在前一个之上。
代码段一:
<FrameLayout android:layout_width="600dp"
    android:layout_height="600dp"
    android:background="@android:color/holo_green_light"
    xmlns:android="http://schemas.android.com/apk/res/android">
    <TextView
        android:layout_gravity="center"
        android:layout_width="200dp"
        android:layout_height="200dp"
        android:background="@android:color/darker_gray"/>
    <TextView
        android:layout_gravity="center"
        android:layout_width="100dp"
        android:layout_height="100dp"
        android:background="@android:color/holo_green_dark"/>
    <TextView
        android:layout_gravity="center"
        android:layout_width="50dp"
        android:layout_height="50dp"
        android:background="@android:color/holo_green_light"/>
</FrameLayout>
效果如图:

代码段二(实例):
<RelativeLayout android:layout_width="match_parent"
    android:layout_height="match_parent"
    xmlns:android="http://schemas.android.com/apk/res/android" >
  <FrameLayout
        android:layout_width="60dp"
        android:layout_height="60dp"
        android:layout_marginLeft="20dp"
        android:layout_marginTop="20dp">
        <TextView
            android:layout_width="match_parent"
            android:layout_height="match_parent"
            android:gravity="center"
            android:background="@android:color/darker_gray"
            android:textColor="@android:color/white"
            android:text="消息"/>
        <TextView
            android:layout_width="20dp"
            android:layout_height="20dp"
            android:background="@android:color/holo_red_dark"
            android:text="5"
            android:gravity="center"
            android:textColor="@android:color/white"
            android:layout_gravity="right"/>
    </FrameLayout></RelativeLayout>
</RelativeLayout>
效果如图:

GridLayout:见名思意,网格布局。其实它的有些特点与TableLayout很像,都是把控件放进一个一个的格子里面去。那么GridLayout又是怎么放的呢?
代码段三:
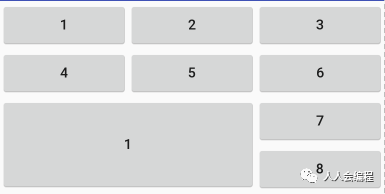
<GridLayout android:layout_width="match_parent"
    android:layout_height="match_parent"
    android:rowCount="3"  //指定行数
    android:columnCount="3" //指定列数
    xmlns:android="http://schemas.android.com/apk/res/android" >
    <Button
        android:layout_columnWeight="1" // 实现平均分布
        android:text="1"
        />
    <Button
        android:layout_columnWeight="1"
        android:text="1"
        />
    <Button
        android:layout_columnWeight="1"
        android:text="1"
        />
    <Button
        android:layout_columnWeight="1"
        android:text="1"
        />
    <Button
        android:layout_columnWeight="1"
        android:text="1"
        />
    <Button
        android:layout_columnWeight="1"
        android:text="1"
        />
    <Button
        android:layout_rowSpan="2" //跨行
        android:layout_columnSpan="2"  //跨列
        android:layout_columnWeight="1"
        android:text="1"
        android:layout_height="95dp" />
    <Button
        android:layout_width="wrap_content"
        android:layout_height="wrap_content"
        android:layout_columnWeight="1"
        android:text="1"
        />
    <Button
        android:layout_columnWeight="1"
        android:text="1"
        />
    <Button
        android:layout_columnWeight="1"
        android:text="1"
        />
</GridLayout>
</RelativeLayout>
效果图如下:
由于帧布局和网格布局,在实际开发中使用的较少,所以将两种内容放在一起进行了说明。下次将对讲述一种新的布局:ConstraintLayout。
现在讲述的为Android系列,如果你觉得文章对你的学习有帮助,或者你想进入到编程的世界,请长按下方图片并关注人人会编程!

文章转载自程序员的日记本,如果涉嫌侵权,请发送邮件至:contact@modb.pro进行举报,并提供相关证据,一经查实,墨天轮将立刻删除相关内容。
