


Tutorialspoint Spring Security 教程
来源:易百教程
Spring Security教程™
Spring Security是一个灵活和强大的身份验证和访问控制框架,以确保基于Spring的Java Web应用程序的安全。
在这些简单Spring Security4 一系列教程中的 Spring Security 示例是基于新的Spring Security4,Spring 4框架版本(除了前面两个实例使用 Spring 3)。
Spring Security是一个轻量级的安全框架,它确保基于Spring的应用程序提供身份验证和授权支持。它与Spring MVC有很好地集成,并配备了流行的安全算法实现捆绑在一起。本系列教程是展示Spring Security4 的基本和高级的用法,固定网址,视图和基于Spring MVC/Hibernate应用方法的示例等。
这个Spring Security系列教程在写作的时候是基于可用版本Spring Security 4.0.1.RELEASE[+] & Spring 4.1.6.RELEASE[+]。
Spring Security动手实践的例子
在本系列教程中,我们将通过Spring Security设置以及共同的特性,应用不同的认证方法:有编码方案保护密码,Spring MVC4集成Spring Security和Hibernate的应用程序,以帮助我们学习的Spring Security如何应用的例子。
1-Spring Security Hello World 注解 + XML示例
Spring MVC 以及 Spring Security注解+基于XML的Hello World项目,使用Spring Security的默认登录形式,在内存(代码)中进行身份验证和定制注销逻辑安全网址。介绍 Spring Security 的基本知识。
2-Spring Security 定义登录表单注解 + XML 示例
Spring MVC 4 & Spring Security注解+基于XML,例如:自定义登录表单,内存验证,CSRF保护和定制注销逻辑的项目。 URL安全性示例。
了解如何正确使用Spring Security4注销登录。这在点击浏览器后退按钮也能很好的工作。
4-Spring Security 4 使用Security标签库在安全视图层示例
使用基于Spring Security的标签库在已登录用户的角色来显示/隐藏JSP/视图片段。查看安全实例。
登录后,将用户重定向到基于用户对应指派角色对应的URL。Spring MVC4 & Spring Security基于注释项目示例,自定义成功处理程序,自定义登录表单,内存验证,CSRF保护和定制注销逻辑等。
6-Spring Security 4 Hibernate身份验证注释 + XML实例
Spring Security4数据库认证范例。使用Hibernate直接从数据库加载用户数据来进行比较和验证处理。这是一个自定义登录表单,数据库认证,自定义UserDetailsService,CSRF保护和定制注销逻辑中的Spring MVC4,Hibernate4 Spring Security4注解为主实例项目。
7-Spring Security 4 Hibernate 基于角色登录实例
登录后,将用户重定向到基于他/她指派对应角色对应的URL。自定义成功处理程序,自定义登录表单,数据库认证,自定义UserDetailsService,CSRF保护和定制注销逻辑的一个Spring MVC4,Hibernate4+Spring Security4注解为主示例项目。
8-Spring Security 4 使用BCrypt算法和Hibernate的密码编码示例
密码编码实例使用SpringSecurity BCrypt算法实现BCryptPasswordEncoder。 Spring MVC4基于注释Hibernate4 + Spring Security4示例项目还呈现出一到多的JSP映射。
9-Spring Security 4 + Hibernate记住我实例
使"记住我"使用持久化标记方法在基于 Spring Security 4 , Spring MVC 4, and Hibernate 4 的应用程序。Spring Security标签的例子。
10-Spring Security 4 方法级别以及@PreAuthorize, @PostAuthorize, @Secured & EL表达式
安全方法调用,使用Spring Security @PreAuthorize, @PostAuthorize, @Secured & EL表达式。方法安全实例。
Spring 4 MVC + Spring Security 4 + Hibernate 4 集成实例
集成Spring MVC 4 with Spring Security 4, Hibernate 4多对多例子,显示CRUD操作,管理查看/JSP多一对多映射,使用BCrypt格式加密存储密码,并提供了rememberMe功能。使用Hibernate定制PersistentTokenRepository实现HibernateTokenRepositoryImpl,Spring转换的例子,显示事务管理和JSR303验证的使用。
Secure Spring REST API使用基础身份认证
本指南介绍了安全REST API使用基本身份验证,涉及两个独立的客户实例[Postman和基于Spring RestTemplate的Java应用程序]用于访问我们的REST API。
AngularJS+Spring Security使用基本身份认证
这篇文章显示了AngularJS应用程序如何访问REST API,它使用Spring Security的基本身份验证方式访问。
Secure Spring REST API 以及OAuth2
一个简单的OAuth2指南,REST API使用Spring OAuth2支持,这里将演示不同的客户端如何使用 OAuth2 令牌来访问保护资源。
参考
2. FAQs
包教不包会,有什么问题再留言提问吧!
代码下载:http://pan.baidu.com/s/1qXE8gaC
本站代码下载:http://www.yiibai.com/siteinfo/download.html
本文属作者原创,转载请注明出处:易百教程 » Spring Security教程
Spring Security入门程序示例 - Spring Security教程™
在本教程中,我们将向您展示如何通过Spring Security使用Spring MVC的Web应用程序来集成一个URL访问。使用 Spring Security 来实现一个“admin”页面的内容后,验证用户输入正确的“用户名”和“密码”。
使用到的技术包括:
- Spring 3.2.8.RELEASE
- Spring Security 3.2.3.RELEASE
- Eclipse 4.2
- JDK 1.6
- Maven 3
注意:
Spring Security 3.0 需要 Java5.0 或更高版本的运行环境,由于在这一系列教程中使用的是Maven来创建工程,如果不了解 Mave 如何使用的,可以参考:http://www.yiibai.com/maven/create-a-maven-web-project-with-eclipse.html
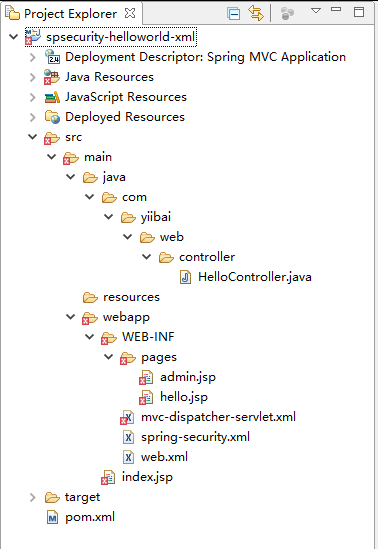
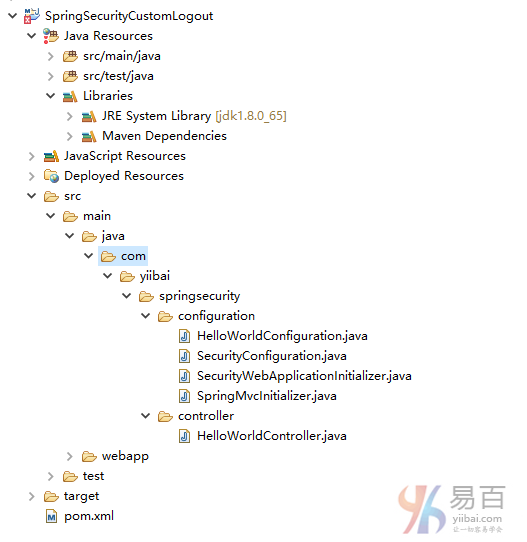
1. 目录结构
下面先来看看本教程的最终目录结构,如下图所示 -
2. Spring Security依懒
要使用 Spring security 你需要 spring-security-web 和 spring-security-config.
pom.xml
<properties>
<jdk.version>1.6</jdk.version>
<spring.version>3.2.8.RELEASE</spring.version>
<spring.security.version>3.2.3.RELEASE</spring.security.version>
<jstl.version>1.2</jstl.version>
</properties>
<dependencies>
<!-- Spring dependencies -->
<dependency>
<groupId>org.springframework</groupId>
<artifactId>spring-core</artifactId>
<version>${spring.version}</version>
</dependency>
<dependency>
<groupId>org.springframework</groupId>
<artifactId>spring-web</artifactId>
<version>${spring.version}</version>
</dependency>
<dependency>
<groupId>org.springframework</groupId>
<artifactId>spring-webmvc</artifactId>
<version>${spring.version}</version>
</dependency>
<!-- Spring Security -->
<dependency>
<groupId>org.springframework.security</groupId>
<artifactId>spring-security-web</artifactId>
<version>${spring.security.version}</version>
</dependency>
<dependency>
<groupId>org.springframework.security</groupId>
<artifactId>spring-security-config</artifactId>
<version>${spring.security.version}</version>
</dependency>
<!-- jstl for jsp page -->
<dependency>
<groupId>jstl</groupId>
<artifactId>jstl</artifactId>
<version>${jstl.version}</version>
</dependency>
</dependencies>
4. Spring MVC Web应用程序
一个简单的控制器:
- 如果URL = /welcome 或 / , 返回 hello 页面;
- 如果 URL = /admin , 返回 admin 页面;
稍后,我们将学习如何使用Spring Security 实现 “/admin” 网址页面显示用户登录表单。
HelloController.java
package com.yiibai.web.controller;
import org.springframework.stereotype.Controller;
import org.springframework.web.bind.annotation.RequestMapping;
import org.springframework.web.bind.annotation.RequestMethod;
import org.springframework.web.servlet.ModelAndView;
@Controller
public class HelloController {
@RequestMapping(value = { "/", "/welcome**" }, method = RequestMethod.GET)
public ModelAndView welcomePage() {
ModelAndView model = new ModelAndView();
model.addObject("title", "Spring Security Hello World");
model.addObject("message", "This is welcome page!");
model.setViewName("hello");
return model;
}
@RequestMapping(value = "/admin**", method = RequestMethod.GET)
public ModelAndView adminPage() {
ModelAndView model = new ModelAndView();
model.addObject("title", "Spring Security Hello World");
model.addObject("message", "This is protected page!");
model.setViewName("admin");
return model;
}
}
需要用到两个JSP 页面,如下所示 -
hello.jsp
<%@page session="false"%>
<html>
<body>
<h1>标题: ${title}</h1>
<h1>消息 : ${message}</h1>
</body>
</html>
admin.jsp
<%@taglib prefix="c" uri="http://java.sun.com/jsp/jstl/core"%>
<%@page session="true"%>
<html>
<body>
<h1>标题: ${title}</h1>
<h1>消息 : ${message}</h1>
<c:if test="${pageContext.request.userPrincipal.name != null}">
<h2>欢迎: ${pageContext.request.userPrincipal.name}
| <a href="<c:url value="/j_spring_security_logout" />" > Logout</a></h2>
</c:if>
</body>
</html>
mvc-dispatcher-servlet.xml
<beans xmlns="http://www.springframework.org/schema/beans"
xmlns:context="http://www.springframework.org/schema/context"
xmlns:xsi="http://www.w3.org/2001/XMLSchema-instance"
xsi:schemaLocation="
http://www.springframework.org/schema/beans
http://www.springframework.org/schema/beans/spring-beans-3.0.xsd
http://www.springframework.org/schema/context
http://www.springframework.org/schema/context/spring-context-3.0.xsd">
<context:component-scan base-package="com.yiibai.*" />
<bean
class="org.springframework.web.servlet.view.InternalResourceViewResolver">
<property name="prefix">
<value>/WEB-INF/pages/</value>
</property>
<property name="suffix">
<value>.jsp</value>
</property>
</bean>
</beans>
5. Spring Security : 用户身份验证
创建一个 Spring Security XML文件,如下所示 -
spring-security.xml
<beans:beans xmlns="http://www.springframework.org/schema/security"
xmlns:beans="http://www.springframework.org/schema/beans"
xmlns:xsi="http://www.w3.org/2001/XMLSchema-instance"
xsi:schemaLocation="http://www.springframework.org/schema/beans
http://www.springframework.org/schema/beans/spring-beans-3.0.xsd
http://www.springframework.org/schema/security
http://www.springframework.org/schema/security/spring-security-3.2.xsd">
<http auto-config="true">
<intercept-url pattern="/admin**" access="ROLE_USER" />
</http>
<authentication-manager>
<authentication-provider>
<user-service>
<user name="yiibai" password="123456" authorities="ROLE_USER" />
</user-service>
</authentication-provider>
</authentication-manager>
</beans:beans>
这里要说明的是:只有用户“yiibai”才能允许访问URL:/admin 。
6. 集成Spring Security
通过Spring Security使用Spring MVC Web应用程序集成,只是声明 DelegatingFilterProxy 作为一个Servlet过滤器来拦截任何传入的请求。
web.xml
<web-app id="WebApp_ID" version="2.4"
xmlns="http://java.sun.com/xml/ns/j2ee"
xmlns:xsi="http://www.w3.org/2001/XMLSchema-instance"
xsi:schemaLocation="http://java.sun.com/xml/ns/j2ee
http://java.sun.com/xml/ns/j2ee/web-app_2_4.xsd">
<display-name>Spring MVC Application</display-name>
<!-- Spring MVC -->
<servlet>
<servlet-name>mvc-dispatcher</servlet-name>
<servlet-class>org.springframework.web.servlet.DispatcherServlet
</servlet-class>
<load-on-startup>1</load-on-startup>
</servlet>
<servlet-mapping>
<servlet-name>mvc-dispatcher</servlet-name>
<url-pattern>/</url-pattern>
</servlet-mapping>
<listener>
<listener-class>org.springframework.web.context.ContextLoaderListener
</listener-class>
</listener>
<!-- Loads Spring Security config file -->
<context-param>
<param-name>contextConfigLocation</param-name>
<param-value>
/WEB-INF/spring-security.xml
</param-value>
</context-param>
<!-- Spring Security -->
<filter>
<filter-name>springSecurityFilterChain</filter-name>
<filter-class>org.springframework.web.filter.DelegatingFilterProxy
</filter-class>
</filter>
<filter-mapping>
<filter-name>springSecurityFilterChain</filter-name>
<url-pattern>/*</url-pattern>
</filter-mapping>
</web-app>
7. 示例
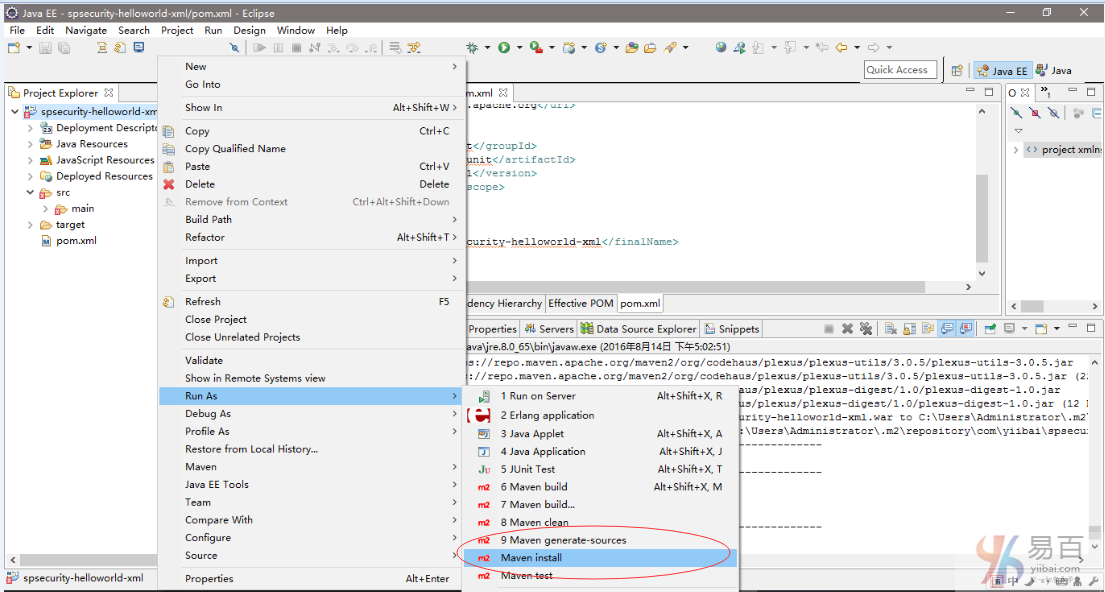
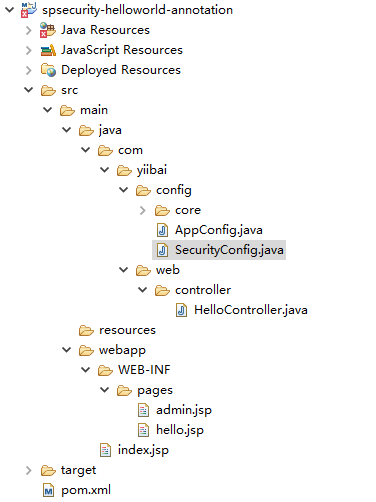
首先要创建一个 Maven 的 j2ee 工程,然后编写代码完成后,再发布 Maven 工程。按照如下操作,在工程名称:spsecurity-helloworld-xml 上右键,选择 Run As -> Maven install 如下图中所示:
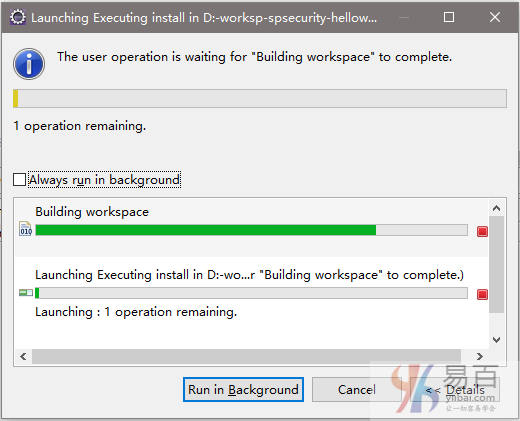
Eclipse 开始下载相关联的依懒包,如下图中所示 -
全部就这些,但是等等...登录表单哪来?不用担心,如果不定制定义登录表单,Spring会自动创建一个简单的登录表单。
定义登录表单
请阅读 “Spring Security登录实例” 以了解如何创建Spring Security中的自定义登录表单。
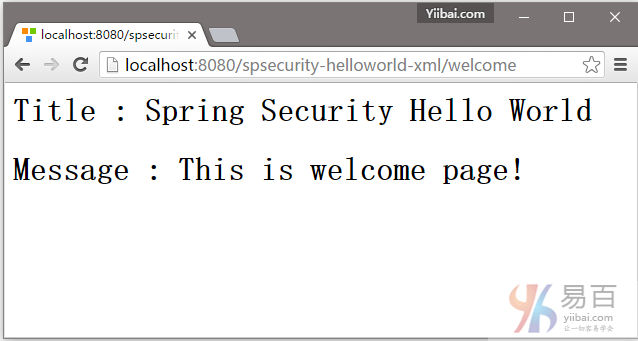
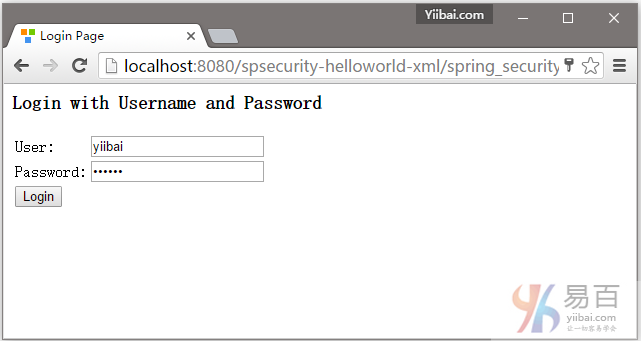
1. 欢迎页面 – http://localhost:8080/spsecurity-helloworld-xml/welcome
2. 现在尝试访问 http://localhost:8080/spsecurity-helloworld-xml/admin 页面,Spring Security将拦截请求并重定向到 /spring_security_login,并显示一个预定义的登录表单。
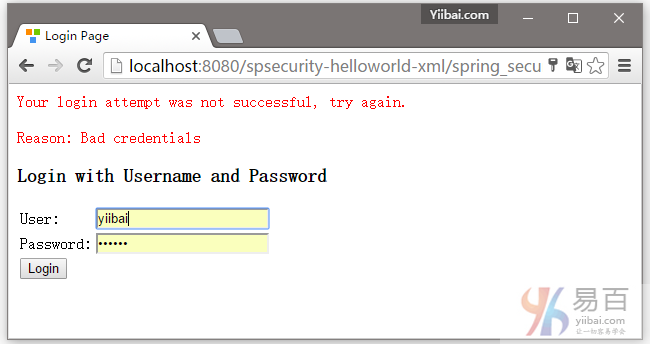
3. 如果用户名和密码不正确,那么将会显示错误信息,并且 Spring 将重定向到以下网址:/spring_security_login?login_error.
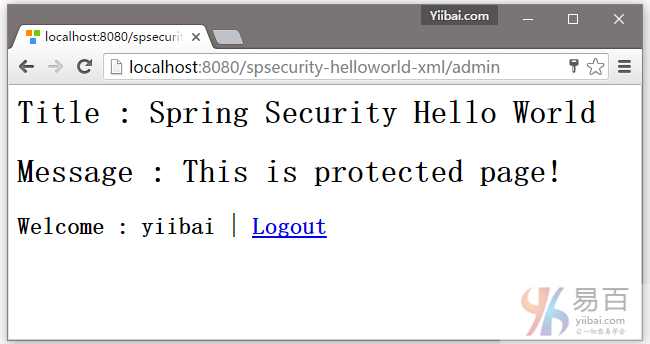
4.如果用户名和密码都正确,Spring将请求重定向到原来请求的URL并显示该网页内容。
下载源代码
请点击以下链接下载示例代码 – spsecurity-helloworld-xml.zip (9 KB)
参考
本站代码下载:http://www.yiibai.com/siteinfo/download.html
本文属作者原创,转载请注明出处:易百教程 » Spring Security入门程序示例
Spring Security入门程序注释示例 - Spring Security教程™
在上一篇文章中,我们使用XML文件来配置 Spring Security 在Spring MVC中的环境。在本教程中,我们将来学习如何将基于XML的Spring Security项目转换成纯 Spring 注解项目。
注意:由于在这一系列教程中使用的是Maven来创建工程,如果不了解 Mave 如何使用的,可以参考:http://www.yiibai.com/maven/create-a-maven-web-project-with-eclipse.html
一些要用到的技术:
- Spring 3.2.8.RELEASE
- Spring Security 3.2.3.RELEASE
- Eclipse 4.2
- JDK 1.6
- Maven 3
- Tomcat 7 (Servlet 3.x)
一些需要注意的事项:
- 本教程使用 WebApplicationInitializer 来自动加载 Spring 上下文加载器,这些仅在 Servlet 3.X 容器中支持,例如:Tomcat7和 Jetty8。
- 由于我们使用了WebApplicationInitializer,所以不需要web.xml配置文件。
- Spring Security注释在旧版本的Servlet容器2.x中支持,例如:Tomcat6. 如果您使用经典的XML文件来加载Spring上下文,本教程仍然能够部署在Servlet容器2.X 中,例如,Tomcat6。
2. 目录结构
下面我们来看看本教程最终的目录结构,如下图中所示:
3. Spring Security依懒
要使用Spring security, 我们需要 spring-security-web 和 spring-security-config.
pom.xml
<properties>
<jdk.version>1.6</jdk.version>
<spring.version>3.2.8.RELEASE</spring.version>
<spring.security.version>3.2.3.RELEASE</spring.security.version>
<jstl.version>1.2</jstl.version>
</properties>
<dependencies>
<!-- Spring 3 dependencies -->
<dependency>
<groupId>org.springframework</groupId>
<artifactId>spring-core</artifactId>
<version>${spring.version}</version>
</dependency>
<dependency>
<groupId>org.springframework</groupId>
<artifactId>spring-web</artifactId>
<version>${spring.version}</version>
</dependency>
<dependency>
<groupId>org.springframework</groupId>
<artifactId>spring-webmvc</artifactId>
<version>${spring.version}</version>
</dependency>
<!-- Spring Security -->
<dependency>
<groupId>org.springframework.security</groupId>
<artifactId>spring-security-web</artifactId>
<version>${spring.security.version}</version>
</dependency>
<dependency>
<groupId>org.springframework.security</groupId>
<artifactId>spring-security-config</artifactId>
<version>${spring.security.version}</version>
</dependency>
<!-- jstl for jsp page -->
<dependency>
<groupId>jstl</groupId>
<artifactId>jstl</artifactId>
<version>${jstl.version}</version>
</dependency>
</dependencies>
4. Spring MVC Web应用程序
一些简单的控制器,如下所示:
- 如果 URL = /welcome 或 / , 返回 hello 页面;
- 如果 URL = /admin , 返回 admin 页面;
- 如果 URL = /dba , 返回admin 页面;
接下来,我们将保证 /admin 和 /dba URLs.
HelloController.java
package com.yiibai.web.controller;
import org.springframework.stereotype.Controller;
import org.springframework.web.bind.annotation.RequestMapping;
import org.springframework.web.bind.annotation.RequestMethod;
import org.springframework.web.servlet.ModelAndView;
@Controller
public class HelloController {
@RequestMapping(value = { "/", "/welcome**" }, method = RequestMethod.GET)
public ModelAndView welcomePage() {
ModelAndView model = new ModelAndView();
model.addObject("title", "Spring Security Hello World");
model.addObject("message", "This is welcome page!");
model.setViewName("hello");
return model;
}
@RequestMapping(value = "/admin**", method = RequestMethod.GET)
public ModelAndView adminPage() {
ModelAndView model = new ModelAndView();
model.addObject("title", "Spring Security Hello World");
model.addObject("message", "This is protected page - Admin Page!");
model.setViewName("admin");
return model;
}
@RequestMapping(value = "/dba**", method = RequestMethod.GET)
public ModelAndView dbaPage() {
ModelAndView model = new ModelAndView();
model.addObject("title", "Spring Security Hello World");
model.addObject("message", "This is protected page - Database Page!");
model.setViewName("admin");
return model;
}
}
两个 JSP 页面如下所示:
hello.jsp
<%@page session="false"%>
<html>
<body>
<h1>Title : ${title}</h1>
<h1>Message : ${message}</h1>
</body>
</html>
admin.jsp
<%@taglib prefix="c" uri="http://java.sun.com/jsp/jstl/core"%>
<%@page session="true"%>
<html>
<body>
<h1>Title : ${title}</h1>
<h1>Message : ${message}</h1>
<c:if test="${pageContext.request.userPrincipal.name != null}">
<h2>Welcome : ${pageContext.request.userPrincipal.name}
| <a href="<c:url value="/logout" />" > Logout</a></h2>
</c:if>
</body>
</html>
5. Spring Security配置
5.1创建 Spring Security 配置文件,并 @EnableWebSecurity 注解,如下代码所示:
SecurityConfig.java
package com.yiibai.config;
import org.springframework.beans.factory.annotation.Autowired;
import org.springframework.context.annotation.Configuration;
import org.springframework.security.config.annotation.authentication.builders.AuthenticationManagerBuilder;
import org.springframework.security.config.annotation.web.builders.HttpSecurity;
import org.springframework.security.config.annotation.web.configuration.EnableWebSecurity;
import org.springframework.security.config.annotation.web.configuration.WebSecurityConfigurerAdapter;
@Configuration
@EnableWebSecurity
public class SecurityConfig extends WebSecurityConfigurerAdapter {
@Autowired
public void configureGlobal(AuthenticationManagerBuilder auth) throws Exception {
auth.inMemoryAuthentication().withUser("yiibai").password("123456").roles("USER");
auth.inMemoryAuthentication().withUser("admin").password("123456").roles("ADMIN");
auth.inMemoryAuthentication().withUser("dba").password("123456").roles("DBA");
}
@Override
protected void configure(HttpSecurity http) throws Exception {
http.authorizeRequests()
.antMatchers("/admin/**").access("hasRole('ROLE_ADMIN')")
.antMatchers("/dba/**").access("hasRole('ROLE_ADMIN') or hasRole('ROLE_DBA')")
.and().formLogin();
}
}
这等同于以下 Spring Security xml 文件:
<http auto-config="true">
<intercept-url pattern="/admin**" access="ROLE_ADMIN" />
<intercept-url pattern="/dba**" access="ROLE_ADMIN,ROLE_DBA" />
</http>
<authentication-manager>
<authentication-provider>
<user-service>
<user name="yiibai" password="123456" authorities="ROLE_USER" />
<user name="admin" password="123456" authorities="ROLE_ADMIN" />
<user name="dba" password="123456" authorities="ROLE_DBA" />
</user-service>
</authentication-provider>
</authentication-manager>
5.2 创建一个扩展 AbstractSecurityWebApplicationInitializer 的一个类, 它将会自动地加载 springSecurityFilterChain 。
SpringSecurityInitializer.java
package com.yiibai.config.core;
import org.springframework.security.web.context.AbstractSecurityWebApplicationInitializer;
public class SpringSecurityInitializer extends AbstractSecurityWebApplicationInitializer {
//do nothing
}
这等同于以下 Spring Security 中的 web.xml 文件,如下:
<filter>
<filter-name>springSecurityFilterChain</filter-name>
<filter-class>org.springframework.web.filter.DelegatingFilterProxy
</filter-class>
</filter>
<filter-mapping>
<filter-name>springSecurityFilterChain</filter-name>
<url-pattern>/*</url-pattern>
</filter-mapping>
6. Spring MVC配置
6.1 这是一个配置类, 定义视图技术和导入上述 SecurityConfig.java.
AppConfig.java
package com.yiibai.config;
import org.springframework.context.annotation.Bean;
import org.springframework.context.annotation.ComponentScan;
import org.springframework.context.annotation.Configuration;
import org.springframework.context.annotation.Import;
import org.springframework.web.servlet.config.annotation.EnableWebMvc;
import org.springframework.web.servlet.view.InternalResourceViewResolver;
import org.springframework.web.servlet.view.JstlView;
@EnableWebMvc
@Configuration
@ComponentScan({ "com.yiibai.web.*" })
@Import({ SecurityConfig.class })
public class AppConfig {
@Bean
public InternalResourceViewResolver viewResolver() {
InternalResourceViewResolver viewResolver
= new InternalResourceViewResolver();
viewResolver.setViewClass(JstlView.class);
viewResolver.setPrefix("/WEB-INF/pages/");
viewResolver.setSuffix(".jsp");
return viewResolver;
}
}
这将等同于以下 Spring XML文件:
<context:component-scan base-package="com.yiibai.web.*" />
<bean
class="org.springframework.web.servlet.view.InternalResourceViewResolver">
<property name="prefix">
<value>/WEB-INF/pages/</value>
</property>
<property name="suffix">
<value>.jsp</value>
</property>
</bean>
6.2 创建一个 Initializer 类来加载所有的一切,如下代码:
SpringMvcInitializer.java
package com.yiibai.config.core;
import org.springframework.web.servlet.support.AbstractAnnotationConfigDispatcherServletInitializer;
import com.yiibai.config.AppConfig;
public class SpringMvcInitializer
extends AbstractAnnotationConfigDispatcherServletInitializer {
@Override
protected Class<?>[] getRootConfigClasses() {
return new Class[] { AppConfig.class };
}
@Override
protected Class<?>[] getServletConfigClasses() {
return null;
}
@Override
protected String[] getServletMappings() {
return new String[] { "/" };
}
}
到这里,实例介绍完成了,您可以参考本实例并自己亲自动实践一下体验。
注意事项:
在Servlet 3.X容器环境+ Spring容器中将会自动检测并加载初始化类。
7. 示例
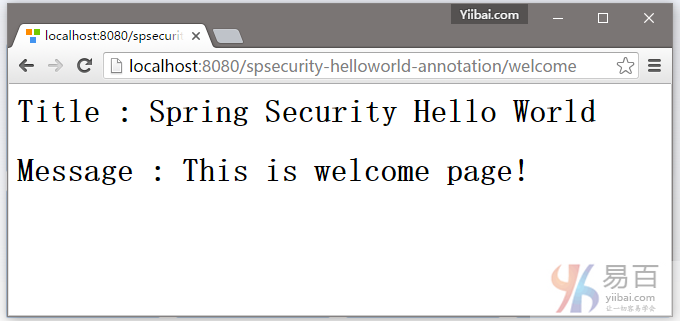
7.1. 打开进入欢迎页面 – http://localhost:8080/spsecurity-helloworld-annotation/welcome 如下图所示 -
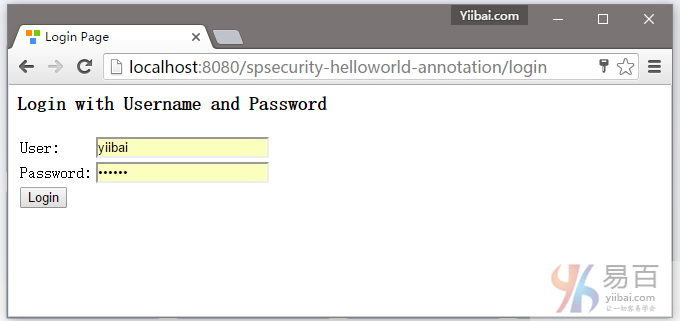
7.2 尝试访问 http://localhost:8080/spsecurity-helloworld-annotation/admin 页面,Spring Security将截取请求并重定向到 /login,并显示一个默认的登录表单。
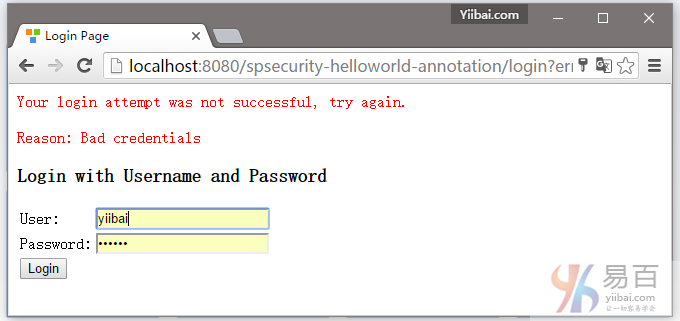
7.3. 如果用户名和密码不正确,将提示(显示)错误信息,并且Spring将重定向到网址:http://localhost:8080/spsecurity-helloworld-annotation/login?error.
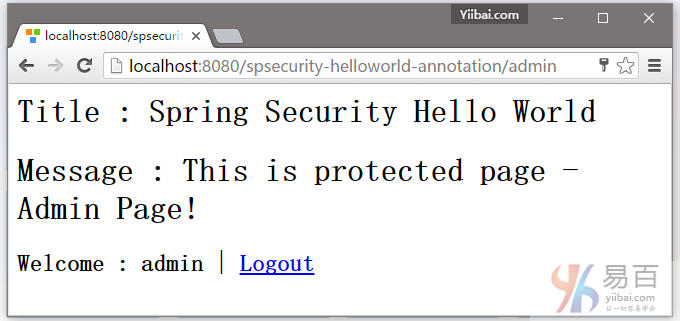
7.4. 如果用户名和密码是正确的,Spring将请求重定向到原来请求的URL并显示该网页。
7.5.对于未经授权的用户,Spring会显示403拒绝访问页面。例如,用户名 “yiibai” 或 “dba” 尝试访问 /admin 这个网址。可以看到一个禁止访问的提示 -
下载源代码
下载本实例的源代码 – spsecurity-helloworld-annotation.zip (12 KB)
参考
- Spring Security
- Spring Security Java Config Preview: Web Security
- Hello Spring MVC Security Java Config
- Wikipedia : Java Servlet
- Wikipedia : Apache Tomcat
- Spring Security Hello World XML实例
本站代码下载:http://www.yiibai.com/siteinfo/download.html
本文属作者原创,转载请注明出处:易百教程 » Spring Security入门程序注释示例
Spring Security自定义表单登录实例 - Spring Security教程™
默认情况下,如果没有指定登录表单,Spring Security会自动创建一个默认的登录表单。请参阅 - Spring Security Hello World实例。
在本教程中,我们将向您展示如何创建Spring Security(例如XML)定制登录表单。注意:由于在这一系列教程中使用的是Maven来创建工程,如果不了解 Mave 如何使用的,可以参考:http://www.yiibai.com/maven/create-a-maven-web-project-with-eclipse.html
需要使用到的技术:
- Spring 3.2.8.RELEASE
- Spring Security 3.2.3.RELEASE
- Eclipse 4.2
- JDK 1.6
- Maven 3
注意
在这个例子中,之前 Spring Security hello world实例将重新使用,现在我们增强它以支持自定义登录表单。
1. 目录结构
我们来看看本教程的最终目录结构,如下图所示:
2. Spring Security配置
在Spring XML文件自定义登录表单。请参见下面的解释:
- login-page=”/login” – 用于显示自定义登录表单的页面
- authentication-failure-url=”/login?error” – 如果验证失败,则将转向URL:/login?error
- logout-success-url=”/login?logout” –如果登录成功,则将转向URL:/logout
- username-parameter=”username” – 请求包含“username”的名字。在HTML中,这是在输入文本的名称。
- <csrf/> – 启用跨站请求伪造(CSRF)保护,请参阅此链接。在XML中,默认情况下CSRF保护被禁用。
通常情况下,我们并不像登录或注销处理认证,要让Spring处理它,我们只需要在处理成功或失败的页面中显示。
spring-security.xml
<beans:beans xmlns="http://www.springframework.org/schema/security"
xmlns:beans="http://www.springframework.org/schema/beans"
xmlns:xsi="http://www.w3.org/2001/XMLSchema-instance"
xsi:schemaLocation="http://www.springframework.org/schema/beans
http://www.springframework.org/schema/beans/spring-beans-3.0.xsd
http://www.springframework.org/schema/security
http://www.springframework.org/schema/security/spring-security-3.2.xsd">
<http auto-config="true">
<intercept-url pattern="/admin**" access="ROLE_USER" />
<form-login
login-page="/login"
default-target-url="/welcome"
authentication-failure-url="/login?error"
username-parameter="username"
password-parameter="password" />
<logout logout-success-url="/login?logout" />
<!-- enable csrf protection -->
<csrf/>
</http>
<authentication-manager>
<authentication-provider>
<user-service>
<user name="yiibai" password="123456" authorities="ROLE_USER" />
</user-service>
</authentication-provider>
</authentication-manager>
</beans:beans>
在上面显示成功的配置中,/admin 及其子文件夹都被密码保护。
跨站请求伪造(CSRF)保护
如果启用了CSRF,那么在登录或注销页面中必须包括_csrf.token。请参阅下面 login.jsp和admin.jsp(注销表单)。否则登录和注销功能将失败。
密码明文?
在过去,您应该大部分时候都在使用哈希算法SHA来加密密码,本教程教学习如何使用 Spring Security 中的密码哈希例子。
3. 定义登录表单
自定义登录表单,以匹配上面(步骤3)Spring Security 的登录成功显示。它应该是很容易就能理解的。
login.jsp
<%@ taglib prefix="c" uri="http://java.sun.com/jsp/jstl/core"%>
<html>
<head>
<title>Login Page</title>
<style>
.error {
padding: 15px;
margin-bottom: 20px;
border: 1px solid transparent;
border-radius: 4px;
color: #a94442;
background-color: #f2dede;
border-color: #ebccd1;
}
.msg {
padding: 15px;
margin-bottom: 20px;
border: 1px solid transparent;
border-radius: 4px;
color: #31708f;
background-color: #d9edf7;
border-color: #bce8f1;
}
#login-box {
width: 300px;
padding: 20px;
margin: 100px auto;
background: #fff;
-webkit-border-radius: 2px;
-moz-border-radius: 2px;
border: 1px solid #000;
}
</style>
</head>
<body onload='document.loginForm.username.focus();'>
<h1>Spring Security Custom Login Form (XML)</h1>
<div id="login-box">
<h2>Login with Username and Password</h2>
<c:if test="${not empty error}">
<div class="error">${error}</div>
</c:if>
<c:if test="${not empty msg}">
<div class="msg">${msg}</div>
</c:if>
<form name='loginForm'
action="<c:url value='j_spring_security_check' />" method='POST'>
<table>
<tr>
<td>User:</td>
<td><input type='text' name='username' value=''></td>
</tr>
<tr>
<td>Password:</td>
<td><input type='password' name='password' /></td>
</tr>
<tr>
<td colspan='2'><input name="submit" type="submit"
value="submit" /></td>
</tr>
</table>
<input type="hidden" name="${_csrf.parameterName}"
value="${_csrf.token}" />
</form>
</div>
</body>
</html>
而另外两个JSP页面,admin.jsp中的密码已经被 Spring 安全保护。
hello.jsp
<%@page session="false"%>
<html>
<body>
<h1>Title : ${title}</h1>
<h1>Message : ${message}</h1>
</body>
</html>
admin.jsp + logout
<%@taglib prefix="c" uri="http://java.sun.com/jsp/jstl/core"%>
<%@page session="true"%>
<html>
<body>
<h1>Title : ${title}</h1>
<h1>Message : ${message}</h1>
<c:url value="/j_spring_security_logout" var="logoutUrl" />
<!-- csrt for log out-->
<form action="${logoutUrl}" method="post" id="logoutForm">
<input type="hidden"
name="${_csrf.parameterName}"
value="${_csrf.token}" />
</form>
<script>
function formSubmit() {
document.getElementById("logoutForm").submit();
}
</script>
<c:if test="${pageContext.request.userPrincipal.name != null}">
<h2>
Welcome : ${pageContext.request.userPrincipal.name} | <a
href="javascript:formSubmit()"> Logout</a>
</h2>
</c:if>
</body>
</html>
4. Spring MVC控制器
一个简单的控制器,如下代码所示 -
HelloController.java
package com.yiibai.web.controller;
import org.springframework.stereotype.Controller;
import org.springframework.web.bind.annotation.RequestMapping;
import org.springframework.web.bind.annotation.RequestMethod;
import org.springframework.web.bind.annotation.RequestParam;
import org.springframework.web.servlet.ModelAndView;
@Controller
public class HelloController {
@RequestMapping(value = { "/", "/welcome**" }, method = RequestMethod.GET)
public ModelAndView welcomePage() {
ModelAndView model = new ModelAndView();
model.addObject("title", "Spring Security Custom Login Form");
model.addObject("message", "This is welcome page!");
model.setViewName("hello");
return model;
}
@RequestMapping(value = "/admin**", method = RequestMethod.GET)
public ModelAndView adminPage() {
ModelAndView model = new ModelAndView();
model.addObject("title", "Spring Security Custom Login Form");
model.addObject("message", "This is protected page!");
model.setViewName("admin");
return model;
}
//Spring Security see this :
@RequestMapping(value = "/login", method = RequestMethod.GET)
public ModelAndView login(
@RequestParam(value = "error", required = false) String error,
@RequestParam(value = "logout", required = false) String logout) {
ModelAndView model = new ModelAndView();
if (error != null) {
model.addObject("error", "Invalid username and password!");
}
if (logout != null) {
model.addObject("msg", "You've been logged out successfully.");
}
model.setViewName("login");
return model;
}
}
5. 示例
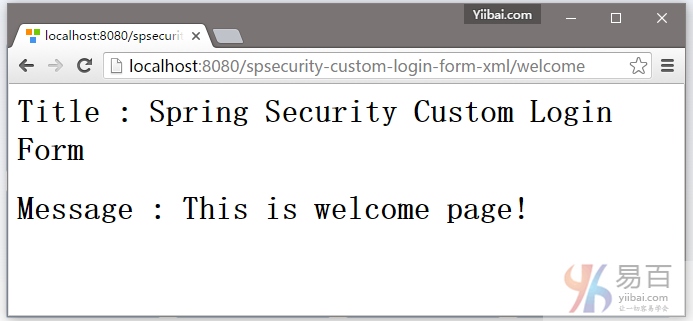
5.1. 欢迎页面 – http://localhost:8080/spsecurity-custom-login-form-xml/welcome ,结果如下图中所示 -
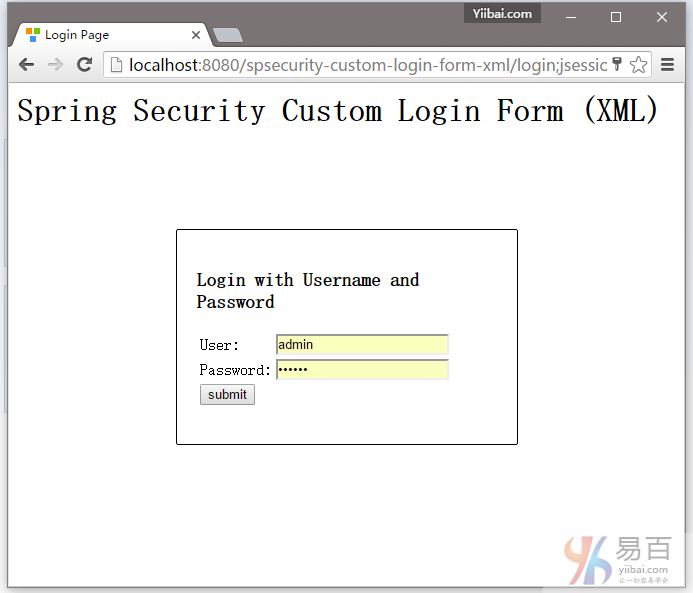
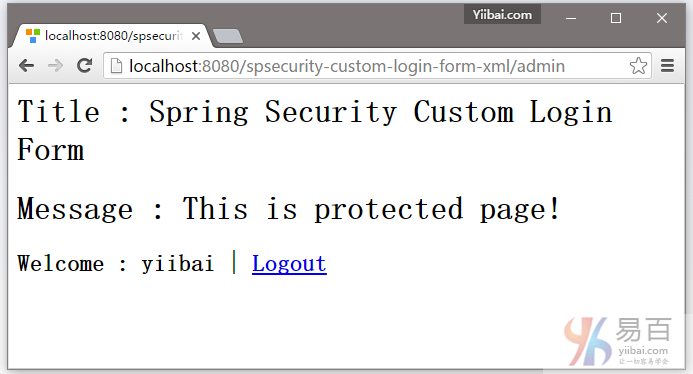
5.2 尝试访问:http://localhost:8080/spsecurity-custom-login-form-xml/admin 页面,Spring Security将截取请求并重定向到 /login ,并显示您的自定义登录表单。
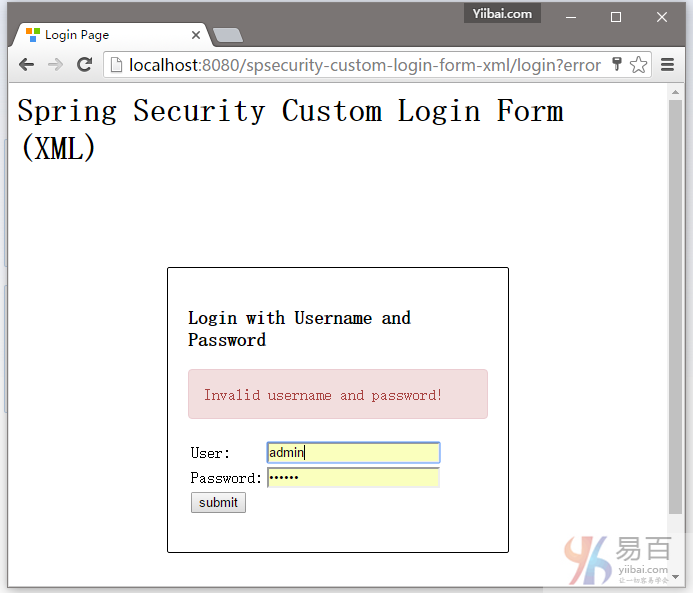
5.3. 如果用户名和密码不正确,将显示错误信息,并且Spring将重定向到网址: http://localhost:8080/spsecurity-custom-login-form-xml/login?error.
5.4. 如果用户名和密码都正确,Spring将重定向到原请求的URL并显示该网页信息。
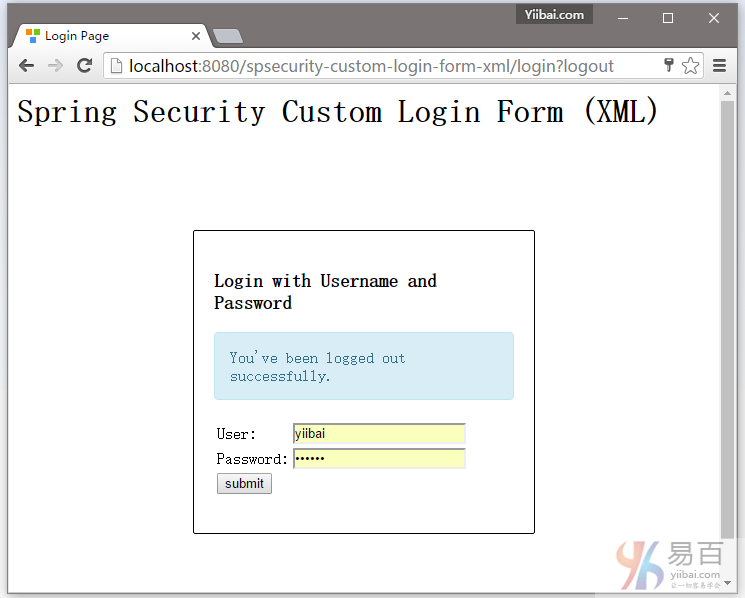
5.5. 尝试注销,它会重定向到 http://localhost:8080/spsecurity-custom-login-form-xml/login?logout 页面。
下载源代码
下载本实例中的代码 – spring-security-custom-login-form-xml.zip
本站代码下载:http://www.yiibai.com/siteinfo/download.html
本文属作者原创,转载请注明出处:易百教程 » Spring Security自定义表单登录实例
Spring Security自定义表单登录注释示例 - Spring Security教程™
在本教程中,我们将以前的 Spring Security定制登录表单(XML)项目 转换为一个纯粹基于注解的项目。注意:由于在这一系列教程中使用的是Maven来创建工程,如果不了解 Mave 如何使用的,可以参考:http://www.yiibai.com/maven/create-a-maven-web-project-with-eclipse.html
需要用到的技术:
- Spring 3.2.8.RELEASE
- Spring Security 3.2.3.RELEASE
- Eclipse 4.2
- JDK 1.6
- Maven 3
- Tomcat 7 (Servlet 3.x)
注意
在这个例子中,上一个Spring Security hello world声明示例 将被重用,增强这个以支持自定义登录表单。
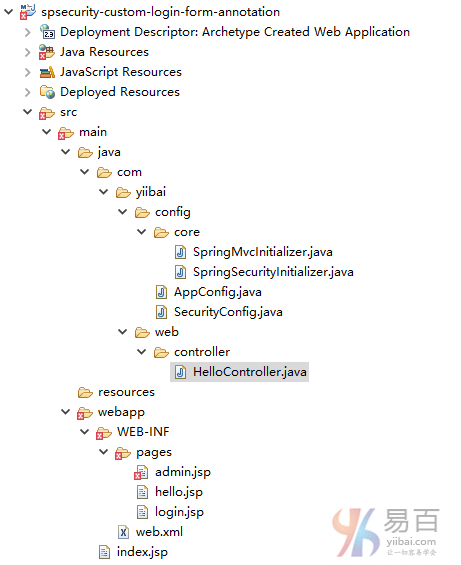
2. 工程目录结构
我们来看看本教程的最终目录结构。如下所示 -
3. Spring Security配置
Spring Security通过注解配置,如下图所示:
SecurityConfig.java
package com.yiibai.config;
import org.springframework.beans.factory.annotation.Autowired;
import org.springframework.context.annotation.Configuration;
import org.springframework.security.config.annotation.authentication.builders.AuthenticationManagerBuilder;
import org.springframework.security.config.annotation.web.builders.HttpSecurity;
import org.springframework.security.config.annotation.web.configuration.EnableWebSecurity;
import org.springframework.security.config.annotation.web.configuration.WebSecurityConfigurerAdapter;
@Configuration
@EnableWebSecurity
public class SecurityConfig extends WebSecurityConfigurerAdapter {
@Autowired
public void configureGlobal(AuthenticationManagerBuilder auth) throws Exception {
auth.inMemoryAuthentication()
.withUser("yiibai").password("123456").roles("USER");
}
//.csrf() is optional, enabled by default, if using WebSecurityConfigurerAdapter constructor
@Override
protected void configure(HttpSecurity http) throws Exception {
http.authorizeRequests()
.antMatchers("/admin/**").access("hasRole('ROLE_USER')")
.and()
.formLogin().loginPage("/login").failureUrl("/login?error")
.usernameParameter("username").passwordParameter("password")
.and()
.logout().logoutSuccessUrl("/login?logout")
.and()
.csrf();
}
}
Spring Security的XML文件相当于以下配置:
<http auto-config="true">
<intercept-url pattern="/admin**" access="ROLE_USER" />
<form-login
login-page="/login"
default-target-url="/welcome"
authentication-failure-url="/login?error"
username-parameter="username"
password-parameter="password" />
<logout logout-success-url="/login?logout" />
<!-- enable csrf protection -->
<csrf/>
</http>
<authentication-manager>
<authentication-provider>
<user-service>
<user name="yiibai" password="123456" authorities="ROLE_USER" />
</user-service>
</authentication-provider>
</authentication-manager>
4. 自定义登录表单
4.1 这个页面用于显示自定义登录表单。如果CSRF保护被启用,记得要在登录和注销表单中添加${_csrf.token}。
login.jsp
<%@ taglib prefix="c" uri="http://java.sun.com/jsp/jstl/core"%>
<html>
<head>
<title>Login Page</title>
<style>
.error {
padding: 15px;
margin-bottom: 20px;
border: 1px solid transparent;
border-radius: 4px;
color: #a94442;
background-color: #f2dede;
border-color: #ebccd1;
}
.msg {
padding: 15px;
margin-bottom: 20px;
border: 1px solid transparent;
border-radius: 4px;
color: #31708f;
background-color: #d9edf7;
border-color: #bce8f1;
}
#login-box {
width: 300px;
padding: 20px;
margin: 100px auto;
background: #fff;
-webkit-border-radius: 2px;
-moz-border-radius: 2px;
border: 1px solid #000;
}
</style>
</head>
<body onload='document.loginForm.username.focus();'>
<h1>Spring Security Custom Login Form (Annotation)</h1>
<div id="login-box">
<h2>Login with Username and Password</h2>
<c:if test="${not empty error}">
<div class="error">${error}</div>
</c:if>
<c:if test="${not empty msg}">
<div class="msg">${msg}</div>
</c:if>
<form name='loginForm'
action="<c:url value='j_spring_security_check' />" method='POST'>
<table>
<tr>
<td>User:</td>
<td><input type='text' name='user' value=''></td>
</tr>
<tr>
<td>Password:</td>
<td><input type='password' name='pass' /></td>
</tr>
<tr>
<td colspan='2'>
<input name="submit" type="submit" value="submit" />
</td>
</tr>
</table>
<input type="hidden"
name="${_csrf.parameterName}" value="${_csrf.token}" />
</form>
</div>
</body>
</html>
4.2 这个页面用来显示欢迎信息,这是一个默认页面。
hello.jsp
<%@page session="false"%>
<html>
<body>
<h1>Title : ${title}</h1>
<h1>Message : ${message}</h1>
</body>
</html>
4.3 这页面有密码保护,只有经过验证的用户才允许访问。
admin.jsp + logout
<%@taglib prefix="c" uri="http://java.sun.com/jsp/jstl/core"%>
<%@page session="true"%>
<html>
<body>
<h1>Title : ${title}</h1>
<h1>Message : ${message}</h1>
<c:url value="/j_spring_security_logout" var="logoutUrl" />
<!-- csrt support -->
<form action="${logoutUrl}" method="post" id="logoutForm">
<input type="hidden"
name="${_csrf.parameterName}"
value="${_csrf.token}" />
</form>
<script>
function formSubmit() {
document.getElementById("logoutForm").submit();
}
</script>
<c:if test="${pageContext.request.userPrincipal.name != null}">
<h2>
Welcome : ${pageContext.request.userPrincipal.name} | <a
href="javascript:formSubmit()"> Logout</a>
</h2>
</c:if>
</body>
</html>
5. Spring MVC控制器
一个简单的控制器,如下所示:
HelloController.java
package com.yiibai.web.controller;
import org.springframework.stereotype.Controller;
import org.springframework.web.bind.annotation.RequestMapping;
import org.springframework.web.bind.annotation.RequestMethod;
import org.springframework.web.bind.annotation.RequestParam;
import org.springframework.web.servlet.ModelAndView;
@Controller
public class HelloController {
@RequestMapping(value = { "/", "/welcome**" }, method = RequestMethod.GET)
public ModelAndView welcomePage() {
ModelAndView model = new ModelAndView();
model.addObject("title", "Spring Security Custom Login Form");
model.addObject("message", "This is welcome page!");
model.setViewName("hello");
return model;
}
@RequestMapping(value = "/admin**", method = RequestMethod.GET)
public ModelAndView adminPage() {
ModelAndView model = new ModelAndView();
model.addObject("title", "Spring Security Custom Login Form");
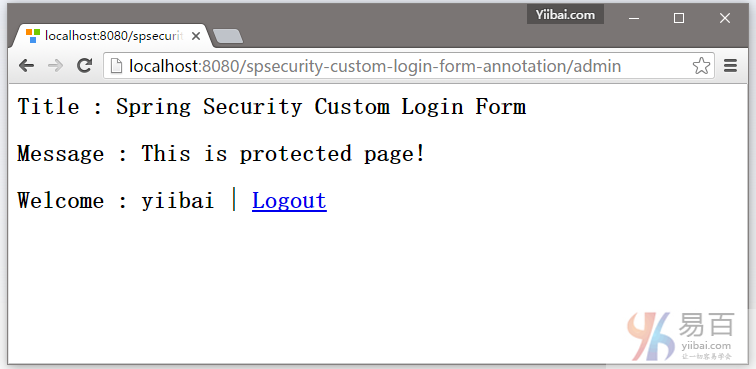
model.addObject("message", "This is protected page!");
model.setViewName("admin");
return model;
}
//Spring Security see this :
@RequestMapping(value = "/login", method = RequestMethod.GET)
public ModelAndView login(
@RequestParam(value = "error", required = false) String error,
@RequestParam(value = "logout", required = false) String logout) {
ModelAndView model = new ModelAndView();
if (error != null) {
model.addObject("error", "Invalid username and password!");
}
if (logout != null) {
model.addObject("msg", "You've been logged out successfully.");
}
model.setViewName("login");
return model;
}
}
6. 初始化类
下面是初始化类,使这个项目是纯粹基于注解。
6.1 初始化类启用Spring Security配置。
SpringSecurityInitializer.java
package com.yiibai.config.core;
import org.springframework.security.web.context.AbstractSecurityWebApplicationInitializer;
public class SpringSecurityInitializer extends AbstractSecurityWebApplicationInitializer {
}
6.2 初始化类启用Spring MVC。
SpringMvcInitializer.java
package com.yiibai.config.core;
import org.springframework.web.servlet.support.AbstractAnnotationConfigDispatcherServletInitializer;
import com.yiibai.config.AppConfig;
public class SpringMvcInitializer
extends AbstractAnnotationConfigDispatcherServletInitializer {
@Override
protected Class<?>[] getRootConfigClasses() {
return new Class[] { AppConfig.class };
}
@Override
protected Class<?>[] getServletConfigClasses() {
return null;
}
@Override
protected String[] getServletMappings() {
return new String[] { "/" };
}
}
AppConfig.java
package com.yiibai.config;
import org.springframework.context.annotation.Bean;
import org.springframework.context.annotation.ComponentScan;
import org.springframework.context.annotation.Configuration;
import org.springframework.context.annotation.Import;
import org.springframework.web.servlet.config.annotation.EnableWebMvc;
import org.springframework.web.servlet.view.InternalResourceViewResolver;
import org.springframework.web.servlet.view.JstlView;
@EnableWebMvc
@Configuration
@ComponentScan({ "com.yiibai.web.*" })
@Import({ SecurityConfig.class })
public class AppConfig {
@Bean
public InternalResourceViewResolver viewResolver() {
InternalResourceViewResolver viewResolver
= new InternalResourceViewResolver();
viewResolver.setViewClass(JstlView.class);
viewResolver.setPrefix("/WEB-INF/pages/");
viewResolver.setSuffix(".jsp");
return viewResolver;
}
}
7. 示例
7.1. 打开欢迎页面 – http://localhost:8080/spsecurity-custom-login-form-annotation/welcome

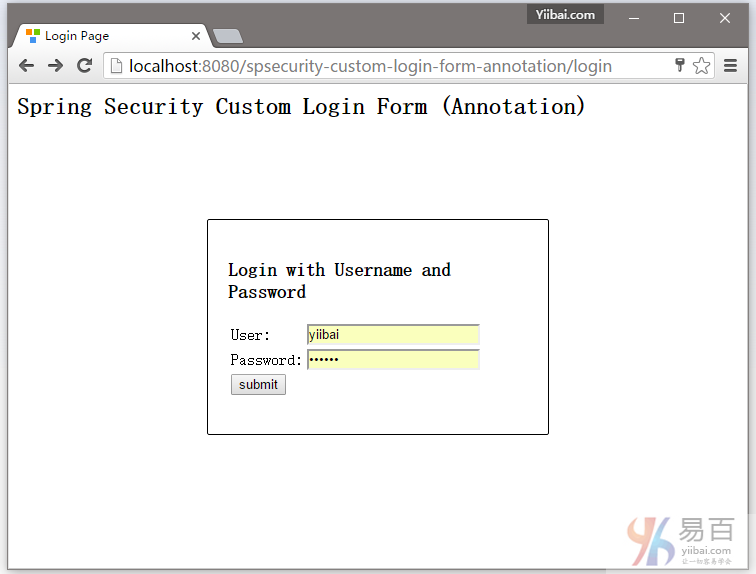
7.2 尝试访问 http://localhost:8080/spsecurity-custom-login-form-annotation/admin 页面,它将会显示自定义登录表单。如下图中所示:
7.3. 如果用户名和密码不正确,将显示页面: http://localhost:8080/spsecurity-custom-login-form-annotation/login?error
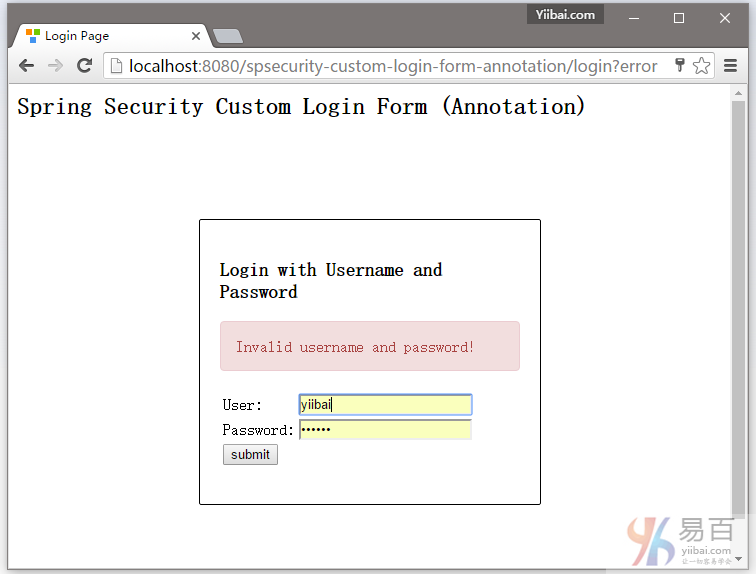
7.4. 如果用户名和密码都正确,Spring将请求重定向到原来请求的URL并显示该网页内容。
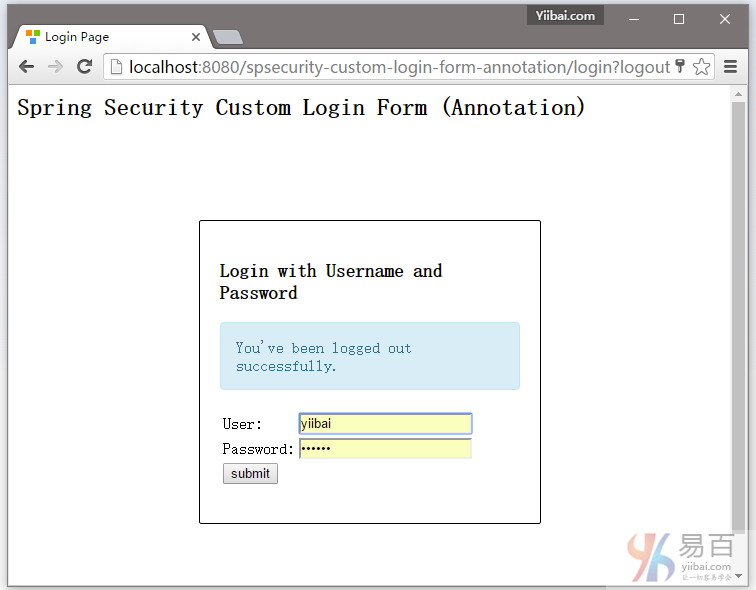
7.5. 尝试注销,它会重定向到 http://localhost:8080/spsecurity-custom-login-form-annotation/login?logout 页面,如下所示:
下载源代码
下载代码 – spsecurity-custom-login-form-annotation.zip (19 KB)
参考
- Spring Security Hello World注释实例
- 创建一个自定义登录表单
- Spring Security 3.2.0.RC1 Highlights: CSRF Protection
- Wikipedia : Cross-site request forgery
本站代码下载:http://www.yiibai.com/siteinfo/download.html
本文属作者原创,转载请注明出处:易百教程 » Spring Security自定义表单登录注释示例
Spring Security注销登录实例 - Spring Security教程™
这篇教程文章将向您展示如何以编程方式注销 Spring Security 用户。使用浏览器的后退按钮也能很好显示。要整个工程完成代码编写并运行后,主页面如下图所示 -
首先我们先来看看工程结构,这里使用的是注释方式来实现的。如下图中所示 -
一般情况下,在你的视图中应该提供一个简单的注销链接来注销用户,类似如下所示:
<%@ page language="java" contentType="text/html; charset=UTF-8" pageEncoding="UTF-8"%>
<%@ taglib prefix="c" uri="http://java.sun.com/jsp/jstl/core"%>
<html>
<head>
<meta http-equiv="Content-Type" content="text/html; charset=UTF-8">
<title>Admin page</title>
</head>
<body>
Dear <strong>${user}</strong>, Welcome to Admin Page.
<a href="<c:url value="/logout" />">Logout</a>
</body>
</html>
没有什么特别的东西。现在,我们只需要在映射控制器到 /logout 注销链接。创建一个新的方法如下所示:
@RequestMapping(value="/logout", method = RequestMethod.GET)
public String logoutPage (HttpServletRequest request, HttpServletResponse response) {
Authentication auth = SecurityContextHolder.getContext().getAuthentication();
if (auth != null){
new SecurityContextLogoutHandler().logout(request, response, auth);
}
return "redirect:/login?logout";//You can redirect wherever you want, but generally it's a good practice to show login screen again.
}
在这里,首先我们确定,如果用户在认证之后使用 SecurityContextHolder.getContext().getAuthentication() 。如果是这样,那么我们调用 SecurityContextLogoutHandler().logout(request, response, auth) 注销用户。
注销调用执行以下操作:
- HTTP的会话失效,那么解除绑定到它的任何对象;
- 将删除 SecurityContext 的身份验证,以防止并发请求的问题;
- 显式地清除当前线程上下文值;
就这样,不需要在应用程序中的任何其他地方处理注销。请注意,你甚至不需要做任何特殊的Spring配置(XML或基于注释),信息如下图所示:
package com.yiibai.springsecurity.configuration;
import org.springframework.beans.factory.annotation.Autowired;
import org.springframework.context.annotation.Configuration;
import org.springframework.security.config.annotation.authentication.builders.AuthenticationManagerBuilder;
import org.springframework.security.config.annotation.web.builders.HttpSecurity;
import org.springframework.security.config.annotation.web.configuration.EnableWebSecurity;
import org.springframework.security.config.annotation.web.configuration.WebSecurityConfigurerAdapter;
@Configuration
@EnableWebSecurity
public class SecurityConfiguration extends WebSecurityConfigurerAdapter {
@Autowired
public void configureGlobalSecurity(AuthenticationManagerBuilder auth) throws Exception {
auth.inMemoryAuthentication().withUser("yiibai").password("123456").roles("USER");
auth.inMemoryAuthentication().withUser("admin").password("123456").roles("ADMIN");
auth.inMemoryAuthentication().withUser("dba").password("123456").roles("ADMIN","DBA");
}
@Override
protected void configure(HttpSecurity http) throws Exception {
http.authorizeRequests()
.antMatchers("/", "/home").permitAll()
.antMatchers("/admin/**").access("hasRole('ADMIN')")
.antMatchers("/db/**").access("hasRole('ADMIN') and hasRole('DBA')")
.and().formLogin().loginPage("/login")
.usernameParameter("ssoId").passwordParameter("password")
.and().exceptionHandling().accessDeniedPage("/Access_Denied");
}
}
如在上面提到的,没有特殊配置来处理注销。
以上如果使用 XML 来配置 Security ,那么格式如下:
<beans:beans xmlns="http://www.springframework.org/schema/security"
xmlns:beans="http://www.springframework.org/schema/beans"
xmlns:xsi="http://www.w3.org/2001/XMLSchema-instance"
xsi:schemaLocation="http://www.springframework.org/schema/beans http://www.springframework.org/schema/beans/spring-beans-4.1.xsd
http://www.springframework.org/schema/security http://www.springframework.org/schema/security/spring-security-4.0.xsd">
<http auto-config="true" >
<intercept-url pattern="/" access="hasRole('USER')" />
<intercept-url pattern="/home" access="hasRole('USER')" />
<intercept-url pattern="/admin**" access="hasRole('ADMIN')" />
<intercept-url pattern="/dba**" access="hasRole('ADMIN') and hasRole('DBA')" />
<form-login login-page="/login"
username-parameter="ssoId"
password-parameter="password"
authentication-failure-url="/Access_Denied" />
</http>
<authentication-manager >
<authentication-provider>
<user-service>
<user name="yiibai" password="123456" authorities="ROLE_USER" />
<user name="admin" password="123456" authorities="ROLE_ADMIN" />
<user name="dba" password="123456" authorities="ROLE_ADMIN,ROLE_DBA" />
</user-service>
</authentication-provider>
</authentication-manager>
</beans:beans>
在本系列教程中的应用程序代码,在之后的文章都是基于这个教程的。所以如果打算往后学习其它教程,请务必清楚理解此文章代码和逻辑,以及相关配置或原理。
发布并运行
如需要自己动手实践,可在文章底部提供的下载链接并点击下载本示例代码,这个项目的完整代码。它是在Servlet 3.0的容器(Tomcat7/8,本文章使用 Tomcat7)上构建和部署运行的。
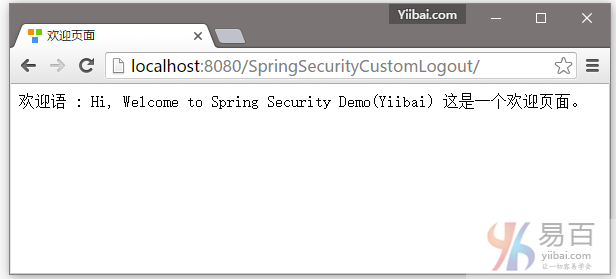
打开您的浏览器,在地址栏中输入网址:http://localhost:8080/SpringSecurityCustomLogout/ ,默认的页面将显示如下 -
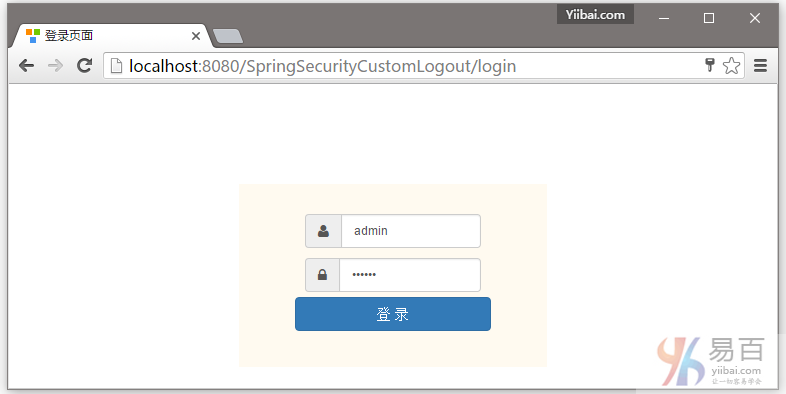
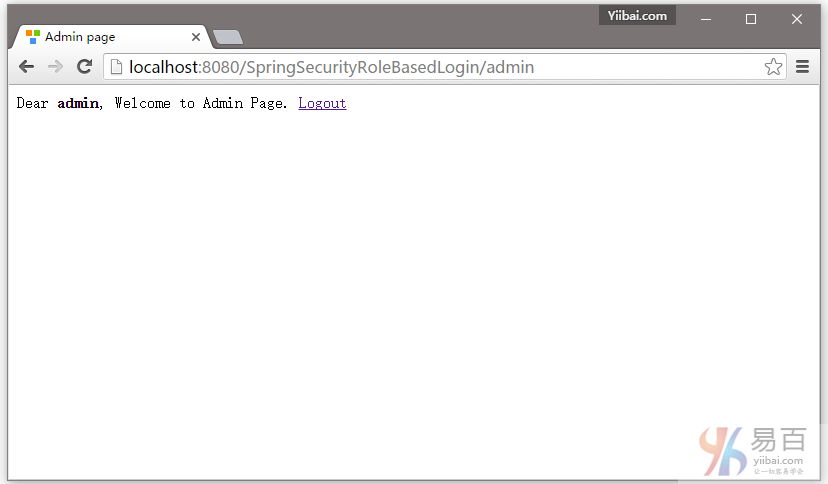
现在访问 http://localhost:8080/SpringSecurityCustomLogout/admin,系统将提示您登录,如下图中所示 -
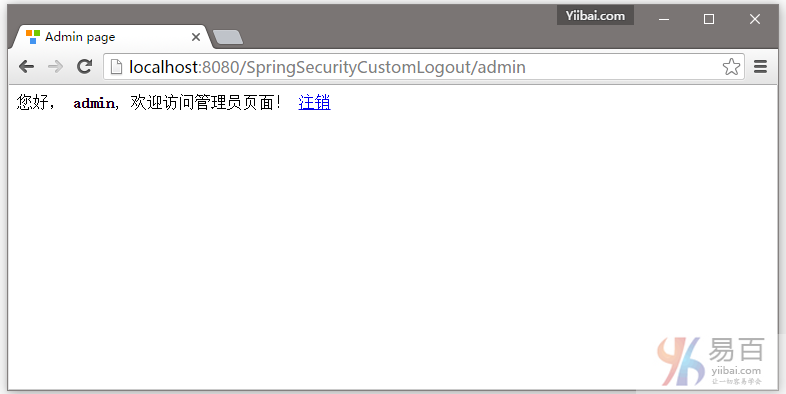
提供用户名和密码(admin/123456)并点击提交,就会看到管理页面。如下图中所示 -
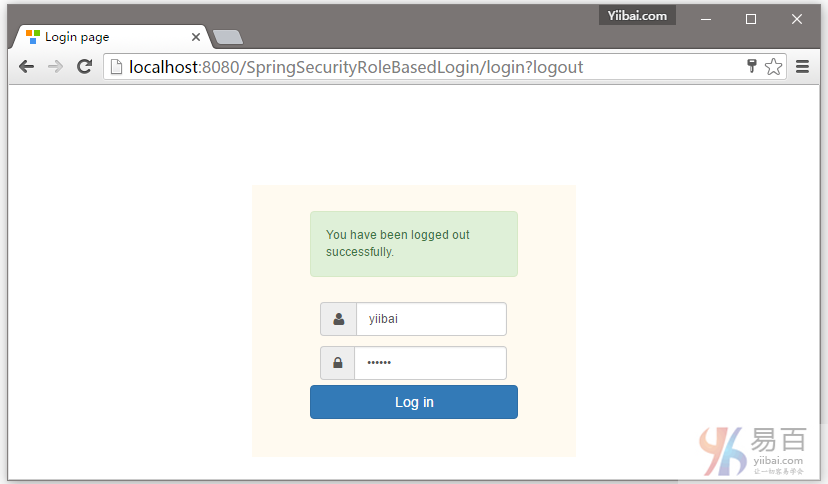
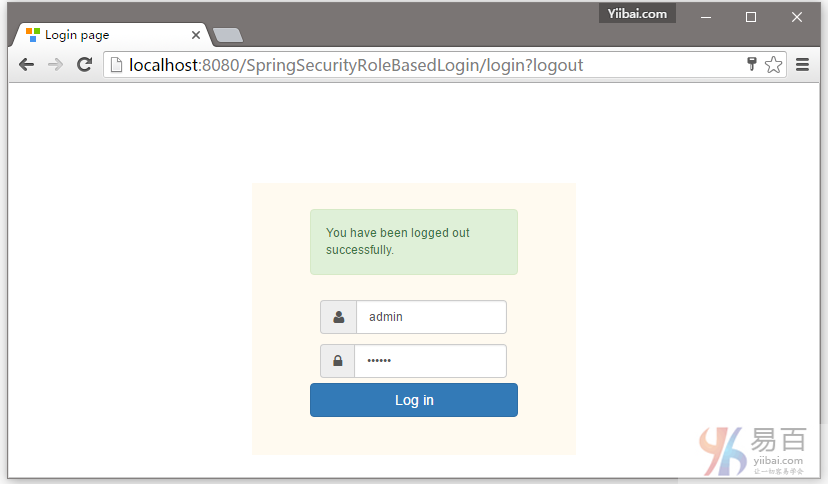
点击注销,将会自动跳转到登录页。如下图中所示 -

点击浏览器后退按钮,将会留在登录屏幕。如下所示 -

而已。下一篇文章将学习如何显示基于已登录用户的角色,使用Spring Security 标签显示 JSP/视图等等。
下载源代码
05-SpringSecurityCustomLogout.zip
本站代码下载:http://www.yiibai.com/siteinfo/download.html
本文属作者原创,转载请注明出处:易百教程 » Spring Security注销登录实例
Spring Security标签库显示视图 - Spring Security教程™
本教程介绍了如何保护视图层,基于已登录用户的角色,使用Spring Security标签来显示/隐藏 Spring MVC Web应用程序的JSP/视图。
完整的工程结构如下所示 -
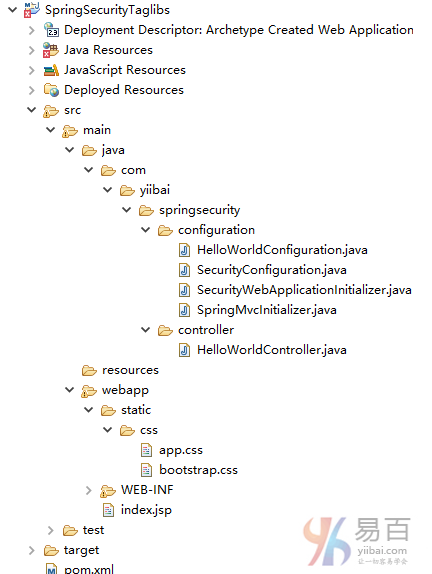
首先,为了使用Spring Security标签,我们需要在pom.xml中包括 spring-security-taglibs 标记库的依赖库,如下图所示:
<dependency>
<groupId>org.springframework.security</groupId>
<artifactId>spring-security-taglibs</artifactId>
<version>4.0.1.RELEASE</version>
</dependency>
然后在下一步在 视图/JSP 包括这些标签库。如下代码所示 -
<%@ taglib prefix="sec" uri="http://www.springframework.org/security/tags"%>
最后,我们就可以使用Spring Security表达式类似 hasRole,hasAnyRole 等。在视图中,如下图所示:
<%@ page language="java" contentType="text/html; charset=UTF-8" pageEncoding="UTF-8"%>
<%@ taglib prefix="c" uri="http://java.sun.com/jsp/jstl/core"%>
<%@ taglib prefix="sec" uri="http://www.springframework.org/security/tags"%>
<html>
<head>
<meta http-equiv="Content-Type" content="text/html; charset=UTF-8">
<title>Welcome page</title>
</head>
<body>
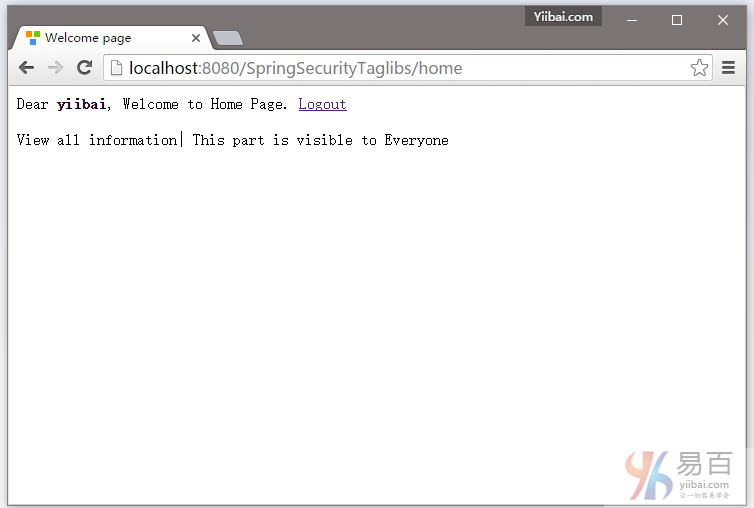
Dear <strong>${user}</strong>, Welcome to Home Page.
<a href="<c:url value="/logout" />">Logout</a>
<br/>
<br/>
<div>
<label>View all information| This part is visible to Everyone</label>
</div>
<br/>
<div>
<sec:authorize access="hasRole('ADMIN')">
<label><a href="#">Edit this page</a> | This part is visible only to ADMIN</label>
</sec:authorize>
</div>
<br/>
<div>
<sec:authorize access="hasRole('ADMIN') and hasRole('DBA')">
<label><a href="#">Start backup</a> | This part is visible only to one who is both ADMIN & DBA</label>
</sec:authorize>
</div>
</html>
这里就是需要基于角色这个有选择地显示/隐藏视图片段,使用Spring Security表达式在视图中。
以下是用于这个例子的 Security 配置:
package com.yiibai.springsecurity.configuration;
import org.springframework.beans.factory.annotation.Autowired;
import org.springframework.context.annotation.Configuration;
import org.springframework.security.config.annotation.authentication.builders.AuthenticationManagerBuilder;
import org.springframework.security.config.annotation.web.builders.HttpSecurity;
import org.springframework.security.config.annotation.web.configuration.EnableWebSecurity;
import org.springframework.security.config.annotation.web.configuration.WebSecurityConfigurerAdapter;
@Configuration
@EnableWebSecurity
public class SecurityConfiguration extends WebSecurityConfigurerAdapter {
@Autowired
public void configureGlobalSecurity(AuthenticationManagerBuilder auth) throws Exception {
auth.inMemoryAuthentication().withUser("yiibai").password("123456").roles("USER");
auth.inMemoryAuthentication().withUser("admin").password("123456").roles("ADMIN");
auth.inMemoryAuthentication().withUser("dba").password("123456").roles("ADMIN","DBA");
}
@Override
protected void configure(HttpSecurity http) throws Exception {
http.authorizeRequests()
.antMatchers("/", "/home").access("hasRole('USER') or hasRole('ADMIN') or hasRole('DBA')")
.and().formLogin().loginPage("/login")
.usernameParameter("ssoId").passwordParameter("password")
.and().exceptionHandling().accessDeniedPage("/Access_Denied");
}
}
上面的安全配置基于XML配置格式如下所示:
<beans:beans xmlns="http://www.springframework.org/schema/security"
xmlns:beans="http://www.springframework.org/schema/beans"
xmlns:xsi="http://www.w3.org/2001/XMLSchema-instance"
xsi:schemaLocation="http://www.springframework.org/schema/beans http://www.springframework.org/schema/beans/spring-beans-4.1.xsd
http://www.springframework.org/schema/security http://www.springframework.org/schema/security/spring-security-4.0.xsd">
<http auto-config="true" >
<intercept-url pattern="/" access="hasRole('USER') or hasRole('ADMIN') or hasRole('DBA')" />
<intercept-url pattern="/home" access="hasRole('USER') or hasRole('ADMIN') or hasRole('DBA')" />
<form-login login-page="/login"
username-parameter="ssoId"
password-parameter="password"
authentication-failure-url="/Access_Denied" />
</http>
<authentication-manager >
<authentication-provider>
<user-service>
<user name="yiibai" password="123456" authorities="ROLE_USER" />
<user name="admin" password="123456" authorities="ROLE_ADMIN" />
<user name="dba" password="123456" authorities="ROLE_ADMIN,ROLE_DBA" />
</user-service>
</authentication-provider>
</authentication-manager>
</beans:beans>
下面是控制器的完整代码,如下所示 -
package com.yiibai.springsecurity.controller;
import javax.servlet.http.HttpServletRequest;
import javax.servlet.http.HttpServletResponse;
import org.springframework.security.core.Authentication;
import org.springframework.security.core.context.SecurityContextHolder;
import org.springframework.security.core.userdetails.UserDetails;
import org.springframework.security.web.authentication.logout.SecurityContextLogoutHandler;
import org.springframework.stereotype.Controller;
import org.springframework.ui.ModelMap;
import org.springframework.web.bind.annotation.RequestMapping;
import org.springframework.web.bind.annotation.RequestMethod;
@Controller
public class HelloWorldController {
@RequestMapping(value = { "/", "/home" }, method = RequestMethod.GET)
public String homePage(ModelMap model) {
model.addAttribute("user", getPrincipal());
return "welcome";
}
@RequestMapping(value = "/Access_Denied", method = RequestMethod.GET)
public String accessDeniedPage(ModelMap model) {
model.addAttribute("user", getPrincipal());
return "accessDenied";
}
@RequestMapping(value = "/login", method = RequestMethod.GET)
public String loginPage() {
return "login";
}
@RequestMapping(value="/logout", method = RequestMethod.GET)
public String logoutPage (HttpServletRequest request, HttpServletResponse response) {
Authentication auth = SecurityContextHolder.getContext().getAuthentication();
if (auth != null){
new SecurityContextLogoutHandler().logout(request, response, auth);
}
return "redirect:/login?logout";
}
private String getPrincipal(){
String userName = null;
Object principal = SecurityContextHolder.getContext().getAuthentication().getPrincipal();
if (principal instanceof UserDetails) {
userName = ((UserDetails)principal).getUsername();
} else {
userName = principal.toString();
}
return userName;
}
}
应用程序的其余部分代码和这个系列的其他教程文章是相同的。
部署和运行
如需要自己动手实践,可在文章底部提供的下载链接并点击下载本示例代码,这个项目的完整代码。它是在Servlet 3.0的容器(Tomcat7/8,本文章使用 Tomcat7)上构建和部署运行的。
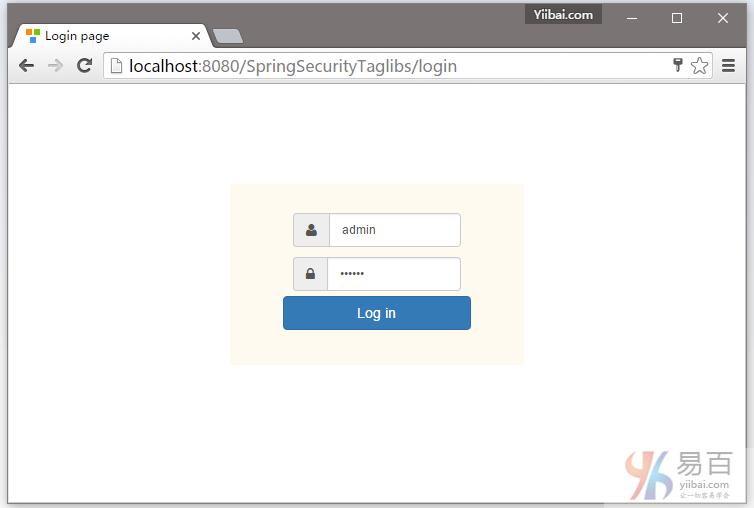
打开您的浏览器,在地址栏中输入网址:http://localhost:8080/SpringSecurityTaglibs,默认的页面将显示(提示登录页面)如下 -
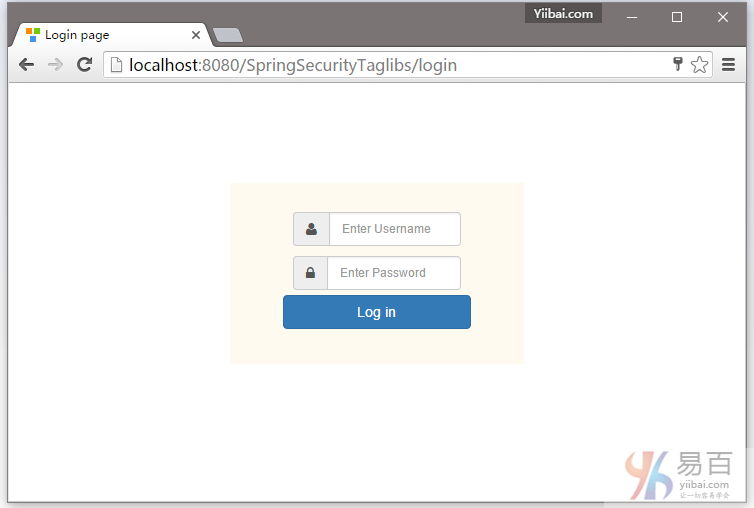
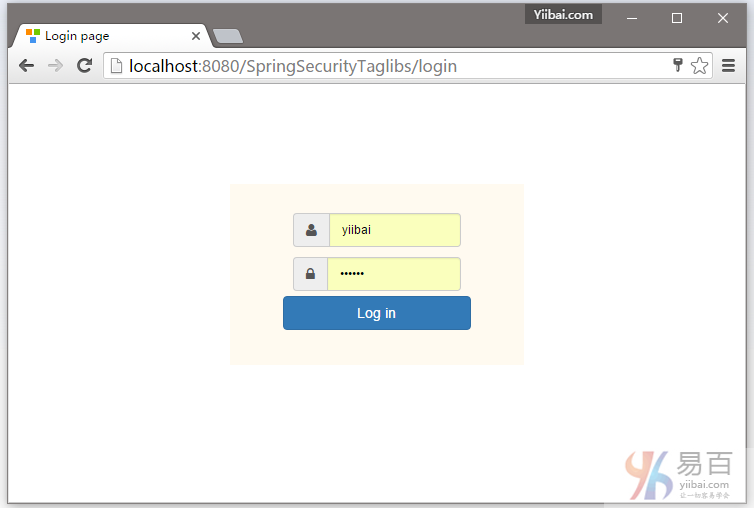
提供用户登录凭据(用户名及密码),首先我们使用 yiibai 这个用户名登录如下所示 -
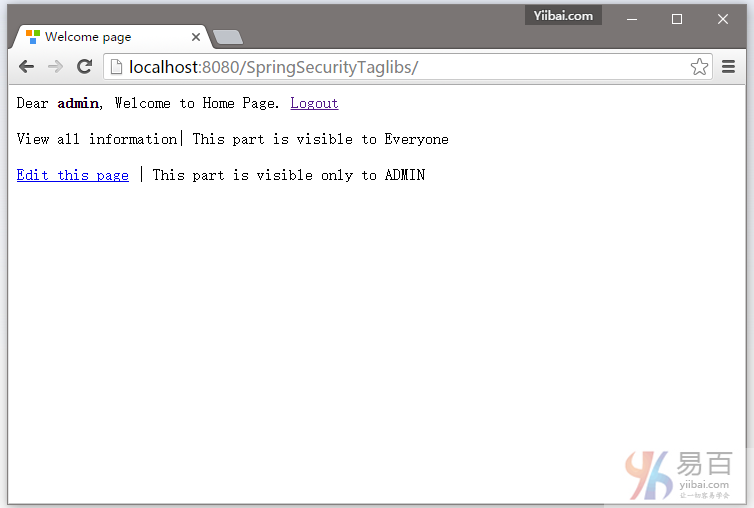
登录成功后可以看到,有限的信息显示页面上,如下图中所示 -
现在点击注销,并使用管理员角色登录,所下图中所示 -
提交登录成功后,你会看到使用ADMIN角色的操作访问,如下图中所示 -
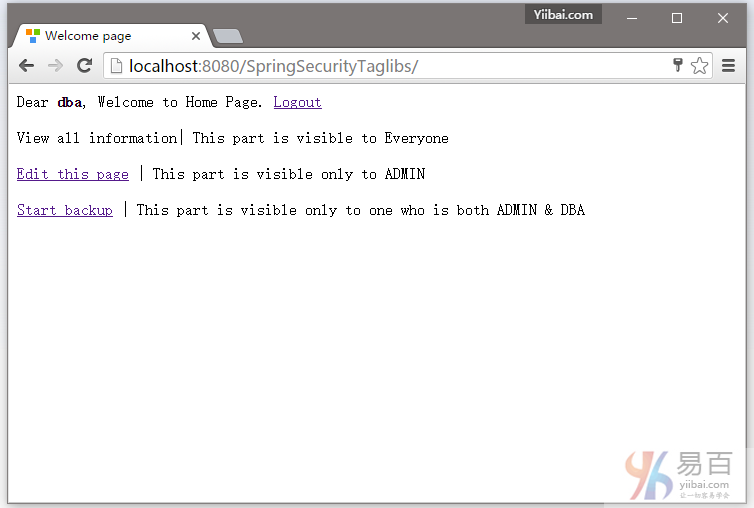
现在注销登录,然后使用 DBA 角色登录,如下图中所示 -

提交登录成功后,你会看到与DBA角色相关的操作访问。

全部就这样(包教不包会)。下一篇教程文章将我们学习如何使用基于角色登录。这意味着可根据自己分配的角色,在登录成功后用户将重定向到不同的URL。
下载代码
参考
本站代码下载:http://www.yiibai.com/siteinfo/download.html
本文属作者原创,转载请注明出处:易百教程 » Spring Security标签库显示视图
Spring Security基于角色登录实例 - Spring Security教程™
本教程介绍了Spring Security的基于角色登录。这意味着程序可根据自己分配的角色在登录时将用户重定向到不同的URL。
最基本的,我们要做的是创建一个自定义的成功处理程序来负责根据登录用户的角色重定向到相应的URL。Spring Security中已经提供了 SimpleUrlAuthenticationSuccessHandler,它包含了成功处理程序的逻辑。我们只是用自己的重定向逻辑扩展它来实现我们的目标。
当这个处理程序成功,我们将通过注册 formLogin() 或 loginPage()。完整的例子如下所示。
需要用到的技术,如下所示 -
- Spring 4.1.6.RELEASE
- Spring Security 4.0.1.RELEASE
- Maven 3
- JDK 1.8
- Tomcat 7
- Eclipse JUNO Service Release 2
让我们现在就开始,建议您按照以下步骤一起来实践。
步骤1: 工程目录结构
现在,让我们解释在上面添加的结构每个细节提及的内容。
第2步:更新pom.xml,包括所需依懒
<project xmlns="http://maven.apache.org/POM/4.0.0" xmlns:xsi="http://www.w3.org/2001/XMLSchema-instance"
xsi:schemaLocation="http://maven.apache.org/POM/4.0.0 http://maven.apache.org/xsd/maven-4.0.0.xsd">
<modelVersion>4.0.0</modelVersion>
<groupId>com.yiibai.springsecurity</groupId>
<artifactId>SpringSecurityRoleBasedLogin</artifactId>
<version>1.0.0</version>
<packaging>war</packaging>
<name>SpringSecurityRoleBasedLogin</name>
<properties>
<springframework.version>4.1.6.RELEASE</springframework.version>
<springsecurity.version>4.0.1.RELEASE</springsecurity.version>
</properties>
<dependencies>
<!-- Spring -->
<dependency>
<groupId>org.springframework</groupId>
<artifactId>spring-core</artifactId>
<version>${springframework.version}</version>
</dependency>
<dependency>
<groupId>org.springframework</groupId>
<artifactId>spring-web</artifactId>
<version>${springframework.version}</version>
</dependency>
<dependency>
<groupId>org.springframework</groupId>
<artifactId>spring-webmvc</artifactId>
<version>${springframework.version}</version>
</dependency>
<!-- Spring Security -->
<dependency>
<groupId>org.springframework.security</groupId>
<artifactId>spring-security-web</artifactId>
<version>${springsecurity.version}</version>
</dependency>
<dependency>
<groupId>org.springframework.security</groupId>
<artifactId>spring-security-config</artifactId>
<version>${springsecurity.version}</version>
</dependency>
<dependency>
<groupId>javax.servlet</groupId>
<artifactId>javax.servlet-api</artifactId>
<version>3.1.0</version>
</dependency>
<dependency>
<groupId>javax.servlet.jsp</groupId>
<artifactId>javax.servlet.jsp-api</artifactId>
<version>2.3.1</version>
</dependency>
<dependency>
<groupId>javax.servlet</groupId>
<artifactId>jstl</artifactId>
<version>1.2</version>
</dependency>
</dependencies>
<build>
<pluginManagement>
<plugins>
<plugin>
<groupId>org.apache.maven.plugins</groupId>
<artifactId>maven-compiler-plugin</artifactId>
<version>3.2</version>
<configuration>
<source>1.7</source>
<target>1.7</target>
</configuration>
</plugin>
<plugin>
<groupId>org.apache.maven.plugins</groupId>
<artifactId>maven-war-plugin</artifactId>
<version>2.4</version>
<configuration>
<warSourceDirectory>src/main/webapp</warSourceDirectory>
<warName>SpringSecurityRoleBasedLoginExample</warName>
<failOnMissingWebXml>false</failOnMissingWebXml>
</configuration>
</plugin>
</plugins>
</pluginManagement>
<finalName>SpringSecurityRoleBasedLogin</finalName>
</build>
</project>
步骤3: 添加Spring Security配置类
这里最重要一个步骤,在我们的应用程序中添加 Spring Security 是来创建Spring Security的Java配置。 这个结构将创建用来负责应用程序内所有安全(保护应用程序的URL,验证提交用户名和密码,重定向到日志中的形式等等)的springSecurityFilterChain Servlet过滤程序。
package com.yiibai.springsecurity.configuration;
import org.springframework.beans.factory.annotation.Autowired;
import org.springframework.context.annotation.Configuration;
import org.springframework.security.config.annotation.authentication.builders.AuthenticationManagerBuilder;
import org.springframework.security.config.annotation.web.builders.HttpSecurity;
import org.springframework.security.config.annotation.web.configuration.EnableWebSecurity;
import org.springframework.security.config.annotation.web.configuration.WebSecurityConfigurerAdapter;
@Configuration
@EnableWebSecurity
public class SecurityConfiguration extends WebSecurityConfigurerAdapter {
@Autowired
CustomSuccessHandler customSuccessHandler;
@Autowired
public void configureGlobalSecurity(AuthenticationManagerBuilder auth) throws Exception {
auth.inMemoryAuthentication().withUser("yiibai").password("123456").roles("USER");
auth.inMemoryAuthentication().withUser("admin").password("123456").roles("ADMIN");
auth.inMemoryAuthentication().withUser("dba").password("123456").roles("ADMIN","DBA");
}
@Override
protected void configure(HttpSecurity http) throws Exception {
http.authorizeRequests()
.antMatchers("/", "/home").access("hasRole('USER')")
.antMatchers("/admin/**").access("hasRole('ADMIN')")
.antMatchers("/db/**").access("hasRole('ADMIN') and hasRole('DBA')")
.and().formLogin().loginPage("/login").successHandler(customSuccessHandler)
.usernameParameter("ssoId").passwordParameter("password")
.and().csrf()
.and().exceptionHandling().accessDeniedPage("/Access_Denied");
}
}
这个类是类似的,只不过有一些重要区别于之前教程文章:
formLogin().loginPage("/login").successHandler(customSuccessHandler). 现在来看看 successHandler。这个类[如下所示]负责基于自定义逻辑的重定向,这对我们来说是根据他的角色[USER / ADMIN / DBA]用户重定向[ home/admin/db]。
以上的安全配置使用XML配置格式如下所示:
<beans:beans xmlns="http://www.springframework.org/schema/security"
xmlns:beans="http://www.springframework.org/schema/beans"
xmlns:xsi="http://www.w3.org/2001/XMLSchema-instance"
xsi:schemaLocation="http://www.springframework.org/schema/beans http://www.springframework.org/schema/beans/spring-beans-4.1.xsd
http://www.springframework.org/schema/security http://www.springframework.org/schema/security/spring-security-4.0.xsd">
<http auto-config="true" >
<intercept-url pattern="/" access="hasRole('USER')" />
<intercept-url pattern="/home" access="hasRole('USER')" />
<intercept-url pattern="/admin**" access="hasRole('ADMIN')" />
<intercept-url pattern="/dba**" access="hasRole('ADMIN') and hasRole('DBA')" />
<form-login login-page="/login"
username-parameter="ssoId"
password-parameter="password"
authentication-success-handler-ref="customSuccessHandler"
authentication-failure-url="/Access_Denied" />
<csrf/>
</http>
<authentication-manager >
<authentication-provider>
<user-service>
<user name="yiibai" password="123456" authorities="ROLE_USER" />
<user name="admin" password="123456" authorities="ROLE_ADMIN" />
<user name="dba" password="123456" authorities="ROLE_ADMIN,ROLE_DBA" />
</user-service>
</authentication-provider>
</authentication-manager>
<beans:bean id="customSuccessHandler" class="com.websystique.springsecurity.configuration.CustomSuccessHandler" />
</beans:beans>
下面是上面提及成功处理的类,如下图的所示 -
package com.websystique.springsecurity.configuration;
import java.io.IOException;
import java.util.ArrayList;
import java.util.Collection;
import java.util.List;
import javax.servlet.http.HttpServletRequest;
import javax.servlet.http.HttpServletResponse;
import org.springframework.security.core.Authentication;
import org.springframework.security.core.GrantedAuthority;
import org.springframework.security.web.DefaultRedirectStrategy;
import org.springframework.security.web.RedirectStrategy;
import org.springframework.security.web.authentication.SimpleUrlAuthenticationSuccessHandler;
import org.springframework.stereotype.Component;
@Component
public class CustomSuccessHandler extends SimpleUrlAuthenticationSuccessHandler {
private RedirectStrategy redirectStrategy = new DefaultRedirectStrategy();
@Override
protected void handle(HttpServletRequest request, HttpServletResponse response, Authentication authentication)
throws IOException {
String targetUrl = determineTargetUrl(authentication);
if (response.isCommitted()) {
System.out.println("Can't redirect");
return;
}
redirectStrategy.sendRedirect(request, response, targetUrl);
}
/*
* This method extracts the roles of currently logged-in user and returns
* appropriate URL according to his/her role.
*/
protected String determineTargetUrl(Authentication authentication) {
String url = "";
Collection<? extends GrantedAuthority> authorities = authentication.getAuthorities();
List<String> roles = new ArrayList<String>();
for (GrantedAuthority a : authorities) {
roles.add(a.getAuthority());
}
if (isDba(roles)) {
url = "/db";
} else if (isAdmin(roles)) {
url = "/admin";
} else if (isUser(roles)) {
url = "/home";
} else {
url = "/accessDenied";
}
return url;
}
private boolean isUser(List<String> roles) {
if (roles.contains("ROLE_USER")) {
return true;
}
return false;
}
private boolean isAdmin(List<String> roles) {
if (roles.contains("ROLE_ADMIN")) {
return true;
}
return false;
}
private boolean isDba(List<String> roles) {
if (roles.contains("ROLE_DBA")) {
return true;
}
return false;
}
public void setRedirectStrategy(RedirectStrategy redirectStrategy) {
this.redirectStrategy = redirectStrategy;
}
protected RedirectStrategy getRedirectStrategy() {
return redirectStrategy;
}
}
注意:看看如何扩展 SimpleUrlAuthenticationSuccessHandler类和overridinghandle()方法,这个方法简单地使用配置RedirectStrategy[默认在这种情况下]调用重定向,由用户定义determineTargetUrl方法返回URL。此方法提取当前认证对象用户记录的角色,然后构造基于角色有相应的URL。最后RedirectStrategy,这是负责 Spring Security 框架内的所有重定向,请求重定向到指定的URL。
以下步骤:其余的都是和之前教程文章中的内容相同了。
第4步:使用war注册springSecurityFilter
下面指定的初始化类使用应用程序 war [步骤3中创建] 来注册springSecurityFilter 。
package com.websystique.springsecurity.configuration;
import org.springframework.security.web.context.AbstractSecurityWebApplicationInitializer;
public class SecurityWebApplicationInitializer extends AbstractSecurityWebApplicationInitializer {
}
上面在XML配置格式中的设置为:
<filter>
<filter-name>springSecurityFilterChain</filter-name>
<filter-class>org.springframework.web.filter.DelegatingFilterProxy</filter-class>
</filter>
<filter-mapping>
<filter-name>springSecurityFilterChain</filter-name>
<url-pattern>/*</url-pattern>
</filter-mapping>
第5步: 添加控制器
package com.yiibai.springsecurity.controller;
import javax.servlet.http.HttpServletRequest;
import javax.servlet.http.HttpServletResponse;
import org.springframework.security.core.Authentication;
import org.springframework.security.core.context.SecurityContextHolder;
import org.springframework.security.core.userdetails.UserDetails;
import org.springframework.security.web.authentication.logout.SecurityContextLogoutHandler;
import org.springframework.stereotype.Controller;
import org.springframework.ui.ModelMap;
import org.springframework.web.bind.annotation.RequestMapping;
import org.springframework.web.bind.annotation.RequestMethod;
@Controller
public class HelloWorldController {
@RequestMapping(value = { "/", "/home" }, method = RequestMethod.GET)
public String homePage(ModelMap model) {
model.addAttribute("user", getPrincipal());
return "welcome";
}
@RequestMapping(value = "/admin", method = RequestMethod.GET)
public String adminPage(ModelMap model) {
model.addAttribute("user", getPrincipal());
return "admin";
}
@RequestMapping(value = "/db", method = RequestMethod.GET)
public String dbaPage(ModelMap model) {
model.addAttribute("user", getPrincipal());
return "dba";
}
@RequestMapping(value = "/Access_Denied", method = RequestMethod.GET)
public String accessDeniedPage(ModelMap model) {
model.addAttribute("user", getPrincipal());
return "accessDenied";
}
@RequestMapping(value = "/login", method = RequestMethod.GET)
public String loginPage() {
return "login";
}
@RequestMapping(value="/logout", method = RequestMethod.GET)
public String logoutPage (HttpServletRequest request, HttpServletResponse response) {
Authentication auth = SecurityContextHolder.getContext().getAuthentication();
if (auth != null){
new SecurityContextLogoutHandler().logout(request, response, auth);
}
return "redirect:/login?logout";
}
private String getPrincipal(){
String userName = null;
Object principal = SecurityContextHolder.getContext().getAuthentication().getPrincipal();
if (principal instanceof UserDetails) {
userName = ((UserDetails)principal).getUsername();
} else {
userName = principal.toString();
}
return userName;
}
}
第6步: 添加SpringMVC配置类
package com.spring.springsecurity.configuration;
import org.springframework.context.annotation.Bean;
import org.springframework.context.annotation.ComponentScan;
import org.springframework.context.annotation.Configuration;
import org.springframework.web.servlet.ViewResolver;
import org.springframework.web.servlet.config.annotation.EnableWebMvc;
import org.springframework.web.servlet.view.InternalResourceViewResolver;
import org.springframework.web.servlet.config.annotation.ResourceHandlerRegistry;
import org.springframework.web.servlet.config.annotation.WebMvcConfigurerAdapter;
import org.springframework.web.servlet.view.JstlView;
@Configuration
@EnableWebMvc
@ComponentScan(basePackages = "com.yiibai.springsecurity")
public class HelloWorldConfiguration extends WebMvcConfigurerAdapter{
@Bean
public ViewResolver viewResolver() {
InternalResourceViewResolver viewResolver = new InternalResourceViewResolver();
viewResolver.setViewClass(JstlView.class);
viewResolver.setPrefix("/WEB-INF/views/");
viewResolver.setSuffix(".jsp");
return viewResolver;
}
/*
* Configure ResourceHandlers to serve static resources like CSS/ Javascript etc...
*/
@Override
public void addResourceHandlers(ResourceHandlerRegistry registry) {
registry.addResourceHandler("/static/**").addResourceLocations("/static/");
}
}
第7步: 添加初始化类
package com.yiibai.springsecurity.configuration;
import org.springframework.web.servlet.support.AbstractAnnotationConfigDispatcherServletInitializer;
public class SpringMvcInitializer extends AbstractAnnotationConfigDispatcherServletInitializer {
@Override
protected Class<?>[] getRootConfigClasses() {
return new Class[] { HelloWorldConfiguration.class };
}
@Override
protected Class<?>[] getServletConfigClasses() {
return null;
}
@Override
protected String[] getServletMappings() {
return new String[] { "/" };
}
}
第8步: 添加视图
login.jsp
这个视图中还包含了用于登录面板布局CSS。
<%@ page language="java" contentType="text/html; charset=ISO-8859-1" pageEncoding="ISO-8859-1"%>
<%@ taglib prefix="c" uri="http://java.sun.com/jsp/jstl/core"%>
<html>
<head>
<meta http-equiv="Content-Type" content="text/html; charset=ISO-8859-1">
<title>Login page</title>
<link href="<c:url value='/static/css/bootstrap.css' />" rel="stylesheet"></link>
<link href="<c:url value='/static/css/app.css' />" rel="stylesheet"></link>
<link rel="stylesheet" type="text/css" href="//cdnjs.cloudflare.com/ajax/libs/font-awesome/4.2.0/css/font-awesome.css" />
</head>
<body>
<div id="mainWrapper">
<div class="login-container">
<div class="login-card">
<div class="login-form">
<c:url var="loginUrl" value="/login" />
<form action="${loginUrl}" method="post" class="form-horizontal">
<c:if test="${param.error != null}">
<div class="alert alert-danger">
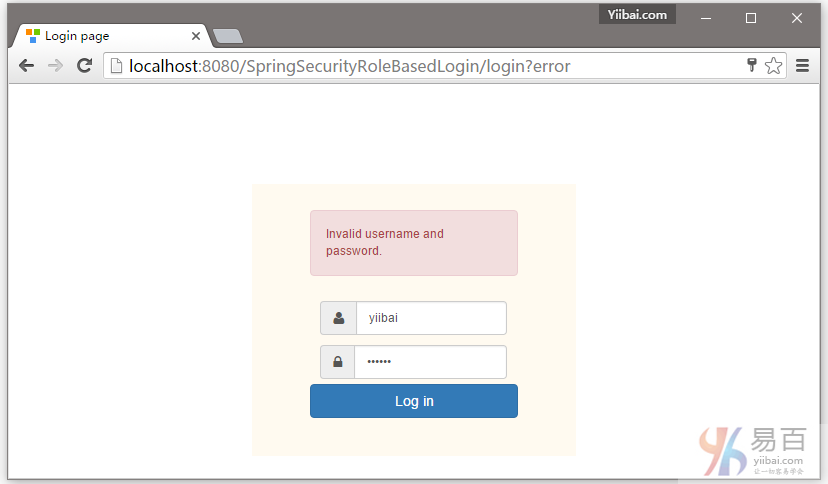
<p>Invalid username and password.</p>
</div>
</c:if>
<c:if test="${param.logout != null}">
<div class="alert alert-success">
<p>You have been logged out successfully.</p>
</div>
</c:if>
<div class="input-group input-sm">
<label class="input-group-addon" for="username"><i class="fa fa-user"></i></label>
<input type="text" class="form-control" id="username" name="ssoId" placeholder="Enter Username" required>
</div>
<div class="input-group input-sm">
<label class="input-group-addon" for="password"><i class="fa fa-lock"></i></label>
<input type="password" class="form-control" id="password" name="password" placeholder="Enter Password" required>
</div>
<input type="hidden" name="${_csrf.parameterName}" value="${_csrf.token}" />
<div class="form-actions">
<input type="submit"
class="btn btn-block btn-primary btn-default" value="Log in">
</div>
</form>
</div>
</div>
</div>
</div>
</body>
</html>
正如在之前的教程文章提到的还有,CSRF关联上述JSP行:
<input type="hidden" name="${_csrf.parameterName}" value="${_csrf.token}" /></strong>
这是需要用来防止跨站请求伪造攻击。正如您所看到的,CSRF参数可在JSP EL表达式访问,还可以通过添加以下到JSP的顶部来强行执行EL表达式计算:
<%@ page isELIgnored="false"%>
welcome.jsp
<%@ page language="java" contentType="text/html; charset=ISO-8859-1" pageEncoding="ISO-8859-1"%>
<%@ taglib prefix="c" uri="http://java.sun.com/jsp/jstl/core"%>
<html>
<head>
<meta http-equiv="Content-Type" content="text/html; charset=ISO-8859-1">
<title>Welcome page</title>
</head>
<body>
Dear <strong>${user}</strong>, Welcome to Home Page.
<a href="<c:url value="/logout" />">Logout</a>
</body>
</html>
admin.jsp
<%@ page language="java" contentType="text/html; charset=UTF-8" pageEncoding="UTF-8"%>
<%@ taglib prefix="c" uri="http://java.sun.com/jsp/jstl/core"%>
<html>
<head>
<meta http-equiv="Content-Type" content="text/html; charset=ISO-8859-1">
<title>Admin page</title>
</head>
<body>
Dear <strong>${user}</strong>, Welcome to Admin Page.
<a href="<c:url value="/logout" />">Logout</a>
</body>
</html>
dba.jsp
<%@ page language="java" contentType="text/html; charset=ISO-8859-1" pageEncoding="ISO-8859-1"%>
<%@ taglib prefix="c" uri="http://java.sun.com/jsp/jstl/core"%>
<html>
<head>
<meta http-equiv="Content-Type" content="text/html; charset=ISO-8859-1">
<title>DBA page</title>
</head>
<body>
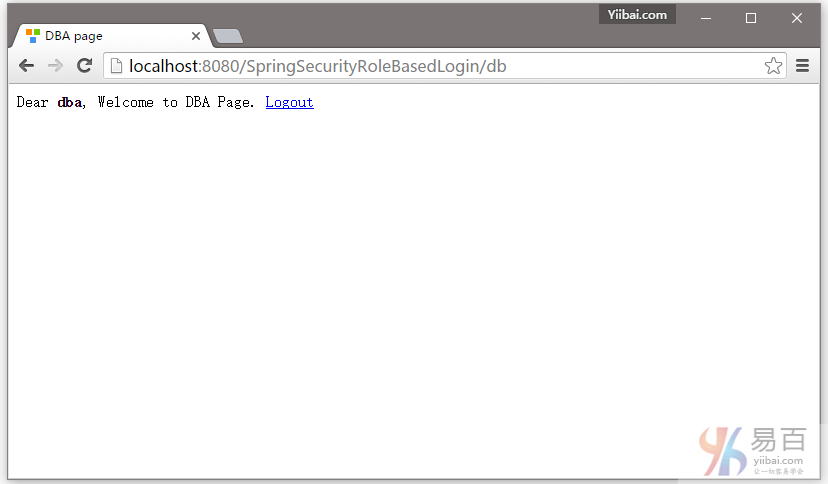
Dear <strong>${user}</strong>, Welcome to DBA Page.
<a href="<c:url value="/logout" />">Logout</a>
</body>
</html>
accessDenied.jsp
<%@ page language="java" contentType="text/html; charset=ISO-8859-1" pageEncoding="ISO-8859-1"%>
<%@ taglib prefix="c" uri="http://java.sun.com/jsp/jstl/core"%>
<html>
<head>
<meta http-equiv="Content-Type" content="text/html; charset=ISO-8859-1">
<title>AccessDenied page</title>
</head>
<body>
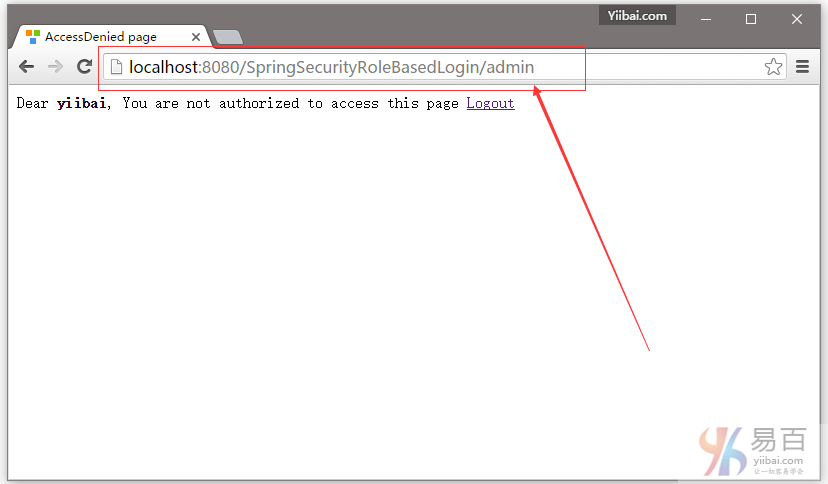
Dear <strong>${user}</strong>, You are not authorized to access this page
<a href="<c:url value="/logout" />">Logout</a>
</body>
</html>
这里是快速一个CSS布局,只是大概进行美化,当然你也可以做得更漂亮一些。
app.css
html{
background-color:#2F2F2F;
}
body, #mainWrapper {
height: 100%;
}
body, #mainWrapper, .form-control{
font-size:14px!important;
}
#mainWrapper {
height: 100vh;
padding-left:10px;
padding-right:10px;
padding-bottom:10px;
}
#authHeaderWrapper{
clear:both;
width: 100%;
height:3%;
padding-top:5px;
padding-bottom:5px;
}
.login-container {
margin-top: 100px;
background-color: floralwhite;
width: 40%;
left: 30%;
position: absolute;
}
.login-card {
width: 80%;
margin: auto;
}
.login-form {
padding: 10%;
}
第9步:构建和部署应用程序
现在构造 war(通过 eclipse/m2eclipse)或通过Maven的命令行(mvn clean install)。部署WAR文件到Servlet3.0容器。由于这里我使用的是在 eclipse 中配置 Tomcat,可以直接发布到 Tomcat 服务容器中。如果不知道怎么使用,可以参考:http://www.yiibai.com/maven/create-a-maven-web-project-with-eclipse.html
运行应用程序
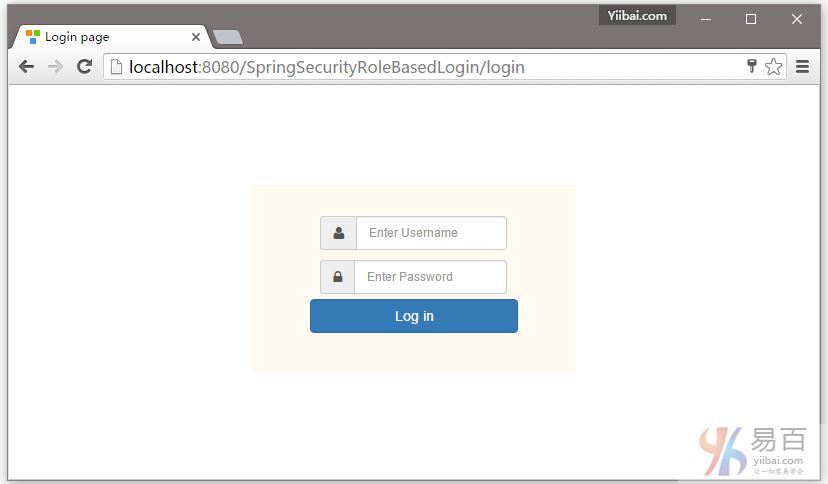
打开浏览器,然后访问:http://localhost:8080/SpringSecurityRoleBasedLogin ,如果没有任何错误,将提示登录 -
DBA提供的凭据(用户名和密码登录),如下所示:

提交,您将会被跳转到 /db 页面,作为登录的用户具有DBA角色(基于角色的登录)。如下图中所示 -
现在注销,并填写用户(yiibai)角色的凭据(使用用户名和密码)登录。
首先提供一个错误的密码,然后点击登录 -
提供正确的用户角色的凭据,您将被重定向到主页。

现在尝试访问管理页面。您应该看到拒绝访问页面。
现在,注销并使用管理员凭据登录,您将会被重向到URL:/admin 。如下图中所示 -
用户 admin 登录成功后的页面,如下所示 -
到这里就结束了。在下一篇文章中将学习使用基于Hibernate的注解方法的Spring Security数据库认证。
下载源代码
07-SpringSecurityRoleBasedLogin.zip
参考
本站代码下载:http://www.yiibai.com/siteinfo/download.html
本文属作者原创,转载请注明出处:易百教程 » Spring Security基于角色登录实例
Spring Security与Hibernate整合以及XML实例 - Spring Security教程™
本教程演示了使用Spring Security4 集成Hibernate执行数据库认证,这里是一个在Spring MVC注解+XML配置的应用程序实例。
在这篇文章中,我们将使用基于Hibernate注解 + XML方法,来学习 Spring Security 的数据库认证。在之前的教程文章中,我们已经有学习过了 Spring Security 基于内存的认证。但是,在实际项目中证书通常存储在数据库或LDAP中。在这篇文章中,我们将通过配置 Spring security 和使用Hibernate 来直接对数据库凭据验证的一个完整的例子。
和之前的在以前的文章中的内存认证相比有什么样的变化?
唯一的主要变化是身份验证方法本身。
如果查看之前的文章,下图所示就是在内存中的身份验证设置代码实现:
@Configuration
@EnableWebSecurity
public class SecurityConfiguration extends WebSecurityConfigurerAdapter {
@Autowired
public void configureGlobalSecurity(AuthenticationManagerBuilder auth) throws Exception {
auth.inMemoryAuthentication().withUser("yiibai").password("123456").roles("USER");
auth.inMemoryAuthentication().withUser("admin").password("123456").roles("ADMIN");
auth.inMemoryAuthentication().withUser("dba").password("123456").roles("ADMIN","DBA");
}
...
...
我们将修改为下面代码来支持数据库认证:
@Configuration
@EnableWebSecurity
public class SecurityConfiguration extends WebSecurityConfigurerAdapter {
@Autowired
@Qualifier("customUserDetailsService")
UserDetailsService userDetailsService;
@Autowired
public void configureGlobalSecurity(AuthenticationManagerBuilder auth) throws Exception {
auth.userDetailsService(userDetailsService);
}
所有凭据现在存储在数据库中,并且Spring Security将通过org.springframework.security.core.userdetails.UserDetailsService实现可以访问。我们将提供 UserDetailsService 最终实现,以及 userService 方法来从数据库中访问数据。
这篇文章的其余部分公共部分的 Spring Security,Spring MVC和Hibernate 设置我们在前面的教程看过很多遍了。
以下这些技术需要使用:
- Spring 4.1.6.RELEASE
- Spring Security 4.0.1.RELEASE
- Hibernate 4.3.6.Final
- MySQL Server 5.6
- Maven 3
- JDK 1.7
- Tomcat 8.0.21
- Eclipse JUNO Service Release 2
现在,让我们一步一步地开始吧!
第1步: 工程目录结构
以下将是最终的项目结构:
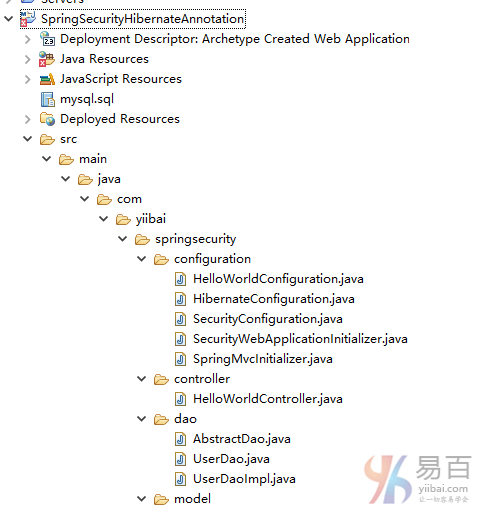
现在,让我们解释上面每个提到的结构内容。
第2步: 更新pom.xml以包括所需的依懒
<project xmlns="http://maven.apache.org/POM/4.0.0" xmlns:xsi="http://www.w3.org/2001/XMLSchema-instance"
xsi:schemaLocation="http://maven.apache.org/POM/4.0.0 http://maven.apache.org/xsd/maven-4.0.0.xsd">
<modelVersion>4.0.0</modelVersion>
<groupId>com.yiibai.springsecurity</groupId>
<artifactId>SpringSecurityHibernateAnnotationExample</artifactId>
<version>1.0.0</version>
<packaging>war</packaging>
<name>SpringSecurityHibernateAnnotation</name>
<properties>
<springframework.version>4.1.6.RELEASE</springframework.version>
<springsecurity.version>4.0.1.RELEASE</springsecurity.version>
<hibernate.version>4.3.6.Final</hibernate.version>
<mysql.connector.version>5.1.31</mysql.connector.version>
</properties>
<dependencies>
<!-- Spring -->
<dependency>
<groupId>org.springframework</groupId>
<artifactId>spring-core</artifactId>
<version>${springframework.version}</version>
</dependency>
<dependency>
<groupId>org.springframework</groupId>
<artifactId>spring-web</artifactId>
<version>${springframework.version}</version>
</dependency>
<dependency>
<groupId>org.springframework</groupId>
<artifactId>spring-webmvc</artifactId>
<version>${springframework.version}</version>
</dependency>
<dependency>
<groupId>org.springframework</groupId>
<artifactId>spring-tx</artifactId>
<version>${springframework.version}</version>
</dependency>
<dependency>
<groupId>org.springframework</groupId>
<artifactId>spring-orm</artifactId>
<version>${springframework.version}</version>
</dependency>
<!-- Spring Security -->
<dependency>
<groupId>org.springframework.security</groupId>
<artifactId>spring-security-web</artifactId>
<version>${springsecurity.version}</version>
</dependency>
<dependency>
<groupId>org.springframework.security</groupId>
<artifactId>spring-security-config</artifactId>
<version>${springsecurity.version}</version>
</dependency>
<!-- Hibernate -->
<dependency>
<groupId>org.hibernate</groupId>
<artifactId>hibernate-core</artifactId>
<version>${hibernate.version}</version>
</dependency>
<!-- MySQL -->
<dependency>
<groupId>mysql</groupId>
<artifactId>mysql-connector-java</artifactId>
<version>${mysql.connector.version}</version>
</dependency>
<dependency>
<groupId>javax.servlet</groupId>
<artifactId>javax.servlet-api</artifactId>
<version>3.1.0</version>
</dependency>
<dependency>
<groupId>javax.servlet.jsp</groupId>
<artifactId>javax.servlet.jsp-api</artifactId>
<version>2.3.1</version>
</dependency>
<dependency>
<groupId>javax.servlet</groupId>
<artifactId>jstl</artifactId>
<version>1.2</version>
</dependency>
</dependencies>
<build>
<pluginManagement>
<plugins>
<plugin>
<groupId>org.apache.maven.plugins</groupId>
<artifactId>maven-compiler-plugin</artifactId>
<version>3.2</version>
<configuration>
<source>1.7</source>
<target>1.7</target>
</configuration>
</plugin>
<plugin>
<groupId>org.apache.maven.plugins</groupId>
<artifactId>maven-war-plugin</artifactId>
<version>2.4</version>
<configuration>
<warSourceDirectory>src/main/webapp</warSourceDirectory>
<warName>SpringSecurityHibernateAnnotationExample</warName>
<failOnMissingWebXml>false</failOnMissingWebXml>
</configuration>
</plugin>
</plugins>
</pluginManagement>
<finalName>SpringSecurityHibernateAnnotationExample</finalName>
</build>
</project>
安全部分
第3步: 添加Spring Security配置类
首先也是最重要的步骤,在我们的应用程序中添加 Spring Security 创建所需要的 Spring Security的Java配置。该结构将创建 Servlet过滤程序叫作 springSecurityFilterChain 来负责应用程序内的所有的安全性(保护应用程序的URL,验证提交用户名和密码,重定向到日志中的表单等等)。
package com.yiibai.springsecurity.configuration;
import org.springframework.beans.factory.annotation.Autowired;
import org.springframework.beans.factory.annotation.Qualifier;
import org.springframework.context.annotation.Configuration;
import org.springframework.security.config.annotation.authentication.builders.AuthenticationManagerBuilder;
import org.springframework.security.config.annotation.web.builders.HttpSecurity;
import org.springframework.security.config.annotation.web.configuration.EnableWebSecurity;
import org.springframework.security.config.annotation.web.configuration.WebSecurityConfigurerAdapter;
import org.springframework.security.core.userdetails.UserDetailsService;
@Configuration
@EnableWebSecurity
public class SecurityConfiguration extends WebSecurityConfigurerAdapter {
@Autowired
@Qualifier("customUserDetailsService")
UserDetailsService userDetailsService;
@Autowired
public void configureGlobalSecurity(AuthenticationManagerBuilder auth) throws Exception {
auth.userDetailsService(userDetailsService);
}
@Override
protected void configure(HttpSecurity http) throws Exception {
http.authorizeRequests()
.antMatchers("/", "/home").permitAll()
.antMatchers("/admin/**").access("hasRole('ADMIN')")
.antMatchers("/db/**").access("hasRole('ADMIN') and hasRole('DBA')")
.and().formLogin().loginPage("/login")
.usernameParameter("ssoId").passwordParameter("password")
.and().csrf()
.and().exceptionHandling().accessDeniedPage("/Access_Denied");
}
}
如前面提到的,唯一的变化是不在内存认证,这里我们实现 UserDetailsService 并使用的数据库认证。
以上的安全配置使用XML配置格式是:
<beans:beans xmlns="http://www.springframework.org/schema/security"
xmlns:beans="http://www.springframework.org/schema/beans"
xmlns:xsi="http://www.w3.org/2001/XMLSchema-instance"
xsi:schemaLocation="http://www.springframework.org/schema/beans http://www.springframework.org/schema/beans/spring-beans-4.1.xsd
http://www.springframework.org/schema/security http://www.springframework.org/schema/security/spring-security-4.0.xsd">
<http auto-config="true" >
<intercept-url pattern="/" access="permitAll" />
<intercept-url pattern="/home" access="permitAll" />
<intercept-url pattern="/admin**" access="hasRole('ADMIN')" />
<intercept-url pattern="/dba**" access="hasRole('ADMIN') and hasRole('DBA')" />
<form-login login-page="/login"
username-parameter="ssoId"
password-parameter="password"
authentication-failure-url="/Access_Denied" />
<csrf/>
</http>
<authentication-manager >
<authentication-provider user-service-ref="customUserDetailsService"/>
</authentication-manager>
<beans:bean id="customUserDetailsService" class="com.yiibai.springsecurity.service.CustomUserDetailsService" />
</beans:beans>
第4步: 使用 war 注册 springSecurityFilter
下面指定的初始化类注册springSecurityFilter与应用程序的war[步骤3中创建]。
package com.yiibai.springsecurity.configuration;
import org.springframework.security.web.context.AbstractSecurityWebApplicationInitializer;
public class SecurityWebApplicationInitializer extends AbstractSecurityWebApplicationInitializer {
}
上面的配置使用XML配置格式是:
<filter>
<filter-name>springSecurityFilterChain</filter-name>
<filter-class>org.springframework.web.filter.DelegatingFilterProxy</filter-class>
</filter>
<filter-mapping>
<filter-name>springSecurityFilterChain</filter-name>
<url-pattern>/*</url-pattern>
</filter-mapping>
第5步: 定义UserDetailsService实现
这项服务是负责提供身份验证细节验证管理。它实现了 Spring 的 UserDetailsService 接口,其中只包含一个方法 loadUserByUsername 使用 username(在我们的例子中是 ssoId)并返回org.springframework.security.core.userdetails.User 对象。我们将用自己的 UserService ,使用UserDAO对象从数据库中获得的数据来填充此对象。
package com.yiibai.springsecurity.service;
import java.util.ArrayList;
import java.util.List;
import org.springframework.beans.factory.annotation.Autowired;
import org.springframework.security.core.GrantedAuthority;
import org.springframework.security.core.authority.SimpleGrantedAuthority;
import org.springframework.security.core.userdetails.UserDetails;
import org.springframework.security.core.userdetails.UserDetailsService;
import org.springframework.security.core.userdetails.UsernameNotFoundException;
import org.springframework.stereotype.Service;
import org.springframework.transaction.annotation.Transactional;
import com.yiibai.springsecurity.model.User;
import com.yiibai.springsecurity.model.UserProfile;
@Service("customUserDetailsService")
public class CustomUserDetailsService implements UserDetailsService{
@Autowired
private UserService userService;
@Transactional(readOnly=true)
public UserDetails loadUserByUsername(String ssoId)
throws UsernameNotFoundException {
User user = userService.findBySso(ssoId);
System.out.println("User : "+user);
if(user==null){
System.out.println("User not found");
throw new UsernameNotFoundException("Username not found");
}
return new org.springframework.security.core.userdetails.User(user.getSsoId(), user.getPassword(),
user.getState().equals("Active"), true, true, true, getGrantedAuthorities(user));
}
private List<GrantedAuthority> getGrantedAuthorities(User user){
List<GrantedAuthority> authorities = new ArrayList<GrantedAuthority>();
for(UserProfile userProfile : user.getUserProfiles()){
System.out.println("UserProfile : "+userProfile);
authorities.add(new SimpleGrantedAuthority("ROLE_"+userProfile.getType()));
}
System.out.print("authorities :"+authorities);
return authorities;
}
}
SpringMVC部分
第6步: 添加控制器
package com.yiibai.springsecurity.controller;
import javax.servlet.http.HttpServletRequest;
import javax.servlet.http.HttpServletResponse;
import org.springframework.security.core.Authentication;
import org.springframework.security.core.context.SecurityContextHolder;
import org.springframework.security.core.userdetails.UserDetails;
import org.springframework.security.web.authentication.logout.SecurityContextLogoutHandler;
import org.springframework.stereotype.Controller;
import org.springframework.ui.ModelMap;
import org.springframework.web.bind.annotation.RequestMapping;
import org.springframework.web.bind.annotation.RequestMethod;
@Controller
public class HelloWorldController {
@RequestMapping(value = { "/", "/home" }, method = RequestMethod.GET)
public String homePage(ModelMap model) {
model.addAttribute("greeting", "Hi, Welcome to mysite");
return "welcome";
}
@RequestMapping(value = "/admin", method = RequestMethod.GET)
public String adminPage(ModelMap model) {
model.addAttribute("user", getPrincipal());
return "admin";
}
@RequestMapping(value = "/db", method = RequestMethod.GET)
public String dbaPage(ModelMap model) {
model.addAttribute("user", getPrincipal());
return "dba";
}
@RequestMapping(value = "/Access_Denied", method = RequestMethod.GET)
public String accessDeniedPage(ModelMap model) {
model.addAttribute("user", getPrincipal());
return "accessDenied";
}
@RequestMapping(value = "/login", method = RequestMethod.GET)
public String loginPage() {
return "login";
}
@RequestMapping(value="/logout", method = RequestMethod.GET)
public String logoutPage (HttpServletRequest request, HttpServletResponse response) {
Authentication auth = SecurityContextHolder.getContext().getAuthentication();
if (auth != null){
new SecurityContextLogoutHandler().logout(request, response, auth);
}
return "redirect:/login?logout";
}
private String getPrincipal(){
String userName = null;
Object principal = SecurityContextHolder.getContext().getAuthentication().getPrincipal();
if (principal instanceof UserDetails) {
userName = ((UserDetails)principal).getUsername();
} else {
userName = principal.toString();
}
return userName;
}
}
第7步: 添加SpringMVC配置类
package com.yiibai.springsecurity.configuration;
import org.springframework.context.annotation.Bean;
import org.springframework.context.annotation.ComponentScan;
import org.springframework.context.annotation.Configuration;
import org.springframework.web.servlet.ViewResolver;
import org.springframework.web.servlet.config.annotation.EnableWebMvc;
import org.springframework.web.servlet.config.annotation.ResourceHandlerRegistry;
import org.springframework.web.servlet.config.annotation.WebMvcConfigurerAdapter;
import org.springframework.web.servlet.view.InternalResourceViewResolver;
import org.springframework.web.servlet.view.JstlView;
@Configuration
@EnableWebMvc
@ComponentScan(basePackages = "com.yiibai.springsecurity")
public class HelloWorldConfiguration extends WebMvcConfigurerAdapter {
@Bean(name="HelloWorld")
public ViewResolver viewResolver() {
InternalResourceViewResolver viewResolver = new InternalResourceViewResolver();
viewResolver.setViewClass(JstlView.class);
viewResolver.setPrefix("/WEB-INF/views/");
viewResolver.setSuffix(".jsp");
return viewResolver;
}
/*
* Configure ResourceHandlers to serve static resources like CSS/ Javascript etc...
*
*/
@Override
public void addResourceHandlers(ResourceHandlerRegistry registry) {
registry.addResourceHandler("/static/**").addResourceLocations("/static/");
}
}
第8步: 添加初始化类
package com.yiibai.springsecurity.configuration;
import org.springframework.web.servlet.support.AbstractAnnotationConfigDispatcherServletInitializer;
public class SpringMvcInitializer extends AbstractAnnotationConfigDispatcherServletInitializer {
@Override
protected Class<?>[] getRootConfigClasses() {
return new Class[] { HelloWorldConfiguration.class };
}
@Override
protected Class<?>[] getServletConfigClasses() {
return null;
}
@Override
protected String[] getServletMappings() {
return new String[] { "/" };
}
}
DAO, Model & Service部分
第9步: 创建Model类
一个用户可以有多个角色 [DBA,ADMIN,USER],一个角色可以被分配给一个以上的用户。因此一个用户和用户配置[角色]之间有多对多的关系。 我们保持这种关系单向[User到UserProfile],因为我们只是在寻找分配给用户的角色(而不是角色的用户)。 我们将使用使用连接(join)表来实现多对多关联。
package com.yiibai.springsecurity.model;
import java.util.HashSet;
import java.util.Set;
import javax.persistence.Column;
import javax.persistence.Entity;
import javax.persistence.FetchType;
import javax.persistence.GeneratedValue;
import javax.persistence.GenerationType;
import javax.persistence.Id;
import javax.persistence.JoinColumn;
import javax.persistence.JoinTable;
import javax.persistence.ManyToMany;
import javax.persistence.Table;
@Entity
@Table(name="APP_USER")
public class User {
@Id @GeneratedValue(strategy=GenerationType.IDENTITY)
private int id;
@Column(name="SSO_ID", unique=true, nullable=false)
private String ssoId;
@Column(name="PASSWORD", nullable=false)
private String password;
@Column(name="FIRST_NAME", nullable=false)
private String firstName;
@Column(name="LAST_NAME", nullable=false)
private String lastName;
@Column(name="EMAIL", nullable=false)
private String email;
@Column(name="STATE", nullable=false)
private String state=State.ACTIVE.getState();
@ManyToMany(fetch = FetchType.EAGER)
@JoinTable(name = "APP_USER_USER_PROFILE",
joinColumns = { @JoinColumn(name = "USER_ID") },
inverseJoinColumns = { @JoinColumn(name = "USER_PROFILE_ID") })
private Set<UserProfile> userProfiles = new HashSet<UserProfile>();
public int getId() {
return id;
}
public void setId(int id) {
this.id = id;
}
public String getSsoId() {
return ssoId;
}
public void setSsoId(String ssoId) {
this.ssoId = ssoId;
}
public String getPassword() {
return password;
}
public void setPassword(String password) {
this.password = password;
}
public String getFirstName() {
return firstName;
}
public void setFirstName(String firstName) {
this.firstName = firstName;
}
public String getLastName() {
return lastName;
}
public void setLastName(String lastName) {
this.lastName = lastName;
}
public String getEmail() {
return email;
}
public void setEmail(String email) {
this.email = email;
}
public String getState() {
return state;
}
public void setState(String state) {
this.state = state;
}
public Set<UserProfile> getUserProfiles() {
return userProfiles;
}
public void setUserProfiles(Set<UserProfile> userProfiles) {
this.userProfiles = userProfiles;
}
@Override
public int hashCode() {
final int prime = 31;
int result = 1;
result = prime * result + id;
result = prime * result + ((ssoId == null) ? 0 : ssoId.hashCode());
return result;
}
@Override
public boolean equals(Object obj) {
if (this == obj)
return true;
if (obj == null)
return false;
if (!(obj instanceof User))
return false;
User other = (User) obj;
if (id != other.id)
return false;
if (ssoId == null) {
if (other.ssoId != null)
return false;
} else if (!ssoId.equals(other.ssoId))
return false;
return true;
}
@Override
public String toString() {
return "User [id=" + id + ", ssoId=" + ssoId + ", password=" + password
+ ", firstName=" + firstName + ", lastName=" + lastName
+ ", email=" + email + ", state=" + state + ", userProfiles=" + userProfiles +"]";
}
}
package com.yiibai.springsecurity.model;
import javax.persistence.Column;
import javax.persistence.Entity;
import javax.persistence.GeneratedValue;
import javax.persistence.GenerationType;
import javax.persistence.Id;
import javax.persistence.Table;
@Entity
@Table(name="USER_PROFILE")
public class UserProfile {
@Id @GeneratedValue(strategy=GenerationType.IDENTITY)
private int id;
@Column(name="TYPE", length=15, unique=true, nullable=false)
private String type = UserProfileType.USER.getUserProfileType();
public int getId() {
return id;
}
public void setId(int id) {
this.id = id;
}
public String getType() {
return type;
}
public void setType(String type) {
this.type = type;
}
@Override
public int hashCode() {
final int prime = 31;
int result = 1;
result = prime * result + id;
result = prime * result + ((type == null) ? 0 : type.hashCode());
return result;
}
@Override
public boolean equals(Object obj) {
if (this == obj)
return true;
if (obj == null)
return false;
if (!(obj instanceof UserProfile))
return false;
UserProfile other = (UserProfile) obj;
if (id != other.id)
return false;
if (type == null) {
if (other.type != null)
return false;
} else if (!type.equals(other.type))
return false;
return true;
}
@Override
public String toString() {
return "UserProfile [id=" + id + ", type=" + type + "]";
}
}
package com.yiibai.springsecurity.model;
public enum UserProfileType {
USER("USER"),
DBA("DBA"),
ADMIN("ADMIN");
String userProfileType;
private UserProfileType(String userProfileType){
this.userProfileType = userProfileType;
}
public String getUserProfileType(){
return userProfileType;
}
}
package com.yiibai.springsecurity.model;
public enum State {
ACTIVE("Active"),
INACTIVE("Inactive"),
DELETED("Deleted"),
LOCKED("Locked");
private String state;
private State(final String state){
this.state = state;
}
public String getState(){
return this.state;
}
@Override
public String toString(){
return this.state;
}
public String getName(){
return this.name();
}
}
第10步: 创建数据访问对象(Dao)层
package com.yiibai.springsecurity.dao;
import java.io.Serializable;
import java.lang.reflect.ParameterizedType;
import org.hibernate.Criteria;
import org.hibernate.Session;
import org.hibernate.SessionFactory;
import org.springframework.beans.factory.annotation.Autowired;
public abstract class AbstractDao<PK extends Serializable, T> {
private final Class<T> persistentClass;
@SuppressWarnings("unchecked")
public AbstractDao(){
this.persistentClass =(Class<T>) ((ParameterizedType) this.getClass().getGenericSuperclass()).getActualTypeArguments()[1];
}
@Autowired
private SessionFactory sessionFactory;
protected Session getSession(){
return sessionFactory.getCurrentSession();
}
@SuppressWarnings("unchecked")
public T getByKey(PK key) {
return (T) getSession().get(persistentClass, key);
}
public void persist(T entity) {
getSession().persist(entity);
}
public void delete(T entity) {
getSession().delete(entity);
}
protected Criteria createEntityCriteria(){
return getSession().createCriteria(persistentClass);
}
}
package com.yiibai.springsecurity.dao;
import com.yiibai.springsecurity.model.User;
public interface UserDao {
User findById(int id);
User findBySSO(String sso);
}
package com.yiibai.springsecurity.dao;
import org.hibernate.Criteria;
import org.hibernate.criterion.Restrictions;
import org.springframework.stereotype.Repository;
import com.yiibai.springsecurity.model.User;
@Repository("userDao")
public class UserDaoImpl extends AbstractDao<Integer, User> implements UserDao {
public User findById(int id) {
return getByKey(id);
}
public User findBySSO(String sso) {
Criteria crit = createEntityCriteria();
crit.add(Restrictions.eq("ssoId", sso));
return (User) crit.uniqueResult();
}
}
第11步: 创建Service层
package com.yiibai.springsecurity.service;
import com.yiibai.springsecurity.model.User;
public interface UserService {
User findById(int id);
User findBySso(String sso);
}
package com.yiibai.springsecurity.service;
import org.springframework.beans.factory.annotation.Autowired;
import org.springframework.stereotype.Service;
import org.springframework.transaction.annotation.Transactional;
import com.yiibai.springsecurity.dao.UserDao;
import com.yiibai.springsecurity.model.User;
@Service("userService")
@Transactional
public class UserServiceImpl implements UserService{
@Autowired
private UserDao dao;
public User findById(int id) {
return dao.findById(id);
}
public User findBySso(String sso) {
return dao.findBySSO(sso);
}
}
Hibernate配置部分
第12步: 创建Hibernate配置
Hibernate的配置类包含数据源层,SessionFactory和事务管理的@Bean方法。数据源属性是取自 application.properties文件,这个文件中包含了MySQL数据库连接的详细信息。
package com.yiibai.springsecurity.configuration;
import java.util.Properties;
import javax.sql.DataSource;
import org.hibernate.SessionFactory;
import org.springframework.beans.factory.annotation.Autowired;
import org.springframework.context.annotation.Bean;
import org.springframework.context.annotation.ComponentScan;
import org.springframework.context.annotation.Configuration;
import org.springframework.context.annotation.PropertySource;
import org.springframework.core.env.Environment;
import org.springframework.jdbc.datasource.DriverManagerDataSource;
import org.springframework.orm.hibernate4.HibernateTransactionManager;
import org.springframework.orm.hibernate4.LocalSessionFactoryBean;
import org.springframework.transaction.annotation.EnableTransactionManagement;
@Configuration
@EnableTransactionManagement
@ComponentScan({ "com.yiibai.springsecurity.configuration" })
@PropertySource(value = { "classpath:application.properties" })
public class HibernateConfiguration {
@Autowired
private Environment environment;
@Bean
public LocalSessionFactoryBean sessionFactory() {
LocalSessionFactoryBean sessionFactory = new LocalSessionFactoryBean();
sessionFactory.setDataSource(dataSource());
sessionFactory.setPackagesToScan(new String[] { "com.yiibai.springsecurity.model" });
sessionFactory.setHibernateProperties(hibernateProperties());
return sessionFactory;
}
@Bean
public DataSource dataSource() {
DriverManagerDataSource dataSource = new DriverManagerDataSource();
dataSource.setDriverClassName(environment.getRequiredProperty("jdbc.driverClassName"));
dataSource.setUrl(environment.getRequiredProperty("jdbc.url"));
dataSource.setUsername(environment.getRequiredProperty("jdbc.username"));
dataSource.setPassword(environment.getRequiredProperty("jdbc.password"));
return dataSource;
}
private Properties hibernateProperties() {
Properties properties = new Properties();
properties.put("hibernate.dialect", environment.getRequiredProperty("hibernate.dialect"));
properties.put("hibernate.show_sql", environment.getRequiredProperty("hibernate.show_sql"));
properties.put("hibernate.format_sql", environment.getRequiredProperty("hibernate.format_sql"));
return properties;
}
@Bean
@Autowired
public HibernateTransactionManager transactionManager(SessionFactory s) {
HibernateTransactionManager txManager = new HibernateTransactionManager();
txManager.setSessionFactory(s);
return txManager;
}
}
application.properties
jdbc.driverClassName = com.mysql.jdbc.Driver
jdbc.url = jdbc:mysql://localhost:3306/yiibai
jdbc.username = root
jdbc.password =
hibernate.dialect = org.hibernate.dialect.MySQLDialect
hibernate.show_sql = true
hibernate.format_sql = true
视图部分
第13步: 添加视图
login.jsp
<%@ page language="java" contentType="text/html; charset=ISO-8859-1" pageEncoding="ISO-8859-1"%>
<%@ taglib prefix="c" uri="http://java.sun.com/jsp/jstl/core"%>
<html>
<head>
<meta http-equiv="Content-Type" content="text/html; charset=ISO-8859-1">
<title>Login page</title>
<link href="<c:url value='/static/css/bootstrap.css' />" rel="stylesheet"></link>
<link href="<c:url value='/static/css/app.css' />" rel="stylesheet"></link>
<link rel="stylesheet" type="text/css" href="//cdnjs.cloudflare.com/ajax/libs/font-awesome/4.2.0/css/font-awesome.css" />
</head>
<body>
<div id="mainWrapper">
<div class="login-container">
<div class="login-card">
<div class="login-form">
<c:url var="loginUrl" value="/login" />
<form action="${loginUrl}" method="post" class="form-horizontal">
<c:if test="${param.error != null}">
<div class="alert alert-danger">
<p>Invalid username and password.</p>
</div>
</c:if>
<c:if test="${param.logout != null}">
<div class="alert alert-success">
<p>You have been logged out successfully.</p>
</div>
</c:if>
<div class="input-group input-sm">
<label class="input-group-addon" for="username"><i class="fa fa-user"></i></label>
<input type="text" class="form-control" id="username" name="ssoId" placeholder="Enter Username" required>
</div>
<div class="input-group input-sm">
<label class="input-group-addon" for="password"><i class="fa fa-lock"></i></label>
<input type="password" class="form-control" id="password" name="password" placeholder="Enter Password" required>
</div>
<input type="hidden" name="${_csrf.parameterName}" value="${_csrf.token}" />
<div class="form-actions">
<input type="submit"
class="btn btn-block btn-primary btn-default" value="Log in">
</div>
</form>
</div>
</div>
</div>
</div>
</body>
</html>
正如您所看到的,CSRF参数有在JSP EL表达式访问中使用,您可能要强行将EL表达式解析,通过添加以下到SP文件的顶部:
<%@ page isELIgnored="false"%>
welcome.jsp
<%@ page language="java" contentType="text/html; charset=ISO-8859-1" pageEncoding="ISO-8859-1"%>
<html>
<head>
<meta http-equiv="Content-Type" content="text/html; charset=ISO-8859-1">
<title>Welcome page</title>
</head>
<body>
Greeting : ${greeting}
This is a welcome page.
</body>
</html>
admin.jsp
<%@ page language="java" contentType="text/html; charset=ISO-8859-1" pageEncoding="ISO-8859-1"%>
<%@ taglib prefix="c" uri="http://java.sun.com/jsp/jstl/core"%>
<html>
<head>
<meta http-equiv="Content-Type" content="text/html; charset=ISO-8859-1">
<title>Admin page</title>
</head>
<body>
Dear <strong>${user}</strong>, Welcome to Admin Page.
<a href="<c:url value="/logout" />">Logout</a>
</body>
</html>
dba.jsp
<%@ page language="java" contentType="text/html; charset=ISO-8859-1" pageEncoding="ISO-8859-1"%>
<%@ taglib prefix="c" uri="http://java.sun.com/jsp/jstl/core"%>
<html>
<head>
<meta http-equiv="Content-Type" content="text/html; charset=ISO-8859-1">
<title>DBA page</title>
</head>
<body>
Dear <strong>${user}</strong>, Welcome to DBA Page.
<a href="<c:url value="/logout" />">Logout</a>
</body>
</html>
accessDenied.jsp
<%@ page language="java" contentType="text/html; charset=ISO-8859-1" pageEncoding="ISO-8859-1"%>
<%@ taglib prefix="c" uri="http://java.sun.com/jsp/jstl/core"%>
<html>
<head>
<meta http-equiv="Content-Type" content="text/html; charset=ISO-8859-1">
<title>AccessDenied page</title>
</head>
<body>
Dear <strong>${user}</strong>, You are not authorized to access this page
<a href="<c:url value="/logout" />">Logout</a>
</body>
</html>
数据库架构部分
第14步:创建数据库表并填充虚拟数据
在第9步已经解释过,User 和 UserProfile 之间是多对多的关系。多对多的关系可使用连接表维护,这个实例中只使用单向(从User到UserProfile)。
/*All User's are stored in APP_USER table*/
create table APP_USER (
id BIGINT NOT NULL AUTO_INCREMENT,
sso_id VARCHAR(30) NOT NULL,
password VARCHAR(100) NOT NULL,
first_name VARCHAR(30) NOT NULL,
last_name VARCHAR(30) NOT NULL,
email VARCHAR(30) NOT NULL,
state VARCHAR(30) NOT NULL,
PRIMARY KEY (id),
UNIQUE (sso_id)
);
/* USER_PROFILE table contains all possible roles */
create table USER_PROFILE(
id BIGINT NOT NULL AUTO_INCREMENT,
type VARCHAR(30) NOT NULL,
PRIMARY KEY (id),
UNIQUE (type)
);
/* JOIN TABLE for MANY-TO-MANY relationship*/
CREATE TABLE APP_USER_USER_PROFILE (
user_id BIGINT NOT NULL,
user_profile_id BIGINT NOT NULL,
PRIMARY KEY (user_id, user_profile_id),
CONSTRAINT FK_APP_USER FOREIGN KEY (user_id) REFERENCES APP_USER (id),
CONSTRAINT FK_USER_PROFILE FOREIGN KEY (user_profile_id) REFERENCES USER_PROFILE (id)
);
/* Populate USER_PROFILE Table */
INSERT INTO USER_PROFILE(type)
VALUES ('USER');
INSERT INTO USER_PROFILE(type)
VALUES ('ADMIN');
INSERT INTO USER_PROFILE(type)
VALUES ('DBA');
/* Populate APP_USER Table */
INSERT INTO APP_USER(sso_id, password, first_name, last_name, email, state)
VALUES ('yiibai','123456', 'Yiibai','Watcher','admin@yiibai.com', 'Active');
INSERT INTO APP_USER(sso_id, password, first_name, last_name, email, state)
VALUES ('danny','123456', 'Danny','Theys','danny@xyz.com', 'Active');
INSERT INTO APP_USER(sso_id, password, first_name, last_name, email, state)
VALUES ('sam','123456', 'Sam','Smith','samy@xyz.com', 'Active');
INSERT INTO APP_USER(sso_id, password, first_name, last_name, email, state)
VALUES ('nicole','123456', 'Nicole','warner','nicloe@xyz.com', 'Active');
INSERT INTO APP_USER(sso_id, password, first_name, last_name, email, state)
VALUES ('kenny','123456', 'Kenny','Roger','kenny@xyz.com', 'Active');
/* Populate JOIN Table */
INSERT INTO APP_USER_USER_PROFILE (user_id, user_profile_id)
SELECT user.id, profile.id FROM app_user user, user_profile profile
where user.sso_id='bill' and profile.type='USER';
INSERT INTO APP_USER_USER_PROFILE (user_id, user_profile_id)
SELECT user.id, profile.id FROM app_user user, user_profile profile
where user.sso_id='danny' and profile.type='USER';
INSERT INTO APP_USER_USER_PROFILE (user_id, user_profile_id)
SELECT user.id, profile.id FROM app_user user, user_profile profile
where user.sso_id='sam' and profile.type='ADMIN';
INSERT INTO APP_USER_USER_PROFILE (user_id, user_profile_id)
SELECT user.id, profile.id FROM app_user user, user_profile profile
where user.sso_id='nicole' and profile.type='DBA';
INSERT INTO APP_USER_USER_PROFILE (user_id, user_profile_id)
SELECT user.id, profile.id FROM app_user user, user_profile profile
where user.sso_id='kenny' and profile.type='ADMIN';
INSERT INTO APP_USER_USER_PROFILE (user_id, user_profile_id)
SELECT user.id, profile.id FROM app_user user, user_profile profile
where user.sso_id='kenny' and profile.type='DBA';
我们已经创建了User, UserProfile表并连接表(用于管理多对多的关系)。我们填充以下用户和角色:
Yiibai,Danny : USER
Sam : ADMIN
Nicole : DBA
Kenny : ADMIN, DBA
下面是MySQL数据库的数据情况快照。
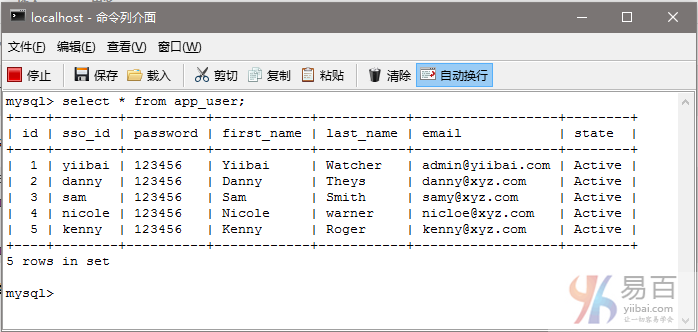
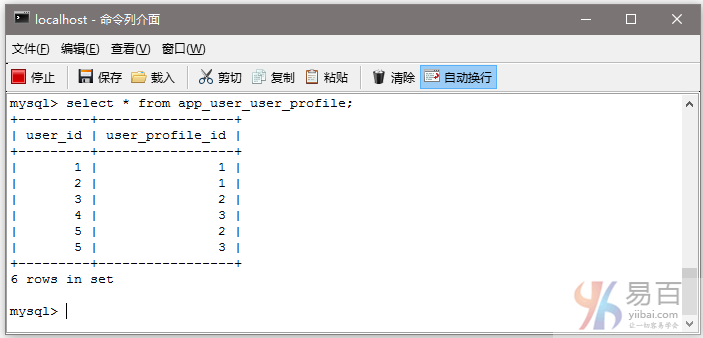
现在,启动我们的web应用程序,并尝试采用不同的用户登录和访问的应用程序不同的部分。
第15步:构建和部署应用程序
现在构造 war(通过 eclipse/m2eclipse)或通过Maven的命令行(mvn clean install)。部署WAR文件到Servlet3.0容器。由于这里我使用的是在 eclipse 中配置 Tomcat,可以直接发布到 Tomcat 服务容器中。如果不知道怎么使用,可以参考:http://www.yiibai.com/maven/create-a-maven-web-project-with-eclipse.html
运行应用程序
打开浏览器并访问 - http://localhost:8080/SpringSecurityHibernateAnnotation/ 结果如下所示 -
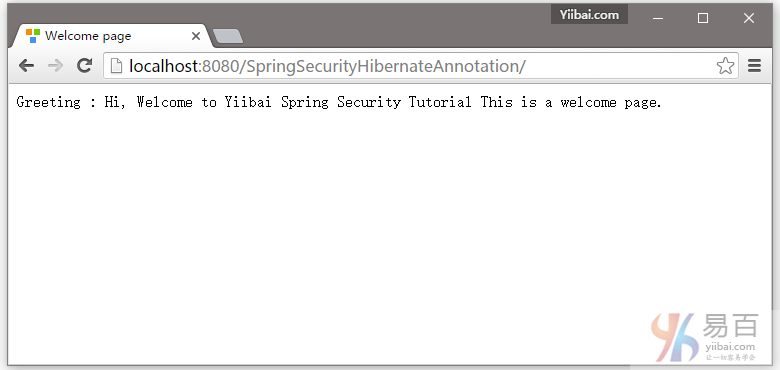
现在尝试访问 - http://localhost:8080/SpringSecurityHibernateAnnotation/admin, 你会看到以下提示登录 -
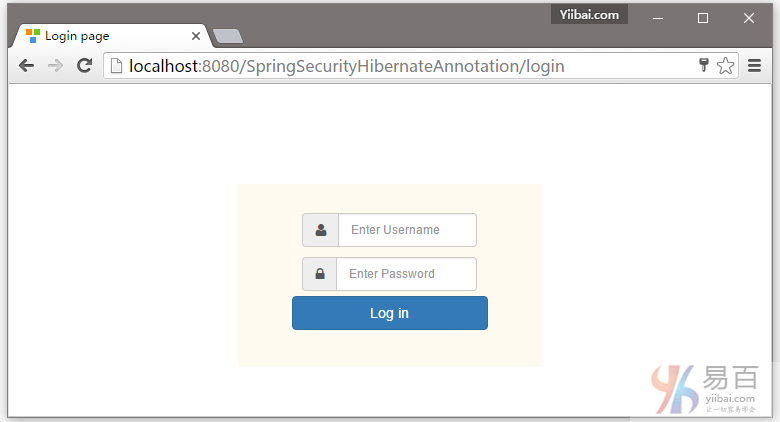
提供 ‘USER’ 角色的凭据,这里使用一个用户:yiibai ,如下图中所示 -
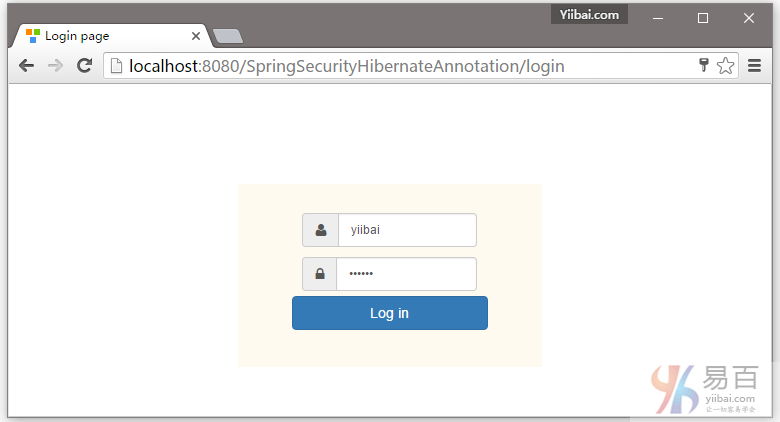
提交后,您会看到拒绝访问页面,如下图中所示 -
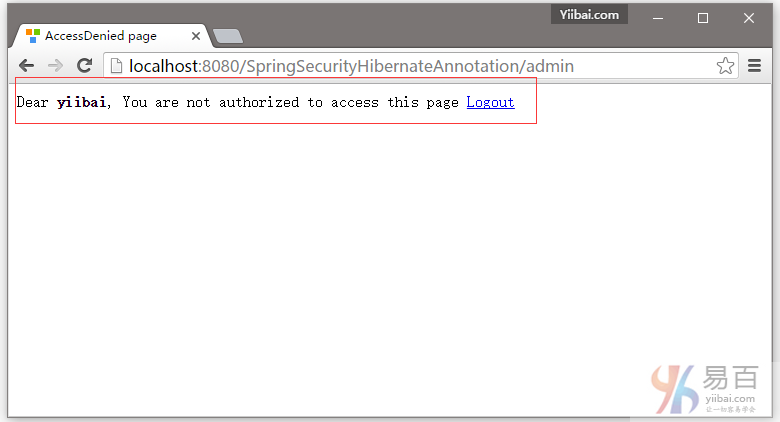
现在,注销并再次尝试访问管理页面,如下所示 -
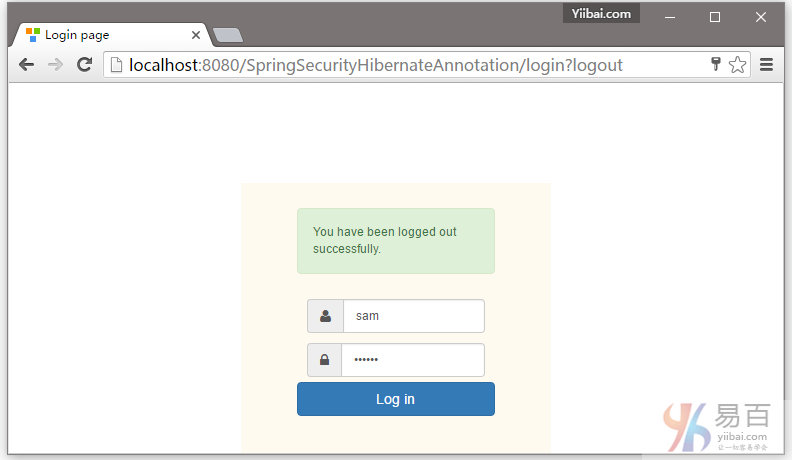
在输入框中提供一个错误的用户名或密码登录,它会提示错误信息,如下所示 -
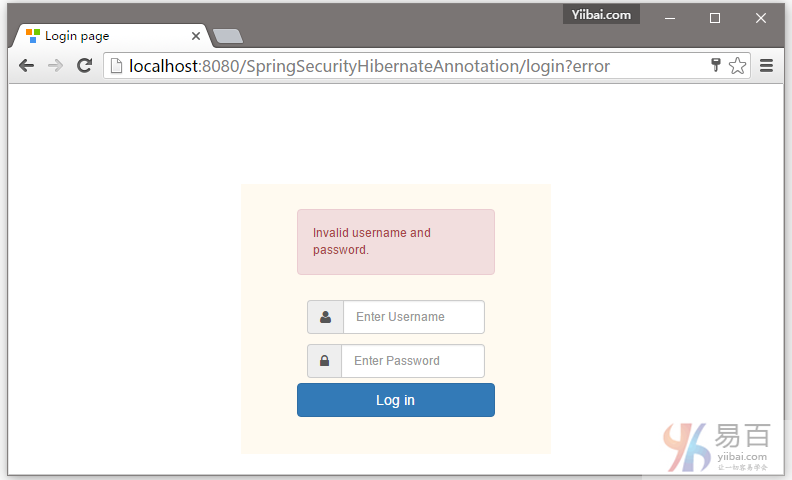
提供适当的管理角色用户名(sam),并登录,如下所示 -
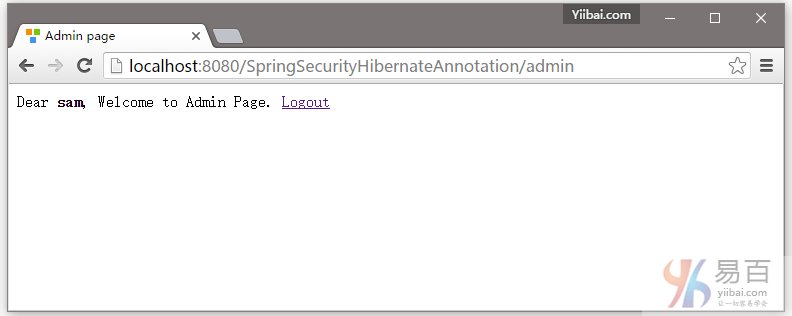
现在尝试访问页面 - http://ocalhost:8080/SpringSecurityHibernateAnnoation/db, 你会得到拒绝访问页面。
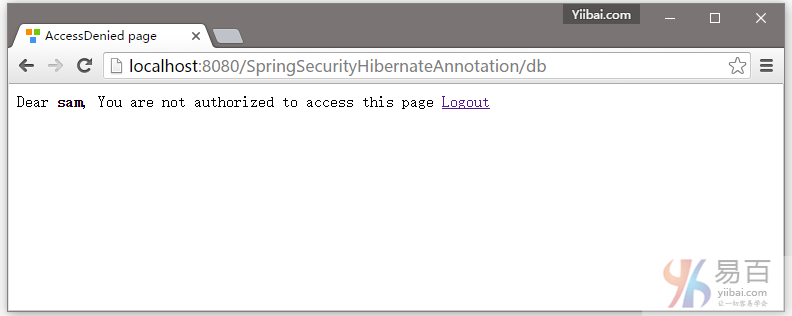
现在退出,使用用户名(kenny)登录后,并重新访问管理页面 - http://localhost:8080/SpringSecurityHibernateAnnoation/admin ,如下图所示 -
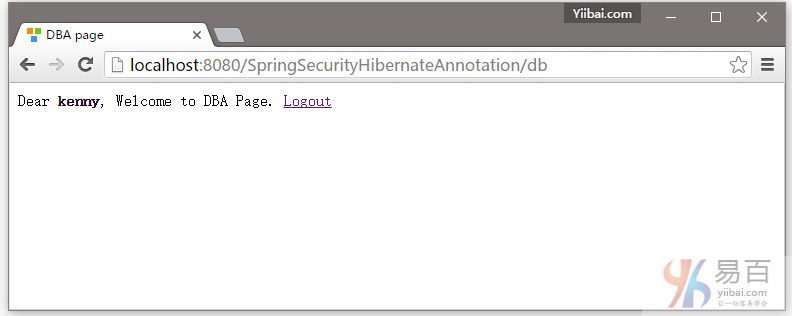
注销上面登录,演示完成!
本篇教程到这里就结束了。下一篇文章我们将学习如何使用Hibernate 设置来实现 Spring Security 基于角色登录。
下载代码 - 08-SpringSecurityHibernateAnnotation.zip
参考
本站代码下载:http://www.yiibai.com/siteinfo/download.html
本文属作者原创,转载请注明出处:易百教程 » Spring Security与Hibernate整合以及XML实例
Spring Secrity与Hibernate基于角色登录实例 - Spring Security教程™
这篇文章介绍了如何使用Hibernate设置来实现Spring Security基于角色登录。程序会根据用户分配的角色,使用Hibernate设置在用户登录后根据用户角色重定向到不同的URL。
这篇文章是在 Spring Security Hibernate注释实例 基础上补充的, 并简单地增加了基于角色的登录功能。由于这个篇文章与 Spring Security Hibernate注解实例有 99% 是相同的,除了一些改变,我们就不在这里重复的代码。仅做了一些简单地更改如下。
首先我们来看看整个工程目录的结构,如下图所示 -
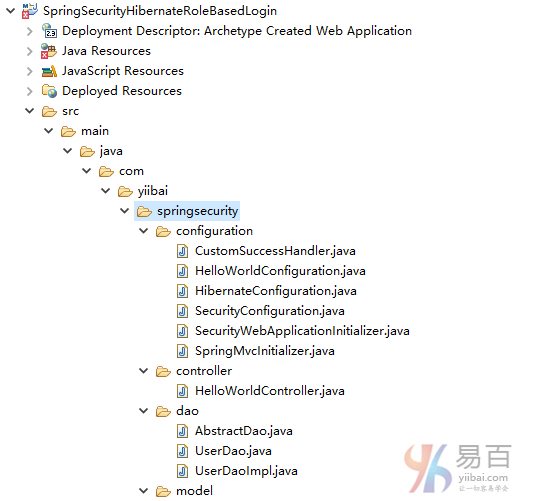
第1步:创建一个新客户成功处理程序
这个类的目标是提供自定义的重定向功能。
package com.yiibai.springsecurity.configuration;
import java.io.IOException;
import java.util.ArrayList;
import java.util.Collection;
import java.util.List;
import javax.servlet.http.HttpServletRequest;
import javax.servlet.http.HttpServletResponse;
import org.springframework.security.core.Authentication;
import org.springframework.security.core.GrantedAuthority;
import org.springframework.security.web.DefaultRedirectStrategy;
import org.springframework.security.web.RedirectStrategy;
import org.springframework.security.web.authentication.SimpleUrlAuthenticationSuccessHandler;
import org.springframework.stereotype.Component;
@Component
public class CustomSuccessHandler extends SimpleUrlAuthenticationSuccessHandler{
private RedirectStrategy redirectStrategy = new DefaultRedirectStrategy();
@Override
protected void handle(HttpServletRequest request,
HttpServletResponse response, Authentication authentication) throws IOException {
String targetUrl = determineTargetUrl(authentication);
if (response.isCommitted()) {
System.out.println("Can't redirect");
return;
}
redirectStrategy.sendRedirect(request, response, targetUrl);
}
protected String determineTargetUrl(Authentication authentication) {
String url="";
Collection<? extends GrantedAuthority> authorities = authentication.getAuthorities();
List<String> roles = new ArrayList<String>();
for (GrantedAuthority a : authorities) {
roles.add(a.getAuthority());
}
if (isDba(roles)) {
url = "/db";
} else if (isAdmin(roles)) {
url = "/admin";
} else if (isUser(roles)) {
url = "/home";
} else {
url="/accessDenied";
}
return url;
}
public void setRedirectStrategy(RedirectStrategy redirectStrategy) {
this.redirectStrategy = redirectStrategy;
}
protected RedirectStrategy getRedirectStrategy() {
return redirectStrategy;
}
private boolean isUser(List<String> roles) {
if (roles.contains("ROLE_USER")) {
return true;
}
return false;
}
private boolean isAdmin(List<String> roles) {
if (roles.contains("ROLE_ADMIN")) {
return true;
}
return false;
}
private boolean isDba(List<String> roles) {
if (roles.contains("ROLE_DBA")) {
return true;
}
return false;
}
}
请注意我们是如何扩展Spring SimpleUrlAuthenticationSuccessHandler类和覆盖 handle() 方法,只是调用使用配置RedirectStrategy重定向[默认在这种情况下]URL,它是用户定义determineTargetUrl方法返回。 这个方法从当前认证对象提取登录用户的角色,然后构造基于角色有相应的URL。最后是RedirectStrategy 负责Spring Security 框架内的所有重定向,将请求重定向到指定的URL。
第2步:注册自定义成功处理程序使用[现有]Security配置
package com.yiibai.springsecurity.configuration;
import org.springframework.beans.factory.annotation.Autowired;
import org.springframework.beans.factory.annotation.Qualifier;
import org.springframework.context.annotation.Configuration;
import org.springframework.security.config.annotation.authentication.builders.AuthenticationManagerBuilder;
import org.springframework.security.config.annotation.web.builders.HttpSecurity;
import org.springframework.security.config.annotation.web.configuration.EnableWebSecurity;
import org.springframework.security.config.annotation.web.configuration.WebSecurityConfigurerAdapter;
import org.springframework.security.core.userdetails.UserDetailsService;
@Configuration
@EnableWebSecurity
public class SecurityConfiguration extends WebSecurityConfigurerAdapter {
@Autowired
@Qualifier("customUserDetailsService")
UserDetailsService userDetailsService;
@Autowired
CustomSuccessHandler customSuccessHandler;
@Autowired
public void configureGlobalSecurity(AuthenticationManagerBuilder auth) throws Exception {
auth.userDetailsService(userDetailsService);
}
@Override
protected void configure(HttpSecurity http) throws Exception {
http.authorizeRequests()
//.antMatchers("/", "/home").permitAll()
.antMatchers("/", "/home").access("hasRole('USER')")
.antMatchers("/admin/**").access("hasRole('ADMIN')")
.antMatchers("/db/**").access("hasRole('ADMIN') and hasRole('DBA')")
//.and().formLogin().loginPage("/login")
.and().formLogin().loginPage("/login").successHandler(customSuccessHandler)
.usernameParameter("ssoId").passwordParameter("password")
.and().csrf()
.and().exceptionHandling().accessDeniedPage("/Access_Denied");
}
}
这里相比之前 Hibernate 文章中的变化是额外调用 successHandler()如下所示:
formLogin().loginPage("/login").successHandler(customSuccessHandler).
我们来看看 successHandler。这个类基于自定义逻辑负责最后的重定向,这对我们来说是用户的重定向[home/admin/db]是根据他的角色[USER/ADMIN/DBA]。
此外,我们根据用户角色保护了主页,使例子更贴近现实。
刚刚在配置包添加这个类并将其注册为成功处理程序来使用Security配置(如上图所示)。
以上对应的XML配置格式的安全配置是:
<beans:beans xmlns="http://www.springframework.org/schema/security"
xmlns:beans="http://www.springframework.org/schema/beans"
xmlns:xsi="http://www.w3.org/2001/XMLSchema-instance"
xsi:schemaLocation="http://www.springframework.org/schema/beans http://www.springframework.org/schema/beans/spring-beans-4.1.xsd
http://www.springframework.org/schema/security http://www.springframework.org/schema/security/spring-security-4.0.xsd">
<http auto-config="true" >
<intercept-url pattern="/" access="permitAll" />
<intercept-url pattern="/home" access="permitAll" />
<intercept-url pattern="/admin**" access="hasRole('ADMIN')" />
<intercept-url pattern="/dba**" access="hasRole('ADMIN') and hasRole('DBA')" />
<form-login login-page="/login"
username-parameter="ssoId"
password-parameter="password"
authentication-success-handler-ref="customSuccessHandler"
authentication-failure-url="/Access_Denied" />
<csrf/>
</http>
<authentication-manager >
<authentication-provider user-service-ref="customUserDetailsService"/>
</authentication-manager>
<beans:bean id="customUserDetailsService" class="com.yiibai.springsecurity.service.CustomUserDetailsService" />
<beans:bean id="customSuccessHandler" class="com.yiibai.springsecurity.configuration.CustomSuccessHandler" />
</beans:beans>
构建和部署应用程序
现在构造 war(通过 eclipse/m2eclipse)或通过Maven的命令行(mvn clean install)。部署WAR文件到Servlet3.0容器。由于这里我使用的是在 eclipse 中配置 Tomcat,可以直接发布到 Tomcat 服务容器中。如果不知道怎么使用,可以参考:http://www.yiibai.com/maven/create-a-maven-web-project-with-eclipse.html
运行应用程序
仅供参考,我们将使用在上一节中的所定义的数据库表结构及数据记录。点击查看数据库表和记录 。
打开浏览器并访问 - http://localhost:8080/SpringSecurityHibernateRoleBasedLogin/
结果如下所示 -
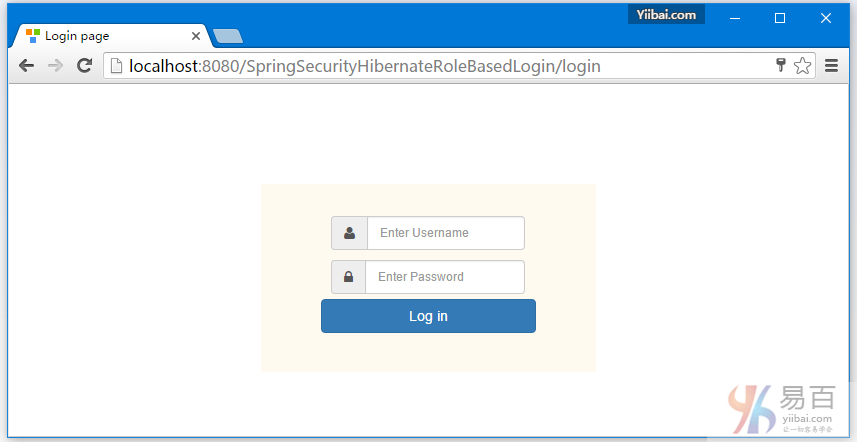
提供DBA登录帐户信息,这里使用 kenny 作为登录名。
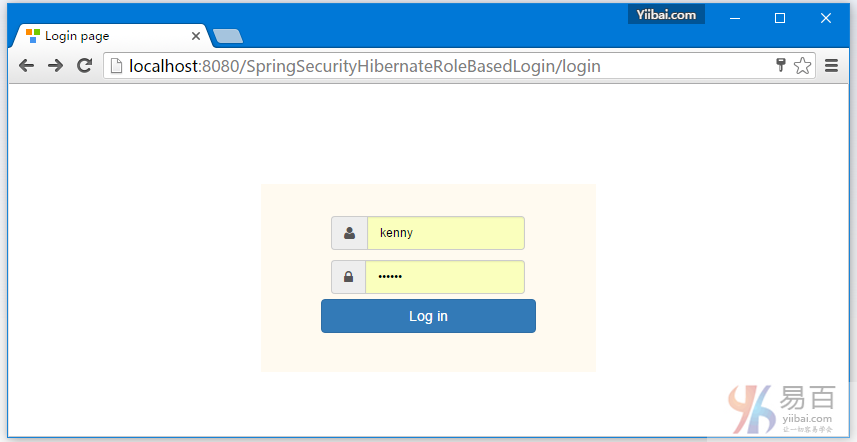
提交后登录成功后,你会被直接跳转到 /db 页面, kenny具有DBA角色。如下图中所示 -

现在注销,并填写一个一般用户角色的用户名,执行登录测试跳转 -
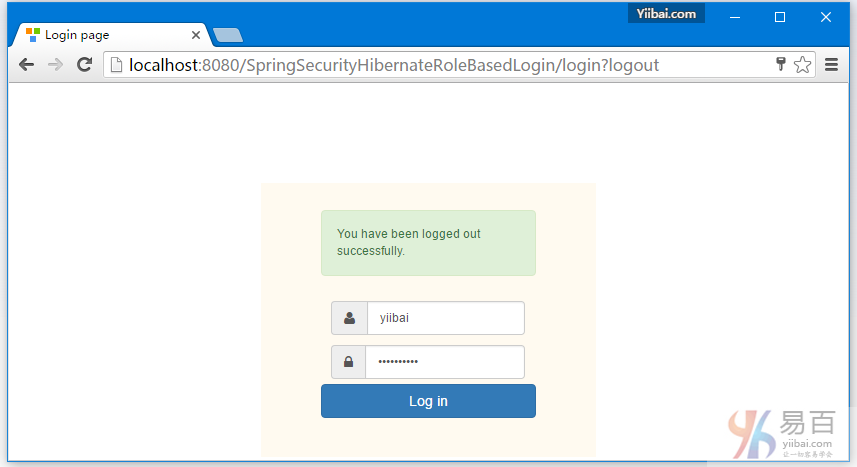
这里为了演示,故意写错了登录密码,如下所示 -
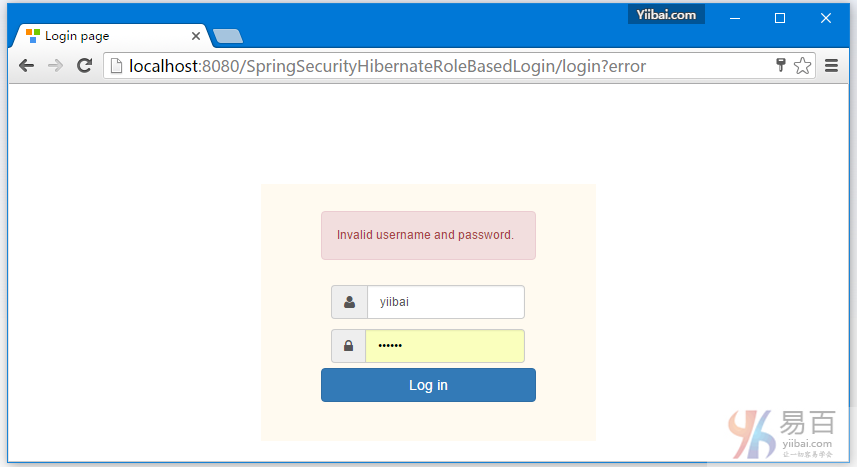
提供正确的用户(USER )角色的凭据,您将被重定向到主页。
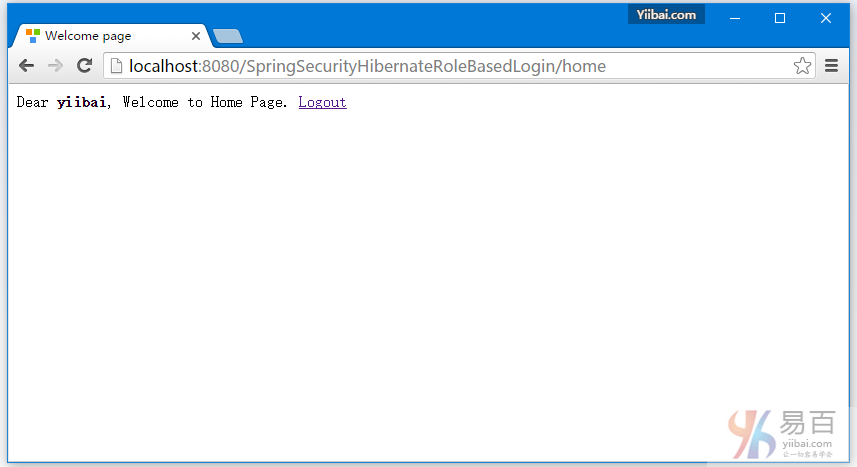
现在尝试访问管理页面:http://localhost:8080/SpringSecurityHibernateRoleBasedLogin/admin 。您应该看到拒绝访问页面。如下图中所示 -
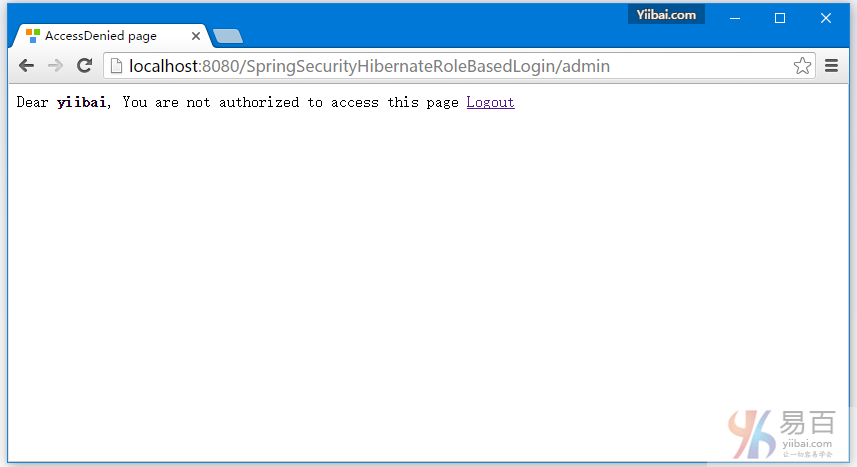
现在,注销和管理员(ADMIN)凭据登录,这里使用一个叫作:sam 的用户登录,您将会被跳转到URL:/admin。如下图中所示 -
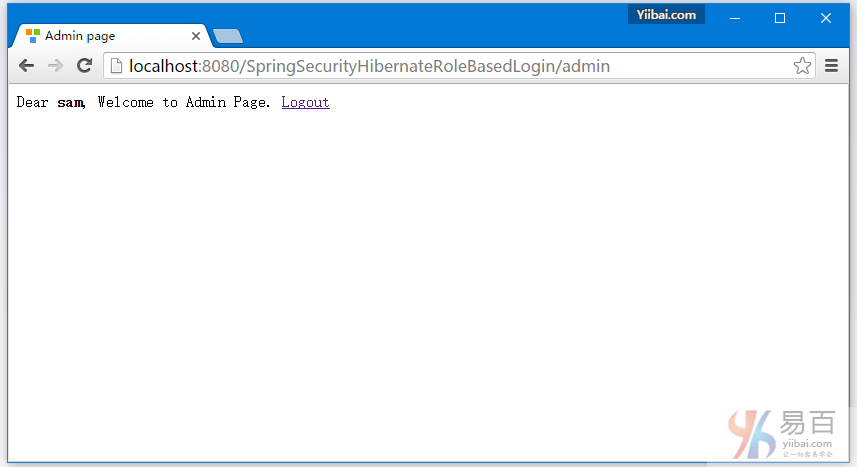
最后,注销登录-
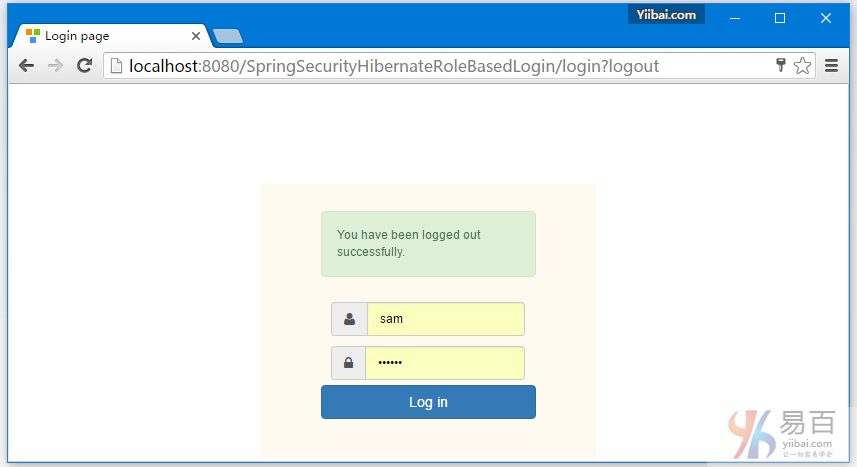
就这样。下一篇文章我们将来学习在 Spring Security 中使用BCryptPasswordEncoder密码编码。
下载源代码
09-SpringSecurityHibernateRoleBasedLogin.zip
参考
本站代码下载:http://www.yiibai.com/siteinfo/download.html
本文属作者原创,转载请注明出处:易百教程 » Spring Secrity与Hibernate基于角色登录实例
Spring Security+Hibernate密码编码器Bcrypt实例 - Spring Security教程™
本教程介绍了在 Spring Security 使用 BCryptPasswordEncoder 来作密码编码。我们将使用 Spring MVC 4,Hibernate 4 & Spring Security 4 的一个实例来说明一个真实世界的设置涉及登录认证和用户创建。
基于注解 + XML这两个项目的代码,可这篇文章的结尾下载。
密码编码的字符
任何应用程序,这需要认真对待安全问题,千万不要以纯文本格式来存储密码。密码应始终使用安全散列算法进行编码。有许多标准算法如:SHA或MD5,这其中要一个适当的 SALT 字符串相结合,可为密码编码提供一个不错的选择。Spring Security提供BCryptPasswordEncoder,并实现了 Spring 的 PasswordEncoder 接口,从而使用 BCrypt 强散列函数对密码进行加密编码。
需要在应用程序中的什么地方进行密码编码?
1. 在密码比较过程中。输入密码经过编辑加密与存储在数据库中密码(它是经过编码的)进行比较;
2. 在新用户创建或现有用户密码需要更新。在保存或更新数据库之前将输入新密码进行加密编码;
与之前的文章有哪些是变化的?
1. 创建和注入 PasswordEncoder 到 AuthenticationProvider并设置作为身份验证提供者在 AuthenticationManagerBuilder
package com.yiibai.springsecurity.configuration;
import org.springframework.beans.factory.annotation.Autowired;
import org.springframework.beans.factory.annotation.Qualifier;
import org.springframework.context.annotation.Bean;
import org.springframework.context.annotation.Configuration;
import org.springframework.security.authentication.dao.DaoAuthenticationProvider;
import org.springframework.security.config.annotation.authentication.builders.AuthenticationManagerBuilder;
import org.springframework.security.config.annotation.web.builders.HttpSecurity;
import org.springframework.security.config.annotation.web.configuration.EnableWebSecurity;
import org.springframework.security.config.annotation.web.configuration.WebSecurityConfigurerAdapter;
import org.springframework.security.core.userdetails.UserDetailsService;
import org.springframework.security.crypto.bcrypt.BCryptPasswordEncoder;
import org.springframework.security.crypto.password.PasswordEncoder;
@Configuration
@EnableWebSecurity
public class SecurityConfiguration extends WebSecurityConfigurerAdapter {
@Autowired
@Qualifier("customUserDetailsService")
UserDetailsService userDetailsService;
@Autowired
public void configureGlobalSecurity(AuthenticationManagerBuilder auth) throws Exception {
auth.userDetailsService(userDetailsService);
auth.authenticationProvider(authenticationProvider());
}
@Bean
public PasswordEncoder passwordEncoder() {
return new BCryptPasswordEncoder();
}
@Bean
public DaoAuthenticationProvider authenticationProvider() {
DaoAuthenticationProvider authenticationProvider = new DaoAuthenticationProvider();
authenticationProvider.setUserDetailsService(userDetailsService);
authenticationProvider.setPasswordEncoder(passwordEncoder());
return authenticationProvider;
}
@Override
protected void configure(HttpSecurity http) throws Exception {
http.authorizeRequests()
.antMatchers("/", "/home").permitAll()
.antMatchers("/admin/**","/newuser").access("hasRole('ADMIN')")
.antMatchers("/db/**").access("hasRole('ADMIN') and hasRole('DBA')")
.and().formLogin().loginPage("/login")
.usernameParameter("ssoId").passwordParameter("password")
.and().csrf()
.and().exceptionHandling().accessDeniedPage("/Access_Denied");
}
}
上面的设置可在应用程序的任何地方来处理密码比较认证过程。
以上安全配置以XML配置格式表示如下:
<beans:beans xmlns="http://www.springframework.org/schema/security"
xmlns:beans="http://www.springframework.org/schema/beans"
xmlns:xsi="http://www.w3.org/2001/XMLSchema-instance"
xsi:schemaLocation="http://www.springframework.org/schema/beans http://www.springframework.org/schema/beans/spring-beans-4.1.xsd
http://www.springframework.org/schema/security http://www.springframework.org/schema/security/spring-security-4.0.xsd">
<http auto-config="true" >
<intercept-url pattern="/" access="permitAll" />
<intercept-url pattern="/home" access="permitAll" />
<intercept-url pattern="/admin**" access="hasRole('ADMIN')" />
<intercept-url pattern="/dba**" access="hasRole('ADMIN') and hasRole('DBA')" />
<form-login login-page="/login"
username-parameter="ssoId"
password-parameter="password"
authentication-failure-url="/Access_Denied" />
<csrf/>
</http>
<authentication-manager >
<authentication-provider user-service-ref="customUserDetailsService">
<password-encoder ref="bcryptEncoder"/>
</authentication-provider>
</authentication-manager>
<beans:bean id="bcryptEncoder" class="org.springframework.security.crypto.bcrypt.BCryptPasswordEncoder" />
<beans:bean id="customUserDetailsService" class="com.yiibai.springsecurity.service.CustomUserDetailsService" />
</beans:beans>
2. 更新 UserService 让它实现在保存新的口令到数据库中之前进行密码编码加密。
@Service("userService")
@Transactional
public class UserServiceImpl implements UserService{
@Autowired
private UserDao dao;
@Autowired
private PasswordEncoder passwordEncoder;
public void save(User user){
user.setPassword(passwordEncoder.encode(user.getPassword()));
dao.save(user);
}
public User findById(int id) {
return dao.findById(id);
}
public User findBySso(String sso) {
return dao.findBySSO(sso);
}
}
需要做的是在应用程序中使用 Spring Security BCrypt 来实现您的密码编码。
完整的实例
使用以下技术:
[blockquote]
- Spring 4.1.6.RELEASE
- Spring Security 4.0.1.RELEASE
- Hibernate 4.3.6.Final
- MySQL Server 5.6
- Maven 3
- JDK 1.8
- Tomcat 8.0.21
- Eclipse JUNO Service Release 2
[/blockquote]
第1步: 工程目录结构
以下将是项目最终的结构:
第2步:更新pom.xml,包括所需的依懒
<project xmlns="http://maven.apache.org/POM/4.0.0" xmlns:xsi="http://www.w3.org/2001/XMLSchema-instance"
xsi:schemaLocation="http://maven.apache.org/POM/4.0.0 http://maven.apache.org/xsd/maven-4.0.0.xsd">
<modelVersion>4.0.0</modelVersion>
<groupId>com.yiibai.springsecurity</groupId>
<artifactId>SpringSecurityPasswordEncodingWithBcryptExample</artifactId>
<version>1.0.0</version>
<packaging>war</packaging>
<name>SpringSecurityPasswordEncodingWithBcryptExample</name>
<properties>
<springframework.version>4.1.6.RELEASE</springframework.version>
<springsecurity.version>4.0.1.RELEASE</springsecurity.version>
<hibernate.version>4.3.6.Final</hibernate.version>
<mysql.connector.version>5.1.31</mysql.connector.version>
</properties>
<dependencies>
<!-- Spring -->
<dependency>
<groupId>org.springframework</groupId>
<artifactId>spring-core</artifactId>
<version>${springframework.version}</version>
</dependency>
<dependency>
<groupId>org.springframework</groupId>
<artifactId>spring-web</artifactId>
<version>${springframework.version}</version>
</dependency>
<dependency>
<groupId>org.springframework</groupId>
<artifactId>spring-webmvc</artifactId>
<version>${springframework.version}</version>
</dependency>
<dependency>
<groupId>org.springframework</groupId>
<artifactId>spring-tx</artifactId>
<version>${springframework.version}</version>
</dependency>
<dependency>
<groupId>org.springframework</groupId>
<artifactId>spring-orm</artifactId>
<version>${springframework.version}</version>
</dependency>
<!-- Spring Security -->
<dependency>
<groupId>org.springframework.security</groupId>
<artifactId>spring-security-web</artifactId>
<version>${springsecurity.version}</version>
</dependency>
<dependency>
<groupId>org.springframework.security</groupId>
<artifactId>spring-security-config</artifactId>
<version>${springsecurity.version}</version>
</dependency>
<!-- Hibernate -->
<dependency>
<groupId>org.hibernate</groupId>
<artifactId>hibernate-core</artifactId>
<version>${hibernate.version}</version>
</dependency>
<!-- jsr303 validation -->
<dependency>
<groupId>javax.validation</groupId>
<artifactId>validation-api</artifactId>
<version>1.1.0.Final</version>
</dependency>
<!-- Hibernate validators -->
<dependency>
<groupId>org.hibernate</groupId>
<artifactId>hibernate-validator</artifactId>
<version>5.1.3.Final</version>
</dependency>
<!-- MySQL -->
<dependency>
<groupId>mysql</groupId>
<artifactId>mysql-connector-java</artifactId>
<version>${mysql.connector.version}</version>
</dependency>
<dependency>
<groupId>javax.servlet</groupId>
<artifactId>javax.servlet-api</artifactId>
<version>3.1.0</version>
</dependency>
<dependency>
<groupId>javax.servlet.jsp</groupId>
<artifactId>javax.servlet.jsp-api</artifactId>
<version>2.3.1</version>
</dependency>
<dependency>
<groupId>javax.servlet</groupId>
<artifactId>jstl</artifactId>
<version>1.2</version>
</dependency>
</dependencies>
<build>
<pluginManagement>
<plugins>
<plugin>
<groupId>org.apache.maven.plugins</groupId>
<artifactId>maven-compiler-plugin</artifactId>
<version>3.2</version>
<configuration>
<source>1.7</source>
<target>1.7</target>
</configuration>
</plugin>
<plugin>
<groupId>org.apache.maven.plugins</groupId>
<artifactId>maven-war-plugin</artifactId>
<version>2.4</version>
<configuration>
<warSourceDirectory>src/main/webapp</warSourceDirectory>
<warName>SpringSecurityPasswordEncodingWithBcryptExample</warName>
<failOnMissingWebXml>false</failOnMissingWebXml>
</configuration>
</plugin>
</plugins>
</pluginManagement>
<finalName>SpringSecurityPasswordEncodingWithBcryptExample</finalName>
</build>
</project>
数据库表部分
第3步:创建数据库模式并填充数据
/*All User's gets stored in APP_USER table*/
create table APP_USER (
id BIGINT NOT NULL AUTO_INCREMENT,
sso_id VARCHAR(30) NOT NULL,
password VARCHAR(100) NOT NULL,
first_name VARCHAR(30) NOT NULL,
last_name VARCHAR(30) NOT NULL,
email VARCHAR(30) NOT NULL,
state VARCHAR(30) NOT NULL,
PRIMARY KEY (id),
UNIQUE (sso_id)
);
/* USER_PROFILE table contains all possible roles */
create table USER_PROFILE(
id BIGINT NOT NULL AUTO_INCREMENT,
type VARCHAR(30) NOT NULL,
PRIMARY KEY (id),
UNIQUE (type)
);
/* JOIN TABLE for MANY-TO-MANY relationship*/
CREATE TABLE APP_USER_USER_PROFILE (
user_id BIGINT NOT NULL,
user_profile_id BIGINT NOT NULL,
PRIMARY KEY (user_id, user_profile_id),
CONSTRAINT FK_APP_USER FOREIGN KEY (user_id) REFERENCES APP_USER (id),
CONSTRAINT FK_USER_PROFILE FOREIGN KEY (user_profile_id) REFERENCES USER_PROFILE (id)
);
/* Populate USER_PROFILE Table */
INSERT INTO USER_PROFILE(type)
VALUES ('USER');
INSERT INTO USER_PROFILE(type)
VALUES ('ADMIN');
INSERT INTO USER_PROFILE(type)
VALUES ('DBA');
/* Populate one Admin User which will further create other users for the application using GUI */
INSERT INTO APP_USER(sso_id, password, first_name, last_name, email, state)
VALUES ('sam','$2a$10$6e2mmsbKPVMRv1zCUTxcS.k2wPxqaXc6.wseLpYBB8qzfIMmKimBK', 'Sam','Smith','samy@yiibai.com', 'Active'); /* Populate JOIN Table */
INSERT INTO APP_USER_USER_PROFILE (user_id, user_profile_id)
SELECT user.id, profile.id FROM app_user user, user_profile profile
where user.sso_id='sam' and profile.type='ADMIN';
请注意,这里我们已经手动插入一个用户(我们还得需要一个管理员用户并登录以及使用应用程序来创建更多的用户)。这是一个真实的应用场景。需要注意一下密码。它用下述工具类[它甚至可以是一个脚本],仅仅用来生成一个管理员用户的初始密码生成。
它完全可以从应用程序中删除。
package com.yiibai.springsecurity.util;
import org.springframework.security.crypto.bcrypt.BCryptPasswordEncoder;
public class QuickPasswordEncodingGenerator {
/**
* @param args
*/
public static void main(String[] args) {
String password = "abc125";
BCryptPasswordEncoder passwordEncoder = new BCryptPasswordEncoder();
System.out.println(passwordEncoder.encode(password));
}
}
上面的程序将使用上述模式产生编码加密密码。请注意 BCrypt散列算法生成的每个密码编码是一个长度为 60 的哈希值,同样的密码可能会得到不同的值。
Security(安全)部分
第4步: 添加Spring Security配置类
package com.yiibai.springsecurity.configuration;
import org.springframework.beans.factory.annotation.Autowired;
import org.springframework.beans.factory.annotation.Qualifier;
import org.springframework.context.annotation.Bean;
import org.springframework.context.annotation.Configuration;
import org.springframework.security.authentication.dao.DaoAuthenticationProvider;
import org.springframework.security.config.annotation.authentication.builders.AuthenticationManagerBuilder;
import org.springframework.security.config.annotation.web.builders.HttpSecurity;
import org.springframework.security.config.annotation.web.configuration.EnableWebSecurity;
import org.springframework.security.config.annotation.web.configuration.WebSecurityConfigurerAdapter;
import org.springframework.security.core.userdetails.UserDetailsService;
import org.springframework.security.crypto.bcrypt.BCryptPasswordEncoder;
import org.springframework.security.crypto.password.PasswordEncoder;
@Configuration
@EnableWebSecurity
public class SecurityConfiguration extends WebSecurityConfigurerAdapter {
@Autowired
@Qualifier("customUserDetailsService")
UserDetailsService userDetailsService;
@Autowired
public void configureGlobalSecurity(AuthenticationManagerBuilder auth) throws Exception {
auth.userDetailsService(userDetailsService);
auth.authenticationProvider(authenticationProvider());
}
@Bean
public PasswordEncoder passwordEncoder() {
return new BCryptPasswordEncoder();
}
@Bean
public DaoAuthenticationProvider authenticationProvider() {
DaoAuthenticationProvider authenticationProvider = new DaoAuthenticationProvider();
authenticationProvider.setUserDetailsService(userDetailsService);
authenticationProvider.setPasswordEncoder(passwordEncoder());
return authenticationProvider;
}
@Override
protected void configure(HttpSecurity http) throws Exception {
http.authorizeRequests()
.antMatchers("/", "/home").permitAll()
.antMatchers("/admin/**","/newuser").access("hasRole('ADMIN')")
.antMatchers("/db/**").access("hasRole('ADMIN') and hasRole('DBA')")
.and().formLogin().loginPage("/login")
.usernameParameter("ssoId").passwordParameter("password")
.and().csrf()
.and().exceptionHandling().accessDeniedPage("/Access_Denied");
}
}
第5步: 使用 war 注册 springSecurityFilter
下面指定的初始化类应用程序的 war 注册 springSecurityFilter [第 3 步中创建的]。
package com.yiibai.springsecurity.configuration;
import org.springframework.security.web.context.AbstractSecurityWebApplicationInitializer;
public class SecurityWebApplicationInitializer extends AbstractSecurityWebApplicationInitializer {
}
以上对应的XML配置格式的配置是:
<filter>
<filter-name>springSecurityFilterChain</filter-name>
<filter-class>org.springframework.web.filter.DelegatingFilterProxy</filter-class>
</filter>
<filter-mapping>
<filter-name>springSecurityFilterChain</filter-name>
<url-pattern>/*</url-pattern>
</filter-mapping>
第6步: 定义UserDetailsService实现
这个服务是负责提供身份验证细节到验证管理。
package com.yiibai.springsecurity.service;
import java.util.ArrayList;
import java.util.List;
import org.springframework.beans.factory.annotation.Autowired;
import org.springframework.security.core.GrantedAuthority;
import org.springframework.security.core.authority.SimpleGrantedAuthority;
import org.springframework.security.core.userdetails.UserDetails;
import org.springframework.security.core.userdetails.UserDetailsService;
import org.springframework.security.core.userdetails.UsernameNotFoundException;
import org.springframework.stereotype.Service;
import org.springframework.transaction.annotation.Transactional;
import com.yiibai.springsecurity.model.User;
import com.yiibai.springsecurity.model.UserProfile;
@Service("customUserDetailsService")
public class CustomUserDetailsService implements UserDetailsService{
@Autowired
private UserService userService;
@Transactional(readOnly=true)
public UserDetails loadUserByUsername(String ssoId)
throws UsernameNotFoundException {
User user = userService.findBySso(ssoId);
System.out.println("User : "+user);
if(user==null){
System.out.println("User not found");
throw new UsernameNotFoundException("Username not found");
}
return new org.springframework.security.core.userdetails.User(user.getSsoId(), user.getPassword(),
user.getState().equals("Active"), true, true, true, getGrantedAuthorities(user));
}
private List<GrantedAuthority> getGrantedAuthorities(User user){
List<GrantedAuthority> authorities = new ArrayList<GrantedAuthority>();
for(UserProfile userProfile : user.getUserProfiles()){
System.out.println("UserProfile : "+userProfile);
authorities.add(new SimpleGrantedAuthority("ROLE_"+userProfile.getType()));
}
System.out.print("authorities :"+authorities);
return authorities;
}
}
SpringMVC部分
第7步: 添加控制器
package com.yiibai.springsecurity.controller;
import java.util.List;
import javax.servlet.http.HttpServletRequest;
import javax.servlet.http.HttpServletResponse;
import javax.validation.Valid;
import org.springframework.beans.factory.annotation.Autowired;
import org.springframework.security.core.Authentication;
import org.springframework.security.core.context.SecurityContextHolder;
import org.springframework.security.core.userdetails.UserDetails;
import org.springframework.security.web.authentication.logout.SecurityContextLogoutHandler;
import org.springframework.stereotype.Controller;
import org.springframework.ui.ModelMap;
import org.springframework.validation.BindingResult;
import org.springframework.web.bind.annotation.ModelAttribute;
import org.springframework.web.bind.annotation.RequestMapping;
import org.springframework.web.bind.annotation.RequestMethod;
import com.yiibai.springsecurity.model.User;
import com.yiibai.springsecurity.model.UserProfile;
import com.yiibai.springsecurity.service.UserProfileService;
import com.yiibai.springsecurity.service.UserService;
@Controller
public class HelloWorldController {
@Autowired
UserProfileService userProfileService;
@Autowired
UserService userService;
@RequestMapping(value = { "/", "/home" }, method = RequestMethod.GET)
public String homePage(ModelMap model) {
model.addAttribute("greeting", "Hi, Welcome to mysite");
return "welcome";
}
@RequestMapping(value = "/admin", method = RequestMethod.GET)
public String adminPage(ModelMap model) {
model.addAttribute("user", getPrincipal());
return "admin";
}
@RequestMapping(value = "/db", method = RequestMethod.GET)
public String dbaPage(ModelMap model) {
model.addAttribute("user", getPrincipal());
return "dba";
}
@RequestMapping(value = "/Access_Denied", method = RequestMethod.GET)
public String accessDeniedPage(ModelMap model) {
model.addAttribute("user", getPrincipal());
return "accessDenied";
}
@RequestMapping(value = "/login", method = RequestMethod.GET)
public String loginPage() {
return "login";
}
@RequestMapping(value="/logout", method = RequestMethod.GET)
public String logoutPage (HttpServletRequest request, HttpServletResponse response) {
Authentication auth = SecurityContextHolder.getContext().getAuthentication();
if (auth != null){
new SecurityContextLogoutHandler().logout(request, response, auth);
}
return "redirect:/login?logout";
}
@RequestMapping(value = "/newUser", method = RequestMethod.GET)
public String newRegistration(ModelMap model) {
User user = new User();
model.addAttribute("user", user);
return "newuser";
}
/*
* This method will be called on form submission, handling POST request It
* also validates the user input
*/
@RequestMapping(value = "/newUser", method = RequestMethod.POST)
public String saveRegistration(@Valid User user,
BindingResult result, ModelMap model) {
if (result.hasErrors()) {
System.out.println("There are errors");
return "newuser";
}
userService.save(user);
System.out.println("First Name : "+user.getFirstName());
System.out.println("Last Name : "+user.getLastName());
System.out.println("SSO ID : "+user.getSsoId());
System.out.println("Password : "+user.getPassword());
System.out.println("Email : "+user.getEmail());
System.out.println("Checking UsrProfiles....");
if(user.getUserProfiles()!=null){
for(UserProfile profile : user.getUserProfiles()){
System.out.println("Profile : "+ profile.getType());
}
}
model.addAttribute("success", "User " + user.getFirstName() + " has been registered successfully");
return "registrationsuccess";
}
private String getPrincipal(){
String userName = null;
Object principal = SecurityContextHolder.getContext().getAuthentication().getPrincipal();
if (principal instanceof UserDetails) {
userName = ((UserDetails)principal).getUsername();
} else {
userName = principal.toString();
}
return userName;
}
@ModelAttribute("roles")
public List<UserProfile> initializeProfiles() {
return userProfileService.findAll();
}
}
第8步: 添加SpringMVC配置类
package com.yiibai.springsecurity.configuration;
import org.springframework.beans.factory.annotation.Autowired;
import org.springframework.context.annotation.ComponentScan;
import org.springframework.context.annotation.Configuration;
import org.springframework.format.FormatterRegistry;
import org.springframework.web.servlet.config.annotation.EnableWebMvc;
import org.springframework.web.servlet.config.annotation.ResourceHandlerRegistry;
import org.springframework.web.servlet.config.annotation.ViewResolverRegistry;
import org.springframework.web.servlet.config.annotation.WebMvcConfigurerAdapter;
import org.springframework.web.servlet.view.InternalResourceViewResolver;
import org.springframework.web.servlet.view.JstlView;
@Configuration
@EnableWebMvc
@ComponentScan(basePackages = "com.yiibai.springsecurity")
public class HelloWorldConfiguration extends WebMvcConfigurerAdapter {
@Autowired
RoleToUserProfileConverter roleToUserProfileConverter;
@Override
public void configureViewResolvers(ViewResolverRegistry registry) {
InternalResourceViewResolver viewResolver = new InternalResourceViewResolver();
viewResolver.setViewClass(JstlView.class);
viewResolver.setPrefix("/WEB-INF/views/");
viewResolver.setSuffix(".jsp");
registry.viewResolver(viewResolver);
}
/*
* Configure ResourceHandlers to serve static resources like CSS/ Javascript etc...
*
*/
@Override
public void addResourceHandlers(ResourceHandlerRegistry registry) {
registry.addResourceHandler("/static/**").addResourceLocations("/static/");
}
/*
* Configure Converter to be used.
* In our example, we need a converter to convert string values[Roles] to UserProfiles in newUser.jsp
*/
@Override
public void addFormatters(FormatterRegistry registry) {
registry.addConverter(roleToUserProfileConverter);
}
}
这个类负责注册转换器并将ID转换成一个对象。这是必需的,以处理JSP中的一对多的关系。在用户创造过程中,用户可以分配多个角色/UserProfiles,所以我们需要一个转换到一个特定的角色/UserProfiles映射到基于配置文件ID的用户。转换器类如下所示。
上面的设置转换为XML配置如下图中所示 -
<mvc:annotation-driven conversion-service="conversionService"/>
<bean id="conversionService" class="org.springframework.format.support.FormattingConversionServiceFactoryBean">
<property name="converters">
<list>
<bean id="roleToUserProfile" class="com.yiibai.springsecurity.configuration.RoleToUserProfileConverter" />
</list>
</property>
</bean>
第9步: 添加SpringMVC转换器类
package com.yiibai.springsecurity.configuration;
import org.springframework.beans.factory.annotation.Autowired;
import org.springframework.core.convert.converter.Converter;
import org.springframework.stereotype.Component;
import com.yiibai.springsecurity.model.UserProfile;
import com.yiibai.springsecurity.service.UserProfileService;
@Component
public class RoleToUserProfileConverter implements Converter<Object, UserProfile>{
@Autowired
UserProfileService userProfileService;
/*
* Gets UserProfile by Id
* @see org.springframework.core.convert.converter.Converter#convert(java.lang.Object)
*/
public UserProfile convert(Object element) {
Integer id = Integer.parseInt((String)element);
UserProfile profile= userProfileService.findById(id);
System.out.println("Profile : "+profile);
return profile;
}
/*
* Gets UserProfile by type
* @see org.springframework.core.convert.converter.Converter#convert(java.lang.Object)
*/
/*
public UserProfile convert(Object element) {
String type = (String)element;
UserProfile profile= userProfileService.findByType(type);
System.out.println("Profile ... : "+profile);
return profile;
}
*/
}
第10步: 添加初始化类
package com.yiibai.springsecurity.configuration;
import org.springframework.web.servlet.support.AbstractAnnotationConfigDispatcherServletInitializer;
public class SpringMvcInitializer extends AbstractAnnotationConfigDispatcherServletInitializer {
@Override
protected Class<?>[] getRootConfigClasses() {
return new Class[] { HelloWorldConfiguration.class };
}
@Override
protected Class<?>[] getServletConfigClasses() {
return null;
}
@Override
protected String[] getServletMappings() {
return new String[] { "/" };
}
}
Hibernate配置部分
第11步: 创建Hibernate配置
Hibernate的配置类包含数据源层,SessionFactory和事务管理的 @Bean 方法。数据源属性是取自 application.properties 文件,包含MySQL数据库连接详细信息。
package com.yiibai.springsecurity.configuration;
import java.util.Properties;
import javax.sql.DataSource;
import org.hibernate.SessionFactory;
import org.springframework.beans.factory.annotation.Autowired;
import org.springframework.context.annotation.Bean;
import org.springframework.context.annotation.ComponentScan;
import org.springframework.context.annotation.Configuration;
import org.springframework.context.annotation.PropertySource;
import org.springframework.core.env.Environment;
import org.springframework.jdbc.datasource.DriverManagerDataSource;
import org.springframework.orm.hibernate4.HibernateTransactionManager;
import org.springframework.orm.hibernate4.LocalSessionFactoryBean;
import org.springframework.transaction.annotation.EnableTransactionManagement;
@Configuration
@EnableTransactionManagement
@ComponentScan({ "com.yiibai.springsecurity.configuration" })
@PropertySource(value = { "classpath:application.properties" })
public class HibernateConfiguration {
@Autowired
private Environment environment;
@Bean
public LocalSessionFactoryBean sessionFactory() {
LocalSessionFactoryBean sessionFactory = new LocalSessionFactoryBean();
sessionFactory.setDataSource(dataSource());
sessionFactory.setPackagesToScan(new String[] { "com.yiibai.springsecurity.model" });
sessionFactory.setHibernateProperties(hibernateProperties());
return sessionFactory;
}
@Bean
public DataSource dataSource() {
DriverManagerDataSource dataSource = new DriverManagerDataSource();
dataSource.setDriverClassName(environment.getRequiredProperty("jdbc.driverClassName"));
dataSource.setUrl(environment.getRequiredProperty("jdbc.url"));
dataSource.setUsername(environment.getRequiredProperty("jdbc.username"));
dataSource.setPassword(environment.getRequiredProperty("jdbc.password"));
return dataSource;
}
private Properties hibernateProperties() {
Properties properties = new Properties();
properties.put("hibernate.dialect", environment.getRequiredProperty("hibernate.dialect"));
properties.put("hibernate.show_sql", environment.getRequiredProperty("hibernate.show_sql"));
properties.put("hibernate.format_sql", environment.getRequiredProperty("hibernate.format_sql"));
return properties;
}
@Bean
@Autowired
public HibernateTransactionManager transactionManager(SessionFactory s) {
HibernateTransactionManager txManager = new HibernateTransactionManager();
txManager.setSessionFactory(s);
return txManager;
}
}
application.properties
jdbc.driverClassName = com.mysql.jdbc.Driver
jdbc.url = jdbc:mysql://localhost:3306/yiibai
jdbc.username = root
jdbc.password =
hibernate.dialect = org.hibernate.dialect.MySQLDialect
hibernate.show_sql = true
hibernate.format_sql = true
DAO, Model & Service部分
第12步: 创建模型类
用户可以有多个角色[DBA,ADMIN,USER]。而角色可以被分配给一个以上的用户。因此,一个用户和用户配置[角色]之间存在多对多的关系。我们保持这种关系单向[User 到 UserProfile],因为我们只是在寻找指定用户的角色(而不反之亦然)。我们将使用连接(Join)表来实现多对多关联。
package com.yiibai.springsecurity.model;
import java.util.HashSet;
import java.util.Set;
import javax.persistence.Column;
import javax.persistence.Entity;
import javax.persistence.FetchType;
import javax.persistence.GeneratedValue;
import javax.persistence.GenerationType;
import javax.persistence.Id;
import javax.persistence.JoinColumn;
import javax.persistence.JoinTable;
import javax.persistence.ManyToMany;
import javax.persistence.Table;
import org.hibernate.validator.constraints.NotEmpty;
@Entity
@Table(name="APP_USER")
public class User {
@Id @GeneratedValue(strategy=GenerationType.IDENTITY)
private int id;
@NotEmpty
@Column(name="SSO_ID", unique=true, nullable=false)
private String ssoId;
@NotEmpty
@Column(name="PASSWORD", nullable=false)
private String password;
@NotEmpty
@Column(name="FIRST_NAME", nullable=false)
private String firstName;
@NotEmpty
@Column(name="LAST_NAME", nullable=false)
private String lastName;
@NotEmpty
@Column(name="EMAIL", nullable=false)
private String email;
@NotEmpty
@Column(name="STATE", nullable=false)
private String state=State.ACTIVE.getState();
@ManyToMany(fetch = FetchType.EAGER)
@JoinTable(name = "APP_USER_USER_PROFILE",
joinColumns = { @JoinColumn(name = "USER_ID") },
inverseJoinColumns = { @JoinColumn(name = "USER_PROFILE_ID") })
private Set<UserProfile> userProfiles = new HashSet<UserProfile>();
public int getId() {
return id;
}
public void setId(int id) {
this.id = id;
}
public String getSsoId() {
return ssoId;
}
public void setSsoId(String ssoId) {
this.ssoId = ssoId;
}
public String getPassword() {
return password;
}
public void setPassword(String password) {
this.password = password;
}
public String getFirstName() {
return firstName;
}
public void setFirstName(String firstName) {
this.firstName = firstName;
}
public String getLastName() {
return lastName;
}
public void setLastName(String lastName) {
this.lastName = lastName;
}
public String getEmail() {
return email;
}
public void setEmail(String email) {
this.email = email;
}
public String getState() {
return state;
}
public void setState(String state) {
this.state = state;
}
public Set<UserProfile> getUserProfiles() {
return userProfiles;
}
public void setUserProfiles(Set<UserProfile> userProfiles) {
this.userProfiles = userProfiles;
}
@Override
public int hashCode() {
final int prime = 31;
int result = 1;
result = prime * result + id;
result = prime * result + ((ssoId == null) ? 0 : ssoId.hashCode());
return result;
}
@Override
public boolean equals(Object obj) {
if (this == obj)
return true;
if (obj == null)
return false;
if (!(obj instanceof User))
return false;
User other = (User) obj;
if (id != other.id)
return false;
if (ssoId == null) {
if (other.ssoId != null)
return false;
} else if (!ssoId.equals(other.ssoId))
return false;
return true;
}
@Override
public String toString() {
return "User [id=" + id + ", ssoId=" + ssoId + ", password=" + password
+ ", firstName=" + firstName + ", lastName=" + lastName
+ ", email=" + email + ", state=" + state + ", userProfiles=" + userProfiles +"]";
}
}
package com.yiibai.springsecurity.model;
import javax.persistence.Column;
import javax.persistence.Entity;
import javax.persistence.GeneratedValue;
import javax.persistence.GenerationType;
import javax.persistence.Id;
import javax.persistence.Table;
@Entity
@Table(name="USER_PROFILE")
public class UserProfile {
@Id @GeneratedValue(strategy=GenerationType.IDENTITY)
private int id;
@Column(name="TYPE", length=15, unique=true, nullable=false)
private String type = UserProfileType.USER.getUserProfileType();
public int getId() {
return id;
}
public void setId(int id) {
this.id = id;
}
public String getType() {
return type;
}
public void setType(String type) {
this.type = type;
}
@Override
public int hashCode() {
final int prime = 31;
int result = 1;
result = prime * result + id;
result = prime * result + ((type == null) ? 0 : type.hashCode());
return result;
}
@Override
public boolean equals(Object obj) {
if (this == obj)
return true;
if (obj == null)
return false;
if (!(obj instanceof UserProfile))
return false;
UserProfile other = (UserProfile) obj;
if (id != other.id)
return false;
if (type == null) {
if (other.type != null)
return false;
} else if (!type.equals(other.type))
return false;
return true;
}
@Override
public String toString() {
return "UserProfile [id=" + id + ", type=" + type + "]";
}
}
package com.yiibai.springsecurity.model;
public enum UserProfileType {
USER("USER"),
DBA("DBA"),
ADMIN("ADMIN");
String userProfileType;
private UserProfileType(String userProfileType){
this.userProfileType = userProfileType;
}
public String getUserProfileType(){
return userProfileType;
}
}
package com.yiibai.springsecurity.model;
public enum State {
ACTIVE("Active"),
INACTIVE("Inactive"),
DELETED("Deleted"),
LOCKED("Locked");
private String state;
private State(final String state){
this.state = state;
}
public String getState(){
return this.state;
}
@Override
public String toString(){
return this.state;
}
public String getName(){
return this.name();
}
}
第13步: 创建Dao层
package com.yiibai.springsecurity.dao;
import java.io.Serializable;
import java.lang.reflect.ParameterizedType;
import org.hibernate.Criteria;
import org.hibernate.Session;
import org.hibernate.SessionFactory;
import org.springframework.beans.factory.annotation.Autowired;
public abstract class AbstractDao<PK extends Serializable, T> {
private final Class<T> persistentClass;
@SuppressWarnings("unchecked")
public AbstractDao(){
this.persistentClass =(Class<T>) ((ParameterizedType) this.getClass().getGenericSuperclass()).getActualTypeArguments()[1];
}
@Autowired
private SessionFactory sessionFactory;
protected Session getSession(){
return sessionFactory.getCurrentSession();
}
@SuppressWarnings("unchecked")
public T getByKey(PK key) {
return (T) getSession().get(persistentClass, key);
}
public void persist(T entity) {
getSession().persist(entity);
}
public void delete(T entity) {
getSession().delete(entity);
}
protected Criteria createEntityCriteria(){
return getSession().createCriteria(persistentClass);
}
}
package com.yiibai.springsecurity.dao;
import com.yiibai.springsecurity.model.User;
public interface UserDao {
void save(User user);
User findById(int id);
User findBySSO(String sso);
}
package com.yiibai.springsecurity.dao;
import org.hibernate.Criteria;
import org.hibernate.criterion.Restrictions;
import org.springframework.stereotype.Repository;
import com.yiibai.springsecurity.model.User;
@Repository("userDao")
public class UserDaoImpl extends AbstractDao<Integer, User> implements UserDao {
public void save(User user) {
persist(user);
}
public User findById(int id) {
return getByKey(id);
}
public User findBySSO(String sso) {
Criteria crit = createEntityCriteria();
crit.add(Restrictions.eq("ssoId", sso));
return (User) crit.uniqueResult();
}
}
package com.yiibai.springsecurity.dao;
import java.util.List;
import com.yiibai.springsecurity.model.UserProfile;
public interface UserProfileDao {
List<UserProfile> findAll();
UserProfile findByType(String type);
UserProfile findById(int id);
}
package com.yiibai.springsecurity.dao;
import java.util.List;
import org.hibernate.Criteria;
import org.hibernate.criterion.Order;
import org.hibernate.criterion.Restrictions;
import org.springframework.stereotype.Repository;
import com.yiibai.springsecurity.model.UserProfile;
@Repository("userProfileDao")
public class UserProfileDaoImpl extends AbstractDao<Integer, UserProfile>implements UserProfileDao{
@SuppressWarnings("unchecked")
public List<UserProfile> findAll(){
Criteria crit = createEntityCriteria();
crit.addOrder(Order.asc("type"));
return (List<UserProfile>)crit.list();
}
public UserProfile findById(int id) {
return getByKey(id);
}
public UserProfile findByType(String type) {
Criteria crit = createEntityCriteria();
crit.add(Restrictions.eq("type", type));
return (UserProfile) crit.uniqueResult();
}
}
第14步: 创建Service层
package com.yiibai.springsecurity.service;
import java.util.List;
import com.yiibai.springsecurity.model.UserProfile;
public interface UserProfileService {
List<UserProfile> findAll();
UserProfile findByType(String type);
UserProfile findById(int id);
}
package com.yiibai.springsecurity.service;
import java.util.List;
import org.springframework.beans.factory.annotation.Autowired;
import org.springframework.stereotype.Service;
import org.springframework.transaction.annotation.Transactional;
import com.yiibai.springsecurity.dao.UserProfileDao;
import com.yiibai.springsecurity.model.UserProfile;
@Service("userProfileService")
@Transactional
public class UserProfileServiceImpl implements UserProfileService{
@Autowired
UserProfileDao dao;
public List<UserProfile> findAll() {
return dao.findAll();
}
public UserProfile findByType(String type){
return dao.findByType(type);
}
public UserProfile findById(int id) {
return dao.findById(id);
}
}
package com.yiibai.springsecurity.service;
import com.yiibai.springsecurity.model.User;
public interface UserService {
void save(User user);
User findById(int id);
User findBySso(String sso);
}
package com.yiibai.springsecurity.service;
import org.springframework.beans.factory.annotation.Autowired;
import org.springframework.security.crypto.password.PasswordEncoder;
import org.springframework.stereotype.Service;
import org.springframework.transaction.annotation.Transactional;
import com.yiibai.springsecurity.dao.UserDao;
import com.yiibai.springsecurity.model.User;
@Service("userService")
@Transactional
public class UserServiceImpl implements UserService{
@Autowired
private UserDao dao;
@Autowired
private PasswordEncoder passwordEncoder;
public void save(User user){
user.setPassword(passwordEncoder.encode(user.getPassword()));
dao.save(user);
}
public User findById(int id) {
return dao.findById(id);
}
public User findBySso(String sso) {
return dao.findBySSO(sso);
}
}
视图部分
第15步: 添加视图
login.jsp
<%@ page language="java" contentType="text/html; charset=ISO-8859-1" pageEncoding="ISO-8859-1"%>
<%@ taglib prefix="c" uri="http://java.sun.com/jsp/jstl/core"%>
<html>
<head>
<meta http-equiv="Content-Type" content="text/html; charset=ISO-8859-1">
<title>HelloWorld Login page</title>
<link href="<c:url value='/static/css/bootstrap.css' />" rel="stylesheet"></link>
<link href="<c:url value='/static/css/app.css' />" rel="stylesheet"></link>
<link rel="stylesheet" type="text/css" href="//cdnjs.cloudflare.com/ajax/libs/font-awesome/4.2.0/css/font-awesome.css" />
</head>
<body>
<div id="mainWrapper">
<div class="login-container">
<div class="login-card">
<div class="login-form">
<c:url var="loginUrl" value="/login" />
<form action="${loginUrl}" method="post" class="form-horizontal">
<c:if test="${param.error != null}">
<div class="alert alert-danger">
<p>Invalid username and password.</p>
</div>
</c:if>
<c:if test="${param.logout != null}">
<div class="alert alert-success">
<p>You have been logged out successfully.</p>
</div>
</c:if>
<div class="input-group input-sm">
<label class="input-group-addon" for="username"><i class="fa fa-user"></i></label>
<input type="text" class="form-control" id="username" name="ssoId" placeholder="Enter Username" required>
</div>
<div class="input-group input-sm">
<label class="input-group-addon" for="password"><i class="fa fa-lock"></i></label>
<input type="password" class="form-control" id="password" name="password" placeholder="Enter Password" required>
</div>
<input type="hidden" name="${_csrf.parameterName}"
value="${_csrf.token}" />
<div class="form-actions">
<input type="submit"
class="btn btn-block btn-primary btn-default" value="Log in">
</div>
</form>
</div>
</div>
</div>
</div>
</body>
</html>
正如你所看到的,CSRF参数需要在JSP中的EL表达式访问,所以还需要通过添将以下的代码添加JSP的顶部来强行执行EL表达式解析编译:
<%@ page isELIgnored="false"%>
welcome.jsp
<%@ page language="java" contentType="text/html; charset=ISO-8859-1" pageEncoding="ISO-8859-1"%>
<%@ taglib prefix="c" uri="http://java.sun.com/jsp/jstl/core"%>
<html>
<head>
<meta http-equiv="Content-Type" content="text/html; charset=ISO-8859-1">
<title>Welcome page</title>
<link href="<c:url value='/static/css/bootstrap.css' />" rel="stylesheet"></link>
<link href="<c:url value='/static/css/app.css' />" rel="stylesheet"></link>
</head>
<body>
<div class="success">
Greeting : ${greeting}
This is a welcome page.
</div>
</body>
</html>
admin.jsp
<%@ page language="java" contentType="text/html; charset=ISO-8859-1" pageEncoding="ISO-8859-1"%>
<%@ taglib prefix="c" uri="http://java.sun.com/jsp/jstl/core"%>
<html>
<head>
<meta http-equiv="Content-Type" content="text/html; charset=ISO-8859-1">
<title>Admin page</title>
<link href="<c:url value='/static/css/bootstrap.css' />" rel="stylesheet"></link>
<link href="<c:url value='/static/css/app.css' />" rel="stylesheet"></link>
</head>
<body>
<div class="success">
Dear <strong>${user}</strong>, Welcome to Admin Page.
<br/>
Would you like to <a href="<c:url value='/newUser' />">Add Some Users</a> to keep yourself busy?
<br/>
<a href="<c:url value="/logout" />">Logout</a>
</div>
</body>
</html>
dba.jsp
<%@ page language="java" contentType="text/html; charset=ISO-8859-1" pageEncoding="ISO-8859-1"%>
<%@ taglib prefix="c" uri="http://java.sun.com/jsp/jstl/core"%>
<html>
<head>
<meta http-equiv="Content-Type" content="text/html; charset=ISO-8859-1">
<title>DBA page</title>
<link href="<c:url value='/static/css/bootstrap.css' />" rel="stylesheet"></link>
<link href="<c:url value='/static/css/app.css' />" rel="stylesheet"></link>
</head>
<body>
<div class="success">
Dear <strong>${user}</strong>, Welcome to DBA Page.
<br/>
<a href="<c:url value="/logout" />">Logout</a>
</div>
</body>
</html>
newuser.jsp
<%@ page language="java" contentType="text/html; charset=ISO-8859-1" pageEncoding="ISO-8859-1"%>
<%@ taglib prefix="form" uri="http://www.springframework.org/tags/form"%>
<%@ taglib prefix="c" uri="http://java.sun.com/jsp/jstl/core" %>
<html>
<head>
<meta http-equiv="Content-Type" content="text/html; charset=ISO-8859-1">
<title>User Registration Form</title>
<link href="<c:url value='/static/css/bootstrap.css' />" rel="stylesheet"></link>
<link href="<c:url value='/static/css/app.css' />" rel="stylesheet"></link>
</head>
<body>
<div class="form-container">
<h1>New User Registration Form</h1>
<form:form method="POST" modelAttribute="user" class="form-horizontal">
<div class="row">
<div class="form-group col-md-12">
<label class="col-md-3 control-lable" for="firstName">First Name</label>
<div class="col-md-7">
<form:input type="text" path="firstName" id="firstName" class="form-control input-sm"/>
<div class="has-error">
<form:errors path="firstName" class="help-inline"/>
</div>
</div>
</div>
</div>
<div class="row">
<div class="form-group col-md-12">
<label class="col-md-3 control-lable" for="lastName">Last Name</label>
<div class="col-md-7">
<form:input type="text" path="lastName" id="lastName" class="form-control input-sm"/>
<div class="has-error">
<form:errors path="lastName" class="help-inline"/>
</div>
</div>
</div>
</div>
<div class="row">
<div class="form-group col-md-12">
<label class="col-md-3 control-lable" for="ssoId">SSO ID</label>
<div class="col-md-7">
<form:input type="text" path="ssoId" id="ssoId" class="form-control input-sm"/>
<div class="has-error">
<form:errors path="ssoId" class="help-inline"/>
</div>
</div>
</div>
</div>
<div class="row">
<div class="form-group col-md-12">
<label class="col-md-3 control-lable" for="password">Password</label>
<div class="col-md-7">
<form:input type="password" path="password" id="password" class="form-control input-sm"/>
<div class="has-error">
<form:errors path="password" class="help-inline"/>
</div>
</div>
</div>
</div>
<div class="row">
<div class="form-group col-md-12">
<label class="col-md-3 control-lable" for="email">Email</label>
<div class="col-md-7">
<form:input type="text" path="email" id="email" class="form-control input-sm"/>
<div class="has-error">
<form:errors path="email" class="help-inline"/>
</div>
</div>
</div>
</div>
<div class="row">
<div class="form-group col-md-12">
<label class="col-md-3 control-lable" for="userProfiles">Roles</label>
<div class="col-md-7">
<form:select path="userProfiles" items="${roles}" multiple="true" itemValue="id" itemLabel="type" class="form-control input-sm"/>
<div class="has-error">
<form:errors path="userProfiles" class="help-inline"/>
</div>
</div>
</div>
</div>
<div class="row">
<div class="form-actions floatRight">
<input type="submit" value="Register" class="btn btn-primary btn-sm"> or <a href="<c:url value='/admin' />">Cancel</a>
</div>
</div>
</form:form>
</div>
</body>
</html>
registrationsuccess.jsp
<%@ page language="java" contentType="text/html; charset=ISO-8859-1" pageEncoding="ISO-8859-1"%>
<%@ taglib prefix="c" uri="http://java.sun.com/jsp/jstl/core" %>
<html>
<head>
<meta http-equiv="Content-Type" content="text/html; charset=ISO-8859-1">
<title>User Registration Form</title>
<link href="<c:url value='/static/css/bootstrap.css' />" rel="stylesheet"></link>
<link href="<c:url value='/static/css/app.css' />" rel="stylesheet"></link>
</head>
<body>
<div class="success">
Confirmation message : ${success}
<br>
Would you like to <a href="<c:url value='/newUser' />">Add More Users</a>?
<br/>
Go to <a href="<c:url value='/admin' />">Admin Page</a> OR <a href="<c:url value="/logout" />">Logout</a>
</div>
</body>
</html>
accessDenied.jsp
<%@ page language="java" contentType="text/html; charset=ISO-8859-1" pageEncoding="ISO-8859-1"%>
<%@ taglib prefix="c" uri="http://java.sun.com/jsp/jstl/core"%>
<html>
<head>
<meta http-equiv="Content-Type" content="text/html; charset=ISO-8859-1">
<title>AccessDenied page</title>
<link href="<c:url value='/static/css/bootstrap.css' />" rel="stylesheet"></link>
<link href="<c:url value='/static/css/app.css' />" rel="stylesheet"></link>
</head>
<body>
Dear <strong>${user}</strong>, You are not authorized to access this page.
<br/>
<a href="<c:url value="/home" />">Go to home</a> OR <a href="<c:url value="/logout" />">Logout</a>
</body>
</html>
第16步 - 构建和部署应用程序
现在构造 war(通过 eclipse/m2eclipse)或通过Maven的命令行(mvn clean install)。部署WAR文件到Servlet3.0容器。由于这里我使用的是在 eclipse 中配置 Tomcat,可以直接发布到 Tomcat 服务容器中。如果不知道怎么使用,可以参考:http://www.yiibai.com/maven/create-a-maven-web-project-with-eclipse.html
运行应用程序
仅供参考,我们将使用在上一节中的所定义的数据库表结构及数据记录。点击查看数据库表和记录 。
打开浏览器并访问 - http://localhost:8080/SpringSecurityPasswordEncodingWithBcrypt/
现在尝试访问本地主机: http://localhost:8080/SpringSecurityPasswordEncodingWithBcrypt/admin,系统将提示您进行登录,提供管理员角色凭据(sam,abc123)(在这一刻仅有的系统用户)。
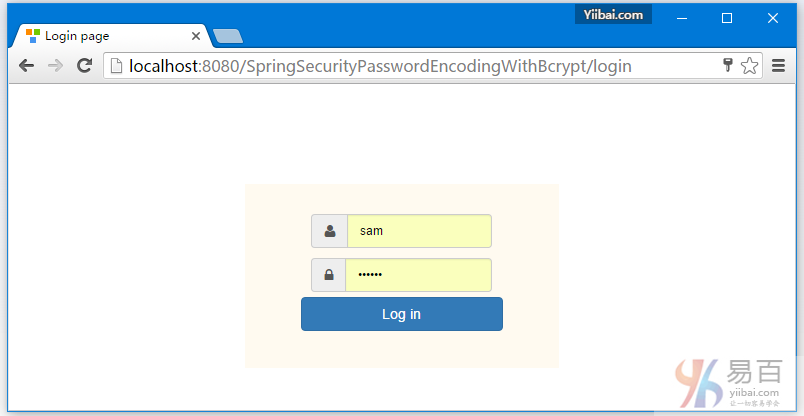
提交后,如下所示 -
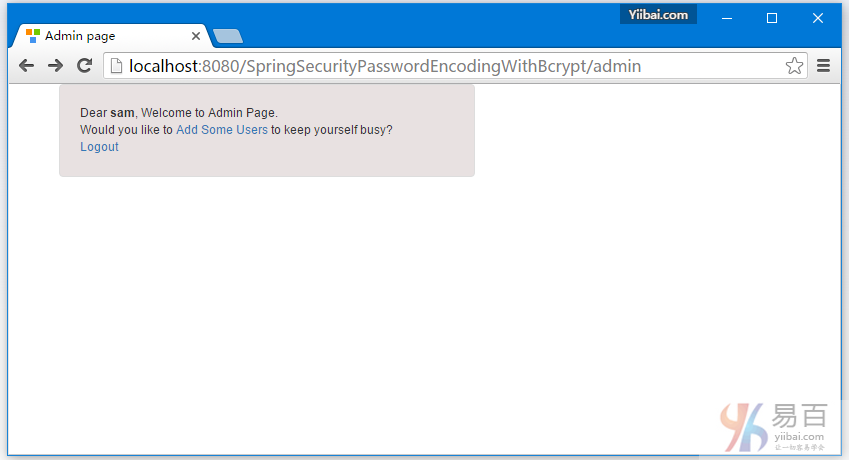
点击 "Add Some Users" 链接,如下所示 -
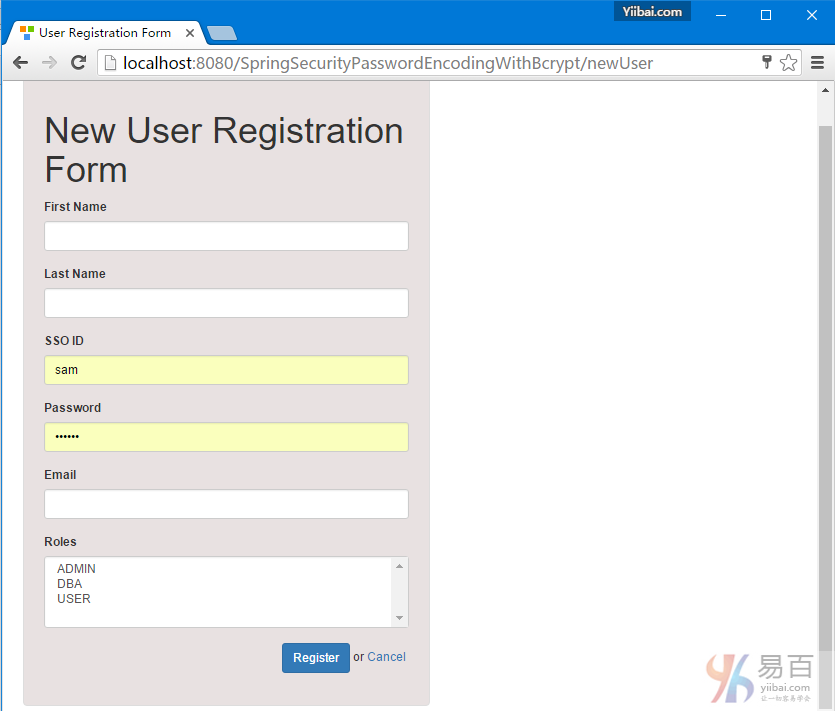
添加一个名为:Bill 的用户[密码:abc123],选择 USER 作为用户角色,如下图所示 -
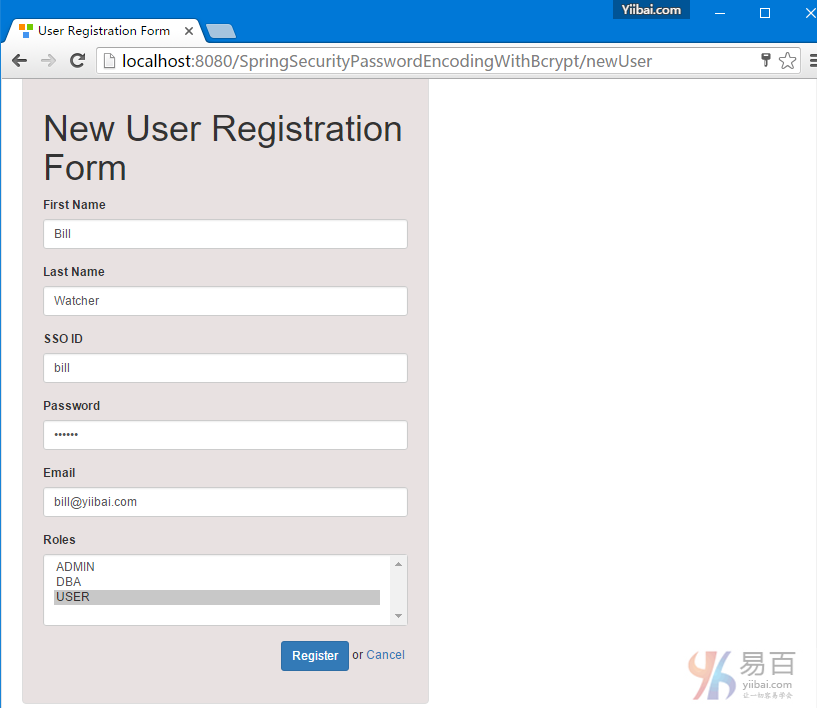
提交后,如下所示 -
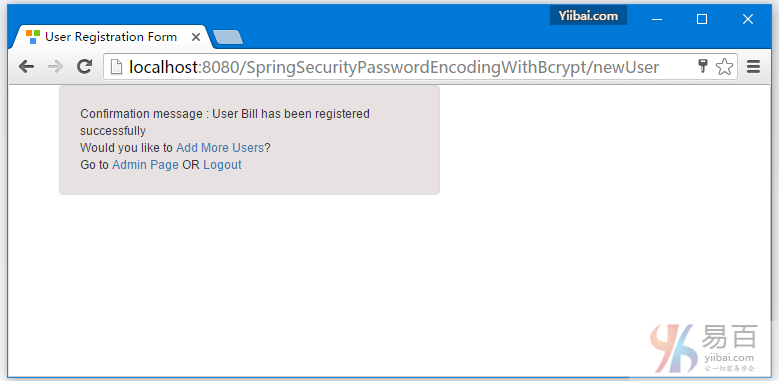
我们再次点击 "Add Some Users" 链接, 填写一个用户:kenny [密码 : abc125] , 选择 ADMIN,DBA 作为此用户的角色,如下图中所示 -
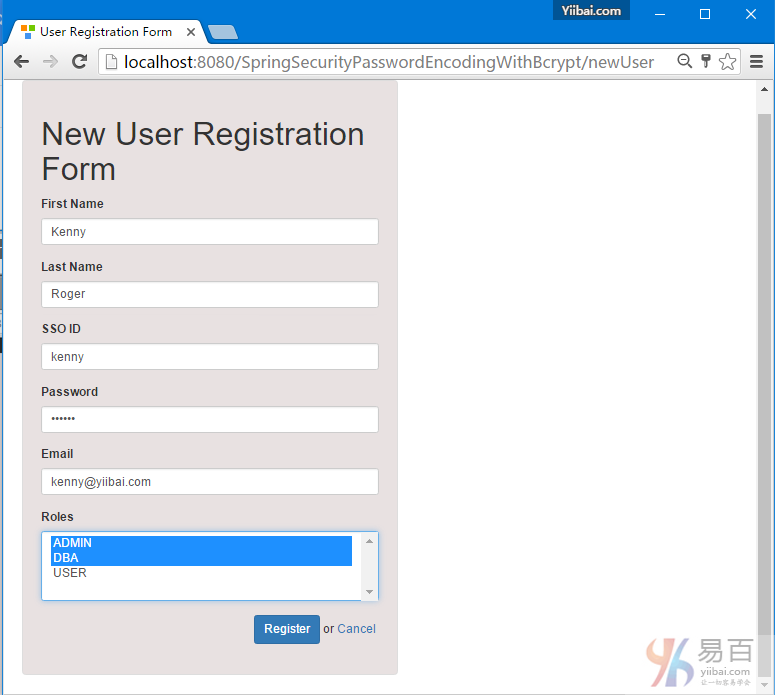
提交后,如下图中所示 -

点击注销。添加 DBA 用户信息(kenny,abc123)并提交,如在上一步中创建的一样,现在使用 kenny 用户名来登录系统 -
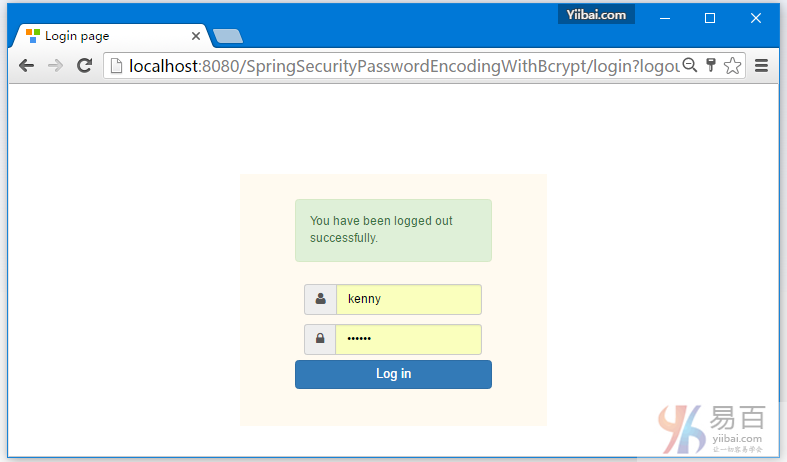
提交后,现在访问 - http://localhost:8080/SpringSecurityPasswordEncodingWithBcrypt/db
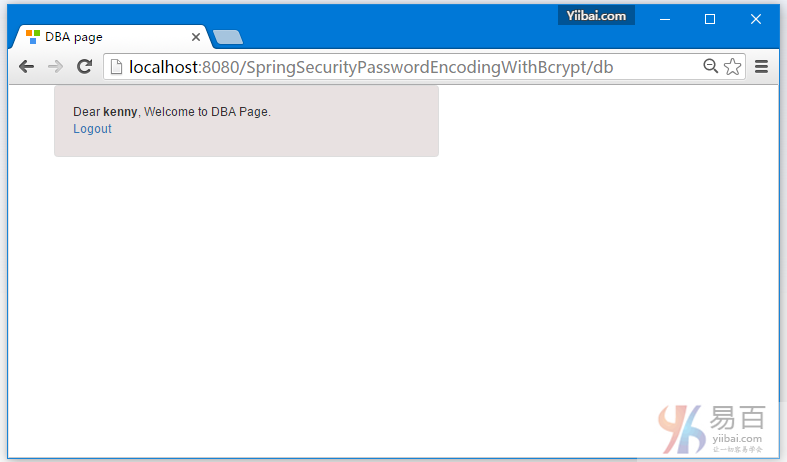
最后,我们注销登录,如下图所示 -
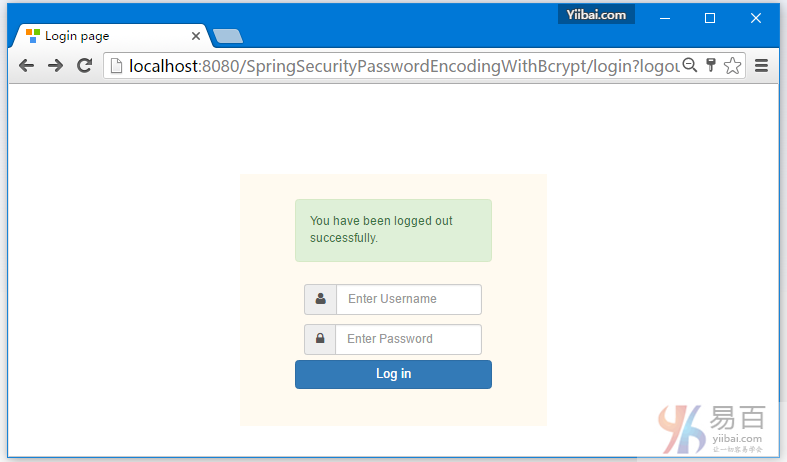
查看数据库表的记录信息,如下图所示 -
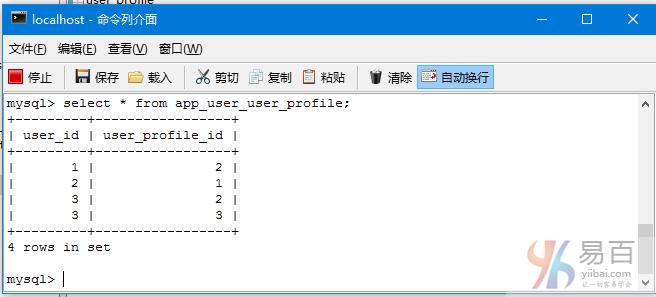
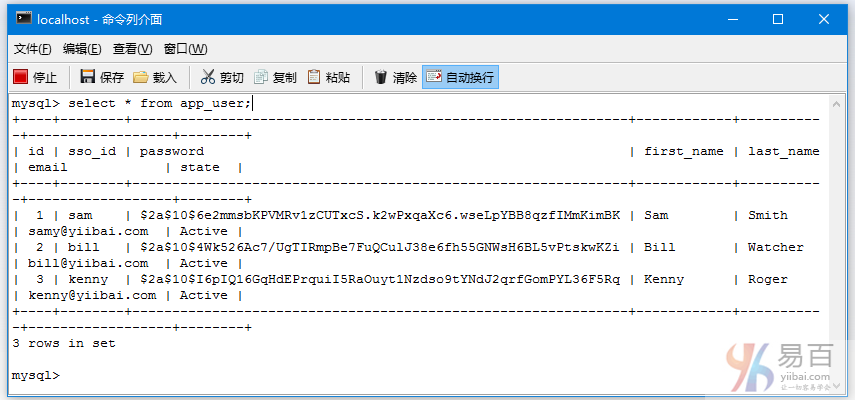
到这里整个教程学习完成,在下一篇文章中我们将学习如何使用 Spring Security 以及 Hibernate 来实现 "记住我" 的认证。
下载源代码
基于注释实例 - 10.1-SpringSecurityPasswordEncodingWithBcrypt.zip
基于XML实例 - 10.2-SpringSecurityPasswordEncodingWithBcryptXML.zip
参考
本站代码下载:http://www.yiibai.com/siteinfo/download.html
本文属作者原创,转载请注明出处:易百教程 » Spring Security+Hibernate密码编码器Bcrypt实例
Spring Security+Hibernate记住我实例 - Spring Security教程™
本教程介绍了使用Spring Security与Hibernate实现"记住我"认证功能。
"记住我" 是持久登录认证,应用程序会记住会话用户的身份。基本上,在登录时当你使用"记住我"功能支持,应用程序会将一个cookie在登录成功后发送到浏览器。这个 cookie 将被存储在浏览器端,并继续在一定期限(由cookie生命过期时间定义)。 下一次,当您尝试访问该应用程序,浏览器将检测到的cookie(如果仍然有效)那么些用户将会自动登录,无需提供如用户ID/密码。
Spring Security提供了两种 “记住我”的实现:
- 简单基于散列标记的方法:它使用散列来保护基于cookie标记的安全性
- 持久化标记方法:它使用一个数据库或其他持久化存储机制来保存生成的标记
在这篇文章中,我们将讨论关于持久化标记方法
相对于正常登录教程文章作了一些以下的修改:
1.持久化标记方法,数据库中添加一个名为:persistent_logins 的表,可以创建使用下面的SQL:
CREATE TABLE persistent_logins (
username VARCHAR(64) NOT NULL,
series VARCHAR(64) NOT NULL,
token VARCHAR(64) NOT NULL,
last_used TIMESTAMP NOT NULL,
PRIMARY KEY (series)
);
此表包含用户名,“记住我”的最后一次活动时间(last_used时间戳),Bcrypt内部实现安全令牌和一系列信息。
2.在Spring Security配置"记住我"
package com.yiibai.springsecurity.configuration;
import javax.sql.DataSource;
import org.springframework.beans.factory.annotation.Autowired;
import org.springframework.beans.factory.annotation.Qualifier;
import org.springframework.context.annotation.Bean;
import org.springframework.context.annotation.Configuration;
import org.springframework.security.config.annotation.authentication.builders.AuthenticationManagerBuilder;
import org.springframework.security.config.annotation.web.builders.HttpSecurity;
import org.springframework.security.config.annotation.web.configuration.EnableWebSecurity;
import org.springframework.security.config.annotation.web.configuration.WebSecurityConfigurerAdapter;
import org.springframework.security.core.userdetails.UserDetailsService;
import org.springframework.security.web.authentication.rememberme.JdbcTokenRepositoryImpl;
import org.springframework.security.web.authentication.rememberme.PersistentTokenRepository;
@Configuration
@EnableWebSecurity
public class SecurityConfiguration extends WebSecurityConfigurerAdapter {
@Autowired
@Qualifier("customUserDetailsService")
UserDetailsService userDetailsService;
@Autowired
DataSource dataSource;
@Autowired
public void configureGlobalSecurity(AuthenticationManagerBuilder auth) throws Exception {
auth.userDetailsService(userDetailsService);
}
@Override
protected void configure(HttpSecurity http) throws Exception {
http.authorizeRequests()
.antMatchers("/", "/home").permitAll()
.antMatchers("/admin/**").access("hasRole('ADMIN')")
.antMatchers("/db/**").access("hasRole('ADMIN') and hasRole('DBA')")
.and().formLogin().loginPage("/login")
.usernameParameter("ssoId").passwordParameter("password")
.and().rememberMe().rememberMeParameter("remember-me").tokenRepository(persistentTokenRepository()).tokenValiditySeconds(86400)
.and().csrf()
.and().exceptionHandling().accessDeniedPage("/Access_Denied");
}
@Bean
public PersistentTokenRepository persistentTokenRepository() {
JdbcTokenRepositoryImpl tokenRepositoryImpl = new JdbcTokenRepositoryImpl();
tokenRepositoryImpl.setDataSource(dataSource);
return tokenRepositoryImpl;
}
}
请注意,我们可调用 rememberMe() 来配置记住我,在视图中提供一个“记住我”复选框身份验证的HTTP参数名称(我们将在视图中看到)。我们还指定要使用 tokenRepository(令牌将被存储),并将该令牌的时间(以秒为单位)仍然有效。要配置存储库时我们要注入了一个数据源。
这是所有你需要激活"记住我",在Spring Security基础的应用程序中。
或者,可以使用Spring Security内置表达以及Spring security标签在您的视图根据特定的逻辑定制/显示/隐藏 "记住我"或使用安全认证。
注意:如果你不愿意使用JDBC,可能在应用程序是基于Hibernate,现在你可以参考Spring MVC+Spring Security+hibernate实例,在这里我创建了一个基于Hibernate实现PersistentTokenRepository,它被命名为 HibernateTokenRepositoryImpl。
以上安全配置以XML配置格式为:
<beans:beans xmlns="http://www.springframework.org/schema/security"
xmlns:beans="http://www.springframework.org/schema/beans"
xmlns:xsi="http://www.w3.org/2001/XMLSchema-instance"
xsi:schemaLocation="http://www.springframework.org/schema/beans http://www.springframework.org/schema/beans/spring-beans-4.1.xsd
http://www.springframework.org/schema/security http://www.springframework.org/schema/security/spring-security-4.0.xsd">
<http auto-config="true" >
<intercept-url pattern="/" access="permitAll" />
<intercept-url pattern="/home" access="permitAll" />
<intercept-url pattern="/admin**" access="hasRole('ADMIN')" />
<intercept-url pattern="/dba**" access="hasRole('ADMIN') and hasRole('DBA')" />
<form-login login-page="/login"
username-parameter="ssoId"
password-parameter="password"
authentication-failure-url="/Access_Denied" />
<csrf/>
</http>
<authentication-manager >
<authentication-provider user-service-ref="customUserDetailsService"/>
</authentication-manager>
<remember-me
remember-me-parameter="remember-me"
remember-me-cookie="remember-me"
token-validity-seconds="86400"
data-source-ref="dataSource" />
<beans:bean id="customUserDetailsService" class="com.yiibai.springsecurity.service.CustomUserDetailsService" />
</beans:beans>
完整的代码示例如下所示。
完整的示例
需要使用到以下技术:
- Spring 4.1.6.RELEASE
- Spring Security 4.0.1.RELEASE
- Hibernate 4.3.6.Final
- MySQL Server 5.6
- Maven 3
- JDK 1.7
- Tomcat 8.0.21
- Eclipse JUNO Service Release 2
现在就让我们开始吧!
第1步: 工程目录结构
这时是最终的项目结构:
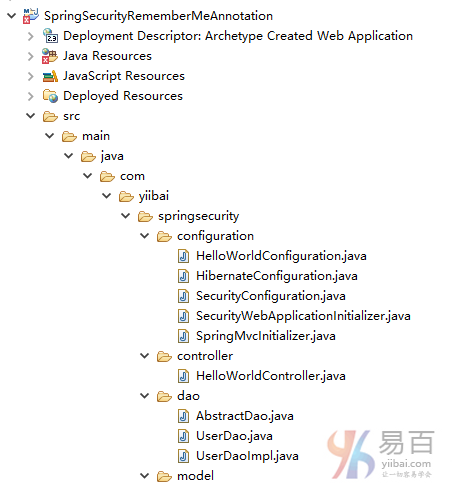
第2步:更新 pom.xml 以包括所需的相关性
<project xmlns="http://maven.apache.org/POM/4.0.0" xmlns:xsi="http://www.w3.org/2001/XMLSchema-instance"
xsi:schemaLocation="http://maven.apache.org/POM/4.0.0 http://maven.apache.org/xsd/maven-4.0.0.xsd">
<modelVersion>4.0.0</modelVersion>
<groupId>com.yiibai.springsecurity</groupId>
<artifactId>SpringSecurityRememberMeAnnotationExample</artifactId>
<version>1.0.0</version>
<packaging>war</packaging>
<name>SpringSecurityRememberMeAnnotationExample</name>
<properties>
<springframework.version>4.1.6.RELEASE</springframework.version>
<springsecurity.version>4.0.1.RELEASE</springsecurity.version>
<hibernate.version>4.3.6.Final</hibernate.version>
<mysql.version>5.1.31</mysql.version>
</properties>
<dependencies>
<!-- Spring -->
<dependency>
<groupId>org.springframework</groupId>
<artifactId>spring-core</artifactId>
<version>${springframework.version}</version>
</dependency>
<dependency>
<groupId>org.springframework</groupId>
<artifactId>spring-web</artifactId>
<version>${springframework.version}</version>
</dependency>
<dependency>
<groupId>org.springframework</groupId>
<artifactId>spring-webmvc</artifactId>
<version>${springframework.version}</version>
</dependency>
<dependency>
<groupId>org.springframework</groupId>
<artifactId>spring-tx</artifactId>
<version>${springframework.version}</version>
</dependency>
<dependency>
<groupId>org.springframework</groupId>
<artifactId>spring-orm</artifactId>
<version>${springframework.version}</version>
</dependency>
<!-- Spring Security -->
<dependency>
<groupId>org.springframework.security</groupId>
<artifactId>spring-security-web</artifactId>
<version>${springsecurity.version}</version>
</dependency>
<dependency>
<groupId>org.springframework.security</groupId>
<artifactId>spring-security-config</artifactId>
<version>${springsecurity.version}</version>
</dependency>
<dependency>
<groupId>org.springframework.security</groupId>
<artifactId>spring-security-taglibs</artifactId>
<version>${springsecurity.version}</version>
</dependency>
<!-- Hibernate -->
<dependency>
<groupId>org.hibernate</groupId>
<artifactId>hibernate-core</artifactId>
<version>${hibernate.version}</version>
</dependency>
<!-- MySQL -->
<dependency>
<groupId>mysql</groupId>
<artifactId>mysql-connector-java</artifactId>
<version>${mysql.version}</version>
</dependency>
<dependency>
<groupId>javax.servlet</groupId>
<artifactId>javax.servlet-api</artifactId>
<version>3.1.0</version>
</dependency>
<dependency>
<groupId>javax.servlet.jsp</groupId>
<artifactId>javax.servlet.jsp-api</artifactId>
<version>2.3.1</version>
</dependency>
<dependency>
<groupId>javax.servlet</groupId>
<artifactId>jstl</artifactId>
<version>1.2</version>
</dependency>
</dependencies>
<build>
<pluginManagement>
<plugins>
<plugin>
<groupId>org.apache.maven.plugins</groupId>
<artifactId>maven-compiler-plugin</artifactId>
<version>3.2</version>
<configuration>
<source>1.7</source>
<target>1.7</target>
</configuration>
</plugin>
<plugin>
<groupId>org.apache.maven.plugins</groupId>
<artifactId>maven-war-plugin</artifactId>
<version>2.4</version>
<configuration>
<warSourceDirectory>src/main/webapp</warSourceDirectory>
<warName>SpringSecurityRememberMeAnnotationExample</warName>
<failOnMissingWebXml>false</failOnMissingWebXml>
</configuration>
</plugin>
</plugins>
</pluginManagement>
<finalName>SpringSecurityRememberMeAnnotationExample</finalName>
</build>
</project>
数据库表部分
第3步:创建数据库模式并填充数据
/* For Remember-Me token storage purpose */
CREATE TABLE persistent_logins (
username VARCHAR(64) NOT NULL,
series VARCHAR(64) NOT NULL,
token VARCHAR(64) NOT NULL,
last_used TIMESTAMP NOT NULL,
PRIMARY KEY (series)
);
/*All User's gets stored in APP_USER table*/
create table APP_USER (
id BIGINT NOT NULL AUTO_INCREMENT,
sso_id VARCHAR(30) NOT NULL,
password VARCHAR(100) NOT NULL,
first_name VARCHAR(30) NOT NULL,
last_name VARCHAR(30) NOT NULL,
email VARCHAR(30) NOT NULL,
state VARCHAR(30) NOT NULL,
PRIMARY KEY (id),
UNIQUE (sso_id)
);
/* USER_PROFILE table contains all possible roles */
create table USER_PROFILE(
id BIGINT NOT NULL AUTO_INCREMENT,
type VARCHAR(30) NOT NULL,
PRIMARY KEY (id),
UNIQUE (type)
);
/* JOIN TABLE for MANY-TO-MANY relationship*/
CREATE TABLE APP_USER_USER_PROFILE (
user_id BIGINT NOT NULL,
user_profile_id BIGINT NOT NULL,
PRIMARY KEY (user_id, user_profile_id),
CONSTRAINT FK_APP_USER FOREIGN KEY (user_id) REFERENCES APP_USER (id),
CONSTRAINT FK_USER_PROFILE FOREIGN KEY (user_profile_id) REFERENCES USER_PROFILE (id)
);
/* Populate USER_PROFILE Table */
INSERT INTO USER_PROFILE(type)
VALUES ('USER');
INSERT INTO USER_PROFILE(type)
VALUES ('ADMIN');
INSERT INTO USER_PROFILE(type)
VALUES ('DBA');
/* Populate one Admin User. We need only one user to demonstrate this example. You can add more as done in previous posts*/
INSERT INTO APP_USER(sso_id, password, first_name, last_name, email, state)
VALUES ('sam','abc125', 'Sam','Smith','samy@xyz.com', 'Active');
/* Populate JOIN Table */
INSERT INTO APP_USER_USER_PROFILE (user_id, user_profile_id)
SELECT user.id, profile.id FROM app_user user, user_profile profile
where user.sso_id='sam' and profile.type='ADMIN';
安全部分
第4步:添加 Spring Security 配置类
package com.yiibai.springsecurity.configuration;
import javax.sql.DataSource;
import org.springframework.beans.factory.annotation.Autowired;
import org.springframework.beans.factory.annotation.Qualifier;
import org.springframework.context.annotation.Bean;
import org.springframework.context.annotation.Configuration;
import org.springframework.security.config.annotation.authentication.builders.AuthenticationManagerBuilder;
import org.springframework.security.config.annotation.web.builders.HttpSecurity;
import org.springframework.security.config.annotation.web.configuration.EnableWebSecurity;
import org.springframework.security.config.annotation.web.configuration.WebSecurityConfigurerAdapter;
import org.springframework.security.core.userdetails.UserDetailsService;
import org.springframework.security.web.authentication.rememberme.JdbcTokenRepositoryImpl;
import org.springframework.security.web.authentication.rememberme.PersistentTokenRepository;
@Configuration
@EnableWebSecurity
public class SecurityConfiguration extends WebSecurityConfigurerAdapter {
@Autowired
@Qualifier("customUserDetailsService")
UserDetailsService userDetailsService;
@Autowired
DataSource dataSource;
@Autowired
public void configureGlobalSecurity(AuthenticationManagerBuilder auth) throws Exception {
auth.userDetailsService(userDetailsService);
}
@Override
protected void configure(HttpSecurity http) throws Exception {
http.authorizeRequests()
.antMatchers("/", "/home").permitAll()
.antMatchers("/admin/**").access("hasRole('ADMIN')")
.antMatchers("/db/**").access("hasRole('ADMIN') and hasRole('DBA')")
.and().formLogin().loginPage("/login")
.usernameParameter("ssoId").passwordParameter("password")
.and().rememberMe().rememberMeParameter("remember-me").tokenRepository(persistentTokenRepository()).tokenValiditySeconds(86400)
.and().csrf()
.and().exceptionHandling().accessDeniedPage("/Access_Denied");
}
@Bean
public PersistentTokenRepository persistentTokenRepository() {
JdbcTokenRepositoryImpl tokenRepositoryImpl = new JdbcTokenRepositoryImpl();
tokenRepositoryImpl.setDataSource(dataSource);
return tokenRepositoryImpl;
}
}
第5步:使用war注册springSecurityFilter
下面指定的初始化类注册 springSecurityFilter 与应用程序 war [步骤3中创建]。
package com.yiibai.springsecurity.configuration;
import org.springframework.security.web.context.AbstractSecurityWebApplicationInitializer;
public class SecurityWebApplicationInitializer extends AbstractSecurityWebApplicationInitializer {
}
以上配置以XML配置格式为:
<filter>
<filter-name>springSecurityFilterChain</filter-name>
<filter-class>org.springframework.web.filter.DelegatingFilterProxy</filter-class>
</filter>
<filter-mapping>
<filter-name>springSecurityFilterChain</filter-name>
<url-pattern>/*</url-pattern>
</filter-mapping>
第6步:定义UserDetailsService实现
这项服务是负责提供身份验证细节和验证管理。
package com.yiibai.springsecurity.service;
import java.util.ArrayList;
import java.util.List;
import org.springframework.beans.factory.annotation.Autowired;
import org.springframework.security.core.GrantedAuthority;
import org.springframework.security.core.authority.SimpleGrantedAuthority;
import org.springframework.security.core.userdetails.UserDetails;
import org.springframework.security.core.userdetails.UserDetailsService;
import org.springframework.security.core.userdetails.UsernameNotFoundException;
import org.springframework.stereotype.Service;
import org.springframework.transaction.annotation.Transactional;
import com.yiibai.springsecurity.model.User;
import com.yiibai.springsecurity.model.UserProfile;
@Service("customUserDetailsService")
public class CustomUserDetailsService implements UserDetailsService{
@Autowired
private UserService userService;
@Transactional(readOnly=true)
public UserDetails loadUserByUsername(String ssoId)
throws UsernameNotFoundException {
User user = userService.findBySso(ssoId);
System.out.println("User : "+user);
if(user==null){
System.out.println("User not found");
throw new UsernameNotFoundException("Username not found");
}
return new org.springframework.security.core.userdetails.User(user.getSsoId(), user.getPassword(),
user.getState().equals("Active"), true, true, true, getGrantedAuthorities(user));
}
private List<GrantedAuthority> getGrantedAuthorities(User user){
List<GrantedAuthority> authorities = new ArrayList<GrantedAuthority>();
for(UserProfile userProfile : user.getUserProfiles()){
System.out.println("UserProfile : "+userProfile);
authorities.add(new SimpleGrantedAuthority("ROLE_"+userProfile.getType()));
}
System.out.print("authorities :"+authorities);
return authorities;
}
}
SpringMVC部分
第7步: 添加控制器
package com.yiibai.springsecurity.controller;
import javax.servlet.http.HttpServletRequest;
import javax.servlet.http.HttpServletResponse;
import org.springframework.security.core.Authentication;
import org.springframework.security.core.context.SecurityContextHolder;
import org.springframework.security.core.userdetails.UserDetails;
import org.springframework.security.web.authentication.logout.SecurityContextLogoutHandler;
import org.springframework.stereotype.Controller;
import org.springframework.ui.ModelMap;
import org.springframework.web.bind.annotation.RequestMapping;
import org.springframework.web.bind.annotation.RequestMethod;
@Controller
public class HelloWorldController {
@RequestMapping(value = { "/", "/home" }, method = RequestMethod.GET)
public String homePage(ModelMap model) {
model.addAttribute("greeting", "Hi, Welcome to mysite");
return "welcome";
}
@RequestMapping(value = "/admin", method = RequestMethod.GET)
public String adminPage(ModelMap model) {
model.addAttribute("user", getPrincipal());
return "admin";
}
@RequestMapping(value = "/db", method = RequestMethod.GET)
public String dbaPage(ModelMap model) {
model.addAttribute("user", getPrincipal());
return "dba";
}
@RequestMapping(value = "/Access_Denied", method = RequestMethod.GET)
public String accessDeniedPage(ModelMap model) {
model.addAttribute("user", getPrincipal());
return "accessDenied";
}
@RequestMapping(value = "/login", method = RequestMethod.GET)
public String loginPage() {
return "login";
}
@RequestMapping(value="/logout", method = RequestMethod.GET)
public String logoutPage (HttpServletRequest request, HttpServletResponse response) {
Authentication auth = SecurityContextHolder.getContext().getAuthentication();
if (auth != null){
new SecurityContextLogoutHandler().logout(request, response, auth);
}
return "redirect:/login?logout";
}
private String getPrincipal(){
String userName = null;
Object principal = SecurityContextHolder.getContext().getAuthentication().getPrincipal();
if (principal instanceof UserDetails) {
userName = ((UserDetails)principal).getUsername();
} else {
userName = principal.toString();
}
return userName;
}
}
第8步: 添加 SpringMVC 配置类
package com.yiibai.springsecurity.configuration;
import org.springframework.context.annotation.Bean;
import org.springframework.context.annotation.ComponentScan;
import org.springframework.context.annotation.Configuration;
import org.springframework.web.servlet.ViewResolver;
import org.springframework.web.servlet.config.annotation.EnableWebMvc;
import org.springframework.web.servlet.config.annotation.ResourceHandlerRegistry;
import org.springframework.web.servlet.config.annotation.WebMvcConfigurerAdapter;
import org.springframework.web.servlet.view.InternalResourceViewResolver;
import org.springframework.web.servlet.view.JstlView;
@Configuration
@EnableWebMvc
@ComponentScan(basePackages = "com.yiibai.springsecurity")
public class HelloWorldConfiguration extends WebMvcConfigurerAdapter {
@Bean(name="HelloWorld")
public ViewResolver viewResolver() {
InternalResourceViewResolver viewResolver = new InternalResourceViewResolver();
viewResolver.setViewClass(JstlView.class);
viewResolver.setPrefix("/WEB-INF/views/");
viewResolver.setSuffix(".jsp");
return viewResolver;
}
/*
* Configure ResourceHandlers to serve static resources like CSS/ Javascript etc...
*
*/
@Override
public void addResourceHandlers(ResourceHandlerRegistry registry) {
registry.addResourceHandler("/static/**").addResourceLocations("/static/");
}
}
第9步: 添加初始化类
package com.yiibai.springsecurity.configuration;
import org.springframework.web.servlet.support.AbstractAnnotationConfigDispatcherServletInitializer;
public class SpringMvcInitializer extends AbstractAnnotationConfigDispatcherServletInitializer {
@Override
protected Class<?>[] getRootConfigClasses() {
return new Class[] { HelloWorldConfiguration.class };
}
@Override
protected Class<?>[] getServletConfigClasses() {
return null;
}
@Override
protected String[] getServletMappings() {
return new String[] { "/" };
}
}
Hibernate配置部分
第10步: 创建Hibernate配置
Hibernate配置类包含数据源层,SessionFactory和事务管理的@Bean方法。数据源属性是取自 application.properties 文件,包含MySQL数据库详细连接信息。
package com.yiibai.springsecurity.configuration;
import java.util.Properties;
import javax.sql.DataSource;
import org.hibernate.SessionFactory;
import org.springframework.beans.factory.annotation.Autowired;
import org.springframework.context.annotation.Bean;
import org.springframework.context.annotation.ComponentScan;
import org.springframework.context.annotation.Configuration;
import org.springframework.context.annotation.PropertySource;
import org.springframework.core.env.Environment;
import org.springframework.jdbc.datasource.DriverManagerDataSource;
import org.springframework.orm.hibernate4.HibernateTransactionManager;
import org.springframework.orm.hibernate4.LocalSessionFactoryBean;
import org.springframework.transaction.annotation.EnableTransactionManagement;
@Configuration
@EnableTransactionManagement
@ComponentScan({ "com.yiibai.springsecurity.configuration" })
@PropertySource(value = { "classpath:application.properties" })
public class HibernateConfiguration {
@Autowired
private Environment environment;
@Bean
public LocalSessionFactoryBean sessionFactory() {
LocalSessionFactoryBean sessionFactory = new LocalSessionFactoryBean();
sessionFactory.setDataSource(dataSource());
sessionFactory.setPackagesToScan(new String[] { "com.yiibai.springsecurity.model" });
sessionFactory.setHibernateProperties(hibernateProperties());
return sessionFactory;
}
@Bean
public DataSource dataSource() {
DriverManagerDataSource dataSource = new DriverManagerDataSource();
dataSource.setDriverClassName(environment.getRequiredProperty("jdbc.driverClassName"));
dataSource.setUrl(environment.getRequiredProperty("jdbc.url"));
dataSource.setUsername(environment.getRequiredProperty("jdbc.username"));
dataSource.setPassword(environment.getRequiredProperty("jdbc.password"));
return dataSource;
}
private Properties hibernateProperties() {
Properties properties = new Properties();
properties.put("hibernate.dialect", environment.getRequiredProperty("hibernate.dialect"));
properties.put("hibernate.show_sql", environment.getRequiredProperty("hibernate.show_sql"));
properties.put("hibernate.format_sql", environment.getRequiredProperty("hibernate.format_sql"));
return properties;
}
@Bean
@Autowired
public HibernateTransactionManager transactionManager(SessionFactory s) {
HibernateTransactionManager txManager = new HibernateTransactionManager();
txManager.setSessionFactory(s);
return txManager;
}
}
application.properties
jdbc.driverClassName = com.mysql.jdbc.Driver
jdbc.url = jdbc:mysql://localhost:3306/yiibai
jdbc.username = myuser
jdbc.password = mypassword
hibernate.dialect = org.hibernate.dialect.MySQLDialect
hibernate.show_sql = true
hibernate.format_sql = true
DAO, Model & Service服务
第11步: 创建模型类
用户可以有多个角色[DBA,ADMIN,USER]。而角色可以被分配给一个以上的用户。因此,有一个用户和用户配置[角色]之间存在多对多的关系。我们保持这种关系单向[用户到用户配置],因为我们只是在查找对于给用户的角色。我们将使用使用连接表来实现多一对多关联。
package com.yiibai.springsecurity.model;
import java.util.HashSet;
import java.util.Set;
import javax.persistence.Column;
import javax.persistence.Entity;
import javax.persistence.FetchType;
import javax.persistence.GeneratedValue;
import javax.persistence.GenerationType;
import javax.persistence.Id;
import javax.persistence.JoinColumn;
import javax.persistence.JoinTable;
import javax.persistence.ManyToMany;
import javax.persistence.Table;
@Entity
@Table(name="APP_USER")
public class User {
@Id @GeneratedValue(strategy=GenerationType.IDENTITY)
private int id;
@Column(name="SSO_ID", unique=true, nullable=false)
private String ssoId;
@Column(name="PASSWORD", nullable=false)
private String password;
@Column(name="FIRST_NAME", nullable=false)
private String firstName;
@Column(name="LAST_NAME", nullable=false)
private String lastName;
@Column(name="EMAIL", nullable=false)
private String email;
@Column(name="STATE", nullable=false)
private String state=State.ACTIVE.getState();
@ManyToMany(fetch = FetchType.EAGER)
@JoinTable(name = "APP_USER_USER_PROFILE",
joinColumns = { @JoinColumn(name = "USER_ID") },
inverseJoinColumns = { @JoinColumn(name = "USER_PROFILE_ID") })
private Set<UserProfile> userProfiles = new HashSet<UserProfile>();
public int getId() {
return id;
}
public void setId(int id) {
this.id = id;
}
public String getSsoId() {
return ssoId;
}
public void setSsoId(String ssoId) {
this.ssoId = ssoId;
}
public String getPassword() {
return password;
}
public void setPassword(String password) {
this.password = password;
}
public String getFirstName() {
return firstName;
}
public void setFirstName(String firstName) {
this.firstName = firstName;
}
public String getLastName() {
return lastName;
}
public void setLastName(String lastName) {
this.lastName = lastName;
}
public String getEmail() {
return email;
}
public void setEmail(String email) {
this.email = email;
}
public String getState() {
return state;
}
public void setState(String state) {
this.state = state;
}
public Set<UserProfile> getUserProfiles() {
return userProfiles;
}
public void setUserProfiles(Set<UserProfile> userProfiles) {
this.userProfiles = userProfiles;
}
@Override
public int hashCode() {
final int prime = 31;
int result = 1;
result = prime * result + id;
result = prime * result + ((ssoId == null) ? 0 : ssoId.hashCode());
return result;
}
@Override
public boolean equals(Object obj) {
if (this == obj)
return true;
if (obj == null)
return false;
if (!(obj instanceof User))
return false;
User other = (User) obj;
if (id != other.id)
return false;
if (ssoId == null) {
if (other.ssoId != null)
return false;
} else if (!ssoId.equals(other.ssoId))
return false;
return true;
}
@Override
public String toString() {
return "User [id=" + id + ", ssoId=" + ssoId + ", password=" + password
+ ", firstName=" + firstName + ", lastName=" + lastName
+ ", email=" + email + ", state=" + state + ", userProfiles=" + userProfiles +"]";
}
}
package com.yiibai.springsecurity.model;
import javax.persistence.Column;
import javax.persistence.Entity;
import javax.persistence.GeneratedValue;
import javax.persistence.GenerationType;
import javax.persistence.Id;
import javax.persistence.Table;
@Entity
@Table(name="USER_PROFILE")
public class UserProfile {
@Id @GeneratedValue(strategy=GenerationType.IDENTITY)
private int id;
@Column(name="TYPE", length=15, unique=true, nullable=false)
private String type = UserProfileType.USER.getUserProfileType();
public int getId() {
return id;
}
public void setId(int id) {
this.id = id;
}
public String getType() {
return type;
}
public void setType(String type) {
this.type = type;
}
@Override
public int hashCode() {
final int prime = 31;
int result = 1;
result = prime * result + id;
result = prime * result + ((type == null) ? 0 : type.hashCode());
return result;
}
@Override
public boolean equals(Object obj) {
if (this == obj)
return true;
if (obj == null)
return false;
if (!(obj instanceof UserProfile))
return false;
UserProfile other = (UserProfile) obj;
if (id != other.id)
return false;
if (type == null) {
if (other.type != null)
return false;
} else if (!type.equals(other.type))
return false;
return true;
}
@Override
public String toString() {
return "UserProfile [id=" + id + ", type=" + type + "]";
}
}
package com.yiibai.springsecurity.model;
public enum UserProfileType {
USER("USER"),
DBA("DBA"),
ADMIN("ADMIN");
String userProfileType;
private UserProfileType(String userProfileType){
this.userProfileType = userProfileType;
}
public String getUserProfileType(){
return userProfileType;
}
}
package com.yiibai.springsecurity.model;
public enum State {
ACTIVE("Active"),
INACTIVE("Inactive"),
DELETED("Deleted"),
LOCKED("Locked");
private String state;
private State(final String state){
this.state = state;
}
public String getState(){
return this.state;
}
@Override
public String toString(){
return this.state;
}
public String getName(){
return this.name();
}
}
第12步: 创建 Dao 层
package com.yiibai.springsecurity.dao;
import java.io.Serializable;
import java.lang.reflect.ParameterizedType;
import org.hibernate.Criteria;
import org.hibernate.Session;
import org.hibernate.SessionFactory;
import org.springframework.beans.factory.annotation.Autowired;
public abstract class AbstractDao<PK extends Serializable, T> {
private final Class<T> persistentClass;
@SuppressWarnings("unchecked")
public AbstractDao(){
this.persistentClass =(Class<T>) ((ParameterizedType) this.getClass().getGenericSuperclass()).getActualTypeArguments()[1];
}
@Autowired
private SessionFactory sessionFactory;
protected Session getSession(){
return sessionFactory.getCurrentSession();
}
@SuppressWarnings("unchecked")
public T getByKey(PK key) {
return (T) getSession().get(persistentClass, key);
}
public void persist(T entity) {
getSession().persist(entity);
}
public void delete(T entity) {
getSession().delete(entity);
}
protected Criteria createEntityCriteria(){
return getSession().createCriteria(persistentClass);
}
}
package com.yiibai.springsecurity.dao;
import com.yiibai.springsecurity.model.User;
public interface UserDao {
User findById(int id);
User findBySSO(String sso);
}
package com.yiibai.springsecurity.dao;
import org.hibernate.Criteria;
import org.hibernate.criterion.Restrictions;
import org.springframework.stereotype.Repository;
import com.yiibai.springsecurity.model.User;
@Repository("userDao")
public class UserDaoImpl extends AbstractDao<Integer, User> implements UserDao {
public User findById(int id) {
return getByKey(id);
}
public User findBySSO(String sso) {
Criteria crit = createEntityCriteria();
crit.add(Restrictions.eq("ssoId", sso));
return (User) crit.uniqueResult();
}
}
第13步: 创建Service层
package com.yiibai.springsecurity.service;
import com.yiibai.springsecurity.model.User;
public interface UserService {
User findById(int id);
User findBySso(String sso);
}
package com.yiibai.springsecurity.service;
import org.springframework.beans.factory.annotation.Autowired;
import org.springframework.stereotype.Service;
import org.springframework.transaction.annotation.Transactional;
import com.yiibai.springsecurity.dao.UserDao;
import com.yiibai.springsecurity.model.User;
@Service("userService")
@Transactional
public class UserServiceImpl implements UserService{
@Autowired
private UserDao dao;
public User findById(int id) {
return dao.findById(id);
}
public User findBySso(String sso) {
return dao.findBySSO(sso);
}
}
视图部分
第14步:添加视图
login.jsp
<%@ page language="java" contentType="text/html; charset=ISO-8859-1" pageEncoding="ISO-8859-1"%>
<%@ taglib prefix="c" uri="http://java.sun.com/jsp/jstl/core"%>
<html>
<head>
<meta http-equiv="Content-Type" content="text/html; charset=ISO-8859-1">
<title>HelloWorld Login page</title>
<link href="<c:url value='/static/css/bootstrap.css' />" rel="stylesheet"></link>
<link href="<c:url value='/static/css/app.css' />" rel="stylesheet"></link>
<link rel="stylesheet" type="text/css" href="//cdnjs.cloudflare.com/ajax/libs/font-awesome/4.2.0/css/font-awesome.css" />
</head>
<body>
<div id="mainWrapper">
<div class="login-container">
<div class="login-card">
<div class="login-form">
<c:url var="loginUrl" value="/login" />
<form action="${loginUrl}" method="post" class="form-horizontal">
<c:if test="${param.error != null}">
<div class="alert alert-danger">
<p>Invalid username and password.</p>
</div>
</c:if>
<c:if test="${param.logout != null}">
<div class="alert alert-success">
<p>You have been logged out successfully.</p>
</div>
</c:if>
<div class="input-group input-sm">
<label class="input-group-addon" for="username"><i class="fa fa-user"></i></label>
<input type="text" class="form-control" id="username" name="ssoId" placeholder="Enter Username" required>
</div>
<div class="input-group input-sm">
<label class="input-group-addon" for="password"><i class="fa fa-lock"></i></label>
<input type="password" class="form-control" id="password" name="password" placeholder="Enter Password" required>
</div>
<div class="input-group input-sm">
<div class="checkbox">
<label><input type="checkbox" id="rememberme" name="remember-me"> Remember Me</label>
</div>
</div>
<input type="hidden" name="${_csrf.parameterName}"
value="${_csrf.token}" />
<div class="form-actions">
<input type="submit"
class="btn btn-block btn-primary btn-default" value="Log in">
</div>
</form>
</div>
</div>
</div>
</div>
</body>
</html>
正如你所看到的,CSRF参数需要在JSP中的EL表达式访问,所以还需要通过添将以下的代码添加JSP的顶部来强行执行EL表达式解析编译:
<%@ page isELIgnored="false"%>
admin.jsp
<%@ page language="java" contentType="text/html; charset=ISO-8859-1" pageEncoding="ISO-8859-1"%>
<%@ taglib prefix="c" uri="http://java.sun.com/jsp/jstl/core"%>
<%@ taglib prefix="sec" uri="http://www.springframework.org/security/tags"%>
<html>
<head>
<meta http-equiv="Content-Type" content="text/html; charset=ISO-8859-1">
<title>Admin page</title>
</head>
<body>
Dear <strong>${user}</strong>, Welcome to Admin Page.
<sec:authorize access="isFullyAuthenticated()">
<label><a href="#">Create New User</a> | <a href="#">View existing Users</a></label>
</sec:authorize>
<sec:authorize access="isRememberMe()">
<label><a href="#">View existing Users</a></label>
</sec:authorize>
<a href="<c:url value="/logout" />">Logout</a>
</body>
</html>
以下提到的视图在这个帖子中不需要,只是在这里提及,作为一个完整的补充。
welcome.jsp
<%@ page language="java" contentType="text/html; charset=ISO-8859-1" pageEncoding="ISO-8859-1"%>
<%@ taglib prefix="c" uri="http://java.sun.com/jsp/jstl/core"%>
<html>
<head>
<meta http-equiv="Content-Type" content="text/html; charset=ISO-8859-1">
<title>Welcome page</title>
<link href="<c:url value='/static/css/bootstrap.css' />" rel="stylesheet"></link>
<link href="<c:url value='/static/css/app.css' />" rel="stylesheet"></link>
</head>
<body>
<div class="success">
Greeting : ${greeting}
This is a welcome page.
</div>
</body>
</html>
dba.jsp
<%@ page language="java" contentType="text/html; charset=ISO-8859-1" pageEncoding="ISO-8859-1"%>
<%@ taglib prefix="c" uri="http://java.sun.com/jsp/jstl/core"%>
<html>
<head>
<meta http-equiv="Content-Type" content="text/html; charset=ISO-8859-1">
<title>DBA page</title>
</head>
<body>
Dear <strong>${user}</strong>, Welcome to DBA Page.
<a href="<c:url value="/logout" />">Logout</a>
</body>
</html>
accessDenied.jsp
<%@ page language="java" contentType="text/html; charset=ISO-8859-1" pageEncoding="ISO-8859-1"%>
<%@ taglib prefix="c" uri="http://java.sun.com/jsp/jstl/core"%>
<html>
<head>
<meta http-equiv="Content-Type" content="text/html; charset=ISO-8859-1">
<title>AccessDenied page</title>
</head>
<body>
Dear <strong>${user}</strong>, You are not authorized to access this page
<a href="<c:url value="/logout" />">Logout</a>
</body>
</html>
第16步 - 构建和部署应用程序
现在构造 war(通过 eclipse/m2eclipse)或通过Maven的命令行(mvn clean install)。部署WAR文件到Servlet3.0容器。由于这里我使用的是在 eclipse 中配置 Tomcat,可以直接发布到 Tomcat 服务容器中。如果不知道怎么使用,可以参考:http://www.yiibai.com/maven/create-a-maven-web-project-with-eclipse.html
运行应用程序
打开浏览器并访问 - http://localhost:8080/SpringSecurityRememberMeAnnotation/admin
系统将提示您登录,如下图中所示 -
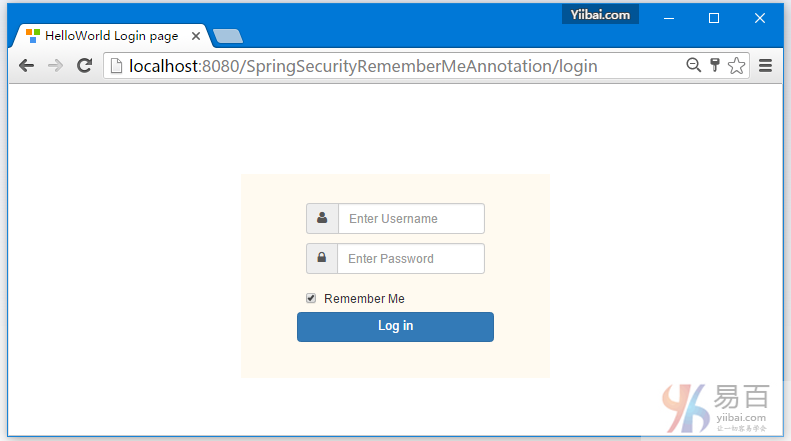
使用"记住我" 验证登录(使用用户:kenny/123456),您将获得管理员视图,如下所示 -
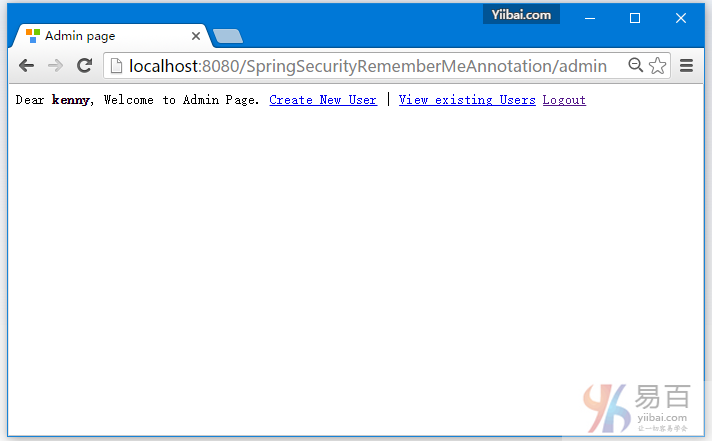
验证查看 Cookies。打开谷歌浏览器设置/显示高级设置/内容设置/所有Cookie和网站数据显示本地主机。你会发现有两个 cookies ,一个用于当前会话[JSESSIONID],一个用于"记住我"的身份验证。
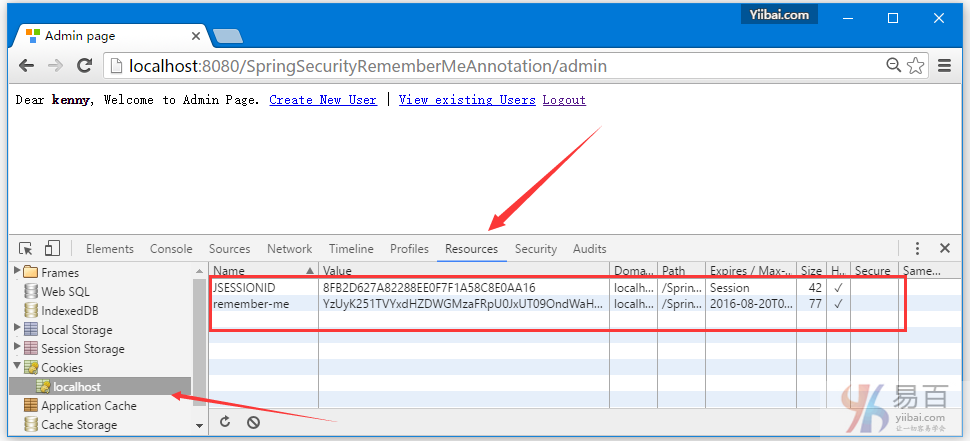
点击"记住我"(remember-me),查看cookie详细信息。你可以看到 cookie 的有效期是一天(如在安全配置设置)。
现在查看 persistent_logins 表中数据。应该有当前用户的 Cookies 记录信息。
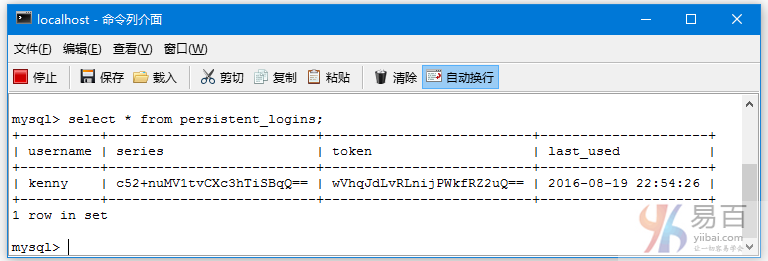
现在退出登录,如下图中所示 -
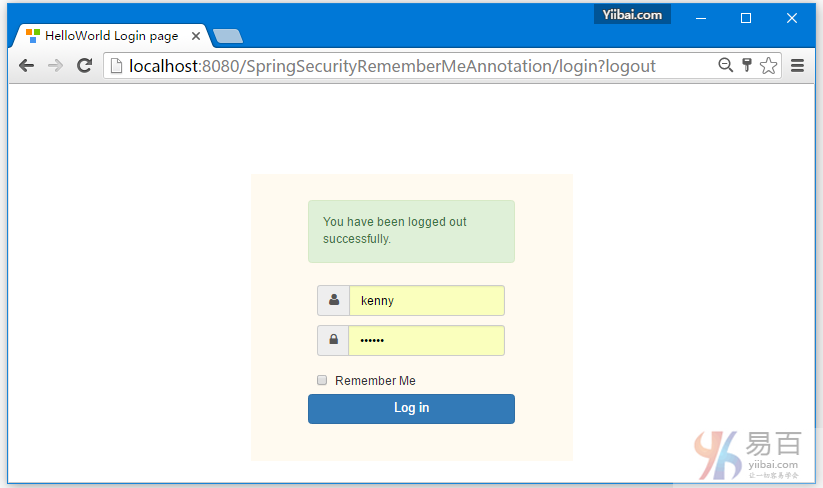
现在再试尝试打开:http://localhost:8080/SpringSecurityRememberMeAnnotation/admin,应该直接登录,而不再需要使用输入用户名和密码登录。
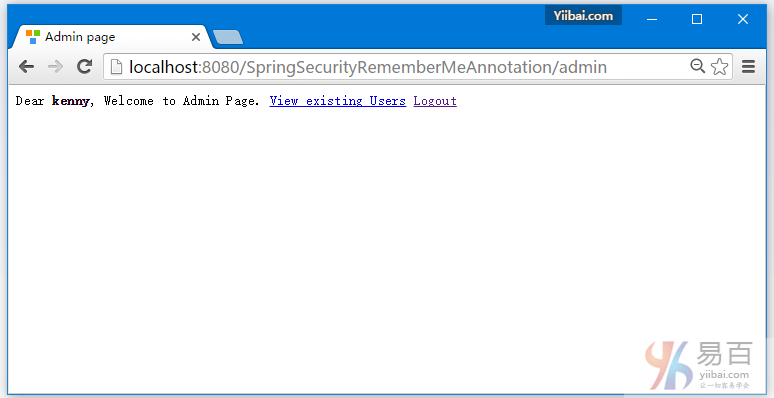
还可以看到 “Create New User” 选项不可用,这是因为一个是仅当用户(使用登录名/密码,例如)有权限的认证才能使用此功能,现在从Chrome中删除 "记住我" 的cookie(如前所示),并再次尝试访问:http://localhost:8080/SpringSecurityRememberMeAnnotation/admin,程序应该提示您登录。
就这么多,下一篇文章我们将来学习使用 Spring Security 的 @PreAuthorize,@PostAuthorize,@Secured和Spring EL表达式的方法级的安全控制。
下载源代码
11-SpringSecurityRememberMeAnnotation.zip
参考
本站代码下载:http://www.yiibai.com/siteinfo/download.html
本文属作者原创,转载请注明出处:易百教程 » Spring Security+Hibernate记住我实例
Spring Security使用@PreAuthorize,@PostAuthorize, @Secured方法安全 - Spring Security教程™
这篇教程文章中我们来学习 Spring Security使用 @PreAuthorize,@PostAuthorize,@Secured和Spring EL表达式的方法级安全。
为了使使用Spring的方法级别安全,我们需要用注释一个 @EnableGlobalMethodSecurity类在@Configuration,如下图所示:
package com.yiibai.springsecurity.configuration;
import org.springframework.beans.factory.annotation.Autowired;
import org.springframework.context.annotation.Configuration;
import org.springframework.security.config.annotation.authentication.builders.AuthenticationManagerBuilder;
import org.springframework.security.config.annotation.method.configuration.EnableGlobalMethodSecurity;
import org.springframework.security.config.annotation.web.builders.HttpSecurity;
import org.springframework.security.config.annotation.web.configuration.EnableWebSecurity;
import org.springframework.security.config.annotation.web.configuration.WebSecurityConfigurerAdapter;
@Configuration
@EnableWebSecurity
@EnableGlobalMethodSecurity(prePostEnabled = true)
public class SecurityConfiguration extends WebSecurityConfigurerAdapter {
@Autowired
public void configureGlobalSecurity(AuthenticationManagerBuilder auth) throws Exception {
auth.inMemoryAuthentication().withUser("yiibai").password("123456").roles("USER");
auth.inMemoryAuthentication().withUser("admin").password("123456").roles("ADMIN");
auth.inMemoryAuthentication().withUser("dba").password("123456").roles("ADMIN","DBA");
}
@Override
protected void configure(HttpSecurity http) throws Exception {
http.authorizeRequests()
.antMatchers("/", "/home").access("hasRole('USER') or hasRole('ADMIN') or hasRole('DBA')")
.and().formLogin().loginPage("/login")
.usernameParameter("ssoId").passwordParameter("password")
.and().exceptionHandling().accessDeniedPage("/Access_Denied");
}
}
@EnableGlobalMethodSecurity 启用 Spring Security 全局方法可以使用如下XML配置:
<beans:beans xmlns="http://www.springframework.org/schema/security"
xmlns:beans="http://www.springframework.org/schema/beans"
xmlns:xsi="http://www.w3.org/2001/XMLSchema-instance"
xsi:schemaLocation="http://www.springframework.org/schema/beans http://www.springframework.org/schema/beans/spring-beans-4.1.xsd
http://www.springframework.org/schema/security http://www.springframework.org/schema/security/spring-security-4.0.xsd">
<http auto-config="true" >
<intercept-url pattern="/" access="hasRole('USER') or hasRole('ADMIN') and hasRole('DBA')" />
<intercept-url pattern="/home" access="hasRole('USER') or hasRole('ADMIN') and hasRole('DBA')" />
<form-login login-page="/login"
username-parameter="ssoId"
password-parameter="password"
authentication-failure-url="/Access_Denied" />
</http>
<global-method-security pre-post-annotations="enabled"/>
<authentication-manager >
<authentication-provider>
<user-service>
<user name="bill" password="abc123" authorities="ROLE_USER" />
<user name="admin" password="root123" authorities="ROLE_ADMIN" />
<user name="dba" password="root123" authorities="ROLE_ADMIN,ROLE_DBA" />
</user-service>
</authentication-provider>
</authentication-manager>
</beans:beans>
需要注意的是@EnableGlobalMethodSecurity需要几个参数,如下所示:
- prePostEnabled :确定 Spring Security 前置注释 [@PreAuthorize,@PostAuthorize,..] 是否应该启用;
- secureEnabled : 确定 Spring Security 安全注释 [@Secured] 是否应该启用;
- jsr250Enabled : 确定 JSR-250注释 [@RolesAllowed..] 是否应该启用;
可以在同一应用程序启动一个以上的类型的注释,但只有一种类型用于接口或类的行为(在类的行为没有明确定义时)。如果找到两个注解适用于特定的方法,那么只有其中的一个被应用。
我们将探讨上面两个提到细节。
@Secured
@Secured注释是用来定义业务方法的安全性配置属性列表。您可以使用@Secured在方法上指定安全性要求[角色/权限等],只有对应角色/权限的用户才可以调用这些方法。如果有人试图调用一个方法,但是不拥有所需的角色/权限,那会将会拒绝访问将引发异常。
@Secured是从之前Spring版本中引入进来的。它有一个缺点(限制)就是不支持Spring EL表达式。考虑下面的例子:
package com.yiibai.springsecurity.service;
import org.springframework.security.access.annotation.Secured;
public interface UserService {
List<User> findAllUsers();
@Secured("ROLE_ADMIN")
void updateUser(User user);
@Secured({ "ROLE_DBA", "ROLE_ADMIN" })
void deleteUser();
}
在上面的例子中,UpdateUser方法可以由具有 Admin 角色的人调用,而deleteUser可以由DBA或管理员角色的人被调用。如果不拥有所需的角色而试图调用一个方法,那么将一个访问拒绝并将引发异常。
如果你想要指定“AND”条件。想调用deleteUser方法同时拥有ADMIN和DBA角色的用户。这是不可能绕过 @Secured 注释的。
这可以使用 Spring 新的 @PreAuthorize/@PostAuthorize 注解来支持 Spring EL 。
@PreAuthorize / @PostAuthorize
Spring 的 @PreAuthorize/@PostAuthorize 注解是首选应用到方法级安全性的方式,并支持Spring表达式语言,也提供基于表达式的访问控制。
@PreAuthorize适合进入方法之前验证授权。 @PreAuthorize可以兼顾,角色/登录用户权限,参数传递给方法等等。
@PostAuthorize 虽然不经常使用,检查授权方法之后才被执行,所以它适合用在对返回的值作验证授权。Spring EL提供可在表达式语言来访问并从方法返回 returnObject 对象来反映实际的对象。
请参见常见内置表达式了解支持表达式的完整列表。让我们回到之前的例子,这一次使用 @PreAuthorize/@PostAuthorize 。
package com.yiibai.springsecurity.service;
import org.springframework.security.access.prepost.PostAuthorize;
import org.springframework.security.access.prepost.PreAuthorize;
import com.yiibai.springsecurity.model.User;
public interface UserService {
List<User> findAllUsers();
@PostAuthorize ("returnObject.type == authentication.name")
User findById(int id);
@PreAuthorize("hasRole('ADMIN')")
void updateUser(User user);
@PreAuthorize("hasRole('ADMIN') AND hasRole('DBA')")
void deleteUser(int id);
}
由于@PreAuthorize可以使用Spring表达式语言,任何条件可以很容易地使用EL来表示。deleteUser 方法现在配置以通过同时拥有ADMIN和DBA角色的用户调用。
此外,我们还在 findById()方法上添加了注解 @PostAuthorize 。使用@PostAuthorize,从方法(用户对象)返回的值将是使用 returnObject 对象访问在Spring表达式语言中,并且返回用户对象的个别属性可以应用到一些安全规则。在这个例子中,我们要确保登录的用户只能得到它自己的用户类型对象。
这是所有关于@Secured,@PreAuthorize,@PostAuthorize和EL的基本用法。
以下在这个例子中要使用的服务实现,用户模型类和控制器等。代码如下所示 -
package com.yiibai.springsecurity.service;
import java.util.ArrayList;
import java.util.List;
import org.springframework.stereotype.Service;
import org.springframework.transaction.annotation.Transactional;
import com.yiibai.springsecurity.model.User;
@Service("userService")
@Transactional
public class UserServiceImpl implements UserService{
static List<User> users = new ArrayList<User>();
static{
users = populateUser();
}
public List<User> findAllUsers(){
return users;
}
public User findById(int id){
for(User u : users){
if(u.getId()==id){
return u;
}
}
return null;
}
public void updateUser(User user) {
System.out.println("Only an Admin can Update a User");
User u = findById(user.getId());
users.remove(u);
u.setFirstName(user.getFirstName());
u.setLastName(user.getLastName());
u.setType(user.getType());
users.add(u);
}
public void deleteUser(int id){
User u = findById(id);
users.remove(u);
}
private static List<User> populateUser(){
List<User> users = new ArrayList<User>();
users.add(new User(1,"Sam","Disilva","admin"));
users.add(new User(2,"Kevin","Brayn","admin"));
users.add(new User(3,"Nina","Conor","dba"));
users.add(new User(4,"Tito","Menz","dba"));
return users;
}
}
public class User {
private int id;
private String firstName;
private String lastName;
private String type;
//getters/setters
}
package com.yiibai.springsecurity.controller;
import java.util.List;
import javax.servlet.http.HttpServletRequest;
import javax.servlet.http.HttpServletResponse;
import org.springframework.beans.factory.annotation.Autowired;
import org.springframework.security.core.Authentication;
import org.springframework.security.core.context.SecurityContextHolder;
import org.springframework.security.core.userdetails.UserDetails;
import org.springframework.security.web.authentication.logout.SecurityContextLogoutHandler;
import org.springframework.stereotype.Controller;
import org.springframework.ui.ModelMap;
import org.springframework.web.bind.annotation.PathVariable;
import org.springframework.web.bind.annotation.RequestMapping;
import org.springframework.web.bind.annotation.RequestMethod;
import com.yiibai.springsecurity.model.User;
import com.yiibai.springsecurity.service.UserService;
@Controller
public class HelloWorldController {
@Autowired
UserService service;
@RequestMapping(value = { "/", "/list" }, method = RequestMethod.GET)
public String listAllUsers(ModelMap model) {
List<User> users = service.findAllUsers();
model.addAttribute("users", users);
return "allusers";
}
@RequestMapping(value = { "/edit-user-{id}" }, method = RequestMethod.GET)
public String editUser(@PathVariable int id, ModelMap model) {
User user = service.findById(id);
model.addAttribute("user", user);
model.addAttribute("edit", true);
return "registration";
}
@RequestMapping(value = { "/edit-user-{id}" }, method = RequestMethod.POST)
public String updateUser(User user, ModelMap model, @PathVariable int id) {
service.updateUser(user);
model.addAttribute("success", "User " + user.getFirstName() + " updated successfully");
return "success";
}
@RequestMapping(value = { "/delete-user-{id}" }, method = RequestMethod.GET)
public String deleteUser(@PathVariable int id) {
service.deleteUser(id);
return "redirect:/list";
}
@RequestMapping(value = "/Access_Denied", method = RequestMethod.GET)
public String accessDeniedPage(ModelMap model) {
model.addAttribute("user", getPrincipal());
return "accessDenied";
}
@RequestMapping(value = "/login", method = RequestMethod.GET)
public String loginPage() {
return "login";
}
@RequestMapping(value="/logout", method = RequestMethod.GET)
public String logoutPage (HttpServletRequest request, HttpServletResponse response) {
Authentication auth = SecurityContextHolder.getContext().getAuthentication();
if (auth != null){
new SecurityContextLogoutHandler().logout(request, response, auth);
}
return "redirect:/login?logout";
}
private String getPrincipal(){
String userName = null;
Object principal = SecurityContextHolder.getContext().getAuthentication().getPrincipal();
if (principal instanceof UserDetails) {
userName = ((UserDetails)principal).getUsername();
} else {
userName = principal.toString();
}
return userName;
}
}
这个例子完整的代码附加在这篇文章的末尾。有需要练习或参考可自行下载(不收费)。
部署和运行
下载并安装在帖子的末尾完整的示例代码。部署它到Servlet3.0容器(例如:Tomcat 8.0.21)。
打开浏览器,并打开网址:http://localhost:8080/SpringSecurityMethodLevelSecurityAnnotation/, 系统将提示您登录。
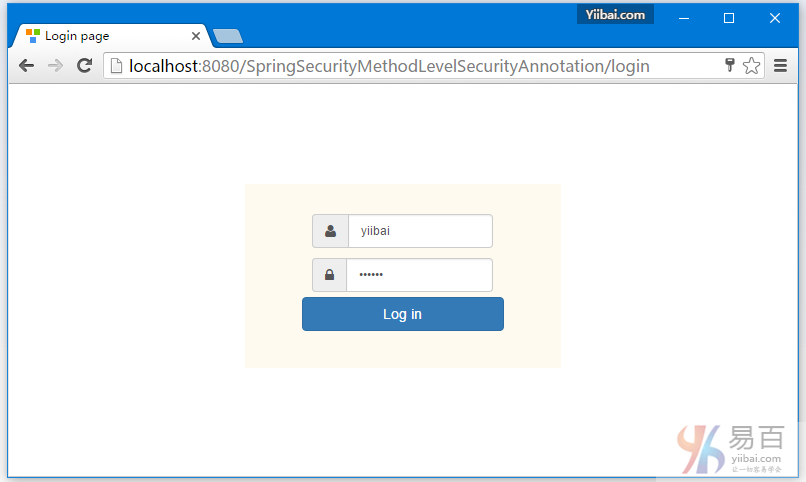
提交后,您会看到一个用户列表。
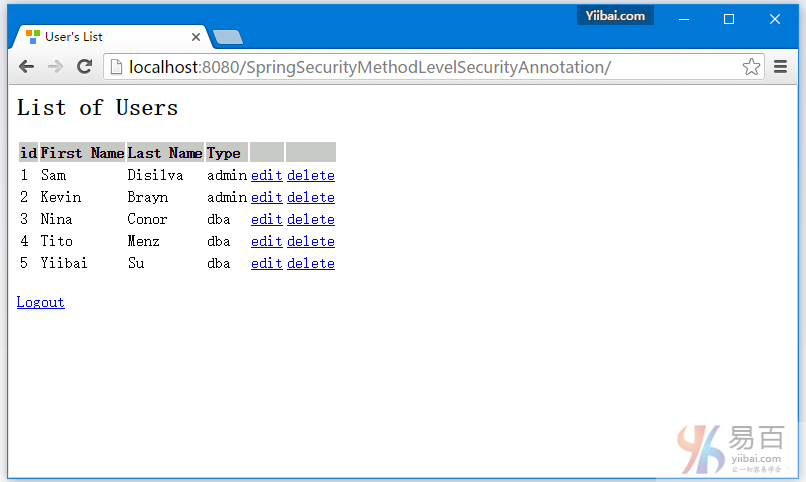
现在尝试编辑或删除用户,你应该看到拒绝访问页面,因为此用户角色无权访问这些功能。

现在注销登录。重新使用 admin 角色的用户(admin / 123456)登录。
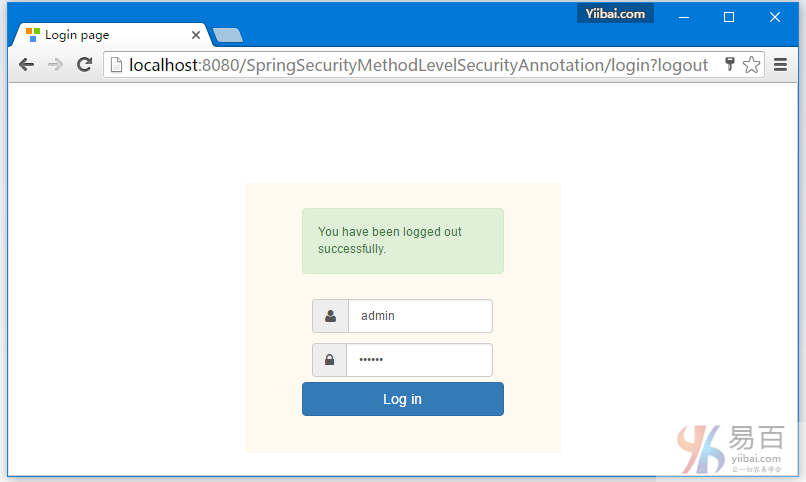
提交后,你会看到用户列表,如下图中所示 -
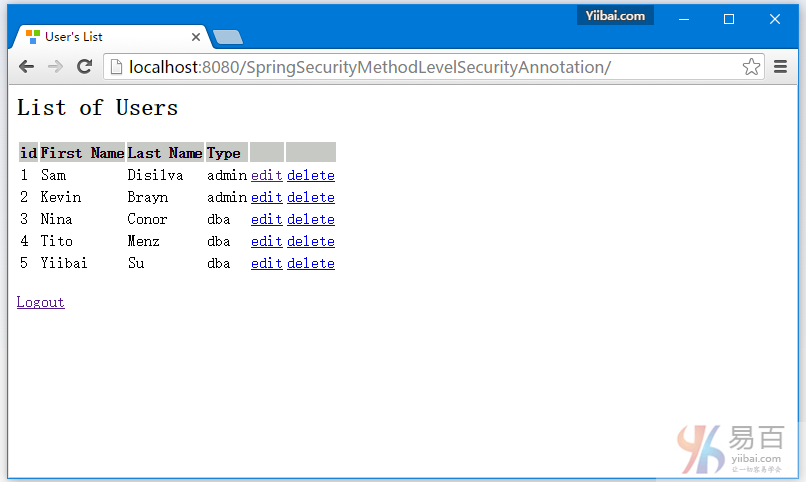
现在点击编辑第一行[type='admin']。编辑页面应该出现。
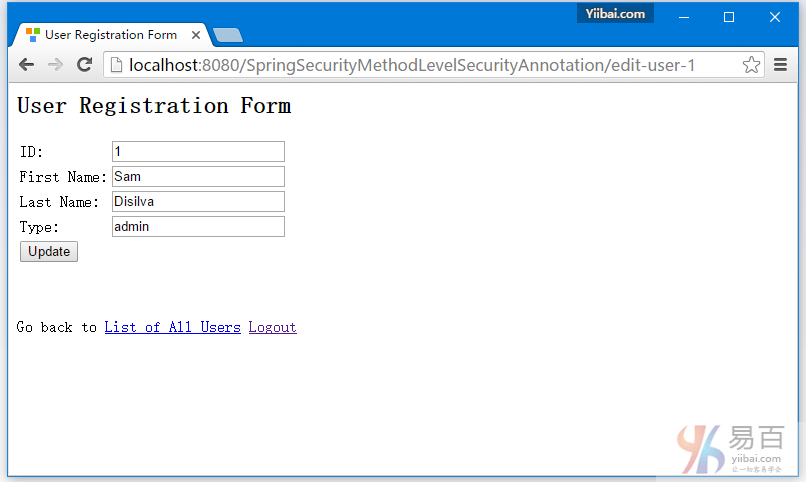
现在回到记录列表中,点击第三行[type = 'dba'],如下所示 -
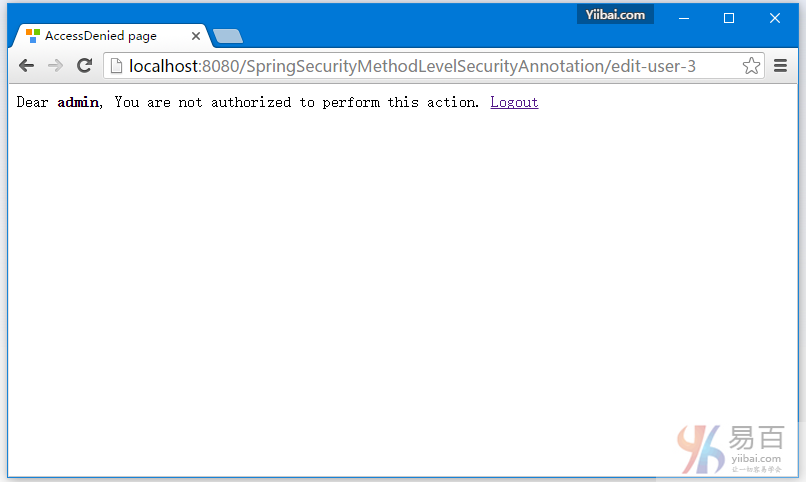
在执行编辑时访问拒绝,findById()函数调用了使用EL限制的 @PostAuthorize注释,返回的对象只能与类型为['dba']一样的登录用户名才能操作。
现在点击任何删除行应该会显示拒绝访问,因为只允许角色为“DBA”的用户才能删除用户。
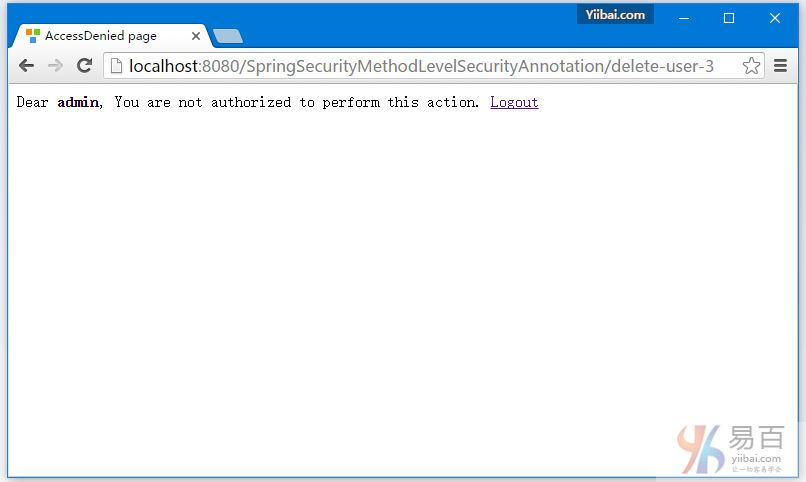
现在注销,登录一个具有DBA角色的用户[dba,123456],然后点击第一行的删除链接,这一行记录应该会被成功删除。其它更多的操作您可以试着去摸索。
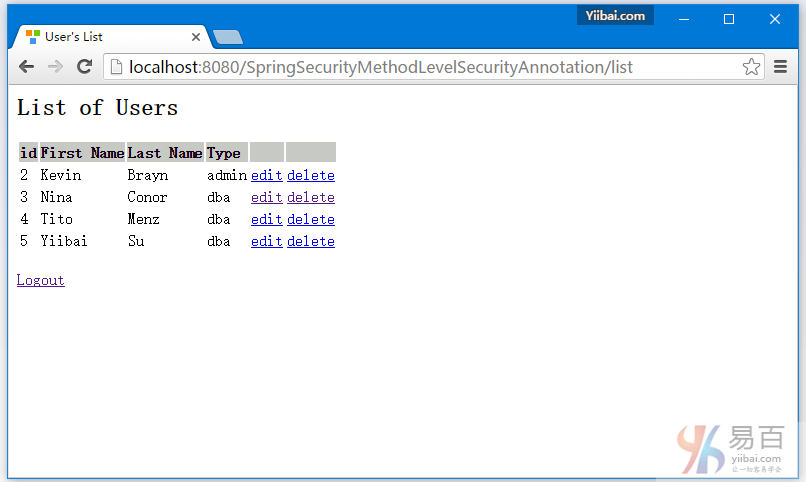
就这么多,包教不包会。
下载源代码
12-SpringSecurityMethodLevelSecurityAnnotation.zip
参考
本站代码下载:http://www.yiibai.com/siteinfo/download.html
本文属作者原创,转载请注明出处:易百教程 » Spring Security使用@PreAuthorize,@PostAuthorize, @Secured方法安全
Spring MVC4 + Spring Security4 + Hibernate实例 - Spring Security教程™
在这篇教程文章中,我们将使用Spring Security,Hibernate+MySQL数据库来集成构建一个成熟的Spring MVC应用程序。处理多对多映射关系,同时利用BCrypt格式加密密码存储,和使用自定义PersistentTokenRepository实现Hibernate HibernateTokenRepositoryImpl并提供了 "记住我" 功能,从数据库检索和更新记录或在事务中删除它们;在这个实例中全部采用注释配置。
这个项目可以作为您自己的Spring MVC项目集成 Spring Security 模板,免受搭建开发环境皮肉之苦。
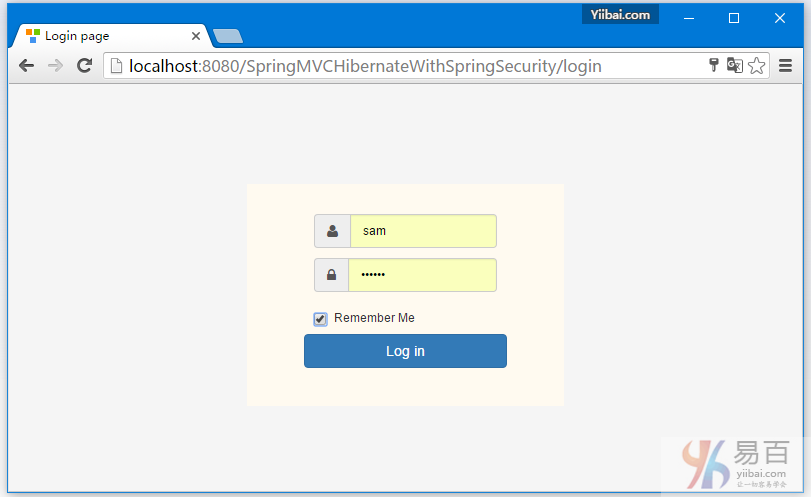
注意:
这篇文章展示了一个完整的应用的完整代码。为了缩小本教程文章的篇幅,这里需要省略一些基本的知识点文字描述。如果您有兴趣了解这些细节,这个,这个和这个文章可能会帮助你。
先来做个概括:
这个项目显示了一个简单的用户管理应用程序。您可以创建一个新用户,编辑或删除现有用户,并列出所有用户信息列表。一个用户可以与一个或多个用户配置(UserProfile)相关联,这表现出了多对多的关系。应用程序的URL是使用 Spring Security 作访问保护的。这意味着,基于对登录用户的角色来获得判定URL是否被授予或禁止访问。在视图层,用户将根据分配给他/她的角色只能看到被允许页面内容,这些是在视图层中使用Spring Security标签来实现的。
以下是一些需要使用到的技术:
- Spring 4.2.5.RELEASE
- Spring Security 4.0.4.RELEASE
- Hibernate Core 4.3.11.Final
- validation-api 1.1.0.Final
- hibernate-validator 5.1.3.Final
- MySQL Server 5.6
- Maven 3
- JDK 1.7
- Tomcat 8.0.21
- Eclipse MARS.1 Release 4.5.1
- logback 1.1.7
现在就让我们开始一步步地学习和实现吧!
第1步:创建目录结构
以下将是最终的项目结构:
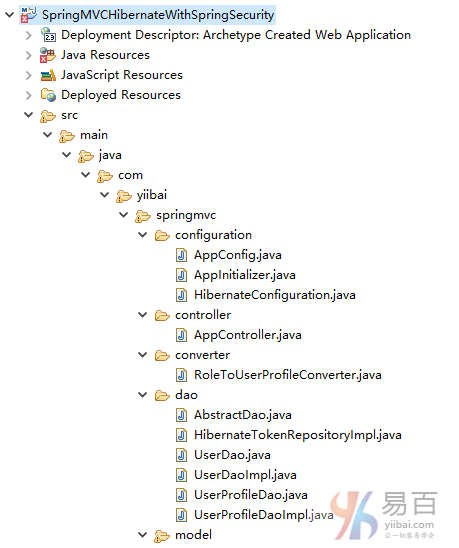
现在,让我们解释在上面提到的结构内容每个细节。
第2步: 更新 pom.xml 以包括必需的依懒
<project xsi:schemaLocation="http://maven.apache.org/POM/4.0.0 http://maven.apache.org/xsd/maven-4.0.0.xsd"
xmlns="http://maven.apache.org/POM/4.0.0" xmlns:xsi="http://www.w3.org/2001/XMLSchema-instance">
<modelVersion>4.0.0</modelVersion>
<groupId>com.yiibai.springmvc</groupId>
<artifactId>SpringMVCHibernateManyToManyCRUDExample</artifactId>
<packaging>war</packaging>
<version>1.0.0</version>
<name>SpringMVCHibernateWithSpringSecurityExample</name>
<properties>
<springframework.version>4.2.5.RELEASE</springframework.version>
<springsecurity.version>4.0.4.RELEASE</springsecurity.version>
<hibernate.version>4.3.11.Final</hibernate.version>
<mysql.connector.version>5.1.31</mysql.connector.version>
</properties>
<dependencies>
<!-- Spring -->
<dependency>
<groupId>org.springframework</groupId>
<artifactId>spring-core</artifactId>
<version>${springframework.version}</version>
</dependency>
<dependency>
<groupId>org.springframework</groupId>
<artifactId>spring-web</artifactId>
<version>${springframework.version}</version>
</dependency>
<dependency>
<groupId>org.springframework</groupId>
<artifactId>spring-webmvc</artifactId>
<version>${springframework.version}</version>
</dependency>
<dependency>
<groupId>org.springframework</groupId>
<artifactId>spring-tx</artifactId>
<version>${springframework.version}</version>
</dependency>
<dependency>
<groupId>org.springframework</groupId>
<artifactId>spring-orm</artifactId>
<version>${springframework.version}</version>
</dependency>
<!-- Spring Security -->
<dependency>
<groupId>org.springframework.security</groupId>
<artifactId>spring-security-web</artifactId>
<version>${springsecurity.version}</version>
</dependency>
<dependency>
<groupId>org.springframework.security</groupId>
<artifactId>spring-security-config</artifactId>
<version>${springsecurity.version}</version>
</dependency>
<dependency>
<groupId>org.springframework.security</groupId>
<artifactId>spring-security-taglibs</artifactId>
<version>${springsecurity.version}</version>
</dependency>
<!-- Hibernate -->
<dependency>
<groupId>org.hibernate</groupId>
<artifactId>hibernate-core</artifactId>
<version>${hibernate.version}</version>
</dependency>
<!-- jsr303 validation -->
<dependency>
<groupId>javax.validation</groupId>
<artifactId>validation-api</artifactId>
<version>1.1.0.Final</version>
</dependency>
<dependency>
<groupId>org.hibernate</groupId>
<artifactId>hibernate-validator</artifactId>
<version>5.1.3.Final</version>
</dependency>
<!-- MySQL -->
<dependency>
<groupId>mysql</groupId>
<artifactId>mysql-connector-java</artifactId>
<version>${mysql.connector.version}</version>
</dependency>
<!-- SLF4J/Logback -->
<dependency>
<groupId>ch.qos.logback</groupId>
<artifactId>logback-classic</artifactId>
<version>1.1.7</version>
</dependency>
<!-- Servlet+JSP+JSTL -->
<dependency>
<groupId>javax.servlet</groupId>
<artifactId>javax.servlet-api</artifactId>
<version>3.1.0</version>
</dependency>
<dependency>
<groupId>javax.servlet.jsp</groupId>
<artifactId>javax.servlet.jsp-api</artifactId>
<version>2.3.1</version>
</dependency>
<dependency>
<groupId>javax.servlet</groupId>
<artifactId>jstl</artifactId>
<version>1.2</version>
</dependency>
</dependencies>
<build>
<pluginManagement>
<plugins>
<plugin>
<groupId>org.apache.maven.plugins</groupId>
<artifactId>maven-compiler-plugin</artifactId>
<version>3.2</version>
<configuration>
<source>1.7</source>
<target>1.7</target>
</configuration>
</plugin>
<plugin>
<groupId>org.apache.maven.plugins</groupId>
<artifactId>maven-war-plugin</artifactId>
<version>2.4</version>
<configuration>
<warSourceDirectory>src/main/webapp</warSourceDirectory>
<warName>SpringMVCHibernateWithSpringSecurityExample</warName>
<failOnMissingWebXml>false</failOnMissingWebXml>
</configuration>
</plugin>
</plugins>
</pluginManagement>
<finalName>SpringMVCHibernateWithSpringSecurityExample</finalName>
</build>
</project>
第3步: 配置安全
这是最重要的步骤,在我们的应用程序中添加的Spring Security是创建Spring Security的Java配置。
该配置将创建被称为负责所有安全的springSecurityFilterChain Servlet过滤程序(保护应用程序的URL,验证提交用户名和密码,重定向到日志等等)提供在应用程序内。
package com.yiibai.springmvc.security;
import org.springframework.beans.factory.annotation.Autowired;
import org.springframework.beans.factory.annotation.Qualifier;
import org.springframework.context.annotation.Bean;
import org.springframework.context.annotation.Configuration;
import org.springframework.security.authentication.AuthenticationTrustResolver;
import org.springframework.security.authentication.AuthenticationTrustResolverImpl;
import org.springframework.security.authentication.dao.DaoAuthenticationProvider;
import org.springframework.security.config.annotation.authentication.builders.AuthenticationManagerBuilder;
import org.springframework.security.config.annotation.web.builders.HttpSecurity;
import org.springframework.security.config.annotation.web.configuration.EnableWebSecurity;
import org.springframework.security.config.annotation.web.configuration.WebSecurityConfigurerAdapter;
import org.springframework.security.core.userdetails.UserDetailsService;
import org.springframework.security.crypto.bcrypt.BCryptPasswordEncoder;
import org.springframework.security.crypto.password.PasswordEncoder;
import org.springframework.security.web.authentication.rememberme.PersistentTokenBasedRememberMeServices;
import org.springframework.security.web.authentication.rememberme.PersistentTokenRepository;
@Configuration
@EnableWebSecurity
public class SecurityConfiguration extends WebSecurityConfigurerAdapter {
@Autowired
@Qualifier("customUserDetailsService")
UserDetailsService userDetailsService;
@Autowired
PersistentTokenRepository tokenRepository;
@Autowired
public void configureGlobalSecurity(AuthenticationManagerBuilder auth) throws Exception {
auth.userDetailsService(userDetailsService);
auth.authenticationProvider(authenticationProvider());
}
@Override
protected void configure(HttpSecurity http) throws Exception {
http.authorizeRequests().antMatchers("/", "/list")
.access("hasRole('USER') or hasRole('ADMIN') or hasRole('DBA')")
.antMatchers("/newuser/**", "/delete-user-*").access("hasRole('ADMIN')").antMatchers("/edit-user-*")
.access("hasRole('ADMIN') or hasRole('DBA')").and().formLogin().loginPage("/login")
.loginProcessingUrl("/login").usernameParameter("ssoId").passwordParameter("password").and()
.rememberMe().rememberMeParameter("remember-me").tokenRepository(tokenRepository)
.tokenValiditySeconds(86400).and().csrf().and().exceptionHandling().accessDeniedPage("/Access_Denied");
}
@Bean
public PasswordEncoder passwordEncoder() {
return new BCryptPasswordEncoder();
}
@Bean
public DaoAuthenticationProvider authenticationProvider() {
DaoAuthenticationProvider authenticationProvider = new DaoAuthenticationProvider();
authenticationProvider.setUserDetailsService(userDetailsService);
authenticationProvider.setPasswordEncoder(passwordEncoder());
return authenticationProvider;
}
@Bean
public PersistentTokenBasedRememberMeServices getPersistentTokenBasedRememberMeServices() {
PersistentTokenBasedRememberMeServices tokenBasedservice = new PersistentTokenBasedRememberMeServices(
"remember-me", userDetailsService, tokenRepository);
return tokenBasedservice;
}
@Bean
public AuthenticationTrustResolver getAuthenticationTrustResolver() {
return new AuthenticationTrustResolverImpl();
}
}
如上图所示,接入到URL被控制,如下所示:
- ‘/’ & ‘/list’ : 供所有用户访问;
- ‘/newuser’ & ‘/delete-user-*’ : 只供管理员(Admin)用户访问;
- ‘/edit-user-*’ : 供 Admin & DBA 用户访问;
由于我们存储凭据在数据库中,所以要在UserDetailsService中配置DaoAuthenticationProvider来处理。此外,为了在数据库加密密码,我们选择BCryptPasswordEncoder。 此外,由于我们也将提供记住我的功能,跟踪令牌数据在数据库中,我们配置PersistentTokenRepository 实现。
Spring Security带有两个PersistentTokenRepository的实现: JdbcTokenRepositoryImpl 和 InMemoryTokenRepositoryImpl. 我们可以选择JdbcTokenRepositoryImpl[此文章演示了rememberMe和JdbcTokenRepositoryImpl]。但在我们的应用程序使用Hibernate,为什么不使用Hibernate来代替JDBC创建一个自定义的实现?下面是相同功能的一个尝试。
package com.yiibai.springmvc.dao;
import java.util.Date;
import org.hibernate.Criteria;
import org.hibernate.criterion.Restrictions;
import org.slf4j.Logger;
import org.slf4j.LoggerFactory;
import org.springframework.security.web.authentication.rememberme.PersistentRememberMeToken;
import org.springframework.security.web.authentication.rememberme.PersistentTokenRepository;
import org.springframework.stereotype.Repository;
import org.springframework.transaction.annotation.Transactional;
import com.yiibai.springmvc.dao.AbstractDao;
import com.yiibai.springmvc.model.PersistentLogin;
@Repository("tokenRepositoryDao")
@Transactional
public class HibernateTokenRepositoryImpl extends AbstractDao<String, PersistentLogin>
implements PersistentTokenRepository {
static final Logger logger = LoggerFactory.getLogger(HibernateTokenRepositoryImpl.class);
@Override
public void createNewToken(PersistentRememberMeToken token) {
logger.info("Creating Token for user : {}", token.getUsername());
PersistentLogin persistentLogin = new PersistentLogin();
persistentLogin.setUsername(token.getUsername());
persistentLogin.setSeries(token.getSeries());
persistentLogin.setToken(token.getTokenValue());
persistentLogin.setLast_used(token.getDate());
persist(persistentLogin);
}
@Override
public PersistentRememberMeToken getTokenForSeries(String seriesId) {
logger.info("Fetch Token if any for seriesId : {}", seriesId);
try {
Criteria crit = createEntityCriteria();
crit.add(Restrictions.eq("series", seriesId));
PersistentLogin persistentLogin = (PersistentLogin) crit.uniqueResult();
return new PersistentRememberMeToken(persistentLogin.getUsername(), persistentLogin.getSeries(),
persistentLogin.getToken(), persistentLogin.getLast_used());
} catch (Exception e) {
logger.info("Token not found...");
return null;
}
}
@Override
public void removeUserTokens(String username) {
logger.info("Removing Token if any for user : {}", username);
Criteria crit = createEntityCriteria();
crit.add(Restrictions.eq("username", username));
PersistentLogin persistentLogin = (PersistentLogin) crit.uniqueResult();
if (persistentLogin != null) {
logger.info("rememberMe was selected");
delete(persistentLogin);
}
}
@Override
public void updateToken(String seriesId, String tokenValue, Date lastUsed) {
logger.info("Updating Token for seriesId : {}", seriesId);
PersistentLogin persistentLogin = getByKey(seriesId);
persistentLogin.setToken(tokenValue);
persistentLogin.setLast_used(lastUsed);
update(persistentLogin);
}
}
上述实现使用实体[PersistentLogin]映射到persistent_logins表,如下图所示是实体本身。
package com.yiibai.springmvc.model;
import java.io.Serializable;
import java.util.Date;
import javax.persistence.Column;
import javax.persistence.Entity;
import javax.persistence.Id;
import javax.persistence.Table;
import javax.persistence.Temporal;
import javax.persistence.TemporalType;
@Entity
@Table(name="PERSISTENT_LOGINS")
public class PersistentLogin implements Serializable{
@Id
private String series;
@Column(name="USERNAME", unique=true, nullable=false)
private String username;
@Column(name="TOKEN", unique=true, nullable=false)
private String token;
@Temporal(TemporalType.TIMESTAMP)
private Date last_used;
public String getSeries() {
return series;
}
public void setSeries(String series) {
this.series = series;
}
public String getUsername() {
return username;
}
public void setUsername(String username) {
this.username = username;
}
public String getToken() {
return token;
}
public void setToken(String token) {
this.token = token;
}
public Date getLast_used() {
return last_used;
}
public void setLast_used(Date last_used) {
this.last_used = last_used;
}
}
这个 UserDetailsService 实现,在安全性配置中使用如下图所示:
package com.yiibai.springmvc.security;
import java.util.ArrayList;
import java.util.List;
import org.slf4j.Logger;
import org.slf4j.LoggerFactory;
import org.springframework.beans.factory.annotation.Autowired;
import org.springframework.security.core.GrantedAuthority;
import org.springframework.security.core.authority.SimpleGrantedAuthority;
import org.springframework.security.core.userdetails.UserDetails;
import org.springframework.security.core.userdetails.UserDetailsService;
import org.springframework.security.core.userdetails.UsernameNotFoundException;
import org.springframework.stereotype.Service;
import org.springframework.transaction.annotation.Transactional;
import com.yiibai.springmvc.model.User;
import com.yiibai.springmvc.model.UserProfile;
import com.yiibai.springmvc.service.UserService;
@Service("customUserDetailsService")
public class CustomUserDetailsService implements UserDetailsService{
static final Logger logger = LoggerFactory.getLogger(CustomUserDetailsService.class);
@Autowired
private UserService userService;
@Transactional(readOnly=true)
public UserDetails loadUserByUsername(String ssoId)
throws UsernameNotFoundException {
User user = userService.findBySSO(ssoId);
logger.info("User : {}", user);
if(user==null){
logger.info("User not found");
throw new UsernameNotFoundException("Username not found");
}
return new org.springframework.security.core.userdetails.User(user.getSsoId(), user.getPassword(),
true, true, true, true, getGrantedAuthorities(user));
}
private List<GrantedAuthority> getGrantedAuthorities(User user){
List<GrantedAuthority> authorities = new ArrayList<GrantedAuthority>();
for(UserProfile userProfile : user.getUserProfiles()){
logger.info("UserProfile : {}", userProfile);
authorities.add(new SimpleGrantedAuthority("ROLE_"+userProfile.getType()));
}
logger.info("authorities : {}", authorities);
return authorities;
}
}
最后,使用下述初始化类注册 springSecurityFilter 应用程序 war。
package com.yiibai.springmvc.security;
import org.springframework.security.web.context.AbstractSecurityWebApplicationInitializer;
public class SecurityWebApplicationInitializer extends AbstractSecurityWebApplicationInitializer {
}
这就是 Spring Security 配置。现在,让我们从Spring MVC部分开始,讨论Hibernate配置,必要的DAO,模型和服务。
第4步: 配置Hibernate
package com.yiibai.springmvc.configuration;
import java.util.Properties;
import javax.sql.DataSource;
import org.hibernate.SessionFactory;
import org.springframework.beans.factory.annotation.Autowired;
import org.springframework.context.annotation.Bean;
import org.springframework.context.annotation.ComponentScan;
import org.springframework.context.annotation.Configuration;
import org.springframework.context.annotation.PropertySource;
import org.springframework.core.env.Environment;
import org.springframework.jdbc.datasource.DriverManagerDataSource;
import org.springframework.orm.hibernate4.HibernateTransactionManager;
import org.springframework.orm.hibernate4.LocalSessionFactoryBean;
import org.springframework.transaction.annotation.EnableTransactionManagement;
@Configuration
@EnableTransactionManagement
@ComponentScan({ "com.yiibai.springmvc.configuration" })
@PropertySource(value = { "classpath:application.properties" })
public class HibernateConfiguration {
@Autowired
private Environment environment;
@Bean
public LocalSessionFactoryBean sessionFactory() {
LocalSessionFactoryBean sessionFactory = new LocalSessionFactoryBean();
sessionFactory.setDataSource(dataSource());
sessionFactory.setPackagesToScan(new String[] { "com.yiibai.springmvc.model" });
sessionFactory.setHibernateProperties(hibernateProperties());
return sessionFactory;
}
@Bean
public DataSource dataSource() {
DriverManagerDataSource dataSource = new DriverManagerDataSource();
dataSource.setDriverClassName(environment.getRequiredProperty("jdbc.driverClassName"));
dataSource.setUrl(environment.getRequiredProperty("jdbc.url"));
dataSource.setUsername(environment.getRequiredProperty("jdbc.username"));
dataSource.setPassword(environment.getRequiredProperty("jdbc.password"));
return dataSource;
}
private Properties hibernateProperties() {
Properties properties = new Properties();
properties.put("hibernate.dialect", environment.getRequiredProperty("hibernate.dialect"));
properties.put("hibernate.show_sql", environment.getRequiredProperty("hibernate.show_sql"));
properties.put("hibernate.format_sql", environment.getRequiredProperty("hibernate.format_sql"));
return properties;
}
@Bean
@Autowired
public HibernateTransactionManager transactionManager(SessionFactory s) {
HibernateTransactionManager txManager = new HibernateTransactionManager();
txManager.setSessionFactory(s);
return txManager;
}
}
下面是这篇教程文章中使用的属性文件。
/src/main/resources/application.properties
jdbc.driverClassName = com.mysql.jdbc.Driver
jdbc.url = jdbc:mysql://localhost:3306/yiibai
jdbc.username = root
jdbc.password =
hibernate.dialect = org.hibernate.dialect.MySQLDialect
hibernate.show_sql = true
hibernate.format_sql = true
第5步:配置Spring MVC
package com.yiibai.springmvc.configuration;
import org.springframework.beans.factory.annotation.Autowired;
import org.springframework.context.MessageSource;
import org.springframework.context.annotation.Bean;
import org.springframework.context.annotation.ComponentScan;
import org.springframework.context.annotation.Configuration;
import org.springframework.context.support.ResourceBundleMessageSource;
import org.springframework.format.FormatterRegistry;
import org.springframework.web.servlet.config.annotation.EnableWebMvc;
import org.springframework.web.servlet.config.annotation.PathMatchConfigurer;
import org.springframework.web.servlet.config.annotation.ResourceHandlerRegistry;
import org.springframework.web.servlet.config.annotation.ViewResolverRegistry;
import org.springframework.web.servlet.config.annotation.WebMvcConfigurerAdapter;
import org.springframework.web.servlet.view.InternalResourceViewResolver;
import org.springframework.web.servlet.view.JstlView;
import com.yiibai.springmvc.converter.RoleToUserProfileConverter;
@Configuration
@EnableWebMvc
@ComponentScan(basePackages = "com.yiibai.springmvc")
public class AppConfig extends WebMvcConfigurerAdapter{
@Autowired
RoleToUserProfileConverter roleToUserProfileConverter;
/**
* Configure ViewResolvers to deliver preferred views.
*/
@Override
public void configureViewResolvers(ViewResolverRegistry registry) {
InternalResourceViewResolver viewResolver = new InternalResourceViewResolver();
viewResolver.setViewClass(JstlView.class);
viewResolver.setPrefix("/WEB-INF/views/");
viewResolver.setSuffix(".jsp");
registry.viewResolver(viewResolver);
}
/**
* Configure ResourceHandlers to serve static resources like CSS/ Javascript etc...
*/
@Override
public void addResourceHandlers(ResourceHandlerRegistry registry) {
registry.addResourceHandler("/static/**").addResourceLocations("/static/");
}
/**
* Configure Converter to be used.
* In our example, we need a converter to convert string values[Roles] to UserProfiles in newUser.jsp
*/
@Override
public void addFormatters(FormatterRegistry registry) {
registry.addConverter(roleToUserProfileConverter);
}
/**
* Configure MessageSource to lookup any validation/error message in internationalized property files
*/
@Bean
public MessageSource messageSource() {
ResourceBundleMessageSource messageSource = new ResourceBundleMessageSource();
messageSource.setBasename("messages");
return messageSource;
}
/**Optional. It's only required when handling '.' in @PathVariables which otherwise ignore everything after last '.' in @PathVaidables argument.
* It's a known bug in Spring [https://jira.spring.io/browse/SPR-6164], still present in Spring 4.1.7.
* This is a workaround for this issue.
*/
@Override
public void configurePathMatch(PathMatchConfigurer matcher) {
matcher.setUseRegisteredSuffixPatternMatch(true);
}
}
这种配置的主要亮点是RoleToUserProfileConverter。这将需要在数据库视图中的单个USERPROFILE ID映射到实际的 UserProfile实体。
package com.yiibai.springmvc.converter;
import org.slf4j.Logger;
import org.slf4j.LoggerFactory;
import org.springframework.beans.factory.annotation.Autowired;
import org.springframework.core.convert.converter.Converter;
import org.springframework.stereotype.Component;
import com.yiibai.springmvc.model.UserProfile;
import com.yiibai.springmvc.service.UserProfileService;
/**
* A converter class used in views to map id's to actual userProfile objects.
*/
@Component
public class RoleToUserProfileConverter implements Converter<Object, UserProfile>{
static final Logger logger = LoggerFactory.getLogger(RoleToUserProfileConverter.class);
@Autowired
UserProfileService userProfileService;
/**
* Gets UserProfile by Id
* @see org.springframework.core.convert.converter.Converter#convert(java.lang.Object)
*/
public UserProfile convert(Object element) {
Integer id = Integer.parseInt((String)element);
UserProfile profile= userProfileService.findById(id);
logger.info("Profile : {}",profile);
return profile;
}
}
由于我们使用JSR验证应用程序验证用户输入,我们已经配置在用户在验证失败情况下显示的消息。下图所示为 message.properties 文件内容:
NotEmpty.user.firstName=First name can not be blank.
NotEmpty.user.lastName=Last name can not be blank.
NotEmpty.user.email=Email can not be blank.
NotEmpty.user.password=Password can not be blank.
NotEmpty.user.ssoId=SSO ID can not be blank.
NotEmpty.user.userProfiles=At least one profile must be selected.
non.unique.ssoId=SSO ID {0} already exist. Please fill in different value.
最后,Spring初始化器类如下所示:
package com.yiibai.springmvc.configuration;
import org.springframework.web.servlet.support.AbstractAnnotationConfigDispatcherServletInitializer;
public class AppInitializer extends AbstractAnnotationConfigDispatcherServletInitializer {
@Override
protected Class<?>[] getRootConfigClasses() {
return new Class[] { AppConfig.class };
}
@Override
protected Class<?>[] getServletConfigClasses() {
return null;
}
@Override
protected String[] getServletMappings() {
return new String[] { "/" };
}
}
第6步: 创建Spring控制器
package com.yiibai.springmvc.controller;
import java.util.List;
import java.util.Locale;
import javax.servlet.http.HttpServletRequest;
import javax.servlet.http.HttpServletResponse;
import javax.validation.Valid;
import org.springframework.beans.factory.annotation.Autowired;
import org.springframework.context.MessageSource;
import org.springframework.security.authentication.AuthenticationTrustResolver;
import org.springframework.security.core.Authentication;
import org.springframework.security.core.context.SecurityContextHolder;
import org.springframework.security.core.userdetails.UserDetails;
import org.springframework.security.web.authentication.rememberme.PersistentTokenBasedRememberMeServices;
import org.springframework.stereotype.Controller;
import org.springframework.ui.ModelMap;
import org.springframework.validation.BindingResult;
import org.springframework.validation.FieldError;
import org.springframework.web.bind.annotation.ModelAttribute;
import org.springframework.web.bind.annotation.PathVariable;
import org.springframework.web.bind.annotation.RequestMapping;
import org.springframework.web.bind.annotation.RequestMethod;
import org.springframework.web.bind.annotation.SessionAttributes;
import com.yiibai.springmvc.model.User;
import com.yiibai.springmvc.model.UserProfile;
import com.yiibai.springmvc.service.UserProfileService;
import com.yiibai.springmvc.service.UserService;
@Controller
@RequestMapping("/")
@SessionAttributes("roles")
public class AppController {
@Autowired
UserService userService;
@Autowired
UserProfileService userProfileService;
@Autowired
MessageSource messageSource;
@Autowired
PersistentTokenBasedRememberMeServices persistentTokenBasedRememberMeServices;
@Autowired
AuthenticationTrustResolver authenticationTrustResolver;
/**
* This method will list all existing users.
*/
@RequestMapping(value = { "/", "/list" }, method = RequestMethod.GET)
public String listUsers(ModelMap model) {
List<User> users = userService.findAllUsers();
model.addAttribute("users", users);
model.addAttribute("loggedinuser", getPrincipal());
return "userslist";
}
/**
* This method will provide the medium to add a new user.
*/
@RequestMapping(value = { "/newuser" }, method = RequestMethod.GET)
public String newUser(ModelMap model) {
User user = new User();
model.addAttribute("user", user);
model.addAttribute("edit", false);
model.addAttribute("loggedinuser", getPrincipal());
return "registration";
}
/**
* This method will be called on form submission, handling POST request for
* saving user in database. It also validates the user input
*/
@RequestMapping(value = { "/newuser" }, method = RequestMethod.POST)
public String saveUser(@Valid User user, BindingResult result,
ModelMap model) {
if (result.hasErrors()) {
return "registration";
}
/*
* Preferred way to achieve uniqueness of field [sso] should be implementing custom @Unique annotation
* and applying it on field [sso] of Model class [User].
*
* Below mentioned peace of code [if block] is to demonstrate that you can fill custom errors outside the validation
* framework as well while still using internationalized messages.
*
*/
if(!userService.isUserSSOUnique(user.getId(), user.getSsoId())){
FieldError ssoError =new FieldError("user","ssoId",messageSource.getMessage("non.unique.ssoId", new String[]{user.getSsoId()}, Locale.getDefault()));
result.addError(ssoError);
return "registration";
}
userService.saveUser(user);
model.addAttribute("success", "User " + user.getFirstName() + " "+ user.getLastName() + " registered successfully");
model.addAttribute("loggedinuser", getPrincipal());
//return "success";
return "registrationsuccess";
}
/**
* This method will provide the medium to update an existing user.
*/
@RequestMapping(value = { "/edit-user-{ssoId}" }, method = RequestMethod.GET)
public String editUser(@PathVariable String ssoId, ModelMap model) {
User user = userService.findBySSO(ssoId);
model.addAttribute("user", user);
model.addAttribute("edit", true);
model.addAttribute("loggedinuser", getPrincipal());
return "registration";
}
/**
* This method will be called on form submission, handling POST request for
* updating user in database. It also validates the user input
*/
@RequestMapping(value = { "/edit-user-{ssoId}" }, method = RequestMethod.POST)
public String updateUser(@Valid User user, BindingResult result,
ModelMap model, @PathVariable String ssoId) {
if (result.hasErrors()) {
return "registration";
}
/*//Uncomment below 'if block' if you WANT TO ALLOW UPDATING SSO_ID in UI which is a unique key to a User.
if(!userService.isUserSSOUnique(user.getId(), user.getSsoId())){
FieldError ssoError =new FieldError("user","ssoId",messageSource.getMessage("non.unique.ssoId", new String[]{user.getSsoId()}, Locale.getDefault()));
result.addError(ssoError);
return "registration";
}*/
userService.updateUser(user);
model.addAttribute("success", "User " + user.getFirstName() + " "+ user.getLastName() + " updated successfully");
model.addAttribute("loggedinuser", getPrincipal());
return "registrationsuccess";
}
/**
* This method will delete an user by it's SSOID value.
*/
@RequestMapping(value = { "/delete-user-{ssoId}" }, method = RequestMethod.GET)
public String deleteUser(@PathVariable String ssoId) {
userService.deleteUserBySSO(ssoId);
return "redirect:/list";
}
/**
* This method will provide UserProfile list to views
*/
@ModelAttribute("roles")
public List<UserProfile> initializeProfiles() {
return userProfileService.findAll();
}
/**
* This method handles Access-Denied redirect.
*/
@RequestMapping(value = "/Access_Denied", method = RequestMethod.GET)
public String accessDeniedPage(ModelMap model) {
model.addAttribute("loggedinuser", getPrincipal());
return "accessDenied";
}
/**
* This method handles login GET requests.
* If users is already logged-in and tries to goto login page again, will be redirected to list page.
*/
@RequestMapping(value = "/login", method = RequestMethod.GET)
public String loginPage() {
if (isCurrentAuthenticationAnonymous()) {
return "login";
} else {
return "redirect:/list";
}
}
/**
* This method handles logout requests.
* Toggle the handlers if you are RememberMe functionality is useless in your app.
*/
@RequestMapping(value="/logout", method = RequestMethod.GET)
public String logoutPage (HttpServletRequest request, HttpServletResponse response){
Authentication auth = SecurityContextHolder.getContext().getAuthentication();
if (auth != null){
//new SecurityContextLogoutHandler().logout(request, response, auth);
persistentTokenBasedRememberMeServices.logout(request, response, auth);
SecurityContextHolder.getContext().setAuthentication(null);
}
return "redirect:/login?logout";
}
/**
* This method returns the principal[user-name] of logged-in user.
*/
private String getPrincipal(){
String userName = null;
Object principal = SecurityContextHolder.getContext().getAuthentication().getPrincipal();
if (principal instanceof UserDetails) {
userName = ((UserDetails)principal).getUsername();
} else {
userName = principal.toString();
}
return userName;
}
/**
* This method returns true if users is already authenticated [logged-in], else false.
*/
private boolean isCurrentAuthenticationAnonymous() {
final Authentication authentication = SecurityContextHolder.getContext().getAuthentication();
return authenticationTrustResolver.isAnonymous(authentication);
}
}
这是一个很小的Spring MVC控制器。对每种方法的视图我们也提供了一些解释。
第7步: 创建模型
package com.yiibai.springmvc.model;
import java.io.Serializable;
import java.util.HashSet;
import java.util.Set;
import javax.persistence.Column;
import javax.persistence.Entity;
import javax.persistence.FetchType;
import javax.persistence.GeneratedValue;
import javax.persistence.GenerationType;
import javax.persistence.Id;
import javax.persistence.JoinColumn;
import javax.persistence.JoinTable;
import javax.persistence.ManyToMany;
import javax.persistence.Table;
import org.hibernate.validator.constraints.NotEmpty;
@Entity
@Table(name="APP_USER")
public class User implements Serializable{
@Id @GeneratedValue(strategy=GenerationType.IDENTITY)
private Integer id;
@NotEmpty
@Column(name="SSO_ID", unique=true, nullable=false)
private String ssoId;
@NotEmpty
@Column(name="PASSWORD", nullable=false)
private String password;
@NotEmpty
@Column(name="FIRST_NAME", nullable=false)
private String firstName;
@NotEmpty
@Column(name="LAST_NAME", nullable=false)
private String lastName;
@NotEmpty
@Column(name="EMAIL", nullable=false)
private String email;
@NotEmpty
@ManyToMany(fetch = FetchType.LAZY)
@JoinTable(name = "APP_USER_USER_PROFILE",
joinColumns = { @JoinColumn(name = "USER_ID") },
inverseJoinColumns = { @JoinColumn(name = "USER_PROFILE_ID") })
private Set<UserProfile> userProfiles = new HashSet<UserProfile>();
public Integer getId() {
return id;
}
public void setId(Integer id) {
this.id = id;
}
public String getSsoId() {
return ssoId;
}
public void setSsoId(String ssoId) {
this.ssoId = ssoId;
}
public String getPassword() {
return password;
}
public void setPassword(String password) {
this.password = password;
}
public String getFirstName() {
return firstName;
}
public void setFirstName(String firstName) {
this.firstName = firstName;
}
public String getLastName() {
return lastName;
}
public void setLastName(String lastName) {
this.lastName = lastName;
}
public String getEmail() {
return email;
}
public void setEmail(String email) {
this.email = email;
}
public Set<UserProfile> getUserProfiles() {
return userProfiles;
}
public void setUserProfiles(Set<UserProfile> userProfiles) {
this.userProfiles = userProfiles;
}
@Override
public int hashCode() {
final int prime = 31;
int result = 1;
result = prime * result + ((id == null) ? 0 : id.hashCode());
result = prime * result + ((ssoId == null) ? 0 : ssoId.hashCode());
return result;
}
@Override
public boolean equals(Object obj) {
if (this == obj)
return true;
if (obj == null)
return false;
if (!(obj instanceof User))
return false;
User other = (User) obj;
if (id == null) {
if (other.id != null)
return false;
} else if (!id.equals(other.id))
return false;
if (ssoId == null) {
if (other.ssoId != null)
return false;
} else if (!ssoId.equals(other.ssoId))
return false;
return true;
}
/*
* DO-NOT-INCLUDE passwords in toString function.
* It is done here just for convenience purpose.
*/
@Override
public String toString() {
return "User [id=" + id + ", ssoId=" + ssoId + ", password=" + password
+ ", firstName=" + firstName + ", lastName=" + lastName
+ ", email=" + email + "]";
}
}
package com.yiibai.springmvc.model;
import java.io.Serializable;
import javax.persistence.Column;
import javax.persistence.Entity;
import javax.persistence.GeneratedValue;
import javax.persistence.GenerationType;
import javax.persistence.Id;
import javax.persistence.Table;
@Entity
@Table(name="USER_PROFILE")
public class UserProfile implements Serializable{
@Id @GeneratedValue(strategy=GenerationType.IDENTITY)
private Integer id;
@Column(name="TYPE", length=15, unique=true, nullable=false)
private String type = UserProfileType.USER.getUserProfileType();
public Integer getId() {
return id;
}
public void setId(Integer id) {
this.id = id;
}
public String getType() {
return type;
}
public void setType(String type) {
this.type = type;
}
@Override
public int hashCode() {
final int prime = 31;
int result = 1;
result = prime * result + ((id == null) ? 0 : id.hashCode());
result = prime * result + ((type == null) ? 0 : type.hashCode());
return result;
}
@Override
public boolean equals(Object obj) {
if (this == obj)
return true;
if (obj == null)
return false;
if (!(obj instanceof UserProfile))
return false;
UserProfile other = (UserProfile) obj;
if (id == null) {
if (other.id != null)
return false;
} else if (!id.equals(other.id))
return false;
if (type == null) {
if (other.type != null)
return false;
} else if (!type.equals(other.type))
return false;
return true;
}
@Override
public String toString() {
return "UserProfile [id=" + id + ", type=" + type + "]";
}
}
package com.yiibai.springmvc.model;
import java.io.Serializable;
public enum UserProfileType implements Serializable{
USER("USER"),
DBA("DBA"),
ADMIN("ADMIN");
String userProfileType;
private UserProfileType(String userProfileType){
this.userProfileType = userProfileType;
}
public String getUserProfileType(){
return userProfileType;
}
}
第7步: 创建DAO
package com.yiibai.springmvc.dao;
import java.io.Serializable;
import java.lang.reflect.ParameterizedType;
import org.hibernate.Criteria;
import org.hibernate.Session;
import org.hibernate.SessionFactory;
import org.springframework.beans.factory.annotation.Autowired;
public abstract class AbstractDao<PK extends Serializable, T> {
private final Class<T> persistentClass;
@SuppressWarnings("unchecked")
public AbstractDao(){
this.persistentClass =(Class<T>) ((ParameterizedType) this.getClass().getGenericSuperclass()).getActualTypeArguments()[1];
}
@Autowired
private SessionFactory sessionFactory;
protected Session getSession(){
return sessionFactory.getCurrentSession();
}
@SuppressWarnings("unchecked")
public T getByKey(PK key) {
return (T) getSession().get(persistentClass, key);
}
public void persist(T entity) {
getSession().persist(entity);
}
public void update(T entity) {
getSession().update(entity);
}
public void delete(T entity) {
getSession().delete(entity);
}
protected Criteria createEntityCriteria(){
return getSession().createCriteria(persistentClass);
}
}
package com.yiibai.springmvc.dao;
import java.util.List;
import com.yiibai.springmvc.model.User;
public interface UserDao {
User findById(int id);
User findBySSO(String sso);
void save(User user);
void deleteBySSO(String sso);
List<User> findAllUsers();
}
package com.yiibai.springmvc.dao;
import java.util.List;
import org.hibernate.Criteria;
import org.hibernate.Hibernate;
import org.hibernate.criterion.Order;
import org.hibernate.criterion.Restrictions;
import org.slf4j.Logger;
import org.slf4j.LoggerFactory;
import org.springframework.stereotype.Repository;
import com.yiibai.springmvc.model.User;
@Repository("userDao")
public class UserDaoImpl extends AbstractDao<Integer, User> implements UserDao {
static final Logger logger = LoggerFactory.getLogger(UserDaoImpl.class);
public User findById(int id) {
User user = getByKey(id);
if(user!=null){
Hibernate.initialize(user.getUserProfiles());
}
return user;
}
public User findBySSO(String sso) {
logger.info("SSO : {}", sso);
Criteria crit = createEntityCriteria();
crit.add(Restrictions.eq("ssoId", sso));
User user = (User)crit.uniqueResult();
if(user!=null){
Hibernate.initialize(user.getUserProfiles());
}
return user;
}
@SuppressWarnings("unchecked")
public List<User> findAllUsers() {
Criteria criteria = createEntityCriteria().addOrder(Order.asc("firstName"));
criteria.setResultTransformer(Criteria.DISTINCT_ROOT_ENTITY);//To avoid duplicates.
List<User> users = (List<User>) criteria.list();
// No need to fetch userProfiles since we are not showing them on list page. Let them lazy load.
// Uncomment below lines for eagerly fetching of userProfiles if you want.
/*
for(User user : users){
Hibernate.initialize(user.getUserProfiles());
}*/
return users;
}
public void save(User user) {
persist(user);
}
public void deleteBySSO(String sso) {
Criteria crit = createEntityCriteria();
crit.add(Restrictions.eq("ssoId", sso));
User user = (User)crit.uniqueResult();
delete(user);
}
}
package com.yiibai.springmvc.dao;
import java.util.List;
import com.yiibai.springmvc.model.UserProfile;
public interface UserProfileDao {
List<UserProfile> findAll();
UserProfile findByType(String type);
UserProfile findById(int id);
}
package com.yiibai.springmvc.dao;
import java.util.List;
import org.hibernate.Criteria;
import org.hibernate.criterion.Order;
import org.hibernate.criterion.Restrictions;
import org.springframework.stereotype.Repository;
import com.yiibai.springmvc.model.UserProfile;
@Repository("userProfileDao")
public class UserProfileDaoImpl extends AbstractDao<Integer, UserProfile>implements UserProfileDao{
public UserProfile findById(int id) {
return getByKey(id);
}
public UserProfile findByType(String type) {
Criteria crit = createEntityCriteria();
crit.add(Restrictions.eq("type", type));
return (UserProfile) crit.uniqueResult();
}
@SuppressWarnings("unchecked")
public List<UserProfile> findAll(){
Criteria crit = createEntityCriteria();
crit.addOrder(Order.asc("type"));
return (List<UserProfile>)crit.list();
}
}
第8步: 创建Services
package com.yiibai.springmvc.service;
import java.util.List;
import com.yiibai.springmvc.model.User;
public interface UserService {
User findById(int id);
User findBySSO(String sso);
void saveUser(User user);
void updateUser(User user);
void deleteUserBySSO(String sso);
List<User> findAllUsers();
boolean isUserSSOUnique(Integer id, String sso);
}
package com.yiibai.springmvc.service;
import java.util.List;
import org.springframework.beans.factory.annotation.Autowired;
import org.springframework.security.crypto.password.PasswordEncoder;
import org.springframework.stereotype.Service;
import org.springframework.transaction.annotation.Transactional;
import com.yiibai.springmvc.dao.UserDao;
import com.yiibai.springmvc.model.User;
@Service("userService")
@Transactional
public class UserServiceImpl implements UserService{
@Autowired
private UserDao dao;
@Autowired
private PasswordEncoder passwordEncoder;
public User findById(int id) {
return dao.findById(id);
}
public User findBySSO(String sso) {
User user = dao.findBySSO(sso);
return user;
}
public void saveUser(User user) {
user.setPassword(passwordEncoder.encode(user.getPassword()));
dao.save(user);
}
/*
* Since the method is running with Transaction, No need to call hibernate update explicitly.
* Just fetch the entity from db and update it with proper values within transaction.
* It will be updated in db once transaction ends.
*/
public void updateUser(User user) {
User entity = dao.findById(user.getId());
if(entity!=null){
entity.setSsoId(user.getSsoId());
if(!user.getPassword().equals(entity.getPassword())){
entity.setPassword(passwordEncoder.encode(user.getPassword()));
}
entity.setFirstName(user.getFirstName());
entity.setLastName(user.getLastName());
entity.setEmail(user.getEmail());
entity.setUserProfiles(user.getUserProfiles());
}
}
public void deleteUserBySSO(String sso) {
dao.deleteBySSO(sso);
}
public List<User> findAllUsers() {
return dao.findAllUsers();
}
public boolean isUserSSOUnique(Integer id, String sso) {
User user = findBySSO(sso);
return ( user == null || ((id != null) && (user.getId() == id)));
}
}
package com.yiibai.springmvc.service;
import java.util.List;
import com.yiibai.springmvc.model.UserProfile;
public interface UserProfileService {
UserProfile findById(int id);
UserProfile findByType(String type);
List<UserProfile> findAll();
}
package com.yiibai.springmvc.service;
import java.util.List;
import org.springframework.beans.factory.annotation.Autowired;
import org.springframework.stereotype.Service;
import org.springframework.transaction.annotation.Transactional;
import com.yiibai.springmvc.dao.UserProfileDao;
import com.yiibai.springmvc.model.UserProfile;
@Service("userProfileService")
@Transactional
public class UserProfileServiceImpl implements UserProfileService{
@Autowired
UserProfileDao dao;
public UserProfile findById(int id) {
return dao.findById(id);
}
public UserProfile findByType(String type){
return dao.findByType(type);
}
public List<UserProfile> findAll() {
return dao.findAll();
}
}
第9步: 创建视图
从登录页面开始,要求输入用户名和密码,以及可选“记住我”的标志。
WEB-INF/views/login.jsp
<%@ page language="java" contentType="text/html; charset=ISO-8859-1" pageEncoding="ISO-8859-1"%>
<%@ page isELIgnored="false" %>
<%@ taglib prefix="c" uri="http://java.sun.com/jsp/jstl/core"%>
<html>
<head>
<meta http-equiv="Content-Type" content="text/html; charset=ISO-8859-1">
<title>Login page</title>
<link href="<c:url value='/static/css/bootstrap.css' />" rel="stylesheet"></link>
<link href="<c:url value='/static/css/app.css' />" rel="stylesheet"></link>
<link rel="stylesheet" type="text/css" href="//cdnjs.cloudflare.com/ajax/libs/font-awesome/4.2.0/css/font-awesome.css" />
</head>
<body>
<div id="mainWrapper">
<div class="login-container">
<div class="login-card">
<div class="login-form">
<c:url var="loginUrl" value="/login" />
<form action="${loginUrl}" method="post" class="form-horizontal">
<c:if test="${param.error != null}">
<div class="alert alert-danger">
<p>Invalid username and password.</p>
</div>
</c:if>
<c:if test="${param.logout != null}">
<div class="alert alert-success">
<p>You have been logged out successfully.</p>
</div>
</c:if>
<div class="input-group input-sm">
<label class="input-group-addon" for="username"><i class="fa fa-user"></i></label>
<input type="text" class="form-control" id="username" name="ssoId" placeholder="Enter Username" required>
</div>
<div class="input-group input-sm">
<label class="input-group-addon" for="password"><i class="fa fa-lock"></i></label>
<input type="password" class="form-control" id="password" name="password" placeholder="Enter Password" required>
</div>
<div class="input-group input-sm">
<div class="checkbox">
<label><input type="checkbox" id="rememberme" name="remember-me"> Remember Me</label>
</div>
</div>
<input type="hidden" name="${_csrf.parameterName}" value="${_csrf.token}" />
<div class="form-actions">
<input type="submit"
class="btn btn-block btn-primary btn-default" value="Log in">
</div>
</form>
</div>
</div>
</div>
</div>
</body>
</html>
当用户登录成功后,将呈现列表页面并显示现有的所有用户。要特别注意下面 Spring Security 标签的使用。添加,编辑和删除的链接/按钮的显示是基于角色,所以‘User’角色的用户不能看到它们。你可能会问:如果直接在浏览器栏输入网址呢?我们已经在 Spring Security 中配置了URL,因此无后顾之忧。
WEB-INF/views/userslist.jsp
<%@ page language="java" contentType="text/html; charset=ISO-8859-1" pageEncoding="ISO-8859-1"%>
<%@ page isELIgnored="false" %>
<%@ taglib prefix="c" uri="http://java.sun.com/jsp/jstl/core" %>
<%@ taglib prefix="sec" uri="http://www.springframework.org/security/tags"%>
<html>
<head>
<meta http-equiv="Content-Type" content="text/html; charset=ISO-8859-1">
<title>Users List</title>
<link href="<c:url value='/static/css/bootstrap.css' />" rel="stylesheet"></link>
<link href="<c:url value='/static/css/app.css' />" rel="stylesheet"></link>
</head>
<body>
<div class="generic-container">
<%@include file="authheader.jsp" %>
<div class="panel panel-default">
<!-- Default panel contents -->
<div class="panel-heading"><span class="lead">List of Users </span></div>
<table class="table table-hover">
<thead>
<tr>
<th>Firstname</th>
<th>Lastname</th>
<th>Email</th>
<th>SSO ID</th>
<sec:authorize access="hasRole('ADMIN') or hasRole('DBA')">
<th width="100"></th>
</sec:authorize>
<sec:authorize access="hasRole('ADMIN')">
<th width="100"></th>
</sec:authorize>
</tr>
</thead>
<tbody>
<c:forEach items="${users}" var="user">
<tr>
<td>${user.firstName}</td>
<td>${user.lastName}</td>
<td>${user.email}</td>
<td>${user.ssoId}</td>
<sec:authorize access="hasRole('ADMIN') or hasRole('DBA')">
<td><a href="<c:url value='/edit-user-${user.ssoId}' />" class="btn btn-success custom-width">edit</a></td>
</sec:authorize>
<sec:authorize access="hasRole('ADMIN')">
<td><a href="<c:url value='/delete-user-${user.ssoId}' />" class="btn btn-danger custom-width">delete</a></td>
</sec:authorize>
</tr>
</c:forEach>
</tbody>
</table>
</div>
<sec:authorize access="hasRole('ADMIN')">
<div class="well">
<a href="<c:url value='/newuser' />">Add New User</a>
</div>
</sec:authorize>
</div>
</body>
</html>
上述页面还包含一个函有欢迎辞和注销链接的JSP页面,如下图所示:
WEB-INF/views/authheader.jsp
<div class="authbar">
<span>Dear <strong>${loggedinuser}</strong>, Welcome to CrazyUsers.</span> <span class="floatRight"><a href="<c:url value="/logout" />">Logout</a></span>
</div>
以“Admin”角色的用户可以添加一个新用户。下面显示出的页面它相同于注册页面。
WEB-INF/views/registration.jsp
<%@ page language="java" contentType="text/html; charset=ISO-8859-1" pageEncoding="ISO-8859-1"%>
<%@ page isELIgnored="false" %>
<%@ taglib prefix="form" uri="http://www.springframework.org/tags/form"%>
<%@ taglib prefix="c" uri="http://java.sun.com/jsp/jstl/core" %>
<html>
<head>
<meta http-equiv="Content-Type" content="text/html; charset=ISO-8859-1">
<title>User Registration Form</title>
<link href="<c:url value='/static/css/bootstrap.css' />" rel="stylesheet"></link>
<link href="<c:url value='/static/css/app.css' />" rel="stylesheet"></link>
</head>
<body>
<div class="generic-container">
<%@include file="authheader.jsp" %>
<div class="well lead">User Registration Form</div>
<form:form method="POST" modelAttribute="user" class="form-horizontal">
<form:input type="hidden" path="id" id="id"/>
<div class="row">
<div class="form-group col-md-12">
<label class="col-md-3 control-lable" for="firstName">First Name</label>
<div class="col-md-7">
<form:input type="text" path="firstName" id="firstName" class="form-control input-sm"/>
<div class="has-error">
<form:errors path="firstName" class="help-inline"/>
</div>
</div>
</div>
</div>
<div class="row">
<div class="form-group col-md-12">
<label class="col-md-3 control-lable" for="lastName">Last Name</label>
<div class="col-md-7">
<form:input type="text" path="lastName" id="lastName" class="form-control input-sm" />
<div class="has-error">
<form:errors path="lastName" class="help-inline"/>
</div>
</div>
</div>
</div>
<div class="row">
<div class="form-group col-md-12">
<label class="col-md-3 control-lable" for="ssoId">SSO ID</label>
<div class="col-md-7">
<c:choose>
<c:when test="${edit}">
<form:input type="text" path="ssoId" id="ssoId" class="form-control input-sm" disabled="true"/>
</c:when>
<c:otherwise>
<form:input type="text" path="ssoId" id="ssoId" class="form-control input-sm" />
<div class="has-error">
<form:errors path="ssoId" class="help-inline"/>
</div>
</c:otherwise>
</c:choose>
</div>
</div>
</div>
<div class="row">
<div class="form-group col-md-12">
<label class="col-md-3 control-lable" for="password">Password</label>
<div class="col-md-7">
<form:input type="password" path="password" id="password" class="form-control input-sm" />
<div class="has-error">
<form:errors path="password" class="help-inline"/>
</div>
</div>
</div>
</div>
<div class="row">
<div class="form-group col-md-12">
<label class="col-md-3 control-lable" for="email">Email</label>
<div class="col-md-7">
<form:input type="text" path="email" id="email" class="form-control input-sm" />
<div class="has-error">
<form:errors path="email" class="help-inline"/>
</div>
</div>
</div>
</div>
<div class="row">
<div class="form-group col-md-12">
<label class="col-md-3 control-lable" for="userProfiles">Roles</label>
<div class="col-md-7">
<form:select path="userProfiles" items="${roles}" multiple="true" itemValue="id" itemLabel="type" class="form-control input-sm" />
<div class="has-error">
<form:errors path="userProfiles" class="help-inline"/>
</div>
</div>
</div>
</div>
<div class="row">
<div class="form-actions floatRight">
<c:choose>
<c:when test="${edit}">
<input type="submit" value="Update" class="btn btn-primary btn-sm"/> or <a href="<c:url value='/list' />">Cancel</a>
</c:when>
<c:otherwise>
<input type="submit" value="Register" class="btn btn-primary btn-sm"/> or <a href="<c:url value='/list' />">Cancel</a>
</c:otherwise>
</c:choose>
</div>
</div>
</form:form>
</div>
</body>
</html>
WEB-INF/views/registrationsuccess.jsp
<%@ page language="java" contentType="text/html; charset=ISO-8859-1" pageEncoding="ISO-8859-1"%>
<%@ page isELIgnored="false" %>
<%@ taglib prefix="c" uri="http://java.sun.com/jsp/jstl/core" %>
<html>
<head>
<meta http-equiv="Content-Type" content="text/html; charset=ISO-8859-1">
<title>Registration Confirmation Page</title>
<link href="<c:url value='/static/css/bootstrap.css' />" rel="stylesheet"></link>
<link href="<c:url value='/static/css/app.css' />" rel="stylesheet"></link>
</head>
<body>
<div class="generic-container">
<%@include file="authheader.jsp" %>
<div class="alert alert-success lead">
${success}
</div>
<span class="well floatRight">
Go to <a href="<c:url value='/list' />">Users List</a>
</span>
</div>
</body>
</html>
如果用户不允许访问某些URL,拒绝访问页面将显示。
WEB-INF/views/accessDenied.jsp
<%@ page language="java" contentType="text/html; charset=ISO-8859-1" pageEncoding="ISO-8859-1"%>
<%@ page isELIgnored="false" %>
<%@ taglib prefix="c" uri="http://java.sun.com/jsp/jstl/core"%>
<html>
<head>
<meta http-equiv="Content-Type" content="text/html; charset=ISO-8859-1">
<title>AccessDenied page</title>
</head>
<body>
<div class="generic-container">
<div class="authbar">
<span>Dear <strong>${loggedinuser}</strong>, You are not authorized to access this page.</span> <span class="floatRight"><a href="<c:url value="/logout" />">Logout</a></span>
</div>
</div>
</body>
</html>
第10步:创建和填充数据库模式
/*All User's gets stored in APP_USER table*/
create table APP_USER (
id BIGINT NOT NULL AUTO_INCREMENT,
sso_id VARCHAR(30) NOT NULL,
password VARCHAR(100) NOT NULL,
first_name VARCHAR(30) NOT NULL,
last_name VARCHAR(30) NOT NULL,
email VARCHAR(30) NOT NULL,
PRIMARY KEY (id),
UNIQUE (sso_id)
);
/* USER_PROFILE table contains all possible roles */
create table USER_PROFILE(
id BIGINT NOT NULL AUTO_INCREMENT,
type VARCHAR(30) NOT NULL,
PRIMARY KEY (id),
UNIQUE (type)
);
/* JOIN TABLE for MANY-TO-MANY relationship*/
CREATE TABLE APP_USER_USER_PROFILE (
user_id BIGINT NOT NULL,
user_profile_id BIGINT NOT NULL,
PRIMARY KEY (user_id, user_profile_id),
CONSTRAINT FK_APP_USER FOREIGN KEY (user_id) REFERENCES APP_USER (id),
CONSTRAINT FK_USER_PROFILE FOREIGN KEY (user_profile_id) REFERENCES USER_PROFILE (id)
);
/* Populate USER_PROFILE Table */
INSERT INTO USER_PROFILE(type)
VALUES ('USER');
INSERT INTO USER_PROFILE(type)
VALUES ('ADMIN');
INSERT INTO USER_PROFILE(type)
VALUES ('DBA');
/* Populate one Admin User which will further create other users for the application using GUI */
INSERT INTO APP_USER(sso_id, password, first_name, last_name, email)
VALUES ('sam','$2a$10$WnZOXD/FO9qZo7aMkzmr.utH/dDH19jTsqJOs2loSnkojh7dRs9cC', 'Sam','Smith','samy@yiibai.com'); /* Populate JOIN Table */
INSERT INTO APP_USER_USER_PROFILE (user_id, user_profile_id)
SELECT user.id, profile.id FROM app_user user, user_profile profile
where user.sso_id='sam' and profile.type='ADMIN';
/* Create persistent_logins Table used to store rememberme related stuff*/
CREATE TABLE persistent_logins (
username VARCHAR(64) NOT NULL,
series VARCHAR(64) NOT NULL,
token VARCHAR(64) NOT NULL,
last_used TIMESTAMP NOT NULL,
PRIMARY KEY (series)
);
请注意,我们要手动插入一个用户(我们需要一个管理员用户来登录应用程序并创建更多的用户)。T这是一个真实世界的场景。请注意,这里是加密密码:“123456” 的结果。它用下述实用类[它甚至可以是一个脚本],它仅仅是用来生成一个初始生成管理员用户的密码。它完全可以从应用程序中删除。
package com.yiibai.springsecurity.util;
import org.springframework.security.crypto.bcrypt.BCryptPasswordEncoder;
public class QuickPasswordEncodingGenerator {
/**
* @param args
*/
public static void main(String[] args) {
String password = "123456";
BCryptPasswordEncoder passwordEncoder = new BCryptPasswordEncoder();
System.out.println(passwordEncoder.encode(password));
}
}
第11步:构建,部署和运行应用程序
现在构造 war(通过 eclipse/m2eclipse)或通过Maven的命令行(mvn clean install)。部署WAR文件到Servlet3.0容器。由于这里我使用的是在 eclipse 中配置 Tomcat,可以直接发布到 Tomcat 服务容器中。如果不知道怎么使用,可以参考:http://www.yiibai.com/maven/create-a-maven-web-project-with-eclipse.html
运行应用程序
打开浏览器并访问 - http://localhost:8080/SpringMVCHibernateWithSpringSecurity/
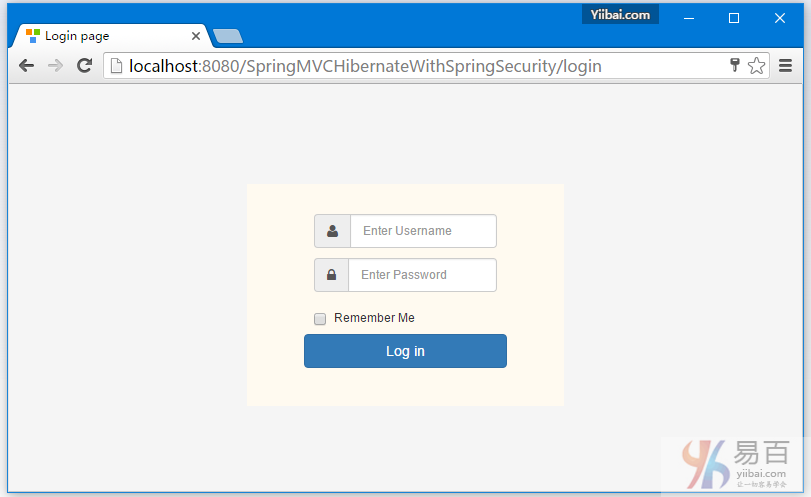
使用用户名:Sam 和密码:123456 来登录,同时选择 “记住我” 。
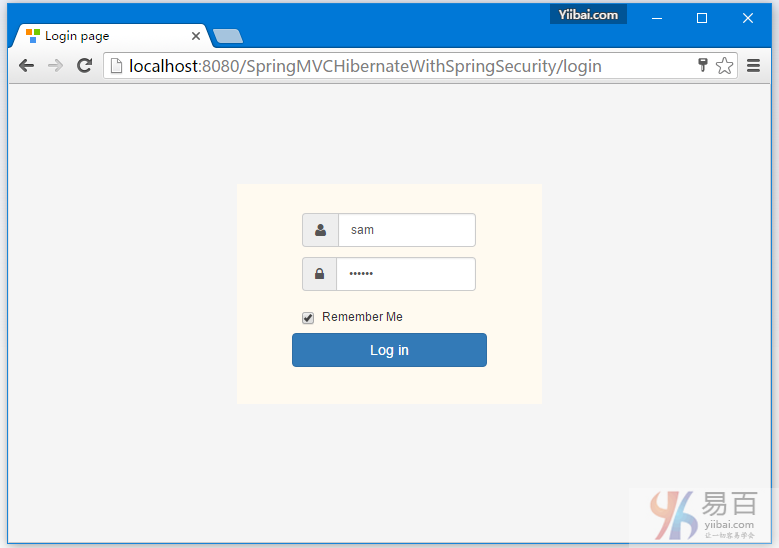
现在查看数据库。应该有一条记录在:persistent_logins表中。
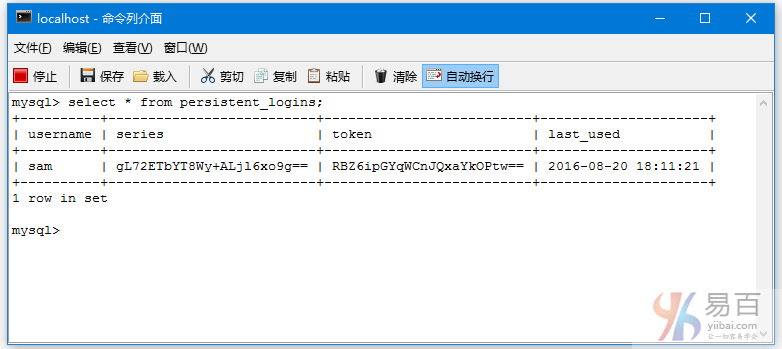
但是对于 APP_USER 表,它没有任何数据上的变化 -
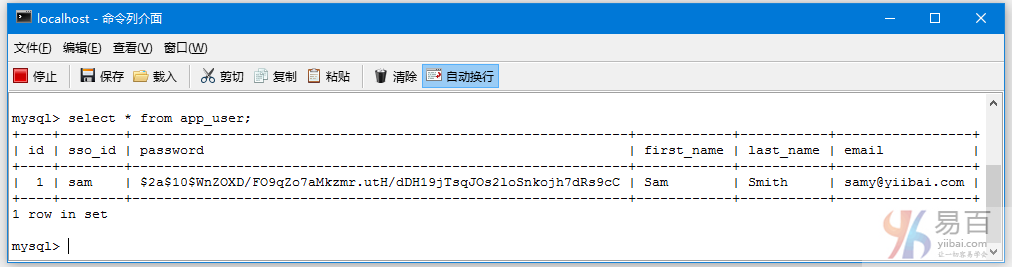
现在,单击 ‘Add new user’ 链接。添加一个 ‘USER’ 角色的用户。如下图中所示 -
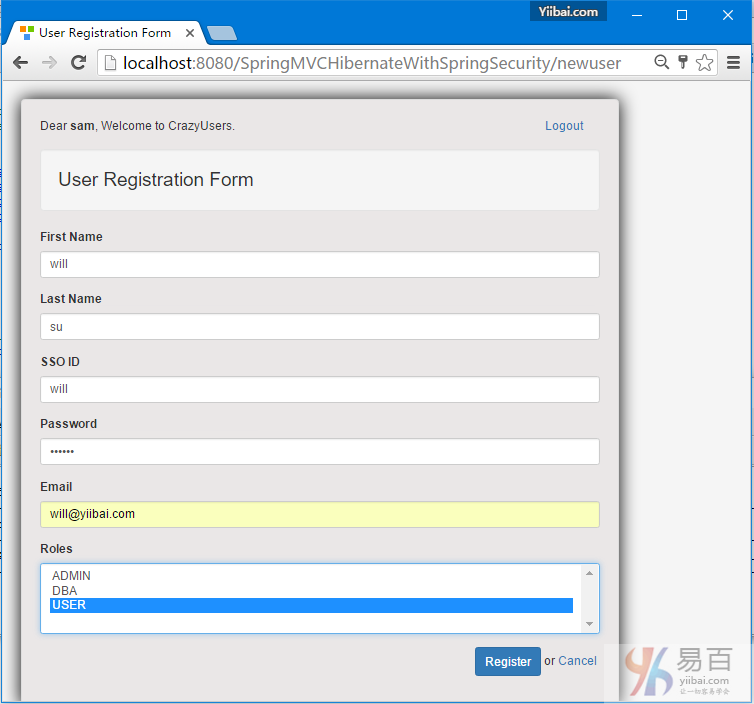
点击注册(Register),用户应该就被添加了。
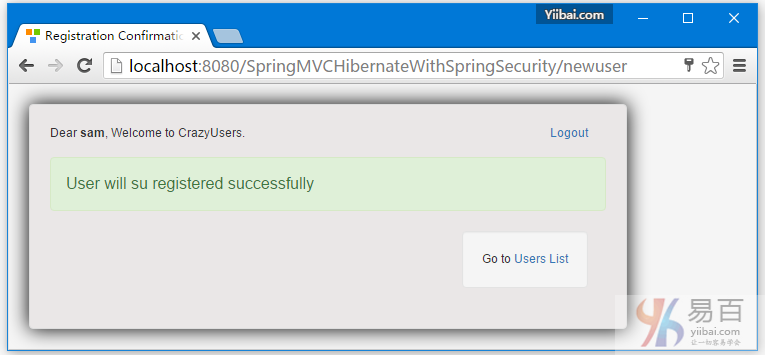
点击 ‘Users List’ 链接。您应该看到刚才新添加的用户信息了。
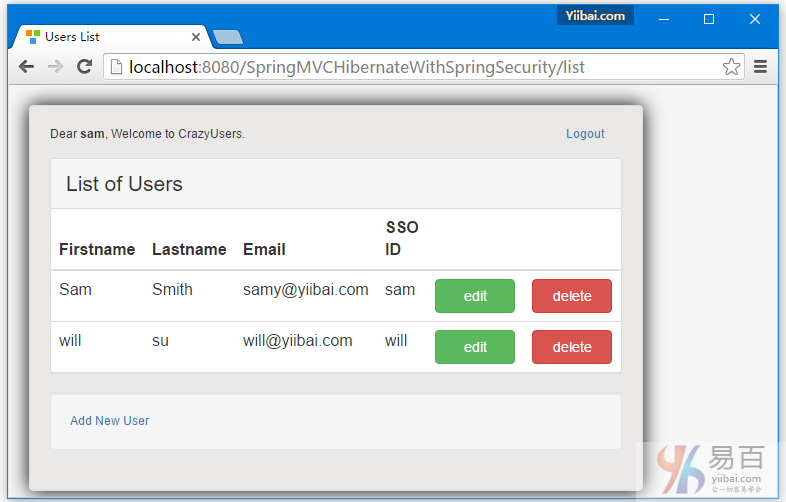
添加另外一个拥有 DBA & USER 角色的用户,如下图中所示 -
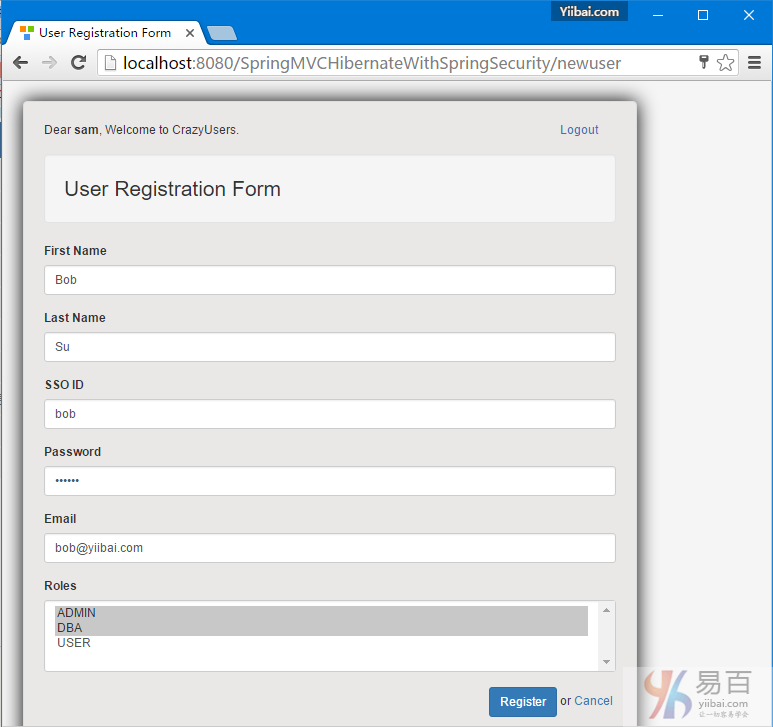
点击“Register",现在我们再来看一下用户列表 -
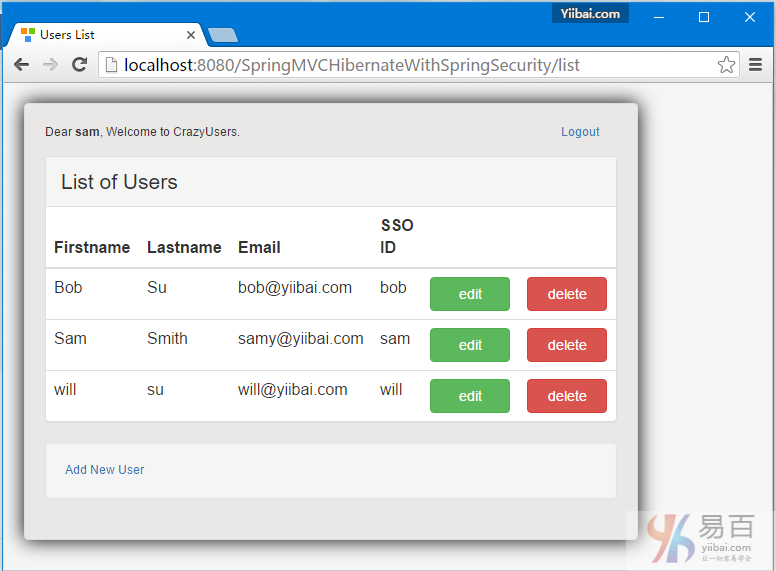
查看验证 APP_USER 表中的数据,如下所示 -
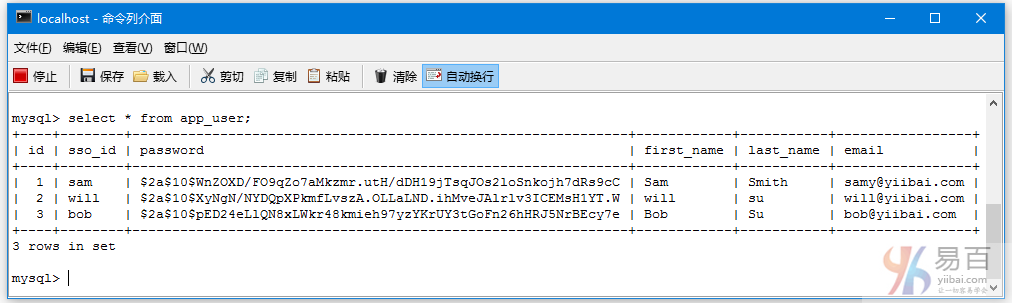
现在注销登录,如下图中所示 -
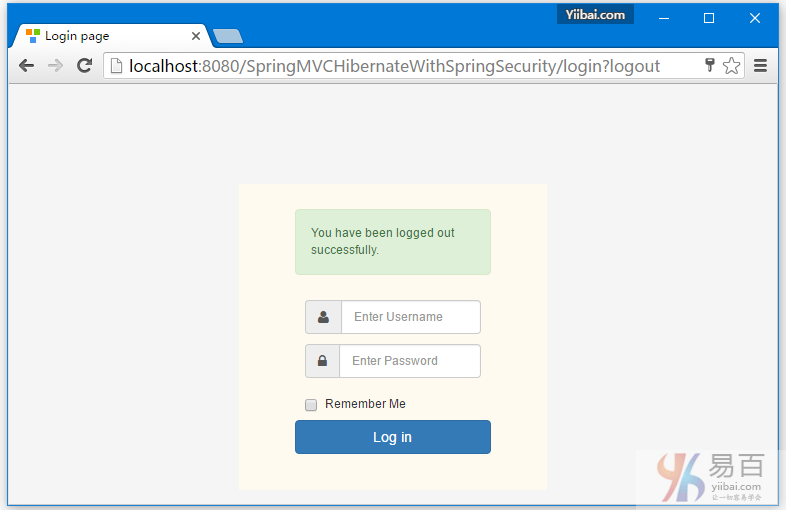
现在查看 persistent_logins 表,登录的相关记录条目应该是被删除了。
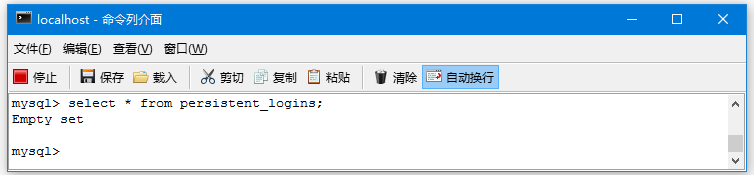
使用用户“will” 作为“USER”角色用户登录。它没有添加/编辑/删除这些操作链接。
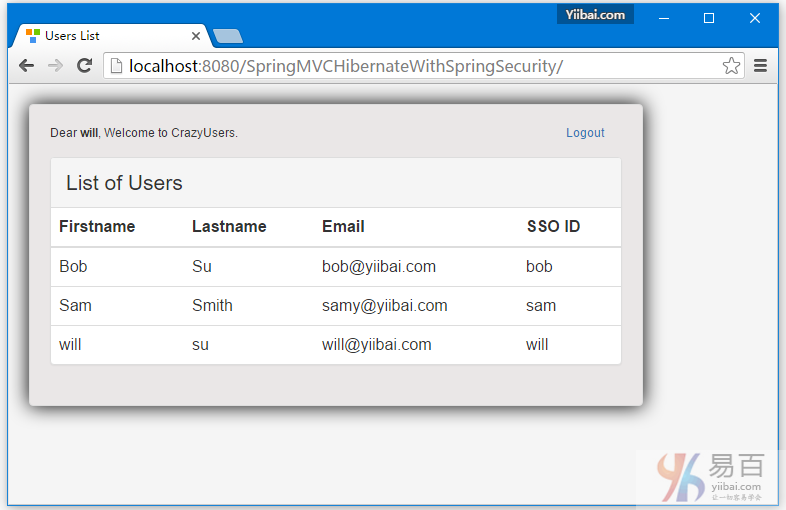
现在,注销并使用‘bob’登录。也没有添加/删除这些操作链接显示给该用户。
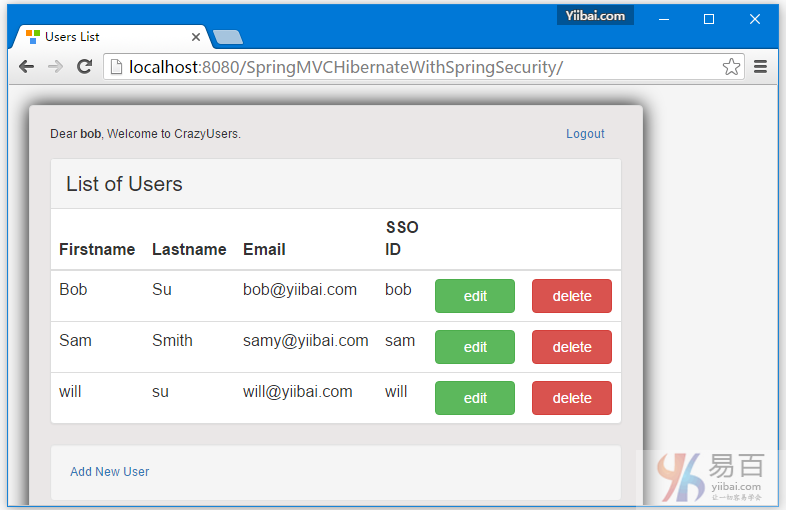
<
现在尝试手动在浏览器栏中输入删除网址URL。您应该看到拒绝访问页面。
本文章教程到此学习完成。正如我们看到的,这是相当简单的一个使用Spring MVC整合的Spring Security。随意评论,并提出改进意见。
下载源代码 - 13-SpringMVCHibernateWithSpringSecurity.zip
参考
本站代码下载:http://www.yiibai.com/siteinfo/download.html
本文属作者原创,转载请注明出处:易百教程 » Spring MVC4 + Spring Security4 + Hibernate实例
Secure Spring REST API使用基本认证 - Spring Security教程™
假设您想保护应用程序的REST API,要怎么做? 有几种流行的方式做到这一点,从基本身份验证到一个完全成熟的OAuth2安全解决方案。 本教程文章中将介绍使用基本安全身份验证,涉及两个独立的客户实例来测试REST API:【Postman和基于Spring RestTemplate的Java应用程序】,现在使用它们来试着访问REST API。我们将在接下来的文章展示 OAuth2 用户相同的例子:使用OAuth2 REST API
与往常一样,完整的代码可以在本文的末尾下载。
如果您正在使用基本身份验证,可查看AngularJS应用基础:AngularJS使用Spring Securyt的基础认证 这篇文章中显示了如何使用AngularJS客户端。
什么是基本身份验证?
如基于Web的客户端的登录页面或会话身份验证的传统方法与人类有良好的互动效果,但并不能完全适合很好地应用,[REST]客户端它不止只一个Web应用程序进行通信时。考虑它是一个完全不同于服务器上的其他API,它随时都会与服务器的API通信,无需任何人为干预。
基本身份验证它提供了一个方法来解决这个问题,虽然不是很安全。基本身份验证,客户端的每个请求发送Base64编码凭据,使用HTTP[授权]头。这意味着每个请求独立于其他请求和服务器可能/不维护客户端,这对可扩展性是非常好的。
在HTTPS个词:对于任何形式的安全实现,从基本身份验证到一个完全成熟的 OAuth2 实现,HTTPS都是具备的。如果没有HTTPS,不管你的实现是什么,安全性是容易受到损害。
下面示出的是准备标头的样本代码。
String plainClientCredentials="myusername:mypassword";
String base64ClientCredentials = new String(Base64.encodeBase64(plainClientCredentials.getBytes()));
HttpHeaders headers = getHeaders();
headers.add("Authorization", "Basic " + base64ClientCredentials);
因而可能会产生这样的结果:
Authorization : Basic bXktdHJ1c3RlZC1jbGllbnQ6c2VjcmV0...
这个头将和每个请求一起发送。由于证书[Base 64编码,甚至不加密]要和每个请求一起发送,这样安全就可能受到损害。为了防止这一点,使用的一种方式是在基本认证时也使用HTTPS。
基本身份验证和Spring Security
有两个步骤,就可以启用基本身份验证在Spring Security配置中。
1. 配置httpBasic : 配置HTTP基本身份验证。 [基于HTTP的XML]
2. 配置有BasicAuthenticationEntryYiibai认证入口点 : 如果验证失败[无效/缺少凭据],这个切入点将被触发。 这是非常重要的,因为我们不想重定向到身份验证失败的登录页面[Spring Security的默认行为] ,因为这里我们没有一个登录页面。
下面显示的是基于HTTP和切入点建立完整的 Spring Security 配置。
package com.yiibai.springmvc.security;
import org.springframework.beans.factory.annotation.Autowired;
import org.springframework.context.annotation.Bean;
import org.springframework.context.annotation.Configuration;
import org.springframework.http.HttpMethod;
import org.springframework.security.config.annotation.authentication.builders.AuthenticationManagerBuilder;
import org.springframework.security.config.annotation.web.builders.HttpSecurity;
import org.springframework.security.config.annotation.web.builders.WebSecurity;
import org.springframework.security.config.annotation.web.configuration.EnableWebSecurity;
import org.springframework.security.config.annotation.web.configuration.WebSecurityConfigurerAdapter;
import org.springframework.security.config.http.SessionCreationPolicy;
@Configuration
@EnableWebSecurity
public class SecurityConfiguration extends WebSecurityConfigurerAdapter {
private static String REALM="MY_TEST_REALM";
@Autowired
public void configureGlobalSecurity(AuthenticationManagerBuilder auth) throws Exception {
auth.inMemoryAuthentication().withUser("bill").password("abc123").roles("ADMIN");
auth.inMemoryAuthentication().withUser("tom").password("abc123").roles("USER");
}
@Override
protected void configure(HttpSecurity http) throws Exception {
http.csrf().disable()
.authorizeRequests()
.antMatchers("/user/**").hasRole("ADMIN")
.and().httpBasic().realmName(REALM).authenticationEntryYiibai(getBasicAuthEntryYiibai())
.and().sessionManagement().sessionCreationPolicy(SessionCreationPolicy.STATELESS);//We don't need sessions to be created.
}
@Bean
public CustomBasicAuthenticationEntryYiibai getBasicAuthEntryYiibai(){
return new CustomBasicAuthenticationEntryYiibai();
}
/* To allow Pre-flight [OPTIONS] request from browser */
@Override
public void configure(WebSecurity web) throws Exception {
web.ignoring().antMatchers(HttpMethod.OPTIONS, "/**");
}
}
而从实际的切入点,如果验证失败将触发程序处理。您可以自定义它来响应发送自定义的内容。
package com.yiibai.springmvc.security;
import java.io.IOException;
import java.io.PrintWriter;
import javax.servlet.ServletException;
import javax.servlet.http.HttpServletRequest;
import javax.servlet.http.HttpServletResponse;
import org.springframework.security.core.AuthenticationException;
import org.springframework.security.web.authentication.www.BasicAuthenticationEntryYiibai;
public class CustomBasicAuthenticationEntryYiibai extends BasicAuthenticationEntryYiibai {
@Override
public void commence(final HttpServletRequest request,
final HttpServletResponse response,
final AuthenticationException authException) throws IOException, ServletException {
//Authentication failed, send error response.
response.setStatus(HttpServletResponse.SC_UNAUTHORIZED);
response.addHeader("WWW-Authenticate", "Basic realm=" + getRealmName() + "");
PrintWriter writer = response.getWriter();
writer.println("HTTP Status 401 : " + authException.getMessage());
}
@Override
public void afterPropertiesSet() throws Exception {
setRealmName("MY_TEST_REALM");
super.afterPropertiesSet();
}
}
这就是需要配置基本安全。现在,让我们来看看动作中的一切,这里用之前老的REST API:
REST API
简单的Spring REST API,它的服务器用户(客户可以使用标准的HTML动词,符合REST风格来执行CRUD操作。
package com.yiibai.springmvc.controller;
import java.util.List;
import org.springframework.beans.factory.annotation.Autowired;
import org.springframework.http.HttpHeaders;
import org.springframework.http.HttpStatus;
import org.springframework.http.MediaType;
import org.springframework.http.ResponseEntity;
import org.springframework.web.bind.annotation.PathVariable;
import org.springframework.web.bind.annotation.RequestBody;
import org.springframework.web.bind.annotation.RequestMapping;
import org.springframework.web.bind.annotation.RequestMethod;
import org.springframework.web.bind.annotation.RestController;
import org.springframework.web.util.UriComponentsBuilder;
import com.yiibai.springmvc.model.User;
import com.yiibai.springmvc.service.UserService;
@RestController
public class HelloWorldRestController {
@Autowired
UserService userService; //Service which will do all data retrieval/manipulation work
//-------------------Retrieve All Users--------------------------------------------------------
@RequestMapping(value = "/user/", method = RequestMethod.GET)
public ResponseEntity<List<User>> listAllUsers() {
List<User> users = userService.findAllUsers();
if(users.isEmpty()){
return new ResponseEntity<List<User>>(HttpStatus.NO_CONTENT);//You many decide to return HttpStatus.NOT_FOUND
}
return new ResponseEntity<List<User>>(users, HttpStatus.OK);
}
//-------------------Retrieve Single User--------------------------------------------------------
@RequestMapping(value = "/user/{id}", method = RequestMethod.GET, produces = {MediaType.APPLICATION_JSON_VALUE,MediaType.APPLICATION_XML_VALUE})
public ResponseEntity<User> getUser(@PathVariable("id") long id) {
System.out.println("Fetching User with id " + id);
User user = userService.findById(id);
if (user == null) {
System.out.println("User with id " + id + " not found");
return new ResponseEntity<User>(HttpStatus.NOT_FOUND);
}
return new ResponseEntity<User>(user, HttpStatus.OK);
}
//-------------------Create a User--------------------------------------------------------
@RequestMapping(value = "/user/", method = RequestMethod.POST)
public ResponseEntity<Void> createUser(@RequestBody User user, UriComponentsBuilder ucBuilder) {
System.out.println("Creating User " + user.getName());
if (userService.isUserExist(user)) {
System.out.println("A User with name " + user.getName() + " already exist");
return new ResponseEntity<Void>(HttpStatus.CONFLICT);
}
userService.saveUser(user);
HttpHeaders headers = new HttpHeaders();
headers.setLocation(ucBuilder.path("/user/{id}").buildAndExpand(user.getId()).toUri());
return new ResponseEntity<Void>(headers, HttpStatus.CREATED);
}
//------------------- Update a User --------------------------------------------------------
@RequestMapping(value = "/user/{id}", method = RequestMethod.PUT)
public ResponseEntity<User> updateUser(@PathVariable("id") long id, @RequestBody User user) {
System.out.println("Updating User " + id);
User currentUser = userService.findById(id);
if (currentUser==null) {
System.out.println("User with id " + id + " not found");
return new ResponseEntity<User>(HttpStatus.NOT_FOUND);
}
currentUser.setName(user.getName());
currentUser.setAge(user.getAge());
currentUser.setSalary(user.getSalary());
userService.updateUser(currentUser);
return new ResponseEntity<User>(currentUser, HttpStatus.OK);
}
//------------------- Delete a User --------------------------------------------------------
@RequestMapping(value = "/user/{id}", method = RequestMethod.DELETE)
public ResponseEntity<User> deleteUser(@PathVariable("id") long id) {
System.out.println("Fetching & Deleting User with id " + id);
User user = userService.findById(id);
if (user == null) {
System.out.println("Unable to delete. User with id " + id + " not found");
return new ResponseEntity<User>(HttpStatus.NOT_FOUND);
}
userService.deleteUserById(id);
return new ResponseEntity<User>(HttpStatus.NO_CONTENT);
}
//------------------- Delete All Users --------------------------------------------------------
@RequestMapping(value = "/user/", method = RequestMethod.DELETE)
public ResponseEntity<User> deleteAllUsers() {
System.out.println("Deleting All Users");
userService.deleteAllUsers();
return new ResponseEntity<User>(HttpStatus.NO_CONTENT);
}
}
运行应用程序
构建和部署应用程序到Web容器[例如Tomcat]。运行它,并使用两种不同的客户端进行测试。
使用客户1: Postman
发送一个请求来获取用户列表。请求URL:http://localhost:8080/SecureRESTApiWithBasicAuthentication/user/,将会得到一个401。
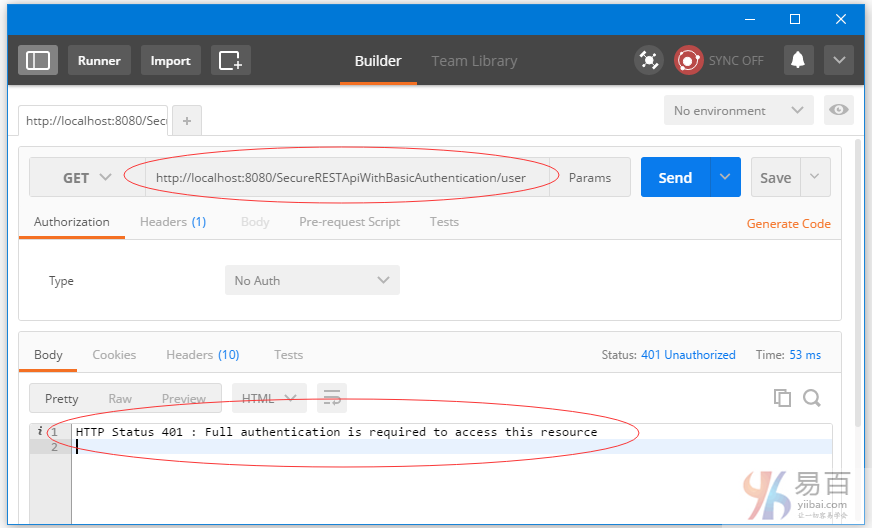
现在,从下拉列表中选择类型(Type)为 ‘Basic Auth’,填写用户名/密码[bill/abc123],,点击 ‘update request’。如下图中所示 -
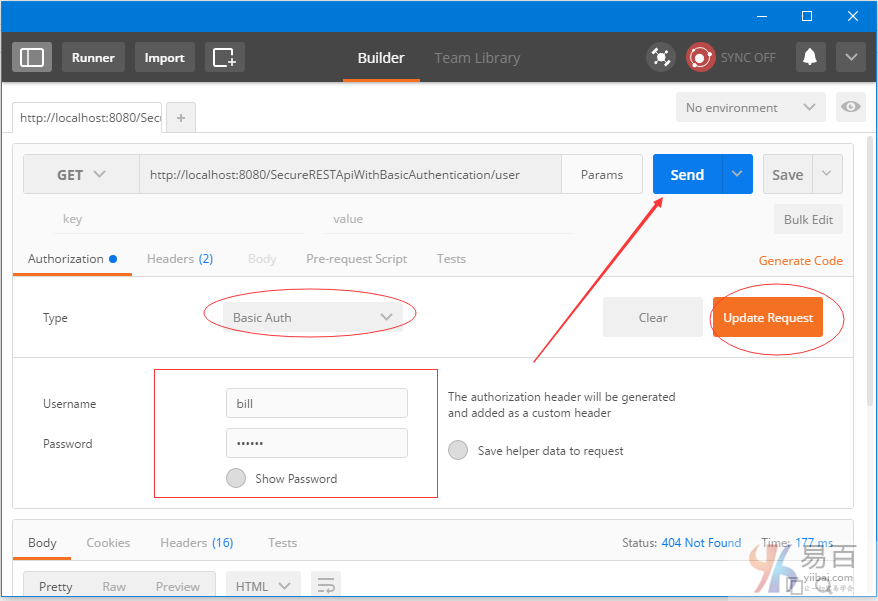
点击头(Headers )标签。您应该看到新的头。让我们添加“Accept”头以及执行JSON响应。如下图中所示 -
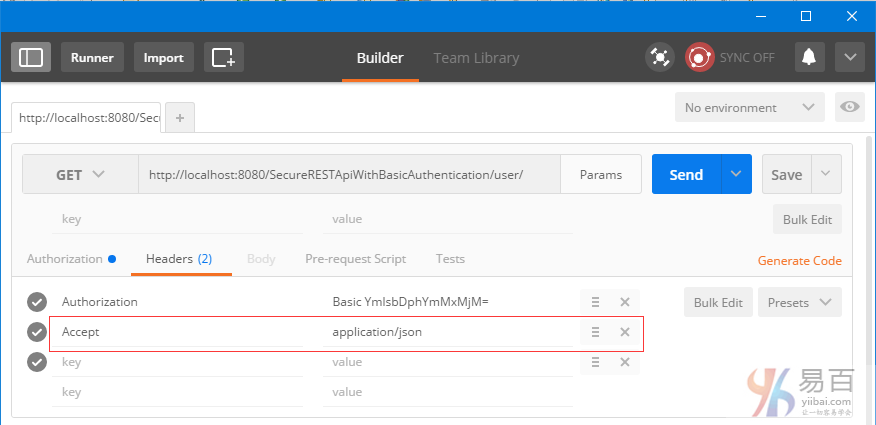
现在发送请求。这个时候您应该看到响应的用户列表了。
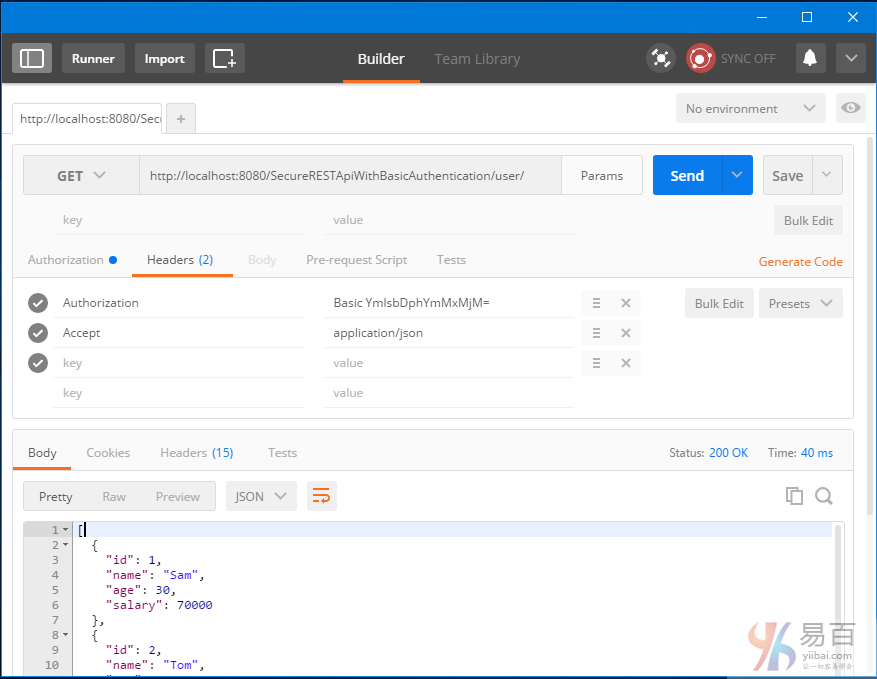
使用客户端2:基于RestTemplate Java应用程序
让我们用一个完全成熟的Java客户端来访问REST API。我们将使用Spring RestTemplate 发送请求。以了解我们如何为每个请求设置请求头,发送请求之前要特别注意。
package com.yiibai.springmvc;
import java.net.URI;
import java.util.Arrays;
import java.util.LinkedHashMap;
import java.util.List;
import org.apache.commons.codec.binary.Base64;
import org.springframework.http.HttpEntity;
import org.springframework.http.HttpHeaders;
import org.springframework.http.HttpMethod;
import org.springframework.http.MediaType;
import org.springframework.http.ResponseEntity;
import org.springframework.web.client.RestTemplate;
import com.yiibai.springmvc.model.User;
public class SpringRestClient {
public static final String REST_SERVICE_URI = "http://localhost:8080/SecureRESTApiWithBasicAuthentication";
/*
* Add HTTP Authorization header, using Basic-Authentication to send user-credentials.
*/
private static HttpHeaders getHeaders(){
String plainCredentials="bill:abc123";
String base64Credentials = new String(Base64.encodeBase64(plainCredentials.getBytes()));
HttpHeaders headers = new HttpHeaders();
headers.add("Authorization", "Basic " + base64Credentials);
headers.setAccept(Arrays.asList(MediaType.APPLICATION_JSON));
return headers;
}
/*
* Send a GET request to get list of all users.
*/
@SuppressWarnings("unchecked")
private static void listAllUsers(){
System.out.println("\nTesting listAllUsers API-----------");
RestTemplate restTemplate = new RestTemplate();
HttpEntity<String> request = new HttpEntity<String>(getHeaders());
ResponseEntity<List> response = restTemplate.exchange(REST_SERVICE_URI+"/user/", HttpMethod.GET, request, List.class);
List<LinkedHashMap<String, Object>> usersMap = (List<LinkedHashMap<String, Object>>)response.getBody();
if(usersMap!=null){
for(LinkedHashMap<String, Object> map : usersMap){
System.out.println("User : id="+map.get("id")+", Name="+map.get("name")+", Age="+map.get("age")+", Salary="+map.get("salary"));;
}
}else{
System.out.println("No user exist----------");
}
}
/*
* Send a GET request to get a specific user.
*/
private static void getUser(){
System.out.println("\nTesting getUser API----------");
RestTemplate restTemplate = new RestTemplate();
HttpEntity<String> request = new HttpEntity<String>(getHeaders());
ResponseEntity<User> response = restTemplate.exchange(REST_SERVICE_URI+"/user/1", HttpMethod.GET, request, User.class);
User user = response.getBody();
System.out.println(user);
}
/*
* Send a POST request to create a new user.
*/
private static void createUser() {
System.out.println("\nTesting create User API----------");
RestTemplate restTemplate = new RestTemplate();
User user = new User(0,"Sarah",51,134);
HttpEntity<Object> request = new HttpEntity<Object>(user, getHeaders());
URI uri = restTemplate.postForLocation(REST_SERVICE_URI+"/user/", request, User.class);
System.out.println("Location : "+uri.toASCIIString());
}
/*
* Send a PUT request to update an existing user.
*/
private static void updateUser() {
System.out.println("\nTesting update User API----------");
RestTemplate restTemplate = new RestTemplate();
User user = new User(1,"Tomy",33, 70000);
HttpEntity<Object> request = new HttpEntity<Object>(user, getHeaders());
ResponseEntity<User> response = restTemplate.exchange(REST_SERVICE_URI+"/user/1", HttpMethod.PUT, request, User.class);
System.out.println(response.getBody());
}
/*
* Send a DELETE request to delete a specific user.
*/
private static void deleteUser() {
System.out.println("\nTesting delete User API----------");
RestTemplate restTemplate = new RestTemplate();
HttpEntity<String> request = new HttpEntity<String>(getHeaders());
restTemplate.exchange(REST_SERVICE_URI+"/user/3", HttpMethod.DELETE, request, User.class);
}
/*
* Send a DELETE request to delete all users.
*/
private static void deleteAllUsers() {
System.out.println("\nTesting all delete Users API----------");
RestTemplate restTemplate = new RestTemplate();
HttpEntity<String> request = new HttpEntity<String>(getHeaders());
restTemplate.exchange(REST_SERVICE_URI+"/user/", HttpMethod.DELETE, request, User.class);
}
public static void main(String args[]){
listAllUsers();
getUser();
createUser();
listAllUsers();
updateUser();
listAllUsers();
deleteUser();
listAllUsers();
deleteAllUsers();
listAllUsers();
}
}
看到上面程序的输出是:
Testing listAllUsers API-----------
User : id=1, Name=Sam, Age=30, Salary=70000.0
User : id=2, Name=Tom, Age=40, Salary=50000.0
User : id=3, Name=Jerome, Age=45, Salary=30000.0
User : id=4, Name=Silvia, Age=50, Salary=40000.0
Testing getUser API----------
User [id=1, name=Sam, age=30, salary=70000.0]
Testing create User API----------
Location : http://localhost:8080/SecureRESTApiWithBasicAuthentication/user/5
Testing listAllUsers API-----------
User : id=1, Name=Sam, Age=30, Salary=70000.0
User : id=2, Name=Tom, Age=40, Salary=50000.0
User : id=3, Name=Jerome, Age=45, Salary=30000.0
User : id=4, Name=Silvia, Age=50, Salary=40000.0
User : id=5, Name=Sarah, Age=51, Salary=134.0
Testing update User API----------
User [id=1, name=Tomy, age=33, salary=70000.0]
Testing listAllUsers API-----------
User : id=1, Name=Tomy, Age=33, Salary=70000.0
User : id=2, Name=Tom, Age=40, Salary=50000.0
User : id=3, Name=Jerome, Age=45, Salary=30000.0
User : id=4, Name=Silvia, Age=50, Salary=40000.0
User : id=5, Name=Sarah, Age=51, Salary=134.0
Testing delete User API----------
Testing listAllUsers API-----------
User : id=1, Name=Tomy, Age=33, Salary=70000.0
User : id=2, Name=Tom, Age=40, Salary=50000.0
User : id=4, Name=Silvia, Age=50, Salary=40000.0
User : id=5, Name=Sarah, Age=51, Salary=134.0
Testing all delete Users API----------
Testing listAllUsers API-----------
No user exist----------
在本实例中所使用的服务如下。完整的代码可以在本文章的结尾部分下载。
package com.yiibai.springmvc.service;
import java.util.ArrayList;
import java.util.Iterator;
import java.util.List;
import java.util.concurrent.atomic.AtomicLong;
import org.springframework.stereotype.Service;
import com.yiibai.springmvc.model.User;
@Service("userService")
public class UserServiceImpl implements UserService{
private static final AtomicLong counter = new AtomicLong();
private static List<User> users;
static{
users= populateDummyUsers();
}
public List<User> findAllUsers() {
return users;
}
public User findById(long id) {
for(User user : users){
if(user.getId() == id){
return user;
}
}
return null;
}
public User findByName(String name) {
for(User user : users){
if(user.getName().equalsIgnoreCase(name)){
return user;
}
}
return null;
}
public void saveUser(User user) {
user.setId(counter.incrementAndGet());
users.add(user);
}
public void updateUser(User user) {
int index = users.indexOf(user);
users.set(index, user);
}
public void deleteUserById(long id) {
for (Iterator<User> iterator = users.iterator(); iterator.hasNext(); ) {
User user = iterator.next();
if (user.getId() == id) {
iterator.remove();
}
}
}
public boolean isUserExist(User user) {
return findByName(user.getName())!=null;
}
public void deleteAllUsers(){
users.clear();
}
private static List<User> populateDummyUsers(){
List<User> users = new ArrayList<User>();
users.add(new User(counter.incrementAndGet(),"Sam",30, 70000));
users.add(new User(counter.incrementAndGet(),"Tom",40, 50000));
users.add(new User(counter.incrementAndGet(),"Jerome",45, 30000));
users.add(new User(counter.incrementAndGet(),"Silvia",50, 40000));
return users;
}
}
工程目录结构
最后,下面示出的是本例项目的结构。
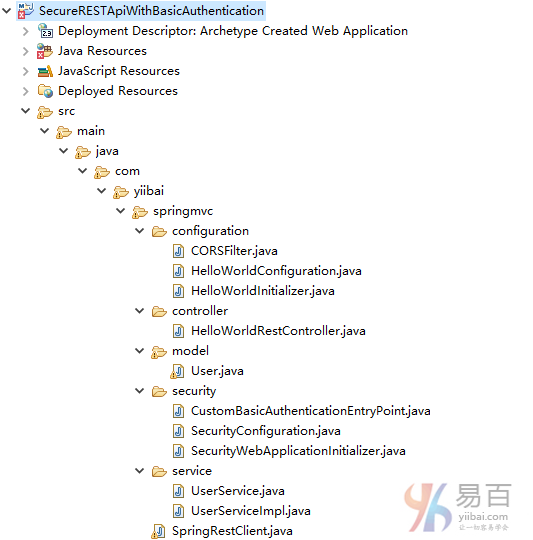
下载源代码
SecureRESTApiWithBasicAuthentication.zip
参考
本站代码下载:http://www.yiibai.com/siteinfo/download.html
本文属作者原创,转载请注明出处:易百教程 » Secure Spring REST API使用基本认证
AngularJS+Spring Security使用基本身份验证 - Spring Security教程™
这篇文章演示AngularJS应用程序如何消耗REST API,它使用Spring Security的基本身份验证。
Secure Spring REST API使用基本身份验证这篇文章中演示了如何使用Spring Security基本身份验证细节。 这个应用程序将作为这个例子的后端。虽然我们只在这里接触到一些主要概念,对于后端完整的代码不会在这里再重复。所以您可以自行下载,安装并在本地启动,以便测试这个AngularJS应用程序。
这里我们将主要集中在前端功能,这是一个纯粹的AngularJS应用程序,它能与REST API有很好地通信。现在访问:http://localhost:8080/AngularClientWithBasicAuth/
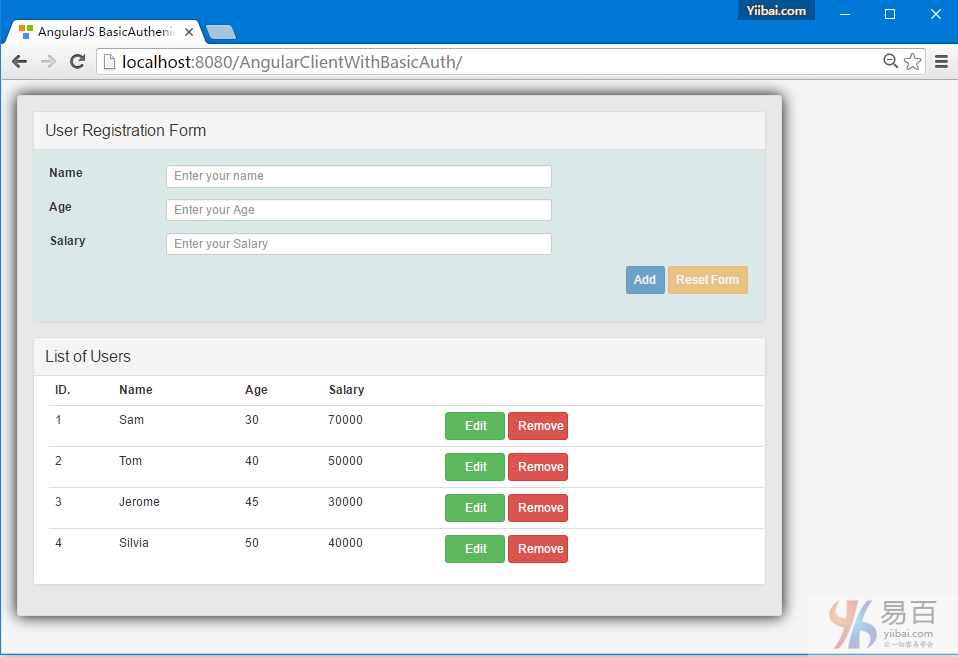
什么是基本身份验证?
如基于Web的客户端的登录页面或会话身份验证的传统方法与人类有良好的互动效果,但并不能完全适合很好地应用,[REST]客户端它不止只一个Web应用程序进行通信时。考虑它是一个完全不同于服务器上的其他API,它随时都会与服务器的API通信,无需任何人为干预。
基本身份验证它提供了一个方法来解决这个问题,虽然不是很安全。基本身份验证,客户端的每个请求发送Base64编码凭据,使用HTTP[授权]头。这意味着每个请求独立于其他请求和服务器可能/不维护客户端,这对可扩展性是非常好的。
前端部分
1.每个请求使用AngularJS发送Authorization头
由于认证头需要在每个请求时发送,拦截器是一个不错的选择用来处理这些请求,而不用手动指定所有 $HTTP头的方法。
authInterceptor.js
angular.module('myApp')
.factory('AuthInterceptor', [function() {
return {
// Send the Authorization header with each request
'request': function(config) {
config.headers = config.headers || {};
var encodedString = btoa("bill:abc123");
config.headers.Authorization = 'Basic '+encodedString;
return config;
}
};
}]);
请注意:我们如何使用 btoa() 函数来获得用户的Base64编码字符串的凭据。这就是我们需要启用基本身份验证。应用程序的其余部分是典型的与服务器REST API通信的AngularJS应用程序。现在,这个拦截器需要使用AngularJS注册,如下图所示。
2. 应用程序
app.js
'use strict';
var App = angular.module('myApp',[]);
App.config(['$httpProvider', function($httpProvider) {
$httpProvider.interceptors.push('AuthInterceptor');
}]);
3. 服务与服务器上的REST API通信
由于拦截器,服务被单独管理,以下服务不涉及任何安全相关的东西。
UserService.js
'use strict';
angular.module('myApp').factory('UserService', ['$http', '$q', function($http, $q){
var REST_SERVICE_URI = 'http://localhost:8080/SecureRESTApiWithBasicAuthentication/user/';
var factory = {
fetchAllUsers: fetchAllUsers,
createUser: createUser,
updateUser:updateUser,
deleteUser:deleteUser
};
return factory;
function fetchAllUsers() {
var deferred = $q.defer();
$http.get(REST_SERVICE_URI)
.then(
function (response) {
deferred.resolve(response.data);
},
function(errResponse){
console.error('Error while fetching Users');
deferred.reject(errResponse);
}
);
return deferred.promise;
}
function createUser(user) {
var deferred = $q.defer();
$http.post(REST_SERVICE_URI, user)
.then(
function (response) {
deferred.resolve(response.data);
},
function(errResponse){
console.error('Error while creating User');
deferred.reject(errResponse);
}
);
return deferred.promise;
}
function updateUser(user, id) {
var deferred = $q.defer();
$http.put(REST_SERVICE_URI+id, user)
.then(
function (response) {
deferred.resolve(response.data);
},
function(errResponse){
console.error('Error while updating User');
deferred.reject(errResponse);
}
);
return deferred.promise;
}
function deleteUser(id) {
var deferred = $q.defer();
$http.delete(REST_SERVICE_URI+id)
.then(
function (response) {
deferred.resolve(response.data);
},
function(errResponse){
console.error('Error while deleting User');
deferred.reject(errResponse);
}
);
return deferred.promise;
}
}]);
4. 控制器
user_controller.js
'use strict';
angular.module('myApp').controller('UserController', ['$scope', 'UserService', function($scope, UserService) {
var self = this;
self.user={id:null,username:'',address:'',email:''};
self.users=[];
self.submit = submit;
self.edit = edit;
self.remove = remove;
self.reset = reset;
fetchAllUsers();
function fetchAllUsers(){
UserService.fetchAllUsers()
.then(
function(d) {
self.users = d;
},
function(errResponse){
console.error('Error while fetching Users');
}
);
}
function createUser(user){
UserService.createUser(user)
.then(
fetchAllUsers,
function(errResponse){
console.error('Error while creating User');
}
);
}
function updateUser(user, id){
UserService.updateUser(user, id)
.then(
fetchAllUsers,
function(errResponse){
console.error('Error while updating User');
}
);
}
function deleteUser(id){
UserService.deleteUser(id)
.then(
fetchAllUsers,
function(errResponse){
console.error('Error while deleting User');
}
);
}
function submit() {
if(self.user.id===null){
console.log('Saving New User', self.user);
createUser(self.user);
}else{
updateUser(self.user, self.user.id);
console.log('User updated with id ', self.user.id);
}
reset();
}
function edit(id){
console.log('id to be edited', id);
for(var i = 0; i < self.users.length; i++){
if(self.users[i].id === id) {
self.user = angular.copy(self.users[i]);
break;
}
}
}
function remove(id){
console.log('id to be deleted', id);
if(self.user.id === id) {//clean form if the user to be deleted is shown there.
reset();
}
deleteUser(id);
}
function reset(){
self.user={id:null,username:'',address:'',email:''};
$scope.myForm.$setPristine(); //reset Form
}
}]);
5. 视图
index.html
<html>
<head>
<title>Form Demo</title>
<style>
.username.ng-valid {
background-color: lightgreen;
}
.username.ng-dirty.ng-invalid-required {
background-color: red;
}
.username.ng-dirty.ng-invalid-minlength {
background-color: yellow;
}
.email.ng-valid {
background-color: lightgreen;
}
.email.ng-dirty.ng-invalid-required {
background-color: red;
}
.email.ng-dirty.ng-invalid-email {
background-color: yellow;
}
</style>
<link rel="stylesheet" href="https://maxcdn.bootstrapcdn.com/bootstrap/3.3.5/css/bootstrap.min.css">
<link rel="stylesheet" href="./css/app.css">
</head>
<body ng-app="myApp">
<div class="generic-container" ng-controller="UserController as ctrl">
<div class="panel panel-default">
<div class="panel-heading"><span class="lead">User Registration Form </span></div>
<div class="formcontainer">
<form ng-submit="ctrl.submit()" name="myForm" class="form-horizontal">
<input type="hidden" ng-model="ctrl.user.id" />
<div class="row">
<div class="form-group col-md-12">
<label class="col-md-2 control-lable" for="uname">Name</label>
<div class="col-md-7">
<input type="text" ng-model="ctrl.user.name" id="uname" class="username form-control input-sm" placeholder="Enter your name" required ng-minlength="3"/>
<div class="has-error" ng-show="myForm.$dirty">
<span ng-show="myForm.uname.$error.required">This is a required field</span>
<span ng-show="myForm.uname.$error.minlength">Minimum length required is 3</span>
<span ng-show="myForm.uname.$invalid">This field is invalid </span>
</div>
</div>
</div>
</div>
<div class="row">
<div class="form-group col-md-12">
<label class="col-md-2 control-lable" for="age">Age</label>
<div class="col-md-7">
<input type="number" ng-model="ctrl.user.age" id="age" class="form-control input-sm" placeholder="Enter your Age"/>
</div>
</div>
</div>
<div class="row">
<div class="form-group col-md-12">
<label class="col-md-2 control-lable" for="salary">Salary</label>
<div class="col-md-7">
<input type="number" ng-model="ctrl.user.salary" id="salary" class="form-control input-sm" placeholder="Enter your Salary" ng-pattern="/^[0-9]+(\.[0-9]{1,2})?$/" step="0.01" required/>
<div class="has-error" ng-show="myForm.$dirty">
<span ng-show="myForm.salary.$error.required">This is a required field</span>
<span ng-show="myForm.salary.$invalid">This field is invalid </span>
</div>
</div>
</div>
</div>
<div class="row">
<div class="form-actions floatRight">
<input type="submit" value="{{!ctrl.user.id ? 'Add' : 'Update'}}" class="btn btn-primary btn-sm" ng-disabled="myForm.$invalid">
<button type="button" ng-click="ctrl.reset()" class="btn btn-warning btn-sm" ng-disabled="myForm.$pristine">Reset Form</button>
</div>
</div>
</form>
</div>
</div>
<div class="panel panel-default">
<!-- Default panel contents -->
<div class="panel-heading"><span class="lead">List of Users </span></div>
<div class="tablecontainer">
<table class="table table-hover">
<thead>
<tr>
<th>ID.</th>
<th>Name</th>
<th>Age</th>
<th>Salary</th>
<th width="100">
</tr>
</thead>
<tbody>
<tr ng-repeat="u in ctrl.users">
<td><span ng-bind="u.id"></span></td>
<td><span ng-bind="u.name"></span></td>
<td><span ng-bind="u.age"></span></td>
<td><span ng-bind="u.salary"></span></td>
<td>
<button type="button" ng-click="ctrl.edit(u.id)" class="btn btn-success custom-width">Edit</button> <button type="button" ng-click="ctrl.remove(u.id)" class="btn btn-danger custom-width">Remove</button>
</tr>
</tbody>
</table>
</div>
</div>
</div>
<script src="https://ajax.googleapis.com/ajax/libs/angularjs/1.4.4/angular.js"></script>
<script src="./js/app.js"></script>
<script src="./js/authInterceptor.js"></script>
<script src="./js/user_service.js"></script>
<script src="./js/user_controller.js"></script>
</body>
</html>
后端程序
1. REST API
下面显示的是 Angular 应用程序,它将用于和REST API通信。
package com.yiibai.springmvc.controller;
import java.util.List;
import org.springframework.beans.factory.annotation.Autowired;
import org.springframework.http.HttpHeaders;
import org.springframework.http.HttpStatus;
import org.springframework.http.MediaType;
import org.springframework.http.ResponseEntity;
import org.springframework.web.bind.annotation.PathVariable;
import org.springframework.web.bind.annotation.RequestBody;
import org.springframework.web.bind.annotation.RequestMapping;
import org.springframework.web.bind.annotation.RequestMethod;
import org.springframework.web.bind.annotation.RestController;
import org.springframework.web.util.UriComponentsBuilder;
import com.yiibai.springmvc.model.User;
import com.yiibai.springmvc.service.UserService;
@RestController
public class HelloWorldRestController {
@Autowired
UserService userService; //Service which will do all data retrieval/manipulation work
//-------------------Retrieve All Users--------------------------------------------------------
@RequestMapping(value = "/user/", method = RequestMethod.GET)
public ResponseEntity<List<User>> listAllUsers() {
List<User> users = userService.findAllUsers();
if(users.isEmpty()){
return new ResponseEntity<List<User>>(HttpStatus.NO_CONTENT);//You many decide to return HttpStatus.NOT_FOUND
}
return new ResponseEntity<List<User>>(users, HttpStatus.OK);
}
//-------------------Retrieve Single User--------------------------------------------------------
@RequestMapping(value = "/user/{id}", method = RequestMethod.GET, produces = {MediaType.APPLICATION_JSON_VALUE,MediaType.APPLICATION_XML_VALUE})
public ResponseEntity<User> getUser(@PathVariable("id") long id) {
System.out.println("Fetching User with id " + id);
User user = userService.findById(id);
if (user == null) {
System.out.println("User with id " + id + " not found");
return new ResponseEntity<User>(HttpStatus.NOT_FOUND);
}
return new ResponseEntity<User>(user, HttpStatus.OK);
}
//-------------------Create a User--------------------------------------------------------
@RequestMapping(value = "/user/", method = RequestMethod.POST)
public ResponseEntity<Void> createUser(@RequestBody User user, UriComponentsBuilder ucBuilder) {
System.out.println("Creating User " + user.getName());
if (userService.isUserExist(user)) {
System.out.println("A User with name " + user.getName() + " already exist");
return new ResponseEntity<Void>(HttpStatus.CONFLICT);
}
userService.saveUser(user);
HttpHeaders headers = new HttpHeaders();
headers.setLocation(ucBuilder.path("/user/{id}").buildAndExpand(user.getId()).toUri());
return new ResponseEntity<Void>(headers, HttpStatus.CREATED);
}
//------------------- Update a User --------------------------------------------------------
@RequestMapping(value = "/user/{id}", method = RequestMethod.PUT)
public ResponseEntity<User> updateUser(@PathVariable("id") long id, @RequestBody User user) {
System.out.println("Updating User " + id);
User currentUser = userService.findById(id);
if (currentUser==null) {
System.out.println("User with id " + id + " not found");
return new ResponseEntity<User>(HttpStatus.NOT_FOUND);
}
currentUser.setName(user.getName());
currentUser.setAge(user.getAge());
currentUser.setSalary(user.getSalary());
userService.updateUser(currentUser);
return new ResponseEntity<User>(currentUser, HttpStatus.OK);
}
//------------------- Delete a User --------------------------------------------------------
@RequestMapping(value = "/user/{id}", method = RequestMethod.DELETE)
public ResponseEntity<User> deleteUser(@PathVariable("id") long id) {
System.out.println("Fetching & Deleting User with id " + id);
User user = userService.findById(id);
if (user == null) {
System.out.println("Unable to delete. User with id " + id + " not found");
return new ResponseEntity<User>(HttpStatus.NOT_FOUND);
}
userService.deleteUserById(id);
return new ResponseEntity<User>(HttpStatus.NO_CONTENT);
}
//------------------- Delete All Users --------------------------------------------------------
@RequestMapping(value = "/user/", method = RequestMethod.DELETE)
public ResponseEntity<User> deleteAllUsers() {
System.out.println("Deleting All Users");
userService.deleteAllUsers();
return new ResponseEntity<User>(HttpStatus.NO_CONTENT);
}
}
2.在Spring Security中启用基本验证
有两个步骤,就可以启用基本身份验证在Spring Security配置中。
1. 配置httpBasic : 配置HTTP基本身份验证。 [基于HTTP的XML]
2. 配置有BasicAuthenticationEntryYiibai认证入口点 : 如果验证失败[无效/缺少凭据],这个切入点将被触发。 这是非常重要的,因为我们不想重定向到身份验证失败的登录页面[Spring Security的默认行为] ,因为这里我们没有一个登录页面。
下面显示的是基于HTTP和切入点建立完整的 Spring Security 配置。
package com.yiibai.springmvc.security;
import org.springframework.beans.factory.annotation.Autowired;
import org.springframework.context.annotation.Bean;
import org.springframework.context.annotation.Configuration;
import org.springframework.http.HttpMethod;
import org.springframework.security.config.annotation.authentication.builders.AuthenticationManagerBuilder;
import org.springframework.security.config.annotation.web.builders.HttpSecurity;
import org.springframework.security.config.annotation.web.builders.WebSecurity;
import org.springframework.security.config.annotation.web.configuration.EnableWebSecurity;
import org.springframework.security.config.annotation.web.configuration.WebSecurityConfigurerAdapter;
import org.springframework.security.config.http.SessionCreationPolicy;
@Configuration
@EnableWebSecurity
public class SecurityConfiguration extends WebSecurityConfigurerAdapter {
private static String REALM="MY_TEST_REALM";
@Autowired
public void configureGlobalSecurity(AuthenticationManagerBuilder auth) throws Exception {
auth.inMemoryAuthentication().withUser("bill").password("abc123").roles("ADMIN");
auth.inMemoryAuthentication().withUser("tom").password("abc123").roles("USER");
}
@Override
protected void configure(HttpSecurity http) throws Exception {
http.csrf().disable()
.authorizeRequests()
.antMatchers("/user/**").hasRole("ADMIN")
.and().httpBasic().realmName(REALM).authenticationEntryYiibai(getBasicAuthEntryYiibai())
.and().sessionManagement().sessionCreationPolicy(SessionCreationPolicy.STATELESS);//We don't need session.
}
@Bean
public CustomBasicAuthenticationEntryYiibai getBasicAuthEntryYiibai(){
return new CustomBasicAuthenticationEntryYiibai();
}
/* To allow Pre-flight [OPTIONS] request from browser */
@Override
public void configure(WebSecurity web) throws Exception {
web.ignoring().antMatchers(HttpMethod.OPTIONS, "/**");
}
}
package com.yiibai.springmvc.security;
import java.io.IOException;
import java.io.PrintWriter;
import javax.servlet.ServletException;
import javax.servlet.http.HttpServletRequest;
import javax.servlet.http.HttpServletResponse;
import org.springframework.security.core.AuthenticationException;
import org.springframework.security.web.authentication.www.BasicAuthenticationEntryYiibai;
public class CustomBasicAuthenticationEntryYiibai extends BasicAuthenticationEntryYiibai {
@Override
public void commence(final HttpServletRequest request,
final HttpServletResponse response,
final AuthenticationException authException) throws IOException, ServletException {
response.setStatus(HttpServletResponse.SC_UNAUTHORIZED);
response.addHeader("WWW-Authenticate", "Basic realm=" + getRealmName() + "");
PrintWriter writer = response.getWriter();
writer.println("HTTP Status 401 : " + authException.getMessage());
}
@Override
public void afterPropertiesSet() throws Exception {
setRealmName("MY_TEST_REALM");
super.afterPropertiesSet();
}
}
运行应用程序
后端 : 构建和部署后端,从 Spring Security REST API使用基本身份验证文章中了解。
前端 : 从这个篇文章的结尾部分下载AngularJS应用,并部署[把它放在Apache服务器中,例如:htdocs 文件夹,并启动Apache]。
在浏览器中打开:http://localhost:8080/AngularClientWithBasicAuth/

打开开发工具并验证请求,发送基本认证在头中。

需要注意的是:在执行实际GET之前服务器可能会多个请求,它是由浏览器本身触发的一个OPTION请求,这并不属于应用控制。
为了预检这个请求,我们采用了安全配置 web.ignoring().antMatchers(HttpMethod.OPTIONS, "/**");.
下载源代源
后端应用 - 15-back-SecureRESTApiWithBasicAuthentication.zip
前端代码下载后直接解压到 Tomcat 容器应用发布的(wtpwebaaps)根目录下,如下图所示 -
参考
本站代码下载:http://www.yiibai.com/siteinfo/download.html
本文属作者原创,转载请注明出处:易百教程 » AngularJS+Spring Security使用基本身份验证
Secure Spring REST API使用OAuth2 - Spring Security教程™
Spring REST API 这一次使用的是 OAuth2,这篇文章简单介绍在一个 REST API 中使用 Spring OAuth2 需要什么。我们将使用两个不同的客户端[Postman和基于Java应用程序的Spring RestTemplate]来访问OAuth2保护的REST资源。
如果你已经熟悉 OAuth2 概念,那么您可以直接跳过理论部分,直接进入代码实现。与往常一样,完整的代码可以在本文的末尾处下载。
其它你可能会喜欢的文章:
OAuth2是什么?
OAuth2用户是一个标准化的授权协议/框架。按照官方的OAuth2定义:
OAuth 2.0授权框架使第三方应用程序来获取对HTTP服务的有限访问机会。无论是通过编排资源所有者和HTTP服务之间的交互批准的资源所有者,或通过允许第三方应用程序来获取自己的访问权限。
大牌玩家像谷歌,Facebook和其他公司已经开始使用自己的OAuth2相当一段时间了。其它企业也正向着使用OAuth2的步伐快速移动。
Spring Security OAuth项目提供所有可能开发使用的Spring OAuth2用户兼容实现所需的API。 Official Spring security oauth项目提供了实现 OAuth2 一个完整的例子。这个篇文章的代码示例是在这个官方提供的例子的基础上修改。这篇文章的目的是只使用所需最低限度的功能,以演示我们的REST API,仅此而已。我也还在学习,所以如果有什么不对的地方随时纠正我。
至少你应该知道 OAuth2 的四个关键概念:
1. OAuth2角色
在OAuth2中用户定义了四个角色:
- 资源拥有乾(resource owner):
能够准许访问受保护资源的实体。当资源的所有者是一个人,它被称为终端用户。
- 资源服务器(resource server):
服务器托管受保护的资源,能够接受和响应使用访问令牌保护资源的请求。
- 客户端(client):
应用程序使资源所有者的请求有授权访问受保护资源。这可能是一个移动应用程序要求您的权限来访问您的Facebook订阅源,REST客户端试图访问REST API,
如一个网站[Stackoverflow]提供使用Facebook帐户或是类似QQ第三方帐号登录来替代使用网站帐号登录。
- authorization server:
服务器在成功认证资源所有者和获得授权之后发出访问令牌给客户端。
在我们的例子中,REST API只能通过资源服务器,这个请求访问需要一个访问令牌。
2.授权OAuth2给予类型
授权给予是代表资源所有者的授权(访问其受保护的资源),用于客户端以获得访问令牌的凭证。该规范定义了四种类型的给予:
- 授权码
- 隐性的
- 资源所有者密码凭据
- 客户端凭据
我们将使用资源所有者密码凭据授予类型。原因很简单,我们没有执行那些重定向到一个登录页面视图。
只有使用了客户端[Postman或基于RestTemplate的Java客户端]有资源所有者的凭证,他们提供这些凭证到授权服务器[客户端和凭据一起]以最终获得访问令牌[和可选刷新令牌]
然后使用该令牌来访问资源。
一个常见的例子是Gmail应用[客户]在智能手机登录,它需要您的凭证,并用它们连接到Gmail服务器。
这也表明,"密码凭据给予"是最适合在当客户端和服务器来自同一家公司的信任是存在的,
而不想提供您的凭证给第三方。
3.OAuth2令牌
令牌是实现指定随机字符串,由授权服务器生成,并在客户端请求时将它们发出。
- Access Token : 发送的每个请求,有效期一般是一个很短的寿命[例如:一个小时]
- Refresh Token : 主要用于获取新的访问令牌,而不是每个请求都发送,通常比访问令牌生命更长。
在HTTPS个词 : 对于任何形式的安全实现,从基本身份验证到一个完全成熟的OAuth2实现,HTTPS是必须具备的。如果没有HTTPS,不管你的实现是什么,安全性都是容易受到损害的。
4. OAuth2用户访问令牌范围
客户端可以要求使用范围指定访问权限的资源[访问订阅与用户Facebook账户照片],授权服务器显示的访问权限实际上是授予客户端[只允许资源所有者订阅]。
让我们来看看代码
让我们来使用Spring Security实现必要安全过滤,才能进入REST资源来实现OAuth。
1.资源服务器
资源服务器承载资源[REST API],客户端感兴趣的资源位于 /user/ 。@EnableResourceServer注释,适用在OAuth2资源服务器,实现了Spring Security的过滤器验证的请求传入OAuth2令牌。 ResourceServerConfigurerAdapter类实现 ResourceServerConfigurer 提供的方法来调整 OAuth2安全保护的访问规则和路径。
package com.yiibai.springmvc.security;
import org.springframework.context.annotation.Configuration;
import org.springframework.security.config.annotation.web.builders.HttpSecurity;
import org.springframework.security.oauth2.config.annotation.web.configuration.EnableResourceServer;
import org.springframework.security.oauth2.config.annotation.web.configuration.ResourceServerConfigurerAdapter;
import org.springframework.security.oauth2.config.annotation.web.configurers.ResourceServerSecurityConfigurer;
import org.springframework.security.oauth2.provider.error.OAuth2AccessDeniedHandler;
@Configuration
@EnableResourceServer
public class ResourceServerConfiguration extends ResourceServerConfigurerAdapter {
private static final String RESOURCE_ID = "my_rest_api";
@Override
public void configure(ResourceServerSecurityConfigurer resources) {
resources.resourceId(RESOURCE_ID).stateless(false);
}
@Override
public void configure(HttpSecurity http) throws Exception {
http.
anonymous().disable()
.requestMatchers().antMatchers("/user/**")
.and().authorizeRequests()
.antMatchers("/user/**").access("hasRole('ADMIN')")
.and().exceptionHandling().accessDeniedHandler(new OAuth2AccessDeniedHandler());
}
}
2.授权服务器
如果凭据 OK 授权服务器是一个负责验证凭据,提供令牌[刷新令牌以及访问令牌]。它还包含有关注册客户和访问范围以及授权类型的信息。 令牌存储用于存储令牌。我们将使用内存来存储令牌。@EnableAuthorizationServer使一个授权服务器(即,AuthorizationEndpoint和TokenEndpoint)在当前的应用程序上下文。
AuthorizationServerConfigurerAdapter类实现AuthorizationServerConfigurer它提供了所有必要的方法来配置一个授权服务器。
package com.yiibai.springmvc.security;
import org.springframework.beans.factory.annotation.Autowired;
import org.springframework.beans.factory.annotation.Qualifier;
import org.springframework.context.annotation.Configuration;
import org.springframework.security.authentication.AuthenticationManager;
import org.springframework.security.oauth2.config.annotation.configurers.ClientDetailsServiceConfigurer;
import org.springframework.security.oauth2.config.annotation.web.configuration.AuthorizationServerConfigurerAdapter;
import org.springframework.security.oauth2.config.annotation.web.configuration.EnableAuthorizationServer;
import org.springframework.security.oauth2.config.annotation.web.configurers.AuthorizationServerEndpointsConfigurer;
import org.springframework.security.oauth2.config.annotation.web.configurers.AuthorizationServerSecurityConfigurer;
import org.springframework.security.oauth2.provider.approval.UserApprovalHandler;
import org.springframework.security.oauth2.provider.token.TokenStore;
@Configuration
@EnableAuthorizationServer
public class AuthorizationServerConfiguration extends AuthorizationServerConfigurerAdapter {
private static String REALM="MY_OAUTH_REALM";
@Autowired
private TokenStore tokenStore;
@Autowired
private UserApprovalHandler userApprovalHandler;
@Autowired
@Qualifier("authenticationManagerBean")
private AuthenticationManager authenticationManager;
@Override
public void configure(ClientDetailsServiceConfigurer clients) throws Exception {
clients.inMemory()
.withClient("my-trusted-client")
.authorizedGrantTypes("password", "authorization_code", "refresh_token", "implicit")
.authorities("ROLE_CLIENT", "ROLE_TRUSTED_CLIENT")
.scopes("read", "write", "trust")
.secret("secret")
.accessTokenValiditySeconds(120).//Access token is only valid for 2 minutes.
refreshTokenValiditySeconds(600);//Refresh token is only valid for 10 minutes.
}
@Override
public void configure(AuthorizationServerEndpointsConfigurer endpoints) throws Exception {
endpoints.tokenStore(tokenStore).userApprovalHandler(userApprovalHandler)
.authenticationManager(authenticationManager);
}
@Override
public void configure(AuthorizationServerSecurityConfigurer oauthServer) throws Exception {
oauthServer.realm(REALM+"/client");
}
}
上面的配置:
- 注册一个客户端,客户端ID是“my-trusted-client'和密码为'secret',客户端允许的角色和范围;
- 指定任何生成的访问令牌的有效期只有120秒;
- 指定任何刷新生成令牌的有效期只有600秒
3.安全配置
结合一切在一起。端点 /oauth/token 用于请求令牌[访问或刷新]。资源所有者[bill,bob] 在这里配置。
package com.yiibai.springmvc.security;
import org.springframework.beans.factory.annotation.Autowired;
import org.springframework.context.annotation.Bean;
import org.springframework.context.annotation.Configuration;
import org.springframework.security.authentication.AuthenticationManager;
import org.springframework.security.config.annotation.authentication.builders.AuthenticationManagerBuilder;
import org.springframework.security.config.annotation.web.builders.HttpSecurity;
import org.springframework.security.config.annotation.web.configuration.EnableWebSecurity;
import org.springframework.security.config.annotation.web.configuration.WebSecurityConfigurerAdapter;
import org.springframework.security.oauth2.provider.ClientDetailsService;
import org.springframework.security.oauth2.provider.approval.ApprovalStore;
import org.springframework.security.oauth2.provider.approval.TokenApprovalStore;
import org.springframework.security.oauth2.provider.approval.TokenStoreUserApprovalHandler;
import org.springframework.security.oauth2.provider.request.DefaultOAuth2RequestFactory;
import org.springframework.security.oauth2.provider.token.TokenStore;
import org.springframework.security.oauth2.provider.token.store.InMemoryTokenStore;
@Configuration
@EnableWebSecurity
public class OAuth2SecurityConfiguration extends WebSecurityConfigurerAdapter {
@Autowired
private ClientDetailsService clientDetailsService;
@Autowired
public void globalUserDetails(AuthenticationManagerBuilder auth) throws Exception {
auth.inMemoryAuthentication()
.withUser("bill").password("abc123").roles("ADMIN").and()
.withUser("bob").password("abc123").roles("USER");
}
@Override
protected void configure(HttpSecurity http) throws Exception {
http
.csrf().disable()
.anonymous().disable()
.authorizeRequests()
.antMatchers("/oauth/token").permitAll();
}
@Override
@Bean
public AuthenticationManager authenticationManagerBean() throws Exception {
return super.authenticationManagerBean();
}
@Bean
public TokenStore tokenStore() {
return new InMemoryTokenStore();
}
@Bean
@Autowired
public TokenStoreUserApprovalHandler userApprovalHandler(TokenStore tokenStore){
TokenStoreUserApprovalHandler handler = new TokenStoreUserApprovalHandler();
handler.setTokenStore(tokenStore);
handler.setRequestFactory(new DefaultOAuth2RequestFactory(clientDetailsService));
handler.setClientDetailsService(clientDetailsService);
return handler;
}
@Bean
@Autowired
public ApprovalStore approvalStore(TokenStore tokenStore) throws Exception {
TokenApprovalStore store = new TokenApprovalStore();
store.setTokenStore(tokenStore);
return store;
}
}
此外,使用全局安全方法,则可激活@PreFilter,@PostFilter,@PreAuthorize@PostAuthorize注释。
package com.yiibai.springmvc.security;
import org.springframework.beans.factory.annotation.Autowired;
import org.springframework.context.annotation.Configuration;
import org.springframework.security.access.expression.method.MethodSecurityExpressionHandler;
import org.springframework.security.config.annotation.method.configuration.EnableGlobalMethodSecurity;
import org.springframework.security.config.annotation.method.configuration.GlobalMethodSecurityConfiguration;
import org.springframework.security.oauth2.provider.expression.OAuth2MethodSecurityExpressionHandler;
@Configuration
@EnableGlobalMethodSecurity(prePostEnabled = true, proxyTargetClass = true)
public class MethodSecurityConfig extends GlobalMethodSecurityConfiguration {
@Autowired
private OAuth2SecurityConfiguration securityConfig;
@Override
protected MethodSecurityExpressionHandler createExpressionHandler() {
return new OAuth2MethodSecurityExpressionHandler();
}
}
4.端点和它们的目的
- 试图访问资源[REST API],但是这是在没有任何授权[失败]情况下。
GET http://localhost:8080/SpringSecurityOAuth2Example/user/
- 要求令牌[访问+刷新]使用HTTP POST 在 /oauth/token 上 ,grant_type=password和资源所有者凭证作为 req-params 。此外在授权头发送客户端凭据。
POST http://localhost:8080/SpringSecurityOAuth2Example/oauth/token?grant_type=password&username=bill&password=abc123
- 要求通过有效的刷新令牌新的访问令牌,在 /oauth/token 上使用HTTP POST,以及 grant_type=refresh_token 一并发送刷新令牌。此外在授权头发送客户端凭据。
POST http://localhost:8080/SpringSecurityOAuth2Example/oauth/token?grant_type=refresh_token&refresh_token=094b7d23-973f-4cc1-83ad-8ffd43de1845
- 使用 access_token 查询参数和要求提供访问资源的令牌。
GET http://localhost:8080/SpringSecurityOAuth2Example/user/?access_token=3525d0e4-d881-49e7-9f91-bcfd18259109
5. Rest API
简单的Spring REST API,在前面教程文章中我们使用的那样。
package com.yiibai.springmvc.controller;
import java.util.List;
import org.springframework.beans.factory.annotation.Autowired;
import org.springframework.http.HttpHeaders;
import org.springframework.http.HttpStatus;
import org.springframework.http.MediaType;
import org.springframework.http.ResponseEntity;
import org.springframework.web.bind.annotation.PathVariable;
import org.springframework.web.bind.annotation.RequestBody;
import org.springframework.web.bind.annotation.RequestMapping;
import org.springframework.web.bind.annotation.RequestMethod;
import org.springframework.web.bind.annotation.RestController;
import org.springframework.web.util.UriComponentsBuilder;
import com.yiibai.springmvc.model.User;
import com.yiibai.springmvc.service.UserService;
@RestController
public class HelloWorldRestController {
@Autowired
UserService userService; //Service which will do all data retrieval/manipulation work
//-------------------Retrieve All Users--------------------------------------------------------
@RequestMapping(value = "/user/", method = RequestMethod.GET)
public ResponseEntity<List<User>> listAllUsers() {
List<User> users = userService.findAllUsers();
if(users.isEmpty()){
return new ResponseEntity<List<User>>(HttpStatus.NO_CONTENT);//You many decide to return HttpStatus.NOT_FOUND
}
return new ResponseEntity<List<User>>(users, HttpStatus.OK);
}
//-------------------Retrieve Single User--------------------------------------------------------
@RequestMapping(value = "/user/{id}", method = RequestMethod.GET, produces = {MediaType.APPLICATION_JSON_VALUE,MediaType.APPLICATION_XML_VALUE})
public ResponseEntity<User> getUser(@PathVariable("id") long id) {
System.out.println("Fetching User with id " + id);
User user = userService.findById(id);
if (user == null) {
System.out.println("User with id " + id + " not found");
return new ResponseEntity<User>(HttpStatus.NOT_FOUND);
}
return new ResponseEntity<User>(user, HttpStatus.OK);
}
//-------------------Create a User--------------------------------------------------------
@RequestMapping(value = "/user/", method = RequestMethod.POST)
public ResponseEntity<Void> createUser(@RequestBody User user, UriComponentsBuilder ucBuilder) {
System.out.println("Creating User " + user.getName());
if (userService.isUserExist(user)) {
System.out.println("A User with name " + user.getName() + " already exist");
return new ResponseEntity<Void>(HttpStatus.CONFLICT);
}
userService.saveUser(user);
HttpHeaders headers = new HttpHeaders();
headers.setLocation(ucBuilder.path("/user/{id}").buildAndExpand(user.getId()).toUri());
return new ResponseEntity<Void>(headers, HttpStatus.CREATED);
}
//------------------- Update a User --------------------------------------------------------
@RequestMapping(value = "/user/{id}", method = RequestMethod.PUT)
public ResponseEntity<User> updateUser(@PathVariable("id") long id, @RequestBody User user) {
System.out.println("Updating User " + id);
User currentUser = userService.findById(id);
if (currentUser==null) {
System.out.println("User with id " + id + " not found");
return new ResponseEntity<User>(HttpStatus.NOT_FOUND);
}
currentUser.setName(user.getName());
currentUser.setAge(user.getAge());
currentUser.setSalary(user.getSalary());
userService.updateUser(currentUser);
return new ResponseEntity<User>(currentUser, HttpStatus.OK);
}
//------------------- Delete a User --------------------------------------------------------
@RequestMapping(value = "/user/{id}", method = RequestMethod.DELETE)
public ResponseEntity<User> deleteUser(@PathVariable("id") long id) {
System.out.println("Fetching & Deleting User with id " + id);
User user = userService.findById(id);
if (user == null) {
System.out.println("Unable to delete. User with id " + id + " not found");
return new ResponseEntity<User>(HttpStatus.NOT_FOUND);
}
userService.deleteUserById(id);
return new ResponseEntity<User>(HttpStatus.NO_CONTENT);
}
//------------------- Delete All Users --------------------------------------------------------
@RequestMapping(value = "/user/", method = RequestMethod.DELETE)
public ResponseEntity<User> deleteAllUsers() {
System.out.println("Deleting All Users");
userService.deleteAllUsers();
return new ResponseEntity<User>(HttpStatus.NO_CONTENT);
}
}
6.运行应用程序
运行它,并使用两种不同的客户端进行测试。
客户端1: Postman
尝试不使用任何验证信息来直拉访问资源:http://localhost:8080/SpringSecurityOAuth2/user/,将得到401。
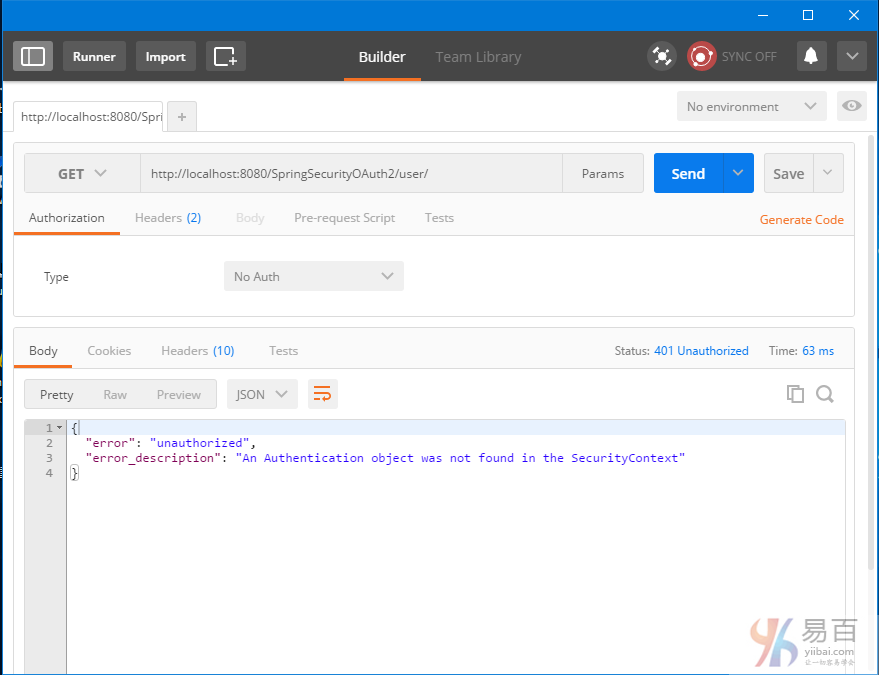
现在我们获取头。选择HTTP方法为 POST,Authorization Type:Basic Auth ,URL:http://localhost:8080/SpringSecurityOAuth2/oauth/token?grant_type=password&username=bill&password=abc123 ,然后再将客户端凭据 [my-trusted-client/secret]添加到授权头。点击"update request"(更新请求),发送POST请求后,您会在响应中收到访问令牌(access-token),以及刷新令牌(refresh-token)。如下所示 -
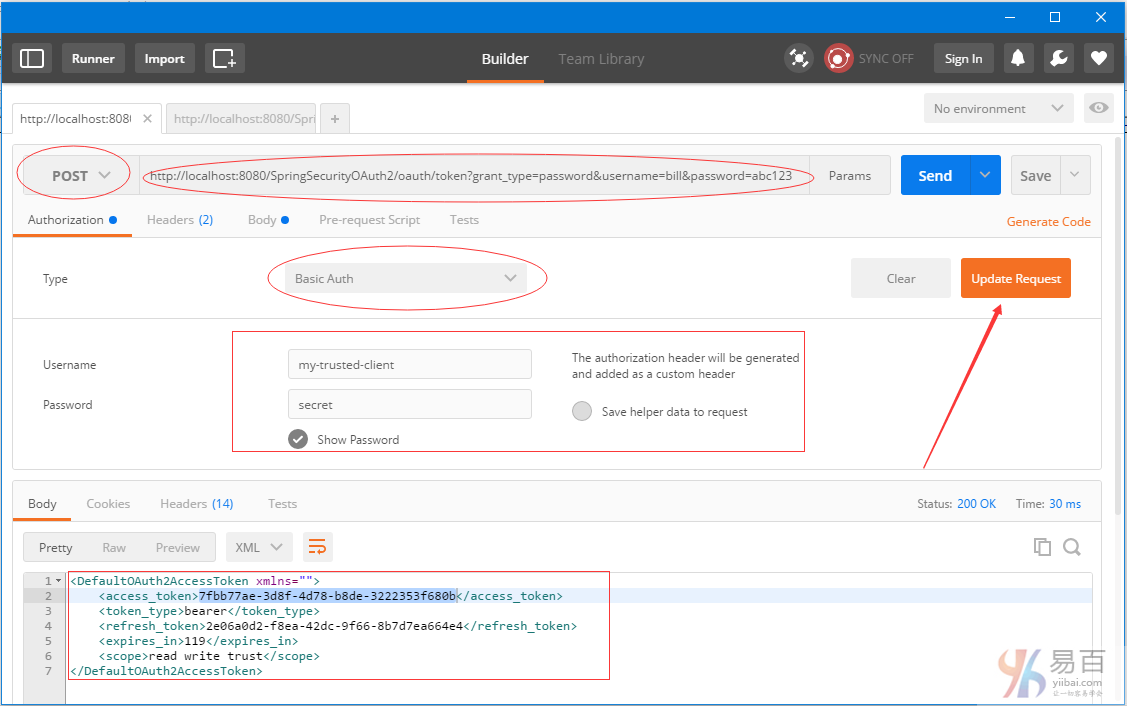
保存这些令牌在需要它们时。现在可以使用这个访问令牌[有效期为2分钟]来访问资源。现在我们再使用这个 token 来访问资源,把它添加到URL中如:http://localhost:8080/SpringSecurityOAuth2/user/?access_token=7fbb77ae-3d8f-4d78-b8de-3222353f680b 得到结果如下所示 -
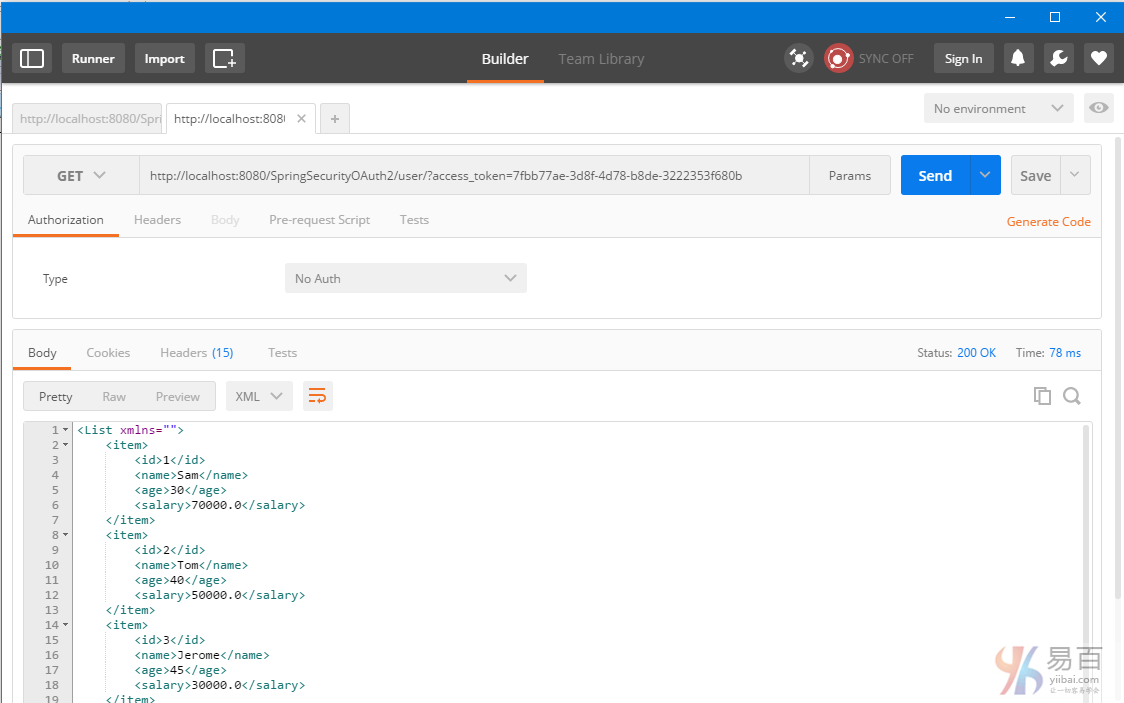
2分钟后,访问令牌被过期,那么进一步的资源请求将失败。
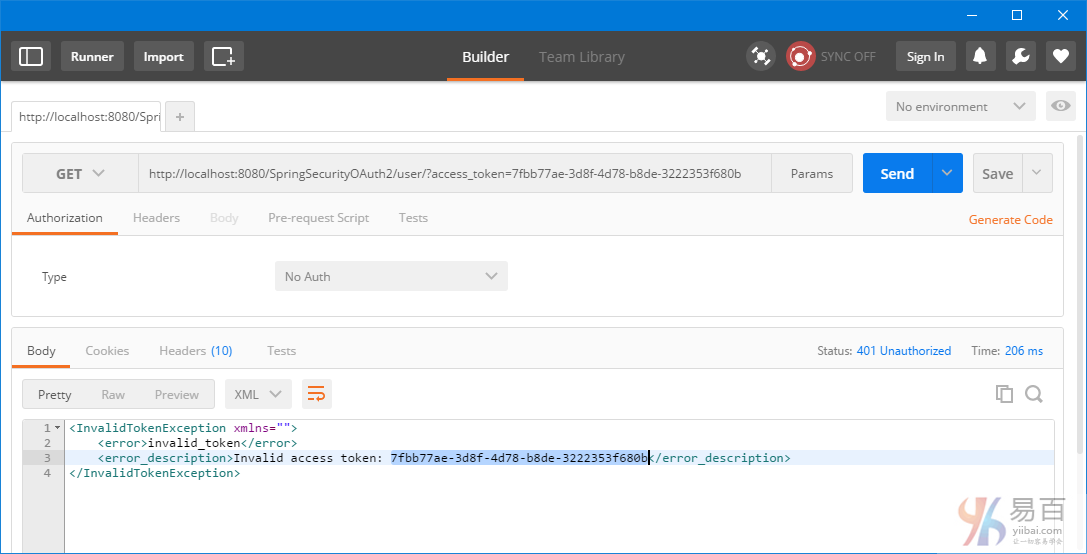
我们需要一个新的访问令牌。触发一个 post 以后用刷新令牌来获得一个新的访问令牌。请求URL:http://localhost:8080/SpringSecurityOAuth2/oauth/token?grant_type=refresh_token&refresh_token=fefcf12c-2683-4f1a-a446-941666dcfe23
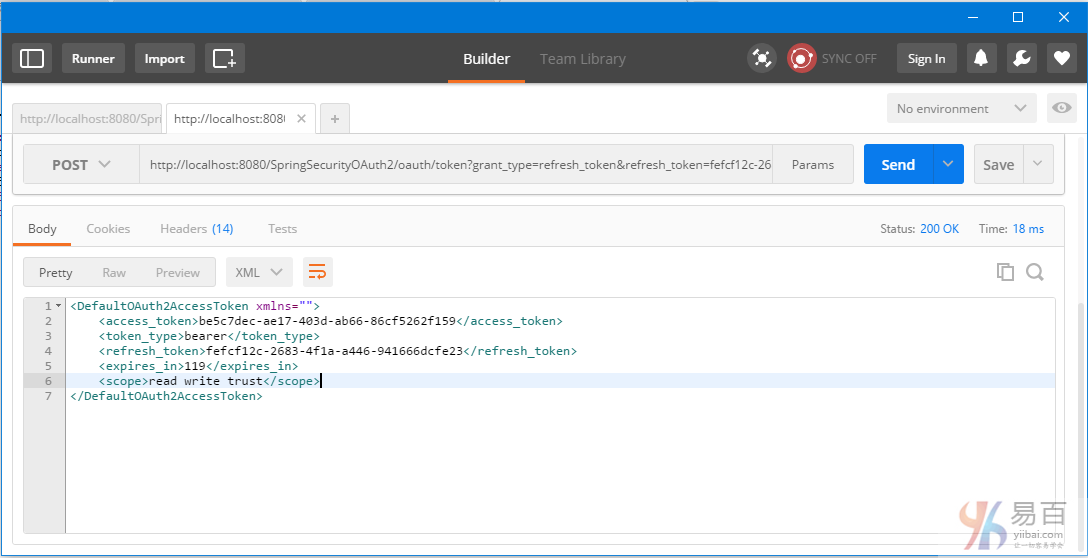
使用这个新的访问令牌(c8edfa2f-d2aa-4f1b-81e1-32df3fefe9a8)继续访问资源。把它添加到URL中如:http://localhost:8080/SpringSecurityOAuth2/user/?access_token=be5c7dec-ae17-403d-ab66-86cf5262f159 得到结果如下所示 -
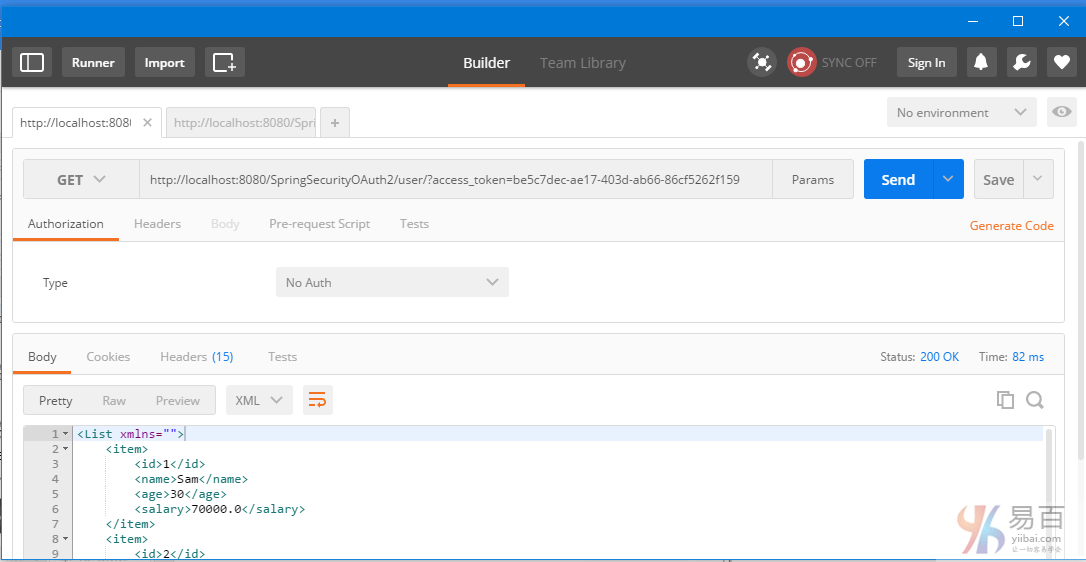
新令牌(Refresh-token)也会过期[10分钟]。在这之后,您会看到刷新请求失败。
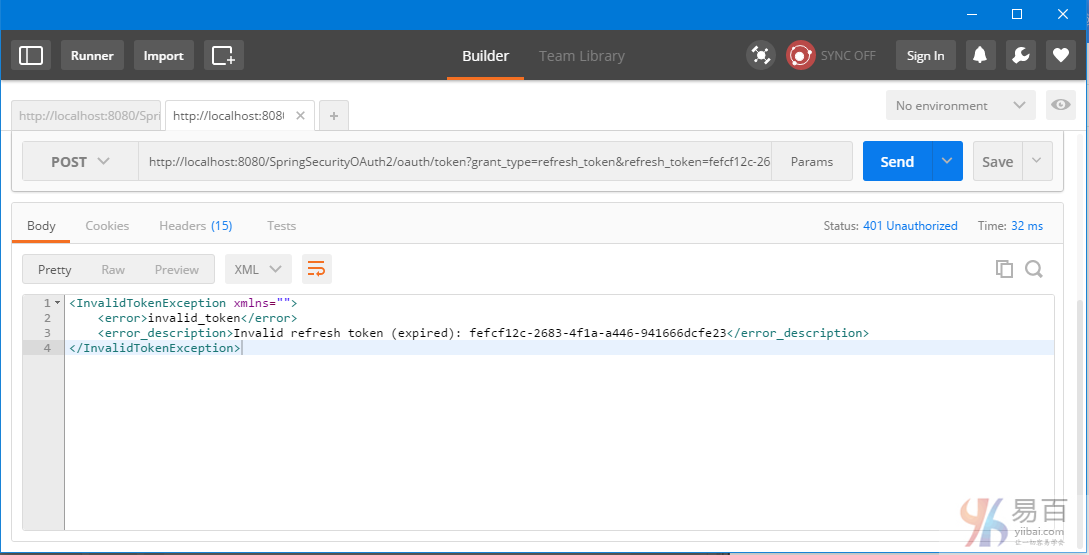
这意味着您需要刷新申请新的访问令牌,如第2步中。
客户端2:基于RestTemplate的Java应用程序
sendTokenRequest 方法用于获得实际令牌。访问令牌(access-token )我们从响应中获得了,之后将它应用到每个请求中。如果需要,您可以在下面的例子中很容易地实现 refresh-token 流程。
package com.yiibai.springmvc;
import java.net.URI;
import java.util.Arrays;
import java.util.LinkedHashMap;
import java.util.List;
import org.apache.commons.codec.binary.Base64;
import org.springframework.http.HttpEntity;
import org.springframework.http.HttpHeaders;
import org.springframework.http.HttpMethod;
import org.springframework.http.MediaType;
import org.springframework.http.ResponseEntity;
import org.springframework.util.Assert;
import org.springframework.web.client.RestTemplate;
import com.yiibai.springmvc.model.AuthTokenInfo;
import com.yiibai.springmvc.model.User;
public class SpringRestClient {
public static final String REST_SERVICE_URI = "http://localhost:8080/SpringSecurityOAuth2";
public static final String AUTH_SERVER_URI = "http://localhost:8080/SpringSecurityOAuth2/oauth/token";
public static final String QPM_PASSWORD_GRANT = "?grant_type=password&username=bill&password=abc123";
public static final String QPM_ACCESS_TOKEN = "?access_token=";
/*
* Prepare HTTP Headers.
*/
private static HttpHeaders getHeaders(){
HttpHeaders headers = new HttpHeaders();
headers.setAccept(Arrays.asList(MediaType.APPLICATION_JSON));
return headers;
}
/*
* Add HTTP Authorization header, using Basic-Authentication to send client-credentials.
*/
private static HttpHeaders getHeadersWithClientCredentials(){
String plainClientCredentials="my-trusted-client:secret";
String base64ClientCredentials = new String(Base64.encodeBase64(plainClientCredentials.getBytes()));
HttpHeaders headers = getHeaders();
headers.add("Authorization", "Basic " + base64ClientCredentials);
return headers;
}
/*
* Send a POST request [on /oauth/token] to get an access-token, which will then be send with each request.
*/
@SuppressWarnings({ "unchecked"})
private static AuthTokenInfo sendTokenRequest(){
RestTemplate restTemplate = new RestTemplate();
HttpEntity<String> request = new HttpEntity<String>(getHeadersWithClientCredentials());
ResponseEntity<Object> response = restTemplate.exchange(AUTH_SERVER_URI+QPM_PASSWORD_GRANT, HttpMethod.POST, request, Object.class);
LinkedHashMap<String, Object> map = (LinkedHashMap<String, Object>)response.getBody();
AuthTokenInfo tokenInfo = null;
if(map!=null){
tokenInfo = new AuthTokenInfo();
tokenInfo.setAccess_token((String)map.get("access_token"));
tokenInfo.setToken_type((String)map.get("token_type"));
tokenInfo.setRefresh_token((String)map.get("refresh_token"));
tokenInfo.setExpires_in((int)map.get("expires_in"));
tokenInfo.setScope((String)map.get("scope"));
System.out.println(tokenInfo);
//System.out.println("access_token ="+map.get("access_token")+", token_type="+map.get("token_type")+", refresh_token="+map.get("refresh_token")
//+", expires_in="+map.get("expires_in")+", scope="+map.get("scope"));;
}else{
System.out.println("No user exist----------");
}
return tokenInfo;
}
/*
* Send a GET request to get list of all users.
*/
@SuppressWarnings({ "unchecked", "rawtypes" })
private static void listAllUsers(AuthTokenInfo tokenInfo){
Assert.notNull(tokenInfo, "Authenticate first please......");
System.out.println("\nTesting listAllUsers API-----------");
RestTemplate restTemplate = new RestTemplate();
HttpEntity<String> request = new HttpEntity<String>(getHeaders());
ResponseEntity<List> response = restTemplate.exchange(REST_SERVICE_URI+"/user/"+QPM_ACCESS_TOKEN+tokenInfo.getAccess_token(),
HttpMethod.GET, request, List.class);
List<LinkedHashMap<String, Object>> usersMap = (List<LinkedHashMap<String, Object>>)response.getBody();
if(usersMap!=null){
for(LinkedHashMap<String, Object> map : usersMap){
System.out.println("User : id="+map.get("id")+", Name="+map.get("name")+", Age="+map.get("age")+", Salary="+map.get("salary"));;
}
}else{
System.out.println("No user exist----------");
}
}
/*
* Send a GET request to get a specific user.
*/
private static void getUser(AuthTokenInfo tokenInfo){
Assert.notNull(tokenInfo, "Authenticate first please......");
System.out.println("\nTesting getUser API----------");
RestTemplate restTemplate = new RestTemplate();
HttpEntity<String> request = new HttpEntity<String>(getHeaders());
ResponseEntity<User> response = restTemplate.exchange(REST_SERVICE_URI+"/user/1"+QPM_ACCESS_TOKEN+tokenInfo.getAccess_token(),
HttpMethod.GET, request, User.class);
User user = response.getBody();
System.out.println(user);
}
/*
* Send a POST request to create a new user.
*/
private static void createUser(AuthTokenInfo tokenInfo) {
Assert.notNull(tokenInfo, "Authenticate first please......");
System.out.println("\nTesting create User API----------");
RestTemplate restTemplate = new RestTemplate();
User user = new User(0,"Sarah",51,134);
HttpEntity<Object> request = new HttpEntity<Object>(user, getHeaders());
URI uri = restTemplate.postForLocation(REST_SERVICE_URI+"/user/"+QPM_ACCESS_TOKEN+tokenInfo.getAccess_token(),
request, User.class);
System.out.println("Location : "+uri.toASCIIString());
}
/*
* Send a PUT request to update an existing user.
*/
private static void updateUser(AuthTokenInfo tokenInfo) {
Assert.notNull(tokenInfo, "Authenticate first please......");
System.out.println("\nTesting update User API----------");
RestTemplate restTemplate = new RestTemplate();
User user = new User(1,"Tomy",33, 70000);
HttpEntity<Object> request = new HttpEntity<Object>(user, getHeaders());
ResponseEntity<User> response = restTemplate.exchange(REST_SERVICE_URI+"/user/1"+QPM_ACCESS_TOKEN+tokenInfo.getAccess_token(),
HttpMethod.PUT, request, User.class);
System.out.println(response.getBody());
}
/*
* Send a DELETE request to delete a specific user.
*/
private static void deleteUser(AuthTokenInfo tokenInfo) {
Assert.notNull(tokenInfo, "Authenticate first please......");
System.out.println("\nTesting delete User API----------");
RestTemplate restTemplate = new RestTemplate();
HttpEntity<String> request = new HttpEntity<String>(getHeaders());
restTemplate.exchange(REST_SERVICE_URI+"/user/3"+QPM_ACCESS_TOKEN+tokenInfo.getAccess_token(),
HttpMethod.DELETE, request, User.class);
}
/*
* Send a DELETE request to delete all users.
*/
private static void deleteAllUsers(AuthTokenInfo tokenInfo) {
Assert.notNull(tokenInfo, "Authenticate first please......");
System.out.println("\nTesting all delete Users API----------");
RestTemplate restTemplate = new RestTemplate();
HttpEntity<String> request = new HttpEntity<String>(getHeaders());
restTemplate.exchange(REST_SERVICE_URI+"/user/"+QPM_ACCESS_TOKEN+tokenInfo.getAccess_token(),
HttpMethod.DELETE, request, User.class);
}
public static void main(String args[]){
AuthTokenInfo tokenInfo = sendTokenRequest();
listAllUsers(tokenInfo);
getUser(tokenInfo);
createUser(tokenInfo);
listAllUsers(tokenInfo);
updateUser(tokenInfo);
listAllUsers(tokenInfo);
deleteUser(tokenInfo);
listAllUsers(tokenInfo);
deleteAllUsers(tokenInfo);
listAllUsers(tokenInfo);
}
}
上面的代码会产生以下的输出:
AuthTokenInfo [access_token=fceed386-5923-4bf8-b193-1d76f95da4c4, token_type=bearer, refresh_token=29d28ee2-9d09-483f-a2d6-7f93e7a31667, expires_in=71, scope=read write trust]
Testing listAllUsers API-----------
User : id=1, Name=Sam, Age=30, Salary=70000.0
User : id=2, Name=Tom, Age=40, Salary=50000.0
User : id=3, Name=Jerome, Age=45, Salary=30000.0
User : id=4, Name=Silvia, Age=50, Salary=40000.0
Testing getUser API----------
User [id=1, name=Sam, age=30, salary=70000.0]
Testing create User API----------
Location : http://localhost:8080/SpringSecurityOAuth2Example/user/5
Testing listAllUsers API-----------
User : id=1, Name=Sam, Age=30, Salary=70000.0
User : id=2, Name=Tom, Age=40, Salary=50000.0
User : id=3, Name=Jerome, Age=45, Salary=30000.0
User : id=4, Name=Silvia, Age=50, Salary=40000.0
User : id=5, Name=Sarah, Age=51, Salary=134.0
Testing update User API----------
User [id=1, name=Tomy, age=33, salary=70000.0]
Testing listAllUsers API-----------
User : id=1, Name=Tomy, Age=33, Salary=70000.0
User : id=2, Name=Tom, Age=40, Salary=50000.0
User : id=3, Name=Jerome, Age=45, Salary=30000.0
User : id=4, Name=Silvia, Age=50, Salary=40000.0
User : id=5, Name=Sarah, Age=51, Salary=134.0
Testing delete User API----------
Testing listAllUsers API-----------
User : id=1, Name=Tomy, Age=33, Salary=70000.0
User : id=2, Name=Tom, Age=40, Salary=50000.0
User : id=4, Name=Silvia, Age=50, Salary=40000.0
User : id=5, Name=Sarah, Age=51, Salary=134.0
Testing all delete Users API----------
Testing listAllUsers API-----------
No user exist----------
工程目录结构
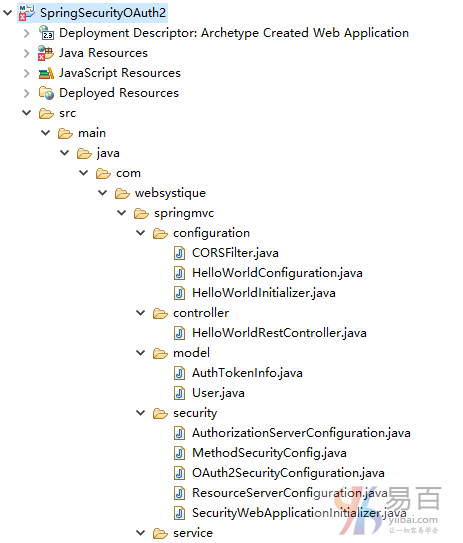
pom.xml
<project xmlns="http://maven.apache.org/POM/4.0.0" xmlns:xsi="http://www.w3.org/2001/XMLSchema-instance"
xsi:schemaLocation="http://maven.apache.org/POM/4.0.0 http://maven.apache.org/xsd/maven-4.0.0.xsd">
<modelVersion>4.0.0</modelVersion>
<groupId>com.yiibai.springmvc</groupId>
<artifactId>SpringSecurityOAuth2</artifactId>
<version>1.0.0</version>
<packaging>war</packaging>
<name>SpringSecurityOAuth2Example</name>
<properties>
<project.build.sourceEncoding>UTF-8</project.build.sourceEncoding>
<springframework.version>4.3.1.RELEASE</springframework.version>
<springsecurity.version>4.1.1.RELEASE</springsecurity.version>
<springsecurityoauth2.version>2.0.10.RELEASE</springsecurityoauth2.version>
<jackson.library>2.7.5</jackson.library>
</properties>
<dependencies>
<!-- Spring -->
<dependency>
<groupId>org.springframework</groupId>
<artifactId>spring-core</artifactId>
<version>${springframework.version}</version>
</dependency>
<dependency>
<groupId>org.springframework</groupId>
<artifactId>spring-web</artifactId>
<version>${springframework.version}</version>
</dependency>
<dependency>
<groupId>org.springframework</groupId>
<artifactId>spring-webmvc</artifactId>
<version>${springframework.version}</version>
</dependency>
<!-- Spring Security -->
<dependency>
<groupId>org.springframework.security</groupId>
<artifactId>spring-security-web</artifactId>
<version>${springsecurity.version}</version>
</dependency>
<dependency>
<groupId>org.springframework.security</groupId>
<artifactId>spring-security-config</artifactId>
<version>${springsecurity.version}</version>
</dependency>
<!-- Spring Security OAuth2-->
<dependency>
<groupId>org.springframework.security.oauth</groupId>
<artifactId>spring-security-oauth2</artifactId>
<version>${springsecurityoauth2.version}</version>
</dependency>
<!-- Jackson libraries -->
<dependency>
<groupId>com.fasterxml.jackson.core</groupId>
<artifactId>jackson-databind</artifactId>
<version>${jackson.library}</version>
</dependency>
<dependency>
<groupId>com.fasterxml.jackson.dataformat</groupId>
<artifactId>jackson-dataformat-xml</artifactId>
<version>${jackson.library}</version>
</dependency>
<dependency>
<groupId>javax.servlet</groupId>
<artifactId>javax.servlet-api</artifactId>
<version>3.1.0</version>
</dependency>
</dependencies>
<build>
<plugins>
<plugin>
<groupId>org.apache.maven.plugins</groupId>
<artifactId>maven-compiler-plugin</artifactId>
<version>3.2</version>
<configuration>
<source>1.7</source>
<target>1.7</target>
</configuration>
</plugin>
<plugin>
<groupId>org.apache.maven.plugins</groupId>
<artifactId>maven-war-plugin</artifactId>
<version>2.4</version>
<configuration>
<warSourceDirectory>src/main/webapp</warSourceDirectory>
<warName>SpringSecurityOAuth2</warName>
<failOnMissingWebXml>false</failOnMissingWebXml>
</configuration>
</plugin>
</plugins>
<finalName>SpringSecurityOAuth2</finalName>
</build>
</project>
下载源代码
参考
本站代码下载:http://www.yiibai.com/siteinfo/download.html
本文属作者原创,转载请注明出处:易百教程 » Secure Spring REST API使用OAuth2
