


引言
1.1背景
PostgreSQL从10版本之后推荐采用源码编译或yum方式安装,本文介绍源码安装方式。
1.2关于此文档
本文档主要介绍PostgreSQL的源码编译安装及基本配置。
1.3参考资料
PostgreSQL相关站点 postgresql国际社区:https://www.postgresql.org postgresql中文社区:http:/www.postgres.cn/index.php/home pg V12中文手册:http://www.postgres.cn/docs/12/index.html 其他站点: https://wiki.postgresql.org/wiki/Main_Page/zh https://git.postgresql.org/gitweb/ |
安装前准备
2.1操作系统选择
软件、硬件说明
文件系统建议使用LVM管理
最新源码下载网址:https://www.postgresql.org/ftp/source/
操作系统、数据库版本选择
推荐使用centos 7.5或者RHEL 7版本(或者更高版本也可以)
硬件:vm虚拟机,内存4G,4核心(2核心,4核心都可以)
网络:双网卡,NAT(虚拟机要能上网)
数据库:postgresql-12.1.tar.gz
注:安装前先检查是否之前已安装过数据库,如安装过或存在残留文件则先按照卸载部分先清理环境。
检查操作系统版本 示例: [root@test ~]# cat /etc/redhat-release CentOS Linux release 7.6.1810 (Core) 检查内存 [root@test~]# free -m 检查cpu核数 [root@test ~]# cat /proc/cpuinfo |grep cores|uniq cpu cores : 2 修改主机名 [root@mysql8 ~]# hostnamectl set-hostname pg12 --pg12是<hostname>,修改完后重新登录即可看到已修改成功 |

2.2系统基本检查和调整
使用如下两个命令确认操作系统版本:
# uname -osr # more /etc/redhat-release |
以下项目需要进行检查,检查不符合的需要进行调整;
- 用uname -r命令检查是否是x86_64位系统
- 关闭selinux;修改/etc/selinux/config文件,将SELINUX=后面的值改为disabled。
cat /etc/selinux/config
[root@test ~]# cat /etc/selinux/config [root@test ~]# cp /etc/selinux/config /etc/selinux/config_`date +"%Y%m%d_%H%M%S"`&& sed -i 's/SELINUX\=enforcing/SELINUX\=disabled/g' /etc/selinux/config |
2.3安装必要包
配置yum源 ##挂载镜像源 mount -o loop -t iso9660 /media/CentOS-7-x86_64-Everything-1810.iso /media/disk ##配置yum源 将原有的配置文件重命名,否则local.repo无法使用 # cd /etc/yum.repos.d # mv CentOS-Base.repo CentOS-Base.repo.bak # cat <<EOF>>/etc/yum.repos.d/local.repo [local] name=local baseurl=file:///media/disk gpgcheck=0 enabled=1 EOF yum list查看是否配置正确。 在依赖的系统包当中,readline是命令行上下翻页的包,zlib是备份压缩选项用的包,除了下面列出的依赖包,其他按需安装。 GNU、make version 3.80 or newer is required GCC tar Readline zlib Perl 5.8.3 or later is needed 依赖包检查 # rpm -q --qf '%{NAME}-%{VERSION}-%{RELEASE} (%{ARCH})\n' \ readline \ readline-devel \ zlib \ zlib-devel \ gettext \ gettext-devel \ openssl \ openssl-devel \ pam \ pam-devel \ libxm12 \ libxm12-devel \ libxslt \ libxslt-devel \ perl \ perl-devel \ tcl-devel \ uuid-devel \ gcc \ gcc-c++ \ make \ flex \ bison \ perl-ExtUtils* 安装依赖包 yum -y install readline readline-devel zlib zlib-devel gettext gettext-devel openssl openssl-devel pam pam-devel libxml2 libxml2-devel libxslt libxslt-devel perl perl-devel tcl-devel uuid-devel gcc gcc-c++ make flex bison perl-ExtUtils* |
2.4编辑hosts文件
将主机名和ip解析写到/etc/hosts文件 # cp /etc/hosts /etc/hosts_`date +"%Y%m%d_%H%M%S"` # cat>>/etc/hosts<<EOF 192.168.0.203 pg12 EOF |
2.5内核参数调整
以下列出了推荐的内核参数值。
参数名 | 参数值 | 说明 |
fs.file-max | 76724200 | file handles available at the system level(系统下可打开的最大文件句柄数, 要大于进程数) |
| 10000 | kernel.sem = SEMMSL SEMMNS SEMOPM SEMMNI |
kernel.shmni | 4096 | 设置系统范围内共享内存段的最大数量 |
kernel.shmall | 1073741824 | 系统任意时刻可以分配的所有共享内存段的总和的最大值(以页为单位),其值应不小于 shmmax/page_size,推荐设置为物理内存大小除以分页大小。 |
kernel.shmmax | 4398046511104 | 单个内存段最大, 设置为内存大小 |
net.core.rmem_default | 262144 | 接收套接字缓冲区大小的缺省值(以字节为单位) |
net.core.rmem_max | 4194304 | 接收套接字缓冲区大小的最大值(以字节为单位) |
net.core.wmem_default | 262144 | 发送套接字缓冲区大小的缺省值(以字节为单位) |
net.core.wmem_max | 1048576 | 发送套接字缓冲区大小的最大值(以字节为单位) |
fs.aio-max-nr | 40960000 | aio-max-nr =no of process per DB * no of databases * 4096 |
net.ipv4.ip_local_port_range | 9000 65500 | Various prerequisite checks (such as the |
vm.min_free_kbytes | 524288 | If the platform is Linux, set up hugepages and set kernel parameter vm.min_free_kbytes to reserve 512MB. Setting hugepages is probably the single most important thing to do on Linux. Note that memory_target can not be set when using hugepages. |
vm.vfs_cache_pressure | 200 | 该文件表示内核回收用于 directory 和 inode cache内存的倾向;缺省值 100 表示内核将根据 pagecache和 swapcache,把 directory 和 inode cache 保持在一个合理的百分比;降低该值低于 100,将导致内核倾向于保留 directory 和 inode cache;增加该值超过 100,将导致内核倾向于回收 directory 和 inode cache |
vm.swappiness | 40 | 这个参数从 RHEL 6.4 开始与之前的版本的行为有所不同,建议不要设置为 0。 |
vm.dirty_background_ratio | 3 | 这个参数指定了当文件系统缓存脏页数量达到系统内存 百 分 之 多 少 时 ( 如 5% ) 就 会 触 发pdflush/flush/kdmflush 等后台回写进程运行,将一定缓存的脏页异步地刷入外存 |
vm.dirty_ratio | 20 | 这个参数则指定了当文件系统缓存脏页数量达到系统内存百分之多少时(如 10%),系统不得不开始处理缓存脏页(因为此时脏页数量已经比较多,为了避免数据丢失需要将一定脏页刷入外存);在此过程中很多应用进程可能会因为系统转而处理文件 IO 而阻塞。 |
vm.dirty_expire_centisecs | 500 | 这个参数声明 Linux 内核写缓冲区里面的数据多“旧”了之后, pdflush 进程就开始考虑写到磁盘中去。单位是 1/100 秒。缺省是 30000,也就是 30 秒的数据就算旧了,将会刷新磁盘。 |
vm.nr_hugepages | 这个参数值需要根据实际的大内存页面数设置,这个 | |
net.ipv4.conf.eth3.rp_filter | 0 | 根据私网网口情况调整, rp_filter 用于实现反向过 |
net.ipv4.conf.eth7.rp_filter | 0 | 根据私网网口情况调整, rp_filter 用于实现反向过 |
net.ipv4.conf.all.rp_filter | 0 | 根据私网网口情况调整, rp_filter 用于实现反向过 |
为方便操作,可以直接将下面的文本附加到/etc/sysctl.conf 文件中,然后执行
sysctl -p 命令使设置生效。
# cp /etc/sysctl.conf /etc/sysctl.conf_`date +"%Y%m%d_%H%M%S"` # cat>>/etc/sysctl.conf<<EOF fs.file-max = 76724200 kernel.sem = 10000 10240000 10000 1024 kernel.shmmni = 4096 kernel.shmall = 253702 kernel.shmmax = 1039163392 net.ipv4.ip_local_port_range = 9000 65500 net.core.rmem_default = 262144 net.core.wmem_default = 262144 net.core.rmem_max = 4194304 net.core.wmem_max = 1048576 fs.aio-max-nr = 40960000 vm.dirty_ratio=20 vm.dirty_background_ratio=3 vm.dirty_writeback_centisecs=100 vm.dirty_expire_centisecs=500 vm.swappiness=10 vm.min_free_kbytes=524288 vm.swappiness=0 vm.overcommit_memory=2 vm.overcommit_ratio=75 net.ipv4.ip_local_port_range = 10000 65535 EOF # sysctl -p |
2.6时间和时钟同步
查看时区
# timedatectl status
确认时区,并且时间同步。
[root@pg12 etc]# timedatectl status Local time: Thu 2023-03-23 15:46:20 CST Universal time: Thu 2023-03-23 07:46:20 UTC RTC time: Thu 2023-03-23 07:46:20 Time zone: Asia/Shanghai (CST, +0800) NTP enabled: yes NTP synchronized: no RTC in local TZ: no DST active: n/a |
建议:主机工程师设置时间同步。
修改时区:
# timedatectl set-timezone Asia/Shanghai
2.7创建用户和组
注:如果原环境有用户,则先清理,在创建 # id postgres # cat /etc/group |grep dba # userdel -r postgres # groupdel dba # groupadd dba -g 2000 # useradd postgres -g 2000 -u 2000 # id postgres uid=2000(postgres) gid=2000(dba) groups=2000(dba) # echo "postgres123"|passwd --stdin postgres Changing password for user postgres. passwd: all authentication tokens updated successfully. |
2.8目录规划
源文件目录 # mkdir /soft 安装文件目录 # mkdir -p /opt/pg12 数据目录 # mkdir -p /opt/pgdata WAL 目录 # mkdir -p /opt/pgwal 归档目录 # mkdir -p /opt/pgarchive # chown -R postgres:dba /soft /opt # chmod 0700 /opt/pgdata /opt/pgwal /opt/pgarchive 如果再同一台服务器安装多套数据库,则,示例: 数据目录 # mkdir -p /opt/pgdata6666 WAL 目录 # mkdir -p /opt/pgwal6666 归档目录 # mkdir -p /opt/pgarchive6666 # chown -R postgres:dba /soft /opt # chmod 0700 /opt/pgdata6666 /opt/pgwal6666 /opt/pgarchive6666 |
2.9用户limits设置
- 把下面的行增加到/etc/security/limits.conf 文件中
# End of file
# cp /etc/security/limits.conf /etc/security/limits.conf_`date +"%Y%m%d_%H%M%S"` # cat>>/etc/security/limits.conf<<EOF postgres soft nofile 1048576 postgres hard nofile 1048576 postgres soft nproc 131072 postgres hard nproc 131072 postgres soft stack 10240 postgres hard stack 32768 postgres soft core 6291456 postgres hard core 6291456 EOF |
# cat /etc/security/limits.conf
reboot主机
2.10禁用防火墙(非必须,不影响安装)
生产环境如使用了白名单,则在客户端连接时需要添加白名单 [root@pg12 ~]# systemctl status firewalld.service ● firewalld.service - firewalld - dynamic firewall daemon Loaded: loaded (/usr/lib/systemd/system/firewalld.service; enabled; vendor preset: enabled) Active: active (running) since Wed 2023-04-19 09:21:01 CST; 43min ago Docs: man:firewalld(1) Main PID: 2959 (firewalld) Tasks: 2 CGroup: /system.slice/firewalld.service └─2959 /usr/bin/python -Es /usr/sbin/firewalld --nofork --nopid Apr 19 09:20:50 pg12 systemd[1]: Starting firewalld - dynamic firewall daemon... Apr 19 09:21:01 pg12 systemd[1]: Started firewalld - dynamic firewall daemon. [root@pg12 ~]# systemctl stop firewalld.service [root@pg12 ~]# systemctl disable firewalld.service Removed symlink /etc/systemd/system/multi-user.target.wants/firewalld.service. Removed symlink /etc/systemd/system/dbus-org.fedoraproject.FirewallD1.service. [root@pg12 ~]# systemctl status firewalld.service ● firewalld.service - firewalld - dynamic firewall daemon Loaded: loaded (/usr/lib/systemd/system/firewalld.service; disabled; vendor preset: enabled) Active: inactive (dead) Docs: man:firewalld(1) Apr 19 09:20:50 pg12 systemd[1]: Starting firewalld - dynamic firewall daemon... Apr 19 09:21:01 pg12 systemd[1]: Started firewalld - dynamic firewall daemon. Apr 19 10:08:18 pg12 systemd[1]: Stopping firewalld - dynamic firewall daemon... Apr 19 10:08:19 pg12 systemd[1]: Stopped firewalld - dynamic firewall daemon. |
安装与卸载
3.1解压安装包
# su - postgres $ cd /soft $ tar -zxvf postgresql-12.1.tar.gz |
3.2编译安装
a,配置 [root@pg12 pg12]# su - postgres [postgres@pg12 soft]$ cd postgresql-12.1/ [postgres@pg12 postgresql-12.1]$ ./configure --prefix=/opt/pg12 --with-pgport=5555 注:--prefix=参数指定数据库安装目录,--with-pgport=参数指定服务器和客户端的端口,在此处定义数据库端口为5555, |
使用gmake或者gmake world
b,编译 [postgres@pg12 soft]$ cd postgresql-12.1/ [postgres@pg12 soft]$ gmake world |
当看到最后一行显示为
PostgreSQL, contrib, and documentation successfully made. Ready to install.
说明已经编译成功
使用gmake install或者gmake install-world进行安装
安装 $ gmake install-world |
当看到最后一行显示为:
PostgreSQL, contrib, and documentation installation complete.
说明已经安装成功
3.3查看版本
$ /opt/pg12/bin/postgres --version postgres (PostgreSQL) 12.1 |
3.4设置软链接
$ cd /opt $ ln -s /opt/pg12 /opt/pgsql --pgsql目录不需要创建 |
3.5初始化数据目录
下面命令中大小写敏感,-D -X -W都必须是大写 $ /opt/pgsql/bin/initdb -D/opt/pgdata -X/opt/pgwal -EUTF8 -Upostgres -W Enter new superuser password: postgres123 Enter it again: postgres123 |
当看到最后一行显示如下,代表初始化成功
Success. You can now start the database server using: 可以用如下命令启动数据库,-l是字母l /opt/pgsql/bin/pg_ctl -D /opt/pgdata -l logfile start 查看数据库服务器使用的本地UNIX套接字,查看安装完成后的端口号是5555, [postgres@pg12 opt]$ netstat -lp --protocol=unix | grep postgres (Not all processes could be identified, non-owned process info will not be shown, you would have to be root to see it all.) unix 2 [ ACC ] STREAM LISTENING 74613 1392/postgres /tmp/.s.PGSQL.5555 查看数据库运行状态 [postgres@pg12 ~]$ /opt/pg12/bin/pg_ctl -D /opt/pgdata status pg_ctl: server is running (PID: 27600) /opt/pg12/bin/postgres "-D" "/opt/pgdata" |
3.6修改数据库参数
方法一:修改/opt/pgdata/postgresql.conf 文件,永久修改,需要重启数据库,参数和建议值如下表格所示:
$ cp /opt/pgdata/postgresql.conf /opt/pgdata/postgresql.conf_`date +"%Y%m%d_%H%M%S"` |
序 号 | 参数 | 参数说明 | 默认值 | 建议值 |
1 | listen_addresses | 监听地址 | localhost | * |
2 | port | 端口 | 5432 | 按需修改编译使用5555 |
3 | max_connections | 最大连连接数 | 100 | 1000(按需调整) |
4 | unix_socket_directories | socket 文件目录 | /tmp | $PGDATA 的路径:/opt/pgdata |
5 | shared_buffers | 数据缓存 | 128MB | 1/4 物理内存:4*1/4=1G |
6 | work_mem | order by,distinct 用到 | 4MB | %2~%4 物理内存:40.96MB |
7 | wal_level | wal 级别 | replica | replica |
8 | max_wal_size | wal 最大限制 | 1GB | shared buffer2 倍:2G |
9 | min_wal_size |
| 80MB | |
10 | archive_mode | 归档模式 | off | on |
11 | archive_command | 归档命令 | 空 | 'DATE=`date |
12 | autovacuum | 自动 vacuum | on | on |
13 | log_destination | 描述记录日志的方法,包 | 空 | csvlog |
14 | logging_collector | 是否开启日志搜集,是配 | OFF | ON |
15 | log_directory | 确认日志生成目录 | log | log |
16 | log_filename | 日志生成名称 | postgresql-%Y-%m- | postgresql_log.%a |
18 | log_truncate_on_rotation | 确认是否覆盖同名的日志文件 | OFF | ON |
20 | log_rotation_size | 独立日志文件的最大大小,超过该大小即可被重用 | 10MB | 100MB |
21 | log_min_messages | 控制日志的详细程度, 有效值是 DEBUG5, DEBUG4, | warning | warining |
22 | log_min_duration_statement | 慢 SQL 记录(秒),超过多长时间的 SQL 被记录在日志中 | 60s | 根据业务情况确定该值 |
23 | log_checkpoints | 检查点的信息记录在日志中,包括缓冲区写入测数据量和花费的时间 | Off | On |
24 | log_connections | 记录到服务器的每个连接 | Off | On |
25 | log_disconnections | 会话退出后,记录其信息 | Off | On |
26 | log_duration | 记录 SQL 的执行时间 | OFF | ON |
27 | log_lock_waits | 记录长时间的阻塞 | OFF | ON |
28 | log_statement | 记录那种类型的 SQL 语句 | None | DDL |
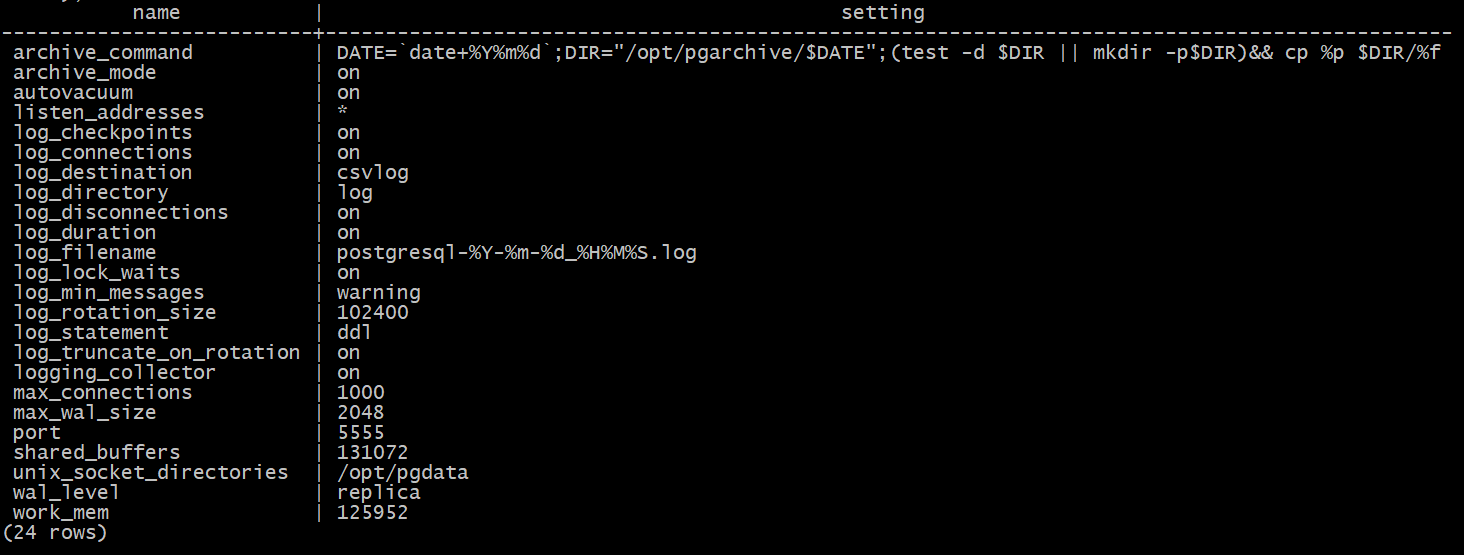
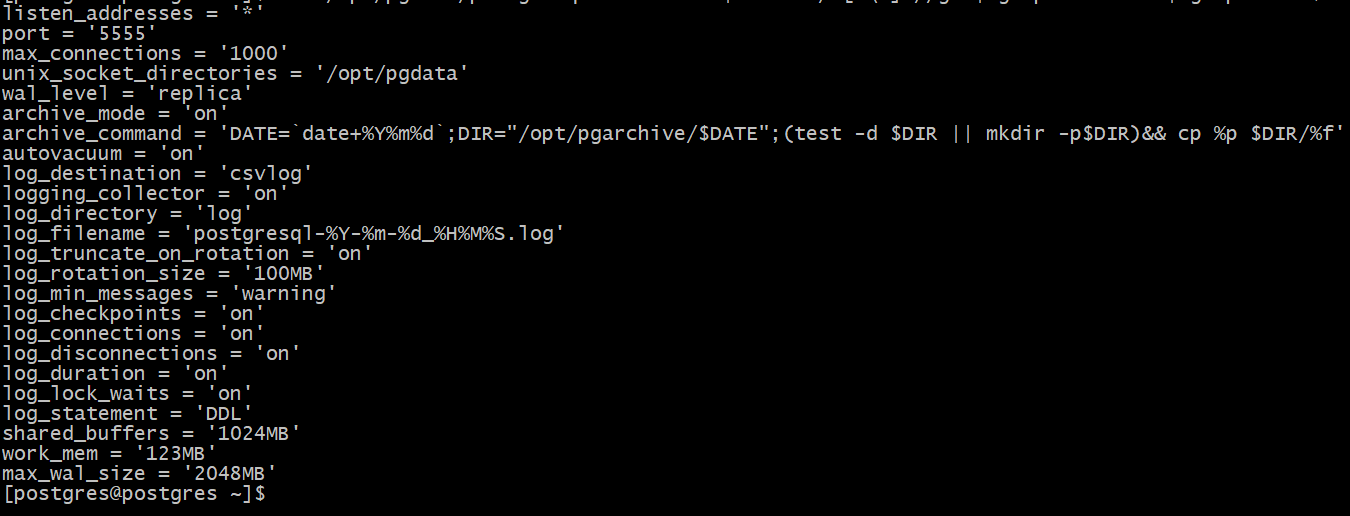
方法二:通过alter system命令修改。会自动编辑postgresql.auto.conf文件,在数据库启动时会加载此文件,并用它的配置覆盖postgresql.conf中已有的配置(不要手动修改postgresql.auto.conf文件),postgresql.auto.conf文件的优先级比postgresql.conf高,这两种方法都是全局配置修改。 登录数据库修改参数 [postgres@pg12 opt]$ /opt/pg12/bin/psql -d postgres -U postgres -h localhost -p 5555 psql (12.1) Type "help" for help. postgres=# 执行如下命令修改数据库参数:min_wal_size 和 log_min_duration_statement 两个参数没有最佳实践值,暂不做修改。 alter system set listen_addresses = '*'; alter system set port = 5555; alter system set max_connections = 1000; alter system set unix_socket_directories = '/opt/pgdata'; alter system set wal_level = replica; alter system set archive_mode = on; alter system set archive_command = 'DATE=`date+%Y%m%d`;DIR="/opt/pgarchive/$DATE";(test -d $DIR || mkdir -p$DIR)&& cp %p $DIR/%f'; alter system set autovacuum = on; alter system set log_destination = 'csvlog'; alter system set logging_collector = on; alter system set log_directory = 'log'; alter system set log_filename = 'postgresql-%Y-%m-%d_%H%M%S.log'; alter system set log_truncate_on_rotation = on; alter system set log_rotation_size = '100MB'; alter system set log_min_messages = warning; alter system set log_checkpoints = on; alter system set log_connections = on; alter system set log_disconnections = on; alter system set log_duration = on; alter system set log_lock_waits = on; alter system set log_statement = 'DDL'; alter system set shared_buffers = '1024MB'; alter system set work_mem = '123MB'; alter system set max_wal_size = '2048MB'; 注意:命令行参数修改单位GB需要换算成MB来执行,否则修改不成功。 注:如上红色的三个参数需要根据实际去调整,注意不能出现小数点 shared_buffers 1/4 物理内存:4*1/4=1G work_mem %2~%4 物理内存 max_wal_size shared buffer 2 倍:2G 重启数据库,上述参数修改需要重启数据库才能生效 $ /opt/pg12/bin/pg_ctl -D /opt/pgdata restart 登录数据库,数据库端口为5555,登录时要指定5555端口 $ /opt/pg12/bin/psql -d postgres -U postgres -h localhost -p 5555 查看设置的参数是否生效 方法一:登录数据库查看 select name,setting from pg_settings where name in ('listen_addresses','port','max_connections','unix_socket_directories','wal_level','archive_mode','archive_command','autovacuum','log_destination','logging_collector','log_directory','log_filename','log_truncate_on_rotation','log_rotation_size','log_min_messages','log_checkpoints','log_connections','log_disconnections','log_duration','log_lock_waits','log_statement','shared_buffers','work_mem','max_wal_size'); 修改后的参数如下所示: 方法二:查看文件postgresql.auto.conf [postgres@pg12]$ cat /opt/pgdata/postgresql.auto.conf | sed 's/^[ \t]*//g' | grep -v "^#" | grep -v "^$" |awk -F# '{ print $1 }' | grep -v "^$" |
3.7配置环境变量
[postgres@pg12 ~]$ cp ~/.bash_profile ~/.bash_profile_`date +"%Y%m%d_%H%M%S"` [postgres@pg12 ~]$ vi ~/.bash_profile PATH=$PATH:$HOME/.local/bin:$HOME/bin export PATH #add export PGPORT=5555 export PGDATA=/opt/pgdata export LANG=en_US.utf8 export PGHOME=/opt/pgsql export LD_LIBRARY_PATH=$PGHOME/lib:/lib64:/usr/lib64:/usr/local/lib64:/lib:/usr/lib:/usr/local/lib:$LD_LIBRARY_PATH export DATE=`date +"%Y%m%d%H%M"` export PATH=$PGHOME/bin:$PATH:. export MANPATH=$PGHOME/share/man:$MANPATH export PGUSER=postgres export PGHOST=localhost #export PGDATABASE=testdb alias rm='rm -i' alias ll='ls -lh' [postgres@pg12 ~]$ source ~/.bash_profile 如果同一台服务器需要安装多个数据库,则示例: cp .bash_profile .bash_profile_6666 修改环境变量 Port 为6666 Pgdata 为/opt/pgdata6666 Source .bash_profile_6666 登录数据库 [postgres@pg12 ~]$ psql psql (12.1) Type "help" for help. postgres=# |
3.8配置开机启动
1,查找postgresql数据库开机自启动脚本位置 [root@pg12 ~]# find / -name start-scripts /soft/postgresql-12.1/contrib/start-scripts [root@pg12 ~]# cd /soft/postgresql-12.1/contrib/start-scripts [root@pg12 start-scripts]# ls -lrt total 8 -rw-r--r-- 1 postgres dba 3552 Nov 12 2019 linux -rw-r--r-- 1 postgres dba 1467 Nov 12 2019 freebsd drwxr-xr-x 2 postgres dba 84 Nov 12 2019 macos linux文件为启动脚本文件 2,将linux文件复制到/etc/init.d目录下,并且将其重命名为postgresql [root@pg12 start-scripts]# cp linux /etc/init.d/postgresql 3,进入/etc/init.d目录下,修改postgresql文件 [root@pg12 start-scripts]# cd /etc/init.d/ [root@pg12 init.d]# ls functions netconsole network postgresql README 将prefix设置为postgresql的安装路径:/opt/pg12 将PGDATA设置为postgresql的数据目录路径:/opt/pgdata [root@pg12 init.d]# vi postgresql prefix=/opt/pg12 PGDATA="/opt/pgdata" 如上两个路径可以通过查看进程来确定,master进程对应的路径 [root@pg12 ~]# ps -ef |grep postgres postgres 3584 1 0 17:28 ? 00:00:00 /opt/pg12/bin/postmaster -D /opt/pgdata postgres 3646 3584 0 17:28 ? 00:00:00 postgres: logger postgres 3653 3584 0 17:28 ? 00:00:00 postgres: checkpointer ...... [root@pg12 init.d]# chmod +x postgresql [root@pg12 init.d]# chkconfig --add postgresql [root@pg12 init.d]# chkconfig --list Note: This output shows SysV services only and does not include native systemd services. SysV configuration data might be overridden by native systemd configuration. If you want to list systemd services use 'systemctl list-unit-files'. To see services enabled on particular target use 'systemctl list-dependencies [target]'. netconsole 0:off 1:off 2:off 3:off 4:off 5:off 6:off network 0:off 1:off 2:on 3:on 4:on 5:on 6:off postgresql 0:off 1:off 2:on 3:on 4:on 5:on 6:off 重启服务器测试 [root@pg12 init.d]# init 6 数据库关闭或者启动状态下重启服务器,数据库都会自动拉起来 [postgres@pg12 ~]$ pg_ctl status pg_ctl: server is running (PID: 3584) /opt/pg12/bin/postgres "-D" "/opt/pgdata" 数据库已经被自动拉起 |
3.9 启动和停止数据库
查看数据库运行状态 --pg_ctl -D /opt/pgdata status \\已经配置了环境变量,以下再不需要再指定数据目录了 $ pg_ctl status pg_ctl: no server running 启动数据库 $ pg_ctl -D /opt/pgdata start 查看数据库运行状态 $ pg_ctl -D /opt/pgdata status pg_ctl: server is running (PID: 15554) /opt/pg12/bin/postgres "-D" "/opt/pgdata" 停止数据库 $ pg_ctl -D /opt/pgdata stop 登录数据库 [postgres@pg12 ~]$ psql psql (12.1) Type "help" for help. 或者 [postgres@pg12 ~]$ psql -U postgres -h localhost -p 5555 psql (12.1) Type "help" for help. postgres=# 查看版本/数据库版本/查看数据库版本 postgres=# select version(); version --------------------------------------------------------------------------------------------------------- PostgreSQL 12.1 on x86_64-pc-linux-gnu, compiled by gcc (GCC) 4.8.5 20150623 (Red Hat 4.8.5-36), 64-bit (1 row) 或者 postgres=# select * from version(); version --------------------------------------------------------------------------------------------------------- PostgreSQL 12.1 on x86_64-pc-linux-gnu, compiled by gcc (GCC) 4.8.5 20150623 (Red Hat 4.8.5-36), 64-bit (1 row) --查看当前连接的数据库/当前数据库 select current_database(); postgres=# select current_database(); current_database ------------------ postgres (1 row) 退出数据库 postgres=# \q [postgres@pg12 pgdata]$ List of databases Name | Owner | Encoding | Collate | Ctype | Access privileges -----------+----------+----------+-------------+-------------+----------------------- postgres | postgres | UTF8 | en_US.UTF-8 | en_US.UTF-8 | template0 | postgres | UTF8 | en_US.UTF-8 | en_US.UTF-8 | =c/postgres + | | | | | postgres=CTc/postgres template1 | postgres | UTF8 | en_US.UTF-8 | en_US.UTF-8 | =c/postgres + | | | | | postgres=CTc/postgres (3 rows) 数据库列表/显示数据库/查询数据库/数据库信息/列出数据库,\l 字母l postgres是默认的一个数据库,template0和template1是两个模板数据库 postgres=# \l postgres=# 也可以用select * from pg_database;来查看数据库列表 postgres=# select * from pg_database; oid | datname | datdba | encoding | datcollate | datctype | datistemplate | datallowconn | datconnlimit | datlastsysoid | datfrozenxid | datminmxid | dattable space | datacl -------+-----------+--------+----------+-------------+-------------+---------------+--------------+--------------+---------------+--------------+------------+--------- ------+------------------------------------- 13593 | postgres | 10 | 6 | en_US.UTF-8 | en_US.UTF-8 | f | t | -1 | 13592 | 480 | 1 | 1663 | 1 | template1 | 10 | 6 | en_US.UTF-8 | en_US.UTF-8 | t | t | -1 | 13592 | 480 | 1 | 1663 | {=c/postgres,postgres=CTc/postgres} 13592 | template0 | 10 | 6 | en_US.UTF-8 | en_US.UTF-8 | t | f | -1 | 13592 | 480 | 1 | 1663 | {=c/postgres,postgres=CTc/postgres} (3 rows) postgres=# |
3.10添加白名单
数据库pg_hba.conf添加客户端连接白名单,以便pgadmin工具连接。 示例:/opt/pgdata/pg_hba.conf [postgres@pg12 ~]$ cd /opt/pgdata [postgres@pg12 ~]$ cp pg_hba.conf pg_hba.conf_`date +"%Y%m%d_%H%M%S"` [postgres@pg12 ~]$ vi pg_hba.conf # TYPE DATABASE USER ADDRESS METHOD # "local" is for Unix domain socket connections only local all all trust # IPv4 local connections: host all all 127.0.0.1/32 trust host all all 192.168.0.2/24 trust # IPv6 local connections: host all all ::1/128 trust #host all all 192.168.0.2/24 trust # Allow replication connections from localhost, by a user with the # replication privilege. local replication all trust host replication all 127.0.0.1/32 trust host replication all ::1/128 trust [postgres@pg12 ~]$ 触发sighup信号,使更改生效,运行“pg_ctl reload”,或者运行“select pg_reload_conf()”。 |
3.11卸载数据库
如需卸载数据库,使用以下方法: 关闭数据库,清理环境 $ pg_ctl status $ pg_ctl stop # id postgres # userdel -r postgres # cat /etc/group |grep dba # groupdel dba # rm -rf /opt 删除开机自启动配置 # cd /etc/init.d # rm postgresql rm: remove regular file ‘postgresql’? yes # ls -lrt |
数据基本操作
4.1开启/关闭数据库
打开数据库 # su - postgres $ pg_ctl -D /opt/pgdata start 关闭数据库 $ pg_ctl -D /opt/pgdata stop |
4.2数据库状态
$ pg_ctl -D /opt/pgdata status pg_ctl: server is running (PID: 15720) /opt/pg12/bin/postgres "-D" "/opt/pgdata" |
4.3重启数据库
$ pg_ctl -D /opt/pgdata restart |
第五章数据库参数配置
5.1配置数据库错误日志
开日志:
本配置已在3.6章节,修改数据库参数中做过修改,无需修改 $ vi /opt/pgdata/postgresql.conf 将如下标黄的值做如下修改并保存 # REPORTING AND LOGGING #------------------------------------------------------------------------------ # - Where to Log - log_destination = 'csvlog' # Valid values are combinations of # stderr, csvlog, syslog, and eventlog, # depending on platform. csvlog # requires logging_collector to be on. # This is used when logging to stderr: logging_collector = on # Enable capturing of stderr and csvlog # into log files. Required to be on for # csvlogs. # (change requires restart) # These are only used if logging_collector is on: log_directory = 'log' # directory where log files are written, # can be absolute or relative to PGDATA log_filename = 'postgresql-%Y-%m-%d_%H%M%S.log' # log file name pattern, # can include strftime() escapes log_file_mode = 0600 # creation mode for log files, # begin with 0 to use octal notation log_truncate_on_rotation = on # If on, an existing log file with the # same name as the new log file will be # truncated rather than appended to. # But such truncation only occurs on # time-driven rotation, not on restarts # or size-driven rotation. Default is # off, meaning append to existing files # in all cases. log_rotation_age = 1d # Automatic rotation of logfiles will # happen after that time. 0 disables. log_rotation_size = 100MB # Automatic rotation of logfiles will # happen after that much log output. # 0 disables. |
初次配置数据库错误日志后,数据库重启即可看到/opt/pgdata目录下自动产生了一个log目录来存放数据库日志
[postgres@pg12 log]$ pwd /opt/pgdata/log [postgres@pg12 log]$ ls postgresql-2023-03-30_145949.csv postgresql-2023-03-30_145949.log 查看错误日志 [postgres@pg12 log]$ tail -f postgresql-2023-03-30_145949.csv 2023-03-30 14:59:49.651 CST,,,12629,,64253365.3155,1,,2023-03-30 14:59:49 CST,,0,LOG,00000,"ending log output to stderr",,"Future log output will go to log destination ""csvlog"".",,,,,,,"" 2023-03-30 14:59:49.654 CST,,,12631,,64253365.3157,1,,2023-03-30 14:59:49 CST,,0,LOG,00000,"database system was shut down at 2023-03-30 14:45:44 CST",,,,,,,,,"" 2023-03-30 14:59:49.660 CST,,,12629,,64253365.3155,2,,2023-03-30 14:59:49 CST,,0,LOG,00000,"database system is ready to accept connections",,,,,,,,,"" 2023-03-30 15:02:54.643 CST,,,12629,,64253365.3155,3,,2023-03-30 14:59:49 CST,,0,LOG,00000,"received fast shutdown request",,,,,,,,,"" 2023-03-30 15:02:54.689 CST,,,12629,,64253365.3155,4,,2023-03-30 14:59:49 CST,,0,LOG,00000,"aborting any active transactions",,,,,,,,,"" 2023-03-30 15:02:54.690 CST,,,12629,,64253365.3155,5,,2023-03-30 14:59:49 CST,,0,LOG,00000,"background worker ""logical replication launcher"" (PID 12637) exited with exit code 1",,,,,,,,,"" 2023-03-30 15:02:54.692 CST,,,12632,,64253365.3158,1,,2023-03-30 14:59:49 CST,,0,LOG,00000,"shutting down",,,,,,,,,"" 2023-03-30 15:02:54.715 CST,,,12629,,64253365.3155,6,,2023-03-30 14:59:49 CST,,0,LOG,00000,"database system is shut down",,,,,,,,,"" |
5.2配置数据库的监听IP和监听端口
本配置已在3.6章节,修改数据库参数中做过修改,无需修改 [postgres@pg12 pgdata]$ cd /opt/pgdata [postgres@pg12 pgdata]$ vi postgresql.conf # - Connection Settings - listen_addresses = '*' # what IP address(es) to listen on; # comma-separated list of addresses; # defaults to 'localhost'; use '*' for all # (change requires restart) port = 5555 # (change requires restart) max_connections = 1000 # (change requires restart) |
5.3查看控制文件状态
[postgres@pg12 ~]$ pg_controldata -D $PGDATA pg_control version number: 1201 Catalog version number: 201909212 Database system identifier: 7213730607668325415 Database cluster state: in production pg_control last modified: Thu 30 Mar 2023 03:14:42 PM CST Latest checkpoint location: 0/1651670 Latest checkpoint's REDO location: 0/1651638 Latest checkpoint's REDO WAL file: 000000010000000000000001 Latest checkpoint's TimeLineID: 1 Latest checkpoint's PrevTimeLineID: 1 Latest checkpoint's full_page_writes: on Latest checkpoint's NextXID: 0:493 Latest checkpoint's NextOID: 16389 Latest checkpoint's NextMultiXactId: 1 Latest checkpoint's NextMultiOffset: 0 Latest checkpoint's oldestXID: 480 Latest checkpoint's oldestXID's DB: 1 Latest checkpoint's oldestActiveXID: 493 Latest checkpoint's oldestMultiXid: 1 Latest checkpoint's oldestMulti's DB: 1 Latest checkpoint's oldestCommitTsXid:0 Latest checkpoint's newestCommitTsXid:0 Time of latest checkpoint: Thu 30 Mar 2023 03:14:42 PM CST Fake LSN counter for unlogged rels: 0/3E8 Minimum recovery ending location: 0/0 Min recovery ending loc's timeline: 0 Backup start location: 0/0 Backup end location: 0/0 End-of-backup record required: no wal_level setting: replica wal_log_hints setting: off max_connections setting: 100 max_worker_processes setting: 8 max_wal_senders setting: 10 max_prepared_xacts setting: 0 max_locks_per_xact setting: 64 track_commit_timestamp setting: off Maximum data alignment: 8 Database block size: 8192 Blocks per segment of large relation: 131072 WAL block size: 8192 Bytes per WAL segment: 16777216 Maximum length of identifiers: 64 Maximum columns in an index: 32 Maximum size of a TOAST chunk: 1996 Size of a large-object chunk: 2048 Date/time type storage: 64-bit integers Float4 argument passing: by value Float8 argument passing: by value Data page checksum version: 0 Mock authentication nonce: 9d70573928c7da3a28d421a9c5920f7dc993a11b8888e29176aef6f3a27d1481 [postgres@pg12 ~]$ |
