关于Yolov8的安装在前一个环节忽略了,其实非常简单,只需要以下两个步骤:
1、安装pytorch
pip3 install torch torchvision torchaudio --index-url https://download.pytorch.org/whl/cu118
2、安装ultralytics
pip install ultralytics
为什么把目录结构单独拿出来扯呢?这个和训练自己的数据集息息相关。
首先我们要知道YOLOv8这次发行中带的预训练模型,是是基于COCO val2017 数据集训练的结果。
Coco2017数据集是具有80个类别的大规模数据集,其数据分为三部分:训练、验证和测试,每部分分别包含 118287, 5000 和 40670张图片,总大小约25g。其中测试数据集没有标注信息,所以注释部分只有训练和验证的
我们看一下yolo进行模型训练的方法,一种是CLI方式,一种是Python方式
CLI方式:
# Build a new model from YAML and start training from scratch
yolo detect train data=coco128.yaml model=yolov8n.yaml epochs=100 imgsz=640

# Start training from a pretrained *.pt model
yolo detect train data=coco128.yaml model=yolov8n.pt epochs=100 imgsz=640

# Build a new model from YAML, transfer pretrained weights to it and start training
yolo detect train data=coco128.yaml model=yolov8n.yaml pretrained=yolov8n.pt epochs=100 imgsz=640
Python方式:
from ultralytics import YOLO

# Load a model
model = YOLO('yolov8n.yaml')  # build a new model from YAML
model = YOLO('yolov8n.pt')  # load a pretrained model (recommended for training)
model = YOLO('yolov8n.yaml').load('yolov8n.pt')  # build from YAML and transfer weights

# Train the model
results = model.train(data='coco128.yaml', epochs=100, imgsz=640)
我们以CLI方式为例
mode: 选择是训练、验证还是预测的任务蕾西 可选['train', 'val', 'predict']
model: 选择yolov8不同的预训练模型,可选yolov8s.pt、yolov8m.pt、yolov8l.pt、yolov8x.pt;或选择yolov8不同的模型配置文件,可选yolov8s.yaml、yolov8m.yaml、yolov8l.yaml、yolov8x.yaml
data: 选择生成的数据集配置文件
epochs:指的就是训练过程中整个数据集将被迭代多少次,显卡不行你就调小点。
batch:一次看完多少张图片才进行权重更新,梯度下降的mini-batch,显卡不行你就调小点
其中data和model要画重点,data是要自己训练的数据集配置文件。
model一般是预训练模型,通常用yolov8n.pt、yolov8s.pt、yolov8m.pt、yolov8l.pt、yolov8x.pt就可以了,但如果想自己指定训练配置文件呢?这个时候,model就使用yolov8n.yaml等网络配置文件, 增加参数pretrained使用yolov8n.pt了。
这些文件在哪儿呢?
到项目所在的venv\Lib\site-packages\ultralytics目录下,看两个重要的目录cfg/datasets和cfg/models/v8
<PycharmProjectsROOT>\<ProjectName>\venv\Lib\site-packages\ultralytics>
├─assets
├─cfg
│  ├─datasets
│  ├─models
│  │  ├─rt-detr
│  │  ├─v3
│  │  ├─v5
│  │  ├─v6
│  │  └─v8
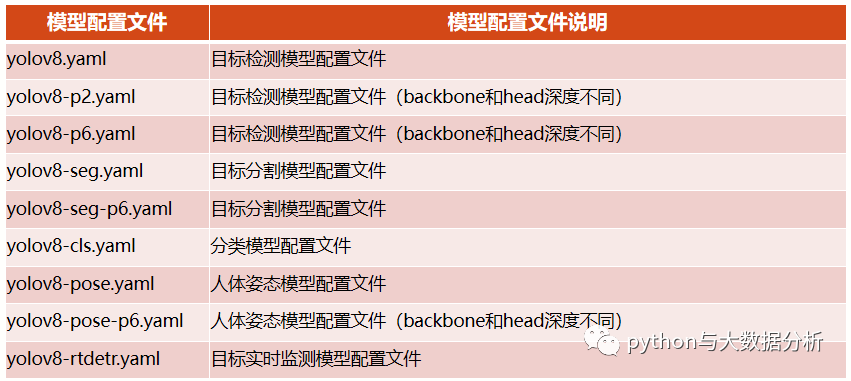
yolov8内置了以下模型配置文件
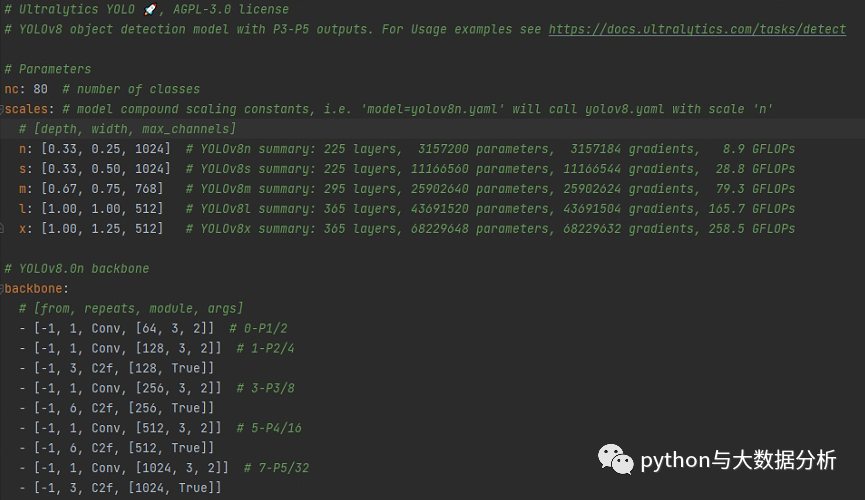
我们看一下yolov8.yaml文件,里面包含了标签总数,yolo几种不同训练模型的Layer数量、参数量、梯度量;骨干网的结构、Head的结构。
要做的事情很简单,基于yolov8.yaml另外复制一份基于训练集命名的文件,只需要修改nc后面的标签总数即可,在训练前可以认为标签总数是已知的。
数据集配置文件还内置Argoverse.yaml、coco-pose.yaml、coco.yaml、coco128-seg.yaml、coco128.yaml、coco8-pose.yaml、coco8-seg.yaml、coco8.yaml、data.yaml、DOTAv2.yaml、GlobalWheat2020.yaml、ImageNet.yaml、Objects365.yaml、open-images-v7.yaml、SKU-110K.yaml、VisDrone.yaml、VOC.yaml、xView.yaml等模板。
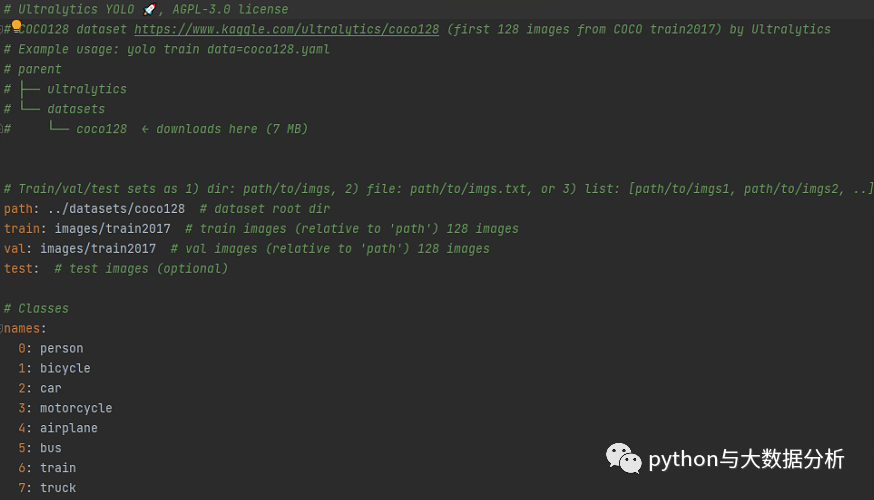
我们看一下coco128.yaml文件,里面包含path(数据集根目录)、train(训练集图片路径))、val(验证集图片路径)、test(测试集图片路径);标签列表清单,按照序号:标签名的方式进行枚举,最后还包括了一个Download script/URL (optional)信息,即下载脚本和路径,这个是可选项 。
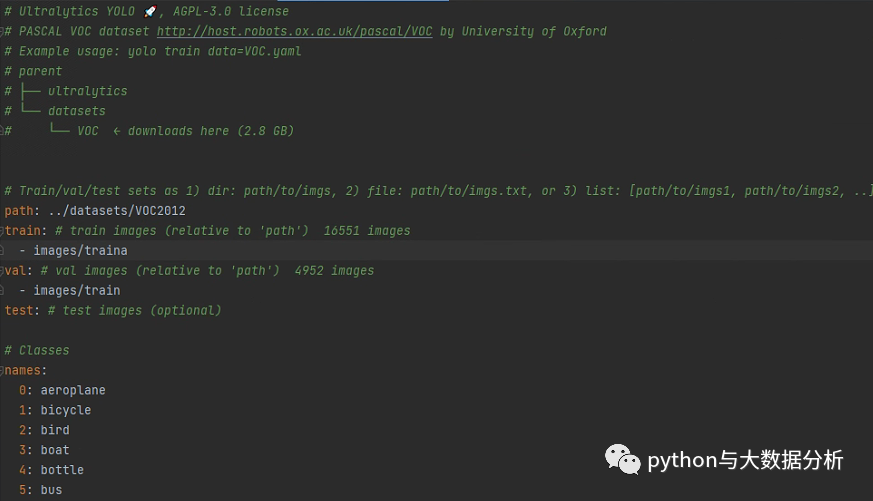
要做的事情很简单,基于coco128.yaml另外复制一份基于训练集命名VOC2012.yaml(我这里是VOC2012)的文件,只需要修改path、train、val、test路径即可;同时需要修改names下的标签列表,然后把多余的download脚本剔除掉,因为假设我们已经提前下载并标注了图片。
再回过头来看一下数据集的组织,在我们的项目根目录下增加一下datasets目录,然后每个目录一个文件夹,文件夹下包括images(图片文件夹)和label(标签文件夹),images放置train、val、test等图片目录,label下一般会放在train、val等标注信息。
└─datasets
    ├─coco128
    │  ├─images
    │  │  └─train2017
    │  └─labels
    │      └─train2017
    └─VOC2012
        ├─images
        │  └─train
        └─labels
            └─train
这个目录该怎么放数据呢?按照正常的做法是先下载VOC2012数据集
VOC2012数据集包括二十个对象类别:
Person :person
Animal :bird, cat, cow, dog, horse, sheep
Vehicle :aeroplane, bicycle, boat, bus, car, motorbike, train
Indoor :bottle, chair, dining table, potted plant, sofa, tv/monitor
VOC2012数据集的目录结构如下:
└─VOCdevkit
    └─VOC2012
        ├─Annotations
        ├─ImageSets
        │  ├─Action
        │  ├─Layout
        │  ├─Main
        │  └─Segmentation
        ├─JPEGImages
        ├─SegmentationClass
        └─SegmentationObject
其中Annotation是标注文件夹,JPEGImages是图片文件夹,基本用到这两个目录,正常情况下我们先会区分训练集、验证集和测试集,当然这次没这么做。不过可以看一下代码,后续做也可以。
import os
import random
import argparse

parser = argparse.ArgumentParser()
#xml文件的地址,根据自己的数据进行修改 xml一般存放在Annotations下
parser.add_argument('--xml_path', default='VOCdevkit/VOC2012/Annotations', type=str, help='input xml label path')
#数据集的划分,地址选择自己数据下的ImageSets/Main
parser.add_argument('--txt_path', default='VOCdevkit/VOC2012/ImageSets/Main', type=str, help='output txt label path')
opt = parser.parse_args()
# Namespace(xml_path='VOCdevkit/VOC2012/Annotations', txt_path='VOCdevkit/VOC2012/ImageSets/Main')

# 训练+验证集一共所占的比例为0.8,剩下的0.2就是测试集
# (train+val)/(train+val+test)=80%
trainval_percent = 0.8
# (train)/(train+val)=80%
# 训练集在训练集和验证集总集合中占的比例
train_percent = 0.8

xmlfilepath = opt.xml_path
# VOCdevkit/VOC2012/Annotations
txtsavepath = opt.txt_path
# VOCdevkit/dataset/ImageSets/Main

# 获取标注文件数量
total_xml = os.listdir(xmlfilepath)
# 创建文件目录
if not os.path.exists(txtsavepath):
    os.makedirs(txtsavepath)

# 随机打散文件序号,生成trainval和train两个随机数组
num = len(total_xml)
list_index = range(num)
tv = int(num * trainval_percent)
tr = int(tv * train_percent)
trainval = random.sample(list_index, tv)
train = random.sample(trainval, tr)


fileTrainVal = open(txtsavepath + '/trainval.txt', 'w')
fileTrain = open(txtsavepath + '/train.txt', 'w')
fileVal = open(txtsavepath + '/val.txt', 'w')
fileTest = open(txtsavepath + '/test.txt', 'w')

for i in list_index:
    # 获取文件名
    name = total_xml[i][:-4] + '\n'
    # 根据trainval,train,val,test的顺序依次写入相关文件
    if i in trainval:
        fileTrainVal.write(name)
        if i in train:
            fileTrain.write(name)
        else:
            fileVal.write(name)
    else:
        fileTest.write(name)

fileTrainVal.close()
fileTrain.close()
fileVal.close()
fileTest.close()
再次是对VOC2012的标注文件XML转换为Yolo的Txt标注格式。
注这里的classes顺序要和上面的VOC2012.yaml中的name保持一致,否则会出现标签名称不对应的情况。
# -*- coding: utf-8 -*-
import xml.etree.ElementTree as ET
import os

sets = ['train', 'val', 'test']
classes = ["aeroplane", 'bicycle', 'bird', 'boat', 'bottle', 'bus', 'car', 'cat', 'chair', 'cow', 'diningtable', 'dog',
           'horse', 'motorcycle', 'person', 'pottedplant', 'sheep', 'sofa', 'train', 'tvmonitor']
absPath = os.getcwd()

def convert(size, box):
    '''

    :param size: 图片size
    :param box: 标注框坐标
    :return:
    VOC->YOLO转换算法
        norm_x=(xmin + xmax)/2/width
        norm_y=(ymin + ymax)/2/height
        norm_w=(xmax - xmin)/width
        norm_h=(ymax - ymin)/height
    YOLO->VOC转换算法
        xmin=width * (norm_x - 0.5 * norm_w)
        ymin=height * (norm_y - 0.5 * norm_h)
        xmax=width * (norm_x + 0.5 * norm_w)
        ymax=height * (norm_y + 0.5 * norm_h)
    '''
    dw = 1. / (size[0])
    dh = 1. / (size[1])
    x = (box[0] + box[1]) / 2.0 - 1
    y = (box[2] + box[3]) / 2.0 - 1
    w = box[1] - box[0]
    h = box[3] - box[2]
    x = x * dw
    w = w * dw
    y = y * dh
    h = h * dh
    return x, y, w, h


def ConvertAnnotation(image_id):
    inputFile = open(absPath + '/VOCdevkit/VOC2012/Annotations/%s.xml' % (image_id), encoding='UTF-8')
    outFile = open(absPath + '/VOCdevkit/VOC2012/YOLOLabels/%s.txt' % (image_id), 'w')
    '''
    VOC2012 标注格式
    <annotation>
        <folder>VOC2012</folder>
        <filename>2008_007069.jpg</filename>
        <source>
            <database>The VOC2008 Database</database>
            <annotation>PASCAL VOC2008</annotation>
            <image>flickr</image>
        </source>
        <size>
            <width>500</width>
            <height>375</height>
            <depth>3</depth>
        </size>
        <segmented>0</segmented>
        <object>
            <name>sheep</name>
            <pose>Right</pose>
            <truncated>0</truncated>
            <occluded>0</occluded>
            <bndbox>
                <xmin>411</xmin>
                <ymin>172</ymin>
                <xmax>445</xmax>
                <ymax>195</ymax>
            </bndbox>
            <difficult>0</difficult>
        </object>
        <object></object>
    </annotation>
    '''

    '''
    Yolo 标注文件格式
    labelclass xCenter yCenter width height
    每个标签有五个数据,依次代表:
    所标注内容的类别,数字与类别一一对应
    1、labelclass 标注框类别 labelclass
    2、xCenter 归一化后标注框的中心点的x轴
    3、yCenter 归一化后标注框的中心点的y轴
    4、width 归一化后目标框的宽度
    5、height 归一化后目标框的高度
    '''
    tree = ET.parse(inputFile)
    root = tree.getroot()
    # 获取标注图片的大小
    size = root.find('size')
    width = int(size.find('width').text)
    height = int(size.find('height').text)
    # 获取标注框信息
    for obj in root.iter('object'):
        difficult = obj.find('difficult').text
        # 获取标注类别名称
        cls = obj.find('name').text
        if cls not in classes or int(difficult) == 1:
            continue
        # 将标注类别按照classes列表信息转换为索引ID
        clsId = classes.index(cls)
        # 获取标注框信息
        xmlBox = obj.find('bndbox')
        boundry = (float(xmlBox.find('xmin').text), float(xmlBox.find('xmax').text), float(xmlBox.find('ymin').text),
             float(xmlBox.find('ymax').text))
        xmin, xmax, ymin, ymax = boundry
        # 标注越界修正
        if xmax > width:
            xmax = width
        if ymax > height:
            ymax = height
        box = (xmin, xmax, ymin, ymax)
        transBox = convert((width, height), box)
        outFile.write(str(clsId) + " " + " ".join([str(a) for a in transBox]) + '\n')

# 判断标注转换目录是否存在
if not os.path.exists(absPath + '/VOCdevkit/VOC2012/YOLOLabels/'):
    os.makedirs(absPath + '/VOCdevkit/VOC2012/YOLOLabels/')
for imageSet in sets:
    # 获取当前文件(train/val/test)的图片ID
    imageIds = open(absPath + '/VOCdevkit/VOC2012/ImageSets/Main/%s.txt' % (imageSet)).read().strip().split()
    listFile = open(absPath + '/VOCdevkit/VOC2012/%s.txt' % (imageSet), 'w')
    for imageId in imageIds:
        # 遍历文件名列表,分别将图片文件全路径写入新的文件中
        listFile.write(absPath + '/VOCdevkit/VOC2012/JPEGImages/%s.jpg\n' % (imageId))
        # 进行文件格式转换
        ConvertAnnotation(imageId)
    listFile.close()
关于Yolov8训练自己的数据集的前序准备工作已完成,后续讲一下怎么开展训练过程。
最后欢迎关注公众号:python与大数据分析