


Table of Contents
- restrict: 修饰指针。除了该指针,不能用其他任何方式修改目标对象。## 12.2 链接类型
第 3 章 7. Dynamic Linking Loader
第 3 章 10. libgc: Garbage Collector
第 3 章 11. libconfig: Configuration File
user.tags[2] = t3;user.code = xxx-xxx-xxx;
- tags: 创建 VIM 使用的 CTAGS 文件。make 常用命令参数:
- LIBS: 需要链接的库名称。除直接提供键值参数外,还可用名为 parse_flags 的特殊参数一次性提供,它会被 ParseFlags 方法自动分解。
- Object: 创建目标文件 (.o)。如果没有构建环境实例,那么这些函数将使用默认环境实例。
前言
作者通过自身学习经历整理出一套 C 语言学习笔记,内容分为4个部分:语言、高级、系统、工具。
适用人群
本文是作者学习 C 语言整理的一些心得体会,想了解这方面可以阅读本教程。
学习前提
在学习本教程之前,你需要对 C 语言基础知识有一定了解。
致谢:https://github.com/qyuhen/book
更新日期 | 更新内容 |
2015-08-7 | C 语言学习笔记 |
第一部分: 语言
示例基于 GCC 32bit...
第 1 章 1. 数据类型
以下是基本整数关键词:
- char: 有符号8位整数。
- short: 有符号16位整数。
- int: 有符号32位整数。
- long: 在32位系统是32整数 (long int),在64位系统则是64位整数。
- long long: 有符号64位整数 (long long int)。
- bool: _Bool 类型,8位整数,在 stdbool.h 中定义了 bool / true / false 宏便于使用。
由于在不同系统上 char 可能代表有符号或无符号8位整数,因此建议使用 unsigned char /signed char 来表示具体的类型。
在 stdint.h 中定义了一些看上去更明确的整数类型。
typedef signed char int8_t;
typedef short int int16_t;
typedef int int32_t;
typedef unsigned char uint8_t;
typedef unsigned short int uint16_t;
typedef unsigned int uint32_t;
#if __WORDSIZE == 64
typedef long int int64_t;
typedef unsigned long int uint64_t;
#else
__extension__
typedef long long int int64_t;
typedef unsigned long long int uint64_t;
#endif
还有各种整数类型的大小限制。
# define INT8_MIN (-128)
# define INT16_MIN (-32767-1)
# define INT32_MIN (-2147483647-1)
# define INT64_MIN (-__INT64_C(9223372036854775807)-1)
# define INT8_MAX (127)
# define INT16_MAX (32767)
# define INT32_MAX (2147483647)
# define INT64_MAX (__INT64_C(9223372036854775807))
# define UINT8_MAX (255)
# define UINT16_MAX (65535)
# define UINT32_MAX (4294967295U)
# define UINT64_MAX (__UINT64_C(18446744073709551615))
字符常量默认是一个 int 整数,但编译器可以自行决定将其解释为 char 或 int。
char c = 'a';
printf("%c, size(char)=%d, size('a')=%d;\n", c, sizeof(c), sizeof('a'));
输出:
a, size(char)=1, size('a')=4;
指针是个有特殊用途的整数,在 stdint.h 中同样给出了其类型定义。
/* Types for `void *' pointers. */
#if __WORDSIZE == 64
typedef unsigned long int uintptr_t;
#else
typedef unsigned int uintptr_t;
#endif
不过在代码中我们通常用 sizeof(char*) 这样的用法,省得去处理32位和64位的区别。
我们可以用不同的后缀来表示整数常量类型。
printf("int size=%d;\n", sizeof(1));
printf("unsigned int size=%d;\n", sizeof(1U));
printf("long size=%d;\n", sizeof(1L));
printf("unsigned long size=%d;\n", sizeof(1UL));
printf("long long size=%d;\n", sizeof(1LL));
printf("unsigned long long size=%d;\n", sizeof(1ULL));
输出:
int size=4;
unsigned int size=4;
long size=4;
unsigned long size=4;
long long size=8;
unsigned long long size=8;
stdint.h 中定义了一些辅助宏。
# if __WORDSIZE == 64
# define __INT64_C(c) c ## L
# define __UINT64_C(c) c ## UL
# else
# define __INT64_C(c) c ## LL
# define __UINT64_C(c) c ## ULL
# endif
注: 宏定义中的 "##" 运算符表示把左和右结合在一起,作为一个符号。
1.2 浮点数
C 提供了不同精度的浮点。 - float: 32位4字节浮点数,精确度6。 - double: 64位8字节浮点数,精确度15。 - long double: 80位10字节浮点数,精确度19位。
浮点数默认类型是 double,可以添加后缀 F 来表示 float,L 表示 long double,可以局部省略。
printf("float %f size=%d\n", 1.F, sizeof(1.F));
printf("double %f size=%d\n", .123, sizeof(.123));
printf("long double %Lf size=%d\n", 1.234L, sizeof(1.234L));
输出:
float 1.000000 size=4
double 0.123000 size=8
long double 1.234000 size=12 # 对齐
C99 提供了复数支持,用两个相同类型的浮点数分别表示复数的实部和虚部。直接在 float、double、long double 后添加 _Complex 即可表示复数,在 complex.h 中定义了complex 宏使得显示更统一美观。
#include <complex.h>
printf("float complex size=%d\n", sizeof((float complex)1.0));
printf("double complex size=%d\n", sizeof((double complex)1.0));
printf("long double complex size=%d\n", sizeof((long double complex)1.0));
输出:
float complex size=8
double complex size=16
long double complex size=24
1.3 枚举
和 C# 中我们熟悉的规则类似。
enum color { black, red = 5, green, yellow };
enum color b = black;
printf("black = %d\n", b);
enum color r = red;
printf("red = %d\n", r);
enum color g = green;
printf("green = %d\n", g);
enum color y = yellow;
printf("yellow = %d\n", y);
输出:
black = 0
red = 5
green = 6
yellow = 7
枚举成员的值可以相同。
enum color { black = 1, red, green = 1, yellow };
输出:
black = 1
red = 2
green = 1
yellow = 2
通常省略枚举小标签用来代替宏定义常量。
enum { BLACK = 1, RED, GREEN = 1, YELLOW };
printf("black = %d\n", BLACK);
printf("red = %d\n", RED);
printf("green = %d\n", GREEN);
printf("yellow = %d\n", YELLOW);
第 1 章 2. 字面值
字面值 (literal) 是源代码中用来描述固定值的记号 (token),可能是整数、浮点数、字符、字符串。
2.1 整数常量
除了常见的十进制整数外,还可以⽤用八进制 (0开头) 或十六进制 (0x/0X)表示法。
int x = 010;
int y = 0x0A;
printf("x = %d, y = %d\n", x, y);
输出:
x = 8, y = 10
常量类型很重要,可以通过后缀来区分类型。
0x200 -> int
200U -> unsigned int
0L -> long
0xf0f0UL -> unsigned long
0777LL -> long long
0xFFULL -> unsigned long long
2.2 浮点常量
可以用十进制或十六进制表示浮点数常量。
10.0 -> 10
10. -> 10
.123 -> 0.123
2.34E5 -> 2.34 * (10 ** 5)
67e-12 -> 67.0 * (10 ** -12)
默认浮点常量是 double,可以用 F 后缀表示 float,用 L 后缀表示 long double 类型。
2.3 字符常量
字符常量默认是 int 类型,除非用前置 L 表示 wchar_t 宽字符类型。
char c = 0x61;
char c2 = 'a';
char c3 = '\x61';
printf("%c, %c, %c\n", c, c2, c3);
输出:
a, a, a
在 Linux 系统中,默认字符集是 UTF-8,可以用 wctomb 等函数进行转换。wchar_t 默认是4字节长度,足以容纳所有 UCS-4 Unicode 字符。
setlocale(LC_CTYPE, "en_US.UTF-8");
wchar_t wc = L'中';
char buf[100] = {};
int len = wctomb(buf, wc);
printf("%d\n", len);
for (int i = 0; i < len; i++)
{
printf("0x%02X ", (unsigned char)buf[i]);
}
输出:
3
0xE4 0xB8 0xAD
2.4 字符串常量
C 语言中的字符串是一个以 NULL (也就是 \0) 结尾的 char 数组。空字符串在内存中占用一个字节,包含一个 NULL 字符,也就是说要表示一个长度为1的字符串最少需要2个字节 (strlen 和 sizeof 表示的含义不同)。
char s[] = "Hello, World!";
char* s2 = "Hello, C!";
同样可以使用 L 前缀声明一个宽字符串。
setlocale(LC_CTYPE, "en_US.UTF-8");
wchar_t* ws = L"中国人";
printf("%ls\n", ws);
char buf[255] = {};
size_t len = wcstombs(buf, ws, 255);
for (int i = 0; i < len; i++)
{
printf("0x%02X ", (unsigned char)buf[i]);
}
输出:
中国人
0xE4 0xB8 0xAD 0xE5 0x9B 0xBD 0xE4 0xBA";
和 char 字符串类型类似,wchar_t 字符串以一个4字节的 NULL 结束。
wchar_t ws[] = L"中国人";
printf("len %d, size %d\n", wcslen(ws), sizeof(ws));
unsigned char* b = (unsigned char*)ws;
int len = sizeof(ws);
for (int i = 0; i < len; i++)
{
printf("%02X ", b[i]);
}
输出:
len 3, size 16
2D 4E 00 00 FD 56 00 00 BA 4E 00 00 00 00 00 00
编译器会自动连接相邻的字符串,这也便于我们在宏或者代码中更好地处理字符串。
#define WORLD "world!"
char* s = "Hello" " " WORLD "\n";
对于源代码中超长的字符串,除了使用相邻字符串外,还可以用 "\" 在行尾换行。
char* s1 = "Hello"
" World!";
char* s2 = "Hello \
World!";
注意:"\" 换行后左侧的空格会被当做字符串的一部分。
第 1 章 3. 类型转换
当运算符的几个操作数类型不同时,就需要进行类型转换。通常编译器会做某些自动的隐式转换操作,在不丢失信息的前提下,将位宽 "窄" 的操作数转换为 "宽" 类型。
3.1 算术类型转换
编译器默认的隐式转换等级:
long double > doulbe > float > long long > long > int > char > _Bool
浮点数的等级比任何类型的整数等级都高;有符号整数和其等价的无符号类型等级相同。在表达式中,可能会将 char、short 当做默认 int (unsigned int) 类型操作数,但 float 并不会自动转换为默认的 double 类型。
char a = 'a';
char c = 'c';
printf("%d\n", sizeof(c - a));
printf("%d\n", sizeof(1.5F - 1));
输出:
4
4
当包含无符号操作数时,需要注意提升后类型是否能容纳无符号类型的所有值。
long a = -1L;
unsigned int b = 100;
printf("%ld\n", a > b ? a : b);
输出:
-1
输出结果让人费解。尽管 long 等级比 unsigned int 高,但在32位系统中,它们都是32位整数,且 long 并不足以容纳 unsigned int 的所有值,因此编译器会将这两个操作数都转换为 unsigned long,也就是高等级的无符号版本,如此 (unsigned long)a 的结果就变成了一个很大的整数。
long a = -1L;
unsigned int b = 100;
printf("%lu\n", (unsigned long)a);
printf("%ld\n", a > b ? a : b);
输出:
4294967295
-1
其他隐式转换还包括: - 赋值和初始化时,右操作数总是被转换成左操作数类型。 - 函数调用时,总是将实参转换为形参类型。 - 将 return 表达式结果转换为函数返回类型。 - 任何类型0值和 NULL 指针都视为 _Bool false,反之为 true。
将宽类型转换为窄类型时,编译器会尝试丢弃高位或者四舍五入等手段返回一个 "近似值"。
3.2 非算术类型转换
(1) 数组名或表达式通常被当做指向第一个元素的指针,除非是以下情况: - 被当做 sizeof 操作数。 - 使用 & 运算符返回 "数组指针"。 - 字符串常量用于初始化 char/wchar_t 数组。
(2) 可以显式将指针转换成任何其他类型指针。
int x = 123, *p = &x;
char* c = (char*)x;
(3) 任何指针都可以隐式转换为 void 指针,反之亦然。
(4) 任何指针都可以隐式转换为类型更明确的指针 (包含 const、volatile、restrict 等限定符)。
int x = 123, *p = &x;
const int* p2 = p;
(5) NULL 可以被隐式转换为任何类型指针。
(6) 可以显式将指针转换为整数,反向转换亦可。
int x = 123, *p = &x;
int px = (int)p;
printf("%p, %x, %d\n", p, px, *(int*)px);
输出:
0xbfc1389c, bfc1389c, 123
第 1 章 4. 运算符
基本的表达式和运算符用法无需多言,仅记录一些特殊的地方。
4.1 复合字面值
C99 新增的内容,我们可以直接用该语法声明一个结构或数组指针。
(类型名称){ 初始化列表 }
演示:
int* i = &(int){ 123 }; ! // 整型变量, 指针
int* x = (int[]){ 1, 2, 3, 4 }; ! // 数组, 指针
struct data_t* data = &(struct data_t){ .x = 123 }; ! // 结构, 指针
func(123, &(struct data_t){ .x = 123 }); ! // 函数参数, 结构指针参数
如果是静态或全局变量,那么初始化列表必须是编译期常量。
4.2 sizeof
返回操作数占用内存空间大小,单位字节 (byte)。sizeof 返回值是 size_t 类型,操作数可以是类型和变量。
size_t size;
int x = 1;
size = sizeof(int);
size = sizeof(x);
size = sizeof x;
size = sizeof(&x);
size = sizeof &x;
附: 不要用 int 代替 size_t,因为在32位和64位平台 size_t 长度不同。
4.3 逗号运算符
逗号是一个二元运算符,确保操作数从左到右被顺序处理,并返回右操作数的值和类型。
int i = 1;
long long x = (i++, (long long)i);
printf("%lld\n", x);
4.4 优先级
C 语言的优先级是个⼤大⿇麻烦,不要吝啬使用 "()" 。
优先级列表 (从高到低):
类型 | 符号 | 结合律 |
后置运算符 | []、func()、.、->、(type){init} | 从左到右 |
一元运算符 | ++、--、!、~、+、-、*、&、sizeof | 从右到左 |
v转换运算符 | (type name) | 从右到左 |
乘除运算符 | *、/、% | 从左到右 |
加减运算符 | +、- | 从左到右 |
位移运算符 | <<、>> | 从左到右 |
关系运算符 | <、<=、>、>= | 从左到右 |
相等运算符 | ==、!= | 从左到右 |
位运算符 | & | 从左到右 |
位运算符 | ^ | 从左到右 |
位运算符 | / | 从左到右 |
逻辑运算符 | && | 从左到右 |
逻辑运算符 | // | 从左到右 |
条件运算符 | ?: | 从右到左 |
赋值运算符 | =、+=、-=、*=、/=、%=、&=、^=、/=、<<=、>>= | 从右到左 |
逗号运算符 | , | 从左到右 |
如果表达式中多个操作符具有相同优先级,那么结合律决定了组合方式是从左还是从右开始。如 "a = b = c",两个 "=" 优先级相同,依结合律顺序 "从右到左",分解成 "a = (b = c)"。
下面是一些容易引起误解的运算符优先级:
(1) "." 优先级高于 "*"。
原型: *p.f
误判: (*p).f
实际: *(p.f)。
(2) "[]" 高于 "*"。
原型: int *ap[]
误判: int (*ap)[]
实际: int *(ap[])
(3) "==" 和 "!=" 高于位操作符。
原型: val & mask != 0
误判: (val & mask) != 0
实际: val & (mask != 0)
(4) "==" 和 "!=" 高于赋值符。
原型: c = getchar() != EOF
误判: (c = getchar()) != EOF
实际: c = (getchar() != EOF)
(5) 算术运算符高于位移运算符。
原型: msb << 4 + lsb
误判: (msb << 4) + lsb
实际: msb << (4 + lsb)
(6) 逗号运算符在所有运算符中优先级最低。
原型: i = 1, 2
误判: i = (1, 2)
实际: (i = 1), 2
第 1 章 5. 语句
语句块代表了一个作用域,在语句块内声明的自动变量超出范围后立即被释放。除了用 "{...}" 表示一个常规语句块外,还可以直接用于复杂的赋值操作,这在宏中经常使用。
int i = ({ char a = 'a'; a++; a; });
printf("%d\n", i);
最后一个表达式被当做语句块的返回值。相对应的宏版本如下。
#define test() ({ \
char _a = 'a'; \
_a++; \
_a; })
int i = test();
printf("%d\n", i);
在宏里使用变量通常会添加下划线前缀,以避免展开后跟上层语句块的同名变量冲突。
5.2 循环语句
C 支持 while、for、do...while 几种循环语句。注意下面的例子,循环会导致 get_len 函数被多次调用。
size_t get_len(const char* s)
{
printf("%s\n", __func__);
return strlen(s);
}
int main(int argc, char* argv[])
{
char *s = "abcde";
for (int i = 0; i < get_len(s); i++)
{
printf("%c\n", s[i]);
}
printf("\n");
return EXIT_SUCCESS;
}
5.3 选择语句
除了 if...else if...else... 和 switch { case ... } 还有谁呢。GCC 支持 switch 范围扩展。
int x = 1;
switch (x)
{
case 0 ... 9: printf("0..9\n"); break;
case 10 ... 99: printf("10..99\n"); break;
default: printf("default\n"); break;
}
char c = 'C';
switch (c)
{
case 'a' ... 'z': printf("a..z\n"); break;
case 'A' ... 'Z': printf("A..Z\n"); break;
case '0' ... '9': printf("0..9\n"); break;
default: printf("default\n"); break;
}
5.4 无条件跳转
无条件跳转: break, continue, goto, return。goto 仅在函数内跳转,常用于跳出嵌套循环。如果在函数外跳转,可使用 longjmp。
5.4.1 longjmp
setjmp 将当前位置的相关信息 (堆栈帧、寄存器等) 保存到 jmp_buf 结构中,并返回0。当后续代码执行 longjmp 跳转时,需要提供一个状态码。代码执行绪将返回 setjmp 处,并返回 longjmp 所提供的状态码。
#include <stdio.h>
#include <stdlib.h>
#include <stdbool.h>
#include <setjmp.h>
void test(jmp_buf *env)
{
printf("1....\n");
longjmp(*env, 10);
}
int main(int argc, char* argv[])
{
jmp_buf env;
int ret = setjmp(env); ! // 执⾏行 longjmp 将返回该位置,ret 等于 longjmp 所提供的状态码。
if (ret == 0)
{
test(&env);
}
else
{
printf("2....(%d)\n", ret);
}
return EXIT_SUCCESS;
}
输出:
1....
2....(10)
第 1 章 6. 函数
函数只能被定义一次,但可以被多次 "声明" 和 "调用"。
6.1 嵌套
gcc 支持嵌套函数扩展。
typedef void(*func_t)();
func_t test()
{
void func1()
{
printf("%s\n", __func__);
};
return func1;
}
int main(int argc, char* argv[])
{
test()();
return EXIT_SUCCESS;
}
内层函数可以 "读写" 外层函数的参数和变量,外层变量必须在内嵌函数之前定义。
#define pp() ({ \
printf("%s: x = %d(%p), y = %d(%p), s = %s(%p);\n", __func__, x, &x, y, &y, s, s); \
})
void test2(int x, char *s)
{
int y = 88;
pp();
void func1()
{
y++;
x++;
pp();
}
func1();
x++;
func1();
pp();
}
int main (int argc, char * argv[])
{
test2(1234, "abc");
return EXIT_SUCCESS;
}
输出:
test2: x = 1234(0xbffff7d4), y = 88(0xbffff7d8), s = abc(0x4ad3);
func1: x = 1235(0xbffff7d4), y = 89(0xbffff7d8), s = abc(0x4ad3);
func1: x = 1237(0xbffff7d4), y = 90(0xbffff7d8), s = abc(0x4ad3);
test2: x = 1237(0xbffff7d4), y = 90(0xbffff7d8), s = abc(0x4ad3);
6.2 类型
注意区分定义 "函数类型" 和 "函数指针 类型"的区别。函数名是一个指向当前函数的指针。
typedef void(func_t)(); // 函数类型
typedef void(*func_ptr_t)(); // 函数指针类型
void test()
{
printf("%s\n", __func__);
}
int main(int argc, char* argv[])
{
func_t* func = test; // 声明一个指针
func_ptr_t func2 = test; // 已经是指针类型
void (*func3)(); // 声明一个包含函数原型的函数指针变量
func3 = test;
func();
func2();
func3();
return EXIT_SUCCESS;
}
6.3 调用
C 函数默认采用 cdecl 调用约定,参数从右往左入栈,且由调用者负责参数入栈和清理。
int main(int argc, char* argv[])
{
int a()
{
printf("a\n");
return 1;
}
char* s()
{
printf("s\n");
return "abc";
}
printf("call: %d, %s\n", a(), s());
return EXIT_SUCCESS;
}
输出:
s
a
call: 1, abc
C 语言中所有对象,包括指针本身都是 "复制传值" 传递,我们可以通过传递 "指针的指针" 来实现传出参数。
void test(int** x)
{
int* p = malloc(sizeof(int));
*p = 123;
*x = p;
}
int main(int argc, char* argv[])
{
int* p;
test(&p);
printf("%d\n", *p);
free(p);
return EXIT_SUCCESS;
}
注意: 别返回 test 中的栈变量。
6.4 修饰符
C99 修饰符: - extern: 默认修饰符,用于函数表示 "具有外部链接的标识符",这类函数可用于任何程序文件。用于变量声明表示该变量在其他单元中定义。 - static: 使用该修饰符的函数仅在其所在编译单元 (源码文件) 中可用。还可以表示函数类的静态变量。 - inline: 修饰符 inline 建议编译器将函数代码内联到调用处,但编译器可自主决定是否完成。通常包含循环或递归函数不能被定义为 inline 函数。
GNU inline 相关说明: - static inline: 内链接函数,在当前编译单元内内联。不过 -O0 时依然是 call。 - inline: 外连接函数,当前单元内联,外部单元为普通外连接函数 (头文件中不能添加 inline 关键字)。
附:inline 关键字只能用在函数定义处。
6.5 可选性自变量
使用可选性自变量实现变参。 - va_start: 通过可选自变量前一个参数位置来初始化 va_list 自变量类型指针。 - va_arg: 获取当前可选自变量值,并将指针移到下一个可选自变量。 - va_end: 当不再需要自变量指针时调用。 - va_copy: 用现存的自变量指针 (va_list) 来初始化另一指针。
#include <stdarg.h>
/* 指定自变量数量 */
void test(int count, ...)
{
va_list args;
va_start(args, count);
for (int i = 0; i < count; i++)
{
int value = va_arg(args, int);
printf("%d\n", value);
}
va_end(args);
}
/* 以 NULL 为结束标记 */
void test2(const char* s, ...)
{
printf("%s\n", s);
va_list args;
va_start(args, s);
char* value;
do
{
value = va_arg(args, char*);
if (value) printf("%s\n", value);
}
while (value != NULL);
va_end(args);
}
/* 直接将 va_list 传递个其他可选自变量函数 */
void test3(const char* format, ...)
{
va_list args;
va_start(args, format);
vprintf(format, args);
va_end(args);
}
int main(int argc, char* argv[])
{
test(3, 11, 22, 33);
test2("hello", "aa", "bb", "cc", "dd", NULL);
test3("%s, %d\n", "hello, world!", 1234);
return EXIT_SUCCESS;
}
第 1 章 7. 数组
如果数组具有自动生存周期,且没有 static 修饰符,那么可以用非常量表达式来定义数组。
void test(int n)
{
int x[n];
for (int i = 0; i < n; i++)
{
x[i] = i;
}
struct data { int x[n]; } d;
printf("%d\n", sizeof(d));
}
int main(int argc, char* argv[])
{
int x[] = { 1, 2, 3, 4 };
printf("%d\n", sizeof(x));
test(2);
return EXIT_SUCCESS;
}
7.2 下标存储
x[i] 相当于 *(x + i),数组名默认为指向第一元素的指针。
int x[] = { 1, 2, 3, 4 };
x[1] = 10;
printf("%d\n", *(x + 1));
*(x + 2) = 20;
printf("%d\n", x[2]);
C 不会对数组下标索引进行范围检查,编码时需要注意过界检查。数组名默认是指向第一元素指针的常量,而 &x[i] 则返回 int* 类型指针,指向目标序号元素。
7.3 初始化
除了使用下标初始化外,还可以直接用初始化器。
int x[] = { 1, 2, 3 };
int y[5] = { 1, 2 };
int a[3] = {};
int z[][2] =
{
{ 1, 1 },
{ 2, 1 },
{ 3, 1 },
};
初始化规则: - 如果数组为静态生存周期,那么初始化器必须是常量表达式。 - 如果提供初始化器,那么可以不提供数组长度,由初始化器的最后一个元素决定。 - 如果同时提供长度和初始化器,那么没有提供初始值的元素都被初始化为0或 NULL。
我们还可以在初始化器中初始化特定的元素。
int x[] = { 1, 2, [6] = 10, 11 };
int len = sizeof(x) / sizeof(int);
for (int i = 0; i < len; i++)
{
printf("x[%d] = %d\n", i, x[i]);
}
输出:
x[0] = 1
x[1] = 2
x[2] = 0
x[3] = 0
x[4] = 0
x[5] = 0
x[6] = 10
x[7] = 11
7.4 字符串
字符串是以 '\0' 结尾的 char 数组。
char s[10] = "abc";
char x[] = "abc";
printf("s, size=%d, len=%d\n", sizeof(s), strlen(s));
printf("x, size=%d, len=%d\n", sizeof(x), strlen(x));
输出:
s, size=10, len=3
x, size=4, len=3
7.5 多维数组
实际上就是 "元素为数组" 的数组,注意元素是数组,并不是数组指针。多维数组的第一个维度下标可以不指定。
int x[][2] =
{
{ 1, 11 },
{ 2, 22 },
{ 3, 33 }
};
int col = 2, row = sizeof(x) / sizeof(int) / col;
for (int r = 0; r < row; r++)
{
for (int c = 0; c < col; c++)
{
printf("x[%d][%d] = %d\n", r, c, x[r][c]);
}
}
输出:
x[0][0] = 1
x[0][1] = 11
x[1][0] = 2
x[1][1] = 22
x[2][0] = 3
x[2][1] = 33
二维数组通常也被称为 "矩阵 (matrix)",相当于一个 row * column 的表格。比如 x[3][2] 相当于三行二列表格。多维数组的元素是连续排列的,这也是区别指针数组的一个重要特征。
int x[][2] =
{
{ 1, 11 },
{ 2, 22 },
{ 3, 33 }
};
int len = sizeof(x) / sizeof(int);
int* p = (int*)x;
for (int i = 0; i < len; i++)
{
printf("x[%d] = %d\n", i, p[i]);
}
输出:
x[0] = 1
x[1] = 11
x[2] = 2
x[3] = 22
x[4] = 3
x[5] = 33
同样,我们可以初始化特定的元素。
int x[][2] =
{
{ 1, 11 },
{ 2, 22 },
{ 3, 33 },
[4][1] = 100,
{ 6, 66 },
[7] = { 9, 99 }
};
int col = 2, row = sizeof(x) / sizeof(int) / col;
for (int r = 0; r < row; r++)
{
for (int c = 0; c < col; c++)
{
printf("x[%d][%d] = %d\n", r, c, x[r][c]);
}
}
输出:
x[0][0] = 1
x[0][1] = 11
x[1][0] = 2
x[1][1] = 22
x[2][0] = 0
x[2][1] = 0
x[3][0] = 0
x[3][1] = 0
x[4][0] = 0
x[4][1] = 100
x[5][0] = 6
x[5][1] = 66
x[6][0] = 0
x[6][1] = 0
x[7][0] = 9
x[7][1] = 99
7.6 数组参数
当数组作为函数参数时,总是被隐式转换为指向数组第一元素的指针,也就是说我们再也无法用 sizeof 获得数组的实际长度了。
void test(int x[])
{
printf("%d\n", sizeof(x));
}
void test2(int* x)
{
printf("%d\n", sizeof(x));
}
int main(int argc, char* argv[])
{
int x[] = { 1, 2, 3 };
printf("%d\n", sizeof(x));
test(x);
test2(x);
return EXIT_SUCCESS;
}
输出:
12
4
4
test 和 test2 中的 sizeof(x) 实际效果是 sizeof(int*)。我们需要显式传递数组长度,或者是一个以特定标记结尾的数组 (NULL)。C99 支持长度可变数组作为函数函数。当我们传递数组参数时,可能的写法包括:
/* 数组名默认指向第一元素指针,和 test2 一个意思 */
void test1(int len, int x[])
{
int i;
for (i = 0; i < len; i++)
{
printf("x[%d] = %d; ", i, x[i]);
}
printf("\n");
}
/* 直接传入数组第一元素指针 */
void test2(int len, int* x)
{
for (int i = 0; i < len; i++)
{
printf("x[%d] = %d; ", i, *(x + i));
}
printf("\n");
}
/* 数组指针: 数组名默认指向第一元素指针,&array 则是获得整个数组指针 */
void test3(int len, int(*x)[len])
{
for (int i = 0; i < len; i++)
{
printf("x[%d] = %d; ", i, (*x)[i]);
}
printf("\n");
}
/* 多维数组: 数组名默认指向第一元素指针,也即是 int(*)[] */
void test4(int r, int c, int y[][c])
{
for (int a = 0; a < r; a++)
{
for (int b = 0; b < c; b++)
{
printf("y[%d][%d] = %d; ", a, b, y[a][b]);
}
}
printf("\n");
}
/* 多维数组: 传递第一个元素的指针 */
void test5(int r, int c, int (*y)[c])
{
for (int a = 0; a < r; a++)
{
for (int b = 0; b < c; b++)
{
printf("y[%d][%d] = %d; ", a, b, (*y)[b]);
}
y++;
}
printf("\n");
}
/* 多维数组 */
void test6(int r, int c, int (*y)[][c])
{
for (int a = 0; a < r; a++)
{
for (int b = 0; b < c; b++)
{
printf("y[%d][%d] = %d; ", a, b, (*y)[a][b]);
}
}
printf("\n");
}
/* 元素为指针的指针数组,相当于 test8 */
void test7(int count, char** s)
{
for (int i = 0; i < count; i++)
{
printf("%s; ", *(s++));
}
printf("\n");
}
void test8(int count, char* s[count])
{
for (int i = 0; i < count; i++)
{
printf("%s; ", s[i]);
}
printf("\n");
}
/* 以 NULL 结尾的指针数组 */
void test9(int** x)
{
int* p;
while ((p = *x) != NULL)
{
printf("%d; ", *p);
x++;
}
printf("\n");
}
int main(int argc, char* argv[])
{
int x[] = { 1, 2, 3 };
int len = sizeof(x) / sizeof(int);
test1(len, x);
test2(len, x);
test3(len, &x);
int y[][2] =
{
{10, 11},
{20, 21},
{30, 31}
};
int a = sizeof(y) / (sizeof(int) * 2);
int b = 2;
test4(a, b, y);
test5(a, b, y);
test6(a, b, &y);
char* s[] = { "aaa", "bbb", "ccc" };
test7(sizeof(s) / sizeof(char*), s);
test8(sizeof(s) / sizeof(char*), s);
int* xx[] = { &(int){111}, &(int){222}, &(int){333}, NULL };
test9(xx);
return EXIT_SUCCESS;
}
第 1 章 8. 指针
void* 又被称为万能指针,可以代表任何对象的地址,但没有该对象的类型。也就是说必须转型后才能进行对象操作。void* 指针可以与其他任何类型指针进行隐式转换。
void test(void* p, size_t len)
{
unsigned char* cp = p;
for (int i = 0; i < len; i++)
{
printf("%02x ", *(cp + i));
}
printf("\n");
}
int main(int argc, char* argv[])
{
int x = 0x00112233;
test(&x, sizeof(x));
return EXIT_SUCCESS;
}
输出:
33 22 11 00
8.2 初始化指针
可以用初始化器初始化指针。 - 空指针常量 NULL。 - 相同类型的指针,或者指向限定符较少的相同类型指针。 - void 指针。
非自动周期指针变量或静态生存期指针变量必须用编译期常量表达式初始化,比如函数名称等。
char s[] = "abc";
char* sp = s;
int x = 5;
int* xp = &x;
void test() {}
typedef void(*test_t)();
int main(int argc, char* argv[])
{
static int* sx = &x;
static test_t t = test;
return EXIT_SUCCESS;
}
8.3 指针运算
(1) 对指针进行相等或不等运算来判断是否指向同一对象。
int x = 1;
int *a, *b;
a = &x;
b = &x;
printf("%d\n", a == b);
(2) 对指针进行加法运算获取数组第 n 个元素指针。
int x[] = { 1, 2, 3 };
int* p = x;
printf("%d, %d\n", x[1], *(p + 1));
(3) 对指针进行减法运算,以获取指针所在元素的数组索引序号。
int x[] = { 1, 2, 3 };
int* p = x;
p++; p++;
int index = p - x;
printf("x[%d] = %d\n", index, x[index]);
输出:
x[2] = 3;
(4) 对指针进行大小比较运算,相当于判断数组索引序号大小。
int x[] = { 1, 2, 3 };
int* p1 = x;
int* p2 = x;
p1++; p2++; p2++;
printf("p1 < p2? %s\n", p1 < p2 ? "Y" : "N");
输出:
p1 < p2? Y
(5) 我们可以直接用 &x[i] 获取指定序号元素的指针。
int x[] = { 1, 2, 3 };
int* p = &x[1];
*p += 10;
printf("%d\n", x[1]);
注: [] 优先级比 & 高,* 运算符优先级比算术运算符高。
8.4 限定符
限定符 const 可以声明 "类型为指针的常量" 和 "指向常量的指针" 。
int x[] = { 1, 2, 3 };
// 指针常量: 指针本身为常量,不可修改,但可修改目标对象。
int* const p1 = x;
*(p1 + 1) = 22;
printf("%d\n", x[1]);
// 常量指针: 目标对象为常量,不可修改,但可修改指针。
int const *p2 = x;
p2++;
printf("%d\n", *p2);
区别在于 const 是修饰 p 还是 *p。具有 restrict 限定符的指针被称为限定指针。告诉编译器在指针生存周期内,只能通过该指针修改对象,但编译器可自主决定是否采纳该建议。
8.5 数组指针
指向数组本身的指针,而非指向第一元素的指针。
int x[] = { 1, 2, 3 };
int(*p)[] = &x;
for (int i = 0; i < 3; i++)
{
printf("x[%d] = %d\n", i, (*p)[i]);
printf("x[%d] = %d\n", i, *(*p + i));
}
&x 返回数组指针,*p 获取和 x 相同的指针,也就是指向第一元素的指针,然后可以用下标或指针运算存储元素。
8.6 指针数组
元素是指针的数组,通常用于表示字符串数组或交错数组。数组元素是目标对象 (可以是数组或其他对象) 的指针,而非实际嵌入内容。
int* x[3] = {};
x[0] = (int[]){ 1 };
x[1] = (int[]){ 2, 22 };
x[2] = (int[]){ 3, 33, 33 };
int* x1 = *(x + 1);
for (int i = 0; i < 2; i++)
{
printf("%d\n", x1[i]);
printf("%d\n", *(*(x + 1) + i));
}
输出:
2
2
22
22
指针数组 x 是三个指向目标对象(数组)的指针,*(x + 1) 获取目标对象,也就是 x[1]。
第 1 章 9. 结构
结构类型无法把自己作为成员类型,但可以包含 "指向自己类型" 的指针成员。
struct list_node
{
struct list_node* prev;
struct list_node* next;
void* value;
};
定义不完整结构类型,只能使用小标签,像下面这样的 typedef 类型名称是不行的。
typedef struct
{
list_node* prev;
list_node* next;
void* value;
} list_node;
编译出错:
$ make
gcc -Wall -g -c -std=c99 -o main.o main.c
main.c:15: error: expected specifier-qualifier-list before ‘list_node’
结合起来用吧。
typedef struct node_t
{
struct node_t* prev;
struct node_t* next;
void* value;
} list_node;
小标签可以和 typedef 定义的类型名相同。
typedef struct node_t
{
struct node_t* prev;
struct node_t* next;
void* value;
} node_t;
9.2 匿名结构
在结构体内部使用匿名结构体成员,也是一种很常见的做法。
typedef struct
{
struct
{
int length;
char chars[100];
} s;
int x;
} data_t;
int main(int argc, char * argv[])
{
data_t d = { .s.length = 100, .s.chars = "abcd", .x = 1234 };
printf("%d\n%s\n%d\n", d.s.length, d.s.chars, d.x);
return EXIT_SUCCESS;
}
或者直接定义一个匿名变量。
int main(int argc, char * argv[])
{
struct { int a; char b[100]; } d = { .a = 100, .b = "abcd" };
printf("%d\n%s\n", d.a, d.b);
return EXIT_SUCCESS;
}
9.3 成员偏移量
利用 stddef.h 中的 offsetof 宏可以获取结构成员的偏移量。
typedef struct
{
int x;
short y[3];
long long z;
} data_t;
int main(int argc, char* argv[])
{
printf("x %d\n", offsetof(data_t, x));
printf("y %d\n", offsetof(data_t, y));
printf("y[1] %d\n", offsetof(data_t, y[1]));
printf("z %d\n", offsetof(data_t, z));
return EXIT_SUCCESS;
}
注意:输出结果有字节对齐。
9.4 定义
定义结构类型有多种灵活的⽅方式。
int main(int argc, char* argv[])
{
/* 直接定义结构类型和变量 */
struct { int x; short y; } a = { 1, 2 }, a2 = {};
printf("a.x = %d, a.y = %d\n", a.x, a.y);
/* 函数内部也可以定义结构类型 */
struct data { int x; short y; };
struct data b = { .y = 3 };
printf("b.x = %d, b.y = %d\n", b.x, b.y);
/* 复合字面值 */
struct data* c = &(struct data){ 1, 2 };
printf("c.x = %d, c.y = %d\n", c->x, c->y);
/* 也可以直接将结构体类型定义放在复合字面值中 */
void* p = &(struct data2 { int x; short y; }){ 11, 22 };
/* 相同内存布局的结构体可以直接转换 */
struct data* d = (struct data*)p;
printf("d.x = %d, d.y = %d\n", d->x, d->y);
return EXIT_SUCCESS;
}
输出:
a.x = 1, a.y = 2
b.x = 0, b.y = 3
c.x = 1, c.y = 2
d.x = 11, d.y = 22
9.5 初始化
结构体的初始化和数组一样简洁方便,包括使用初始化器初始化特定的某些成员。未被初始化器初始化的成员将被设置为0。
typedef struct
{
int x;
short y[3];
long long z;
} data_t;
int main(int argc, char* argv[])
{
data_t d = {};
data_t d1 = { 1, { 11, 22, 33 }, 2LL };
data_t d2 = { .z = 3LL, .y[2] = 2 };
return EXIT_SUCCESS;
}
结果:
d = {x = 0, y = {0, 0, 0}, z = 0}
d1 = {x = 1, y = {11, 22, 33}, z = 2}
d2 = {x = 0, y = {0, 0, 2}, z = 3}
9.6 弹性结构成员
通常又称作 “不定长结构”,就是在结构体尾部声明一个未指定长度的数组。用 sizeof 运算符时,该数组未计入结果。
typedef struct string
{
int length;
char chars[];
} string;
int main(int argc, char * argv[])
{
int len = sizeof(string) + 10; // 计算存储一个 10 字节长度的字符串(包括 \0)所需的长度。
char buf[len]; // 从栈上分配所需的内存空间。
string *s = (string*)buf; // 转换成 struct string 指针。
s->length = 9;
strcpy(s->chars, "123456789");
printf("%d\n%s\n", s->length, s->chars);
return EXIT_SUCCESS;
}
考虑到不同编译器和 ANSI C 标准的问题,也用 char chars[1] 或 char chars[0] 来代替。对这类结构体进行拷贝的时候,尾部结构成员不会被复制。
int main(int argc, char * argv[])
{
int len = sizeof(string) + 10;
char buf[len];
string *s = (string*)buf;
s->length = 10;
strcpy(s->chars, "123456789");
string s2 = *s; ! ! ! ! ! // 复制 struct string s。
printf("%d\n%s\n", s2.length, s2.chars); ! // s2.length 正常,s2.chars 就悲剧了。
return EXIT_SUCCESS;
}
而且不能直接对弹性成员进行初始化。
第 1 章 10. 联合
联合和结构的区别在于:联合每次只能存储一个成员,联合的长度由最宽成员类型决定。
typedef struct
{
int type;
union
{
int ivalue;
long long lvalue;
} value;
} data_t;
data_t d = { 0x8899, .value.lvalue = 0x1234LL };
data_t d2;
memcpy(&d2, &d, sizeof(d));
printf("type:%d, value:%lld\n", d2.type, d2.value.lvalue);
当然也可以用指针来实现上例功能,但 union 会将数据内嵌在结构体中,这对于进行 memcpy 等操作更加方便快捷,而且无需进行指针类型转换。
可以使用初始化器初始化联合,如果没有指定成员修饰符,则默认是第一个成员。
union value_t
{
int ivalue;
long long lvalue;
};
union value_t v1 = { 10 };
printf("%d\n", v1.ivalue);
union value_t v2 = { .lvalue = 20LL };
printf("%lld\n", v2.lvalue);
union value2_t { char c; int x; } v3 = { .x = 100 };
printf("%d\n", v3.x);
一个常用的联合用法。
union { int x; struct {char a, b, c, d;} bytes; } n = { 0x12345678 };
printf("%#x => %x, %x, %x, %x\n", n.x, n.bytes.a, n.bytes.b, n.bytes.c, n.bytes.d);
输出:
0x12345678 => 78, 56, 34, 12
第 1 章 11. 位字段
可以把结构或联合的多个成员 "压缩存储" 在一个字段中,以节约内存。
struct
{
unsigned int year : 22;
unsigned int month : 4;
unsigned int day : 5;
} d = { 2010, 4, 30 };
printf("size: %d\n", sizeof(d));
printf("year = %u, month = %u, day = %u\n", d.year, d.month, d.day);
输出:
size: 4
year = 2010, month = 4, day = 30
用来做标志位也挺好的,比用位移运算符更直观,更节省内存。
int main(int argc, char * argv[])
{
struct
{
bool a: 1;
bool b: 1;
bool c: 1;
} flags = { .b = true };
printf("%s\n", flags.b ? "b.T" : "b.F");
printf("%s\n", flags.c ? "c.T" : "c.F");
return EXIT_SUCCESS;
}
不能对位字段成员使用 offsetof。
第 1 章 12. 声明
声明 (declaration) 表示目标样式,可以在多处声明同一个目标,但只能有一个定义(definition)。定义将创建对象实体,为其分配存储空间 (内存),而声明不会。
声明通常包括: - 声明结构、联合或枚举等用户自定义类型 (UDT)。 - 声明函数。 - 声明并定义一个全局变量。 - 声明一个外部变量。 - 用 typedef 为已有类型声明一个新名字。
如果声明函数时同时出现函数体,则此函数的声明同时也是定义。如果声明对象时给此对象分配内存 (比如定义变量),那么此对象声明的同时也是定义。
12.1 类型修饰符
C99 定义的类型修饰符: - const: 常量修饰符,定义后无法修改。 - volatile: 目标可能被其他线程或事件修改,使用该变量前,都须从主存重新获取。
- restrict: 修饰指针。除了该指针,不能用其他任何方式修改目标对象。## 12.2 链接类型
元素 | 存储类型 | 作用域 | 生存周期 | 链接类型 |
全局UDT | - | 文件 | - | 内链接 |
嵌套UDT | - | 类 | - | 内链接 |
局部UDT | - | 程序块 | - | 无链接 |
全局函数、变量 | extern | 文件 | 永久 | 外连接 |
静态全局函数和变量 | static | 文件 | 永久 | 内链接 |
局部变量、常量 | auto | 程序块 | 临时 | 无链接 |
局部静态变量、常量 | static | 程序块 | 永久 | 无链接 |
全局常量 | - | 文件 | 永久 | 内链接 |
静态全局常量 | static | 文件 | 永久 | 内链接 |
宏定义 | - | 文件 | - | 内链接 |
12.3 隐式初始化
具有静态生存周期的对象,会被初始化位默认值0(指针为NULL)。
第 1 章 13. 预处理
预处理指令以 # 开始 (其前面可以有 space 或 tab),通常独立一行,但可以用 "\" 换行。
13.1 常量
编译器会展开替换掉宏。
#define SIZE 10
int main(int argc, char* argv[])
{
int x[SIZE] = {};
return EXIT_SUCCESS;
}
展开:
$ gcc -E main.c
int main(int argc, char* argv[])
{
int x[10] = {};
return 0;
}
13.2 宏函数
利用宏可以定义伪函数,通常用 ({ ... }) 来组织多行语句,最后一个表达式作为返回值 (无 return,且有个 ";" 结束)。
#define test(x, y) ({ \
int _z = x + y; \
_z; })
int main(int argc, char* argv[])
{
printf("%d\n", test(1, 2));
return EXIT_SUCCESS;
}
展开:
int main(int argc, char* argv[])
{
printf("%d\n", ({ int _z = 1 + 2; _z; }));
return 0;
}
13.3 可选性变量
VA_ARGS 标识符用来表示一组可选性自变量。
#define println(format, ...) ({ \
printf(format "\n", __VA_ARGS__); })
int main(int argc, char* argv[])
{
println("%s, %d", "string", 1234);
return EXIT_SUCCESS;
}
展开:
int main(int argc, char* argv[])
{
({ printf("%s, %d" "\n", "string", 1234); });
return 0;
}
13.4 字符串化运算符
单元运算符 # 将一个宏参数转换为字符串。
#define test(name) ({ \
printf("%s\n", #name); })
int main(int argc, char* argv[])
{
test(main);
test("\"main");
return EXIT_SUCCESS;
}
展开:
int main(int argc, char* argv[])
{
({ printf("%s\n", "main"); });
({ printf("%s\n", "\"\\\"main\""); });
return 0;
}
这个不错,会自动进行转义操作。
13.5 粘贴记号运算符
二元运算符 ## 将左和右操作数结合成一个记号。
#define test(name, index) ({ \
int i, len = sizeof(name ## index) / sizeof(int); \
for (i = 0; i < len; i++) \
{ \
printf("%d\n", name ## index[i]); \
}})
int main(int argc, char* argv[])
{
int x1[] = { 1, 2, 3 };
int x2[] = { 11, 22, 33, 44, 55 };
test(x, 1);
test(x, 2);
return EXIT_SUCCESS;
}
展开:
int main(int argc, char* argv[])
{
int x1[] = { 1, 2, 3 };
int x2[] = { 11, 22, 33, 44, 55 };
({ int i, len = sizeof(x1) / sizeof(int); for (i = 0; i < len; i++) { printf("%d\n",
x1[i]); }});
({ int i, len = sizeof(x2) / sizeof(int); for (i = 0; i < len; i++) { printf("%d\n",
x2[i]); }});
return 0;
}
13.6 条件编译
可以使用 "#if ... #elif ... #else ... #endif"、#define、#undef 进行条件编译。
#define V1
#if defined(V1) || defined(V2)
printf("Old\n");
#else
printf("New\n");
#endif
#undef V1
展开:
int main(int argc, char* argv[])
{
printf("Old\n");
return 0;
}
也可以用 #ifdef、#ifndef 代替 #if。
#define V1
#ifdef V1
printf("Old\n");
#else
printf("New\n");
#endif
#undef A
展开:
int main(int argc, char* argv[])
{
printf("Old\n");
return 0;
}
13.7 typeof
使用 GCC 扩展 typeof 可以获知参数的类型。
#define test(x) ({ \
typeof(x) _x = (x); \
_x += 1; \
_x; \
})
int main(int argc, char* argv[])
{
float f = 0.5F;
float f2 = test(f);
printf("%f\n", f2);
return EXIT_SUCCESS;
}
13.8 其他
一些常用的特殊常量。 - error "message" : 定义一个编译器错误信息。 - DATE : 编译日期字符串。 - TIME : 编译时间字符串。 - FILE : 当前源码文件名。 - LINE : 当前源码行号。 - func : 当前函数名称。
第 1 章 14. 调试
要习惯使用 assert 宏进行函数参数和执行条件判断,这可以省却很多麻烦。
#include <assert.h>
void test(int x)
{
assert(x > 0);
printf("%d\n", x);
}
int main(int argc, char* argv[])
{
test(-1);
return EXIT_SUCCESS;
}
展开效果:
$ gcc -E main.c
void test(int x)
{
((x > 0) ? (void) (0) : __assert_fail ("x > 0", "main.c", 16, __PRETTY_FUNCTION__));
printf("%d\n", x);
}
如果 assert 条件表达式不为 true,则出错并终止进程。
$ ./test
test: main.c:16: test: Assertion `x > 0' failed.
Aborted
不过呢在编译 Release 版本时,记得加上 -DNDEBUG 参数。
$ gcc -E -DNDEBUG main.c
void test(int x)
{
((void) (0));
printf("%d\n", x);
}
第二部分: 高级
第 2 章 1. 指针概要
简单罗列一下 C 的指针用法,便于复习。
1.1 指针常量
指针常量意指 "类型为指针的常量",初始化后不能被修改,固定指向某个内存地址。我们无法修改指针自身的值,但可以修改指针所指目标的内容。
int x[] = { 1, 2, 3, 4 };
int* const p = x;
for (int i = 0; i < 4; i++)
{
int v = *(p + i);
*(p + i) = ++v;
printf("%d\n", v);
//p++; // Compile Error!
}
上例中的指针 p 始终指向数组 x 的第一个元素,和数组名 x 作用相同。由于指针本身是常量,自然无法执行 p++、++p 之类的操作,否则会导致编译错误。
1.2 常量指针
常量指针是说 "指向常量数据的指针",指针目标被当做常量处理 (尽管原目标不一定是常量),不能用通过指针做赋值处理。指针自身并非常量,可以指向其他位置,但依然不能做赋值操作。
int x = 1, y = 2;
int const* p = &x;
//*p = 100; ! ! // Compile Error!
p = &y;
printf("%d\n", *p);
//*p = 100; ! ! // Compile Error!
建议常量指针将 const 写在前面更易识别。
const int* p = &x;
看几种特殊情况: (1) 下面的代码据说在 VC 下无法编译,但 GCC 是可以的。
const int x = 1;
int* p = &x;
printf("%d\n", *p);
*p = 1234;
printf("%d\n", *p);
(2) const int* p 指向 const int 自然没有问题,但肯定也不能通过指针做出修改。
const int x = 1;
const int* p = &x;
printf("%d\n", *p);
*p = 1234; ! ! ! // Compile Error!
(3) 声明指向常量的指针常量,这很罕见,但也好理解。
int x = 10;
const int* const p = &i;
p++; ! ! ! ! // Compile Error!
*p = 20; ! ! ! // Compile Error!
区别指针常量和常量指针方法很简单:看 const 修饰的是谁,也就是*
在 const 的左边还是右边。 - int* const p: const 修饰指针变量 p,指针是常量。 - int const *p: const 修饰指针所指向的内容 *p
,是常量的指针。或写成 const int *p。 - const int*
const p: 指向常量的指针常量。右 const 修饰 p 常量,左 const 表明 *p 为常量。
1.3 指针的指针
指针本身也是内存区的一个数据变量,自然也可以用其他的指针来指向它。
int x = 10;
int* p = &x;
int** p2 = &p;
printf("p = %p, *p = %d\n", p, *p);
printf("p2 = %p, *p2 = %x\n", p2, *p2);
printf("x = %d, %d\n",*p, **p2);
输出:
p = 0xbfba3e5c, *p = 10
p2 = 0xbfba3e58, *p2 = bfba3e5c
x = 10, 10
我们可以发现 p2 存储的是指针 p 的地址。因此才有了指针的指针一说。
1.4 数组指针
默认情况下,数组名为指向该数组第一个元素的指针常量。
int x[] = { 1, 2, 3, 4 };
int* p = x;
for (int i = 0; i < 4; i++)
{
printf("%d, %d, %d\n", x[i], *(x + i), , *p++);
}
尽管我们可以用 *(x + 1) 访问数组元素,但不能执行 x++ / ++x 操作。但 "数组的指针" 和数组名并不是一个类型,数组指针将整个数组当做一个对象,而不是其中的成员(元素)。
int x[] = { 1, 2, 3, 4 };
int* p = x;
int (*p2)[] = &x; ! ! // 数组指针
for(int i = 0; i < 4; i++)
{
printf("%d, %d\n", *p++, (*p2)[i]);
}
更多详情参考《数组指针》。
1.5 指针数组
元素类型为指针的数组称之为指针数组。
int x[] = { 1, 2, 3, 4 };
int* ps[] = { x, x + 1, x + 2, x + 3 };
for(int i = 0; i < 4; i++)
{
printf("%d\n", *(ps[i]));
}
x 默认就是指向第⼀一个元素的指针,那么 x + n 自然获取后续元素的指针。
指针数组通常⽤用来处理交错数组 (Jagged Array,又称数组的数组,不是二维数组),最常见的就是字符串数组了。
void test(const char** x, int len)
{
for (int i = 0; i < len; i++)
{
printf("test: %d = %s\n", i, *(x + i));
}
}
int main(int argc, char* argv[])
{
char* a = "aaa";
char* b = "bbb";
char* ss[] = { a, b };
for (int i = 0; i < 2; i++)
{
printf("%d = %s\n", i, ss[i]);
}
test(ss, 2);
return EXIT_SUCCESS;
}
更多详情参考《指针数组》。
1.6 函数指针
默认情况下,函数名就是指向该函数的指针常量。
void inc(int* x)
{
*x += 1;
}
int main(void)
{
void (*f)(int*) = inc;
int i = 100;
f(&i);
printf("%d\n", i);
return 0;
}
如果嫌函数指针的声明不好看,可以像 C# 委托那样定义一个函数指针类型。
typedef void (*inc_t)(int*);
int main(void)
{
inc_t f = inc;
... ...
}
很显然,有了 typedef,下面的代码更易阅读和理解。
inc_t getFunc()
{
return inc;
}
int main(void)
{
inc_t inc = getFunc();
... ...
}
注意: - 定义函数指针类型: typedef void (inc_t)(int) - 定义函数类型: typedef void (inc_t)(int*)
void test()
{
printf("test");
}
typedef void(func_t)();
typedef void(*func_ptr_t)();
int main(int argc, char* argv[])
{
func_t* f = test;
func_ptr_t p = test;
f();
p();
return EXIT_SUCCESS;
}
第 2 章 2. 数组指针
注意下面代码中指针的区别。
int x[] = {1,2,3,4,5,6};
int *p1 = x; ! // 指向整数的指针
int (*p2)[] = &x; ! // 指向数组的指针
p1 的类型是 int,也就是说它指向一个整数类型。数组名默认指向数组中的第一个元素,因此 x 默认也是 int 类型。
p2 的含义是指向一个 "数组类型" 的指针,注意是 "数组类型" 而不是 "数组元素类型",这有本质上的区别。
数组指针把数组当做一个整体,因为从类型角度来说,数组类型和数组元素类型是两个概念。因此"p2 = &x" 当中 x 代表的是数组本身而不是数组的第一个元素地址,&x 取的是数组指针,而不是"第一个元素指针的指针"。
接下来,我们看看如何用数组指针操作一维数组。
void array1()
{
int x[] = {1,2,3,4,5,6};
int (*p)[] = &x; // 指针 p 指向数组
for(int i = 0; i < 6; i++)
{
printf("%d\n", (*p)[i]); // *p 返回该数组, (*p)[i] 相当于 x[i]
}
}
有了上面的说明,这个例子就很好理解了。
"p = &x" 使得指针 p 存储了该数组的指针,p 自然就是获取该数组。那么 (p)[i] 也就等于 x[i]。 注意: p 的目标类型是数组,因此 p++ 指向的不是数组下一个元素,而是 "整个数组之后" 位置 (EA + SizeOf(x)),这已经超出数组范围了。
数组指针对二维数组的操作。
void array2()
{
int x[][4] = {{1, 2, 3, 4}, {11, 22, 33, 44}};
int (*p)[4] = x; !! ! ! ! // 相当于 p = &x[0]
for(int i = 0; i < 2; i++)
{
for (int c = 0; c < 4; c++)
{
printf("[%d, %d] = %d\n", i, c, (*p)[c]);
}
p++;
}
}
x 是一个二维数组,x 默认指向该数组的第一个元素,也就是 {1,2,3,4}。不过要注意,这第一个元素不是 int,而是一个 int[],x 实际上是 int()[] 指针。因此 "p = x" 而不是 "p = &x",否则 p 就指向 int ()[][] 了。
既然 p 指向第一个元素,那么 p 自然也就是第一行数组了,也就是 {1,2,3,4},(p)[2] 的含义就是第一行的第三个元素。p++ 的结果自然也就是指向下一行。我们还可以直接用 *(p + 1) 来访问 x[1]。
void array2()
{
int x[][4] = {{1, 2, 3, 4}, {11, 22, 33, 44}};
int (*p)[4] = x;
printf("[1, 3] = %d\n", (*(p + 1))[3]);
}
我们继续看看 int (*)[][] 的例子。
void array3()
{
int x[][4] = {{1, 2, 3, 4}, {11, 22, 33, 44}};
int (*p)[][4] = &x;
for(int i = 0; i < 2; i++)
{
for (int c = 0; c < 4; c++)
{
printf("[%d, %d] = %d\n", i, c, (*p)[i][c]);
}
}
}
这回 "p = &x",也就是说把整个二维数组当成一个整体,因此 *p 返回的是整个二维数组,因此 p++ 也就用不得了。
附: 在附有初始化的数组声明语句中,只有第一维度可以省略。
将数组指针当做函数参数传递。
void test1(p,len)
int(*p)[];
int len;
{
for(int i = 0; i < len; i++)
{
printf("%d\n", (*p)[i]);
}
}
void test2(void* p, int len)
{
int(*pa)[] = p;
for(int i = 0; i < len; i++)
{
printf("%d\n", (*pa)[i]);
}
}
int main (int args, char* argv[])
{
int x[] = {1,2,3};
test1(&x, 3);
test2(&x, 3);
return 0;
}
由于数组指针类型中有括号,因此 test1 的参数定义看着有些古怪,不过习惯就好了。
第 2 章 3. 指针数组
指针数组是指元素为指针类型的数组,通常用来处理 "交错数组",又称之为数组的数组。和二维数组不同,指针数组的元素只是一个指针,因此在初始化的时候,每个元素只占用4字节内存空间,比二维数组节省。同时,每个元素数组的长度可以不同,这也是交错数组的说法。(在C# 中,二维数组用 [,] 表示,交错数组用 [][])
int main(int argc, char* argv[])
{
int x[] = {1,2,3};
int y[] = {4,5};
int z[] = {6,7,8,9};
int* ints[] = { NULL, NULL, NULL };
ints[0] = x;
ints[1] = y;
ints[2] = z;
printf("%d\n", ints[2][2]);
for(int i = 0; i < 4; i++)
{
printf("[2,%d] = %d\n", i, ints[2][i]);
}
return 0;
}
输出:
8
[2,0] = 6
[2,1] = 7
[2,2] = 8
[2,3] = 9
我们查看一下指针数组 ints 的内存数据。
(gdb) x/3w ints
0xbf880fd0: 0xbf880fdc 0xbf880fe8 0xbf880fc0
(gdb) x/3w x
0xbf880fdc: 0x00000001 0x00000002 0x00000003
(gdb) x/2w y
0xbf880fe8: 0x00000004 0x00000005
(gdb) x/4w z
0xbf880fc0: 0x00000006 0x00000007 0x00000008 0x00000009
可以看出,指针数组存储的都是目标元素的指针。
那么默认情况下 ints 是哪种类型的指针呢?按规则来说,数组名默认是指向第一个元素的指针,那么第一个元素是什么呢?数组?当然不是,而是一个 int* 的指针而已。注意 "ints[0] = x;" 这条语 句,实际上 x 返回的是 &x[0] 的指针 (int),而非 &a 这样的数组指针(int ()[])。继续,*ints 取出第一个元素内容 (0xbf880fdc),这个内容又是一个指针,因此 ints 隐式成为一个指针的指针(int**),就交错数组而言,它默认指向 ints[0][0]。
int main(int argc, char* argv[])
{
int x[] = {1,2,3};
int y[] = {4,5};
int z[] = {6,7,8,9};
int* ints[] = { NULL, NULL, NULL };
ints[0] = x;
ints[1] = y;
ints[2] = z;
printf("%d\n", **ints);
printf("%d\n", *(*ints + 1));
printf("%d\n", **(ints + 1));
return 0;
}
输出:
1
2
4
第一个 printf 语句验证了我们上面的说法。我们继续分析后面两个看上去有些复杂的 printf 语句。
(1) (ints + 1) 首先 ints 取出了第一个元素,也就是 ints[0][0] 的指针。那么 "ints + 1" 实际上就是向后移动一 次指针,因此指向 ints[0][1] 的指针。"(ints + 1)" 的结果也就是取出 ints[0][1] 的值了。 (2) (ints + 1) ints 指向第一个元素 (0xbf880fdc),"ints + 1" 指向第二个元素(0xbf880fe8)。"*(ints + 1)" 取 出 ints[1] 的内容,这个内容是另外一只指针,因此 "(ints + 1)" 就是取出 ints[1][0] 的内容。
下面这种写法,看上去更容易理解一些。
int main(int argc, char* argv[])
{
int x[] = {1,2,3};
int y[] = {4,5};
int z[] = {6,7,8,9};
int* ints[] = { NULL, NULL, NULL };
ints[0] = x;
ints[1] = y;
ints[2] = z;
int** p = ints;
// -----------------------------------------------
// *p 取出 ints[0] 存储的指针(&ints[0][0])
// **p 取出 ints[0][0] 值
printf("%d\n", **p);
// -----------------------------------------------
// p 指向 ints[1]
p++;
// *p 取出 ints[1] 存储的指针(&ints[1][0])
// **p 取出 ints[1][0] 的值(= 4)
printf("%d\n", **p);
// -----------------------------------------------
// p 指向 ints[2]
p++;
// *p 取出 ints[2] 存储的指针(&ints[2][0])
// *p + 1 返回所取出指针的后一个位置
// *(*p + 1) 取出 ints[2][0 + 1] 的值(= 7)
printf("%d\n", *(*p + 1));
return 0;
}
指针数组经常出现在操作字符串数组的场合。
int main (int args, char* argv[])
{
char* strings[] = { "Ubuntu", "C", "C#", "NASM" };
for (int i = 0; i < 4; i++)
{
printf("%s\n", strings[i]);
}
printf("------------------\n");
printf("[2,1] = '%c'\n", strings[2][1]);
strings[2] = "CSharp";
printf("%s\n", strings[2]);
printf("------------------\n");
char** p = strings;
printf("%s\n", *(p + 2));
return 0;
}
输出:
Ubuntu
C
C#
## NASM[2,1] = '#'
## CSharpCSharp
main 参数的两种写法。
int main(int argc, char* argv[])
{
for (int i = 0; i < argc; i++)
{
printf("%s\n", argv[i]);
}
return 0;
}
int main(int argc, char** argv)
{
for (int i = 0; i < argc; i++)
{
printf("%s\n", *(argv + i));
}
return 0;
}
当然,指针数组不仅仅用来处理数组。
int main (int args, char* argv[])
{
int* ints[] = { NULL, NULL, NULL, NULL };
int a = 1;
int b = 2;
ints[2] = &a;
ints[3] = &b;
for(int i = 0; i < 4; i++)
{
int* p = ints[i];
printf("%d = %d\n", i, p == NULL ? 0 : *p);
}
return 0;
}
第 2 章 4. 函数调用
先准备一个简单的例子。
源代码
#include <stdio.h>
int test(int x, char* s)
{
s = "Ubuntu!";
return ++x;
}
int main(int args, char* argv[])
{
char* s = "Hello, World!";
int x = 0x1234;
int c = test(x, s);
printf(s);
return 0;
}
编译 (注意没有使用优化参数):
$ gcc -Wall -g -o hello hello.c
调试之初,我们先反编译代码,并做简单标注。
$ gdb hello
(gdb) set disassembly-flavor intel ; 设置反汇编指令格式
(gdb) disass main ; 反汇编 main
Dump of assembler code for function main:
0x080483d7 <main+0>: lea ecx,[esp+0x4]
0x080483db <main+4>: and esp,0xfffffff0
0x080483de <main+7>: push DWORD PTR [ecx-0x4]
0x080483e1 <main+10>: push ebp ; main 堆栈帧开始
0x080483e2 <main+11>: mov ebp,esp ; 修正 ebp 基址
0x080483e4 <main+13>: push ecx ; 保护寄存器现场
0x080483e5 <main+14>: sub esp,0x24 ; 预留堆栈帧空间
0x080483e8 <main+17>: mov DWORD PTR [ebp-0x8],0x80484f8 ; 设置变量 s,为字符串地址。
0x080483ef <main+24>: mov DWORD PTR [ebp-0xc],0x1234 ; 变量 x,内容为内联整数值。
0x080483f6 <main+31>: mov eax,DWORD PTR [ebp-0x8] ; 复制变量 s
0x080483f9 <main+34>: mov DWORD PTR [esp+0x4],eax ; 将复制结果写入新堆栈位置
0x080483fd <main+38>: mov eax,DWORD PTR [ebp-0xc] ; 复制变量 x
0x08048400 <main+41>: mov DWORD PTR [esp],eax ; 将复制结果写入新堆栈位置
0x08048403 <main+44>: call 0x80483c4 <test> ; 调用 test
0x08048408 <main+49>: mov DWORD PTR [ebp-0x10],eax ; 保存 test 返回值
0x0804840b <main+52>: mov eax,DWORD PTR [ebp-0x8] ; 复制变量 s 内容
0x0804840e <main+55>: mov DWORD PTR [esp],eax ; 保存复制结果到新位置
0x08048411 <main+58>: call 0x80482f8 <printf@plt> ; 调用 printf
0x08048416 <main+63>: mov eax,0x0 ; 丢弃 printf 返回值
0x0804841b <main+68>: add esp,0x24 ; 恢复 esp 到堆栈空间预留前位置
0x0804841e <main+71>: pop ecx ; 恢复 ecx 保护现场
0x0804841f <main+72>: pop ebp ; 修正前一个堆栈帧基址
0x08048420 <main+73>: lea esp,[ecx-0x4] ; 修正 esp 指针
0x08048423 <main+76>: ret
End of assembler dump.
(gdb) disass test ! ! ! ! ! ! ; 反汇编 test
Dump of assembler code for function test:
0x080483c4 <test+0>: push ebp ; 保存前一个堆栈帧的基址
0x080483c5 <test+1>: mov ebp,esp ; 修正 ebp 基址
0x080483c7 <test+3>: mov DWORD PTR [ebp+0xc],0x80484f0 ; 修改参数 s, 是前一堆栈帧地址
0x080483ce <test+10>: add DWORD PTR [ebp+0x8],0x1 ; 累加参数 x
0x080483d2 <test+14>: mov eax,DWORD PTR [ebp+0x8] ; 将返回值存入 eax
0x080483d5 <test+17>: pop ebp ; 恢复 ebp
0x080483d6 <test+18>: ret
End of assembler dump.
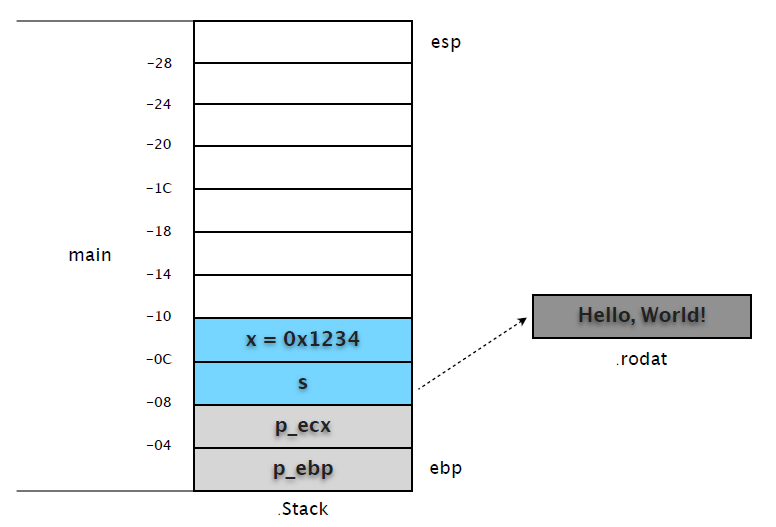
我们一步步分析,并用示意图说明堆栈状态。
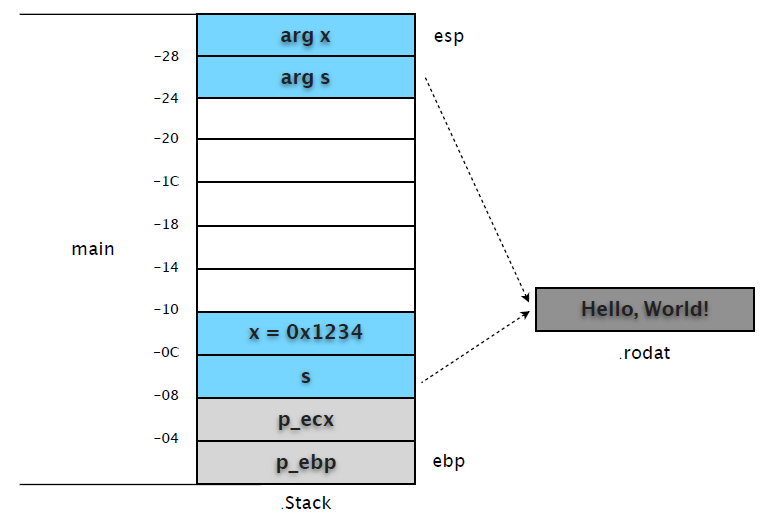
(1) 在 0x080483f6 处设置断点,这时候 main 完成了基本的初始化和内部变量赋值。
(gdb) b *0x080483f6
Breakpoint 1 at 0x80483f6: file hello.c, line 14.
(gdb) r
Starting program: /home/yuhen/Projects/Learn.C/hello
Breakpoint 1, main () at hello.c:14
14 int c = test(x, s);
我们先记下 ebp 和 esp 的地址。
(gdb) p $ebp
$8 = (void *) 0xbfcb3c78
(gdb) p $esp
$9 = (void *) 0xbfcb3c50! # $ebp - $esp = 0x28,不是 0x24?在预留空间前还 "push ecx" 了。
(gdb) p x ! ! ! # 整数值直接保存在堆栈
$10 = 4660
(gdb) p &x ! ! ! # 变量 x 地址 = ebp (0xbfcb3c78) - 0xc = 0xbfcb3c6c
$11 = (int *) 0xbfcb3c6c
(gdb) p s ! ! ! # 变量 s 在堆栈保存了字符串在 .rodata 段的地址
$12 = 0x80484f8 "Hello, World!"
(gdb) p &s ! ! ! # 变量 s 地址 = ebp (0xbfcb3c78) - 0x8 = 0xbfcb3c70
$13 = (char **) 0xbfcb3c70
这时候的堆栈示意图如下:

(2) 接下来,我们将断点设在 call test 之前,看看调用前堆栈的准备情况。
(gdb) b *0x08048403
Breakpoint 2 at 0x8048403: file hello.c, line 14
(gdb) c
Continuing.
Breakpoint 2, 0x08048403 in main () at hello.c:14
14 int c = test(x, s);
0x08048403 之前的 4 条指令通过 eax 做中转,分别在 [esp+0x4] 和 [esp] 处复制了变量 s、x的内容。
(gdb) x/12w $esp
0xbfcb3c50: 0x00001234 0x080484f8 0xbfcb3c68 0x080482c4
0xbfcb3c60: 0xb8081ff4 0x08049ff4 0xbfcb3c88 0x00001234
0xbfcb3c70: 0x080484f8 0xbfcb3c90 0xbfcb3ce8 0xb7f39775
第 1 行: 复制的变量 x,复制的变量 s,未使用,未使用 第 2 行: 未使用,未使用,未使用,变量 x 第 3 行: 变量 s,ecx 保护值,ebp 保护值,eip 保护值。
可以和 frame 信息对照着看。
(gdb) info frame
Stack level 0, frame at 0xbfcb3c80:
eip = 0x8048403 in main (hello.c:14); saved eip 0xb7f39775
source language c.
Arglist at 0xbfcb3c78, args:
Locals at 0xbfcb3c78, Previous frame's sp at 0xbfcb3c74
Saved registers:
ebp at 0xbfcb3c78, eip at 0xbfcb3c7c
说明: 严格来说堆栈帧(frame)从函数被调用的 call 指令将 eip 入栈开始,而不是我们通常所指修正后的 ebp 位置。以 ebp 为基准纯粹是为了阅读代码方便,本文也以此做示意图。也就是说在 call test 之前,内存当中已经有了两份 s 和 x 。从中我们也看到了 C 函数参数是按照从右到左的方式入栈。
附:这种由调用方负责参数入栈和清理的方式是 C 默认的调用约定 cdecl,调用者除了参数入栈,还负责堆栈清理。相比 stdcall 的好处就是:cdecl 允许方法参数数量不固定。
(3) 在 test 中设置断点,我们看看 test 中的代码对堆栈的影响。
(gdb) b test
Breakpoint 3 at 0x80483c7: file hello.c, line 5.
(gdb) c
Continuing.
Breakpoint 3, test (x=4660, s=0x80484f8 "Hello, World!") at hello.c:5
5 s = "Ubuntu!";
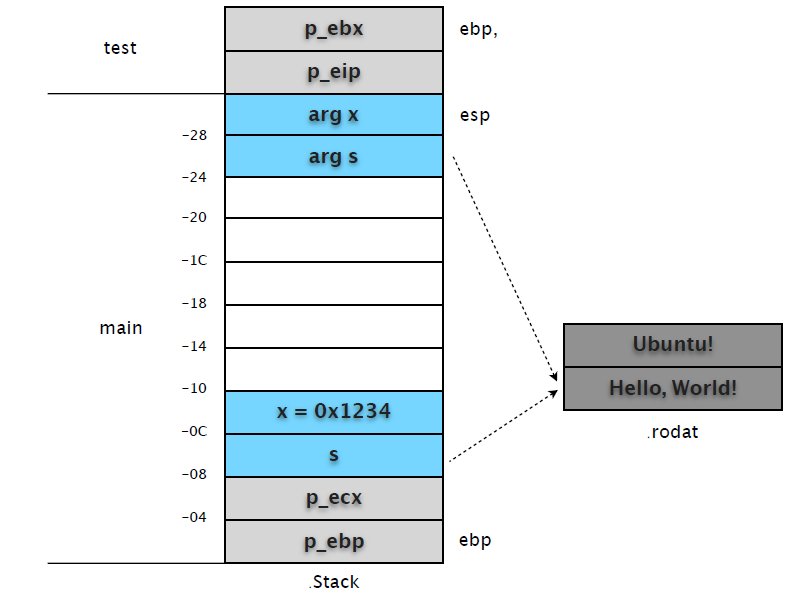
main 中的 call 指令会先将 eip 的值入栈,以便函数完成时可以恢复调用位置。然后才是跳转到 test 函数地址入口。因此我们在 test 中设置的断点(0x080483c7)中断时,test 堆栈帧中就有了 p_eip 和 p_ebp 两个数据。
(gdb) x/2w $esp
0xbfcb3c48: 0xbfcb3c78 0x08048408
分别保存了 main ebp 和 main call 后一条指令的 eip 地址。其后的指令直接修改 [ebp+0xc] 内容,使其指向新的字符串 "Ubuntu"。然后累加 [ebp+0x8] 的值,并用 eax 寄存器返回函数结果。
0x080483c7 <test+3>: mov DWORD PTR [ebp+0xc],0x80484f0
0x080483ce <test+10>: add DWORD PTR [ebp+0x8],0x1
0x080483d2 <test+14>: mov eax,DWORD PTR [ebp+0x8]
注意都是直接对 main 栈帧中的复制变量进⾏行操作,并没有在 test 栈帧中开辟存储区域。
(gdb) x/s 0x80484f0
0x80484f0: "Ubuntu!"
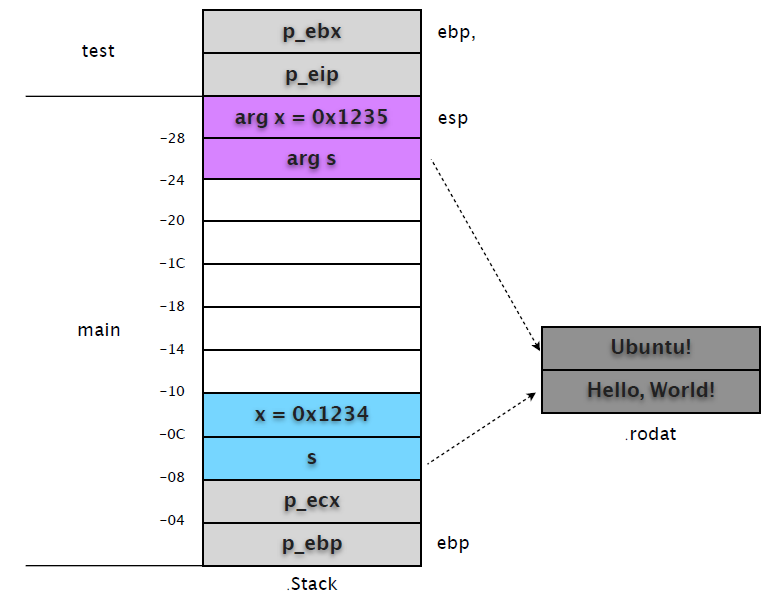
执行到函数结束,然后再次输出 main 堆栈帧的内容看看。
(gdb) finish ! ! ! # test 执⾏行结束,回到 main frame。
Run till exit from #0 test (x=4660, s=0x80484f8 "Hello, World!") at hello.c:5
0x08048408 in main () at hello.c:14
14 int c = test(x, s);
Value returned is $21 = 4661
(gdb) p $eip ! ! ! # eip 重新指向 main 中的指令
$22 = (void (*)()) 0x8048408 <main+49>
(gdb) x/12xw $esp ! ! # 查看 main 堆栈帧内存
0xbfcb3c50: 0x00001235 0x080484f0 0xbfcb3c68 0x080482c4
0xbfcb3c60: 0xb8081ff4 0x08049ff4 0xbfcb3c88 0x00001234
0xbfcb3c70: 0x080484f8 0xbfcb3c90 0xbfcb3ce8 0xb7f39775
重新查看 main 堆栈帧信息,我们会发现栈顶两个复制变量的值被改变。
(3) 继续执行,查看修改后的变量对后续代码的影响。
当 call test 发生后,其返回值 eax 被保存到 [ebp-0x10] 处,也就是变量 c 的内容。
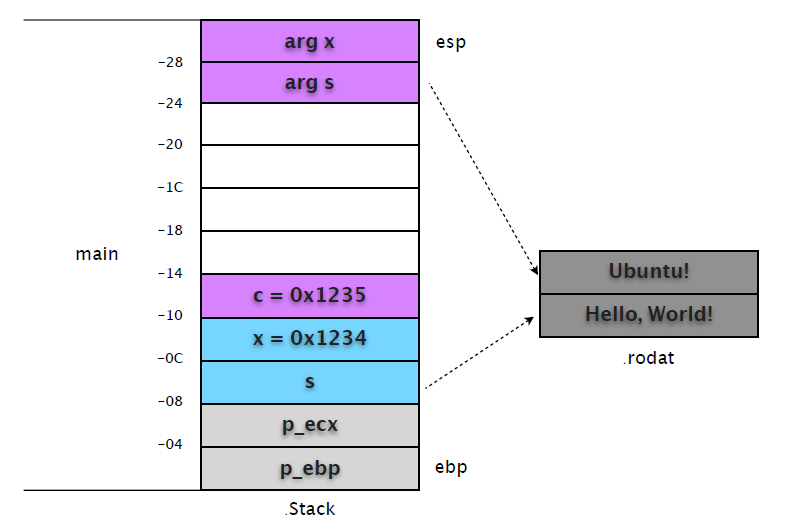
继续 "printf(s)",我们会发现和 call test 一样,再次复制了变量 s 到 [esp]。
0x0804840b <main+52>: mov eax,DWORD PTR [ebp-0x8]
0x0804840e <main+55>: mov DWORD PTR [esp],eax
0x08048411 <main+58>: call 0x80482f8 <printf@plt>
很显然,这会覆盖 test 修改的值。我们在 0x08048411 设置断点,查看堆栈帧的变化。
(gdb) b *0x08048411
Breakpoint 4 at 0x8048411: file hello.c, line 15.
(gdb) c
Continuing.
Breakpoint 4, 0x08048411 in main () at hello.c:15
15 printf(s);
(gdb) x/12w $esp
0xbfcb3c50: 0x080484f8 0x080484f0 0xbfcb3c68 0x080482c4
0xbfcb3c60: 0xb8081ff4 0x08049ff4 0x00001235 0x00001234
0xbfcb3c70: 0x080484f8 0xbfcb3c90 0xbfcb3ce8 0xb7f39775
从输出的栈内存可以看出,[esp] 和 [ebp-0x8] 值相同,都是指向 "Hello, World!" 的地址。
由此可见,test 的修改并没有对后续调用造成影响。这也是所谓 "指针本身也是按值传送" 的规则。剩余的工作就是恢复现场等等,在此就不多说废话了。
第三部分: 系统
第 3 章 1. ELF File Format
Executable and Linking Format,缩写 ELF。是 Linux 系统目标文件 (Object File) 格式。
主要有如下三种类型:
(1) 可重定位文件 (relocatable file),可与其它目标文件一起创建可执行文件或共享目标文件。
$ gcc -g -c hello.c
$ file hello.o
hello.o: ELF 32-bit LSB relocatable, Intel 80386, version 1 (SYSV), not stripped
(2) 可执行文件 (executable file)。
$ gcc -g hello.c -o hello
$ file hello
hello: ELF 32-bit LSB executable, Intel 80386, version 1 (SYSV), dynamically linked (uses shared
libs), for GNU/Linux 2.6.15, not stripped
(3) 共享目标文件 (shared object file),通常是 "函数库",可静态链接到其他 ELF 文件中,或动态链接共同创建进程映像 (类似 DLL)。
$ gcc -shared -fpic stack.c -o hello.so
$ file hello.so
hello.so: ELF 32-bit LSB shared object, Intel 80386, version 1 (SYSV), dynamically linked, not
stripped
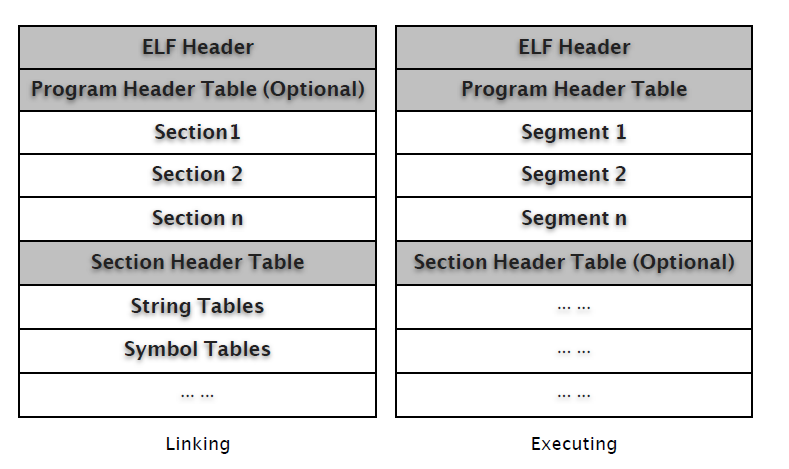
1.1 基本结构
我们可以从文件 (Linking) 和执行 (Execution) 两个角度审视 ELF 结构 (/usr/include/elf.h)。
和 Windows COFF 格式类似,ELF 也有一个特定的文件头,包括一个特定的标志串 (Magic)。
文件头中描述了 ELF 文件版本 (Version),目标机器型号 (Machine),程序入口地址 (Entry point Address) 等信息。紧接其后的是可选的程序头表 (Program Header Table) 和多个段(Section),其中有我们所熟悉的存储了执行代码的 .text 段。
ELF 使用段表 (Section Header Table) 存储各段的相关信息,包括名称、起始位置、长度、权限属性等等。除了段表,ELF 中还有符号表 (Symbol Table)、字符串表 (String Table,段、函数等名称) 等。
Section 和 Segment 中文翻译虽然都是 "段",但它们并不是一个意思。Section 主要是面向目标文件连接器,而 Segment 则是面向执行加载器,后者描述的是内存布局结构。本文主要分析 ELF 静态文件格式,也就是说主要跟 Section 打交道,而有关 ELF 进程及内存布局模型将另文详述。
相关分析将使用下面这个例子,如非说明,所有生成文件都是32位。
$ cat hello.c
#include <stdio.h>
int main(int argc, char* argv[])
{
printf("Hello, World!\n");
return 0;
}
$ gcc -g -c hello.c
$ gcc -g hello.c -o hello
$ ls
hello.c hello.o hello
$ file hello
hello: ELF 32-bit LSB executable, Intel 80386, version 1 (SYSV), dynamically linked (uses shared
libs), for GNU/Linux 2.6.15, not stripped
附: ELF文件标准历史
20世纪90年代,一些厂商联合成立了一个委员会,起草并发布了一个 ELF 文件格式标准供公开使用,并且希望所有人能够遵循这项标准并且从中获益。1993年,委员会发布了 ELF 文件标准。当时参与该委员会的有来自于编译器的厂商,如 Watcom 和 Borland;来自 CPU 的厂商如 IBM 和 Intel;来自操作系统的厂商如 IBM 和 Microsoft。1995年,委员会发布了 ELF1.2 标准,自此委员会完成了自己的使命,不久就解散了。所以 ELF 最新版本为1.2。
1.2 ELF Header
我们先看看 elf.h 中的相关定义。
typedef uint16_t Elf32_Half;
typedef uint32_t Elf32_Word;
typedef uint32_t Elf32_Addr;
typedef uint32_t Elf32_Off;
#define EI_NIDENT (16)
typedef struct
{
unsigned char e_ident[EI_NIDENT]; /* Magic number and other info */
Elf32_Half e_type; /* Object file type */
Elf32_Half e_machine; /* Architecture */
Elf32_Word e_version; /* Object file version */
Elf32_Addr e_entry; /* Entry point virtual address */
Elf32_Off e_phoff; /* Program header table file offset */
Elf32_Off e_shoff; /* Section header table file offset */
Elf32_Word e_flags; /* Processor-specific flags */
Elf32_Half e_ehsize; /* ELF header size in bytes */
Elf32_Half e_phentsize; /* Program header table entry size */
Elf32_Half e_phnum; /* Program header table entry count */
Elf32_Half e_shentsize; /* Section header table entry size */
Elf32_Half e_shnum; /* Section header table entry count */
Elf32_Half e_shstrndx; /* Section header string table index */
} Elf32_Ehdr;
总长度是 52 (0x34) 字节。
$ xxd -g 1 -l 0x34 hello
0000000: 7f 45 4c 46 01 01 01 00 00 00 00 00 00 00 00 00 .ELF............
0000010: 02 00 03 00 01 00 00 00 30 83 04 08 34 00 00 00 ........0...4...
0000020: 80 16 00 00 00 00 00 00 34 00 20 00 08 00 28 00 ........4. ...(.
0000030: 26 00 23 00 &.#.
我们可以借助 readelf 这个工具来查看详细信息。
$ readelf -h hello
ELF Header:
Magic: 7f 45 4c 46 01 01 01 00 00 00 00 00 00 00 00 00
Class: ELF32
Data: 2's complement, little endian
Version: 1 (current)
OS/ABI: UNIX - System V
ABI Version: 0
Type: EXEC (Executable file)
Machine: Intel 80386
Version: 0x1
Entry point address: 0x8048330
Start of program headers: 52 (bytes into file)
Start of section headers: 5760 (bytes into file)
Flags: 0x0
Size of this header: 52 (bytes)
Size of program headers: 32 (bytes)
Number of program headers: 8
Size of section headers: 40 (bytes)
Number of section headers: 38
Section header string table index: 35
头信息中,我们通常关注的是 Entry point address、Start of section headers。
$ objdump -dS hello | less
08048330 <_start>:
8048330: 31 ed xor %ebp,%ebp
8048332: 5e pop %esi
8048333: 89 e1 mov %esp,%ecx
8048335: 83 e4 f0 and $0xfffffff0,%esp
8048338: 50 push %eax
注意 Entry point address 指向 <_start> 而非 mian(),我们再看看段表信息。
$ readelf -S hello
There are 38 section headers, starting at offset 0x1680:
Section Headers:
[Nr] Name Type Addr Off Size ES Flg Lk Inf Al
[ 0] NULL 00000000 000000 000000 00 0 0 0
[ 1] .interp PROGBITS 08048134 000134 000013 00 A 0 0 1
[ 2] .note.ABI-tag NOTE 08048148 000148 000020 00 A 0 0 4
[ 3] .note.gnu.build-i NOTE 08048168 000168 000024 00 A 0 0 4
[ 4] .hash HASH 0804818c 00018c 000028 04 A 6 0 4
[ 5] .gnu.hash GNU_HASH 080481b4 0001b4 000020 04 A 6 0 4
[ 6] .dynsym DYNSYM 080481d4 0001d4 000050 10 A 7 1 4
[ 7] .dynstr STRTAB 08048224 000224 00004a 00 A 0 0 1
[ 8] .gnu.version VERSYM 0804826e 00026e 00000a 02 A 6 0 2
[ 9] .gnu.version_r VERNEED 08048278 000278 000020 00 A 7 1 4
[10] .rel.dyn REL 08048298 000298 000008 08 A 6 0 4
[11] .rel.plt REL 080482a0 0002a0 000018 08 A 6 13 4
[12] .init PROGBITS 080482b8 0002b8 000030 00 AX 0 0 4
[13] .plt PROGBITS 080482e8 0002e8 000040 04 AX 0 0 4
[14] .text PROGBITS 08048330 000330 00016c 00 AX 0 0 16
[15] .fini PROGBITS 0804849c 00049c 00001c 00 AX 0 0 4
[16] .rodata PROGBITS 080484b8 0004b8 000016 00 A 0 0 4
[17] .eh_frame PROGBITS 080484d0 0004d0 000004 00 A 0 0 4
[18] .ctors PROGBITS 08049f0c 000f0c 000008 00 WA 0 0 4
[19] .dtors PROGBITS 08049f14 000f14 000008 00 WA 0 0 4
[20] .jcr PROGBITS 08049f1c 000f1c 000004 00 WA 0 0 4
[21] .dynamic DYNAMIC 08049f20 000f20 0000d0 08 WA 7 0 4
[22] .got PROGBITS 08049ff0 000ff0 000004 04 WA 0 0 4
[23] .got.plt PROGBITS 08049ff4 000ff4 000018 04 WA 0 0 4
[24] .data PROGBITS 0804a00c 00100c 000008 00 WA 0 0 4
[25] .bss NOBITS 0804a014 001014 000008 00 WA 0 0 4
[26] .comment PROGBITS 00000000 001014 000046 01 MS 0 0 1
[27] .debug_aranges PROGBITS 00000000 001060 000040 00 0 0 8
[28] .debug_pubnames PROGBITS 00000000 0010a0 000040 00 0 0 1
[29] .debug_info PROGBITS 00000000 0010e0 0001ae 00 0 0 1
[30] .debug_abbrev PROGBITS 00000000 00128e 0000c3 00 0 0 1
[31] .debug_line PROGBITS 00000000 001351 0000ba 00 0 0 1
[32] .debug_frame PROGBITS 00000000 00140c 00002c 00 0 0 4
[33] .debug_str PROGBITS 00000000 001438 0000c6 01 MS 0 0 1
[34] .debug_loc PROGBITS 00000000 0014fe 00002c 00 0 0 1
[35] .shstrtab STRTAB 00000000 00152a 000156 00 0 0 1
[36] .symtab SYMTAB 00000000 001c70 0004a0 10 37 54 4
[37] .strtab STRTAB 00000000 002110 000202 00 0 0 1
Key to Flags:
W (write), A (alloc), X (execute), M (merge), S (strings)
I (info), L (link order), G (group), x (unknown)
O (extra OS processing required) o (OS specific), p (processor specific)
"starting at offset 0x1680" 转换成十进制就是5760。
1.3 Program Header
程序头表告诉系统如何建立一个进程映象。
操作系统依据该表对进程地址空间进行分段 (Segment),并依据该表数据对进程 "内存段" 进行属性和权限管理。
typedef struct
{
Elf32_Word p_type; /* Segment type */
Elf32_Off p_offset; /* Segment file offset */
Elf32_Addr p_vaddr; /* Segment virtual address */
Elf32_Addr p_paddr; /* Segment physical address */
Elf32_Word p_filesz; /* Segment size in file */
Elf32_Word p_memsz; /* Segment size in memory */
Elf32_Word p_flags; /* Segment flags */
Elf32_Word p_align; /* Segment alignment */
} Elf32_Phdr;
ELF 头信息中已经给出了 Program 的相关数据,起始位置 52(0x34),数量8,每个头信息长度32(0x20) 字节,总长度 256(0x100) 字节。
$ readelf -h hello
ELF Header:
... ...
Start of program headers: 52 (bytes into file)
Size of program headers: 32 (bytes)
Number of program headers: 8
... ...
$ xxd -g 1 -s 0x34 -l 0x100 hello
0000034: 06 00 00 00 34 00 00 00 34 80 04 08 34 80 04 08 ....4...4...4...
0000044: 00 01 00 00 00 01 00 00 05 00 00 00 04 00 00 00 ................
0000054: 03 00 00 00 34 01 00 00 34 81 04 08 34 81 04 08 ....4...4...4...
0000064: 13 00 00 00 13 00 00 00 04 00 00 00 01 00 00 00 ................
0000074: 01 00 00 00 00 00 00 00 00 80 04 08 00 80 04 08 ................
0000084: d4 04 00 00 d4 04 00 00 05 00 00 00 00 10 00 00 ................
0000094: 01 00 00 00 0c 0f 00 00 0c 9f 04 08 0c 9f 04 08 ................
00000a4: 08 01 00 00 10 01 00 00 06 00 00 00 00 10 00 00 ................
00000b4: 02 00 00 00 20 0f 00 00 20 9f 04 08 20 9f 04 08 .... ... ... ...
00000c4: d0 00 00 00 d0 00 00 00 06 00 00 00 04 00 00 00 ................
00000d4: 04 00 00 00 48 01 00 00 48 81 04 08 48 81 04 08 ....H...H...H...
00000e4: 44 00 00 00 44 00 00 00 04 00 00 00 04 00 00 00 D...D...........
00000f4: 51 e5 74 64 00 00 00 00 00 00 00 00 00 00 00 00 Q.td............
0000104: 00 00 00 00 00 00 00 00 06 00 00 00 04 00 00 00 ................
0000114: 52 e5 74 64 0c 0f 00 00 0c 9f 04 08 0c 9f 04 08 R.td............
0000124: f4 00 00 00 f4 00 00 00 04 00 00 00 01 00 00 00 ................
从程序表数据中,我们可以从执行角度来看操作系统如何映射 ELF 文件数据 (Section to Segment mapping),如何确定各段 (Segment) 加载偏移量、内存虚拟地址以及内存属性 (Flag)、对齐方式等信息。
$ readelf -l hello
Elf file type is EXEC (Executable file)
Entry point 0x8048330
There are 8 program headers, starting at offset 52
Program Headers:
Type Offset VirtAddr PhysAddr FileSiz MemSiz Flg Align
PHDR 0x000034 0x08048034 0x08048034 0x00100 0x00100 R E 0x4
INTERP 0x000134 0x08048134 0x08048134 0x00013 0x00013 R 0x1
[Requesting program interpreter: /lib/ld-linux.so.2]
LOAD 0x000000 0x08048000 0x08048000 0x004d4 0x004d4 R E 0x1000
LOAD 0x000f0c 0x08049f0c 0x08049f0c 0x00108 0x00110 RW 0x1000
DYNAMIC 0x000f20 0x08049f20 0x08049f20 0x000d0 0x000d0 RW 0x4
NOTE 0x000148 0x08048148 0x08048148 0x00044 0x00044 R 0x4
GNU_STACK 0x000000 0x00000000 0x00000000 0x00000 0x00000 RW 0x4
GNU_RELRO 0x000f0c 0x08049f0c 0x08049f0c 0x000f4 0x000f4 R 0x1
Section to Segment mapping:
Segment Sections...
00
01 .interp
02 .interp .note.ABI-tag .note.gnu.build-id .hash .gnu.hash .dynsym ...
03 .ctors .dtors .jcr .dynamic .got .got.plt .data .bss
04 .dynamic
05 .note.ABI-tag .note.gnu.build-id
06
07 .ctors .dtors .jcr .dynamic .got
1.4 Section Header Table
分析 Section 之前,我们需要先了解 Section Header Table,因为我们需要通过它定位 Section,并获知相关的属性信息。
从 ELF Header 中我们可以获知起始位置、单条记录长度、总记录数以及存储段名称字符串表的索引号信息。
$ readelf -h hello
ELF Header:
Start of section headers: 5760 (bytes into file)
Size of section headers: 40 (bytes)
Number of section headers: 38
Section header string table index: 35
elf.h 中对 Section Header 的数据结构定义:
typedef struct
{
Elf32_Word sh_name; /* Section name (string tbl index) */
Elf32_Word sh_type; /* Section type */
Elf32_Word sh_flags; /* Section flags */
Elf32_Addr sh_addr; /* Section virtual addr at execution */
Elf32_Off sh_offset; /* Section file offset */
Elf32_Word sh_size; /* Section size in bytes */
Elf32_Word sh_link; /* Link to another section */
Elf32_Word sh_info; /* Additional section information */
Elf32_Word sh_addralign; /* Section alignment */
Elf32_Word sh_entsize; /* Entry size if section holds table */
} Elf32_Shdr;
每条 Header 记录是 40(0x28) 字节。我们对照着分析看看。
$ readelf -S hello
There are 38 section headers, starting at offset 0x1680:
Section Headers:
[Nr] Name Type Addr Off Size ES Flg Lk Inf Al
[ 0] NULL 00000000 000000 000000 00 0 0 0
[ 1] .interp PROGBITS 08048134 000134 000013 00 A 0 0 1
[ 2] .note.ABI-tag NOTE 08048148 000148 000020 00 A 0 0 4
... ...
[35] .shstrtab STRTAB 00000000 00152a 000156 00 0 0 1
[36] .symtab SYMTAB 00000000 001c70 0004a0 10 37 54 4
[37] .strtab STRTAB 00000000 002110 000202 00 0 0 1
Key to Flags:
W (write), A (alloc), X (execute), M (merge), S (strings)
I (info), L (link order), G (group), x (unknown)
O (extra OS processing required) o (OS specific), p (processor specific)
$ xxd -g 1 -s 0x1680 -l 0x78 hello
0001680: 00 00 00 00 00 00 00 00 00 00 00 00 00 00 00 00 ................
0001690: 00 00 00 00 00 00 00 00 00 00 00 00 00 00 00 00 ................
00016a0: 00 00 00 00 00 00 00 00 1b 00 00 00 01 00 00 00 ................
00016b0: 02 00 00 00 34 81 04 08 34 01 00 00 13 00 00 00 ....4...4.......
00016c0: 00 00 00 00 00 00 00 00 01 00 00 00 00 00 00 00 ................
00016d0: 23 00 00 00 07 00 00 00 02 00 00 00 48 81 04 08 #...........H...
00016e0: 48 01 00 00 20 00 00 00 00 00 00 00 00 00 00 00 H... ...........
00016f0: 04 00 00 00 00 00 00 00 ........
Sections[0] 为空,我们就从 [1] .interp 开始分析,跳过40个字节,从 0x1680 + 0x28 = 0x16a8 开始抓取数据。
$ xxd -g 1 -s 0x16a8 -l 0x28 hello
00016a8: 1b 00 00 00 01 00 00 00 02 00 00 00 34 81 04 08 ............4...
00016b8: 34 01 00 00 13 00 00 00 00 00 00 00 00 00 00 00 4...............
00016c8: 01 00 00 00 00 00 00 00 ........
从 elf.h 结构定义中得知,前4个字节存储了该段名称在字符串表中序号。
$ readelf -p .shstrtab hello ; 也可以使用索引号 "readelf -p 35 hello"
String dump of section '.shstrtab':
[ 1] .symtab
[ 9] .strtab
[ 11] .shstrtab
[ 1b] .interp
[ 23] .note.ABI-tag
[ 31] .note.gnu.build-id
.. ...
很好,名称是 "[ 1b] .interp"。
sh_type(Section type) = 0x00000001 = SHT_PROGBITS。
#define SHT_PROGBITS 1 /* Program data */
sh_flags(Section flags) = 0x00000002 = SHF_ALLOC
#define SHF_ALLOC (1 << 1) /* Occupies memory during execution */
sh_addr(virtual addr) = 0x08048134
sh_offset(Section file offset) = 0x00000134
sh_size(Section size) = 0x00000013
... ...
嗯相关信息和 readelf 输出的都对上号了。
1.5 String Table
字符串表是以 "堆(Heap)" 的方式存储的,也就是说 "序号" 实际上是字符串在该段的偏移位置。
$ readelf -x .shstrtab hello ; 或使用索引号 "readelf -x 35 hello"
Hex dump of section '.shstrtab':
0x00000000 002e7379 6d746162 002e7374 72746162 ..symtab..strtab
0x00000010 002e7368 73747274 6162002e 696e7465 ..shstrtab..inte
0x00000020 7270002e 6e6f7465 2e414249 2d746167 rp..note.ABI-tag
0x00000030 002e6e6f 74652e67 6e752e62 75696c64 ..note.gnu.build
... ...
我们数一下:
.symtab 序号是 1
.strtab 序号是 9
...
字符串以 "\0" 结尾,并以此来分割表中的多个字符串。
$ readelf -p .shstrtab hello
String dump of section '.shstrtab':
[ 1] .symtab
[ 9] .strtab
[ 11] .shstrtab
[ 1b] .interp
... ...
1.6 Symbol Table
符号表记录了程序中符号的定义信息和引用信息,它是一个结构表,每条记录对应一个符号。
记录中存储了符号的名称、类型、尺寸等信息,这些记录可能对应源代码文件、结构类型、某个函数或者某个常变量。
当我们调试程序时,这些信息有助于我们快速定位问题所在,我们可以使用符号信息设置断点,看到更易阅读的反汇编代码。
typedef uint16_t Elf32_Section;
typedef struct
{
Elf32_Word st_name; /* Symbol name (string tbl index) */
Elf32_Addr st_value; /* Symbol value */
Elf32_Word st_size; /* Symbol size */
unsigned char st_info; /* Symbol type and binding */
unsigned char st_other; /* Symbol visibility */
Elf32_Section st_shndx; /* Section index */
} Elf32_Sym;
每条记录的长度是 16 (0xF) 字节。我们可以用 "readelf -s" 查看符号表详细信息。
$ readelf -s hello
Symbol table '.dynsym' contains 5 entries:
Num: Value Size Type Bind Vis Ndx Name
0: 00000000 0 NOTYPE LOCAL DEFAULT UND
1: 00000000 0 NOTYPE WEAK DEFAULT UND __gmon_start__
2: 00000000 0 FUNC GLOBAL DEFAULT UND __libc_start_main@GLIBC_2.0 (2)
3: 00000000 0 FUNC GLOBAL DEFAULT UND puts@GLIBC_2.0 (2)
4: 080484bc 4 OBJECT GLOBAL DEFAULT 16 _IO_stdin_used
Symbol table '.symtab' contains 74 entries:
Num: Value Size Type Bind Vis Ndx Name
0: 00000000 0 NOTYPE LOCAL DEFAULT UND
1: 08048134 0 SECTION LOCAL DEFAULT 1
... ...
35: 00000000 0 FILE LOCAL DEFAULT ABS init.c
36: 00000000 0 FILE LOCAL DEFAULT ABS crtstuff.c
37: 08049f0c 0 OBJECT LOCAL DEFAULT 18 __CTOR_LIST__
... ...
49: 00000000 0 FILE LOCAL DEFAULT ABS hello.c
50: 08049ff4 0 OBJECT LOCAL HIDDEN 23 _GLOBAL_OFFSET_TABLE_
... ...
72: 080483e4 28 FUNC GLOBAL DEFAULT 14 main
73: 080482b8 0 FUNC GLOBAL DEFAULT 12 _init
我们看看 "symtab" 段具体的数据信息。符号表所需的字符串数据存储在 .strtab 字符串表。
$ readelf -S hello
There are 38 section headers, starting at offset 0x1680:
Section Headers:
[Nr] Name Type Addr Off Size ES Flg Lk Inf Al
... ...
[14] .text PROGBITS 08048330 000330 00016c 00 AX 0 0 16
... ...
[36] .symtab SYMTAB 00000000 001c70 0004a0 10 37 54 4
[37] .strtab STRTAB 00000000 002110 000202 00 0 0 1
我们用 "72: 080483e4 28 FUNC GLOBAL DEFAULT 14 main" 这条记录来比对数据。
$ readelf -x .symtab hello
Hex dump of section '.symtab':
0x00000000 00000000 00000000 00000000 00000000 ................
0x00000010 00000000 34810408 00000000 03000100 ....4...........
0x00000020 00000000 48810408 00000000 03000200 ....H...........
0x00000030 00000000 68810408 00000000 03000300 ....h...........
0x00000040 00000000 8c810408 00000000 03000400 ................
0x00000050 00000000 b4810408 00000000 03000500 ................
... ...
0x00000410 9b010000 189f0408 00000000 11021300 ................
0x00000420 a8010000 10840408 5a000000 12000e00 ........Z.......
0x00000430 b8010000 14a00408 00000000 1000f1ff ................
0x00000440 c4010000 1ca00408 00000000 1000f1ff ................
0x00000450 c9010000 00000000 00000000 12000000 ................
0x00000460 d9010000 14a00408 00000000 1000f1ff ................
0x00000470 e0010000 6a840408 00000000 12020e00 ....j...........
0x00000480 f7010000 e4830408 1c000000 12000e00 ................
0x00000490 fc010000 b8820408 00000000 12000c00 ................
记录长度是16,整好一行,我们直接挑出所需的记录 (72 * 16 = 0x480)。
0x00000480 f7010000 e4830408 1c000000 12000e00 ................
st_name(Symbol name) = 0x000001f7
st_value(Symbol value) = 0x080483e4
st_size(Symbol size) = 0x0000001c
st_info(Symbol type and binding) = 0x12
st_other(Symbol visibility) = 0x00
st_shndx(Section index) = 0x000e
首先从字符串表找出 Name。
$ readelf -p .strtab hello
String dump of section '.strtab':
[ 1] init.c
... ...
[ 1f7] main
[ 1fc] _init
elf.h 中的相关定义:
#define STT_FUNC 2 /* Symbol is a code object */
#define STB_GLOBAL 1 /* Global symbol */
#define STV_DEFAULT 0 /* Default symbol visibility rules */
整理一下:
st_name(Symbol name) = 0x000001f7 -> "main"
st_value(Symbol value) = 0x080483e4
st_size(Symbol size) = 0x0000001c -> 28
st_info(Symbol type and binding) = 0x12 -> 参考 elf 中的转换公式
st_other(Symbol visibility) = 0x00 -> STV_DEFAULT
st_shndx(Section index) = 0x000e -> "[14] .text"
嘿嘿,对上号了。
我们还可以用 strip 命令删除符号表 .symtab,这可以缩减文件尺寸。
$ ls -l hello
-rwxr-xr-x 1 yuhen yuhen 8978 2009-12-04 00:24 hello
$ strip hello
$ ls -l hello
-rwxr-xr-x 1 yuhen yuhen 5528 2009-12-04 20:27 hello
$ readelf -s hello ; .symtab 不见了
Symbol table '.dynsym' contains 5 entries:
Num: Value Size Type Bind Vis Ndx Name
0: 00000000 0 NOTYPE LOCAL DEFAULT UND
1: 00000000 0 NOTYPE WEAK DEFAULT UND __gmon_start__
2: 00000000 0 FUNC GLOBAL DEFAULT UND __libc_start_main@GLIBC_2.0 (2)
3: 00000000 0 FUNC GLOBAL DEFAULT UND puts@GLIBC_2.0 (2)
4: 080484bc 4 OBJECT GLOBAL DEFAULT 16 _IO_stdin_used
$ readelf -S hello ; Section 也少了很多
There are 28 section headers, starting at offset 0x1138:
Section Headers:
[Nr] Name Type Addr Off Size ES Flg Lk Inf Al
[ 0] NULL 00000000 000000 000000 00 0 0 0
[ 1] .interp PROGBITS 08048134 000134 000013 00 A 0 0 1
[ 2] .note.ABI-tag NOTE 08048148 000148 000020 00 A 0 0 4
[ 3] .note.gnu.build-i NOTE 08048168 000168 000024 00 A 0 0 4
[ 4] .hash HASH 0804818c 00018c 000028 04 A 6 0 4
[ 5] .gnu.hash GNU_HASH 080481b4 0001b4 000020 04 A 6 0 4
[ 6] .dynsym DYNSYM 080481d4 0001d4 000050 10 A 7 1 4
[ 7] .dynstr STRTAB 08048224 000224 00004a 00 A 0 0 1
[ 8] .gnu.version VERSYM 0804826e 00026e 00000a 02 A 6 0 2
[ 9] .gnu.version_r VERNEED 08048278 000278 000020 00 A 7 1 4
[10] .rel.dyn REL 08048298 000298 000008 08 A 6 0 4
[11] .rel.plt REL 080482a0 0002a0 000018 08 A 6 13 4
[12] .init PROGBITS 080482b8 0002b8 000030 00 AX 0 0 4
[13] .plt PROGBITS 080482e8 0002e8 000040 04 AX 0 0 4
[14] .text PROGBITS 08048330 000330 00016c 00 AX 0 0 16
[15] .fini PROGBITS 0804849c 00049c 00001c 00 AX 0 0 4
[16] .rodata PROGBITS 080484b8 0004b8 000016 00 A 0 0 4
[17] .eh_frame PROGBITS 080484d0 0004d0 000004 00 A 0 0 4
[18] .ctors PROGBITS 08049f0c 000f0c 000008 00 WA 0 0 4
[19] .dtors PROGBITS 08049f14 000f14 000008 00 WA 0 0 4
[20] .jcr PROGBITS 08049f1c 000f1c 000004 00 WA 0 0 4
[21] .dynamic DYNAMIC 08049f20 000f20 0000d0 08 WA 7 0 4
[22] .got PROGBITS 08049ff0 000ff0 000004 04 WA 0 0 4
[23] .got.plt PROGBITS 08049ff4 000ff4 000018 04 WA 0 0 4
[24] .data PROGBITS 0804a00c 00100c 000008 00 WA 0 0 4
[25] .bss NOBITS 0804a014 001014 000008 00 WA 0 0 4
[26] .comment PROGBITS 00000000 001014 000046 01 MS 0 0 1
[27] .shstrtab STRTAB 00000000 00105a 0000de 00 0 0 1
1.7 Section .text
.text 段中保存了所有函数的执行代码,我们看看 main 的反汇编代和 .text 数据对比。
$ objdump -d hello | less
080483e4 <main>:
80483e4: 55
80483e5: 89 e5
80483e7: 83 e4 f0
80483ea: 83 ec 10
80483ed: c7 04 24 c0 84 04 08
80483f4: e8 1f ff ff ff
80483f9: b8 00 00 00 00
80483fe: c9
80483ff: c3
08048400 <__libc_csu_fini>:
8048400: 55
8048401: 89 e5
8048403: 5d
8048404: c3
8048405: 8d 74 26 00
8048409: 8d bc 27 00 00 00 00
$ readelf -x .text hello
Hex dump of section '.text':
... ...
0x080483e0 ******** 5589e583 e4f083ec 10c70424
0x080483f0 c0840408 e81fffff ffb80000 0000c9c3
0x08048400 5589e55d c38d7426 008dbc27 00000000
... ...
通过对比数据,我们会发现 .text 段中只保存了所有函数机器码,并没有其他的信息,包括函数名称、起始位置等等。那么反编译时如何确定某个函数的名称以及具体位置和长度呢?这其实就是我们前面提到的符号表的作用了。
$ readelf -s hello
... ...
Symbol table '.symtab' contains 74 entries:
Num: Value Size Type Bind Vis Ndx Name
... ...
72: 080483e4 28 FUNC GLOBAL DEFAULT 14 main
... ...
Type = FUNC 表明该记录是个函数,起始位置就是 Value:080483e4,代码长度 28(0x1c) 字节,存储在索引号为14的段中。怎么样?这回对上了吧。不过有个问题,很显然反编译和符号表中给出的都是虚拟地址,我们如何确定代码在文件中的实际位置呢?
公式:VA - Section Address + Offset = 实际文件中的位置
$ readelf -S hello
There are 38 section headers, starting at offset 0x1680:
Section Headers:
[Nr] Name Type Addr Off Size ES Flg Lk Inf Al
... ...
[14] .text PROGBITS 08048330 000330 00016c 00 AX 0 0 16
... ...
0x080483e4 - 0x08048330 + 0x000330 = 0x3E4
验证一下。
$ xxd -g 1 -s 0x3e4 -l 0x1c hello
00003e4: 55 89 e5 83 e4 f0 83 ec 10 c7 04 24 c0 84 04 08
00003f4: e8 1f ff ff ff b8 00 00 00 00 c9 c3
如果用 strip 命令删除了符号表,反汇编效果就比较悲惨了,都挤到 .text 段,正经的入门级汇编编码风格啊。
$ strip hello
$ objdump -d hello | less
Disassembly of section .text:
... ...
08048330 <.text>:
8048330: 31 ed
8048332: 5e
8048333: 89 e1
... ...
80483e4: 55 ! ! ; 可怜的 <main> 就是从这嘎达开始的
80483e5: 89 e5
80483e7: 83 e4 f0
80483ea: 83 ec 10
80483ed: c7 04 24 c0 84 04 08
80483f4: e8 1f ff ff ff
80483f9: b8 00 00 00 00
80483fe: c9
80483ff: c3
8048400: 55 ! ! ; 这家伙是 <__libc_csu_fini>
8048401: 89 e5
8048403: 5d
8048404: c3
8048405: 8d 74 26 00
8048409: 8d bc 27 00 00 00 00
... ...
1.8 Section .rodata .data
.data 段包含了诸如全局变量、常量、静态局部变量之类的需要初始化的数据,而 .rodata 段则包含代码中的常量字符串(注意不是函数名这些符号名)等只读数据。
.data 段是可写的,实际内容是指针或常量值,而 .rodata 则是个只读段。
为了查看实际效果,需要修改一下演示程序。
#include <stdio.h>
const char* format = "Hello, %s !\n";
char* name = "Q.yuhen";
int main(int argc, char* argv[])
{
printf(format, name);
return 0;
}
我们开始分析编译后的程序文件。
$ objdump -dS -M intel hello | less
... ...
080483e4 <main>:
const char* format = "Hello, %s !\n";
char* name = "Q.yuhen";
int main(int argc, char* argv[])
{
80483e4: push ebp
80483e5: mov ebp,esp
80483e7: and esp,0xfffffff0
80483ea: sub esp,0x10
printf(format, name);
80483ed: mov edx,DWORD PTR ds:0x804a018 ! ! ; 变量 name
80483f3: mov eax,ds:0x804a014 ! ! ! ; 常量 format
80483f8: mov DWORD PTR [esp+0x4],edx
80483fc: mov DWORD PTR [esp],eax
80483ff: call 804831c <printf@plt>
return 0;
8048404: mov eax,0x0
}
8048409: leave
804840a: ret
804840b: nop
804840c: nop
804840d: nop
804840e: nop
... ...
我们可以从符号表中找出相关的定义信息。通过对比,就可以知道汇编代码中的虚拟地址的实际含义。
$ readelf -s hello
... ...
Symbol table '.symtab' contains 76 entries:
Num: Value Size Type Bind Vis Ndx Name
... ...
57: 0804a014 4 OBJECT GLOBAL DEFAULT 24 format
70: 0804a018 4 OBJECT GLOBAL DEFAULT 24 name
74: 080483e4 39 FUNC GLOBAL DEFAULT 14 main
... ...
$ readelf -S hello
There are 38 section headers, starting at offset 0x16f0:
Section Headers:
... ...
[Nr] Name Type Addr Off Size ES Flg Lk Inf Al
[16] .rodata PROGBITS 080484c8 0004c8 00001d 00 A 0 0 4
[24] .data PROGBITS 0804a00c 00100c 000010 00 WA 0 0 4
... ...
Key to Flags:
W (write), A (alloc), X (execute), M (merge), S (strings)
I (info), L (link order), G (group), x (unknown)
O (extra OS processing required) o (OS specific), p (processor specific)
format 和 name 都存储在 .data 段中,且该段是可写的,这表明该变量是多个栈共享。我们继续看看 .data 段中具体内容。
$ readelf -x .data hello
Hex dump of section '.data':
0x0804a00c 00000000 00000000 d0840408 dd840408 ................
从符号表的 Value 值我们可以看到:
[format] = 0x080484d0
[name] = 0x080484dd
.data 中存储的指针显然指向 .rodata 段 (0x080484c8 ~ 0x080484e5)。
$ readelf -x .rodata hello
Hex dump of section '.rodata':
0x080484c8 03000000 01000200 48656c6c 6f2c2025 ........Hello, %
0x080484d8 7320210a 00512e79 7568656e 00 s !..Q.yuhen.
.rodata 段果然也就是这些变量所指向的字符串。
1.9 Section .bss
.bss 段实际是执行后才会启用,并不占用文件空间 (下面 .bss 和 .comment Offset 相同),相关细节可参考 Linux/ELF 内存布局分析之类文章。
$ readelf -S hello
Section Headers:
[Nr] Name Type Addr Off Size ES Flg Lk Inf Al
... ...
[25] .bss NOBITS 0804a01c 00101c 000008 00 WA 0 0 4
[26] .comment PROGBITS 00000000 00101c 000046 01 MS 0 0 1
... ...
Key to Flags:
W (write), A (alloc), X (execute), M (merge), S (strings)
I (info), L (link order), G (group), x (unknown)
O (extra OS processing required) o (OS specific), p (processor specific)
$ readelf -x .bss hello
Section '.bss' has no data to dump.
ELF 中我们常打交道的几个段: - .bss : 存储未初始化的全局和静态局部变量等。程序运行时初始为零,不占文件空间。 - .data : 包含占据内存映像的初始化数据 (包括已初始化的全局变量、静态局部变量等)。 - .rodata : 包含程序映像中的只读数据,通常是代码中的常量字符串 (非符号名)。 - .shstrtab : 字符串表,包含 Section 名称。 - .strtab : 字符串表,包含符号表记录 (Symbol Table Entry) 名称。 - .symtab : 符号表,包含定位或重定位程序符号定义和引用时所需要的信息。 - .text : 包含程序的可执行指令。
第 3 章 2. Linux Process Model
下图是一个简易的内存模型示意图。其中某些段 (Segment) 是从可执行文件加载的,有关 ELFSection 和 Segment 的映射关系,我们可以从 ELF Program Headers 中获取相关信息。
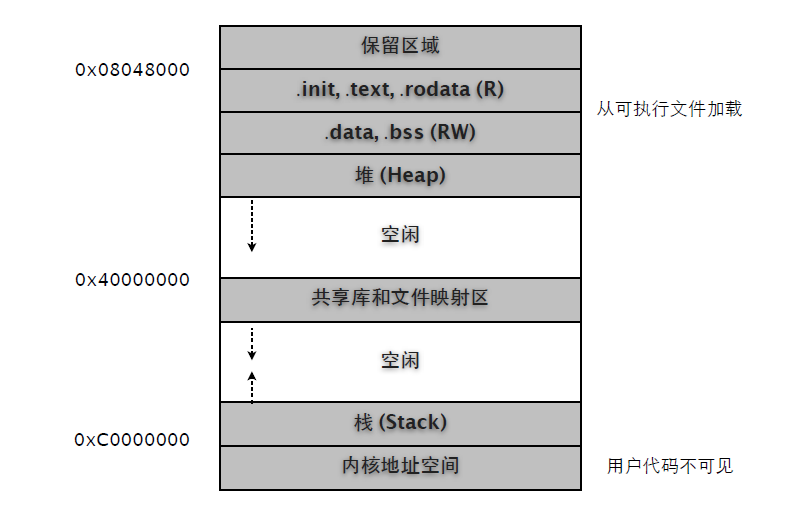
$ readelf -l hello
Elf file type is EXEC (Executable file)
Entry point 0x8048410
There are 8 program headers, starting at offset 52
Program Headers:
Type Offset VirtAddr PhysAddr FileSiz MemSiz Flg Align
PHDR 0x000034 0x08048034 0x08048034 0x00100 0x00100 R E 0x4
INTERP 0x000134 0x08048134 0x08048134 0x00013 0x00013 R 0x1
LOAD 0x000000 0x08048000 0x08048000 0x0064c 0x0064c R E 0x1000
LOAD 0x000f0c 0x08049f0c 0x08049f0c 0x0011c 0x00128 RW 0x1000
DYNAMIC 0x000f20 0x08049f20 0x08049f20 0x000d0 0x000d0 RW 0x4
NOTE 0x000148 0x08048148 0x08048148 0x00044 0x00044 R 0x4
GNU_STACK 0x000000 0x00000000 0x00000000 0x00000 0x00000 RW 0x4
GNU_RELRO 0x000f0c 0x08049f0c 0x08049f0c 0x000f4 0x000f4 R 0x1
Section to Segment mapping:
Segment Sections...
00
01 .interp
02 ... .init .plt .text .fini .rodata
03 ... .data .bss
04 .dynamic
05 .note.ABI-tag .note.gnu.build-id
06
07 .ctors .dtors .jcr .dynamic .got
对照示意图,我们可以看到 .text, .rodata, .data, .bss 被加载到 0x08048000 之后,也就是序号02, 03两个 LOAD Segemtn 段中。ELF Section 信息中的 Virtual Address 也是一个参考。
$ readelf -S hello
There are 38 section headers, starting at offset 0x1a10:
Section Headers:
[Nr] Name Type Addr Off Size ES Flg Lk Inf Al
... ...
[14] .text PROGBITS 08048410 000410 0001ec 00 AX 0 0 16
[16] .rodata PROGBITS 08048618 000618 000030 00 A 0 0 4
[24] .data PROGBITS 0804a018 001018 000010 00 WA 0 0 4
[25] .bss NOBITS 0804a028 001028 00000c 00 WA 0 0 4
[35] .shstrtab STRTAB 00000000 0018b8 000156 00 0 0 1
[36] .symtab SYMTAB 00000000 002000 000540 10 37 56 4
[37] .strtab STRTAB 00000000 002540 000263 00 0 0 1
Key to Flags:
W (write), A (alloc), X (execute), M (merge), S (strings)
I (info), L (link order), G (group), x (unknown)
O (extra OS processing required) o (OS specific), p (processor specific)
注意不是所有的 Section 都会被加载到进程内存空间。
查看进程运行时内存信息:
(1) pmap
$ ps aux | grep hello | grep -v grep
yuhen 6649 0.0 1.6 39692 8404 pts/0 Sl+ Dec10 0:13 vim hello.c
yuhen 12787 0.0 0.0 1664 396 pts/1 S+ 08:24 0:00 ./hello
$ pmap -x 12787
12787: ./hello
Address Kbytes RSS Anon Locked Mode Mapping
00110000 1272 - - - r-x-- libc-2.10.1.so
0024e000 8 - - - r---- libc-2.10.1.so
00250000 4 - - - rw--- libc-2.10.1.so
00251000 12 - - - rw--- [ anon ]
002b2000 108 - - - r-x-- ld-2.10.1.so
002cd000 4 - - - r---- ld-2.10.1.so
002ce000 4 - - - rw--- ld-2.10.1.so
00c4d000 4 - - - r-x-- [ anon ]
08048000 4 - - - r-x-- hello
08049000 4 - - - r---- hello
94
0804a000 4 - - - rw--- hello
09f89000 132 - - - rw--- [ anon ]
b7848000 4 - - - rw--- [ anon ]
b7855000 16 - - - rw--- [ anon ]
bfc40000 84 - - - rw--- [ stack ]
-------- ------- ------- ------- -------
total kB 1664 - - -
(2) maps
$ cat /proc/12787/maps
00110000-0024e000 r-xp 00000000 08:01 5231 /lib/tls/i686/cmov/libc-2.10.1.so
0024e000-00250000 r--p 0013e000 08:01 5231 /lib/tls/i686/cmov/libc-2.10.1.so
00250000-00251000 rw-p 00140000 08:01 5231 /lib/tls/i686/cmov/libc-2.10.1.so
00251000-00254000 rw-p 00000000 00:00 0
002b2000-002cd000 r-xp 00000000 08:01 1809 /lib/ld-2.10.1.so
002cd000-002ce000 r--p 0001a000 08:01 1809 /lib/ld-2.10.1.so
002ce000-002cf000 rw-p 0001b000 08:01 1809 /lib/ld-2.10.1.so
00c4d000-00c4e000 r-xp 00000000 00:00 0 [vdso]
08048000-08049000 r-xp 00000000 08:01 135411 /home/yuhen/Projects/Learn.C/hello
08049000-0804a000 r--p 00000000 08:01 135411 /home/yuhen/Projects/Learn.C/hello
0804a000-0804b000 rw-p 00001000 08:01 135411 /home/yuhen/Projects/Learn.C/hello
09f89000-09faa000 rw-p 00000000 00:00 0 [heap]
b7848000-b7849000 rw-p 00000000 00:00 0
b7855000-b7859000 rw-p 00000000 00:00 0
bfc40000-bfc55000 rw-p 00000000 00:00 0 [stack]
(3) gdb
$ gdb --pid=12787
(gdb) info proc mappings
process 12619
cmdline = '/home/yuhen/Projects/Learn.C/hello'
cwd = '/home/yuhen/Projects/Learn.C'
exe = '/home/yuhen/Projects/Learn.C/hello'
Mapped address spaces:
Start Addr End Addr Size Offset objfile
... ...
0x8048000 0x8049000 0x1000 0 /home/yuhen/Projects/Learn.C/hello
0x8049000 0x804a000 0x1000 0 /home/yuhen/Projects/Learn.C/hello
0x804a000 0x804b000 0x1000 0x1000 /home/yuhen/Projects/Learn.C/hello
0x9f89000 0x9faa000 0x21000 0 [heap]
0xb7848000 0xb7849000 0x1000 0
0xb7855000 0xb7859000 0x4000 0
0xbfc40000 0xbfc55000 0x15000 0 [stack]
接下来我们分析不同生存周期变量在进程空间的位置。
#include <stdio.h>
#include <stdlib.h>
#include <stdbool.h>
#include <string.h>
int x = 0x1234;
char *s;
int test()
{
static int a = 0x4567;
static int b;
return ++a;
}
int main(int argc, char* argv[])
{
int i = test() + x;
s = "Hello, World!";
char* p = malloc(10);
return EXIT_SUCCESS;
}
在分析 ELF 文件结构时我们就已经知道全局变量和静态局部变量在编译期就决定了其内存地址。
$ readelf -s hello
Symbol table '.symtab' contains 79 entries:
Num: Value Size Type Bind Vis Ndx Name
... ...
50: 0804a018 4 OBJECT LOCAL DEFAULT 24 a.2344
51: 0804a024 4 OBJECT LOCAL DEFAULT 25 b.2345
57: 0804a028 4 OBJECT GLOBAL DEFAULT 25 s
65: 0804a014 4 OBJECT GLOBAL DEFAULT 24 x
... ...
$ readelf -S hello
There are 38 section headers, starting at offset 0x1a10:
Section Headers:
[Nr] Name Type Addr Off Size ES Flg Lk Inf Al
... ...
[16] .rodata PROGBITS 080484f8 0004f8 000016 00 A 0 0 4
[24] .data PROGBITS 0804a00c 00100c 000010 00 WA 0 0 4
[25] .bss NOBITS 0804a01c 00101c 000010 00 WA 0 0 4
Key to Flags:
W (write), A (alloc), X (execute), M (merge), S (strings)
I (info), L (link order), G (group), x (unknown)
O (extra OS processing required) o (OS specific), p (processor specific)
通过对比相关段,我们可确定已初始化的全局和静态变量被分配在 .data 中,而未初始化全局和静态变量则分配在 .bss。
.data 0804a00c ~ 0804a01b : x(0804a014), a(0804a018),
.bss 0804a01c ~ 0804a02b : b(0804a024), s(0804a028)
而代码中的字符串 "Hello, World!" 被分配在 .rodata 中。
$ readelf -p .rodata hello
String dump of section '.rodata':
[ 8] Hello, World!
$ readelf -x .rodata hello
Hex dump of section '.rodata':
0x080484f8 03000000 01000200 48656c6c 6f2c2057 ........Hello, W
0x08048508 6f726c64 2100 orld!.
可以用反汇编代码验证一下。
$ objdump -dS -M intel hello | less
int x = 0x1234;
char *s;
int test()
{
80483e4: push ebp
80483e5: mov ebp,esp
static int a = 0x4567;
static int b;
return ++a;
80483e7: mov eax,ds:0x804a018 ! ! ; 静态变量 a
80483ec: add eax,0x1 ! ! ; 计算 (eax) = (eax) + 1
80483ef: mov ds:0x804a018,eax ! ! ; 将结果存回 a
80483f4: mov eax,ds:0x804a018
}
int main(int argc, char* argv[])
{
int i = test() + x;
8048404: call 80483e4 <test> ! ; test() 返回值被存入 eax
8048409: mov edx,DWORD PTR ds:0x804a014 ! ; 将全局变量 x 值放入 edx
804840f: add eax,edx ! ; 计算 (eax) = test() + x
8048411: mov DWORD PTR [esp+0x1c],eax ! ; 局部变量 i = (eax), 显然 i 在栈分配
s = "Hello, World!";
8048415: mov DWORD PTR ds:0x804a028,0x8048500 ; 将 "Hello..." 地址复制给 s
... ...
char* p = malloc(10);
804841f: mov DWORD PTR [esp],0xa
8048426: call 804831c <malloc@plt>
804842b: mov DWORD PTR [esp+0x18],eax
return EXIT_SUCCESS;
804842f: mov eax,0x0
}
也可以用 gdb 查看运行期分配状态。
(gdb) p &i ! ! ! ; main() 局部变量 i 地址
$1 = (int *) 0xbffff74c
(gdb) p p ! ! ! ; malloc 返回空间指针 p
$2 = 0x804b008 ""
(gdb) info proc mappings
Mapped address spaces:
Start Addr End Addr Size Offset objfile
0x804b000 0x806c000 0x21000 0 [heap]
0xbffeb000 0xc0000000 0x15000 0 [stack]
很显然,局部变量 i 分配在 Stack,而 malloc p 则是在 Heap 上分配。
第 3 章 3. Core Dump
程序总免不了要崩溃的…… 这是常态,要淡定!
利用 setrlimit 函数我们可以将 "core file size" 设置成一个非0值,这样就可以在崩溃时自动生成 core 文件了。(可参考 bshell ulimit 命令)
#include <sys/resource.h>
void test()
{
char* s = "abc";
*s = 'x';
}
int main(int argc, char** argv)
{
struct rlimit res = { .rlim_cur = RLIM_INFINITY, .rlim_max = RLIM_INFINITY };
setrlimit(RLIMIT_CORE, &res);
test();
return (EXIT_SUCCESS);
}
很显然,我们在 test 函数中特意制造了一个 "Segmentation fault",执行一下看看效果。
$ ./test
Segmentation fault (core dumped)
$ ls -l
total 104
-rw------- 1 yuhen yuhen 172032 2010-01-14 20:59 core
-rwxr-xr-x 1 yuhen yuhen 9918 2010-01-14 20:53 test
第 3 章 4. Thread
线程对于 Linux 内核来说就是一种特殊的 "轻量级进程"。如同 fork 处理子进程一样,当线程结束时,它会维持一个最小现场,其中保存有退出状态等资源,以便主线程或其他线程调用 thread_join 获取这些信息。如果我们不处理这个现场,那么就会发生内存泄露。
void* test(void* arg)
{
printf("%s\n", (char*)arg);
return (void*)0;
}
int main(int argc, char** argv)
{
pthread_t tid;
pthread_create(&tid, NULL, test, "a");
sleep(3);
return (EXIT_SUCCESS);
}
编译后,我们用 Valgrind 检测一下。
$ valgrind --leak-check=full ./test
==11224== Memcheck, a memory error detector
==11224== Copyright (C) 2002-2009, and GNU GPL'd, by Julian Seward et al.
==11224== Using Valgrind-3.5.0-Debian and LibVEX; rerun with -h for copyright info
==11224== Command: ./test
==11224==
a
==11224==
==11224== HEAP SUMMARY:
==11224== in use at exit: 136 bytes in 1 blocks
==11224== total heap usage: 1 allocs, 0 frees, 136 bytes allocated
==11224==
==11224== 136 bytes in 1 blocks are possibly lost in loss record 1 of 1
==11224== at 0x4023F5B: calloc (vg_replace_malloc.c:418)
==11224== by 0x40109AB: _dl_allocate_tls (dl-tls.c:300)
==11224== by 0x403F102: pthread_create@@GLIBC_2.1 (allocatestack.c:561)
==11224== by 0x80484F8: main (main.c:51)
==11224==
==11224== LEAK SUMMARY:
==11224== definitely lost: 0 bytes in 0 blocks
==11224== indirectly lost: 0 bytes in 0 blocks
==11224== possibly lost: 136 bytes in 1 blocks
==11224== still reachable: 0 bytes in 0 blocks
==11224== suppressed: 0 bytes in 0 blocks
==11224==
==11224== For counts of detected and suppressed errors, rerun with: -v
==11224== ERROR SUMMARY: 1 errors from 1 contexts (suppressed: 15 from 8)
结果报告显示 pthread_create 发生内存泄露。
我们试着调用 pthread_join 获取线程状态,看看内核是否会回收这个被泄露的线程遗留内存。
void* test(void* arg)
{
printf("%s\n", (char*)arg);
return (void*)123;
}
int main(int argc, char** argv)
{
pthread_t tid;
pthread_create(&tid, NULL, test, "a");
void* state;
pthread_join(tid, &state);
printf("%d\n", (int)state);
return (EXIT_SUCCESS);
}
$ valgrind --leak-check=full ./test
==11802== Memcheck, a memory error detector
==11802== Copyright (C) 2002-2009, and GNU GPL'd, by Julian Seward et al.
==11802== Using Valgrind-3.5.0-Debian and LibVEX; rerun with -h for copyright info
==11802== Command: ./test
==11802==
a
123
==11802==
==11802== HEAP SUMMARY:
==11802== in use at exit: 0 bytes in 0 blocks
==11802== total heap usage: 1 allocs, 1 frees, 136 bytes allocated
==11802==
==11802== All heap blocks were freed -- no leaks are possible
==11802==
==11802== For counts of detected and suppressed errors, rerun with: -v
==11802== ERROR SUMMARY: 0 errors from 0 contexts (suppressed: 15 from 8)
这次检测结果表明,内存不再泄露。可见 pthread_join 和 waitpid 之类的函数作用类似,就是获取状态,并通知内核完全回收相关内存区域。
在实际开发中,我们并不是总要关心线程的退出状态。例如异步调用,主线程只需建立线程,然后继续自己的任务。这种状况下,我们可以为用 "分离线程 (detach)" 来通知内核无需维持状态线程,直接回收全部内存。
可以调用 pthread_detach 函数分离线程。
int main(int argc, char** argv)
{
pthread_t tid;
pthread_create(&tid, NULL, test, "a");
pthread_detach(tid);
sleep(3);
return (EXIT_SUCCESS);
}
当然,也可以在 thread function 中调用。
void* test(void* arg)
{
printf("%s\n", (char*)arg);
pthread_detach(pthread_self());
return NULL;
}
或者使用线程属性。
int main(int argc, char** argv)
{
pthread_attr_t attr;
pthread_attr_init(&attr);
pthread_attr_setdetachstate(&attr, PTHREAD_CREATE_DETACHED);
pthread_t tid;
pthread_create(&tid, &attr, test, "a");
sleep(3);
pthread_attr_destroy(&attr);
return (EXIT_SUCCESS);
}
根据编码需要,任选其一即可。
4.2 Cancel
pthread_cancel 是个危险的东东,天知道会在哪旮旯停掉线程。
void* test(void* arg)
{
for (int i = 0; i < 10; i++)
{
printf("start: %d; ", i);
sleep(1);
printf("end: %d\n", i);
}
return (void*)0;
}
int main(int argc, char* argv[])
{
// 创建线程
pthread_t tid;
pthread_create(&tid, NULL, test, NULL);
// 3秒后取消线程
sleep(3);
pthread_cancel(tid);
// 释放资源
void* ret;
pthread_join(tid, &ret);
if ((int)ret != 0) fprintf(stderr, "cancel!\n");
return EXIT_SUCCESS;
}
假设以下三行构成一个完整的事务逻辑。
printf("start: %d; ", i);
sleep(1);
printf("end: %d\n", i);
那么执行的结果可能是这样。
$ ./test
start: 0; end: 0
start: 1; end: 1
start: 2;
cancel!
"end: 2" 不见了,如果是真实的业务逻辑可能会惹出大麻烦。原因是因为本例中的 "sleep(1)" 是一个 "取消点",类似的函数含有很多,天知道会有什么道理可讲。
当对某个线程调用 thread_cancel 时,会将线程设置成 "未决状态",当执行到 "取消点" 时就会终止线程。可以考虑用 pthread_setcancelstate 将线程从默认的 PTHREAD_CANCEL_ENABLED 改成PTHREAD_CANCEL_DISABLE,等我们的逻辑执行完成后再改回。
void* test(void* arg)
{
for (int i = 0; i < 10; i++)
{
pthread_setcancelstate(PTHREAD_CANCEL_DISABLE, NULL);
printf("start: %d; ", i);
sleep(1);
printf("end: %d\n", i);
pthread_setcancelstate(PTHREAD_CANCEL_ENABLE, NULL);
pthread_testcancel();
}
return (void*)0;
}
这回搞定了,下面是输出效果。注意当我们改回 PTHREAD_CANCEL_ENABLE 后,仅表示该线程可以被中断了,还需要调用 pthread_testcancel 来完成这次中断。
$ ./test
start: 0; end: 0
start: 1; end: 1
start: 2; end: 2
cancel!
就算我们在完成一次完整逻辑后不立即改回 PTHREAD_CANCEL_ENABLE,就算后续循环再次调用PTHREAD_CANCEL_DISABLE 设置,其 "未决状态" 依然会保留的。因此我们写成下面这样。
void* test(void* arg)
{
for (int i = 0; i < 10; i++)
{
pthread_setcancelstate(PTHREAD_CANCEL_DISABLE, NULL);
printf("start: %d; ", i);
sleep(1);
printf("end: %d\n", i);
if (i > 7)
{
pthread_setcancelstate(PTHREAD_CANCEL_ENABLE, NULL);
pthread_testcancel();
}
}
return (void*)0;
}
输出:
$ ./test
start: 0; end: 0
start: 1; end: 1
start: 2; end: 2
start: 3; end: 3
start: 4; end: 4
start: 5; end: 5
start: 6; end: 6
start: 7; end: 7
start: 8; end: 8
cancel!
4.3 Synchronization
建议开发中总是设置 PTHREAD_MUTEX_RECURSIVE 属性,避免死锁。
pthread_mutex_t mutex;
pthread_cond_t cond;
void* test(void* arg)
{
pthread_mutex_lock(&mutex);
for (int i = 0; i < 10; i++)
{
printf("T1: %d\n", i);
sleep(1);
// 释放锁,等待信号后再次加锁继续执行。
if (i == 5) pthread_cond_wait(&cond, &mutex);
}
pthread_mutex_unlock(&mutex);
return (void*)0;
}
void* test2(void* arg)
{
// 多次加锁
pthread_mutex_lock(&mutex);
pthread_mutex_lock(&mutex);
for (int i = 0; i < 10; i++)
{
printf("T2: %d\n", i);
sleep(1);
}
// 发送信号
pthread_cond_signal(&cond);
pthread_mutex_unlock(&mutex);
pthread_mutex_unlock(&mutex);
return (void*)0;
}
int main(int argc, char* argv[])
{
// 线程属性: 分离
pthread_attr_t p_attr;
pthread_attr_init(&p_attr);
pthread_attr_setdetachstate(&p_attr, PTHREAD_CREATE_DETACHED);
// 互斥量属性: 同一线程可多次加锁
pthread_mutexattr_t m_attr;
pthread_mutexattr_init(&m_attr);
pthread_mutexattr_settype(&m_attr, PTHREAD_MUTEX_RECURSIVE);
// 初始化
pthread_mutex_init(&mutex, &m_attr);
pthread_cond_init(&cond, NULL);
// 创建线程
pthread_t tid1, tid2;
pthread_create(&tid1, &p_attr, test, NULL);
sleep(1);
pthread_create(&tid2, &p_attr, test2, NULL);
// 释放
pthread_attr_destroy(&p_attr);
pthread_mutexattr_destroy(&m_attr);
sleep(30);
return EXIT_SUCCESS;
}
输出:
$ ./test
T1: 0
T1: 1
T1: 2
T1: 3
T1: 4
T1: 5 ----> 释放锁,开始等待信号。
T2: 0 ----> 2 号线程获得锁开始执行。
T2: 1
T2: 2
T2: 3
T2: 4
T2: 5
T2: 6
T2: 7
T2: 8
T2: 9 ----> 发送信号后,释放锁。
T1: 6 ----> 1 号线程开始执行。
T1: 7
T1: 8
T1: 9
第 3 章 5. Signal
利用信号在进程间传送数据,可以是 int 类型的标志,或者某个共享内存的地址。为了便于阅读,下面代码中对函数返回值的判断被删除了……
#include <stdio.h>
#include <stdlib.h>
#include <stdbool.h>
#include <string.h>
#include <sys/types.h>
#include <sys/wait.h>
#include <unistd.h>
#include <signal.h>
void sig_test(int signo, siginfo_t* si, void* p)
{
// 终于等到子进程送盒饭过来了,除了整数外,还可以是共享内存的地址。
printf("signo:%d pid:%d value:%d\n", signo, si->si_pid, si->si_int);
}
void parent()
{
// 让子进程退出后自动回收,避免成为僵尸或者需要父进程 wait。
struct sigaction sat_cld = { .sa_handler = SIG_IGN, .sa_flags = SA_NOCLDWAIT };
sigaction(SIGCHLD, &sat_cld, NULL);
// 注册信号处理程序
struct sigaction sat_usr = { .sa_flags = SA_SIGINFO, .sa_sigaction = sig_test };
sigaction(SIGUSR1, &sat_usr, NULL);
// 父进程该干嘛干嘛,作为示例只好无聊地坐看风起云灭。
while(true) pause();
}
void child()
{
if (fork() == 0)
{
// 休息一下,等父进程完成信号处理程序注册。
sleep(1);
for (int i = 0; i < 10; i++)
{
// 发送附加数据的信号,也可以发送某个共享内存的地址。
sigqueue(getppid(), SIGUSR1, (union sigval){ .sival_int = i });
// 间隔一下,连续发送会导致失败。
usleep(1);
}
// 子进程退出
exit(EXIT_SUCCESS);
}
}
int main(int argc, char* argv[])
{
child();
parent();
return EXIT_SUCCESS;
}
5.2 Blocking
内核可能在任何时候暂停正在执行的函数,然后执行信号服务程序。基于安全等原因,我们可能需要阻塞这种行为,确保我们的关键逻辑被完整执行。
先看一个非阻塞版本。
void sig_handler(int signo)
{
printf("signal: %d\n", signo);
}
void test()
{
for (int i = 0; i < 10; i++)
{
printf("%s: %d\n", __func__, i);
sleep(1);
}
}
void child()
{
if (fork() == 0)
{
sleep(1);
for (int i = 0; i < 10; i++)
{
if (kill(getppid(), SIGUSR1) == -1) perror("kill");
sleep(1);
}
exit(EXIT_SUCCESS);
}
}
int main(int argc, char* argv[])
{
signal(SIGUSR1, sig_handler);
child();
test();
return EXIT_SUCCESS;
}
编译执行,很显然 test 函数多次被信号中断。
$ ./test
test: 0
signal: 10
test: 1
signal: 10
test: 2
signal: 10
test: 3
signal: 10
test: 4
signal: 10
test: 5
signal: 10
test: 6
signal: 10
test: 7
signal: 10
test: 8
signal: 10
test: 9
signal: 10
通过 sigprocmask 函数我们可以实现自己的不可重入函数。
void test()
{
sigset_t set,;
sigemptyset(&set);
sigaddset(&set, SIGUSR1);
sigprocmask(SIG_BLOCK, &set, NULL);
for (int i = 0; i < 10; i++)
{
printf("%s: %d\n", __func__, i);
sleep(1);
}
sigprocmask(SIG_UNBLOCK, &set, NULL);
}
编译执行,信号被阻塞。同时要注意这期间相同的信号只有一个在排队 (Linux)。
$ ./test
test: 0
test: 1
test: 2
test: 3
test: 4
test: 5
test: 6
test: 7
test: 8
test: 9
signal: 10
我们还以用 sigfillset 来阻挡除 SIGKILL 和 SIGSTOP 之外的所有信号。
void test()
{
sigset_t set, oldset;
sigemptyset(&set);
sigfillset(&set);
sigprocmask(SIG_SETMASK, &set, &oldset);
for (int i = 0; i < 10; i++)
{
printf("%s: %d\n", __func__, i);
sleep(1);
}
sigprocmask(SIG_SETMASK, &oldset, NULL);
}
你可以试试在运行期间按 + C 试试。
第 3 章 6. Zombie Process
在写多进程服务程序的时候,免不了要处理僵尸进程。为了让服务程序长时间正常运转,我们需要有些过硬的功夫对付这些赖着不走的死鬼们。哦,对了,先看看僵尸啥样。
int main(int argc, char* argv[])
{
for (int i = 0; i < 10; i++)
{
pid_t child = fork();
if (child == 0)
{
printf("child: %d, parent: %d\n", getpid(), getppid());
exit(EXIT_SUCCESS);
}
else if (child == -1)
{
perror("fork");
}
}
while(true) pause();
return EXIT_SUCCESS;
}
编译执行。
$ ./test
child: 2038, parent: 2035
child: 2039, parent: 2035
child: 2040, parent: 2035
child: 2041, parent: 2035
child: 2042, parent: 2035
child: 2043, parent: 2035
child: 2037, parent: 2035
child: 2036, parent: 2035
child: 2044, parent: 2035
child: 2045, parent: 2035
^Z
[2]+ Stopped ./test
$ ps aux | grep test
yuhen 2035 0.0 0.0 1632 376 pts/0 T 17:32 0:00 ./test
yuhen 2036 0.0 0.0 0 0 pts/0 Z 17:32 0:00 [test] <defunct>
yuhen 2037 0.0 0.0 0 0 pts/0 Z 17:32 0:00 [test] <defunct>
yuhen 2038 0.0 0.0 0 0 pts/0 Z 17:32 0:00 [test] <defunct>
yuhen 2039 0.0 0.0 0 0 pts/0 Z 17:32 0:00 [test] <defunct>
yuhen 2040 0.0 0.0 0 0 pts/0 Z 17:32 0:00 [test] <defunct>
yuhen 2041 0.0 0.0 0 0 pts/0 Z 17:32 0:00 [test] <defunct>
yuhen 2042 0.0 0.0 0 0 pts/0 Z 17:32 0:00 [test] <defunct>
yuhen 2043 0.0 0.0 0 0 pts/0 Z 17:32 0:00 [test] <defunct>
yuhen 2044 0.0 0.0 0 0 pts/0 Z 17:32 0:00 [test] <defunct>
yuhen 2045 0.0 0.0 0 0 pts/0 Z 17:32 0:00 [test] <defunct>
好多僵尸啊。子进程退出时会保留一个最小现场,其中有退出状态码等东东,等待父进程查询。默认情况下,我们需要在父进程用 wait / waitpid 之类的函数进行处理后,僵尸才会消失。但在实际开发中,我们并不总是需要获知子进程的结束状态。
从下面的兵器中选一把,准备杀僵尸吧。
6.1 fork + fork
也就是所谓两次 fork 调用,主进程并不直接创建目标子进程,而是通过创建一个 Son,然后再由Son 创建实际的目标子进程 Grandson。Son 在创建 Grandson 后立即返回,并由主进程 waitpid回收掉。而真正的目标 Grandson 则因为 "生父" Son 死掉而被 init 收养,然后直接被人道毁灭。
void create_child()
{
pid_t son = fork();
if (son == 0)
{
pid_t grandson = fork();
if (grandson == 0)
{
printf("child: %d, parent: %d\n", getpid(), getppid());
exit(EXIT_SUCCESS);
}
exit(EXIT_SUCCESS);
}
else if (son > 0)
{
waitpid(son, NULL, 0);
}
else
{
perror("fork");
}
}
int main(int argc, char* argv[])
{
for (int i = 0; i < 10; i++)
{
create_child();
}
while(true) pause();
return EXIT_SUCCESS;
}
6.2 signal
父进程注册 SIGCHLD 信号处理程序来完成异步 wait 回收操作。
void create_child()
{
pid_t son = fork();
if (son == 0)
{
printf("child: %d, parent: %d\n", getpid(), getppid());
exit(EXIT_SUCCESS);
}
else if (son == -1)
{
perror("fork");
}
}
void sig_child(int signo)
{
if (signo != SIGCHLD) return;
int status;
pid_t pid = wait(&status);
printf("child %d exited!\n", pid);
}
int main(int argc, char* argv[])
{
signal(SIGCHLD, sig_child);
for (int i = 0; i < 10; i++)
{
create_child();
}
while(true) pause();
return EXIT_SUCCESS;
}
6.3 sigaction
同样是信号,但区别在于提前告知内核:别等我了,直接杀了吧。
void create_child()
{
pid_t son = fork();
if (son == 0)
{
printf("child: %d, parent: %d\n", getpid(), getppid());
exit(EXIT_SUCCESS);
}
else if (son == -1)
{
perror("fork");
}
}
int main(int argc, char* argv[])
{
struct sigaction act_nowait = { .sa_handler = SIG_IGN, .sa_flags = SA_NOCLDWAIT};
sigaction(SIGCHLD, &act_nowait, NULL);
for (int i = 0; i < 10; i++)
{
create_child();
}
while(true) pause();
return EXIT_SUCCESS;
}
第 3 章 7. Dynamic Linking Loader
在运行时动态载入库 (.so),并调用其中的函数。
7.1 动态库
我们调用的目标函数就是 testfunc。
mylib.c
#include <stdio.h>
#include <stdlib.h>
#include <string.h>
void testfunc(const char* s, int x)
{
printf("testfunc call.\n");
printf("%s, %d\n", s, x);
}
编译成动态库。
$ gcc -fPIC -shared -o libmy.so mylib.c
$ nm libmy.so
... ...
000004ac T testfunc
符号表中包含了目标函数名称。
7.2 调用
我们需要的函数在 "dlfcn.h" 中可以找到。相关函数信息可以通过 "man 3 dlopen" 查询。
main.c
#include <stdio.h>
#include <stdlib.h>
#include <stdbool.h>
#include <string.h>
#include <dlfcn.h>
int main(int argc, char* argv[])
{
// 载入并返回动态库句柄
void* handle = dlopen("./libmy.so", RTLD_LAZY);
// 如果句柄为 NULL,打印出错信息
if (!handle)
{
fprintf(stderr, "error1: %s\n", dlerror());
return EXIT_FAILURE;
}
// 声明函数指针
void (*func)(const char*, int);
// 通过符号名称返回函数指针
func = dlsym(handle, "testfunc");
// 如果 dlerror() 结果不为 NULL 表示出错
char* error = dlerror();
if (error)
{
fprintf(stderr, "error2: %s\n", error);
return EXIT_FAILURE;
}
// 调用函数
func("Hello, Dynamic Library!", 1234);
// 关闭动态库
dlclose(handle);
return EXIT_SUCCESS;
}
编译并测试。
$ gcc -g -o test -ldl main.c
$ ./test
testfunc call.
Hello, Dynamic Library!, 1234
注意添加 "-ldl" 编译参数。
第 3 章 8. Unit Testing
不要嫌单元测试麻烦,从长期看,这个投资是非常值得的。CUnit 和其孪生兄弟们的使用方法并没有多大差异,写起来很简单。 - Test Registry: 测试单元,通常与要测试的目标模块对应。可包含多个 "Test Suite"。 - Test Suite: 将多个测试函数组成一个有执行顺序的测试逻辑组。 - Test Function: 这个简单,就是一个签名为 "void test_func(void)" 的函数。 使用步骤: (1) 编写测试函数。 (2) 如果需要的话可以为 "Test Suite" 创建 init/cleanup 函数。 (3) 初始化 "Test Registry"。 (4) 添加一个或多个 "Test Suite" 到 "Test Registry"。 (5) 添加 "Test Function" 到 "Test Suite"。 (6) 运行单元测试函数,例如 CU_basic_run_tests()。 (7) 清理 "Test Registry"。 试着写个简单的演示吧 (在实际项目中,我们会为单元测试专门创建一个子目录和独立的源代码文件)。
#define _GNU_SOURCE
#include <stdio.h>
#include <stdlib.h>
#include <stdbool.h>
#include <string.h>
#include <errno.h>
#include <CUnit/Basic.h>
/*---待测试函数-----------------------------------------------*/
int max(int a, int b)
{
return a > b a : b;
}
/*---单元测试--------------------------------------------------*/
static int init()
{
return 0;
}
static int cleanup()
{
return 0;
}
static void test_max()
{
CU_ASSERT_EQUAL(3, max(1, 3));
CU_ASSERT_NOT_EQUAL(1, max(1, 3));
}
void utest()
{
CU_initialize_registry();
CU_pSuite suite1 = CU_add_suite("my suite1", init, cleanup);
CU_add_test(suite1, "max", test_max);
CU_basic_set_mode(CU_BRM_VERBOSE);
CU_basic_run_tests();
CU_cleanup_registry();
}
/*-------------------------------------------------------------*/
int main(int argc, char* argv[])
{
utest();
return EXIT_SUCCESS;
}
输出:
Suite: my suite1
Test: max ... passed
--Run Summary: Type Total Ran Passed Failed
suites 1 1 n/a 0
tests 1 1 1 0
asserts 2 2 2 0
CUnit 提供了大量的 CU_ASSERT_ 测试宏方便我们对测试结果做出判断。每个 Suite 可以指定 init/cleanup 函数,其实就是我们熟悉的 NUnit setup/teardown,函数返回0表示执行成功。
typedef void (*CU_TestFunc)(void)
typedef int (*CU_InitializeFunc)(void)
typedef int (*CU_CleanupFunc)(void)
除了使用默认 CU_initialize_registry 函数,我们还可以使用 CU_create_new_registry 创建多个Test Registry 进行测试。相关细节参考官方文档。
第 3 章 9. libmm: Memory Pool
本文的 libmm 除了 Share Memory,也可做 Memory Pool 用,就是用 mmap 预先划出一大块内存,以后的分配操作都可以在这块内存内部进行,包括 malloc、calloc、free 等等。
Memory Pool 的好处是不在堆和栈上分配,可以重复使用,避免多次向内核请求分配和释放内存,一定程度上提高了性能。另外只需释放整个 Pool 即可完成所有的内存释放,避免内存泄露的发生。
安装 libmm 库:
$ sudo apt-get libmm14 libmm-dev libmm-dbg
头文件: /usr/include/mm.h
/* Standard Malloc-Style API */
MM *mm_create(size_t, const char *);
int mm_permission(MM *, mode_t, uid_t, gid_t);
void mm_reset(MM *);
void mm_destroy(MM *);
int mm_lock(MM *, mm_lock_mode);
int mm_unlock(MM *);
void *mm_malloc(MM *, size_t);
void *mm_realloc(MM *, void *, size_t);
void mm_free(MM *, void *);
void *mm_calloc(MM *, size_t, size_t);
char *mm_strdup(MM *, const char *);
size_t mm_sizeof(MM *, const void *);
size_t mm_maxsize(void);
size_t mm_available(MM *);
char *mm_error(void);
void mm_display_info(MM *);
和标准库内存分配函数差不多,很好理解。
#include <stdio.h>
#include <stdlib.h>
#include <stdbool.h>
#include <string.h>
#include <mm.h>
int main(int argc, char* argv[])
{
// 创建 10KB 内存池 (最小 8192),"abc" 是创建锁定标识文件名。
MM* pool = mm_create(1024 * 10, "abc");
// 锁定池,在当前目录下创建 abc.sem 文件。
mm_lock(pool, MM_LOCK_RW);
// 在池内分配内存块。
int* x = mm_malloc(pool, sizeof(int));
*x = 1234;
// 获取池内分配的某个块大小。
printf("%p = %d\n", x, mm_sizeof(pool, x));
// 显式整个池状态信息。
mm_display_info(pool);
printf("max:%d, avail:%d\n", mm_maxsize(), mm_available(pool));
getchar();
// 删除 abc.sem,解除锁定。
mm_unlock(pool);
// 释放整个池。
mm_destroy(pool);
return EXIT_SUCCESS;
}
输出:
$ gcc -g -o test -lmm main.c
$ ldd ./test
linux-gate.so.1 => (0xb7729000)
libmm.so.14 => /usr/lib/libmm.so.14 (0xb771c000)
libc.so.6 => /lib/tls/i686/cmov/libc.so.6 (0xb75d7000)
/lib/ld-linux.so.2 (0xb772a000)
$ ./test
0xb7850034 = 4
Information for MM
memory area = 0xb7850014 - 0xb78a0314
memory size = 10264
memory offset = 40
bytes spare = 10224
bytes free = 0 (0 chunks)
bytes allocated = 16
List of free chunks:
<empty-list>
max:33546216, avail:10224
对照输出的地址信息,我们可以看 ./test 进程的内存映射数据。
$ ps aux | grep test
yuhen 2406 0.0 0.0 1576 440 pts/1 S+ 19:37 0:00 ./test
$ cat /proc/2406/maps
08048000-08049000 r-xp 00000000 fc:00 30456 /home/yuhen/projects/c/test
08049000-0804a000 r--p 00000000 fc:00 30456 /home/yuhen/projects/c/test
0804a000-0804b000 rw-p 00001000 fc:00 30456 /home/yuhen/projects/c/test
b7701000-b7703000 rw-p 00000000 00:00 0
b7703000-b7841000 r-xp 00000000 fc:00 690 /lib/tls/i686/cmov/libc-2.10.1.so
b7841000-b7842000 ---p 0013e000 fc:00 690 /lib/tls/i686/cmov/libc-2.10.1.so
b7842000-b7844000 r--p 0013e000 fc:00 690 /lib/tls/i686/cmov/libc-2.10.1.so
b7844000-b7845000 rw-p 00140000 fc:00 690 /lib/tls/i686/cmov/libc-2.10.1.so
120
b7845000-b7848000 rw-p 00000000 00:00 0
b7848000-b784b000 r-xp 00000000 fc:00 50664 /usr/lib/libmm.so.14.0.22
b784b000-b784d000 rw-p 00003000 fc:00 50664 /usr/lib/libmm.so.14.0.22
b784d000-b784f000 rw-p 00000000 00:00 0
b784f000-b7853000 rw-s 00000000 00:09 491521 /SYSV00000000 (deleted)
b7853000-b7855000 rw-p 00000000 00:00 0
b7855000-b7856000 r-xp 00000000 00:00 0 [vdso]
b7856000-b7871000 r-xp 00000000 fc:00 599 /lib/ld-2.10.1.so
b7871000-b7872000 r--p 0001a000 fc:00 599 /lib/ld-2.10.1.so
b7872000-b7873000 rw-p 0001b000 fc:00 599 /lib/ld-2.10.1.so
bfd3c000-bfd51000 rw-p 00000000 00:00 0 [stack]
再试试其他的函数。
#include <stdio.h>
#include <stdlib.h>
#include <stdbool.h>
#include <string.h>
#include <mm.h>
int main(int argc, char* argv[])
{
MM* pool = mm_create(1024 * 10, "abc");
/* --------- DUP ------------------ */
char* s1 = mm_malloc(pool, 10);
strcpy(s1, "abcd");
char* s2 = mm_strdup(pool, s1);
printf("s1=%p,%s, s2=%p,%s\n", s1, s1, s2, s2);
printf("[Befor Reset] available: %d\n", mm_available(pool));
/* --------- RESET ----------------- */
mm_reset(pool);
printf("[After Reset] available: %d\n", mm_available(pool));
int* x = mm_malloc(pool, sizeof(int));
*x = 0x1234;
printf("x=%p,0x%x\n", x, *x);
/* --------- ERROR ----------------- */
char* s = mm_malloc(pool, 1024 * 20);
if (!s) printf("%s\n", mm_error());
/* --------- INFO ------------------ */
mm_display_info(pool);
mm_destroy(pool);
return EXIT_SUCCESS;
}
输出:
$ ./test
s1=0xb78d8034,abcd, s2=0xb78d804c,abcd
[Befor Reset] available: 10200
[After Reset] available: 10240
x=0xb78d8034,0x1234
mm:alloc: out of memory
Information for MM
memory area = 0xb78d8014 - 0xb7928314
memory size = 10264
memory offset = 40
bytes spare = 10224
bytes free = 0 (0 chunks)
bytes allocated = 16
List of free chunks:
<empty-list>
调用 mm_reset 后内存池重新 "从头" 分配,当超出最大尺寸时返回 NULL。这些操作不会导致内存泄露。尽管池创建时都被初始化为 0,但随着分配和释放,池和堆一样会遗留大量垃圾数据,因此注意使用 mm_malloc 和 mm_calloc。
$ valgrind --leak-check=full ./test
==2654== Memcheck, a memory error detector
==2654== Copyright (C) 2002-2009, and GNU GPL'd, by Julian Seward et al.
==2654== Using Valgrind-3.5.0-Debian and LibVEX; rerun with -h for copyright info
==2654== Command: ./test
==2654==
==2654==
==2654== HEAP SUMMARY:
==2654== in use at exit: 0 bytes in 0 blocks
==2654== total heap usage: 0 allocs, 0 frees, 0 bytes allocated
==2654==
==2654== All heap blocks were freed -- no leaks are possible
==2654==
==2654== For counts of detected and suppressed errors, rerun with: -v
==2654== ERROR SUMMARY: 0 errors from 0 contexts (suppressed: 15 from 8)
mm.h 还有一组以大写字母 MM 开头的函数,不过是用了一个全局变量存储池指针,然后内部调用mm_xxx 而已。
000016c0 <MM_reset>:
16c0: 55 push ebp
16c1: 89 e5 mov ebp,esp
16c3: 53 push ebx
16c4: e8 4e fd ff ff call 1417 <mm_lib_error_set@plt+0xcb>
16c9: 81 c3 2b 29 00 00 add ebx,0x292b
16cf: 83 ec 04 sub esp,0x4
16d2: 8b 83 34 01 00 00 mov eax,DWORD PTR [ebx+0x134]
16d8: 85 c0 test eax,eax
16da: 74 08 je 16e4 <MM_reset+0x24>
16dc: 89 04 24 mov DWORD PTR [esp],eax
16df: e8 d8 fa ff ff call 11bc <mm_reset@plt>
16e4: 83 c4 04 add esp,0x4
16e7: 5b pop ebx
16e8: 5d pop ebp
16e9: c3 ret
16ea: 8d b6 00 00 00 00 lea esi,[esi+0x0]
第 3 章 10. libgc: Garbage Collector
习惯了 .NET 和 Java 平台的程序员,可能会对 C 编码的内存泄露存在某种未知的恐惧。其实 C 一样有好用、成熟而高效的垃圾回收库 —— libgc。
官方网站已经发布了 7.2 Alpha4,包括 Mozilla、Mono 等项目都是其用户。
我们先准备一个内存泄露的例子,当然通常所说的内存泄露只发生在堆 (Heap) 上。
#include <stdio.h>
#include <stdlib.h>
#include <unistd.h>
void test()
{
char *s = malloc(102400);
*s = 0x10;
}
int main(void)
{
for (int i = 0; i < 10000; i++)
{
printf("%d\n", i);
test();
sleep(1);
}
}
$ gcc -o test -g test.c
$ ./test
0
1
2
3
4
... ...
新开一个终端,我们监视内存变化。
$ ps aux | grep test
yuhen 3474 0.0 0.0 2360 416 pts/1 S+ 20:44 0:00 ./test
$ top -p 3474
Mem: 509336k total, 499840k used, 9496k free, 55052k buffers
Swap: 409616k total, 116k used, 409500k free, 307464k cached
PID USER PR NI VIRT RES SHR S %CPU %MEM TIME+ COMMAND
3474 yuhen 20 0 4160 492 324 S 0.0 0.1 0:00.00 test
内存占用 (VIRT) 不断上升,显然内存泄露正在发生。
接下来我们正式引入 libgc,首先得安装相关的库。
$ sudo apt-get install libgc-dev
我们先看看 libgc 检测内存泄露的本事。
#include <stdio.h>
#include <stdlib.h>
#include <unistd.h>
#include <gc/leak_detector.h>
void test()
{
char *s = malloc(102400);
*s = 0x10;
}
int main(void)
{
GC_find_leak = 1;
for (int i = 0; i < 10000; i++)
{
printf("%d\n", i);
test();
}
CHECK_LEAKS();
getchar();
return 0;
}
GC_find_leak 和 CHECK_LEAKS 的信息可参考 /usr/include/gc/gc.h、leak_detector.h。
$ gcc -o test -g test.c -lgc
$ ./test
0
1
2
3
4
5
Leaked composite object at 0x8c94010 (test.c:13, sz=102400, NORMAL)
Leaked composite object at 0x8c7a010 (test.c:13, sz=102400, NORMAL)
Leaked composite object at 0x8c60010 (test.c:13, sz=102400, NORMAL)
... ...
我们可以看到每隔一定的周期就会输出内存泄露提示,很详细,包括泄露代码位置和大小。
见识了 libgc 检测内存泄露的本事,那么就正式启用 GC 吧。
#include <stdio.h>
#include <stdlib.h>
#include <unistd.h>
#include <gc/gc.h>
void test()
{
char *s = GC_MALLOC(102400);
*s = 0x10;
}
int main(void)
{
for (int i = 0; i < 10000; i++)
{
printf("%d, heap=%d\n", i, GC_get_heap_size());
test();
sleep(1);
}
getchar();
return 0;
}
$ gcc -o test -g test.c -lgc
$ ./test
0, heap=0
1, heap=192512
2, heap=360448
3, heap=585728
4, heap=585728
5, heap=585728
6, heap=585728
7, heap=585728
... ...
我们再次启用 top 监控会发现内存维持在一个稳定的数字,不再增长,这显然是垃圾回收起了作用。
对于已有的项目源码,我们也不必大费周章地将 malloc、free 替换成 GC_MALLOC、GC_FREE,
直接在 main.c 中定义宏即可。
#include <stdio.h>
#include <stdlib.h>
#include <unistd.h>
#include <gc/gc.h>
#define malloc(n) GC_MALLOC(n);
#define free(n) GC_FREE(n);
void test()
{
char *s = malloc(102400);
*s = 0x10;
free(s);
}
... ...
$ objdump -dS -M intel test | less
void test()
{
... ...
char *s = malloc(102400);
804865a: mov DWORD PTR [esp],0x19000
8048661: call 8048550 <GC_malloc@plt>
8048666: mov DWORD PTR [ebp-0xc],eax
... ...
free(s);
804866f: mov eax,DWORD PTR [ebp-0xc]
8048672: mov DWORD PTR [esp],eax
8048675: call 8048570 <GC_free@plt>
}
还可以静态编译,以免发布时带个拖油瓶。
$ gcc -o test -g test.c /usr/lib/libgc.a -lpthread
void test()
{
char *s = malloc(102400);
804930a: mov DWORD PTR [esp],0x19000
8049311: call 8049a90 <GC_malloc>
8049316: mov DWORD PTR [ebp-0xc],eax
... ...
}
注意:libgc 只对 GC_MALLOC 等方法分配的内存空间有效。
第 3 章 11. libconfig: Configuration File
配置文件很重要,INI 太弱,XML 太繁复,Linux *.conf 很酷。
找了好几种相关的类库,发觉还是 hyperrealm libconfig 最强大最好用,相关细节可参考 官方手册。源中的版本是1.3.2-1,也可以去官方文章下载最新版本。
$ sudo apt-get install libconfig8 libconfig8-dev
完全类脚本化的配置语法,支持注释、包含、简单配置、数组、列表以及非常像类的组。
test.conf
# Example application configuration file
title = "Test Application"; // scalar value
version = 1; // int, int64, float, bool, string
app: // group
{
user:
{
name = "Q.yuhen";
code = "xxx-xxx-xxx";
tags = ["t1", "t2", "t3"]; // array
data = ( "Hello", 1234 ); // list
}
};
11.1 Path
直接用多级路径读取目标值,这是最简单的做法。注意区分参数中 path 和 name 的区别,后者无法使用路径。
int config_lookup_int (const config_t * config, const char * path, int * value)
int config_lookup_int64 (const config_t * config, const char * path, long long * value)
int config_lookup_float (const config_t * config, const char * path, double * value)
int config_lookup_bool (const config_t * config, const char * path, int * value)
int config_lookup_string (const config_t * config, const char * path, const char ** value)
我们试试看。
#include <stdio.h>
#include <stdlib.h>
#include <stdbool.h>
#include <string.h>
#include <libconfig.h>
void scalar(config_t* conf)
{
char* title;
config_lookup_string(conf, "title", &title);
printf("title = %s;\n", title);
int version;
config_lookup_int(conf, "version", &version);
printf("version = %d;\n", version);
char* user_name;
config_lookup_string(conf, "app.user.name", &user_name);
printf("app.user.name = %s;\n", user_name);
char* tag;
config_lookup_string(conf, "app.user.tags.[2]", &tag);
printf("app.user.tags[2] = %s;\n", tag);
int data;
config_lookup_int(conf, "app.user.data.[1]", &data);
printf("app.user.data.[1] = %d;\n", data);
}
int main(int argc, char* argv[])
{
config_t* conf = &(config_t){};
config_init(conf);
config_read_file(conf, "test.conf");
scalar(conf);
config_destroy(conf);
return EXIT_SUCCESS;
}
输出:
title = Test Application;
version = 1;
app.user.name = Q.yuhen;
app.user.tags[2] = t3;
app.user.data.[1] = 1234;
11.2 Config_Setting
所有的 Group 和其 Member 都是 Config_Setting,我们可以用 config_lookup 找出目标后,然后使用 Name 读取。
config_setting_t * config_lookup (const config_t * config, const char * path)
int config_setting_lookup_int (const config_setting_t * setting, const char * name, int * value)
int config_setting_lookup_int64 (const config_setting_t * setting, const char * name, long long *
value)
int config_setting_lookup_float (const config_setting_t * setting, const char * name, double *
value)
129
int config_setting_lookup_bool (const config_setting_t * setting, const char * name, int * value)
int config_setting_lookup_string (const config_setting_t * setting, const char * name, const char
** value)
注意 config_setting_lookup_xxx 只能使用 Member Name,而不是 Path。
```void group(config_t* conf) { config_setting_t* user = config_lookup(conf, "app.user");
char* code;
config_setting_lookup_string(user, "code", &code);
printf("user.code = %s;\n", code);
}
利用相关的函数,我们还可以遍历 Array/List 的所有 Element。
void group(config_t* conf) { config_setting_t* user = config_lookup(conf, "app.user");
config_setting_t* tags = config_setting_get_member(user, "tags");
int count = config_setting_length(tags);
int i;
for (i = 0; i < count; i++)
{
printf("user.tags[%d] = %s;\n", i, config_setting_get_string_elem(tags, i));
}
}
输出:
user.tags[0] = t1; user.tags[1] = t2; user.tags[2] = t3;
当然,我们也可以用 config_lookup 直接找到 app.user.tags,然后遍历。
void group(config_t* conf) { config_setting_t* tags = config_lookup(conf, "app.user.tags"); int count = config_setting_length(tags);
int i;
for (i = 0; i < count; i++)
{
printf("user.tags[%d] = %s;\n", i, config_setting_get_string_elem(tags, i));
}
printf("-----------------------\n");
config_setting_t* code = config_lookup(conf, "app.user.code");
printf("user.code = %s;\n", config_setting_get_string(code));
}
输出:
user.tags[0] = t1; user.tags[1] = t2;
user.tags[2] = t3;user.code = xxx-xxx-xxx;
上面的例子中,我们还可以直接用 lookup 查找简单配置 app.user.code,然后用相关方法返回值,无需再次提供 Name。
int config_setting_get_int (const config_setting_t * setting) long long config_setting_get_int64 (const config_setting_t * setting) double config_setting_get_float (const config_setting_t * setting) int config_setting_get_bool (const config_setting_t * setting) const char * config_setting_get_string (const config_setting_t * setting)
Array/List 的内容可以是 Group,我们可以用 config_setting_get_elem() 获取指定序号的元素后继续操作。 config_setting_t * config_setting_get_member (config_setting_t * setting, const char * name) config_setting_t * config_setting_get_elem (const config_setting_t * setting, unsigned int idx)
## 11.3 Write
配置文件吗,增删改操作都要全乎。
int config_setting_set_int (config_setting_t * setting, int value) int config_setting_set_int64 (config_setting_t * setting, long long value) int config_setting_set_float (config_setting_t * setting, double value) int config_setting_set_bool (config_setting_t * setting, int value) int config_setting_set_string (config_setting_t * setting, const char * value)
config_setting_t * config_setting_set_int_elem (config_setting_t * setting, int idx, int value) config_setting_t * config_setting_set_int64_elem (config_setting_t * setting, int idx, long long value) config_setting_t * config_setting_set_float_elem (config_setting_t * setting, int idx, double value) config_setting_t * config_setting_set_bool_elem (config_setting_t * setting, int idx, int value) config_setting_t * config_setting_set_string_elem (config_setting_t * setting, int idx, const char * value)
config_setting_t * config_setting_add (config_setting_t * parent, const char * name, int type)
int config_setting_remove (config_setting_t * parent, const char * name) int config_setting_remove_elem (config_setting_t * parent, unsigned int idx)
const char * config_setting_name (const config_setting_t * setting)
为了方便查看,我直接 "保存" 到 stdout 了。
void write(config_t* conf) { config_setting_t* user = config_lookup(conf, "app.user"); config_setting_t* name = config_setting_get_member(user, "name"); config_setting_t* tags = config_setting_get_member(user, "tags"); config_setting_t* data = config_setting_get_member(user, "data");
/* ----------------- Add ------------------- */
config_setting_t* comment = config_setting_add(user, "comment", CONFIG_TYPE_STRING);
config_setting_set_string(comment, "test...");
/* ----------------- Remove ---------------- */
config_setting_remove(user, "code");
config_setting_remove_elem(tags, 1);
/* ----------------- Set ------------------- */
config_setting_set_string(name, "Rainsoft");
config_setting_set_string_elem(data, 0, "Ubuntu");
/* ----------------- Write ----------------- */
config_write(conf, stdout);
}
输出:
title = "Test Application"; version = 1; app : { user : { name = "Rainsoft"; tags = [ "t1", "t3" ]; data = ( "Ubuntu", 1234 ); comment = "test..."; }; };
## 11.4 Q & A
(1) 调用 config_destroy 后,其分配的字符串会被全部释放,因此得自己注意 strcpy / strdup。
(2) 官方文档中标明了 "Libconfig is not thread-safe","Libconfig is not async-safe" ……似乎 Array/List 必须是 Group Member,不知道是不是版本的问题。
# 12. libevent: Event Notification
libevent 貌似是 Linux 下写高性能服务器的首选组件。当然也可以自己用 epoll 写,不是太复杂,用成熟组件的好处就是降低了开发和维护成本。听说还有个 libev,似乎比 libevent 还强悍,找时间研究看看。
下面是学习 libevent 时写的测试代码,仅供参考。
第 3 章 define _GNU_SOURCE
第 3 章 include <stdio.h>
第 3 章 include <stdlib.h>
第 3 章 include <stdbool.h>
第 3 章 include <string.h>
第 3 章 include <errno.h>
第 3 章 include <time.h>
第 3 章 include <sys/types.h>
第 3 章 include <sys/stat.h>
第 3 章 include <sys/wait.h>
第 3 章 include <sys/epoll.h>
第 3 章 include <unistd.h>
第 3 章 include <pthread.h>
第 3 章 include <signal.h>
第 3 章 include <event.h>
void sig_exit(int signo) { event_loopbreak(); }
void test(int fd, short event, void* arg) { char buf[256] = {}; scanf("%s", buf); printf("[R] %s\n", buf); }
void test2(struct bufferevent* bv, void* arg) { // 查找分隔符 u_char* sep; while((sep = evbuffer_find(bv->input, (u_char*)";", 1)) != NULL) { int size = sep - bv->input->buffer;
// 读有效字符串
char buf[size + 2];
memset(buf, '\0', sizeof(buf));
size_t len = bufferevent_read(bv, buf, size + 1);
// 替换换行符
for (int i = 0; i < sizeof(buf); i++)
{
if (buf[i] == '\n') buf[i] = '-';
}
// 显示字符串以及缓存中剩余的字符数
printf("[Read Chars] %s; len:%d;\n", buf, len);
printf("[Cache Chars] %d;\n", strlen((char*)bv->input->buffer));
}
}
void test3(int fd, short event, void* arg) { char buf[50]; time_t curtime; struct tm* loctime;
curtime = time(NULL);
loctime = localtime(&curtime);
strftime(buf, 50, "%F %T", loctime);
printf("%s\n", buf);
}
int main(int argc, char* argv[]) { /* --- Signal ------------------------------------------------ */ signal(SIGINT, sig_exit); signal(SIGHUP, sig_exit);
/* --- Event Init -------------------------------------------- */
event_init();
/* --- Standard usage --------------------------------------- */
//struct event* e = malloc(sizeof(struct event));
//event_set(e, STDIN_FILENO, EV_READ | EV_PERSIST, test, NULL);
//event_add(e, NULL);
/* --- I/O Buffers ------------------------------------------ */
struct bufferevent* bv = bufferevent_new(STDIN_FILENO, test2, NULL, NULL, NULL);
bufferevent_enable(bv, EV_READ | EV_PERSIST);
/* --- Timers ----------------------------------------------- */
//struct timeval* time = malloc(sizeof(struct timeval));
//time->tv_sec = 5;
//time->tv_usec = 0;
//struct event* e = malloc(sizeof(struct event));
//evtimer_set(e, test3, NULL);
//evtimer_add(e, time);
/* --- Event Dispatch ---------------------------------------- */
event_dispatch();
/* --- Free Memory ------------------------------------------- */
//free(e);
bufferevent_free(bv);
//free(e); free(time);
printf("exit!\n");
return EXIT_SUCCESS;
}
第四部分: 工具
第 4 章 1. GCC
输出预处理结果到文件。
$ gcc -E main.c -o main.i
保留文件头注释。
$ gcc -C -E main.c -o main.i
参数 -Dname 定义宏 (源文件中不能定义该宏),-Uname 取消 GCC 设置中定义的宏。
$ tail -n 10 main.c
int main(int argc, char* argv[])
{
#if __MY__
printf("a");
#else
printf("b");
#endif
return EXIT_SUCCESS;
}
$ gcc -E main.c -D__MY__ | tail -n 10
int main(int argc, char* argv[])
{
printf("a");
return 0;
}
-Idirectory 设置头文件(.h)的搜索路径。
$ gcc -g -I./lib -I/usr/local/include/cbase main.c mylib.c
查看依赖文件。
$ gcc -M -I./lib main.c
$ gcc -MM -I./lib main.c # 忽略标准库
1.2 汇编
我们可以将 C 源代码编译成汇编语言 (.s)。
$ gcc -S main.c
$ head -n 20 main.s
.file "main.c"
.section .rodata
.LC0:
.string "Hello, World!"
.text
.globl main
.type main, @function
main:
pushl %ebp
movl %esp, %ebp
andl $-16, %esp
subl $16, %esp
movl $.LC0, (%esp)
call test
movl $0, %eax
leave
ret
.size main, .-main
.ident "GCC: (Ubuntu 4.4.1-4ubuntu9) 4.4.1"
.section .note.GNU-stack,"",@progbits
使用 -fverbose-asm 参数可以获取变量注释。如果需要指定汇编格式,可以使用 "-masm=intel"参数。
1.3 链接
参数 -c 仅生成目标文件 (.o),然后需要调用链接器 (link) 将多个目标文件链接成单一可执行文件。
$ gcc -g -c main.c mylib.c
参数 -l 链接其他库,比如 -lpthread 链接 libpthread.so。或指定 -static 参数进行静态链接。我们还可以直接指定链接库 (.so, .a) 完整路径。
$ gcc -g -o test main.c ./libmy.so ./libtest.a
$ ldd ./test
linux-gate.so.1 => (0xb7860000)
./libmy.so (0xb785b000)
libc.so.6 => /lib/tls/i686/cmov/libc.so.6 (0xb7710000)
/lib/ld-linux.so.2 (0xb7861000)
另外一种做法就是用 -L 指定库搜索路径。
$ gcc -g -o test -L/usr/local/lib -lgdsl main.c
$ ldd ./test
linux-gate.so.1 => (0xb77b6000)
libgdsl.so.1 => /usr/local/lib/libgdsl.so.1 (0xb779b000)
libc.so.6 => /lib/tls/i686/cmov/libc.so.6 (0xb7656000)
/lib/ld-linux.so.2 (0xb77b7000)
1.4 动态库
使用 "-fPIC -shared" 参数生成动态库。
$ gcc -fPIC -c -O2 mylib.c
$ gcc -shared -o libmy.so mylib.o
$ nm libmy.so
... ...
00000348 T _init
00002010 b completed.6990
00002014 b dtor_idx.6992
... ...
0000047c T test
静态库则需要借助 ar 工具将多个目标文件 (.o) 打包。
c$ gcc -c mylib.c
$ ar rs libmy.a mylib.o
ar: creating libmy.a
1.5 优化
参数 -O0 关闭优化 (默认);-O1 (或 -O) 让可执行文件更小,速度更快;-O2 采用几乎所有的优化手段。
$ gcc -O2 -o test main.c mylib.c
1.6 调试
参数 -g 在对象文件 (.o) 和执行文件中生成符号表和源代码行号信息,以便使用 gdb 等工具进行调试。
$ gcc -g -o test main.c mylib.c
$ readelf -S test
There are 38 section headers, starting at offset 0x18a8:
Section Headers:
[Nr] Name Type Addr Off Size ES Flg Lk Inf Al
... ...
[27] .debug_aranges PROGBITS 00000000 001060 000060 00 0 0 8
[28] .debug_pubnames PROGBITS 00000000 0010c0 00005b 00 0 0 1
[29] .debug_info PROGBITS 00000000 00111b 000272 00 0 0 1
[30] .debug_abbrev PROGBITS 00000000 00138d 00014b 00 0 0 1
[31] .debug_line PROGBITS 00000000 0014d8 0000f1 00 0 0 1
[32] .debug_frame PROGBITS 00000000 0015cc 000058 00 0 0 4
[33] .debug_str PROGBITS 00000000 001624 0000d5 01 MS 0 0 1
[34] .debug_loc PROGBITS 00000000 0016f9 000058 00 0 0 1
... ...
参数 -pg 会在程序中添加性能分析 (profiling) 函数,用于统计程序中最耗费时间的函数。程序执行后,统计信息保存在 gmon.out 文件中,可以用 gprof 命令查看结果。
$ gcc -g -pg main.c mylib.c
第 4 章 2. GDB
作为内置和最常用的调试器,GDB 显然有着无可辩驳的地位。熟练使用 GDB,就好像所有 Linux 下的开发人员建议你用 VIM 一样,是个很 "奇怪" 的情节。
测试用源代码。
#include <stdio.h>
int test(int a, int b)
{
int c = a + b;
return c;
}
int main(int argc, char* argv[])
{
int a = 0x1000;
int b = 0x2000;
int c = test(a, b);
printf("%d\n", c);
printf("Hello, World!\n");
return 0;
}
编译命令 (注意使用 -g 参数生成调试符号):
$ gcc -g -o hello hello.c
开始调试:
$ gdb hello
GNU gdb 6.8-debian
Copyright (C) 2008 Free Software Foundation, Inc.
This GDB was configured as "i486-linux-gnu"...
(gdb)
2.1 源码
在调试过程中查看源代码是必须的。list (缩写 l) 支持多种方式查看源码。
(gdb) l # 显示源代码
2
3 int test(int a, int b)
4 {
5 int c = a + b;
6 return c;
7 }
8
9 int main(int argc, char* argv[])
10 {
11 int a = 0x1000;
(gdb) l # 继续显示
12 int b = 0x2000;
13 int c = test(a, b);
14 printf("%d\n", c);
15
16 printf("Hello, World!\n");
17 return 0;
18 }
(gdb) l 3, 10 # 显示特定范围的源代码
3 int test(int a, int b)
4 {
5 int c = a + b;
6 return c;
7 }
8
9 int main(int argc, char* argv[])
10 {
(gdb) l main # 显示特定函数源代码
5 int c = a + b;
6 return c;
7 }
8
9 int main(int argc, char* argv[])
10 {
11 int a = 0x1000;
12 int b = 0x2000;
13 int c = test(a, b);
14 printf("%d\n", c);
可以用如下命令修改源代码显示行数。
(gdb) set listsize 50
2.2 断点
可以使用函数名或者源代码行号设置断点。
(gdb) b main # 设置函数断点
Breakpoint 1 at 0x804841b: file hello.c, line 11.
(gdb) b 13 # 设置源代码行断点
Breakpoint 2 at 0x8048429: file hello.c, line 13.
(gdb) b # 将下一行设置为断点 (循环、递归等调试很有用)
Breakpoint 5 at 0x8048422: file hello.c, line 12.
(gdb) tbreak main # 设置临时断点 (中断后失效)
Breakpoint 1 at 0x804841b: file hello.c, line 11.
(gdb) info breakpoints # 查看所有断点
Num Type Disp Enb Address What
2 breakpoint keep y 0x0804841b in main at hello.c:11
3 breakpoint keep y 0x080483fa in test at hello.c:5
(gdb) d 3 # delete: 删除断点 (还可以用范围 "d 1-3",无参数时删除全部断点)
(gdb) disable 2 # 禁用断点 (还可以用范围 "disable 1-3")
(gdb) enable 2 # 启用断点 (还可以用范围 "enable 1-3")
(gdb) ignore 2 1 # 忽略 2 号中断 1 次
当然少不了条件式中断。
(gdb) b test if a == 10
Breakpoint 4 at 0x80483fa: file hello.c, line 5.
(gdb) info breakpoints
Num Type Disp Enb Address What
4 breakpoint keep y 0x080483fa in test at hello.c:5
stop only if a == 10
可以用 condition 修改条件,注意表达式不包含 if。
(gdb) condition 4 a == 30
(gdb) info breakpoints
Num Type Disp Enb Address What
2 breakpoint keep y 0x0804841b in main at hello.c:11
ignore next 1 hits
4 breakpoint keep y 0x080483fa in test at hello.c:5
stop only if a == 30
2.3 执行
通常情况下,我们会先设置 main 入口断点。
(gdb) b main
Breakpoint 1 at 0x804841b: file hello.c, line 11.
(gdb) r # 开始执行 (Run)
Starting program: /home/yuhen/Learn.c/hello
Breakpoint 1, main () at hello.c:11
11 int a = 0x1000;
(gdb) n # 单步执行 (不跟踪到函数内部, Step Over)
12 int b = 0x2000;
(gdb) n
13 int c = test(a, b);
(gdb) s # 单步执行 (跟踪到函数内部, Step In)
test (a=4096, b=8192) at hello.c:5
5 int c = a + b;
(gdb) finish # 继续执行直到当前函数结束 (Step Out)
Run till exit from #0 test (a=4096, b=8192) at hello.c:5
0x0804843b in main () at hello.c:13
13 int c = test(a, b);
Value returned is $1 = 12288
(gdb) c # Continue: 继续执行,直到下一个断点。
Continuing.
12288
Hello, World!
Program exited normally.
2.4 堆栈
查看调用堆栈无疑是调试过程中非常重要的事情。
(gdb) where # 查看调用堆栈 (相同作用的命令还有 info s 和 bt)
#0 test (a=4096, b=8192) at hello.c:5
#1 0x0804843b in main () at hello.c:13
(gdb) frame # 查看当前堆栈帧,还可显示当前代码
#0 test (a=4096, b=8192) at hello.c:5
5 int c = a + b;
(gdb) info frame # 获取当前堆栈帧更详细的信息
Stack level 0, frame at 0xbfad3290:
eip = 0x80483fa in test (hello.c:5); saved eip 0x804843b
called by frame at 0xbfad32c0
source language c.
Arglist at 0xbfad3288, args: a=4096, b=8192
Locals at 0xbfad3288, Previous frame's sp is 0xbfad3290
Saved registers:
ebp at 0xbfad3288, eip at 0xbfad328c
可以用 frame 修改当前堆栈帧,然后查看其详细信息。
(gdb) frame 1
#1 0x0804843b in main () at hello.c:13
13 int c = test(a, b);
(gdb) info frame
Stack level 1, frame at 0xbfad32c0:
eip = 0x804843b in main (hello.c:13); saved eip 0xb7e59775
caller of frame at 0xbfad3290
source language c.
Arglist at 0xbfad32b8, args:
Locals at 0xbfad32b8, Previous frame's sp at 0xbfad32b4
Saved registers:
ebp at 0xbfad32b8, eip at 0xbfad32bc
2.5 变量和参数
(gdb) info locals # 显示局部变量
c = 0
(gdb) info args # 显示函数参数(自变量)
a = 4096
b = 8192
我们同样可以切换 frame,然后查看不同堆栈帧的信息。
(gdb) p a # print 命令可显示局部变量和参数值
$2 = 4096
(gdb) p/x a # 十六进制输出
$10 = 0x1000
(gdb) p a + b # 还可以进行表达式计算
$5 = 12288
x 命令内存输出格式: - d: 十进制 - u: 十进制无符号 - x: 十六进制 - o: 八进制 - t: 二进制
- c: 字符set variable 可用来修改变量值。
(gdb) set variable a=100
(gdb) info args
a = 100
b = 8192
2.6 内存及寄存器
x 命令可以显示指定地址的内存数据。
格式: x/nfu [address]
- n: 显示内存单位 (组或者行)。
- f: 格式 (除了 print 格式外,还有 字符串 s 和 汇编 i)。
- u: 内存单位 (b: 1字节; h: 2字节; w: 4字节; g: 8字节)。
(gdb) x/8w 0x0804843b # 按四字节(w)显示 8 组内存数据
0x804843b <main+49>: 0x8bf04589 0x4489f045 0x04c70424 0x04853024
0x804844b <main+65>: 0xfecbe808 0x04c7ffff 0x04853424 0xfecfe808
(gdb) x/8i 0x0804843b # 显示 8 行汇编指令
0x804843b <main+49>: mov DWORD PTR [ebp-0x10],eax
0x804843e <main+52>: mov eax,DWORD PTR [ebp-0x10]
0x8048441 <main+55>: mov DWORD PTR [esp+0x4],eax
0x8048445 <main+59>: mov DWORD PTR [esp],0x8048530
0x804844c <main+66>: call 0x804831c <printf@plt>
0x8048451 <main+71>: mov DWORD PTR [esp],0x8048534
0x8048458 <main+78>: call 0x804832c <puts@plt>
0x804845d <main+83>: mov eax,0x0
(gdb) x/s 0x08048530 # 显示字符串
0x8048530: "%d\n"
除了通过 "info frame" 查看寄存器值外,还可以用如下指令。
(gdb) info registers # 显示所有寄存器数据
eax 0x1000 4096
ecx 0xbfad32d0 -1079168304
edx 0x1 1
ebx 0xb7fa1ff4 -1208344588
esp 0xbfad3278 0xbfad3278
ebp 0xbfad3288 0xbfad3288
esi 0x8048480 134513792
edi 0x8048340 134513472
eip 0x80483fa 0x80483fa <test+6>
eflags 0x286 [ PF SF IF ]
cs 0x73 115
ss 0x7b 123
ds 0x7b 123
es 0x7b 123
fs 0x0 0
gs 0x33 51
(gdb) p $eax # 显示单个寄存器数据
$11 = 4096
2.7 反汇编
我对 AT&T 汇编不是很熟悉,还是设置成 intel 格式的好。
(gdb) set disassembly-flavor intel # 设置反汇编格式
(gdb) disass main # 反汇编函数
Dump of assembler code for function main:
0x0804840a <main+0>: lea ecx,[esp+0x4]
0x0804840e <main+4>: and esp,0xfffffff0
0x08048411 <main+7>: push DWORD PTR [ecx-0x4]
0x08048414 <main+10>: push ebp
0x08048415 <main+11>: mov ebp,esp
0x08048417 <main+13>: push ecx
0x08048418 <main+14>: sub esp,0x24
0x0804841b <main+17>: mov DWORD PTR [ebp-0x8],0x1000
0x08048422 <main+24>: mov DWORD PTR [ebp-0xc],0x2000
0x08048429 <main+31>: mov eax,DWORD PTR [ebp-0xc]
0x0804842c <main+34>: mov DWORD PTR [esp+0x4],eax
0x08048430 <main+38>: mov eax,DWORD PTR [ebp-0x8]
0x08048433 <main+41>: mov DWORD PTR [esp],eax
0x08048436 <main+44>: call 0x80483f4 <test>
0x0804843b <main+49>: mov DWORD PTR [ebp-0x10],eax
0x0804843e <main+52>: mov eax,DWORD PTR [ebp-0x10]
0x08048441 <main+55>: mov DWORD PTR [esp+0x4],eax
0x08048445 <main+59>: mov DWORD PTR [esp],0x8048530
0x0804844c <main+66>: call 0x804831c <printf@plt>
0x08048451 <main+71>: mov DWORD PTR [esp],0x8048534
0x08048458 <main+78>: call 0x804832c <puts@plt>
0x0804845d <main+83>: mov eax,0x0
0x08048462 <main+88>: add esp,0x24
0x08048465 <main+91>: pop ecx
0x08048466 <main+92>: pop ebp
0x08048467 <main+93>: lea esp,[ecx-0x4]
0x0804846a <main+96>: ret
End of assembler dump.
可以用 "b *address" 设置汇编断点,然后用 si 和 ni 进行汇编级单步执行,这对于分析指针和寻址非常有用。
2.8 进程
查看进程相关信息,尤其是 maps 内存数据是非常有用的。
(gdb) help info proc stat
Show /proc process information about any running process.
Specify any process id, or use the program being debugged by default.
Specify any of the following keywords for detailed info:
mappings -- list of mapped memory regions.
stat -- list a bunch of random process info.
status -- list a different bunch of random process info.
all -- list all available /proc info.
(gdb) info proc mappings !# 相当于 cat /proc/{pid}/maps
process 22561
cmdline = '/home/yuhen/Learn.c/hello'
cwd = '/home/yuhen/Learn.c'
exe = '/home/yuhen/Learn.c/hello'
Mapped address spaces:
Start Addr End Addr Size Offset objfile
0x8048000 0x8049000 0x1000 0 /home/yuhen/Learn.c/hello
0x8049000 0x804a000 0x1000 0 /home/yuhen/Learn.c/hello
0x804a000 0x804b000 0x1000 0x1000 /home/yuhen/Learn.c/hello
0x8a33000 0x8a54000 0x21000 0x8a33000 [heap]
0xb7565000 0xb7f67000 0xa02000 0xb7565000
0xb7f67000 0xb80c3000 0x15c000 0 /lib/tls/i686/cmov/libc-2.9.so
0xb80c3000 0xb80c4000 0x1000 0x15c000 /lib/tls/i686/cmov/libc-2.9.so
0xb80c4000 0xb80c6000 0x2000 0x15c000 /lib/tls/i686/cmov/libc-2.9.so
0xb80c6000 0xb80c7000 0x1000 0x15e000 /lib/tls/i686/cmov/libc-2.9.so
0xb80c7000 0xb80ca000 0x3000 0xb80c7000
0xb80d7000 0xb80d9000 0x2000 0xb80d7000
0xb80d9000 0xb80da000 0x1000 0xb80d9000 [vdso]
0xb80da000 0xb80f6000 0x1c000 0 /lib/ld-2.9.so
0xb80f6000 0xb80f7000 0x1000 0x1b000 /lib/ld-2.9.so
0xb80f7000 0xb80f8000 0x1000 0x1c000 /lib/ld-2.9.so
0xbfee2000 0xbfef7000 0x15000 0xbffeb000 [stack]
2.9 线程
可以在 pthread_create 处设置断点,当线程创建时会生成提示信息。
(gdb) c
Continuing.
[New Thread 0xb7e78b70 (LWP 2933)]
(gdb) info threads # 查看所有线程列表
* 2 Thread 0xb7e78b70 (LWP 2933) test (arg=0x804b008) at main.c:24
1 Thread 0xb7e796c0 (LWP 2932) 0xb7fe2430 in __kernel_vsyscall ()
(gdb) where # 显示当前线程调用堆栈
#0 test (arg=0x804b008) at main.c:24
#1 0xb7fc580e in start_thread (arg=0xb7e78b70) at pthread_create.c:300
#2 0xb7f478de in clone () at ../sysdeps/unix/sysv/linux/i386/clone.S:130
(gdb) thread 1 # 切换线程
[Switching to thread 1 (Thread 0xb7e796c0 (LWP 2932))]#0 0xb7fe2430 in __kernel_vsyscall ()
(gdb) where # 查看切换后线程调用堆栈
#0 0xb7fe2430 in __kernel_vsyscall ()
#1 0xb7fc694d in pthread_join (threadid=3085405040, thread_return=0xbffff744) at pthread_join.c:89
#2 0x08048828 in main (argc=1, argv=0xbffff804) at main.c:36
2.10 其他
调试子进程。
(gdb) set follow-fork-mode child
临时进入 Shell 执行命令,Exit 返回。
(gdb) shell
调试时直接调用函数。
(gdb) call test("abc")
使用 "--tui" 参数,可以在终端窗口上部显示一个源代码查看窗。
$ gdb --tui hello
查看命令帮助。
(gdb) help b
最后就是退出命令。
(gdb) q
和 Linux Base Shell 习惯一样,对于记不住的命令,可以在输入前几个字母后按 Tab 补全。
2.11 Core Dump
在 Windows 下我们已经习惯了用 Windbg 之类的工具调试 dump 文件,从而分析并排除程序运行时错误。在 Linux 下我们同样可以完成类似的工作 —— Core Dump。
我们先看看相关的设置。
$ ulimit -a
core file size (blocks, -c) 0
data seg size (kbytes, -d) unlimited
scheduling priority (-e) 20
file size (blocks, -f) unlimited
pending signals (-i) 16382
max locked memory (kbytes, -l) 64
max memory size (kbytes, -m) unlimited
open files (-n) 1024
pipe size (512 bytes, -p) 8
POSIX message queues (bytes, -q) 819200
real-time priority (-r) 0
stack size (kbytes, -s) 8192
cpu time (seconds, -t) unlimited
max user processes (-u) unlimited
virtual memory (kbytes, -v) unlimited
file locks (-x) unlimited
"core file size (blocks, -c) 0" 意味着在程序崩溃时不会生成 core dump 文件,我们需要修改一下设置。如果你和我一样懒得修改配置文件,那么就输入下面这样命令吧。
$ sudo sh -c "ulimit -c unlimited; ./test" # test 是可执行文件名。
等等…… 我们还是先准备个测试目标。
#include <stdio.h>
#include <stdlib.h>
void test()
{
char* s = "abc";
*s = 'x';
}
int main(int argc, char** argv)
{
test();
return (EXIT_SUCCESS);
}
很显然,我们在 test 里面写了一个不该写的东东,这无疑会很严重。生成可执行文件后,执行上面的命令。
$ sudo sh -c "ulimit -c unlimited; ./test"
Segmentation fault (core dumped)
$ ls -l
total 96
-rw------- 1 root root 167936 2010-01-06 13:30 core
-rwxr-xr-x 1 yuhen yuhen 9166 2010-01-06 13:16 test
这个 core 文件就是被系统 dump 出来的,我们分析目标就是它了。
$ sudo gdb test core
GNU gdb (GDB) 7.0-ubuntu
Copyright (C) 2009 Free Software Foundation, Inc.
Reading symbols from .../dist/Debug/test...done.
warning: Can't read pathname for load map: Input/output error.
Reading symbols from /lib/tls/i686/cmov/libpthread.so.0... ...done.
(no debugging symbols found)...done.
Loaded symbols for /lib/tls/i686/cmov/libpthread.so.0
Reading symbols from /lib/tls/i686/cmov/libc.so.6... ...done.
(no debugging symbols found)...done.
Loaded symbols for /lib/tls/i686/cmov/libc.so.6
Reading symbols from /lib/ld-linux.so.2... ...done.
(no debugging symbols found)...done.
Loaded symbols for /lib/ld-linux.so.2
Core was generated by `./test'.
Program terminated with signal 11, Segmentation fault.
#0 0x080483f4 in test () at main.c:16
warning: Source file is more recent than executable.
16 *s = 'x';
最后这几行提示已经告诉我们错误的原因和代码位置,接下来如何调试就是 gdb 的技巧了,可以先输入 where 看看调用堆栈。
(gdb) where
#0 0x080483f4 in test () at main.c:16
#1 0x08048401 in main (argc=1, argv=0xbfd53e44) at main.c:22
(gdb) p s
$1 = 0x80484d0 "abc"
(gdb) info files
Symbols from ".../dist/Debug/test".
Local core dump file:
Local exec file:
`.../dist/Debug/test', file type elf32-i386.
Entry point: 0x8048330
0x08048134 - 0x08048147 is .interp
... ...
0x08048330 - 0x080484ac is .text
0x080484ac - 0x080484c8 is .fini
0x080484c8 - 0x080484d4 is .rodata
很显然 abc 属于 .rodata,严禁调戏。
附:如果你调试的是 Release (-O2) 版本,而且删除(strip)了符号表,那还是老老实实数汇编代码吧。可见用 Debug 版本试运行是很重要滴!!!
第 4 章 3. VIM
Unix-like 环境下最常用的编辑器,应该掌握最基本的快捷键操作。
在 OSX 下可以用 macvim 代替,毕竟图形化界面要更方便一点。
全局配置文件:/etc/vim/vimrc 用户配置文件:~/.vimrc
" 显示行号
set nu
" 高亮当前行
set cursorline
" 用空格代替Tab
set expandtab
" 自动缩进
set autoindent
set smartindent
set smarttab
set cindent
" 缩进宽度
set tabstop=4
set shiftwidth=4
" 语法高亮
syntax on
" 禁止在 Makefile 中将 Tab 转换成空格
autocmd FileType make set noexpandtab
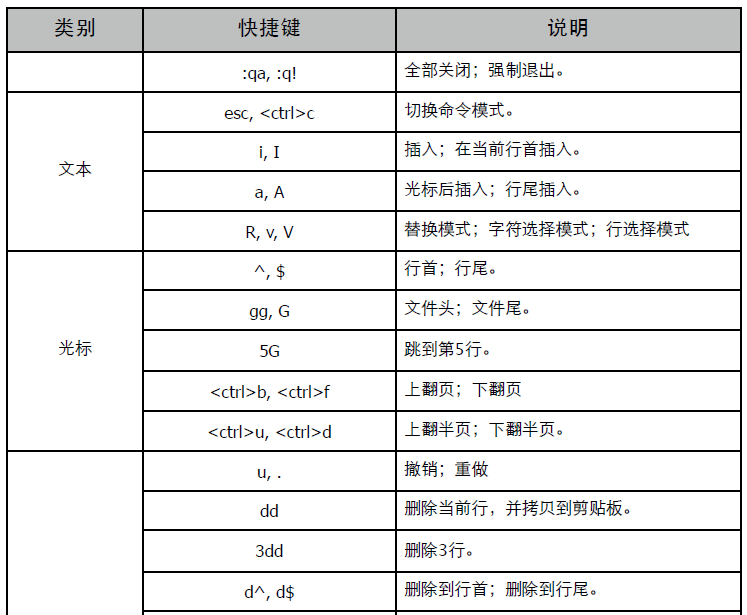
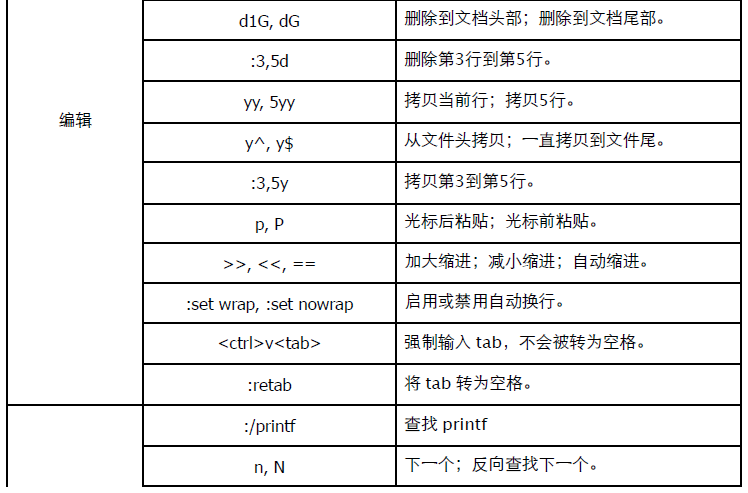
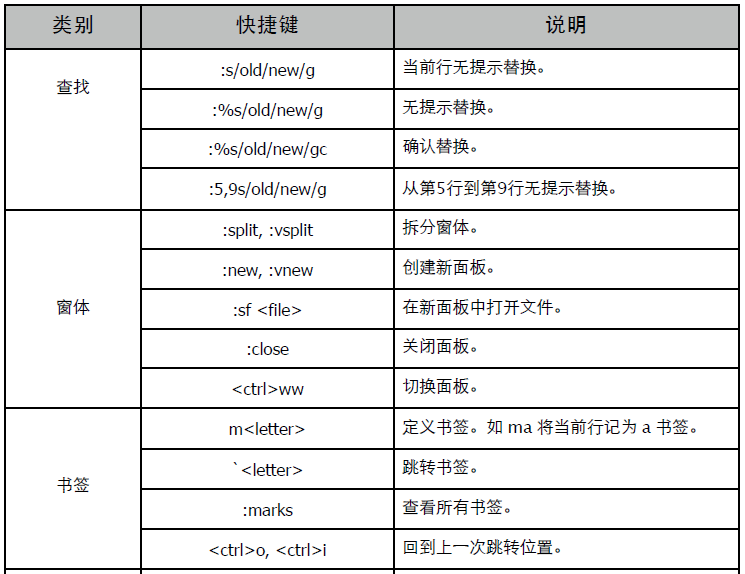
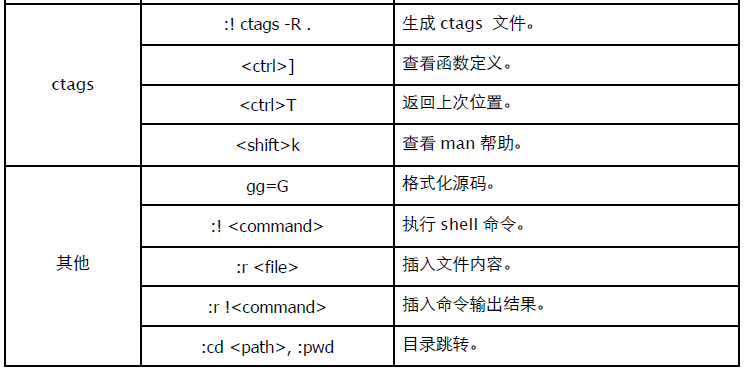
第 4 章 4. Make
一个完整的 Makefile 通常由 "显式规则"、"隐式规则"、"变量定义"、"指示符"、"注释" 五部分组成。
- 显式规则: 描述了在何种情况下如何更新一个或多个目标文件。
- 隐式规则: make 默认创建目标文件的规则。(可重写)
- 变量定义: 类似 shell 变量或 C 宏,用一个简短名称代表一段文本。
- 指示符: 包括包含(include)、条件执行、宏定义(多行变量)等内容。
- 注释: 字符 "#" 后的内容被当作注释。
(1) 在工作目录按 "GNUmakefile、makefile、Makefile (推荐)" 顺序查找执行,或 -f 指定。 (2) 如果不在 make 命令行显式指定目标规则名,则默认使用第一个有效规则。 (3) Makefile 中 $、# 有特殊含义,可以进行转义 "#"、"$$"。 (4) 可以使用 \ 换行 (注释行也可以使用),但其后不能有空格,新行同样必须以 Tab 开头和缩进。
注意: 本文中提到的目标文件通常是 ".o",类似的还有源文件 (.c)、头文件 (.h) 等。
4.1 规则
规则组成方式:
target...: prerequisites...
command
...
- target: 目标。
- prerequisites: 依赖列表。文件名列表 (空格分隔,通常是 ".o, .c, .h",可使用通配符)。
- command: 命令行。shell 命令或程序,且必须以 TAB 开头 (最容易犯的错误)。
没有命令行的规则只能指示依赖关系,没有依赖项的规则指示 "如何" 构建目标,而非 "何时" 构建。
目标的依赖列表可以通过 GCC -MM 参数获得。
规则处理方式: - 目标文件不存在,使用其规则 (显式或隐式规则) 创建。 - 目标文件存在,但如果任何一个依赖文件比目标文件修改时间 "新",则重新创建目标文件。 - 目标文件存在,且比所有依赖文件 "新",则什么都不做。
4.1.1 隐式规则
当我们不编写显式规则时,隐式规则就会生效。当然我们可以修改隐式规则的命令。
%.o: %.c
$(CC) $(CFLAGS) -o $@ -c $<
未定义规则或者不包含命令的规则都会使用隐式规则。
# 隐式规则
%.o: %.c
@echo $<
@echo $^
$(CC) $(CFLAGS) -o $@ -c $<
all: test.o main.o
$(CC) $(CFLAGS) $(LDFLAGS) -o $(OUT) $^
main.o: test.o test.h
输出:
$ make
./lib/test.c
./lib/test.c
gcc -Wall -g -std=c99 -I./lib -I./src -o test.o -c ./lib/test.c
./src/main.c
./src/main.c test.o ./lib/test.h
gcc -Wall -g -std=c99 -I./lib -I./src -o main.o -c ./src/main.c
gcc -Wall -g -std=c99 -I./lib -I./src -lpthread -o test test.o main.o
test.o 规则不存在,使用隐式规则。main.o 没有命令,使用隐式规则的同时,还会合并依赖列表。
可以有多个隐式规则,比如:
%.o: %.c
...
%o: %c %h
...
4.1.2 模式规则
在隐式规则前添加特定的目标,就形成了模式规则。
test.o main.o: %.o: %.c
$(CC) $(CFLAGS) -o $@ -c $<
4.1.3 搜索路径
在实际项目中我们通常将源码文件分散在多个目录中,将这些路径写入 Makefile 会很麻烦,此时可以考虑用 VPATH 变量指定搜索路径。
all: lib/test.o src/main.o
$(CC) $(CFLAGS) $(LDFLAGS) -o $(OUT) $^
改写成 VPATH 方式后,要调整项目目录就简单多了。
# 依赖目标搜索路径
VPATH = ./src:./lib
# 隐式规则
%.o:%.c
-@echo "source file: $<"
$(CC) $(CFLAGS) -o $@ -c $<
all:test.o main.o
$(CC) $(CFLAGS) $(LDFLAGS) -o $(OUT) $^
执行:
$ make
source file: ./lib/test.c
gcc -Wall -g -std=c99 -I./lib -I./src -o test.o -c ./lib/test.c
source file: ./src/main.c
gcc -Wall -g -std=c99 -I./lib -I./src -o main.o -c ./src/main.c
gcc -Wall -g -std=c99 -I./lib -I./src -lpthread -o test test.o main.o
还可使用 make 关键字 vpath。比 VPATH 变量更灵活,甚至可以单独为某个文件定义路径。
vpath %.c ./src:./lib # 定义匹配模式(%匹配任意个字符)和搜索路径。
vpath %.c # 取消该模式
vpath # 取消所有模式
相同的匹配模式可以定义多次,make 会按照定义顺序搜索这多个定义的路径。
vpath %.c ./src
vpath %.c ./lib
vpath %.h ./lib
VPATH 和 vpath 定义的搜索路径仅对 makefile 规则有效,对 gcc/g++ 命令行无效,比如不能用它定义命令行头文件搜索路径参数。
4.1.4 伪目标
当我们为了执行命令而非创建目标文件时,就会使用伪目标了,比如 clean。伪目标总是被执行。
clean:
-rm *.o
.PHONY: clean
使用 "-" 前缀可以忽略命令错误,".PHONY" 的作用是避免和当前目录下的文件名冲突 (可能引发隐式规则)。
4.2 命令
每条命令都在一个独立 shell 环境中执行,如希望在同一 shell 执行,可以用 ";" 将命令写在一行。
test:
cd test; cp test test.bak
提示: 可以用 "\" 换行,如此更美观一些。
默认情况下,多行命令会顺序执行。但如果命令出错,默认会终止后续执行。可以添加 "-" 前缀来忽略命令错误。另外还可以添加 "@" 来避免显示命令行本身。
all: test.o main.o
@echo "build ..."
@$(CC) $(CFLAGS) $(LDFLAGS) -o $(OUT) $^
执行其他规则:
all: test.o main.o
$(MAKE) info
@$(CC) $(CFLAGS) $(LDFLAGS) -o $(OUT) $^
info:
@echo "build..."
4.3 变量
Makefile 支持类似 shell 的变量功能,相当于 C 宏,本质上就是文本替换。 变量名区分大小写。变量名建议使用字母、数字和下划线组成。引用方式 $(var) 或 ${var}。引用未定义变量时,输出空。
4.3.1 变量定义
首先注意的是 "=" 和 ":=" 的区别。 - = : 递归展开变量,仅在目标展开时才会替换,也就是说它可以引用在后面定义的变量。 - := : 直接展开变量,在定义时就直接展开,它无法后置引用。
A = "a: $(C)"
B := "b: $(C)"
C = "haha..."
all:
@echo $A
@echo $B
输出:
$ make
a: haha...
b:
由于 B 定义时 C 尚未定义,所以直接展开的结果就是空。修改一下,再看。
C = "none..."
A = "a: $(C)"
B := "b: $(C)"
C = "haha..."
all:
@echo $A
@echo $B
输出:
$ make
a: haha...
b: none...
可见 A 和 B 的展开时机的区别。
除了使用 "="、":=" 外,还可以用 "define ... endef" 定义多行变量 (宏,递归展开,只需在调用时添加 @ 即可)。
define help
echo ""
echo " make release : Build release version."
echo " make clean : Clean templ files."
echo ""
endef
debug:
@echo "Build debug version..."
@$(help)
@$(MAKE) $(OUT) DEBUG=1
release:
@echo "Build release version..."
@$(help)
@$(MAKE) clean $(OUT)
4.3.2 操作符
"?=" 表示变量为空或未定义时才进行赋值操作。
A ?= "a"
A ?= "A"
B = "B"
all:
@echo $A
@echo $B
输出:
$ make
a
B
"+=" 追加变量值。注意变量展开时机。
A = "$B"
A += "..."
B = "haha"
all:
@echo $A
输出:
$ make
haha ...
4.3.3 替换引用
使用 "$(VAR:A=B)" 可以将变量 VAR 中所有以 A 结尾的单词替换成以 B 结尾。
A = "a.o b.o c.o"
all:
@echo $(A:o=c)
输出:
$ make
a.c b.c c.o
4.3.4 命令行变量
命令行变量会替换 Makefile 中定义的变量值,除非使用 override。
A = "aaa"
override B = "bbb"
C += "ccc"
override D += "ddd"
all:
@echo $A
@echo $B
@echo $C
@echo $D
执行:
$ make A="111" B="222" C="333" D="444"
111
bbb
333
444 ddd
我们注意到追加方式在使用 override 后才和命令行变量合并。
4.3.5 目标变量
仅在某个特定目标中生效,相当于局部变量。
test1: A = "abc"
test1:
@echo "test1" $A
test2:
@echo "test2" $A
输出:
$ make test1 test2
test1 abc
test2
还可以定义模式变量。
test%: A = "abc"
test1:
@echo "test1" $A
test2:
@echo "test2" $A
输出:
$ make test1 test2
test1 abc
test2 abc
4.3.6 自动化变量
- $? : 比目标新的依赖项。
- $@ : 目标名称。
- $< : 第一个依赖项名称 (搜索后路径)。
- $^ : 所有依赖项 (搜索后路径,排除重复项)。
4.3.7 通配符
在变量定义中使用通配符则需要借助 wildcard。
FILES = $(wildcard *.o)
all:
@echo $(FILES)
4.3.8 环境变量
和 shell 一样,可以使用 "export VAR" 将变量设定为环境变量,以便让命令和递归调用的 make 命令能接收到参数。
例如: 使用 GCC C_INCLUDE_PATH 环境变量来代替 -I 参数。
C_INCLUDE_PATH := ./lib:/usr/include:/usr/local/include
export C_INCLUDE_PATH
4.4 条件
没有条件判断是不行滴。
CFLAGS = -Wall -std=c99 $(INC_PATHS)
ifdef DEBUG
CFLAGS += -g
else
CFLAGS += -O3
endif
类似的还有: ifeq、ifneq、ifndef 格式: ifeq (ARG1, ARG2) 或 ifeq "ARG1" "ARG2"
# DEBUG == 1
ifeq "$(DEBUG)" "1"
...
else
...
endif
# DEBUG 不为空
ifneq ($(DEBUG), )
...
else
...
endif
实际上,我们可以用 if 函数来代替。相当于编程语言中的三元表达式 "?:"。
CFLAGS = -Wall $(if $(DEBUG), -g, -O3) -std=c99 $(INC_PATHS)
4.5 函数
*nix 下的 "配置" 都有点 "脚本语言" 的感觉。
make 支持函数的使用,调用方法 "$(function args)" 或 "${function args}"。多个参数之间用"," (多余的空格可能会成为参数的一部分)。
例如: 将 "Hello, World!" 替换成 "Hello, GNU Make!"。
A = Hello, World!
all:
@echo $(subst World, GUN Make, $(A))
注意: 字符串没有用引号包含起来,如果字符串中有引号字符,使用 "\" 转义。
4.5.1 foreach
这个 foreach 很好,执行结果输出 "[1] [2] [3]"。
A = 1 2 3
all:
@echo $(foreach x,$(A),[$(x)])
4.5.2 call
我们还可以自定义一个函数,其实就是用一个变量来代替复杂的表达式,比如对上面例子的改写。
A = x y z
func = $(foreach x, $(1), [$(x)])
all:
@echo $(call func, $(A))
@echo $(call func, 1 2 3)
传递的参数分别是 "$(1), $(2) ..."。
用 define 可以定义一个更复杂一点的多行函数。
A = x y z
define func
echo "$(2): $(1) -> $(foreach x, $(1), [$(x)])"
endef
all:
@$(call func, $(A), char)
@$(call func, 1 2 3, num)
输出:
$ make
char: x y z -> [x] [y] [z]
num: 1 2 3 -> [1] [2] [3]
4.5.3 eval
eval 函数的作用是动态生成 Makefile 内容。
define func
$(1) = $(1)...
endef
$(eval $(call func, A))
$(eval $(call func, B))
all:
@echo $(A) $(B)
上面例子的执行结果实际上是 "动态" 定义了两个变量而已。当然,借用 foreach 可以更紧凑一些。
$(foreach x, A B, $(eval $(call func, $(x))))
4.5.4 shell
执行 shell 命令,这个非常实用。
A = $(shell uname)
all:
@echo $(A)
更多的函数列表和详细信息请参考相关文档。
4.6 包含
include 指令会读取其他的 Makefile 文件内容,并在当前位置展开。通常使用 ".mk" 作为扩展名,支持文件名通配符,支持相对和绝对路径。
4.7 执行
Makefile 常用目标名:
- all: 默认目标。
- clean: 清理项目文件的伪目标。
- install: 安装(拷贝)编译成功的项目文件。
- tar: 创建源码压缩包。
- dist: 创建待发布的源码压缩包。
- tags: 创建 VIM 使用的 CTAGS 文件。make 常用命令参数:
- -n: 显示待执行的命令,但不执行。
- -t: 更新目标文件时间戳,也就是说就算依赖项被修改,也不更新目标文件。
- -k: 出错时,继续执行。
- -B: 不检查依赖列表,强制更新目标。
- -C: 执行 make 前,进入特定目录。让我们可以在非 Makefile 目录下执行 make 命令。
- -e: 使用系统环境变量覆盖同名变量。
- -i: 忽略命令错误。相当于 "-" 前缀。
- -I: 指定 include 包含文件搜索目录。
- -p: 显示所有 Makefile 和 make 的相关参数信息。
- -s: 不显示执行的命令行。相当于 "@" 前缀。
顺序执行多个目标:
$ make clean debug
第 4 章 5. Scons
Scons 采用 Python 编写,用来替换 GNU Make 的自动化编译构建工具。相比 Makefile 和类似的老古董,scons 更智能,更简单。
5.1 脚本
在项目目录下创建名为 SConstruct (或 Sconstruct、 sconstruct) 的文件,作用类似 Makefile。实质上就是 py 源文件。
简单样本:
Program("test", ["main.c"])
常用命令:
$ scons!! ! ! ! ! # 构建,输出详细信息。
scons: Reading SConscript files ...
scons: done reading SConscript files.
scons: Building targets ...
gcc -o main.o -c main.c
gcc -o test main.o
scons: done building targets.
$ scons -c! ! ! ! ! # 清理,类似 make clean。
scons: Reading SConscript files ...
scons: done reading SConscript files.
scons: Cleaning targets ...
Removed main.o
Removed test
scons: done cleaning targets.
$ scons -Q! ! ! ! ! # 构建,简化信息输出。
gcc -o main.o -c main.c
gcc -o test main.o
$ scons -i! ! ! ! ! # 忽略错误,继续执行。
$ scons -n! ! ! ! ! # 输出要执行的命令,但并不真的执行。
$ scons -s! ! ! ! ! # 安静执行,不输出任何非错误信息。
$ scons -j 2! ! ! ! ! # 并行构建。
如需调试,建议插入 "import pdb; pdb.set_trace()",命令行参数 "--debug=pdb" 并不好用。可用 SConscript(path/filename) 包含其他设置文件 (或列表),按惯例命名为 SConscript。
5.2 环境
影响 scons 执行的环境 (Environment ) 因素包括: - External:外部环境。执行 scons 时的操作系统环境变量,可以用 os.environ 访问。 - Construction: 构建环境,用来控制实际的编译行为。 - Execution: 执行环境,用于设置相关工具所需设置。比如 PATH 可执行搜索路径。
简单程序,可直接使用默认构建环境实例。
env = DefaultEnvironment(CCFLAGS = "-g")! ! # 返回默认构建环境实例,并设置参数。
Program("test", ["main.c"])! ! ! ! # 相当于 env.Program()
输出:
gcc -o main.o -c -g main.c
gcc -o test main.o
如需多个构建环境,可用 Environment 函数创建。同一环境可编译多个目标,比如用相同设置编译静态库和目标执行程序。
env = Environment(CCFLAGS = "-O3")
env.Library("my", ["test.c"], srcdir = "lib")
env.Program("test", ["main.c"], LIBS = ["my"], LIBPATH = ["."])
输出:
gcc -o lib/test.o -c -O3 lib/test.c
ar rc libmy.a lib/test.o
ranlib libmy.a
gcc -o main.o -c -O3 main.c
gcc -o test main.o -L. -lmy
常用环境参数: - CC: 编译器,默认 "gcc"。 - CCFLAGS: 编译参数。 - CPPDEFINES: 宏定义。 - CPPPATH:头文件搜索路径。 - LIBPATH:库文件搜索路径。
- LIBS: 需要链接的库名称。除直接提供键值参数外,还可用名为 parse_flags 的特殊参数一次性提供,它会被 ParseFlags 方法自动分解。
env = Environment(parse_flags = "-Ilib -L.")
print env["CPPPATH"], env["LIBPATH"]
输出:
['lib'] ['.']
调用 Dictionary 方法返回环境参数字典,或直接用 Dump 方法返回 Pretty-Print 字符串。
print env.Dictionary(); ! print env.Dictionary("LIBS", "CPPPATH")
print env.Dump(); ! ! print env.Dump("LIBS")
用 "ENV" 键访问执行环境字典。系统不会自动拷贝外部环境变量,需自行设置。
import os
env = DefaultEnvironment(ENV = os.environ)
print env["ENV"]["PATH"]
5.3 方法
5.3.1 编译
同一构建环境,可用相关方法编译多个目标。无需关心这些方法调用顺序,系统会自动处理依赖关系,安排构建顺序。 - Program: 创建可执行程序 (ELF、.exe)。 - Library, StaticLibrary: 创建静态库 (.a, .lib)。 - SharedLibrary: 创建动态库 (.so, .dylib, .dll)。
- Object: 创建目标文件 (.o)。如果没有构建环境实例,那么这些函数将使用默认环境实例。
用首个位置参数指定目标文件名 (不包括扩展名),或用 target、source 指定命名参数。source 是单个源文件名 (包含扩展名) 或列表。
Program("test1", "main.c")
Program("test2", ["main.c", "lib/test.c"])! ! # 列表
Program("test3", Split("main.c lib/test.c"))!! # 分解成列表
Program("test4", "main.c lib/test.c".split())! # 分解成列表
Glob 用通配符匹配多个文件,还可用 srcdir 指定源码目录简化文件名列表。为方法单独提供环境参数仅影响该方法,不会修改环境对象。
Library("my", "test.c", srcdir = "lib")
Program("test2", Glob("*.c"), LIBS = ["my"], LIBPATH = ["."], CPPPATH = "lib")
输出:
gcc -o lib/test.o -c lib/test.c
ar rc libmy.a lib/test.o
ranlib libmy.a
gcc -o main.o -c -Ilib main.c
gcc -o test2 main.o -L. -lmy
创建共享库。
SharedLibrary("my", "test.c", srcdir = "lib")
Program("test", Glob("*.c"), LIBS = ["my"], LIBPATH = ["."], CPPPATH = "lib")
输出:
gcc -o lib/test.os -c -fPIC lib/test.c
gcc -o libmy.dylib -dynamiclib lib/test.os
gcc -o main.o -c -Ilib main.c
gcc -o test main.o -L. -lmy
编译方法返回列表,第一元素是目标文件全名。
print env.Library("my", "test.c", srcdir = "lib")
输出:
['libmy.a']
5.3.2 参数
Append: 追加参数数据。
env = Environment(X = "a")
env.Append(X = "b")! ! ! # "a" + "b"。
env.Append(X = ["c"]) !! # 如果原参数或新值是列表,那么 [] + []。
print env["X"]
输出:
['ab', 'c']
AppendUnique: 判断要追加的数据是否已经存在。delete_existing 参数删除原数据,然后添加到列表尾部。原参数值必须是列表。
env = Environment(X = ["a", "b", "c"])
env.AppendUnique(X = "d")
env.AppendUnique(1, X = "b")
print env["X"]
输出:
['a', 'c', 'd', 'b']
Prepend, PrependUnique: 将值添加到头部。
env = Environment(X = ["a", "b", "c"])
env.Prepend(X = "d")
print env["X"]
输出:
['d', 'a', 'b', 'c']
AppendENVPath, PrependENVPath: 向执行环境追加路径,去重。
env = Environment()
print env["ENV"]["PATH"]
env.AppendENVPath("PATH", "./lib")
env.AppendENVPath("PATH", "./lib")
print env["ENV"]["PATH"]
输出:
/opt/bin:/usr/bin:/bin:/usr/sbin:/sbin:/usr/local/bin
/opt/bin:/usr/bin:/bin:/usr/sbin:/sbin:/usr/local/bin:./lib
Replace: 替换参数。如目标不存在,新增。
env = Environment(CCFLAGS = ["-g"])
env.Replace(CCFLAGS = "-O3")
print env["CCFLAGS"]
输出:
-O3
SetDefault: 和 Python dict.setdefault 作用相同,仅在目标键不存在时添加。
env = Environment(CCFLAGS = "-g")
env.SetDefault(CCFLAGS = "-O3")
env.SetDefault(LIBS = ["m", "pthread"])
print env["CCFLAGS"], env["LIBS"]
输出:
-g ['m', 'pthread']
MergeFlags: 合并参数字典,去重。
env = Environment(CCFLAGS = ["option"], CPPATH = ["/usr/local/include"])
env.MergeFlags({"CCFLAGS" : "-O3" })
env.MergeFlags("-I/usr/opt/include -O3 -I/usr/local/include")
print env['CCFLAGS'], env["CPPPATH"]
输出:
['option', '-O3'] ['/usr/opt/include', '/usr/local/include']
ParseFlags: 分解参数。
env = Environment()
d = env.ParseFlags("-I/opt/include -L/opt/lib -lfoo")
env.MergeFlags(d)
print d
print env["CPPPATH"], env["LIBS"], env["LIBPATH"]
输出:
{'LIBPATH': ['/opt/lib'], 'LIBS': ['foo'], ..., 'CPPPATH': ['/opt/include']}
['/opt/include'] ['foo'] ['/opt/lib']
5.3.3 其他
Clone: 环境对象深度复制,可指定覆盖参数。
env = Environment(CCFLAGS = ["-g"], LIBS = ["m", "pthread"])
env2 = env.Clone(CCFLAGS = "-O3")
print env2["CCFLAGS"], env2["LIBS"]
输出:
-O3 ['m', 'pthread']
NoClean: 指示 "scons -c" 不要清理这些文件。
my = Library("my", "test.c", srcdir = "lib")
test = Program("test", "main.c")
NoClean(test, my) ! ! ! ! ! # 也可直接使用文件名,注意是 libmy.a。
subst: 展开所有环境参数。
print env["CCCOM"]
print env.subst("$CCCOM")
输出:
'$CC -o $TARGET -c $CFLAGS $CCFLAGS $_CCCOMCOM $SOURCES'
'gcc -o -c -O3'
各方法详细信息可参考 "man scons" 或 在线手册。
5.4 依赖
当依赖文件发生变更时,需重新编译目标程序。可使用 Decider 决定变更探测方式,可选项包括: - MD5: 默认设置,根据文件内容进行判断。 - timestamp-newer: 如果源文件比目标文件新,则表示发生变更。 - timestamp-match: 检查源文件修改时间和上次编译时是否相同。
- MD5-timestamp: 记录内容变化,但只有源文件修改时间变化时变更。用 touch 更新某个源文件修改时间,即便文件内容没有变化,timestamp-newer 也会让 scons 重新编译该目标文件。
env.Decider("timestamp-newer")
env.Program("test", "main.c")
某些时候,scons 无法探测到依赖关系,那么可以用 Depends 显式指定依赖。
env.Decider("timestamp-newer")
test = env.Program("test", "main.c")
env.Depends(test, ["lib/test.h"])
Ignore 忽略依赖关系,Require 指定编译顺序。下例中,指示在编译 my 前必须先构建 test,即便它们之间没有任何依赖关系。
my = env.Library("my", "test.c", srcdir = "lib")
test = env.Program("test", "main.c")
env.Requires(my, test)
AlwaysBuild 指示目标总是被编译。不管依赖项是否变更,这个目标总是会被重新构建。
my = env.Library("my", "test.c", srcdir = "lib")
env.AlwaysBuild(my)
5.5 命令行
scons 提供了三种不同的命令行参数: - Options: 以一个或两个 "-" 开始的参数,通常是系统参数,可扩展。 - Variables: 以键值对方式出现。 - Targets: 需要编译的目标。
5.5.1 Variables
所有键值都保存在 ARGUMENTS 字典中,可用 Help 函数添加帮助信息。
vars = Variables(None, ARGUMENTS)
vars.Add('RELEASE', 'Set to 1 to build for release', 0)
env = Environment(variables = vars)
Help(vars.GenerateHelpText(env))
if not GetOption("help"):
print ARGUMENTS
print ARGUMENTS.get("RELEASE", "0")
输出:
$ scons -Q -h
RELEASE: Set to 1 to build for release
default: 0
actual: 0
Use scons -H for help about command-line options.
$ scons -Q RELEASE=1
{'RELEASE': '1'}
1
$ scons -Q
{}
0
另有 BoolVariable、EnumVariable、ListVariable、PathVariable 等函数对参数做进一步处理。
5.5.2 Targets
Program、Library 等编译目标文件名,可通过 COMMAND_LINE_TARGETS 列表获取。
print COMMAND_LINE_TARGETS
Library("my", "lib/test.c")
env = Environment()
env.Program("test", "main.c")
输出:
$ scons -Q test
['test']
gcc -o main.o -c main.c
gcc -o test main.o
$ scons -Q libmy.a
['libmy.a']
gcc -o lib/test.o -c lib/test.c
ar rc libmy.a lib/test.o
ranlib libmy.a
$ scons -Q -c test libmy.a
['test', 'libmy.a']
Removed main.o
Removed test
Removed lib/test.o
Removed libmy.a
除非用 Default 函数指定默认目标,否则 scons 会构建所有目标。多次调用 Default 的结果会被合并,保存在 DEFAULT_TARGETS 列表中。
my = Library("my", "lib/test.c")
test = Program("test", "main.c")
Default(my)! ! ! ! ! # 可指定多个目标,比如 Default(my, test)。
输出:
$ scons -Q
gcc -o lib/test.o -c lib/test.c
ar rc libmy.a lib/test.o
ranlib libmy.a
就算指定了默认目标,我们依然可以用 "scons -Q ." 来构建所有目标,清理亦同。
附: scons 还有 Install、InstallAs、Alias、Package 等方法用来处理安装和打包,详细信息可参考官方手册。
SCons User Guide Man page of SCons
第 4 章 6. Git
通常情况下,我们只需简单设置用户信息和着色即可。
$ git config --global user.name "Q.yuhen"
$ git config --global user.email qyuhen@abc.com
$ git config --global color.ui true
可以使用 "--list" 查看当前设置。
$ git config --list
6.2 初始化
创建项目目录,然后执行 git init 初始化。这会在项目目录创建 .git 目录,即为元数据信息所在。
$ git init
通常我们还需要创建一个忽略配置文件 ".gitignore",并不是什么都需要加到代码仓库中的。
$ cat > .gitignore << end
> *.[oa]
> *.so
> *~
> !a.so
> test
> tmp/
> end
如果作为 Server 存在,那么可以忽略工作目录,以纯代码仓库形式存在。
$ git --bare init
在客户端,我们可以调用 clone 命令克隆整个项目。支持 SSH / HTTP/ GIT 等协议。
$ git clone ssh://user@server:3387/git/myproj
$ git clone git://github.com/schacon/grit.git mygrit
6.3 基本操作
Git 分为 "工作目录"、"暂存区"、"代码仓库" 三个部分。
6.3.1 添加
文件通过 "git add " 被添加到暂存区,如此暂存区将拥有一份文件快照。
$ git add .
$ git add file1 file2
$ git add *.c
"git add" 除了添加新文件到暂存区进行跟踪外,还可以刷新已被跟踪文件的暂存区快照。需要注意的是,被提交到代码仓库的是暂存区的快照,而不是工作目录中的文件。
6.3.2 提交
"git commit -m " 命令将暂存区的快照提交到代码仓库。
$ git commit -m "message"
在执行 commit 提交时,我们通常会直接使用 "-a" 参数。该参数的含义是:刷新暂存区快照,提交时同时移除被删除的文件。但该参数并不会添加未被跟踪的新文件,依然需要执行 "git add "操作。
$ git commit -am "message"
6.3.3 状态
可以使用 "git status" 查看暂存区状态,通常包括 "当前工作分支 (Branch)"、"被修改的已跟踪文件(Changed but not updated)",以及 "未跟踪的新文件 (Untracked files)" 三部分信息。
$ git status
# On branch master
# Changed but not updated:
# (use "git add <file>..." to update what will be committed)
# (use "git checkout -- <file>..." to discard changes in working directory)
#
# modified: readme
#
# Untracked files:
# (use "git add <file>..." to include in what will be committed)
#
# install
no changes added to commit (use "git add" and/or "git commit -a")
6.3.4 比较
要比较三个区域的文件差别,需要使用 "git diff" 命令。
使用 "git diff [file]" 查看工作目录和暂存区的差异。 使用 "git diff --staged [file]" 或 "git diff --cached [file]" 查看暂存区和代码仓库的差异。
$ git diff readme
diff --git a/readme b/readme
index e69de29..df8285e 100644
--- a/readme
+++ b/readme
@@ -0,0 +1,2 @@
+1111111111111111111
+
查看当前所有未提交的差异,包括工作目录和暂存区。
$ git diff HEAD
6.3.5 撤销
作为代码管理工作,我们随时可以 "反悔"。
使用 "git reset HEAD " 命令可以取消暂存区的文件快照(即恢复成最后一个提交版本),这不会影响工作目录的文件修改。
使用 "git checkout -- " 从仓库恢复工作目录文件,暂存区不受影响。
$ git chekcout -- readme
在 Git 中 "HEAD" 表示仓库中最后一个提交版本,"HEAD^" 是倒数第二个版本,"HEAD~2" 则是更老的版本。
我们可以直接 "签出" 代码仓库中的某个文件版本到工作目录,该操作同时会取消暂存区快照。
$ git checkout HEAD^ readme
如果想将整个项目回溯到以前的某个版本,可以使用 "git reset"。可以选择的参数包括默认的 "--mixed" 和 "--hard",前者不会取消工作目录的修改,而后者则放弃全部的修改。该操作会丢失其后的日志。
$ git reset --hard HEAD^
6.3.6 日志
每次提交都会为整个项目创建一个版本,我们可以通过日志来查看相关信息。
参数 "git log -p" 可以查看详细信息,包括修改的内容。 参数 "git log -2" 查看最后两条日志。 参数 "git log --stat" 可以查看统计摘要。
$ git log --stat -2 -p
commit c11364da1bde38f55000bc6dea9c1dda426c00f9
Author: Q.yuhen <qyuhen@hotmail.com>
Date: Sun Jul 18 15:53:55 2010 +0800
## b0 files changed, 0 insertions(+), 0 deletions(-)
diff --git a/install b/install
new file mode 100644
index 0000000..e69de29
commit 784b289acc8dccd1d2d9742d17f586ccaa56a3f0
Author: Q.yuhen <qyuhen@hotmail.com>
Date: Sun Jul 18 15:33:24 2010 +0800
## a0 files changed, 0 insertions(+), 0 deletions(-)
diff --git a/readme b/readme
new file mode 100644
index 0000000..e69de29
6.3.7 重做
马有失蹄,使用 "git commit --amend" 可以重做最后一次提交。
$ git commit --amend -am "b2"
[master 6abac48] b2
0 files changed, 0 insertions(+), 0 deletions(-)
create mode 100644 abc
create mode 100644 install
$ git log
commit 6abac48c014598890c6c4f47b4138f6be020e403
Author: Q.yuhen <qyuhen@hotmail.com>
Date: Sun Jul 18 15:53:55 2010 +0800
b2
commit 784b289acc8dccd1d2d9742d17f586ccaa56a3f0
Author: Q.yuhen <qyuhen@hotmail.com>
Date: Sun Jul 18 15:33:24 2010 +0800
a
6.3.8 查看
使用 "git show" 可以查看日志中文件的变更信息,默认显示最后一个版本 (HEAD)。
$ git show readme
$ git show HEAD^ readme
6.3.9 标签
可以使用标签 (tag) 对最后提交的版本做标记,如此可以方便记忆和操作,这通常也是一个里程碑的标志。
$ git tag v0.9
$ git tag
v0.9
$ git show v0.9
commit 3fcdd49fc0f0a45cd283a86bc743b4e5a1dfdf5d
Author: Q.yuhen <qyuhen@hotmail.com>
Date: Sun Jul 18 14:53:55 2010 +0800
...
可以直接用标签号代替日志版本号进行操作。
$ git log v0.9
commit 3fcdd49fc0f0a45cd283a86bc743b4e5a1dfdf5d
Author: Q.yuhen <qyuhen@hotmail.com>
Date: Sun Jul 18 14:53:55 2010 +0800
a
6.3.10 补丁
在不方便共享代码仓库,或者修改一个没有权限的代码时,可以考虑通过补丁文件的方式来分享代码修改。
输出补丁:
$ git diff > patch.txt
$ git diff HEAD HEAD~ > patch.txt
合并补丁:
$ git apply < patch.txt
6.4 工作分支
用 Git 一定得习惯用分支进行工作。
使用 "git branch " 创建分支,还可以创建不以当前版本为起点的分支 "git branch HEAD^"。
使用 "git checkout " 切换分支。
$ git branch yuhen
$ git checkout yuhen
Switched to branch 'yuhen'
$ git branch
master
* yuhen
使用 "git chekcout -b " 一次完成分支创建和切换操作。
$ git checkout -b yuhen
Switched to a new branch 'yuhen'
$ git branch
master
* yuhen
在分支中完成提交,然后切换回主分支进行合并 (git merge) 和 删除 (git branch -d ) 操作。
$ git checkout master
Switched to branch 'master'
$ git merge yuhen
Updating 6abac48..7943312
Fast-forward
0 files changed, 0 insertions(+), 0 deletions(-)
create mode 100644 abc.txt
$ git branch -d yuhen
Deleted branch yuhen (was 7943312).
$ git branch
* master
附注: 如果当前工作目录有未提交的内容,直接切换到其他分支会将变更一同带入。
6.5 服务器
(1) 首先克隆服务器代码仓库。
$ git clone git@192.168.1.202:/git.server/project1 # SSH
完成克隆后,可以用 origin 来代替服务器地址。使用 "git remote" 命令查看相关信息。
$ git remote
origin
$ git remote show origin
* remote origin
Fetch URL: ...
Push URL: ...
HEAD branch: master
Remote branch:
master tracked
Local branch configured for 'git pull':
master merges with remote master
Local ref configured for 'git push':
master pushes to master (up to date)
还可以创建新的 remote 设置。
$ git remote add project1 git@192.168.1.202:/git.server/project1
$ git remote
origin
project1
$ git remote rm project1
(2) 在将代码提交 (push) 到服务器之前,首先要确认相关更新已经合并到主分支。还应该先从服务器刷新 (pull) 最新代码,以确保自己的提交不会和别人最新提交的代码冲突。
$ git pull origin master
$ git push origin master
(3) 要提交标签到服务器,需要额外操作 (先执行 git push 提交,然后再执行该指令)。
$ git push origin --tags
6.6 管理
检查损坏情况。
$ git fsck
清理无用数据。
$ git gc
第 4 章 7. Debug
在初学汇编时,MS-DOS debug.com 命令是个最佳的实验工具。
7.1 命令
常用命令: - 输入指令: a [address] - 反汇编: u [range] - 执行: g [=address] [breakpoint] - 执行: p [=address] [number] - 单步: t - 查看寄存器: r - 修改寄存器: r - 内存显示: d [range] - 内存比较: c
<
address> - 内存修改: e
<
address>
- 内存填充: f 参数格式:
- range: 表示一段内存范围,可以是 "<起始> <结束>",或 "<起始>L<长度>"。
- list: 表示一个或多个内存字节值,用英文逗号分隔。
7.1.1 汇编
输入汇编指令,转换成机器码存入指定位置。
a [address]
address 可以是偏移量,或者完整的段地址 (CS:SA)。
-a 100
1396:0100 mov bx, fefe
1396:0103 mov ax, bx
1396:0105
-u 100 103
1396:0100 BBFEFE MOV BX,FEFE
1396:0103 89D8 MOV AX,BX
除了输入汇编指令,我们还可以使用 db 和 dw 这两个伪指令。
-a
1396:0105 db 1,2,3,4
1396:0109 dw 5,6,7,8
1396:0111 db "Hello, World!"
1396:011E
-d 100
1396:0100 BB FE FE 89 D8 01 02 03-04 05 00 06 00 07 00 08 ................
1396:0110 00 48 65 6C 6C 6F 2C 20-57 6F 72 6C 64 21 33 44 .Hello, World!3D
1396:0120 55 00 00 00 00 00 00 00-00 00 00 00 00 00 00 00 U...............
1396:0130 11 22 33 00 00 00 00 00-00 00 00 00 00 00 00 00 ."3.............
1396:0140 00 00 00 00 00 00 00 00-00 00 00 00 00 00 00 00 ................
1396:0150 00 00 00 00 00 00 00 00-00 00 00 00 00 00 00 00 ................
1396:0160 33 44 55 33 00 00 00 00-00 00 00 00 00 00 00 00 3DU3............
1396:0170 00 00 00 00 00 00 00 00-00 00 00 00 00 00 00 00 ................
对应的,我们可以用 U 命令进行反汇编。
u [range]
如果省略 range,则从上次结束位置继续反汇编。
-u 100 105
1396:0100 BBFEFE MOV BX,FEFE
1396:0103 89D8 MOV AX,BX
1396:0105 0102 ADD [BP+SI],AX
-u
1396:0107 0304 ADD AX,[SI]
1396:0109 050006 ADD AX,0600
1396:010C 0007 ADD [BX],AL
1396:010E 0008 ADD [BX+SI],CL
1396:0110 004865 ADD [BX+SI+65],CL
1396:0113 6C DB 6C
1396:0114 6C DB 6C
1396:0115 6F DB 6F
1396:0116 2C20 SUB AL,20
1396:0118 57 PUSH DI
1396:0119 6F DB 6F
1396:011A 726C JB 0188
1396:011C 64 DB 64
1396:011D 2101 AND [BX+DI],AX
1396:011F 0203 ADD AL,[BP+DI]
1396:0121 0000 ADD [BX+SI],AL
1396:0123 0000 ADD [BX+SI],AL
1396:0125 0000 ADD [BX+SI],AL
7.1.2 比较
比较两段内存区域的差异。
c <range> <address>
- range: 表示第一段内存区域。
- address: 是第二段内存的起始地址。
-d 100
1396:0100 BB FE FE 89 D8 01 02 03-04 05 00 06 00 07 00 08 ................
1396:0110 00 48 65 6C 6C 6F 2C 20-57 6F 72 6C 64 21 33 44 .Hello, World!3D
1396:0120 55 00 00 00 00 00 00 00-00 00 00 00 00 00 00 00 U...............
1396:0130 11 22 33 00 00 00 00 00-00 00 00 00 00 00 00 00 ."3.............
-c 100l3 160
1396:0100 BB 33 1396:0160
1396:0101 FE 44 1396:0161
1396:0102 FE 55 1396:0162
-c 100 102 160
1396:0100 BB 33 1396:0160
1396:0101 FE 44 1396:0161
1396:0102 FE 55 1396:0162
7.1.3 显示
显示内存信息。
d [range]
可以不指定 range,从上次显示尾部继续显示后续内容。也可以不指定长度或结束地址。
-d 100
1396:0100 BB FE FE 89 D8 01 02 03-04 05 00 06 00 07 00 08 ................
1396:0110 00 48 65 6C 6C 6F 2C 20-57 6F 72 6C 64 21 33 44 .Hello, World!3D
1396:0120 55 00 00 00 00 00 00 00-00 00 00 00 00 00 00 00 U...............
1396:0130 11 22 33 00 00 00 00 00-00 00 00 00 00 00 00 00 ."3.............
-d
1396:0180 00 00 00 00 00 00 00 00-00 00 00 00 00 00 00 00 ................
1396:0190 00 00 00 00 00 00 00 00-00 00 00 00 00 00 00 00 ................
1396:01A0 00 00 00 00 00 00 00 00-00 00 00 00 00 00 00 00 ................
1396:01B0 00 00 00 00 00 00 00 00-00 00 00 00 00 00 00 00 ................
-d 100l5
1396:0100 BB FE FE 89 D8 .....
-d 100 11f
1396:0100 BB FE FE 89 D8 01 02 03-04 05 00 06 00 07 00 08 ................
1396:0110 00 48 65 6C 6C 6F 2C 20-57 6F 72 6C 64 21 33 44 .Hello, World!3D
7.1.4 修改
修改内存数据。
e <address> [list]
使用逗号分隔多个值。
-d 100
1396:0100 00 00 00 00 00 00 00 00-00 00 00 00 00 00 00 00 ................
1396:0110 00 00 00 00 00 00 00 00-00 00 00 00 00 00 00 00 ................
1396:0120 00 00 00 00 00 00 00 00-00 00 00 00 00 00 00 00 ................
-e 100 1,2,3,4,5,6
-d 100
1396:0100 01 02 03 04 05 06 00 00-00 00 00 00 00 00 00 00 ................
1396:0110 00 00 00 00 00 00 00 00-00 00 00 00 00 00 00 00 ................
1396:0120 00 00 00 00 00 00 00 00-00 00 00 00 00 00 00 00 ................
也可以按字节输入修改值。调试器会给出当前值,在符号 "." 后输入新值,空格键继续下一字节,回车结束。
-e 100
1396:0100 01.aa 02.bb 03.cc
-d 100
1396:0100 AA BB CC 04 05 06 00 00-00 00 00 00 00 00 00 00 ................
1396:0110 00 00 00 00 00 00 00 00-00 00 00 00 00 00 00 00 ................
1396:0120 00 00 00 00 00 00 00 00-00 00 00 00 00 00 00 00 ................
7.1.5 填充
使用特定数据填充内存。
f <range> <list>
可以是多个字节。
-f 100l6 ff
-d 100
1396:0100 FF FF FF FF FF FF 00 00-00 00 00 00 00 00 00 00 ................
1396:0110 00 00 00 00 00 00 00 00-00 00 00 00 00 00 00 00 ................
1396:0120 00 00 00 00 00 00 00 00-00 00 00 00 00 00 00 00 ................
-f 100 120 1,2,3,4,5
-d 100
1396:0100 01 02 03 04 05 01 02 03-04 05 01 02 03 04 05 01 ................
1396:0110 02 03 04 05 01 02 03 04-05 01 02 03 04 05 01 02 ................
1396:0120 03 00 00 00 00 00 00 00-00 00 00 00 00 00 00 00 ................
我们通常用该命令清空某个内存,以便观察操作结果。
f 100l50 00
7.1.6 运行
运行汇编指令。
g [=address] [breakpoint]
注意不能省略地址前的 "="。如果不输入开始地址,则使用 CS:IP。
-a 100
1396:0100 mov bx, 1000
1396:0103 mov ax, bx
1396:0105 add ax, 2000
1396:0108
-g =100 108
AX=3000 BX=1000 CX=0000 DX=0000 SP=FFE6 BP=0000 SI=0000 DI=0000
DS=1396 ES=1396 SS=1396 CS=1396 IP=0108 NV UP EI PL NZ NA PE NC
1396:0108 0405 ADD AL,05
命令 P 比 G 更方便一些,可以直接指定要执行的指令数。
p [=address] [number]
number 默认是 1。
-p =100 3
AX=0000 BX=1000 CX=0000 DX=0000 SP=FFE6 BP=0000 SI=0000 DI=0000
DS=1396 ES=1396 SS=1396 CS=1396 IP=0103 NV UP EI PL NZ NA PE NC
1396:0103 89D8 MOV AX,BX
AX=1000 BX=1000 CX=0000 DX=0000 SP=FFE6 BP=0000 SI=0000 DI=0000
DS=1396 ES=1396 SS=1396 CS=1396 IP=0105 NV UP EI PL NZ NA PE NC
1396:0105 050020 ADD AX,2000
AX=3000 BX=1000 CX=0000 DX=0000 SP=FFE6 BP=0000 SI=0000 DI=0000
DS=1396 ES=1396 SS=1396 CS=1396 IP=0108 NV UP EI PL NZ NA PE NC
1396:0108 0405 ADD AL,05
剩下一个命令是 T,它单步执行汇编指令。
-r ip ; 修改寄存器 IP,调整开始执行位置
IP 4444
:100
-t
AX=1000 BX=1000 CX=0000 DX=0000 SP=FFE4 BP=0000 SI=0000 DI=0000
DS=1396 ES=1396 SS=1396 CS=1396 IP=0103 NV UP EI PL NZ NA PE NC
1396:0103 89D8 MOV AX,BX
-t
AX=1000 BX=1000 CX=0000 DX=0000 SP=FFE4 BP=0000 SI=0000 DI=0000
DS=1396 ES=1396 SS=1396 CS=1396 IP=0105 NV UP EI PL NZ NA PE NC
1396:0105 050020 ADD AX,2000
-t
AX=3000 BX=1000 CX=0000 DX=0000 SP=FFE4 BP=0000 SI=0000 DI=0000
DS=1396 ES=1396 SS=1396 CS=1396 IP=0108 NV UP EI PL NZ NA PE NC
1396:0108 0405 ADD AL,05
7.1.7 计算
计算两个值的 "和" 与 "差"。
h <value1> <value2>
第一个结果是 "和",第二个是 "差"。
-h 2000 1000
3000 1000
7.1.8 复制
复制内存块。
m <range> <address>
range 是源内存地址范围,address 是目标起始地址。
-d 100
1396:0100 BB 00 10 89 D8 05 00 20-04 05 01 02 03 04 05 01 ....... ........
1396:0110 02 03 04 05 01 02 03 04-05 01 02 03 04 05 01 02 ................
-m 100l6 110
-d 100
1396:0100 BB 00 10 89 D8 05 00 20-04 05 01 02 03 04 05 01 ....... ........
1396:0110 BB 00 10 89 D8 05 03 04-05 01 02 03 04 05 01 02 ................
7.1.9 寄存器
显示或修改寄存器内容。
r [register]
演示:
-r
AX=3000 BX=1000 CX=0000 DX=0000 SP=FFE4 BP=0000 SI=0000 DI=0000
DS=1396 ES=1396 SS=1396 CS=1396 IP=0108 NV UP EI PL NZ NA PE NC
1396:0108 0405 ADD AL,05
-r ip
IP 0108
:100
7.1.10 退出
退出调试器。
q
7.2 8086 寻址模式
7.2.1 立即寻址方式
直接将操作数存放在指令中。该操作数是为常数,通常用来初始化寄存器。
-a
1396:0100 mov ax, 1234
1396:0103
-t
AX=1234 BX=0000 CX=0000 DX=0000 SP=FFEE BP=0000 SI=0000 DI=0000
DS=1396 ES=1396 SS=1396 CS=1396 IP=0103 NV UP EI PL NZ NA PO NC
1396:0103 0000 ADD [BX+SI],AL DS:0000=CD
7.2.2 寄存器寻址方式
操作数存放于寄存器中,通过寄存器名完成操作。
-a 100
1396:0100 mov ax, 5555
1396:0103 mov bx, ax
1396:0105
-p =100 2
AX=5555 BX=0000 CX=0000 DX=0000 SP=FFEE BP=0000 SI=0000 DI=0000
DS=1396 ES=1396 SS=1396 CS=1396 IP=0103 NV UP EI PL NZ NA PO NC
1396:0103 89C3 MOV BX,AX
AX=5555 BX=5555 CX=0000 DX=0000 SP=FFEE BP=0000 SI=0000 DI=0000
DS=1396 ES=1396 SS=1396 CS=1396 IP=0105 NV UP EI PL NZ NA PO NC
1396:0105 0000 ADD [BX+SI],AL DS:5555=00
7.2.3 直接寻址方式
直接在指令中用常数操作数指定偏移地址。
-a 100
139B:0100 mov ax, [0010] ; 从 DS:0010 处读取数据
139B:0103
-p =100 1
AX=0DFF BX=0000 CX=0000 DX=0000 SP=FFEE BP=0000 SI=0000 DI=0000
DS=139B ES=139B SS=139B CS=139B IP=0103 NV UP EI PL NZ NA PO NC
139B:0103 BE0200 MOV SI,0002
-d 0010l6
139B:0010 FF 0D 17 03 FF 0D ......
7.2.4 寄存器间接寻址方式
将偏移地址存放在寄存器中,通过寄存器间接读取目标数据。
-a 100
1396:0100 mov bx, 0010
1396:0103 mov ax, [bx] ; 相当于 "mov ax, [0010]"
1396:0105
-p =100 2
AX=0000 BX=0010 CX=0000 DX=0000 SP=FFEE BP=0000 SI=0000 DI=0000
DS=1000 ES=1396 SS=1396 CS=1396 IP=0103 NV UP EI PL NZ NA PO NC
1396:0103 8B07 MOV AX,[BX] DS:0010=E85B
AX=E85B BX=0010 CX=0000 DX=0000 SP=FFEE BP=0000 SI=0000 DI=0000
DS=1000 ES=1396 SS=1396 CS=1396 IP=0105 NV UP EI PL NZ NA PO NC
1396:0105 0000 ADD [BX+SI],AL DS:0010=5B
-d 0010l6
1000:0010 5B E8 59 00 E8 D8 ......
7.2.5 寄存器相对寻址方式
偏移地址 = 寄存器内容 + 偏移常数。
"COUNT[BX]" 或 "[BX + COUNT]"。
-a 100
139B:0100 mov bx, 0010
139B:0103 mov ax, 2[bx] ; 相当于 "mov ax, [0010 + 2]"
139B:0106
-p =100 2
AX=0000 BX=0010 CX=0000 DX=0000 SP=FFEE BP=0000 SI=0000 DI=0000
DS=139B ES=139B SS=139B CS=139B IP=0103 NV UP EI PL NZ NA PO NC
139B:0103 8B4702 MOV AX,[BX+02] DS:0012=0317
AX=0317 BX=0010 CX=0000 DX=0000 SP=FFEE BP=0000 SI=0000 DI=0000
DS=139B ES=139B SS=139B CS=139B IP=0106 NV UP EI PL NZ NA PO NC
139B:0106 0000 ADD [BX+SI],AL DS:0010=FF
-d 0010l6
139B:0010 FF 0D 17 03 FF 0D ......
7.2.6 基址变址寻址方式
偏移地址 = 基址寄存器内容 + 变址寄存器内容。
"[BX][DI]" 也可写成 "[BX + DI]"
-a 100
139B:0100 mov bx, 0010
139B:0103 mov di, 2
139B:0106 mov ax, [bx][di] ; 相当于 "mov ax, [0010 + 2]"
139B:0108
-p =100 3
AX=0317 BX=0010 CX=0000 DX=0000 SP=FFEE BP=0000 SI=0000 DI=0000
DS=139B ES=139B SS=139B CS=139B IP=0103 NV UP EI PL NZ NA PO NC
139B:0103 BF0200 MOV DI,0002
AX=0317 BX=0010 CX=0000 DX=0000 SP=FFEE BP=0000 SI=0000 DI=0002
DS=139B ES=139B SS=139B CS=139B IP=0106 NV UP EI PL NZ NA PO NC
139B:0106 8B01 MOV AX,[BX+DI] DS:0012=0317
AX=0317 BX=0010 CX=0000 DX=0000 SP=FFEE BP=0000 SI=0000 DI=0002
DS=139B ES=139B SS=139B CS=139B IP=0108 NV UP EI PL NZ NA PO NC
139B:0108 0000 ADD [BX+SI],AL DS:0010=FF
-d 0010l4
139B:0010 FF 0D 17 03 ....
7.2.7 相对基址变址寻址方式
偏移地址 = 基址寄存器内容 + 变址寄存器内容 + 偏移常数。
"MASK[BX][SI]" 或 "MASK[BX + SI]" 或 "[MASK + BX + SI]"
-a 100
139B:0100 mov bx, 0010
139B:0103 mov si, 2
139B:0106 mov ax, 2[bx][si] ; 相当于 "mov ax, [0010 + 2 + 2]"
139B:0109
-p =100 3
AX=0317 BX=0010 CX=0000 DX=0000 SP=FFEE BP=0000 SI=0000 DI=0002
DS=139B ES=139B SS=139B CS=139B IP=0103 NV UP EI PL NZ NA PO NC
139B:0103 BE0200 MOV SI,0002
AX=0317 BX=0010 CX=0000 DX=0000 SP=FFEE BP=0000 SI=0002 DI=0002
DS=139B ES=139B SS=139B CS=139B IP=0106 NV UP EI PL NZ NA PO NC
139B:0106 8B4002 MOV AX,[BX+SI+02] DS:0014=0DFF
AX=0DFF BX=0010 CX=0000 DX=0000 SP=FFEE BP=0000 SI=0002 DI=0002
DS=139B ES=139B SS=139B CS=139B IP=0109 NV UP EI PL NZ NA PO NC
139B:0109 0000 ADD [BX+SI],AL DS:0012=17
-d 0010l6
139B:0010 FF 0D 17 03 FF 0D ......
比例变址寻址方式: COUNT[ESI * 4] == [ ESI * 4 + COUNT] 基址比例变址寻址方式: [EAX][EDX * 8] == [EDX * 8 + EAX] 相对基址比例变址寻址方式: MASK[EBP][EDI * 4] == [EDI * 4 + EBP + MASK]
第 4 章 8. Binutils
将程序地址(VA)转换为源代码文件名和行号。 参数: - f: 显示函数名。 - s: 仅显示文件名,不包括路径。 - p: 以 Pretty-Print 方式显示。 - e: 文件名。
$ addr2line -pfe test 8028783
8.2 ar
用来创建、修改、提取静态库文件。
参数: - s: 创建或更新静态库索引,相当于 ranlib。 - r: 替换库文件中的老旧目标文件。 - c: 删除已有文件,创建新静态库。 - t: 显示包内容。 - x: 展开包成员。
生成静态库。
$ ar rs libfunc.a func.o
查看静态库组成。
$ ar t libfunc.a
展开静态库。
$ ar x libfunc.a
8.3 gcc
GNU 编译器。
参数: - c: 生成目标文件,但不做链接。 - g: 生成必要的调试信息。 - I: 添加 include 头文件搜索路径。(字母 i 大写) - L: 添加 library 搜索路径。 - l: 链接库文件。比如 -lm 表示链接 libm.so 。 - static: 静态链接。 - fPIC: 生成位置无关代码,通常是共享库。 - O: 优化代码,分为 0, 1, 2, 3 四个等级。 - M, MM: 查看依赖文件。 - Wall: 显示所以可能的警告信息。
编译程序。
$ gcc -g -Wall -std=c99 -I./include -I/usr/include/gc -o test -lgc main.o func.o
生成动态库。
$ gcc -c func.c
$ gcc -fPIC -shared -o libfunc.so func.o
8.4 ldd
通过模拟运行,查看可执行文件动态库加载。通常用于查看动态库加载失败信息。
参数: - v: 显示详细信息。
$ ldd test
8.5 nm
查看目标文件符号表中定义的符号。
参数: - l: 显示文件名和行号。 - n: 按地址排序。
$ nm func.o
8.6 objcopy
用于把一种目标文件中的内容复制到另一种类型的目标文件中。
8.7 objdump
显示目标文件信息,通常用于反汇编。
参数: - a: 显示静态库信息,类似 ls -l。 - g: 显示调试信息。 - x: 显示头部信息。 - d: 反汇编。 - l: 反汇编时输出文件名和行号。 - M: 反汇编参数,比如指定 intel 或 att 指令格式。 - S: 反汇编时输出 C 源码。
$ objdump -dS -M intel test
8.8 readelf
用于显示 ELF 文件详细信息。
参数: - a: 全部信息。 - h: ELF 头。 - l: Program 段。 - S: Section 头。 - x: 以二进制显示段内容。
- p: 以字符串显示段内容。显示 section table 信息。
$ readelf -S test
显示 section 二进制内容,可以是 -S 输出的段序号或段名称。
$ readelf -x 13 test
$ readelf -x .text test
显示 section 字符串内容。
$ readelf -p .strtab test
8.9 size
列出目标文件段和总体大小。
参数: - A: 更详细信息。
$ size test
8.10 strings
显示目标文件中的所有可打印字符串。
$ strings test
8.11 strip
删除目标文件符号。
参数: - s: 删除全部符号。 - d: 仅删除调试符号。
$ strip test
第 4 章 9. Manpages
虽然比不上 MSDN 豪华,但也是日常开发离不了的东西。
$ sudo apt-get install manpages-dev
然后就可以用如下命令查看标准库函数手册了
$ man 3 <function>
如:
man 3 printf
还可以用 -k 参数搜索所有相关的信息
$ man -k printf
printf (1) - format and print data
printf (3) - formatted output conversion
vsnprintf (3) - formatted output conversion
vsprintf (3) - formatted output conversion
vswprintf (3) - formatted wide-character output conversion
vwprintf (3) - formatted wide-character output conversion
wprintf (3) - formatted wide-character output conversion
查看函数所在手册文件
$ man -wa printf
/usr/share/man/man1/printf.1.gz
/usr/share/man/man3/printf.3.gz
ManPages Section:
1 - commands
2 - system calls
3 - library calls
4 - special files
5 - file formats and convertions
6 - games for linux
7 - macro packages and conventions
8 - system management commands
9 - others


更多信息请访问

