


首先是安装操作系统,要求很简单:
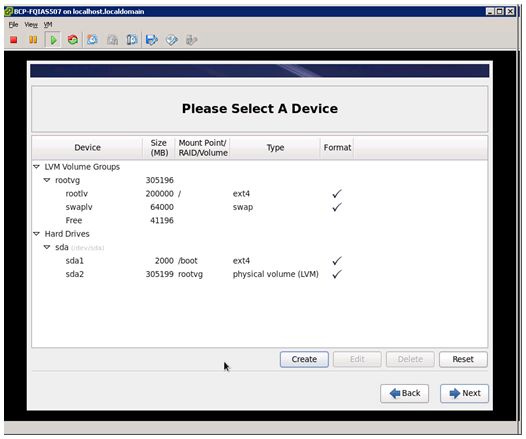
分区:
除了/boot或者相关用standard fs,其他的用lvm,懒省事,swap64G+(内存一般在128G+),其余的全部给/(根分区),除非有特殊要求。如图:
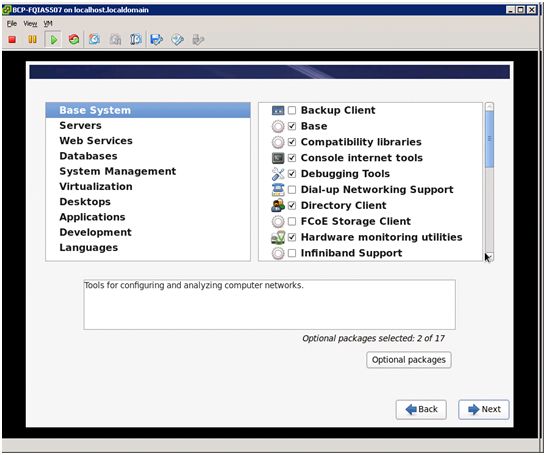
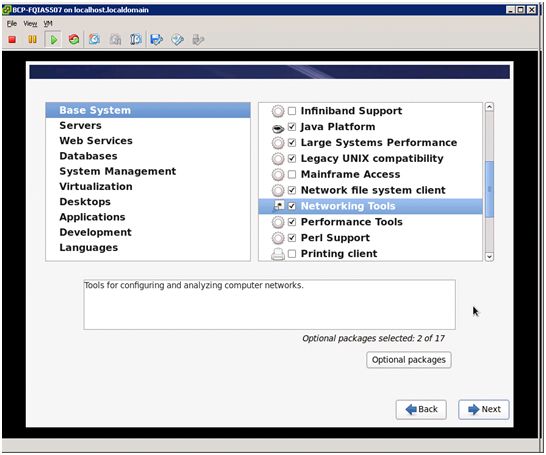
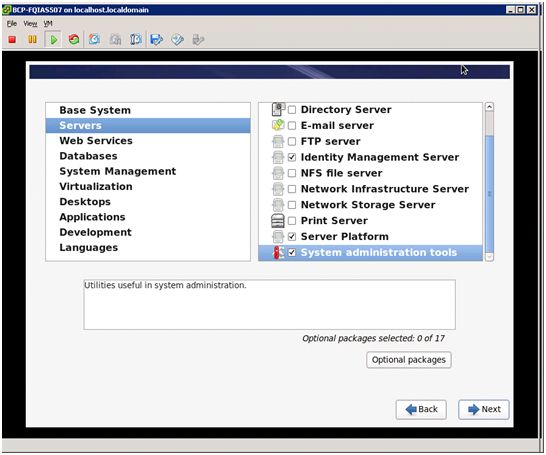
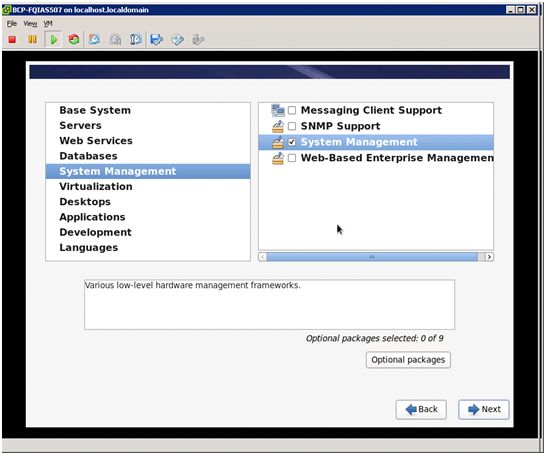
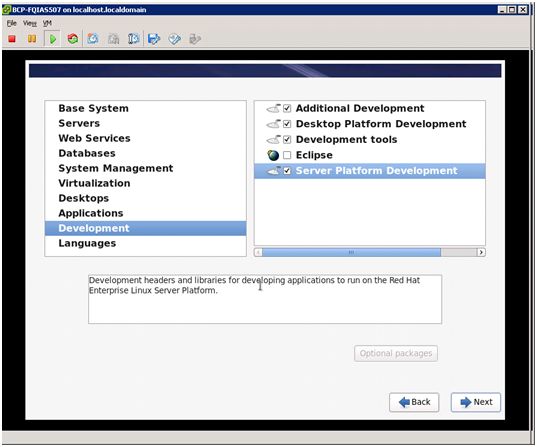
安装包一般如下图:

网卡bond,实现网卡的冗余
双网卡bonding,mode=1,bond0为publicIP bond1为PrivateIP
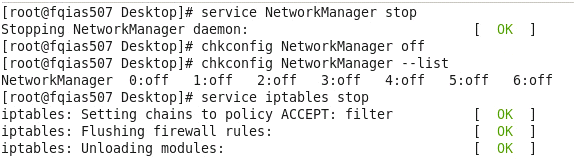
关闭以下服务:


还有SELINUX设置为disabled
YUM配置:
mkdir –p /mnt/rhel67
[root@woidb519leaderit]# cat /etc/yum.repos.d/yumlocal.repo
[rhel67]
name=rhel67
baseurl=file:///mnt/rhel67
enabled=1
gpgcheck=1
gpgkey=file:///mnt/rhel67/RPM-GPG-KEY-redhat-release
操作系统安装后还有以下操作:
1、创建用户组。以root身份运行以下命令:
/usr/sbin/groupadd-g 500 oinstall
/usr/sbin/groupadd-g 501 dba
/usr/sbin/groupadd-g 502 asmadmin
/usr/sbin/groupadd-g 503 asmdba
/usr/sbin/groupadd-g 504 asmoper
2.设置oracle账户的密码,用你自己的密码替代命令中出现的password:oracle
passwd oracle
passwd grid
3.创建oracle软件的拥有着账户(是不是感觉反了):
/usr/sbin/useradd-u 500 -g oinstall -G dba,asmdba oracle
/usr/sbin/useradd-u 501 -g oinstall -G asmadmin,asmdba,asmoper grid
配置安装 配置安装 用户的无密码用户的无密码 用户的无密码 ssh ssh访问
分别用每个用户在每个节点都执行:
在 wiodb511 上执行
===================================host1=====================================
mkdir ~/.ssh
chmod 700 ~/.ssh
ssh-keygen -trsa
ssh-keygen -tdsa
在 rac2 上执行
===================================host2=====================================
mkdir ~/.ssh
chmod 700 ~/.ssh
ssh-keygen -t rsa
ssh-keygen -t dsa
在 wiodb511 上执行
===================================host1=====================================
cat~/.ssh/id_rsa.pub >> ~/.ssh/authorized_keys
cat~/.ssh/id_dsa.pub >> ~/.ssh/authorized_keys
ssh woidb516 cat~/.ssh/id_rsa.pub >> ~/.ssh/authorized_keys
ssh woidb516 cat~/.ssh/id_dsa.pub >> ~/.ssh/authorized_keys
scp~/.ssh/authorized_keys woidb516:~/.ssh/authorized_keys
4. 创建 oracle 用户环境文件:
export EDITOR=vi
exportORACLE_SID=trade1
export ORACLE_BASE=/u01/app/oracle
exportORACLE_HOME=$ORACLE_BASE/product/11.2.0/db_1
exportLD_LIBRARY_PATH=$ORACLE_HOME/lib
exportPATH=$ORACLE_HOME/bin:/bin:/usr/bin:/usr/sbin:/usr/local/bin:/usr/X11R6/bin
#exportLANG=zh_CN.GBK
#exportLC_ALL="zh_CN.GBK"
exportNLS_LANG=AMERICAN_AMERICA.ZHS16GBK
umask 022
创建 grid 用户环境文件:
export EDITOR=vi
exportORACLE_SID=+ASM1
exportORACLE_BASE=/u01/11.2.0/grid
exportORACLE_HOME=/u01/app/grid/product/11.2.0/gd_1
exportLD_LIBRARY_PATH=$ORACLE_HOME/lib
exportPATH=$ORACLE_HOME/bin:/bin:/usr/bin:/usr/sbin:/usr/local/bin:/usr/X11R6/bin
#exportLANG=zh_CN.GBK
#exportLC_ALL="zh_CN.GBK"
exportNLS_LANG=AMERICAN_AMERICA.ZHS16GBK
umask 022
5、IP规划
# Do not removethe following line, or various programs
# that requirenetwork functionality will fail.
127.0.0.1localhost.localdomain localhost
#public ip
10.0.0.161 woidb515
10.0.0.163 woidb516
#private ip
10.0.253.68 woidb515-priv
10.0.253.69 woidb516-priv
#virtual ip
10.0.0.162 woidb515-vip
10.0.0.164 woidb516-vip
#scan ip
10.0.0.160 woidbtrd
6、集群名称:
cluwoidbtrd
woidbtrd
10.6.1.9
./runcluvfy.shstage -pre crsinst -n wiodb511 -fixup -verbose
./runcluvfy.shstage -post hwos -n wiodb511 -verbose
./runcluvfy.shstage -pre dbinst -n wiodb511
cluvfy stage-pre dbinst -n wiodb511
7. 如果你在DNS中配置了IP地址,那么,以root的身份在/etc/nsswitch.conf文件中做如下修改,改变主机查询的先后顺序:
Old:
hosts: files nisdns
New:
hosts: dns filesnis
8. 配置完etc/nsswitch.conf后,重启nscd服务
# /sbin/servicenscd restart
9,设置时间同步应用 设置时间同步应用设置时间同步应用
grid时间同步所需要的设置(11gR2新增检查项)
/etc/init.d/ntpdstop
chkconfig ntpdoff
mv /etc/ntp.conf/etc/ntp.conf.bak
10. 以root用户的身份在/etc/sysctl.conf中配置以下参数。如果任一参数已经存在于该配置文件中,取两个数值中较大的那一个作为修改后的值:
fs.aio-max-nr =1048576
fs.file-max =6815744
kernel.shmmni =4096
kernel.sem = 25032000 100 128
net.ipv4.ip_local_port_range= 9000 65500
net.core.rmem_default= 262144
net.core.rmem_max= 4194304
net.core.wmem_default= 262144
net.core.wmem_max= 1048586
注:最新的相关参数的信息在MyOracle Support的ExtNote:169706.1中。
以root身份执行以下命令使参数生效:
#/sbin/sysctl -p
在所有的节点上重复以上操作
11. 在vi/etc/security/limits.conf中添加以下参数:
grid soft nproc4096
grid hard nproc16384
grid soft nofile4096
grid hard nofile65536
oracle softnproc 4096
oracle hardnproc 16384
oracle softnofile 4096
oracle hardnofile 65536
添加或编辑vi /etc/pam.d/login文件,添加以下内容:
session requiredpam_limits.so
12. 创建oracleinventory目录
以root身份执行以下命令创建oracleinventory目录:
mkdir -p/u01/11.2.0
chown -Rgrid:oinstall /u01/11.2.0
chmod -R 775/u01/11.2.0
mkdir -p/u01/app/grid
chown -Rgrid:oinstall /u01/app/grid
chmod -R 775/u01/app/grid
mkdir -p/u01/app/oracle
chown -Roracle:oinstall /u01/app/oracle
chmod -R 775/u01/app/oracle
mkdir -p/u01/app/grid/product/11.2.0/gd_1
chown -Rgrid:oinstall /u01/app/grid/product/11.2.0/gd_1
chmod -R 775/u01/app/grid/product/11.2.0/gd_1
mkdir -p/u01/app/oracle/product/11.2.0/db_1
chown -Roracle:oinstall /u01/app/oracle/product/11.2.0/db_1
chmod -R 775/u01/app/oracle/product/11.2.0/db_1
13.以下的命令可以列出当前已经安装的包:
rpm -q binutilsgcc gcc-c++ glibc libstdc++-devel makesysstat xscreensaver libaio libaio-devel gcc43 glibc libgcc43 libstdc++43libstdc++33 ksh libstdc++43 libstdc++43 libgcc43
共享存储配置
配置文件如下:
[root@tjdb11g1~]# cat /etc/udev/rules.d/99-oracle-asmdevices.rules
#All volumeswhich starts with orarac* #
ENV{DM_NAME}=="oracmpl*",OWNER:="grid", GROUP:="asmadmin", MODE:="0660"
其中oracmpl为多路径配置,巨日如下:
# This is abasic configuration file with some examples, for device mapper
# multipath.
# For a completelist of the default configuration values, see
#/usr/share/doc/device-mapper-multipath-0.4.9/multipath.conf.defaults
# For a list ofconfiguration options with descriptions, see
#/usr/share/doc/device-mapper-multipath-0.4.9/multipath.conf.annotated
#
# REMEMBER:After updating multipath.conf, you must run
#
# servicemultipathd reload
#
# for thechanges to take effect in multipathd
## By default,devices with vendor = "IBM" and product = "S/390.*" are
## blacklisted.To enable mulitpathing on these devies, uncomment the
## followinglines.
#blacklist_exceptions{
# device {
# vendor "IBM"
# product "S/390.*"
# }
#}
## Use userfriendly names, instead of using WWIDs as names.
defaults {
user_friendly_names yes
}
##
## Here is anexample of how to configure some standard options.
##
#
#defaults {
# udev_dir /dev
# polling_interval 10
# path_selector "round-robin 0"
# path_grouping_policy multibus
# getuid_callout "/lib/udev/scsi_id --whitelisted--device=/dev/%n"
# prio alua
# path_checker readsector0
# rr_min_io 100
# max_fds 8192
# rr_weight priorities
# failback immediate
# no_path_retry fail
# user_friendly_names yes
#}
##
## The wwid linein the following blacklist section is shown as an example
## of how toblacklist devices by wwid. The 2 devnodelines are the
## compiled indefault blacklist. If you want to blacklist entire types
## of devices,such as all scsi devices, you should use a devnode line.
## However, ifyou want to blacklist specific devices, you should use
## a wwidline. Since there is no guarantee that aspecific device will
## not changenames on reboot (from /dev/sda to /dev/sdb for example)
## devnode linesare not recommended for blacklisting specific devices.
##
blacklist {
wwid 26353900f02796769
devnode"^(ram|raw|loop|fd|md|dm-|sr|scd|st)[0-9]*"
devnode "^hd[a-z]"
}
multipaths {
multipath {
wwid 36000d310014ec400000000000000000b
alias oracmpl_100g
}
multipath {
wwid 36000d310014ec400000000000000000c
alias oracmpl_500g_data1
}
multipath {
wwid 36000d310014ec400000000000000000d
alias oracmpl_500g_data2
}
multipath {
wwid 36000d310014ec400000000000000000e
alias oracmpl_500g_fra1
}
multipath {
wwid 36000d310014ec400000000000000000f
alias oracmpl_500g_fra2
}
multipath {
wwid 36000d310014ec4000000000000000010
alias lun_cmpl_2t
}
}
#multipaths {
# multipath {
# wwid 3600508b4000156d700012000000b0000
# alias yellow
# path_grouping_policy multibus
# path_checker readsector0
# path_selector "round-robin 0"
# failback manual
# rr_weight priorities
# no_path_retry 5
# }
# multipath {
# wwid 1DEC_____321816758474
# alias red
# }
#}
#devices {
# device {
# vendor "COMPAQ "
# product "HSV110 (C)COMPAQ"
# path_grouping_policy multibus
# getuid_callout "/lib/udev/scsi_id --whitelisted--device=/dev/%n"
# path_checker readsector0
# path_selector "round-robin 0"
# hardware_handler "0"
# failback 15
# rr_weight priorities
# no_path_retry queue
# }
# device {
# vendor "COMPAQ "
# product "MSA1000 "
# path_grouping_policy multibus
# }
#}
显示如下:
[root@tjdb11g1~]# multipath -ll
oracmpl_500g_fra2(36000d310014ec400000000000000000f) dm-9 COMPELNT,Compellent Vol
size=500Gfeatures='1 queue_if_no_path' hwhandler='0' wp=rw
`-+-policy='round-robin 0' prio=1 status=active
|- 1:0:3:6 sdm 8:192 active ready running
|- 1:0:0:6 sdc 8:32 active ready running
|- 2:0:2:6 sdw 65:96 active ready running
`- 2:0:3:6 sdy 65:128 active ready running
oracmpl_500g_fra1(36000d310014ec400000000000000000e) dm-5 COMPELNT,Compellent Vol
size=500Gfeatures='1 queue_if_no_path' hwhandler='0' wp=rw
`-+-policy='round-robin 0' prio=1 status=active
|- 1:0:1:5 sdg 8:96 active ready running
|- 1:0:2:5 sdk 8:160 active ready running
|- 2:0:0:5 sdq 65:0 active ready running
`- 2:0:1:5 sdu 65:64 active ready running
lun_cmpl_2t(36000d310014ec4000000000000000010) dm-6 COMPELNT,Compellent Vol
size=2.0Tfeatures='1 queue_if_no_path' hwhandler='0' wp=rw
`-+-policy='round-robin 0' prio=1 status=active
|- 1:0:2:2 sdi 8:128 active ready running
|- 1:0:1:2 sde 8:64 active ready running
|- 2:0:0:2 sdo 8:224 active ready running
`- 2:0:1:2 sds 65:32 active ready running
oracmpl_100g(36000d310014ec400000000000000000b) dm-8 COMPELNT,Compellent Vol
size=100Gfeatures='1 queue_if_no_path' hwhandler='0' wp=rw
`-+-policy='round-robin 0' prio=1 status=active
|- 1:0:1:1 sdd 8:48 active ready running
|- 1:0:2:1 sdh 8:112 active ready running
|- 2:0:0:1 sdn 8:208 active ready running
`- 2:0:1:1 sdr 65:16 active ready running
oracmpl_500g_data2(36000d310014ec400000000000000000d) dm-4 COMPELNT,Compellent Vol
size=500Gfeatures='1 queue_if_no_path' hwhandler='0' wp=rw
`-+-policy='round-robin 0' prio=1 status=active
|- 1:0:3:4 sdl 8:176 active ready running
|- 1:0:0:4 sdb 8:16 active ready running
|- 2:0:3:4 sdx 65:112 active ready running
`- 2:0:2:4 sdv 65:80 active ready running
oracmpl_500g_data1(36000d310014ec400000000000000000c) dm-7 COMPELNT,Compellent Vol
size=500Gfeatures='1 queue_if_no_path' hwhandler='0' wp=rw
`-+- policy='round-robin0' prio=1 status=active
|- 1:0:1:3 sdf 8:80 active ready running
|- 1:0:2:3 sdj 8:144 active ready running
|- 2:0:0:3 sdp 8:240 active ready running
`- 2:0:1:3 sdt 65:48 active ready running
接着就是安装了
