


点击上方蓝字关注我们
全文字数: 2338字 阅读用时: 8分钟
背景
每个项目都有不同的安全策略,自动化策略的检查跟实施变得尤其重要,在往 Kubernetes 部署的时候,我正在寻求可以应用在 Kubernetes 中去做一些类似策略控制的动作,这个时候通过Google 去找到 OPA 并且写下这篇文章。
概览
Open Policy Agent(OPA)是 CNCF(云原生计算基金会)下开源的通用策略引擎。OPA 提供了一种高级声明式的语言 (Rego),可以将 policy 指定为代码,真正意义上的 policy as code,提供了简单的 API 将 policy 从软件中抽离出来,我们可以使用 OPA 在微服务、Kubernetes、CI/CD pipelines、API gateways 等方面去实施策略。
概念
Rego
Rego 是 OPA 策略所用到的声明语言。Repo 是专门为在复杂的分层数据结构上表达策略而构建的。
举个例子,以下 Rego 代码不允许 kind 是 Service 的使用 NodePort:
package main
deny[msg] {
input.kind = "Service"
input.spec.type = "NodePort"
msg = sprintf("%v %v - NodePort Services are not permitted", [input.kind, input.metadata.name])
}
conftest
conftest 是一个工具,可以帮助我们针对结构化配置数据编写测试,例如可以为 Kubernetes 配置、Tekton Pipeline 定义、Terraform 代码等结构化数据编写测试。conftset 依赖于 OPA 代理的 Rego 语言来编写断言,源码跟链接我放在 reference 上。
OPA Gatekeeper
OPA Gatekeeper 是一个验证 webhook,他强制执行 OPA 执行的基于 CRD 的 policy, 非常好的将 OPA 和 Kubernetes 进行了集成。Gatekeeper 提供了:
可扩展、参数化的策略定义方式。
通过 CRD 定义了constraints (约束), 可以很方便的创建通用的策略。
通过 CRD 定义了 constraints template (约束模版), 增加了一些灵活性。
提供了审计功能。
思想
Policy As Code.
OPA 的优缺点
对我个人来说,OPA 最大的优点是声明性地指定策略,无需重新编译或部署就可以随时对其进行更新,并自动执行。
最大的缺点没办法直接做到用户验证跟权限管理。
OPA 跟 CI/CD 集成
在 Overview 里面我们提到了 OPA 可以跟 CI/CD 集成,在 CI/CD 集成的话,可以在将应用部署到 Kubernetes 之前就可以检查到我们应用部署的所有资源是否符合我们的预期,在 CI 里面拒绝不符合策略的 manifest 的提交,这里我们使用 GitLab 的 Pipeline 去详细讲讲怎么使用 OPA 跟 CI 集成去强制要求 namespace 必须是小写。

首先我们需要一个可以让我们运行策略检查的 docker image, 这个 docker image 安装了 conftest 工具,我们将此镜像推送到仓库中:
image: docker:stable
variables:
IMAGE_URL: xx/k8s-docker
stages:
- build_image
before_script:
- docker info
build_image:
image: docker:dind
services:
- docker:dind
stage: build_image
script:
- mkdir ~/.docker
- echo $DOCKER_AUTH_CONFIG > ~/.docker/config.json
- TAG=${CI_COMMIT_TAG:-$CI_COMMIT_SHORT_SHA}
- wget https://github.com/instrumenta/conftest/releases/download/v$CONFTEST_VER/conftest_${CONFTEST_VER}_Linux_x86_64.tar.gz
- tar xzf conftest_${CONFTEST_VER}_Linux_x86_64.tar.gz
- mv conftest /usr/local/bin/conftest
- rm conftest_${CONFTEST_VER}_Linux_x86_64.tar.gz
- docker build -t $IMAGE_URL:$TAG --build-arg KUSTOMIZE_VER=$CI_COMMIT_TAG .
- docker push demo-docker:$TAG
tags:
- docker
然后我们新建一个叫 rego-policy 的 git repo 去存放 Rego policy,现在我们设置一下 policy:
namespace 的 name 必须是小写,并且 name 必须以中横杠为分隔符。
要求 Deployment/DaemonSet/StatefulSet/Pod 都必须有我们选定的 label.
允许 servicesadmin 这个用户组下的用户做任何操作。
# 第一个文件是namespace的文件:namespace.rego
package main
deny[msg] {
input.kind = "Namespace"
input.metadata.name != lower(input.metadata.name)
msg = sprintf("%v %v - Name should be lowercase", [input.kind, input.metadata.name])
}
deny[msg] {
input.kind = "Namespace"
count(split(input.metadata.name,"-")) != 2
msg = sprintf("%v %v - Name should be in format '<organization>-<function>'", [input.kind, input.metadata.name])
}
# 第二个文件是resource的文件:resource.rego
package main
deny[msg] {
kinds := {"Deployment", "DaemonSet", "StatefulSet", "Pod"}
kinds[_] = input.kind
provided := {label | input.metadata.labels[label]}
required := {"name", "organization", "function", "owner"}
missing := required - provided
count(missing) > 0
msg = sprintf("%v %v - You must provide labels: %v", [input.kind, input.metadata.name, missing])
}
# 第二个文件是用户组的文件:user.rego
package authz
allow {
input.group[_] == "servicesadmin"
}
最后一步,我们定义 CI Pipeline:.GitLab-ci.yml 文件,当开发提交了代码到 GitLab 中,这个 pipeline 会使用上面的 docker image 去运行,然后使用 conftest 这个工具去检查是否符合我们 repo-policy 这个 git repo 定义的所有 policy,如果符合,则这次构建成功,否则构建失败。构建成功之后,我们合并此次代码到 master 分支,然后 GitOps 会监控到 master 分支的变化部署到 Kubernetes 中。
---
before_script:
- git config --global url."https://GitLab-ci-token:${CI_JOB_TOKEN}@GitLab.xxxm/".insteadOf "git@git.xx:"
image: xx-xx/demo-docker:commitid
stages:
- test
test:
stage: test
tags:
- docker
script:
- git clone git@git.xx:demo/rego-policy.git
- cat manifests.yaml | conftest -p ./rego-policy test -
OPA 跟 Kubernetes 集成
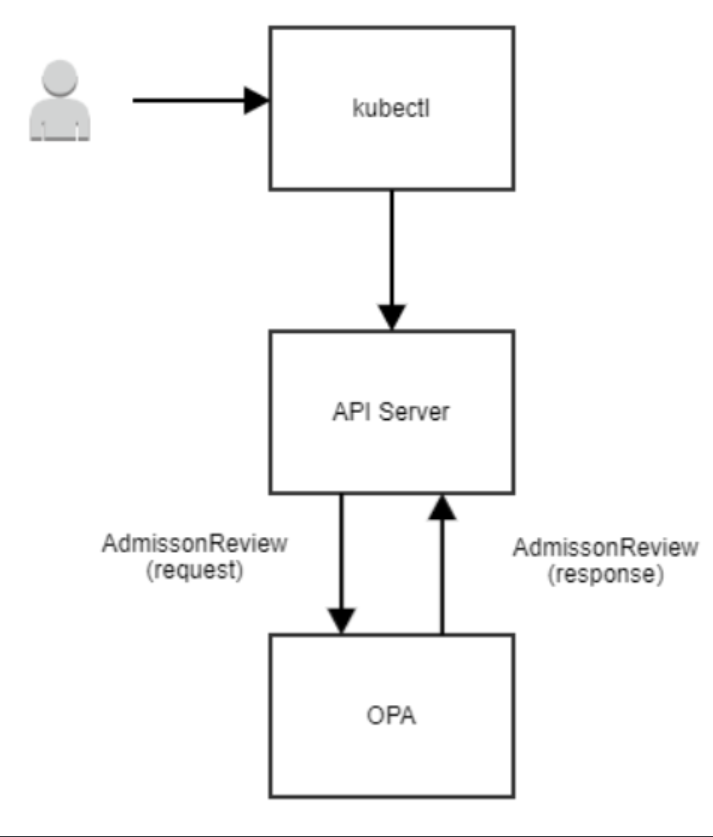
将 OPA 跟 Kubernetes 集成的好处是,如果运维或者其他人绕过 CI 的检查直接将资源部署进 Kubernetes 中,我们使用 OPA Gatekeeper 将 OPA 跟 Kubernetes 的 Admission Controller 集成,去实现 Kubernetes 中将 webhook 请求对象发给 OPA,然后 OPA 使用 policy 决策之后返回数据。
安装
kubectl apply -f https://raw.githubusercontent.com/open-policy-agent/gatekeeper/master/deploy/gatekeeper.yaml
简单使用
在定义约束之前,必须先定义一个 ConstraintTemplate,它描述了强制约束的 Rego 和约束的 template。约束的 template 允许管理员调整约束的行为,就像我们调整函数的参数一样,下面是一个例子,它要求约束中描述的所有标签都必须出现:
apiVersion: templates.gatekeeper.sh/v1beta1
kind: ConstraintTemplate
metadata:
name: k8srequiredlabels
spec:
crd:
spec:
names:
kind: K8sRequiredLabels
listKind: K8sRequiredLabelsList
plural: k8srequiredlabels
singular: k8srequiredlabels
validation:
# Schema for the `parameters` field
openAPIV3Schema:
properties:
labels:
type: array
items: string
targets:
- target: admission.k8s.gatekeeper.sh
rego: |
package k8srequiredlabels
violation[{"msg": msg, "details": {"missing_labels": missing}}] {
provided := {label | input.review.object.metadata.labels[label]}
required := {label | label := input.parameters.labels[_]}
missing := required - provided
count(missing) > 0
msg := sprintf("you must provide labels: %v", [missing])
}
然后我们使用 kubectl apply -f 来把上面的约束模板部署到 Kubernetes 中。
现在我们使用 Contraints 通知 Gatekeeper 强制实施 ConstraintTemplate,以及如何实施,这个约束使用上面的 k8srequiredlabels 约束模板,以确保在所有 namespace 都定义了 gatekeeper 的 label。
apiVersion: constraints.gatekeeper.sh/v1beta1
kind: K8sRequiredLabels
metadata:
name: ns-must-have-gk
spec:
match:
kinds:
- apiGroups: [""]
kinds: ["Namespace"]
parameters:
labels: ["gatekeeper"]
同样的,我们使用 kubectl apply -f 来把上面的约束部署到 Kubernetes 中。
Some OPA Examples
上面说 OPA 跟 CI/CD 或者跟 Kubernetes 集成,让很多人都以为 OPA 只是一个跟 Kubernetes 集成定义安全策略的工具,但 OPA 的应用场景很多,他是独立在 Kubernetes 之外的,我们可以应用来跟 terraform 集成运行单元测试,跟 elasticsearch 集成做 data filtering 或者 kafka 的 topic authorization 等等。
例子1:安全策略之:仅允许从给定的仓库拉取镜像
deny[reason] {
some container
input_containers[container]
not startswith(container.image, "artifactory-domain.net/")
reason := "container image refers to illegal registry (must be artifactory-domain.net)"
}
input_containers[container] {
container := input.request.object.spec.containers[_]
}
input_containers[container] {
container := input.request.object.spec.template.spec.containers[_]
}
例子2:实现 terraform 创建资源的单元测试
由于项目大部分 team 都有写 terraform 的知识,我们跳过 terraform 写资源这一步,初始化 terraform,要求它计算将做哪些更改,并且将输出保存到 tfplan.libary.
terraform init
terraform plan --out tfplan.bina
将 terraform plan 转化成 JSON
terraform show -json tfplan.binary > tfplan.json
接下来,我们就可以看到 terraform plan 生成大量信息,包括像 resource_change
package terraform.analysis
import input as tfplan
# 自动授权可接受分数
blast_radius = 30
# weights assigned for each operation on each resource-type
weights = {
"aws_autoscaling_group": {"delete": 100, "create": 10, "modify": 1},
"aws_instance": {"delete": 10, "create": 1, "modify": 1}
}
# 在计算中要考虑的资源类型
resource_types = {"aws_autoscaling_group", "aws_instance", "aws_iam", "aws_launch_configuration"}
# 没有对IAM进行任何更改的话,授权将保持不变 default authz = false
authz {
score < blast_radius
not touches_iam }
# 以删除、创建、修改的加权和计算Terraform plan的得分
score = s {
all := [ x |
some resource_type
crud := weights[resource_type];
del := crud["delete"] * num_deletes[resource_type];
new := crud["create"] * num_creates[resource_type];
mod := crud["modify"] * num_modifies[resource_type];
x := del + new + mod
]
s := sum(all)
}
# IAM是否有任何变化
touches_iam {
all := resources["aws_iam"]
count(all) > 0
}
# 给定类型的所有资源的列表 resources[resource_type] = all {
some resource_type
resource_types[resource_type]
all := [name |
name:= tfplan.resource_changes[_]
name.type == resource_type
]
}
# 给定类型的资源的创建数量
num_creates[resource_type] = num {
some resource_type
resource_types[resource_type]
all := resources[resource_type]
creates := [res | res:= all[_]; res.change.actions[_] == "create"]
num := count(creates)
}
# 给定类型的资源的删除次数
num_deletes[resource_type] = num {
some resource_type
resource_types[resource_type]
all := resources[resource_type]
deletions := [res | res:= all[_]; res.change.actions[_] == "delete"]
num := count(deletions)
}
# 对给定类型的资源的修改次数 num_modifies[resource_type] = num {
some resource_type
resource_types[resource_type]
all := resources[resource_type]
modifies := [res | res:= all[_]; res.change.actions[_] == "update"]
num := count(modifies)
}
最后一步,评估策略查看通过策略测试并且检查得分。
opa eval --data terraform.rego --input tfplan_large.json "data.terraform.analysis.authz" opa eval --data terraform.rego --input tfplan_large.json "data.terraform.analysis.score"
后话
上面讲了 OPA 分别跟 CI/CD 和 Kubernetes 集成,我们还可以将 OPA 在 Kubernetes 的 RBAC 基础上实现更加灵活的 AA,在多集群环境中,可以通过策略来限制不同租户能够使用的集群等。
Reference
https://www.openpolicyagent.org/docs/latest/
https://github.com/instrumenta/conftest
https://github.com/open-policy-agent/gatekeeper
