


前言
作为一个国产数据库爱好者,肯定不会放过国产数据库中名列前茅的TiDB。
由于平常工作中,并没有合适的实战机会,所以通过来考试认证来学习并检验自己的学习成果。
遂,准备一套测试环境,尽可能去实践课程里讲的内容,可能更容易理解和消化。
TiDB简介
先大概看一下改款数据库的架构组件,因为会涉及到我后面机器资源的准备和规划。
本来想偷个懒,就用一台虚拟机快速搭建个伪分布式环境,一个前辈说,一台机器玩什么分布式,没有灵魂,至少得3台吧。哈哈哈。所以我准备了3台虚拟机。
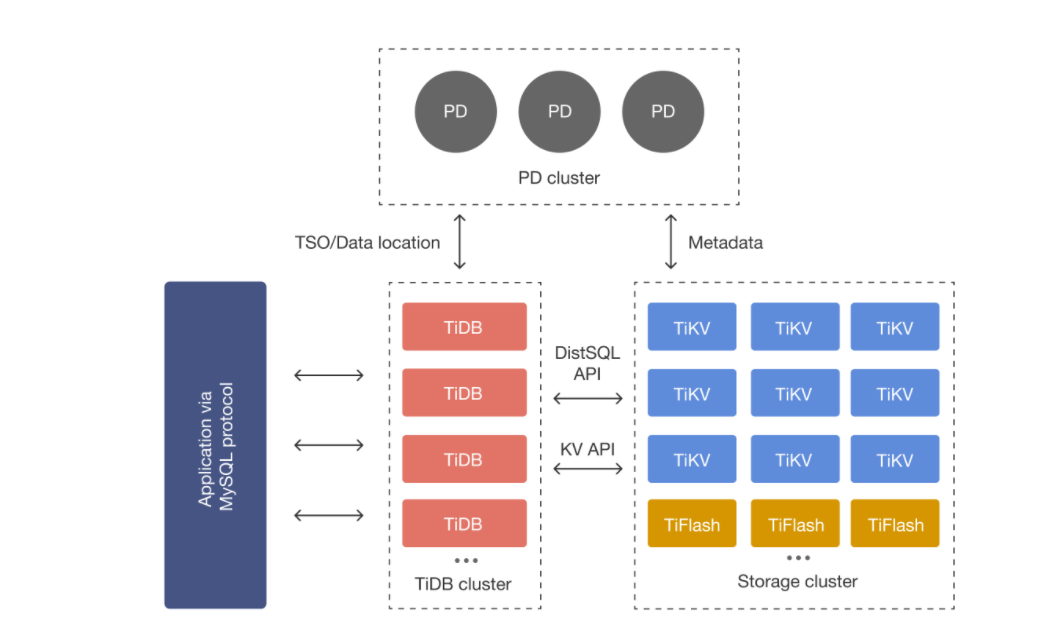
1.TiDB Server:SQL 层,对外暴露 MySQL 协议的连接 endpoint,负责接受客户端的连接,执行 SQL 解析和优化,最终生成分布式执行计划。TiDB 层本身是无状态的,实践中可以启动多个 TiDB 实例,通过负载均衡组件(如 LVS、HAProxy 或 F5)对外提供统一的接入地址,客户端的连接可以均匀地分摊在多个 TiDB 实例上以达到负载均衡的效果。TiDB Server 本身并不存储数据,只是解析 SQL,将实际的数据读取请求转发给底层的存储节点 TiKV(或 TiFlash)。
2.PD (Placement Driver) Server:整个 TiDB 集群的元信息管理模块,负责存储每个 TiKV 节点实时的数据分布情况和集群的整体拓扑结构,提供 TiDB Dashboard 管控界面,并为分布式事务分配事务 ID。PD 不仅存储元信息,同时还会根据 TiKV 节点实时上报的数据分布状态,下发数据调度命令给具体的 TiKV 节点,可以说是整个集群的“大脑”。此外,PD 本身也是由至少 3 个节点构成,拥有高可用的能力。建议部署奇数个 PD 节点。
3.TiKV Server:负责存储数据,从外部看 TiKV 是一个分布式的提供事务的 Key-Value 存储引擎。存储数据的基本单位是 Region,每个 Region 负责存储一个 Key Range(从 StartKey 到 EndKey 的左闭右开区间)的数据,每个 TiKV 节点会负责多个 Region。TiKV 的 API 在 KV 键值对层面提供对分布式事务的原生支持,默认提供了 SI (Snapshot Isolation) 的隔离级别,这也是 TiDB 在 SQL 层面支持分布式事务的核心。TiDB 的 SQL 层做完 SQL 解析后,会将 SQL 的执行计划转换为对 TiKV API 的实际调用。所以,数据都存储在 TiKV 中。另外,TiKV 中的数据都会自动维护多副本(默认为三副本),天然支持高可用和自动故障转移。
4.TiFlash:TiFlash 是一类特殊的存储节点。和普通 TiKV 节点不一样的是,在 TiFlash 内部,数据是以列式的形式进行存储,主要的功能是为分析型的场景加速。
初步参考官方问题的最小拓扑规划。
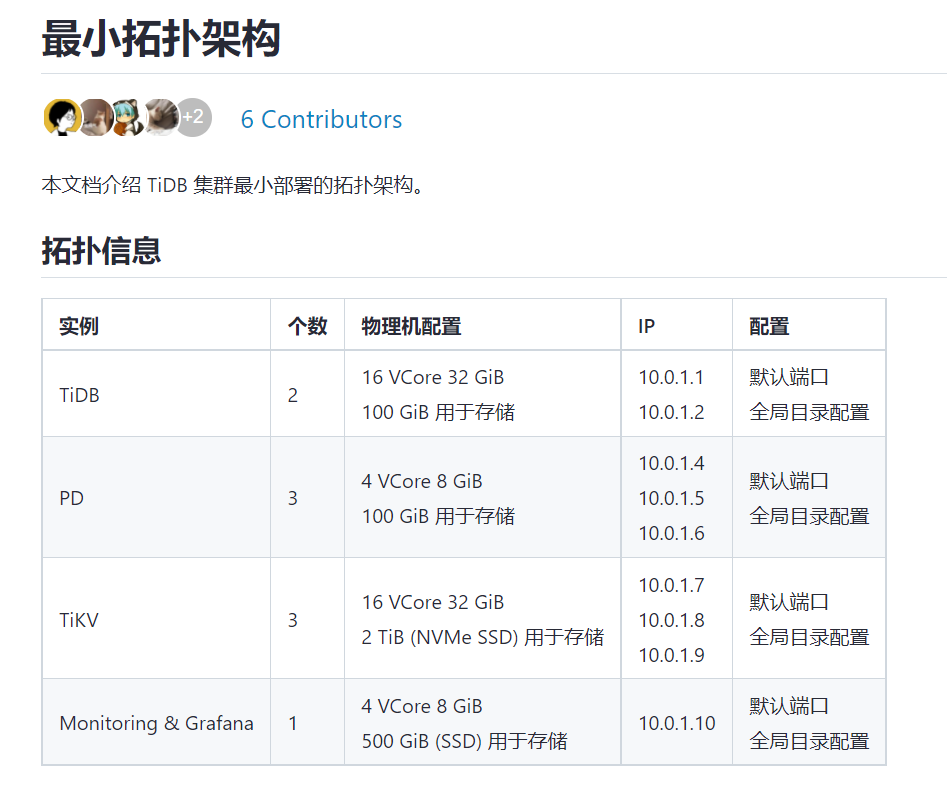
1. 主机资源
准备了3台虚拟机,部署2个TiDB,3个PD,3个TiKV。
| ip | hostname | 配置 | 节点 |
|---|---|---|---|
| 192.168.3.232 | gsm1 | 2C8G100G | TiUP,TiDB,PD,TiKV |
| 192.168.3.234 | shard1 | 2C8G100G | TiDB,PD,TiKV |
| 192.168.3.235 | shard2 | 2C8G100G | 监控,PD,TiKV |
使用TiUP来离线部署和管理数据库。
2. 安装前准备
参考:https://docs.pingcap.com/zh/tidb/v6.1/check-before-deployment
2.1 关闭防火墙
systemctl stop firewalld
systemctl disable firewalld
2.2 创建用户tidb&配置sudo权限
useradd tidb
echo "tidb" | passwd --stdin tidb

cat >> /etc/sudoers << EOF
tidb ALL=(ALL) NOPASSWD: ALL
EOF
2.3 创建目录
mkdir /tidb
mkdir /tmp/tidb
chmod -R 777 /tmp/tid
2.4 修改sysctl.conf和limits.conf
echo "fs.file-max = 1000000">> /etc/sysctl.conf
echo "net.core.somaxconn = 32768">> /etc/sysctl.conf
echo "net.ipv4.tcp_tw_recycle = 0">> /etc/sysctl.conf
echo "net.ipv4.tcp_syncookies = 0">> /etc/sysctl.conf
echo "vm.overcommit_memory = 1">> /etc/sysctl.conf
sysctl -p


cat << EOF >>/etc/security/limits.conf
tidb           soft    nofile          1000000
tidb           hard    nofile          1000000
tidb           soft    stack          32768
tidb           hard    stack          32768
EOF
2.5 配置免密登录
#在三台机器上生成密钥
[tidb@gsm1 ~]$ ssh-keygen -t rsa
[tidb@sd1 ~]$ ssh-keygen -t rsa
[tidb@sd2 ~]$ ssh-keygen -t rsa

#在中控机上配置免密登录
[tidb@gsm1 ~]$ ssh-copy-id -i ~/.ssh/id_rsa.pub 192.168.3.232
[tidb@gsm1 ~]$ ssh-copy-id -i ~/.ssh/id_rsa.pub 192.168.3.234
[tidb@gsm1 ~]$ ssh-copy-id -i ~/.ssh/id_rsa.pub 192.168.3.235
[tidb@gsm1 ~]$ cat /etc/hosts
127.0.0.1   localhost localhost.localdomain localhost4 localhost4.localdomain4
::1         localhost localhost.localdomain localhost6 localhost6.localdomain6

192.168.3.232 gsm1
192.168.3.234 sd1
192.168.3.235 sd2
[tidb@gsm1 ~]$ ssh gsm1
[tidb@gsm1 ~]$ exit
logout
Connection to gsm1 closed.
[tidb@gsm1 ~]$ ssh 192.168.3.234
Last login: Fri Nov 10 17:26:28 2023
[tidb@sd1 ~]$ exit
logout
Connection to 192.168.3.234 closed.
[tidb@gsm1 ~]$ ssh 192.168.3.235
Last login: Fri Nov 10 17:26:35 2023
[tidb@sd2 ~]$ exit
logout
Connection to 192.168.3.235 closed.
3. 安装部署
参考:https://docs.pingcap.com/zh/tidb/stable/production-deployment-using-tiup
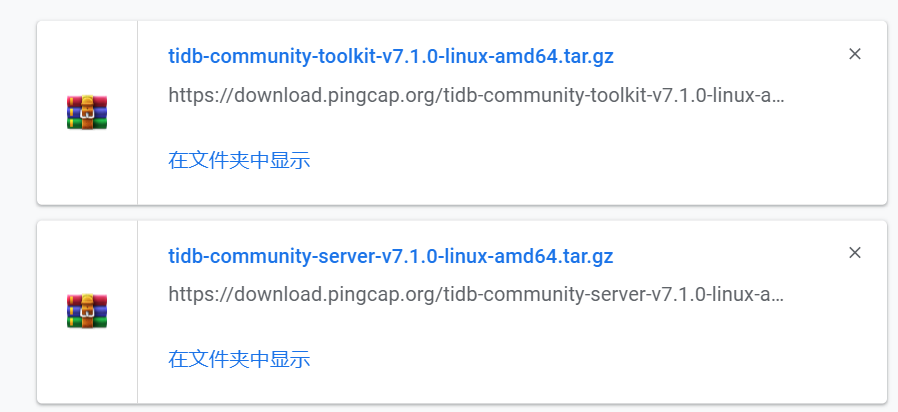
3.1 下载软件包
3.2 部署TiUP组件
如果是通过官方下载页面下载的离线软件包,需要将 TiDB-community-server 软件包和 TiDB-community-toolkit 软件包合并到离线镜像中。
[tidb@gsm1 soft]$ ll
total 2718488
-rw-r--r--. 1 root root 1386122312 Nov 17 17:17 tidb-community-server-v7.1.0-linux-amd64.tar.gz
-rw-r--r--. 1 root root 1397598668 Nov 17 17:17 tidb-community-toolkit-v7.1.0-linux-amd64.tar.gz
[tidb@gsm1 soft]$ tar zxvf tidb-community-server-v7.1.0-linux-amd64.tar.gz
[tidb@gsm1 soft]$ sh tidb-community-server-v7.1.0-linux-amd64/local_install.sh
[tidb@gsm1 soft]$ source ~/.bash_profile
[tidb@gsm1 soft]$ cat ~/.bash_profile
# .bash_profile

# Get the aliases and functions
if [ -f ~/.bashrc ]; then
	. ~/.bashrc
fi

# User specific environment and startup programs

PATH=$PATH:$HOME/.local/bin:$HOME/bin

export PATH
export PATH=/home/tidb/.tiup/bin:$PATH

[tidb@gsm1 soft]$ tar xf tidb-community-toolkit-v7.1.0-linux-amd64.tar.gz
[tidb@gsm1 soft]$ ls -ld tidb-community-server-v7.1.0-linux-amd64 tidb-community-toolkit-v7.1.0-linux-amd64
drwxr-xr-x. 3 tidb tidb 4096 May 31 15:17 tidb-community-server-v7.1.0-linux-amd64
drwxr-xr-x. 3 tidb tidb 4096 May 31 15:22 tidb-community-toolkit-v7.1.0-linux-amd64
[tidb@gsm1 soft]$ cd tidb-community-server-v7.1.0-linux-amd64/
[tidb@gsm1 tidb-community-server-v7.1.0-linux-amd64]$ cp -rp keys ~/.tiup/
[tidb@gsm1 tidb-community-server-v7.1.0-linux-amd64]$ tiup mirror merge ../tidb-community-toolkit-v7.1.0-linux-amd64
3.3 编辑配置文件
从这拷贝模板-https://docs.pingcap.com/zh/tidb/stable/minimal-deployment-topology,或者也可以参考官方安装手册输入命令生成,然后根据实际情况修改。
[tidb@gsm1 tidb-community-server-v7.1.0-linux-amd64]$ cat topology.yaml
global:
  user: "tidb"
  ssh_port: 22
  deploy_dir: "/tidb/tidb-deploy"
  data_dir: "/tidb/tidb-data"

pd_servers:
  - host: 192.168.3.232
  - host: 192.168.3.234
  - host: 192.168.3.235

tidb_servers:
  - host: 192.168.3.232
  - host: 192.168.3.234

tikv_servers:
  - host: 192.168.3.232
  - host: 192.168.3.234
  - host: 192.168.3.235

monitoring_servers:
  - host: 192.168.3.235

grafana_servers:
  - host: 192.168.3.235

alertmanager_servers:
  - host: 192.168.3.235
3.4 检查集群&修复
看起来风险不少惹,但是好像安装上不阻塞。
#检查check
##不懂这里为什么用root用户,命名tidb用户不仅配置了免密还给了sudo权限。好在我三台机器的root用户密码一致,顺利开始检查。
[tidb@gsm1 tidb-community-server-v7.1.0-linux-amd64]$ tiup cluster check ./topology.yaml --user root -p -i /home/root/.ssh/gcp_rsa
Node           Check         Result  Message
----           -----         ------  -------
192.168.3.234  cpu-governor  Warn    Unable to determine current CPU frequency governor policy
192.168.3.234  network       Pass    network speed of ens192 is 10000MB
192.168.3.234  thp           Fail    THP is enabled, please disable it for best performance
192.168.3.234  os-version    Pass    OS is CentOS Linux 7 (Core) 7.9.2009
192.168.3.234  cpu-cores     Pass    number of CPU cores / threads: 2
192.168.3.234  disk          Warn    mount point /tidb does not have 'noatime' option set
192.168.3.234  selinux       Fail    SELinux is not disabled
192.168.3.234  command       Fail    numactl not usable, bash: numactl: command not found
192.168.3.234  timezone      Pass    time zone is the same as the first PD machine: Asia/Shanghai
192.168.3.234  memory        Pass    memory size is 8192MB
192.168.3.235  selinux       Fail    SELinux is not disabled
192.168.3.235  command       Fail    numactl not usable, bash: numactl: command not found
192.168.3.235  timezone      Pass    time zone is the same as the first PD machine: Asia/Shanghai
192.168.3.235  os-version    Pass    OS is CentOS Linux 7 (Core) 7.9.2009
192.168.3.235  cpu-governor  Warn    Unable to determine current CPU frequency governor policy
192.168.3.235  memory        Pass    memory size is 8192MB
192.168.3.235  network       Pass    network speed of ens192 is 10000MB
192.168.3.235  cpu-cores     Pass    number of CPU cores / threads: 2
192.168.3.235  disk          Warn    mount point /tidb does not have 'noatime' option set
192.168.3.235  thp           Fail    THP is enabled, please disable it for best performance
192.168.3.232  cpu-cores     Pass    number of CPU cores / threads: 2
192.168.3.232  network       Pass    network speed of ens192 is 10000MB
192.168.3.232  disk          Warn    mount point /tidb does not have 'noatime' option set
192.168.3.232  selinux       Fail    SELinux is not disabled
192.168.3.232  thp           Fail    THP is enabled, please disable it for best performance
192.168.3.232  command       Pass    numactl: policy: default
192.168.3.232  os-version    Pass    OS is CentOS Linux 7 (Core) 7.9.2009
192.168.3.232  cpu-governor  Warn    Unable to determine current CPU frequency governor policy
192.168.3.232  memory        Pass    memory size is 8192MB
#修复
##自动修复集群存在的潜在问题
[tidb@gsm1 tidb-community-server-v7.1.0-linux-amd64]$ tiup cluster check ./topology.yaml --apply --user root -p -i /home/root/.ssh/gcp_rsa
tiup is checking updates for component cluster ...
Starting component `cluster`: /home/tidb/.tiup/components/cluster/v1.12.2/tiup-cluster check ./topology.yaml --apply --user root -p -i /home/root/.ssh/gcp_rsa
Input SSH password:


+ Detect CPU Arch Name
  - Detecting node 192.168.3.232 Arch info ... Done
  - Detecting node 192.168.3.234 Arch info ... Done
  - Detecting node 192.168.3.235 Arch info ... Done


+ Detect CPU OS Name
  - Detecting node 192.168.3.232 OS info ... Done
  - Detecting node 192.168.3.234 OS info ... Done
  - Detecting node 192.168.3.235 OS info ... Done
+ Download necessary tools
  - Downloading check tools for linux/amd64 ... Done
+ Collect basic system information
  - Getting system info of 192.168.3.232:22 ... ⠏ CopyComponent: component=insight, version=, remote=192.168.3.232:/tmp/tiup os=linux, arch=amd64
+ Collect basic system information
+ Collect basic system information
  - Getting system info of 192.168.3.232:22 ... Done
  - Getting system info of 192.168.3.234:22 ... Done
  - Getting system info of 192.168.3.235:22 ... Done
+ Check time zone
  - Checking node 192.168.3.232 ... Done
  - Checking node 192.168.3.234 ... Done
  - Checking node 192.168.3.235 ... Done
+ Check system requirements
+ Check system requirements
  - Checking node 192.168.3.232 ... Done
+ Check system requirements
+ Check system requirements
+ Check system requirements
+ Check system requirements
  - Checking node 192.168.3.232 ... Done
+ Check system requirements
+ Check system requirements
  - Checking node 192.168.3.232 ... Done
  - Checking node 192.168.3.234 ... Done
  - Checking node 192.168.3.235 ... Done
  - Checking node 192.168.3.232 ... Done
  - Checking node 192.168.3.234 ... Done
  - Checking node 192.168.3.235 ... Done
  - Checking node 192.168.3.232 ... Done
  - Checking node 192.168.3.234 ... Done
  - Checking node 192.168.3.235 ... Done
  - Checking node 192.168.3.235 ... Done
  - Checking node 192.168.3.235 ... Done
  - Checking node 192.168.3.232 ... Done
  - Checking node 192.168.3.234 ... Done
  - Checking node 192.168.3.235 ... Done
+ Cleanup check files
  - Cleanup check files on 192.168.3.232:22 ... Done
  - Cleanup check files on 192.168.3.234:22 ... Done
  - Cleanup check files on 192.168.3.235:22 ... Done
Node           Check         Result  Message
----           -----         ------  -------
192.168.3.232  os-version    Pass    OS is CentOS Linux 7 (Core) 7.9.2009
192.168.3.232  disk          Warn    mount point /tidb does not have 'noatime' option set, auto fixing not supported
192.168.3.232  thp           Fail    will try to disable THP, please check again after reboot
192.168.3.232  command       Pass    numactl: policy: default
192.168.3.232  cpu-cores     Pass    number of CPU cores / threads: 2
192.168.3.232  cpu-governor  Warn    Unable to determine current CPU frequency governor policy, auto fixing not supported
192.168.3.232  memory        Pass    memory size is 8192MB
192.168.3.232  network       Pass    network speed of ens192 is 10000MB
192.168.3.232  selinux       Fail    will try to disable SELinux, reboot might be needed
192.168.3.234  timezone      Pass    time zone is the same as the first PD machine: Asia/Shanghai
192.168.3.234  cpu-cores     Pass    number of CPU cores / threads: 2
192.168.3.234  cpu-governor  Warn    Unable to determine current CPU frequency governor policy, auto fixing not supported
192.168.3.234  memory        Pass    memory size is 8192MB
192.168.3.234  thp           Fail    will try to disable THP, please check again after reboot
192.168.3.234  command       Fail    numactl not usable, bash: numactl: command not found, auto fixing not supported
192.168.3.234  os-version    Pass    OS is CentOS Linux 7 (Core) 7.9.2009
192.168.3.234  network       Pass    network speed of ens192 is 10000MB
192.168.3.234  disk          Warn    mount point /tidb does not have 'noatime' option set, auto fixing not supported
192.168.3.234  selinux       Fail    will try to disable SELinux, reboot might be needed
192.168.3.235  thp           Fail    will try to disable THP, please check again after reboot
192.168.3.235  os-version    Pass    OS is CentOS Linux 7 (Core) 7.9.2009
192.168.3.235  memory        Pass    memory size is 8192MB
192.168.3.235  selinux       Fail    will try to disable SELinux, reboot might be needed
192.168.3.235  network       Pass    network speed of ens192 is 10000MB
192.168.3.235  disk          Warn    mount point /tidb does not have 'noatime' option set, auto fixing not supported
192.168.3.235  command       Fail    numactl not usable, bash: numactl: command not found, auto fixing not supported
192.168.3.235  timezone      Pass    time zone is the same as the first PD machine: Asia/Shanghai
192.168.3.235  cpu-cores     Pass    number of CPU cores / threads: 2
192.168.3.235  cpu-governor  Warn    Unable to determine current CPU frequency governor policy, auto fixing not supported


+ Try to apply changes to fix failed checks
+ Try to apply changes to fix failed checks
  - Applying changes on 192.168.3.232 ... ⠴ Shell: host=192.168.3.232, sudo=true, command=`sed -i 's/^[[:blank:]]*SELINUX=enforcing/SELINUX=disabled/g' /etc/selinux/config && setenforce 0`
+ Try to apply changes to fix failed checks
  - Applying changes on 192.168.3.232 ... Done
  - Applying changes on 192.168.3.234 ... Done
  - Applying changes on 192.168.3.235 ... Done
1.看起来像selinux要重启才能生效,先不管,有问题再说吧
2.thp查看服务都没有,不知道为啥是enabled
[tidb@sd2 ~]$ sudo systemctl status thp
Unit thp.service could not be found.
[tidb@sd2 ~]$ service thp status
Redirecting to /bin/systemctl status thp.service
Unit thp.service could not be found.
3.还有numactl没装,后面有问题再说吧
3.5 部署集群
预期日志结尾输出 Deployed cluster
tidb-testsuccessfully 关键词,表示部署成功。
[tidb@gsm1 tidb-community-server-v7.1.0-linux-amd64]$ tiup cluster deploy tidb-test v7.1.0 ./topology.yaml --user tidb
tiup is checking updates for component cluster ...
Starting component `cluster`: /home/tidb/.tiup/components/cluster/v1.12.2/tiup-cluster deploy tidb-test v7.1.0 ./topology.yaml --user tidb


+ Detect CPU Arch Name
  - Detecting node 192.168.3.232 Arch info ... Done
  - Detecting node 192.168.3.234 Arch info ... Done
  - Detecting node 192.168.3.235 Arch info ... Done


+ Detect CPU OS Name
  - Detecting node 192.168.3.232 OS info ... Done
  - Detecting node 192.168.3.234 OS info ... Done
  - Detecting node 192.168.3.235 OS info ... Done
Please confirm your topology:
Cluster type:    tidb
Cluster name:    tidb-test
Cluster version: v7.1.0
Role          Host           Ports        OS/Arch       Directories
----          ----           -----        -------       -----------
pd            192.168.3.232  2379/2380    linux/x86_64  /tidb/tidb-deploy/pd-2379,/tidb/tidb-data/pd-2379
pd            192.168.3.234  2379/2380    linux/x86_64  /tidb/tidb-deploy/pd-2379,/tidb/tidb-data/pd-2379
pd            192.168.3.235  2379/2380    linux/x86_64  /tidb/tidb-deploy/pd-2379,/tidb/tidb-data/pd-2379
tikv          192.168.3.232  20160/20180  linux/x86_64  /tidb/tidb-deploy/tikv-20160,/tidb/tidb-data/tikv-20160
tikv          192.168.3.234  20160/20180  linux/x86_64  /tidb/tidb-deploy/tikv-20160,/tidb/tidb-data/tikv-20160
tikv          192.168.3.235  20160/20180  linux/x86_64  /tidb/tidb-deploy/tikv-20160,/tidb/tidb-data/tikv-20160
tidb          192.168.3.232  4000/10080   linux/x86_64  /tidb/tidb-deploy/tidb-4000
tidb          192.168.3.234  4000/10080   linux/x86_64  /tidb/tidb-deploy/tidb-4000
prometheus    192.168.3.235  9090/12020   linux/x86_64  /tidb/tidb-deploy/prometheus-9090,/tidb/tidb-data/prometheus-9090
grafana       192.168.3.235  3000         linux/x86_64  /tidb/tidb-deploy/grafana-3000
alertmanager  192.168.3.235  9093/9094    linux/x86_64  /tidb/tidb-deploy/alertmanager-9093,/tidb/tidb-data/alertmanager-9093
Attention:
    1. If the topology is not what you expected, check your yaml file.
    2. Please confirm there is no port/directory conflicts in same host.
Do you want to continue? [y/N]: (default=N) y
+ Generate SSH keys ... Done
+ Download TiDB components
  - Download pd:v7.1.0 (linux/amd64) ... Done
  - Download tikv:v7.1.0 (linux/amd64) ... Done
  - Download tidb:v7.1.0 (linux/amd64) ... Done
  - Download prometheus:v7.1.0 (linux/amd64) ... Done
  - Download grafana:v7.1.0 (linux/amd64) ... Done
  - Download alertmanager: (linux/amd64) ... Done
  - Download node_exporter: (linux/amd64) ... Done
  - Download blackbox_exporter: (linux/amd64) ... Done
+ Initialize target host environments
  - Prepare 192.168.3.235:22 ... Done
  - Prepare 192.168.3.232:22 ... Done
  - Prepare 192.168.3.234:22 ... Done
+ Deploy TiDB instance
  - Copy pd -> 192.168.3.232 ... Done
  - Copy pd -> 192.168.3.234 ... Done
  - Copy pd -> 192.168.3.235 ... Done
  - Copy tikv -> 192.168.3.232 ... Done
  - Copy tikv -> 192.168.3.234 ... Done
  - Copy tikv -> 192.168.3.235 ... Done
  - Copy tidb -> 192.168.3.232 ... Done
  - Copy tidb -> 192.168.3.234 ... Done
  - Copy prometheus -> 192.168.3.235 ... Done
  - Copy grafana -> 192.168.3.235 ... Done
  - Copy alertmanager -> 192.168.3.235 ... Done
  - Deploy node_exporter -> 192.168.3.232 ... Done
  - Deploy node_exporter -> 192.168.3.234 ... Done
  - Deploy node_exporter -> 192.168.3.235 ... Done
  - Deploy blackbox_exporter -> 192.168.3.232 ... Done
  - Deploy blackbox_exporter -> 192.168.3.234 ... Done
  - Deploy blackbox_exporter -> 192.168.3.235 ... Done
+ Copy certificate to remote host
+ Init instance configs
  - Generate config pd -> 192.168.3.232:2379 ... Done
  - Generate config pd -> 192.168.3.234:2379 ... Done
  - Generate config pd -> 192.168.3.235:2379 ... Done
  - Generate config tikv -> 192.168.3.232:20160 ... Done
  - Generate config tikv -> 192.168.3.234:20160 ... Done
  - Generate config tikv -> 192.168.3.235:20160 ... Done
  - Generate config tidb -> 192.168.3.232:4000 ... Done
  - Generate config tidb -> 192.168.3.234:4000 ... Done
  - Generate config prometheus -> 192.168.3.235:9090 ... Done
  - Generate config grafana -> 192.168.3.235:3000 ... Done
  - Generate config alertmanager -> 192.168.3.235:9093 ... Done
+ Init monitor configs
  - Generate config node_exporter -> 192.168.3.235 ... Done
  - Generate config node_exporter -> 192.168.3.232 ... Done
  - Generate config node_exporter -> 192.168.3.234 ... Done
  - Generate config blackbox_exporter -> 192.168.3.232 ... Done
  - Generate config blackbox_exporter -> 192.168.3.234 ... Done
  - Generate config blackbox_exporter -> 192.168.3.235 ... Done
Enabling component pd
	Enabling instance 192.168.3.235:2379
	Enabling instance 192.168.3.232:2379
	Enabling instance 192.168.3.234:2379
	Enable instance 192.168.3.235:2379 success
	Enable instance 192.168.3.234:2379 success
	Enable instance 192.168.3.232:2379 success
Enabling component tikv
	Enabling instance 192.168.3.235:20160
	Enabling instance 192.168.3.232:20160
	Enabling instance 192.168.3.234:20160
	Enable instance 192.168.3.235:20160 success
	Enable instance 192.168.3.234:20160 success
	Enable instance 192.168.3.232:20160 success
Enabling component tidb
	Enabling instance 192.168.3.234:4000
	Enabling instance 192.168.3.232:4000
	Enable instance 192.168.3.234:4000 success
	Enable instance 192.168.3.232:4000 success
Enabling component prometheus
	Enabling instance 192.168.3.235:9090
	Enable instance 192.168.3.235:9090 success
Enabling component grafana
	Enabling instance 192.168.3.235:3000
	Enable instance 192.168.3.235:3000 success
Enabling component alertmanager
	Enabling instance 192.168.3.235:9093
	Enable instance 192.168.3.235:9093 success
Enabling component node_exporter
	Enabling instance 192.168.3.234
	Enabling instance 192.168.3.235
	Enabling instance 192.168.3.232
	Enable 192.168.3.235 success
	Enable 192.168.3.234 success
	Enable 192.168.3.232 success
Enabling component blackbox_exporter
	Enabling instance 192.168.3.234
	Enabling instance 192.168.3.235
	Enabling instance 192.168.3.232
	Enable 192.168.3.235 success
	Enable 192.168.3.234 success
	Enable 192.168.3.232 success
Cluster `tidb-test` deployed successfully, you can start it with command: `tiup cluster start tidb-test --init`
部署成功。
开启集群
#TiUP 支持管理多个 TiDB 集群,该命令会输出当前通过 TiUP cluster 管理的所有集群信息,包括集群名称、部署用户、版本、密钥信息等。
[tidb@gsm1 tidb-community-server-v7.1.0-linux-amd64]$ tiup cluster list
tiup is checking updates for component cluster ...
Starting component `cluster`: /home/tidb/.tiup/components/cluster/v1.12.2/tiup-cluster list
Name       User  Version  Path                                                 PrivateKey
----       ----  -------  ----                                                 ----------
tidb-test  tidb  v7.1.0   /home/tidb/.tiup/storage/cluster/clusters/tidb-test  /home/tidb/.tiup/storage/cluster/clusters/tidb-test/ssh/id_rsa

#检查 tidb-test 集群情况
[tidb@gsm1 tidb-community-server-v7.1.0-linux-amd64]$ tiup cluster display tidb-test
tiup is checking updates for component cluster ...
Starting component `cluster`: /home/tidb/.tiup/components/cluster/v1.12.2/tiup-cluster display tidb-test
Cluster type:       tidb
Cluster name:       tidb-test
Cluster version:    v7.1.0
Deploy user:        tidb
SSH type:           builtin
Grafana URL:        http://192.168.3.235:3000
ID                   Role          Host           Ports        OS/Arch       Status  Data Dir                           Deploy Dir
--                   ----          ----           -----        -------       ------  --------                           ----------
192.168.3.235:9093   alertmanager  192.168.3.235  9093/9094    linux/x86_64  Down    /tidb/tidb-data/alertmanager-9093  /tidb/tidb-deploy/alertmanager-9093
192.168.3.235:3000   grafana       192.168.3.235  3000         linux/x86_64  Down    -                                  /tidb/tidb-deploy/grafana-3000
192.168.3.232:2379   pd            192.168.3.232  2379/2380    linux/x86_64  Down    /tidb/tidb-data/pd-2379            /tidb/tidb-deploy/pd-2379
192.168.3.234:2379   pd            192.168.3.234  2379/2380    linux/x86_64  Down    /tidb/tidb-data/pd-2379            /tidb/tidb-deploy/pd-2379
192.168.3.235:2379   pd            192.168.3.235  2379/2380    linux/x86_64  Down    /tidb/tidb-data/pd-2379            /tidb/tidb-deploy/pd-2379
192.168.3.235:9090   prometheus    192.168.3.235  9090/12020   linux/x86_64  Down    /tidb/tidb-data/prometheus-9090    /tidb/tidb-deploy/prometheus-9090
192.168.3.232:4000   tidb          192.168.3.232  4000/10080   linux/x86_64  Down    -                                  /tidb/tidb-deploy/tidb-4000
192.168.3.234:4000   tidb          192.168.3.234  4000/10080   linux/x86_64  Down    -                                  /tidb/tidb-deploy/tidb-4000
192.168.3.232:20160  tikv          192.168.3.232  20160/20180  linux/x86_64  N/A     /tidb/tidb-data/tikv-20160         /tidb/tidb-deploy/tikv-20160
192.168.3.234:20160  tikv          192.168.3.234  20160/20180  linux/x86_64  N/A     /tidb/tidb-data/tikv-20160         /tidb/tidb-deploy/tikv-20160
192.168.3.235:20160  tikv          192.168.3.235  20160/20180  linux/x86_64  N/A     /tidb/tidb-data/tikv-20160         /tidb/tidb-deploy/tikv-20160
Total nodes: 11

#安全启动集群 --init
[tidb@gsm1 tidb-community-server-v7.1.0-linux-amd64]$ tiup cluster start tidb-test --init
tiup is checking updates for component cluster ...
Starting component `cluster`: /home/tidb/.tiup/components/cluster/v1.12.2/tiup-cluster start tidb-test --init
Starting cluster tidb-test...
+ [ Serial ] - SSHKeySet: privateKey=/home/tidb/.tiup/storage/cluster/clusters/tidb-test/ssh/id_rsa, publicKey=/home/tidb/.tiup/storage/cluster/clusters/tidb-test/ssh/id_rsa.pub
+ [Parallel] - UserSSH: user=tidb, host=192.168.3.234
+ [Parallel] - UserSSH: user=tidb, host=192.168.3.235
+ [Parallel] - UserSSH: user=tidb, host=192.168.3.232
+ [Parallel] - UserSSH: user=tidb, host=192.168.3.234
+ [Parallel] - UserSSH: user=tidb, host=192.168.3.235
+ [Parallel] - UserSSH: user=tidb, host=192.168.3.235
+ [Parallel] - UserSSH: user=tidb, host=192.168.3.235
+ [Parallel] - UserSSH: user=tidb, host=192.168.3.235
+ [Parallel] - UserSSH: user=tidb, host=192.168.3.232
+ [Parallel] - UserSSH: user=tidb, host=192.168.3.232
+ [Parallel] - UserSSH: user=tidb, host=192.168.3.234
+ [ Serial ] - StartCluster
Starting component pd
	Starting instance 192.168.3.235:2379
	Starting instance 192.168.3.234:2379
	Starting instance 192.168.3.232:2379
	Start instance 192.168.3.235:2379 success
	Start instance 192.168.3.234:2379 success
	Start instance 192.168.3.232:2379 success
Starting component tikv
	Starting instance 192.168.3.235:20160
	Starting instance 192.168.3.234:20160
	Starting instance 192.168.3.232:20160
	Start instance 192.168.3.235:20160 success
	Start instance 192.168.3.232:20160 success
	Start instance 192.168.3.234:20160 success
Starting component tidb
	Starting instance 192.168.3.234:4000
	Starting instance 192.168.3.232:4000
	Start instance 192.168.3.232:4000 success
	Start instance 192.168.3.234:4000 success
Starting component prometheus
	Starting instance 192.168.3.235:9090
	Start instance 192.168.3.235:9090 success
Starting component grafana
	Starting instance 192.168.3.235:3000
	Start instance 192.168.3.235:3000 success
Starting component alertmanager
	Starting instance 192.168.3.235:9093
	Start instance 192.168.3.235:9093 success
Starting component node_exporter
	Starting instance 192.168.3.234
	Starting instance 192.168.3.235
	Starting instance 192.168.3.232
	Start 192.168.3.235 success
	Start 192.168.3.234 success
	Start 192.168.3.232 success
Starting component blackbox_exporter
	Starting instance 192.168.3.234
	Starting instance 192.168.3.235
	Starting instance 192.168.3.232
	Start 192.168.3.234 success
	Start 192.168.3.235 success
	Start 192.168.3.232 success
+ [ Serial ] - UpdateTopology: cluster=tidb-test
Started cluster `tidb-test` successfully
The root password of TiDB database has been changed.
The new password is: 'tvd3_9j0WCU7@48J^-'.
Copy and record it to somewhere safe, it is only displayed once, and will not be stored.
The generated password can NOT be get and shown again.

#验证集群运行状态
## 预期结果输出:各节点 Status 状态信息为 Up 说明集群状态正常。
[tidb@gsm1 tidb-community-server-v7.1.0-linux-amd64]$ tiup cluster display tidb-test
tiup is checking updates for component cluster ...
Starting component `cluster`: /home/tidb/.tiup/components/cluster/v1.12.2/tiup-cluster display tidb-test
Cluster type:       tidb
Cluster name:       tidb-test
Cluster version:    v7.1.0
Deploy user:        tidb
SSH type:           builtin
Dashboard URL:      http://192.168.3.232:2379/dashboard
Grafana URL:        http://192.168.3.235:3000
ID                   Role          Host           Ports        OS/Arch       Status  Data Dir                           Deploy Dir
--                   ----          ----           -----        -------       ------  --------                           ----------
192.168.3.235:9093   alertmanager  192.168.3.235  9093/9094    linux/x86_64  Up      /tidb/tidb-data/alertmanager-9093  /tidb/tidb-deploy/alertmanager-9093
192.168.3.235:3000   grafana       192.168.3.235  3000         linux/x86_64  Up      -                                  /tidb/tidb-deploy/grafana-3000
192.168.3.232:2379   pd            192.168.3.232  2379/2380    linux/x86_64  Up|UI   /tidb/tidb-data/pd-2379            /tidb/tidb-deploy/pd-2379
192.168.3.234:2379   pd            192.168.3.234  2379/2380    linux/x86_64  Up|L    /tidb/tidb-data/pd-2379            /tidb/tidb-deploy/pd-2379
192.168.3.235:2379   pd            192.168.3.235  2379/2380    linux/x86_64  Up      /tidb/tidb-data/pd-2379            /tidb/tidb-deploy/pd-2379
192.168.3.235:9090   prometheus    192.168.3.235  9090/12020   linux/x86_64  Up      /tidb/tidb-data/prometheus-9090    /tidb/tidb-deploy/prometheus-9090
192.168.3.232:4000   tidb          192.168.3.232  4000/10080   linux/x86_64  Up      -                                  /tidb/tidb-deploy/tidb-4000
192.168.3.234:4000   tidb          192.168.3.234  4000/10080   linux/x86_64  Up      -                                  /tidb/tidb-deploy/tidb-4000
192.168.3.232:20160  tikv          192.168.3.232  20160/20180  linux/x86_64  Up      /tidb/tidb-data/tikv-20160         /tidb/tidb-deploy/tikv-20160
192.168.3.234:20160  tikv          192.168.3.234  20160/20180  linux/x86_64  Up      /tidb/tidb-data/tikv-20160         /tidb/tidb-deploy/tikv-20160
192.168.3.235:20160  tikv          192.168.3.235  20160/20180  linux/x86_64  Up      /tidb/tidb-data/tikv-20160         /tidb/tidb-deploy/tikv-20160
Total nodes: 11
到这里整个集群的安装就结束了,整体来说比单机集中式数据库部署要复杂一些,但是也没有想象中那么复杂。
个人感受
1.安装部署:作为一款分布式数据库,这个安装部署我感觉已经是很顺利了,本来担心很多没有配置好,部署会失败,没想到一次就部署成功了。
2.文档:文档虽然看起来内容很多链接要跳转的看,但是每个步骤有个很关键的信息,就是他会告诉你预期结果,这个让用户能很直观的感受到自己这个步骤是否执行成功。
环境准备完成,后面就是使用学习数据库功能了。
