


q使用 redis 作为 celery 的 broker 时,celery 的交互操作同 redis 中数据记录的关联关系。
1、当前我的redis实例上没有任何的key。
127.0.0.1:6379> keys *
(empty array)
2、现在发起一个任务(注意此时worker还没有启动)。
from project import tasks
t= tasks.show_name.delay("haha")
t.get()
3、此时查看redis中key的变化。
127.0.0.1:6379> keys *
1) "celery"
127.0.0.1:6379> type celery
list
127.0.0.1:6379> llen celery
(integer) 1
127.0.0.1:6379> lindex celery 0
"{\"body\": \"W1siaGFoYSJdLCB7fSwgeyJjYWxsYmFja3MiOiBudWxsLCAiZXJyYmFja3MiOiBudWxsLCAiY2hhaW4iOiBudWxsLCAiY2hvcmQiOiBudWxsfV0=\", \"content-encoding\": \"utf-8\", \"content-type\": \"application/json\", \"headers\": {\"lang\": \"py\", \"task\": \"project.tasks.show_name\", \"id\": \"93f18ba9-82ed-47d8-8534-dc9eef59c64f\", \"shadow\": null, \"eta\": null, \"expires\": null, \"group\": null, \"group_index\": null, \"retries\": 0, \"timelimit\": [null, null], \"root_id\": \"93f18ba9-82ed-47d8-8534-dc9eef59c64f\", \"parent_id\": null, \"argsrepr\": \"('haha',)\", \"kwargsrepr\": \"{}\", \"origin\": \"gen31986@wangkailideMacBook-Pro.local\", \"ignore_result\": false}, \"properties\": {\"correlation_id\": \"93f18ba9-82ed-47d8-8534-dc9eef59c64f\", \"reply_to\": \"47f79418-e882-3b1c-bcbc-d6e25ef64af5\", \"delivery_mode\": 2, \"delivery_info\": {\"exchange\": \"\", \"routing_key\": \"celery\"}, \"priority\": 0, \"body_encoding\": \"base64\", \"delivery_tag\": \"c17d37d0-4ec0-4846-9d1b-a22023988efc\"}}"
可以看到发起任务后,redis中多了一个名为celery的key。celery的type是list, list的长度是1。List中的内容就是推送到redis的消息。
celery向任务队列broker中推送消息时,会对数据进行序列化,celery消息序列化的方式有json、pickle、yaml、msgpack或者在kombu.serialization.registry中注册的自定义序列化方法。在celery4.0之前默认的序列化方式是pickle, 4.0之后是json。这个可以通过CELERY_TASK_SERIALIZER参数来指定。
我们尝试对celery中的消息进行反序列化。
import base64
import json

data = "{\"body\": \"W1siaGFoYSJdLCB7fSwgeyJjYWxsYmFja3MiOiBudWxsLCAiZXJyYmFja3MiOiBudWxsLCAiY2hhaW4iOiBudWxsLCAiY2hvcmQiOiBudWxsfV0=\", \"content-encoding\": \"utf-8\", \"content-type\": \"application/json\", \"headers\": {\"lang\": \"py\", \"task\": \"project.tasks.show_name\", \"id\": \"93f18ba9-82ed-47d8-8534-dc9eef59c64f\", \"shadow\": null, \"eta\": null, \"expires\": null, \"group\": null, \"group_index\": null, \"retries\": 0, \"timelimit\": [null, null], \"root_id\": \"93f18ba9-82ed-47d8-8534-dc9eef59c64f\", \"parent_id\": null, \"argsrepr\": \"('haha',)\", \"kwargsrepr\": \"{}\", \"origin\": \"gen31986@wangkailideMacBook-Pro.local\", \"ignore_result\": false}, \"properties\": {\"correlation_id\": \"93f18ba9-82ed-47d8-8534-dc9eef59c64f\", \"reply_to\": \"47f79418-e882-3b1c-bcbc-d6e25ef64af5\", \"delivery_mode\": 2, \"delivery_info\": {\"exchange\": \"\", \"routing_key\": \"celery\"}, \"priority\": 0, \"body_encoding\": \"base64\", \"delivery_tag\": \"c17d37d0-4ec0-4846-9d1b-a22023988efc\"}}"

# 先用json.loads解析以上json数据。
data = json.loads(data)
body = data['body']

# json解析之后,我们再将body中的数据进行base64解码。
body = base64.b64decode(body)

# 再使用json.loads解析
body = json.loads(body)
print(body)
4、此时再发起一个任务。
from project import tasks
aa = tasks.show_name.delay("ddd")
aa.state
'PENDING'
5、再来看下redis key的变化。
127.0.0.1:6379> keys *
1) "_kombu.binding.celery"
2) "celery"
127.0.0.1:6379> llen celery
(integer) 2
127.0.0.1:6379> lindex celery 1
"{\"body\": \"W1siaGFoYSJdLCB7fSwgeyJjYWxsYmFja3MiOiBudWxsLCAiZXJyYmFja3MiOiBudWxsLCAiY2hhaW4iOiBudWxsLCAiY2hvcmQiOiBudWxsfV0=\", \"content-encoding\": \"utf-8\", \"content-type\": \"application/json\", \"headers\": {\"lang\": \"py\", \"task\": \"project.tasks.show_name\", \"id\": \"93f18ba9-82ed-47d8-8534-dc9eef59c64f\", \"shadow\": null, \"eta\": null, \"expires\": null, \"group\": null, \"group_index\": null, \"retries\": 0, \"timelimit\": [null, null], \"root_id\": \"93f18ba9-82ed-47d8-8534-dc9eef59c64f\", \"parent_id\": null, \"argsrepr\": \"('haha',)\", \"kwargsrepr\": \"{}\", \"origin\": \"gen31986@wangkailideMacBook-Pro.local\", \"ignore_result\": false}, \"properties\": {\"correlation_id\": \"93f18ba9-82ed-47d8-8534-dc9eef59c64f\", \"reply_to\": \"47f79418-e882-3b1c-bcbc-d6e25ef64af5\", \"delivery_mode\": 2, \"delivery_info\": {\"exchange\": \"\", \"routing_key\": \"celery\"}, \"priority\": 0, \"body_encoding\": \"base64\", \"delivery_tag\": \"c17d37d0-4ec0-4846-9d1b-a22023988efc\"}}"
127.0.0.1:6379>
可以看到celery的长度变为2。还多了一个key,_kombu.binding.celery,这个不用管(celery 使用 kombu 维护消息队列)。
6、我们启动worker。
celery -A project worker -l debug
查看worker的日志,我们看到上面的两个任务都被执行了。
7、看下redis key的变化。
127.0.0.1:6379> keys *
1) "_kombu.binding.celery"
2) "celery-task-meta-8c7ead35-2b12-4d26-9fc3-4d65b25aa5b0"
3) "celery-task-meta-93f18ba9-82ed-47d8-8534-dc9eef59c64f"
4) "_kombu.binding.celery.pidbox"
5) "_kombu.binding.celeryev"
可以看到celery这个key已经不存在了。多了两个以“__kombu”开头的key, 这两个也是kombu维护的,也暂时不用关注。
还多了两个以“celery-task-meta”开头的key, 这两个key分别存储两个任务的执行结果。key的过期时间为24小时。
127.0.0.1:6379> type celery-task-meta-8c7ead35-2b12-4d26-9fc3-4d65b25aa5b0
string
127.0.0.1:6379> get celery-task-meta-8c7ead35-2b12-4d26-9fc3-4d65b25aa5b0
"{\"status\": \"SUCCESS\", \"result\": \"ddd\", \"traceback\": null, \"children\": [], \"date_done\": \"2021-11-17T03:45:14.846224\", \"task_id\": \"8c7ead35-2b12-4d26-9fc3-4d65b25aa5b0\"}"
127.0.0.1:6379> ttl celery-task-meta-8c7ead35-2b12-4d26-9fc3-4d65b25aa5b0
(integer) 85954
8、试一下延时任务。
from project import tasks
aa = tasks.show_name.apply_async(('hello world', ), countdown=60)
9、看下redis key的变化。
127.0.0.1:6379> keys *
1) "_kombu.binding.celery"
2) "unacked_index"
3) "celery-task-meta-8c7ead35-2b12-4d26-9fc3-4d65b25aa5b0"
4) "celery-task-meta-93f18ba9-82ed-47d8-8534-dc9eef59c64f"
5) "_kombu.binding.celery.pidbox"
6) "_kombu.binding.celeryev"
7) "unacked"
多了两个key:unacked 和unacked_index 。
unacked:可以理解为这个是被 worker 接收了但是还没开始执行的 task 列表(因为60秒后才会开始执行)。
unacked_index:用户标记上面 unacked 的任务的 id,理论上应该与 unacked 一一对应的。
60s后再查看keys,会发现这两个key已经不存在了。
10、我们试一下,如果启动任务60 秒内,worker异常退出了,会怎样。
启动任务:t= tasks.show_name.apply_async(('hello', ), countdown=60)
查看Redis keys:
127.0.0.1:6379> keys *
1) "celery-task-meta-d9861bd3-8714-4c28-b012-cef8c5bd151e"
2) "_kombu.binding.celery"
3) "unacked_index"
4) "celery-task-meta-8c7ead35-2b12-4d26-9fc3-4d65b25aa5b0"
5) "celery-task-meta-93f18ba9-82ed-47d8-8534-dc9eef59c64f"
6) "_kombu.binding.celery.pidbox"
7) "_kombu.binding.celeryev"
8) "unacked"
关闭workers:
celery -A project control shutdown
查看Redis keys:
127.0.0.1:6379> keys *
1) "_kombu.binding.celery"
2) "celery-task-meta-d9861bd3-8714-4c28-b012-cef8c5bd151e"
3) "celery-task-meta-8c7ead35-2b12-4d26-9fc3-4d65b25aa5b0"
4) "celery"
5) "celery-task-meta-93f18ba9-82ed-47d8-8534-dc9eef59c64f"
可以发现多了名为celery的key。
由此可以推断:如果在接到通知前,如果worker中断了,这时 redis 中的unacked和unacked_index记录会重新被写回到celery key中。
再次启动worker,可以发现任务被再次领取和运行。
结论
综上我们,celery和redis之间交互的基本原理:
使用redis做celery的消息队列(broker),触发一次任务调用,就会发送一条消息给redis。redis将消息默认存储在名为celery 的key中,worker从redis获取任务进行处理,在worker获取任务之前,任务会一直存在redis中。 延时任务会将相关信息记录到unacked和unacked_index中。 worker根据task设定的期望执行时间执行任务,如果接到的不是延时任务或者已经超过了期望时间,则立即执行。 worker开始执行任务时,将unacked和unacked_index相关记录移除。 如果在接到通知前,如果worker中断了,这时redis中的unacked和unacked_index记录会重新被写回到celery key 中。
多队列
上面讲到,redis将任务存储在名为celery的键中,如果想要不同的消息发送到不同的队列,我们可以通过设置routing task。
参考:https://docs.celeryproject.org/en/latest/userguide/routing.html
from kombu import Exchange, Queue

app.conf.task_queues = (
    Queue('backup', Exchange('backup'), routing_key='backup'),
)
# backup.tasks下的任务,发送到backup队列。
app.conf.task_routes = {'backup.tasks.*': {'queue': 'backup'}}
我们发起backup.tasks下的一个任务。
from backup import tasks
a = tasks.MongoDBInstanceBackupMonitor.delay()
a.state
'PENDING'
看下redis中的key
127.0.0.1:6379> keys *
1) "backup"
2) "_kombu.binding.backup"
127.0.0.1:6379> keys *
1) "backup"
2) "_kombu.binding.backup"
127.0.0.1:6379> llen backup
(integer) 1
127.0.0.1:6379> lindex backup 0
"{\"body\": \"W1tdLCB7fSwgeyJjYWxsYmFja3MiOiBudWxsLCAiZXJyYmFja3MiOiBudWxsLCAiY2hhaW4iOiBudWxsLCAiY2hvcmQiOiBudWxsfV0=\", \"content-encoding\": \"utf-8\", \"content-type\": \"application/json\", \"headers\": {\"lang\": \"py\", \"task\": \"backup.tasks.MongoDBInstanceBackupMonitor\", \"id\": \"fe042ee5-1a9b-490f-80f9-160aa8964e04\", \"shadow\": null, \"eta\": null, \"expires\": null, \"group\": null, \"group_index\": null, \"retries\": 0, \"timelimit\": [null, null], \"root_id\": \"fe042ee5-1a9b-490f-80f9-160aa8964e04\", \"parent_id\": null, \"argsrepr\": \"()\", \"kwargsrepr\": \"{}\", \"origin\": \"gen7279@wangkailideMacBook-Pro.local\", \"ignore_result\": false}, \"properties\": {\"correlation_id\": \"fe042ee5-1a9b-490f-80f9-160aa8964e04\", \"reply_to\": \"5ac6dc49-74f9-312d-97a3-35969afce9a3\", \"delivery_mode\": 2, \"delivery_info\": {\"exchange\": \"\", \"routing_key\": \"backup\"}, \"priority\": 0, \"body_encoding\": \"base64\", \"delivery_tag\": \"0a0945e7-a00b-4138-9c34-d1a77ed7a80e\"}}"
可以看到这个任务被发送到了backup key中。
多队列模型就涉及到celery的消息路由机制,celery是基于amqp协议的任务调度框架。amqp的协议的消息模型如下:
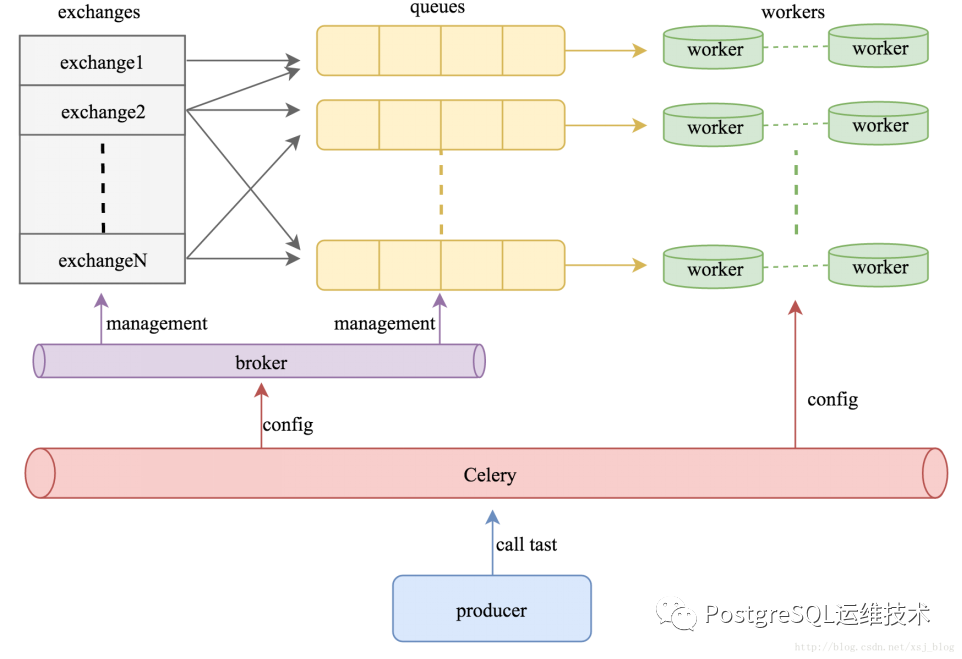
其工作过程为:
生产者(producer)发布消息,经由交换机(exchange); 交换机根据路由规则将收到的消息发送到与该交换机绑定的队列(Queue); 最后代理(broker)将消息投递给订阅了此队列的消费者(worker),或者消费者自行获取;
参考:
https://www.jianshu.com/p/52552c075bc0
https://docs.celeryproject.org/en/latest/userguide/routing.html
https://www.cnblogs.com/zknublx/p/9149891.html
