


大家好,最近公司在做新型数据仓库选型来代替老一代hadoop平台那套东西: 候选的数仓平台有 Doris , GreenPlum 等等。
这篇文章是Doris基础安装部署的, 为公司后续 RDBMS(oracle/MYSQL/PG) + finkCDC + Doris 的架构提供测试环境。
我们准备3台VM测试机器:
(测试环境我们采用的FE/BE混装的方式,生产环境官网建议分布在不同的机器上,做到资源分离)
| Server IP | CPU | RAM | Component |
|---|---|---|---|
| 10.67.38.170 | 8 core | 32GB | FE/BE |
| 10.67.38.171 | 8 core | 32GB | FE/BE |
| 10.67.38.173 | 8 core | 32GB | FE/BE |
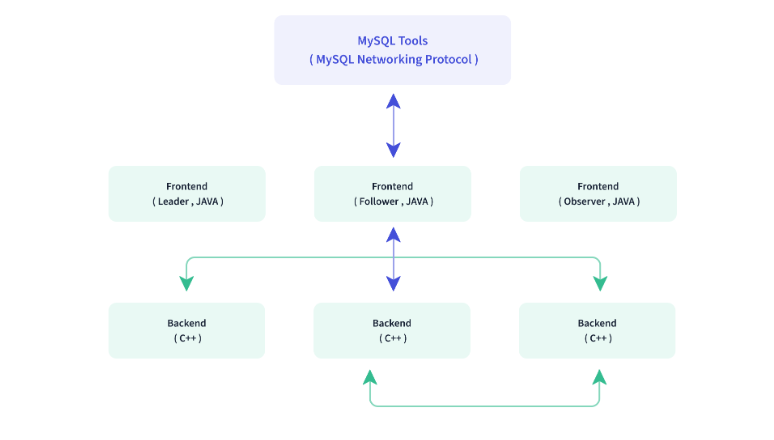
关于Doris FE/BE的官方架构图:
OS 环境的要求:
1)JDK 1.8+,GCC 4.8.2+
JDK下载: https://www.oracle.com/java/technologies/javase/javase8-archive-downloads.html#license-lightbox
tar -xvf jdk-8u202-linux-x64.tar.gz
vi .bash_profile
if [ -f ~/.bashrc ]; then
        . ~/.bashrc
fi

JAVA_HOME=$HOME/jdk1.8.0_202
# User specific environment and startup programs
PATH=$PATH:$HOME/.local/bin:$HOME/bin:$JAVA_HOME/bin
export PATH
---------------------------------------------------------
source .bash_profile
java -version
2)设置系统最大打开文件句柄数
vi /etc/security/limits.conf
* soft nofile 65536
* hard nofile 65536
3)时钟同步:配置NTP 服务
sudo yum install ntp ntpdate && \
sudo systemctl start ntpd.service && \
sudo systemctl enable ntpd.service
4)关闭 SWAP交换内存
echo "vm.swappiness = 0">> /etc/sysctl.conf
swapoff -a && swapon -a
sysctl -p
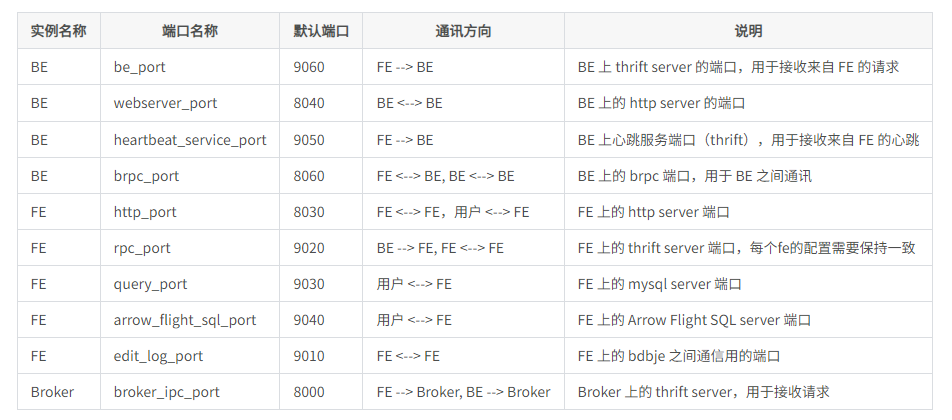
5)网络端口规划:
关闭防火墙
sudo systemctl stop firewalld.service
sudo systemctl disable firewalld.service
Doris 软件的下载与安装:https://github.com/apache/doris/releases
我们下载2.02版本
wget https://apache-doris-releases.oss-accelerate.aliyuncs.com/apache-doris-2.0.2-bin-x64.tar.gz
我们来配置一个FE的节点:
解压软件:
tar -xf apache-doris-2.0.2-bin-x64.tar.gz
修改FE的配置文件
cd apache-doris-2.0.2-bin-x64/fe/conf/

修改参数:
priority_networks=10.67.38.0/24
meta_dir = ${DORIS_HOME}/doris-meta
启动FE:
./bin/start_fe.sh --daemon
我们测试一下web端口服务:http://10.67.38.170:8030/login(默认管理员的账号root,密码为空)

我们可以通过mysql 客户端命令去连接doris: 这里doris 对外暴露mysql协议的端口是 9030
/opt/mysql/product/percona8.0/bin/mysql -h 10.67.38.170 -u root -P 9030
查询FE的状态
mysql> show frontends\G;
*************************** 1. row ***************************
             Name: fe_ee06b840_41cf_43fd_819c_333b08e26f98
             Host: 10.67.38.170
      EditLogPort: 9010
         HttpPort: 8030
        QueryPort: 9030
          RpcPort: 9020
             Role: FOLLOWER
         IsMaster: true
        ClusterId: 688693497
             Join: true
            Alive: true
ReplayedJournalId: 20898
    LastHeartbeat: 2023-11-28 13:24:28
         IsHelper: true
           ErrMsg:
          Version: doris-2.0.2-rc05-ae923f7
CurrentConnected: Yes
1 row in set (0.05 sec)
接下来,我们在同一个节点启动BE服务:
创建BE的存储路径:
mkdir -p /data/doris/be/data
修改BE文件夹的be.conf文件:
JAVA_HOME=/home/doris/jdk1.8.0_202
priority_networks = 10.67.38.0/24
storage_root_path=/data/doris/be/data
启动BE:
./bin/start_be.sh --daemon
启动成功后,我们可以看见BE暴露的端口:
INFRA [doris@ljzdccapp006 log]# netstat -nltp | grep be
(Not all processes could be identified, non-owned process info
will not be shown, you would have to be root to see it all.)
tcp        0      0 0.0.0.0:9050            0.0.0.0:*               LISTEN      128495/doris_be
tcp        0      0 0.0.0.0:8060            0.0.0.0:*               LISTEN      128495/doris_be
tcp        0      0 0.0.0.0:9060            0.0.0.0:*               LISTEN      128495/doris_be
tcp        0      0 0.0.0.0:8040            0.0.0.0:*               LISTEN      128495/doris_be
同样我们可以通过webpage查看BE节点的信息: http://10.67.38.170:8040/

下一步,我们通过FE的mysql命令台把BE的节点加入到 doris的集群中:
mysql> ALTER SYSTEM ADD BACKEND "10.67.38.170:9050";
Query OK, 0 rows affected (0.02 sec)


mysql> SHOW BACKENDS\G
*************************** 1. row ***************************
              BackendId: 24505
                   Host: 10.67.38.170
          HeartbeatPort: 9050
                 BePort: 9060
               HttpPort: 8040
               BrpcPort: 8060
          LastStartTime: 2023-11-28 14:03:16
          LastHeartbeat: 2023-11-28 14:13:10
                  Alive: true
   SystemDecommissioned: false
              TabletNum: 0
       DataUsedCapacity: 0.000
     TrashUsedCapcacity: 0.000
          AvailCapacity: 1.000 B
          TotalCapacity: 0.000
                UsedPct: 0.00 %
         MaxDiskUsedPct: 0.00 %
     RemoteUsedCapacity: 0.000
                    Tag: {"location" : "default"}
                 ErrMsg:
                Version: doris-2.0.2-rc05-ae923f7
                 Status: {"lastSuccessReportTabletsTime":"N/A","lastStreamLoadTime":-1,"isQueryDisabled":false,"isLoadDisabled":false}
HeartbeatFailureCounter: 0
               NodeRole: mix
1 row in set (0.00 sec)
相同的道理,我们启动另外2个节点的BE服务:
重复上面的操作即可:
mkdir -p /data/doris/be/data
JAVA_HOME=/home/doris/jdk1.8.0_202
priority_networks = 10.67.38.0/24
storage_root_path=/data/doris/be/data
./bin/start_be.sh --daemon
我们把新创建启动的2个BE节点,加入到FE的服务中:
mysql> ALTER SYSTEM ADD BACKEND "10.67.38.171:9050";
Query OK, 0 rows affected (0.00 sec)


mysql> ALTER SYSTEM ADD BACKEND "10.67.38.173:9050";
Query OK, 0 rows affected (0.00 sec)
查看3个BE节点的运行情况:
mysql> SHOW BACKENDS\G
*************************** 1. row ***************************
              BackendId: 24505
                   Host: 10.67.38.170
          HeartbeatPort: 9050
                 BePort: 9060
               HttpPort: 8040
               BrpcPort: 8060
          LastStartTime: 2023-11-28 14:03:16
          LastHeartbeat: 2023-11-28 14:58:57
                  Alive: true
   SystemDecommissioned: false
              TabletNum: 0
       DataUsedCapacity: 0.000
     TrashUsedCapcacity: 18.174 KB
          AvailCapacity: 66.004 GB
          TotalCapacity: 195.862 GB
                UsedPct: 66.30 %
         MaxDiskUsedPct: 66.30 %
     RemoteUsedCapacity: 0.000
                    Tag: {"location" : "default"}
                 ErrMsg:
                Version: doris-2.0.2-rc05-ae923f7
                 Status: {"lastSuccessReportTabletsTime":"2023-11-28 14:58:22","lastStreamLoadTime":-1,"isQueryDisabled":false,"isLoadDisabled":false}
HeartbeatFailureCounter: 0
               NodeRole: mix
*************************** 2. row ***************************
              BackendId: 24576
                   Host: 10.67.38.171
          HeartbeatPort: 9050
                 BePort: 9060
               HttpPort: 8040
               BrpcPort: 8060
          LastStartTime: 2023-11-28 14:48:05
          LastHeartbeat: 2023-11-28 14:58:57
                  Alive: true
   SystemDecommissioned: false
              TabletNum: 9
       DataUsedCapacity: 0.000
     TrashUsedCapcacity: 0.000
          AvailCapacity: 105.623 GB
          TotalCapacity: 195.862 GB
                UsedPct: 46.07 %
         MaxDiskUsedPct: 46.07 %
     RemoteUsedCapacity: 0.000
                    Tag: {"location" : "default"}
                 ErrMsg:
                Version: doris-2.0.2-rc05-ae923f7
                 Status: {"lastSuccessReportTabletsTime":"2023-11-28 14:58:10","lastStreamLoadTime":-1,"isQueryDisabled":false,"isLoadDisabled":false}
HeartbeatFailureCounter: 0
               NodeRole: mix
*************************** 3. row ***************************
              BackendId: 24577
                   Host: 10.67.38.173
          HeartbeatPort: 9050
                 BePort: 9060
               HttpPort: 8040
               BrpcPort: 8060
          LastStartTime: 2023-11-28 14:53:32
          LastHeartbeat: 2023-11-28 14:58:57
                  Alive: true
   SystemDecommissioned: false
              TabletNum: 12
       DataUsedCapacity: 0.000
     TrashUsedCapcacity: 0.000
          AvailCapacity: 108.372 GB
          TotalCapacity: 195.862 GB
                UsedPct: 44.67 %
         MaxDiskUsedPct: 44.67 %
     RemoteUsedCapacity: 0.000
                    Tag: {"location" : "default"}
                 ErrMsg:
                Version: doris-2.0.2-rc05-ae923f7
                 Status: {"lastSuccessReportTabletsTime":"2023-11-28 14:58:14","lastStreamLoadTime":-1,"isQueryDisabled":false,"isLoadDisabled":false}
HeartbeatFailureCounter: 0
               NodeRole: mix
3 rows in set (0.00 sec)
okay, 至此我们完成了向FE节点中加入3个BE的节点。
我们下一步,将FE的节点从单节点扩充到3节点。
我们需要先启动另外2点节点上的FE服务:
./bin/start_fe.sh --daemon
把启动后的2个FE的节点,加入到集群中:
mysql> ALTER SYSTEM ADD FOLLOWER "10.67.38.171:9010";
Query OK, 0 rows affected (0.01 sec)


mysql> ALTER SYSTEM ADD FOLLOWER "10.67.38.173:9010";
Query OK, 0 rows affected (0.02 sec)
查看FE的节点状态:
mysql> show frontends\G;
*************************** 1. row ***************************
             Name: fe_670b0313_19e0_4a1c_a7cc_157b18443567
             Host: 10.67.38.173
      EditLogPort: 9010
         HttpPort: 8030
        QueryPort: 0
          RpcPort: 0
             Role: FOLLOWER
         IsMaster: false
        ClusterId: 688693497
             Join: false
            Alive: false
ReplayedJournalId: 0
    LastHeartbeat: NULL
         IsHelper: true
           ErrMsg: Socket is closed by peer.
          Version: NULL
CurrentConnected: No
*************************** 2. row ***************************
             Name: fe_ee06b840_41cf_43fd_819c_333b08e26f98
             Host: 10.67.38.170
      EditLogPort: 9010
         HttpPort: 8030
        QueryPort: 9030
          RpcPort: 9020
             Role: FOLLOWER
         IsMaster: true
        ClusterId: 688693497
             Join: true
            Alive: true
ReplayedJournalId: 23106
    LastHeartbeat: 2023-11-28 15:23:43
         IsHelper: true
           ErrMsg:
          Version: doris-2.0.2-rc05-ae923f7
CurrentConnected: Yes
*************************** 3. row ***************************
             Name: fe_3504c3ca_2d40_421d_be2e_4a9e8e10b18a
             Host: 10.67.38.171
      EditLogPort: 9010
         HttpPort: 8030
        QueryPort: 0
          RpcPort: 0
             Role: FOLLOWER
         IsMaster: false
        ClusterId: 688693497
             Join: false
            Alive: false
ReplayedJournalId: 0
    LastHeartbeat: NULL
         IsHelper: true
           ErrMsg: Socket is closed by peer.
          Version: NULL
CurrentConnected: No
3 rows in set (0.01 sec)
下面我们参照官网,导入一些数据进行测试:
mysql> create database demo;
Query OK, 0 rows affected (0.01 sec)


mysql> use demo;
Database changed
mysql> CREATE TABLE IF NOT EXISTS demo.example_tbl
    -> (
    ->     `user_id` LARGEINT NOT NULL COMMENT "用户id",
    ->     `date` DATE NOT NULL COMMENT "数据灌入日期时间",
    ->     `city` VARCHAR(20) COMMENT "用户所在城市",
    ->     `age` SMALLINT COMMENT "用户年龄",
    ->     `sex` TINYINT COMMENT "用户性别",
    ->     `last_visit_date` DATETIME REPLACE DEFAULT "1970-01-01 00:00:00" COMMENT "用户最后一次访问时间",
    ->     `cost` BIGINT SUM DEFAULT "0" COMMENT "用户总消费",
    ->     `max_dwell_time` INT MAX DEFAULT "0" COMMENT "用户最大停留时间",
    ->     `min_dwell_time` INT MIN DEFAULT "99999" COMMENT "用户最小停留时间"
    -> )
    -> AGGREGATE KEY(`user_id`, `date`, `city`, `age`, `sex`)
    -> DISTRIBUTED BY HASH(`user_id`) BUCKETS 1
    -> PROPERTIES (
    ->     "replication_allocation" = "tag.location.default: 1"
    -> );
Query OK, 0 rows affected (0.01 sec)
导入测试数据CSV格式:
10000,2017-10-01,北京,20,0,2017-10-01 06:00:00,20,10,10
10000,2017-10-01,北京,20,0,2017-10-01 07:00:00,15,2,2
10001,2017-10-01,北京,30,1,2017-10-01 17:05:45,2,22,22
10002,2017-10-02,上海,20,1,2017-10-02 12:59:12,200,5,5
10003,2017-10-02,广州,32,0,2017-10-02 11:20:00,30,11,11
10004,2017-10-01,深圳,35,0,2017-10-01 10:00:15,100,3,3
10004,2017-10-03,深圳,35,0,2017-10-03 10:20:22,11,6,6
命令行导入数据:返回插入7条数据
curl  --location-trusted -u root: -T test.csv -H "column_separator:," http://127.0.0.1:8030/api/demo/example_tbl/_stream_load

INFRA [doris@ljzdccapp006 ~]# curl  --location-trusted -u root: -T test.csv -H "column_separator:," http://127.0.0.1:8030/api/demo/example_tbl/_stream_load
{
    "TxnId": 44,
    "Label": "40488bbc-6302-4696-839e-2f2f5d54a366",
    "Comment": "",
    "TwoPhaseCommit": "false",
    "Status": "Success",
    "Message": "OK",
    "NumberTotalRows": 7,
    "NumberLoadedRows": 7,
    "NumberFilteredRows": 0,
    "NumberUnselectedRows": 0,
    "LoadBytes": 399,
    "LoadTimeMs": 232,
    "BeginTxnTimeMs": 18,
    "StreamLoadPutTimeMs": 161,
    "ReadDataTimeMs": 0,
    "WriteDataTimeMs": 11,
    "CommitAndPublishTimeMs": 40
}
查询数据:
你可能会好奇明明日志里显示导入"NumberLoadedRows": 7, 为什么查出来只有6条?
答案: 这个表 example_tbl 定义的 AGGREGATE KEY 是 (user_id, date, city, age, sex)
下面2条记录的 AGGREGATE KEY 都是一样的,所以2条记录进行了聚合的操作 cost = sum(20+15) = 35, max_dwell_time = max(10,2),min_dwell_time = min(10,2) 合并成了一条。
10000,2017-10-01,北京,20,0,2017-10-01 06:00:00,20,10,10
10000,2017-10-01,北京,20,0,2017-10-01 07:00:00,15,2,2
mysql> select * from example_tbl;
+---------+------------+--------+------+------+---------------------+------+----------------+----------------+
| user_id | date       | city   | age  | sex  | last_visit_date     | cost | max_dwell_time | min_dwell_time |
+---------+------------+--------+------+------+---------------------+------+----------------+----------------+
| 10000   | 2017-10-01 | 北京   |   20 |    0 | 2017-10-01 07:00:00 |   35 |             10 |              2 |
| 10001   | 2017-10-01 | 北京   |   30 |    1 | 2017-10-01 17:05:45 |    2 |             22 |             22 |
| 10002   | 2017-10-02 | 上海   |   20 |    1 | 2017-10-02 12:59:12 |  200 |              5 |              5 |
| 10003   | 2017-10-02 | 广州   |   32 |    0 | 2017-10-02 11:20:00 |   30 |             11 |             11 |
| 10004   | 2017-10-01 | 深圳   |   35 |    0 | 2017-10-01 10:00:15 |  100 |              3 |              3 |
| 10004   | 2017-10-03 | 深圳   |   35 |    0 | 2017-10-03 10:20:22 |   11 |              6 |              6 |
+---------+------------+--------+------+------+---------------------+------+----------------+----------------+
6 rows in set (0.17 sec)


mysql> select * from example_tbl where city='上海';
+---------+------------+--------+------+------+---------------------+------+----------------+----------------+
| user_id | date       | city   | age  | sex  | last_visit_date     | cost | max_dwell_time | min_dwell_time |
+---------+------------+--------+------+------+---------------------+------+----------------+----------------+
| 10002   | 2017-10-02 | 上海   |   20 |    1 | 2017-10-02 12:59:12 |  200 |              5 |              5 |
+---------+------------+--------+------+------+---------------------+------+----------------+----------------+
1 row in set (0.08 sec)


mysql> select city, sum(cost) as total_cost from example_tbl group by city;
+--------+------------+
| city   | total_cost |
+--------+------------+
| 北京   |         37 |
| 上海   |        200 |
| 广州   |         30 |
| 深圳   |        111 |
+--------+------------+
4 rows in set (0.11 sec)
本文是入门文章,属于你的第一篇doris 文档, 后续会带来 doris + flinkCDC + mysql & PG的数据集成篇。
Have a fun 🙂 !
