「YashanDB个人版体验」以DBA角度深度体验YashanDB
1. 数据库安装
先说说总体体验:
- 从安装的简易性来看,安装比较简单,但安装步骤稍显繁杂。安装包建议做成开箱即用的模式,安装过程通过读取环境变量{YASDB_HOME}和{YASDB_DATA}目录即可。
- 命令行安装时暂未看到关于内存大小、连接数等初始化安装比较关注的参数供用户自定义配置。
1.1 命令行安装
顺手写了2个脚本,安装执行如下2脚本即可~
1.1.1 操作系统环境配置
vi /root/script/config_system.sh

########################################################################
#!/bin/bash
#############################
## Author: Rae
## Date: 20231123
## Version: 0.1
#############################

##1. 开发环境调试模式
cat >> /etc/security/limits.conf <<EOF
soft core unlimited
hard core unlimited
EOF
ulimit -c unlimited

##2. 关闭交换分区
echo "vm.swappiness = 0">> /etc/sysctl.conf
sysctl -w vm.swappiness=0

##3. 配置自动调整本地端口范围
sysctl -w net.ipv4.ip_local_port_range='32768 60999'
echo "net.ipv4.ip_local_port_range = 32768 60999" >> /etc/sysctl.conf

##4. 调整进程的VMA上限
echo "vm.max_map_count=2000000" >> /etc/sysctl.conf
sysctl -w vm.max_map_count=2000000

##5. 调整资源限制值
cat >> /etc/security/limits.conf <<EOF
* soft nofile 65536
* hard nofile 65536
* soft nproc 65536
* hard nproc 65536
* soft rss unlimited
* hard rss unlimited
* soft stack 8192
* hard stack 8192
EOF

##6. 关闭透明大页
echo never > /sys/kernel/mm/transparent_hugepage/enabled
echo never > /sys/kernel/mm/transparent_hugepage/defrag
cat >> /etc/rc.local <<EOF
echo never > /sys/kernel/mm/transparent_hugepage/enabled
echo never > /sys/kernel/mm/transparent_hugepage/defrag
EOF
chmod +x /etc/rc.local

##7. 关闭防火墙
systemctl stop firewalld
systemctl disable firewalld

##8. 历史残留配置文件
rm -f /etc/ld.so.conf.d/yashandb*.conf

##9. 清理共享内存
ipcrm -a
########################################################################

chmod +x /root/script/optimize_system.sh
sh /root/script/optimize_system.sh > /dev/null
1.1.2 数据库安装
脚本说明:
##操作系统用户密码:yashan/yashan
##数据库用户密码:sys/yashan#2023

##安装包上传到/home/yashan下,root用户授权
chown yashan.YASDBA yashandb-personal-23.1.1.100-linux-x86_64.tar.gz

vi /home/yashan/script/yashan_install.sh
########################################################################
#!/bin/bash
#############################
## Author: Rae
## Date: 20231123
## Version: 0.1
#############################

##1. 创建用户
useradd -d /home/yashan -m yashan
groupadd YASDBA
usermod -a -G YASDBA yashan
echo "yashan" | passwd --stdin yashan

##2. 配置sudo免密
cat >> /etc/sudoers <<EOF
yashan  ALL=(ALL) NOPASSWD:ALL
EOF
chmod -w /etc/sudoers

##3. 创建目录
mkdir -p /data/yashan/{soft,data,yashan}
chown -R yashan.YASDBA /data
chmod 755 /data

##4. 解压软件
tar xzf /home/yashan/yashandb-personal-23.1.1.100-linux-x86_64.tar.gz -C /data/yashan/soft

##5. 数据库安装部署
cd /data/yashan/soft/
yashan_soft="/data/yashan/soft"
#生成数据库部署文件
${yashan_soft}/bin/yasboot package se gen --cluster yashandb -u yashan -p yashan --ip 127.0.0.1 --port 22 --install-path /data/yashan/yashan/yasdb_home --data-path /data/yashan/data/yasdb_data --begin-port 1688
#执行数据库安装,结束之后会启动yasagent和yasom两个
${yashan_soft}/bin/yasboot package install -t hosts.toml -i /home/yashan/yashandb-personal-23.1.1.100-linux-x86_64.tar.gz
#数据库部署
${yashan_soft}/bin/yasboot cluster deploy -t yashandb.toml

##6. 环境变量配置
cat /data/yashan/yashan/yasdb_home/yashandb/23.1.1.100/conf/yashandb.bashrc >> /home/yashan/.bash_profile
source ~/.bash_profile

##7. 修改sys用户口令
${yashan_soft}/bin/yasboot cluster password set -n yashan#2023 -c yashandb

##8. 查看数据库状态
${yashan_soft}/bin/yasboot cluster status -c yashandb -d

##9. 崖山登录测试
${yashan_soft}/bin/yasql sys/yashan#2023@127.0.0.1:1688 -c "select 'Hello, yashan' from dual;"
########################################################################

chmod +x /home/yashan/script/yashan_install.sh
sh /home/yashan/script/yashan_install.sh

## 看到命令结束,回显输出OPEN状态,即表示数据库安装完成。
1.2 可视化安装
1.2.1 操作系统环境配置
vi /root/script/config_system.sh

########################################################################
#!/bin/bash
#############################
## Author: Rae
## Date: 20231123
## Version: 0.1
#############################

##1. 开发环境调试模式
cat >> /etc/security/limits.conf <<EOF
soft core unlimited
hard core unlimited
EOF
ulimit -c unlimited

##2. 关闭交换分区
echo "vm.swappiness = 0">> /etc/sysctl.conf
sysctl -w vm.swappiness=0

##3. 配置自动调整本地端口范围
sysctl -w net.ipv4.ip_local_port_range='32768 60999'
echo "net.ipv4.ip_local_port_range = 32768 60999" >> /etc/sysctl.conf

##4. 调整进程的VMA上限
echo "vm.max_map_count=2000000" >> /etc/sysctl.conf
sysctl -w vm.max_map_count=2000000

##5. 调整资源限制值
cat >> /etc/security/limits.conf <<EOF
* soft nofile 65536
* hard nofile 65536
* soft nproc 65536
* hard nproc 65536
* soft rss unlimited
* hard rss unlimited
* soft stack 8192
* hard stack 8192
EOF

##6. 关闭透明大页
echo never > /sys/kernel/mm/transparent_hugepage/enabled
echo never > /sys/kernel/mm/transparent_hugepage/defrag
cat >> /etc/rc.local <<EOF
echo never > /sys/kernel/mm/transparent_hugepage/enabled
echo never > /sys/kernel/mm/transparent_hugepage/defrag
EOF
chmod +x /etc/rc.local

##7. 关闭防火墙
systemctl stop firewalld
systemctl disable firewalld

##8. 历史残留配置文件
rm -f /etc/ld.so.conf.d/yashandb*.conf

##9. 清理共享内存
ipcrm -a
########################################################################

chmod +x /root/script/optimize_system.sh
sh /root/script/optimize_system.sh > /dev/null
1.2.1 数据库安装
##1. 创建用户
useradd -d /home/yashan -m yashan
groupadd YASDBA
usermod -a -G YASDBA yashan
echo "yashan" | passwd --stdin yashan

##2. 配置sudo免密
cat >> /etc/sudoers <<EOF
yashan  ALL=(ALL) NOPASSWD:ALL
EOF
chmod -w /etc/sudoers

##3. 创建目录
mkdir -p /data/yashan/{soft,data,yashan}
chown -R yashan.YASDBA /data
chmod 755 /data

##4. 解压软件
tar xzf /home/yashan/yashandb-personal-23.1.1.100-linux-x86_64.tar.gz -C /data/yashan/soft

##5. 启动web页面访问
yashan_soft="/data/yashan/soft"
${yashan_soft}/bin/yasom --web --listen 10.28.12.22:9001

##6. 配置环境变量
cat /home/yashan/yashan/yasdb_home/yashandb/23.1.1.100/conf/yashandb.bashrc >> ~/.bash_profile

source ~/.bash_profile
yasql sys/password@10.28.12.22:1688

##########################################################################
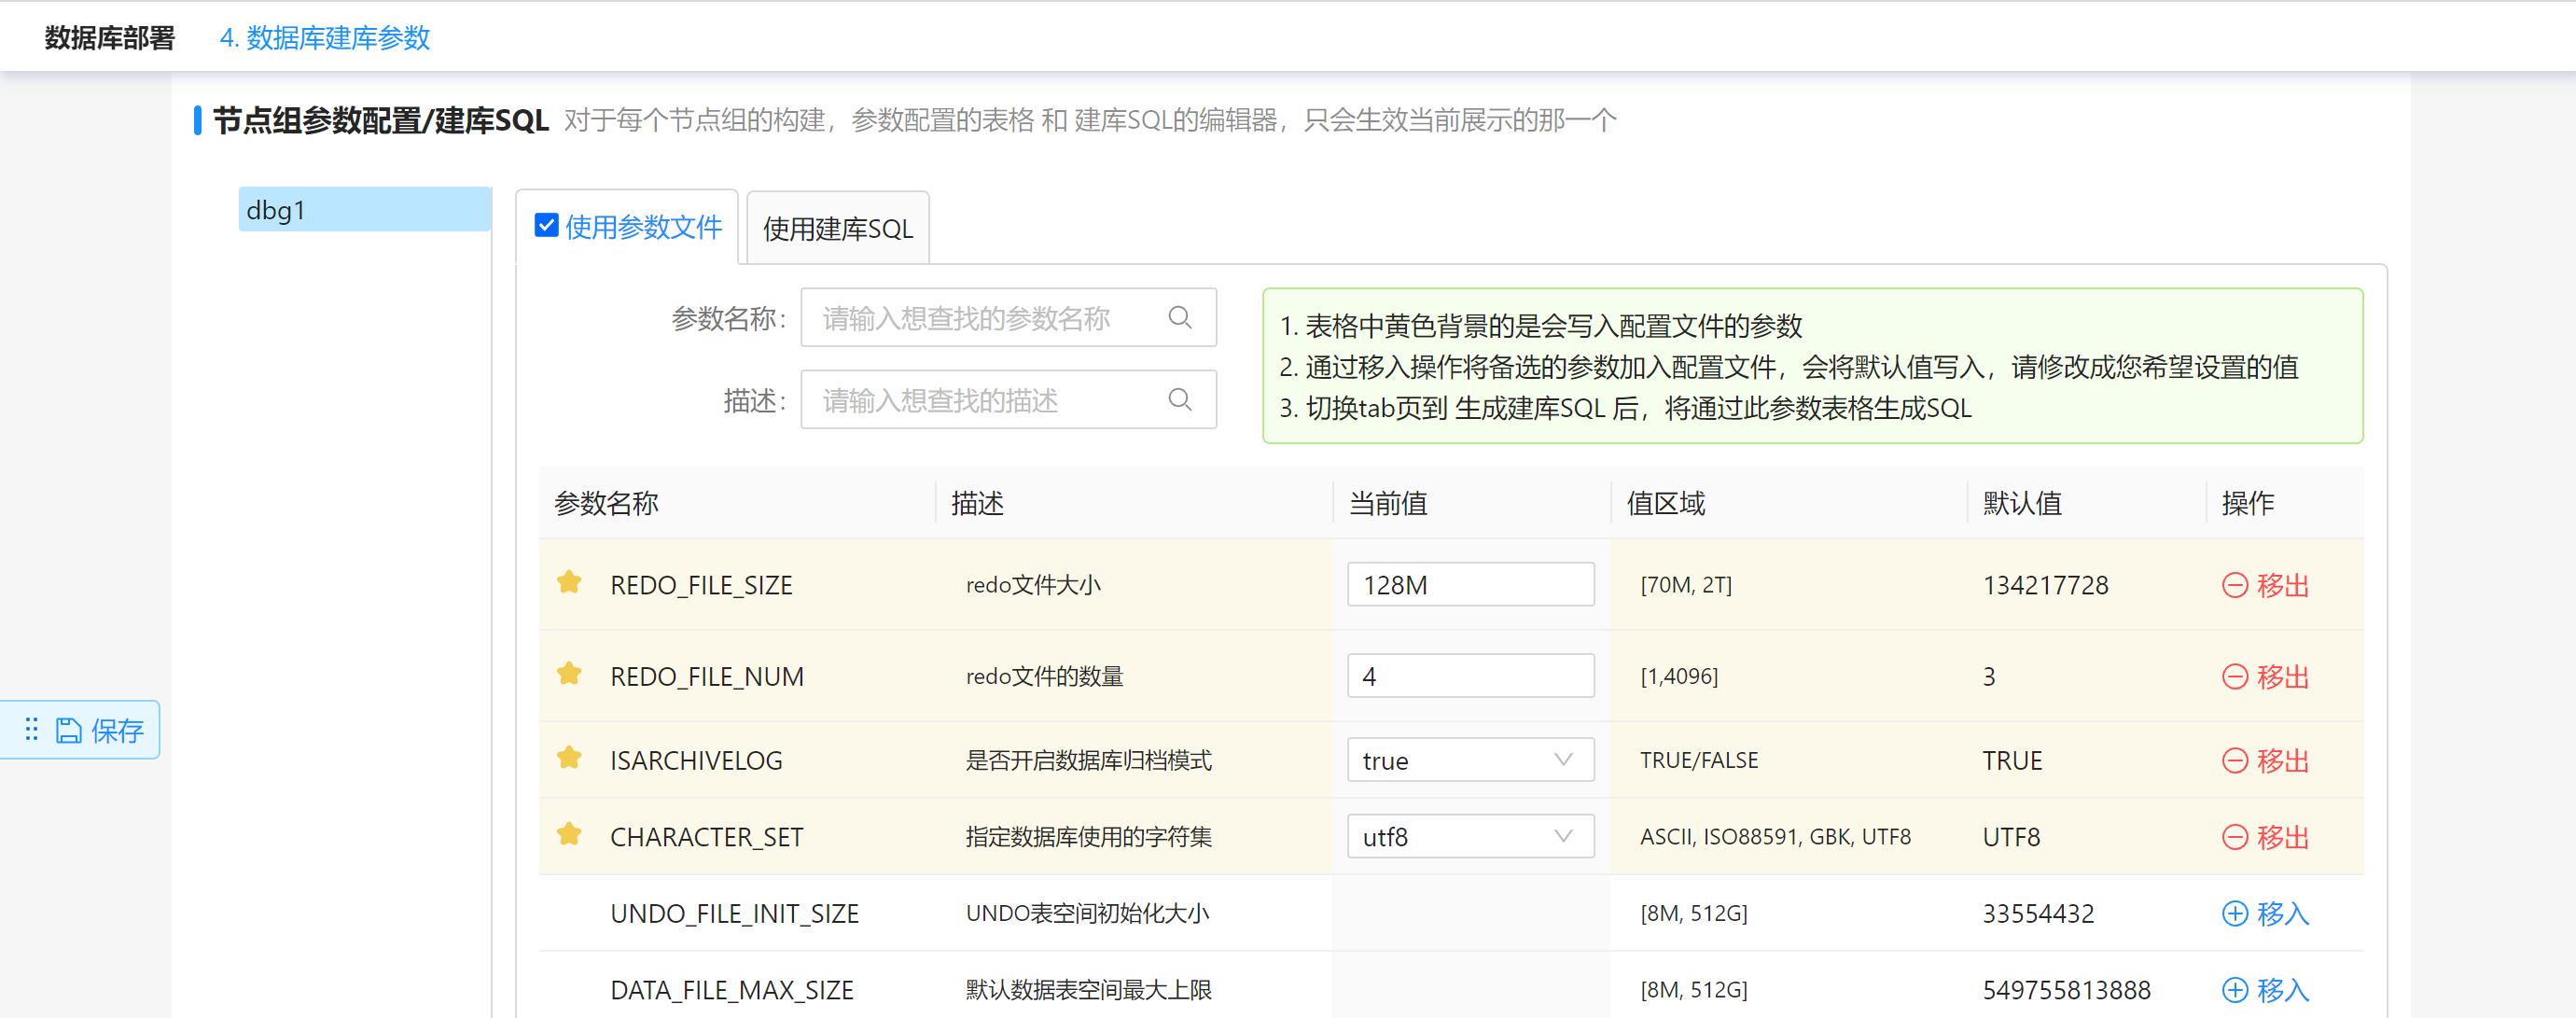
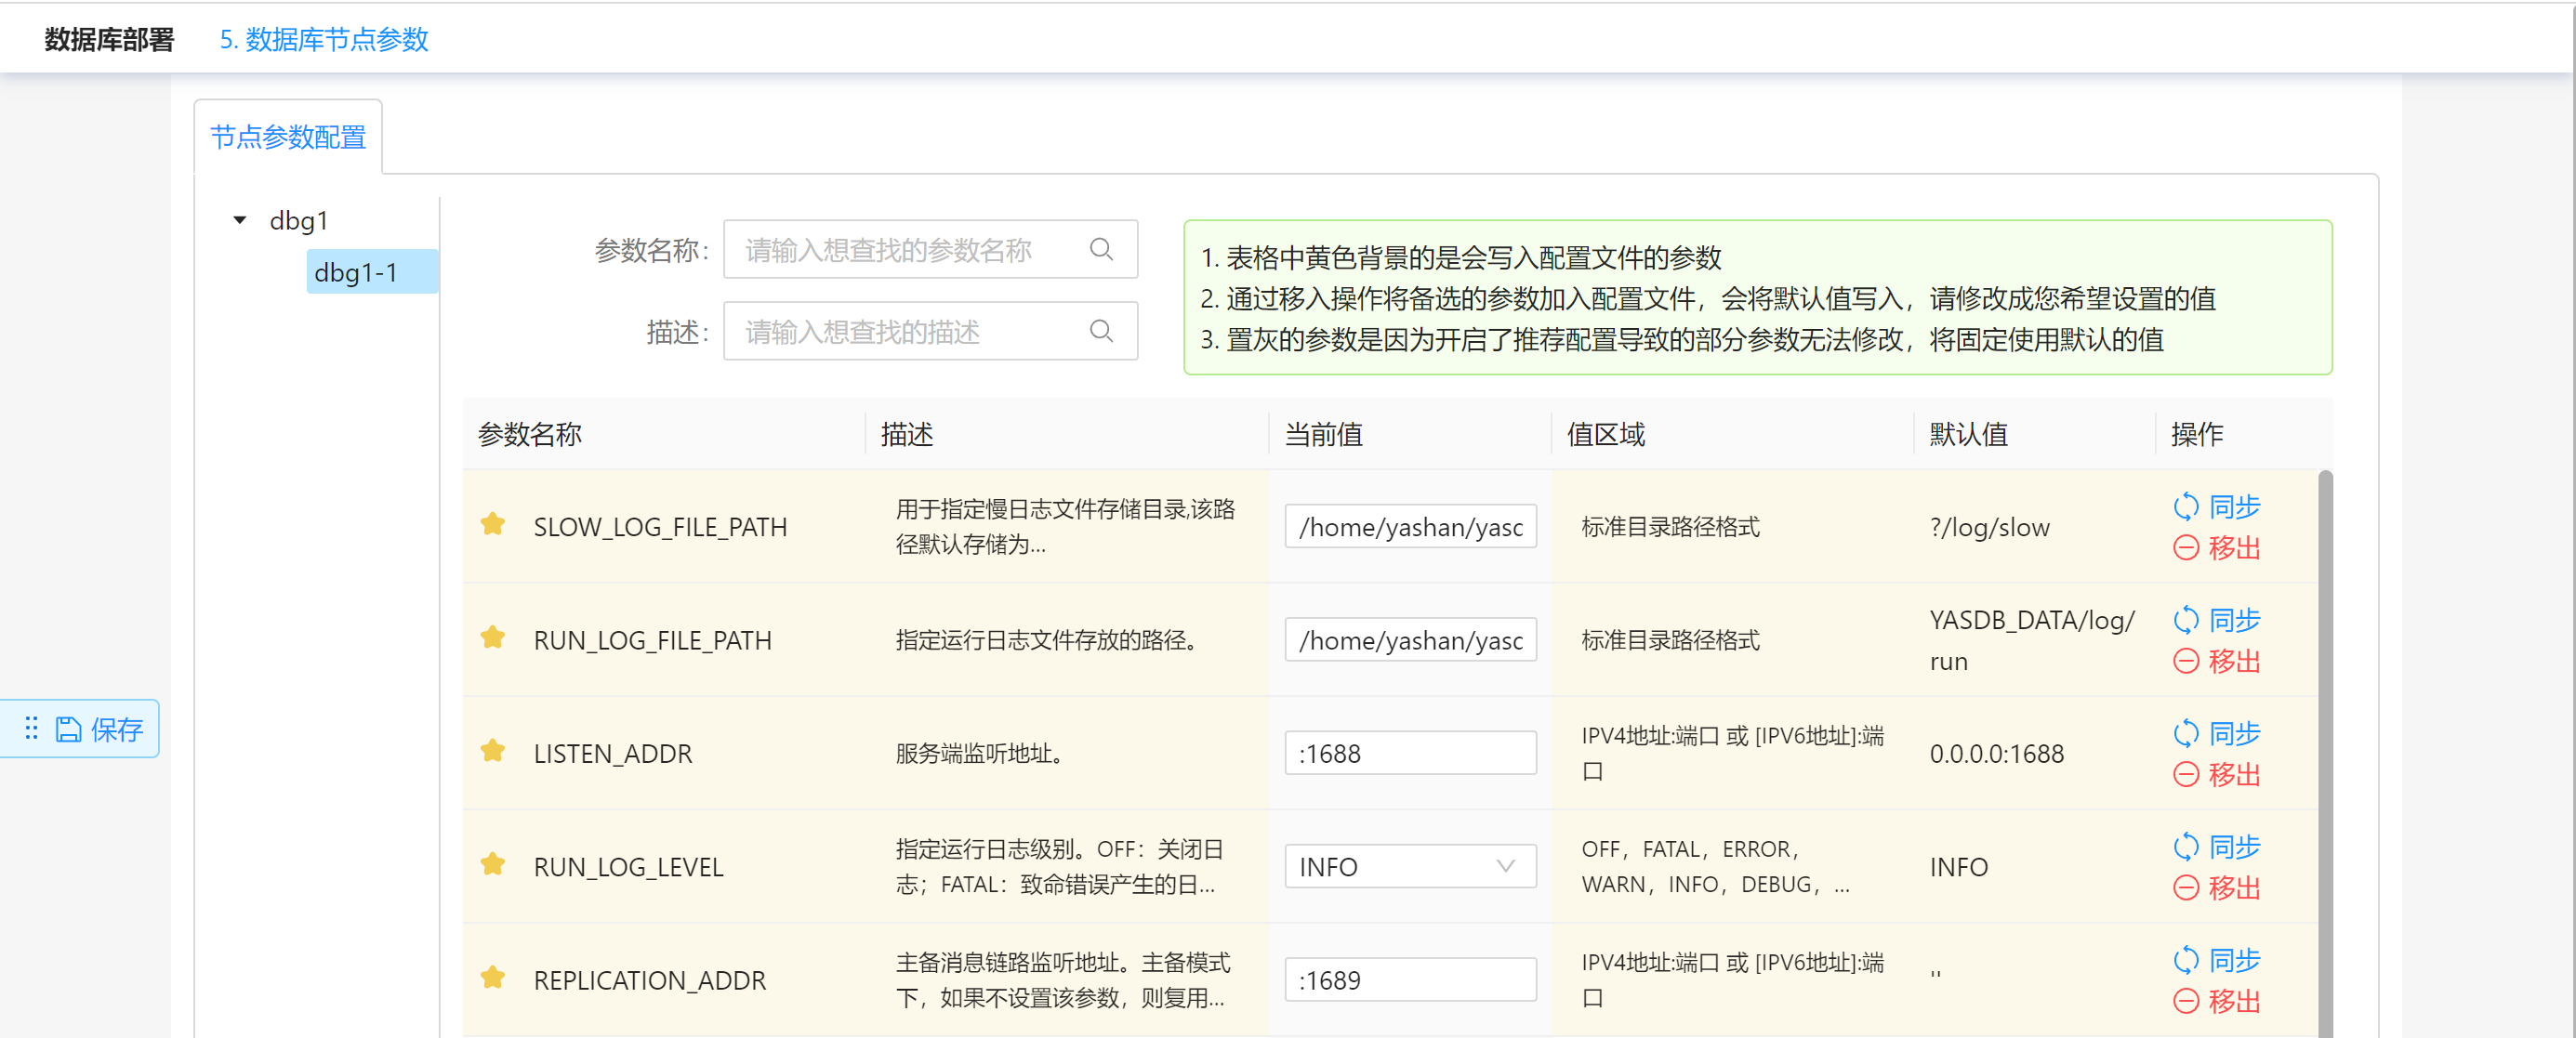
注意:存在节点的内存限制,最小为 1536M,每台主机的节点的内存限制之和不能大于此主机的内存限制。

默认建库的语句如下:
CREATE DATABASE yashandb CHARACTER SET utf8 LOGFILE('?/dbfiles/redo1' SIZE 128M BLOCKSIZE 4K,'?/dbfiles/redo2' SIZE 128M BLOCKSIZE 4K,'?/dbfiles/redo3' SIZE 128M BLOCKSIZE 4K,'?/dbfiles/redo4' SIZE 128M BLOCKSIZE 4K)            ARCHIVELOG ;
##########################################################################



2. 数据库维护
先说说总体体验
- Yashan的大部分视图与Oracle一致,学习成本较低,有Oracle基础的比较容易上手。
- Yashan关于历史视图的内容较少,历史事件回溯比较困难。
- Yashan性能分析工具比较单一,awr输出内容相对比较简单,sql性能分析的工具较有限。
- 恢复演练测试中发现Yashan缺少手工创建控制文件、自定义数据文件、日志文件路径功能。
- AWR报告无法直接导出,还需要手工复制粘贴,ADDM功能暂未能体现出来。
- 针对单个SQL的跟踪优化,是否能提供类似Oracle的sql monitor功能。
2.1 日常维护
整理了日常运维工作中常用的SQL,如数据库启停、表空间情况、慢日志、锁定位分析等内容供参考~
##数据库启停
yasboot process yasagent start -c yashandb
yasboot process yasagent status -c yashandb
yasboot process yasom start -c yashandb
yasboot process yasom status -c yashandb
-- 由于服务都是通过yasboot工具管理 ,所以必须先启动om和agent服务。

##查看状态
yasql sys/yashan#2023@127.0.0.1:1688 -c "select database_name  from v\$database;"
yasql sys/yashan#2023@127.0.0.1:1688 -c "select status from v\$instance;"
yasboot cluster status -c yashandb

##启动数据库
yasboot cluster start -c yashandb -m nomount
yasboot cluster start -c yashandb -m mount
yasboot cluster start -c yashandb
数据库启动的三个状态: nomount --> mount --> open
nomount 可通过 alter database mount; alter database open;的方式推进启动进度。

##.关闭数据库
yasboot cluster stop -c yashandb

##重启数据库
yasboot cluster restart -c yashandb

-- 表空间大小查询
select id,
       dt.tablespace_name,
       max_size / 1024 / 1024 max_size_mb,
       total_bytes / 1024 / 1024 total_size_mb,
       ts_used_size_mb,
       status,
       contents,
       logging,
       allocation_type,
       block_size,
       segment_space_management,
       encrypted
  from dba_tablespaces dt
  left join (select tablespace_name,
                    sum(bytes) / 1024 / 1024 ts_used_size_mb
               from dba_segments d
              group by d.tablespace_name) eg
    on dt.tablespace_name = eg.tablespace_name;

-- 临时表空间信息
SELECT FILE_ID,
       FILE_NAME,
       STATUS,
       BYTES / 1024 / 1024 SIZE_MB,
       AUTOEXTENSIBLE,
       TABLESPACE_NAME,
       MAXBYTES / 1024 / 1024 MAXSIZE_MB,
       INCREMENT_BY
  FROM DBA_TEMP_FILES;

-- 日志文件信息
select thread#,
       name,
       block_size,
       block_count,
       used_blocks,
       sequence#,
       status
  from v$logfile;

-- 用户信息
select username,
       user_id,
       password,
       account_status,
       lock_date,
       expiry_date,
       default_tablespace,
       created,
       authentication_type,
       last_login,
       password_change_date,
       database_maintained,
       profile
  from dba_users;

 -- 密码过期可通过加密密文修改:
alter user xx identified by values "S:39435DAFBF9608EF2430B7AFD1169B7A949D96D9397C2070F39DAB47D70FCB126A1BC1E5A63BD60F8A70" default tablespace users;

-- 所有用户角色
select grantee,
       granted_role privilege,
       'role_privs' privilege_type,
       case admin_option
         when 'y' then
          'yes'
         else
          'no'
       end admin_option
  from dba_role_privs
union
select grantee, privilege, 'sys_privs' privilege_type, admin_option
  from dba_sys_privs
union
select grantee,
       privilege || ' on ' || owner || '.' || table_name privilege,
       'table_privs' privilege_type,
       grantable
  from dba_tab_privs t
 where t.grantee in
       (select username
          from all_users a
         where a.username not in ('sys', 'sysdba', 'syssso', 'sysauditor'))
 order by grantee, privilege_type, privilege;

-- 查看参数
select * from v$parameter;
show parameter xx;

-- 统计对象情况
select d.owner, d.object_type, count(*) cnt
  from dba_objects d
 where d.owner not in ('sys', 'sysdba', 'syssso', 'ctisys', 'sysauditor')
 group by d.owner, d.object_type;

-- 查看推荐参数
exec DBMS_PARAM.OPTIMIZE();
select dbms_param.show_recommend() as recommend_settings from dual;

-- 查看归档情况
select database_id, database_name, log_mode, block_size, restore_time from v$database;

-- 查看每小时归档情况
select left(first_time, 10) day,
        sum(decode(substr(first_time, 12, 2), '00', 1, 0)) h00,
        sum(decode(substr(first_time, 12, 2), '01', 1, 0)) h01,
        sum(decode(substr(first_time, 12, 2), '02', 1, 0)) h02,
        sum(decode(substr(first_time, 12, 2), '03', 1, 0)) h03,
        sum(decode(substr(first_time, 12, 2), '04', 1, 0)) h04,
        sum(decode(substr(first_time, 12, 2), '05', 1, 0)) h05,
        sum(decode(substr(first_time, 12, 2), '06', 1, 0)) h06,
        sum(decode(substr(first_time, 12, 2), '07', 1, 0)) h07,
        sum(decode(substr(first_time, 12, 2), '08', 1, 0)) h08,
        sum(decode(substr(first_time, 12, 2), '09', 1, 0)) h09,
        sum(decode(substr(first_time, 12, 2), '10', 1, 0)) h10,
        sum(decode(substr(first_time, 12, 2), '11', 1, 0)) h11,
        sum(decode(substr(first_time, 12, 2), '12', 1, 0)) h12,
        sum(decode(substr(first_time, 12, 2), '13', 1, 0)) h13,
        sum(decode(substr(first_time, 12, 2), '14', 1, 0)) h14,
        sum(decode(substr(first_time, 12, 2), '15', 1, 0)) h15,
        sum(decode(substr(first_time, 12, 2), '16', 1, 0)) h16,
        sum(decode(substr(first_time, 12, 2), '17', 1, 0)) h17,
        sum(decode(substr(first_time, 12, 2), '18', 1, 0)) h18,
        sum(decode(substr(first_time, 12, 2), '19', 1, 0)) h19,
        sum(decode(substr(first_time, 12, 2), '20', 1, 0)) h20,
        sum(decode(substr(first_time, 12, 2), '21', 1, 0)) h21,
        sum(decode(substr(first_time, 12, 2), '22', 1, 0)) h22,
        sum(decode(substr(first_time, 12, 2), '23', 1, 0)) h23,
        count(*) total
from  v$archived_log
where first_time>=(sysdate-7)
group by left(first_time, 10)
order by left(first_time, 10) desc;

-- 会话情况
select count(*) cnt,
       a.ip_address,
               a.cli_program,
       a.cli_hostname,
       a.cli_osuser,
               a.username,
               a.status
from   v$session a
group  by a.ip_address,
               a.cli_program,
       a.cli_hostname,
       a.cli_osuser,
               a.username,
               a.status
order  by count(*) desc;

-- 查看错误日志
select * from (select incident_id, session_id, error_number, error_argument, error_comments from v$diag_incident) where rownum<=100;

-- 查看awr信息
select dbid, snap_interval, retention, most_recent_snap_id, most_recent_snap_time, status_flag from sys.wrm$_wr_control;

-- 查看慢sql
 select *
  from (select sa.SQL_TEXT,
               sa.SQL_FULLTEXT,
               sa.EXECUTIONS "执行次数",
               round(sa.ELAPSED_TIME / 1000000, 2) "总执行时间",
               round(sa.ELAPSED_TIME / 1000000 / sa.EXECUTIONS, 2) "平均执行时间",
               sa.COMMAND_TYPE,
               sa.PARSING_USER_ID "用户ID",
               u.username "用户名",
               sa.HASH_VALUE
          from v$sqlarea sa
          left join all_users u
            on sa.PARSING_USER_ID = u.user_id
         where sa.EXECUTIONS > 0
         order by (sa.ELAPSED_TIME / sa.EXECUTIONS) desc)
 where rownum <= 5;

-- 查看事务隔离级别
select * from v$transaction;

-- 等待事件
select * from (select  * from v$system_event order by total_waits desc) where rownum<=20;

-- 查看TX锁对象(被阻塞的会话)
select inst_id, sid, serial#, username, sql_id, lockwait, wait_event, ip_address from gv$session where wait_event is not null;
select sql_id, sql_text from gv$sqltext where sql_id = '';

 -- 查看锁源
select * from v$lock; --拿取sid
select sql_text  from "V_$SQLTEXT" a join "V_$SESSION" b on a.HASH_VALUE  = b.SQL_HASH_VALUE  AND b.sid = xx;

select l.lmode,
       o.owner,
       o.object_name,
       o.object_type,
       s.sid,
       s.serial#,
       s.sql_id,
       st.sql_text,
       p.THREAD_ID
  from v$locked_object l,
       dba_objects     o,
       v_$session      s,
       v$process       p,
       v$sqltext,
       v_$sqltext      st
 where l.object_id = o.object_id
   and l.session_id = s.sid
   and s.paddr = p.THREAD_ADDR
   and st.hash_value = s.sql_hash_value
 order by o.object_id;

-- 查看前5系统等待事件
select * from gv$session_wait where wait_event is not null;
select * from (select * from gv$system_event order by AVERAGE_WAIT_FG desc) where rownum <=5;
select * from (select * from gv$system_wait_class order by time_waited desc ) where rownum <= 5;
2.2 备份恢复
2.2.1 SQL命令备份恢复
##1. 数据库全备
mkdir -p /home/yashan/backup/
yasql / as sysdba
backup database full format '/home/yashan/backup/full_20211209191000' tag 'yashan_fullbak_20231129' parallelism 3;

##2. 数据库0级备份和1级备份
backup database incremental level 0 format '/home/yashan/backup/base_0_20231129';
backup database incremental level 1 format '/home/yashan/backup/incr_1_20231129';

##3. 数据库恢复
yasboot cluster stop -c yashandb
yasboot cluster start -c yashandb -m nomount
##注:恢复之前,要先清空数据目录
restore database from '/home/yashan/backup/base_0_20231129' parallelism 3;
recover database; --恢复到最新
--restore database until time to_date('2023-11-29 11:50:50','yyyy-mm-dd hh24:mi:ss');  --恢复到指定时间点
alter database open <resetlogs>;
2.2.2 yasrman备份恢复
##1. 创建catalog
yasrman sys/sys@127.0.0.1:1688 -c 'create catalog' -D /home/yashan/catalog
yasrman sys/sys@127.0.0.1:1688 -c 'show all' -D /home/yashan/catalog

## 2. 数据库全备
yasrman sys/yashan#2023@127.0.0.1:1688 -c "backup database full format '/home/yashan/backup/full_001' tag 'full_backup' parallelism 3" -D /home/yashan/catalog
##不指定存放路径的话,默认备份存放路径:$YASDB_DATA/backup

##3. 数据库0级备份和1级备份
## 0级备份
yasrman sys/yashan#2023@127.0.0.1:1688 -c "backup database incremental level 0 format '/home/yashan/backup/full_001' tag 'full_backup' parallelism 3" -D /home/yashan/catalog
yasrman sys/yashan#2023@127.0.0.1:1688 -c "backup database incremental level 1 format '/home/yashan/backup/full_001' tag 'full_backup' parallelism 3" -D /home/yashan/catalog
## 1级备份

##4. 查看备份集
yasrman sys/yashan#2023@127.0.0.1:1688 -c "list backup" -D /home/yashan/catalog

##4. 删除备份集
##(物理)
yasrman sys/yashan#2023@127.0.0.1:1688 -c "delete backupset tag 'full_backup1'" -D /home/yashan/catalog
编写了数据库备份恢复脚本,每周日全备1次,周一到周六增备1次,脚本内容如下:
cat /home/yashan/script/yashan_backup.sh

#!/bin/bash
#############################################
# Scipt is uesd to set backup level 0 policy.
# Author: Rae
# Date: 2023/11/29
# Version: 1.0
#############################################
# Set enviroment parameter
source ~/.bash_profile
export DATE=`date +%Y%m%d-%H%M%S`
export CURRENT_DATE=`date +%A`

BAK_PATH="/home/yashan/backup"
CATALOG_PATH="/home/yashan/catalog"
BAK_LOG="/home/yashan/backup/yashan_backup.log"
USERNAME="sys"
PASSWORD="yashan#2023"
IP="127.0.0.1"
PORT=1688
PARALLELISM=4

# Create necessary directory
if [ ! -d ${BAK_PATH} ];then
 mkdir -p ${BAK_PATH}
fi
if [ ! -d ${CATALOG_PATH} ];then
 mkdir -p ${CATALOG_PATH}
 yasrman ${USERNAME}/${PASSWORD}@127.0.0.1:1688 -c 'create catalog' -D ${CATALOG_PATH}
 echo "`date +%Y%m%d-%H%M%S` | [Info] | Success create yashan catalog !" >> ${BAK_LOG}
fi

if [ ${CURRENT_DATE} == "Sunday" ];then
 echo "`date +%Y%m%d-%H%M%S` | [Info] | Begin backup databaseincremental level 0 !" >> ${BAK_LOG}
 yasrman ${USERNAME}/${PASSWORD}@${IP}:${PORT} -c "backup database incremental level 0 format '${BAK_PATH}/level0_${DATE}' tag 'level0_${DATE}'" -D ${CATALOG_PATH}
 echo "`date +%Y%m%d-%H%M%S` | [Info] | Success backup databaseincremental level 0 !" >> ${BAK_LOG}

else
 previous_sunday=`date -d "last Sunday" +%Y%m%d`
 result=`yasrman ${USERNAME}/${PASSWORD}@${IP}:${PORT} -c "list backup" -D ${CATALOG_PATH} | grep "tag" | grep "level0" | grep ${previous_sunday} | wc -l`
 if [[ ${result} == 1 ]];then
  echo "`date +%Y%m%d-%H%M%S` | [Info] | Begin backup databaseincremental level 1 !" >> ${BAK_LOG}
  yasrman ${USERNAME}/${PASSWORD}@${IP}:${PORT} -c "backup database incremental level 1 format '${BAK_PATH}/level0_${DATE}' tag 'level1_${DATE}'" -D ${CATALOG_PATH}
  echo "`date +%Y%m%d-%H%M%S` | [Info] | Success backup databaseincremental level 1 !" >> ${BAK_LOG}
 else
  echo "`date +%Y%m%d-%H%M%S` | [Info] | Begin backup databaseincremental level 0 !" >> ${BAK_LOG}
  yasrman ${USERNAME}/${PASSWORD}@${IP}:${PORT} -c "backup database incremental level 0 format '${BAK_PATH}/level0_${DATE}' tag 'level0_${DATE}'" -D ${CATALOG_PATH}
  echo "`date +%Y%m%d-%H%M%S` | [Info] | Success backup databaseincremental level 0 !" >> ${BAK_LOG}
 fi
fi

#配置定时任务
crontab -l
0 1 * * * /home/yashan/script/yashan_backup.sh
2.3 性能分析
2.3.1 AWR报告
select dbid, instance_number, snap_id, begin_interval_time from WRM$_SNAPSHOT;
set serveroutput on
exec dbms_awr.awr_report(dbid,instance_number,start_snap_id,stop_snap_id);

手工创建快照:exec dbms_awr.create_snapshot();
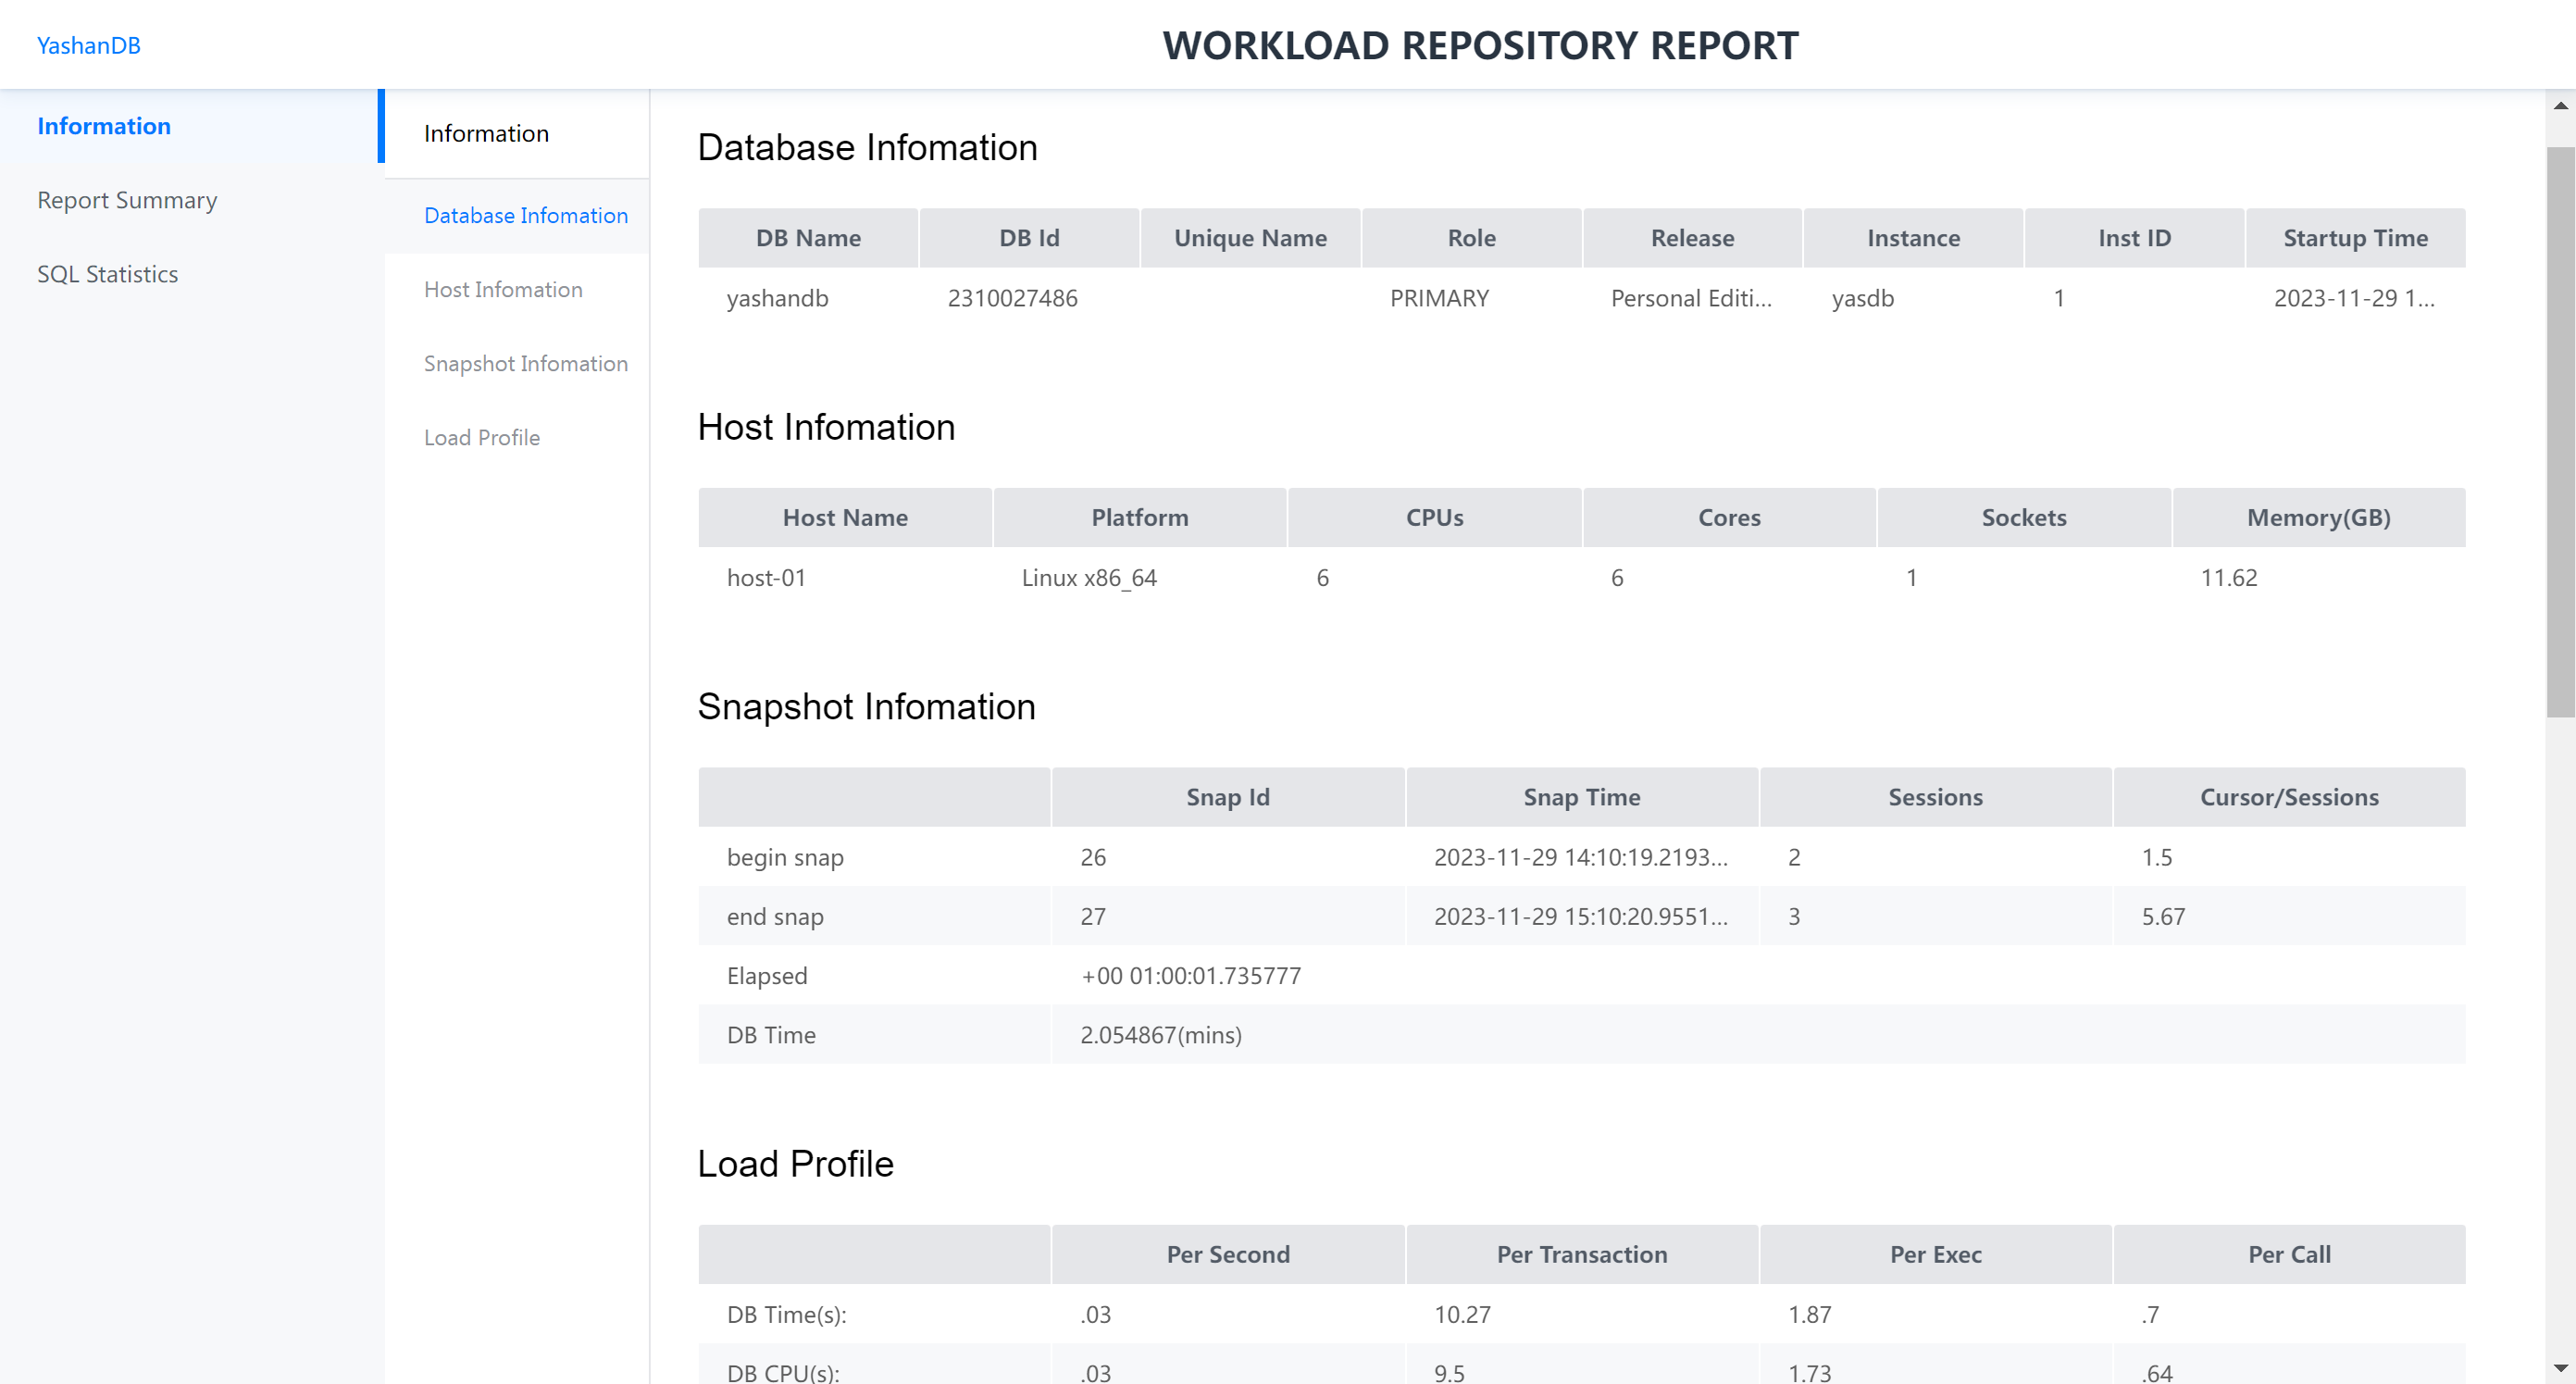
主要记录了数据库基本信息、数据库负载情况以及SQL执行情况。
2.3.2 性能视图
2.3.3 执行计划分析
方式1: explain select * from a, b where a.id = b.id;

方式2:alter session set statistic_level = all; set autotrace on; select *  from a, b where a.id = b.id;
2.3.4 统计信息

判断列统计信息准确性(最大值,最小值判断):
select max(id), min(id) from t1;
select high_value, low_value from dba_tab_col_statistics where table_name = 'T1' and column_name = 'ID';

查看统计信息是否失效:
select owner, table_name, num_rows, avg_space, chain_cnt, sample_size, last_analyzed, global_stats, stale_stats from dba_tab_statistics where table_name = 'T1';

统计信息收集:
ANALYZE TABLE t1 PARTITION NULL INDEX_CASCADE true METHOD_OPTION 'FOR ALL COLUMNS' GRANULARITY 'AUTO' PARALLEL_DEGREE 1;
2.3.5 hint调优
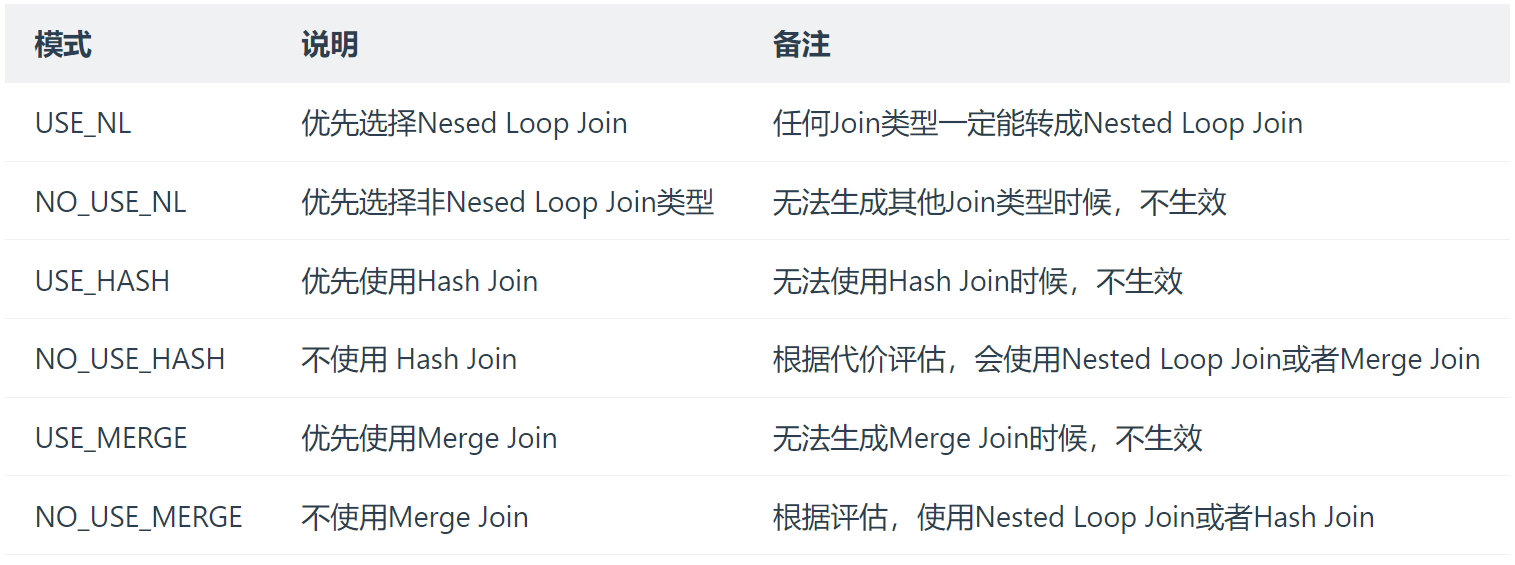
2.3.5.1. 改变join的hint
2.3.5.2. 改变访问路径的hint

2.3.5.3 选择率的hint
explain select * from t1, t2, t3 where t1.c1 = t2.c1 selectivity 0.0001 and t2.c1 = t3.c1;
2.3.6 绑定执行计划outline
3. 数据库升级
先说说总体体验:
- 升级比较简单,但是步骤还是稍显冗杂。建议将部分步骤整合成自动化脚本,缩减步骤。
- 升级前置检查,建议可以开发precheck脚本,评估当前系统满足升级需求。
- 建议增加预升级功能,把升级需要跑通的步骤check一遍,提高升级成功率。
yasboot cluster upgrade --cluster yashandb
yasboot cluster rollback -c yashandb -d yashandb
4. 数据库迁移
暂时没有时间测试了,有空测试了,再更新~
5. 使用总结
YashanDB的总体体验还是不错的,运维学习成本较低,具备Oracle运维经验的工程师可以很快速的上手。功能上虽然距离Oracle还有一定距离,但是相信国产数据库YashanDB会越做越好。
暂时先写到这里了,相信这份文档能给你一些收获。
最后修改时间:2023-12-03 12:16:55
「喜欢这篇文章,您的关注和赞赏是给作者最好的鼓励」
关注作者
【版权声明】本文为墨天轮用户原创内容,转载时必须标注文章的来源(墨天轮),文章链接,文章作者等基本信息,否则作者和墨天轮有权追究责任。如果您发现墨天轮中有涉嫌抄袭或者侵权的内容,欢迎发送邮件至:contact@modb.pro进行举报,并提供相关证据,一经查实,墨天轮将立刻删除相关内容。


