前言
在现在国产数据库遍地开花的时代,正好赶上《YashanDB个人版正式开放下载!参与首批体验官活动赢好礼!》活动。
安装
个人开发环境最小配置
| 项目 | 描述 |
|---|---|
| 操作系统 | CentOS 7.6,kylin V10 |
| CPU | X86_64,ARM64 2C |
| 内存 | 4G |
| 硬盘 | 50G |
| 文件系统 | SSD |
| 网络 | 千兆以太网,支持TCP和UDP链接 |
1、环境介绍
| 操作系统 | 内存 | 硬盘 |
|---|---|---|
| CentOS release 6.7 (Final) | 8GB | 48GB |
目前只有CentOS release 6.7的系统环境,尝试一把6.7系统的安装。
文章有点小众,希望能为有面临同等困境的同伴提供一些帮助。
2、创建安装用户:yashan
[root@localhost ~]# useradd yashan
[root@localhost ~]# passwd yashan
更改用户 yashan 的密码 。
新的 密码:
重新输入新的 密码:
passwd: 所有的身份验证令牌已经成功更新。
-- 密码:yashan123
3、系统参数调整
下表为YashanDB数据库所需的资源限制值的最小要求,请根据下表所示将资源限制值调整为大于或等于最小要求的值。
| 资源项 | 描述 | 最小要求 |
|---|---|---|
| open files | content2 | content3 |
| open files | 文件句柄 | 65536 |
| max user processes | 最大用户线程数 | 65536 |
| max memory size | 最大内存限制 | unlimited |
| stack size | 堆栈大小 | 8192 |
- 配置参数永久生效
[root@localhost ~]# vim /etc/security/limits.conf
yashan soft nofile 65536
yashan hard nofile 65536
yashan soft nproc 65536
yashan hard nproc 65536
yashan soft rss unlimited
yashan hard rss unlimited
yashan soft stack 8192
yashan hard stack 8192
4、下载软件

软件包下载完成 :yashandb-personal-23.1.1.100-linux-x86_64.tar.gz
5、创建安装目录&解压
[root@localhost ~]# su yashan
[yashan@localhost ~]$ mkdir insertall
[yashan@localhost insertall]$ mv /home/yashan/yashandb-personal-23.1.1.100-linux-x86_64.tar.gz ./
[yashan@localhost insertall]$ ls
yashandb-personal-23.1.1.100-linux-x86_64.tar.gz
[yashan@localhost insertall]$ tar -zxvf yashandb-personal-23.1.1.100-linux-x86_64.tar.gz
[yashan@localhost insertall]$ ll
总用量 171344
drwxrwxr-x 6 yashan yashan      4096 11月  9 18:16 admin
drwxrwxr-x 2 yashan yashan      4096 11月  9 18:16 bin
drwxrwxr-x 2 yashan yashan      4096 11月  9 18:16 conf
drwxrwxr-x 5 yashan yashan      4096 11月  9 18:16 ext
-rw-rw-r-- 1 yashan yashan     11632 11月  9 18:16 gitmoduleversion.dat
drwxrwxr-x 2 yashan yashan      4096 11月  9 18:16 include
drwxrwxr-x 3 yashan yashan      4096 11月  9 18:16 java
drwxrwxr-x 2 yashan yashan      4096 11月  9 18:16 lib
-rw-r----- 1 yashan yashan     14989 11月  9 18:16 LICENSE
drwxrwxr-x 3 yashan yashan      4096 11月  9 18:16 plug-in
drwxrwxr-x 2 yashan yashan      4096 11月  9 18:16 scripts
-rw-rw-r-- 1 yashan yashan 175386922 12月  2 2023 yashandb-personal-23.1.1.100-linux-x86_64.tar.gz
6、生成参数文件
执行如下命令生成安装参数文件,ssh登录密码为创建yashan用户时指定的密码,
请将–ip参数后面的值更换成安装服务端主机所在IP地址(使用127.0.0.1会导致客户端无法连接至服务端):
[yashan@localhost insertall]$ ./bin/yasboot package se gen --cluster yashandb -u yashan -p yashan123 --ip 10.10.5.137 --port 22 --install-path /home/yashan/yasdb_home  --data-path /home/yashan/yasdb_data --begin-port 1688
10.10.5.137
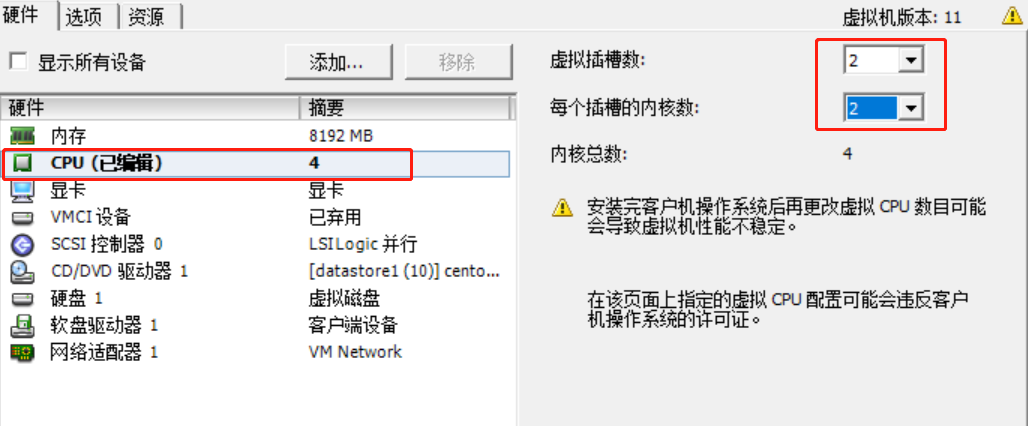
  ip:10.10.5.137 cpu cores is less than 2
 hostid   | group | node_type | node_name | listen_addr      | replication_addr | data_path
----------------------------------------------------------------------------------------------------------
 host0001 | dbg1  | db        | 1-1       | 10.10.5.137:1688 | 10.10.5.137:1689 | /home/yashan/yasdb_data
----------+-------+-----------+-----------+------------------+------------------+-------------------------

Generate config success
- 查看参数文件 :
[yashan@localhost insertall]$ cat hosts.toml
uuid = "65545d31967b22cd46ee403164737850"
cluster = "yashandb"
yas_type = "SE"
secret_key = "94c021bc8ed68103"
add_yasdba = true

[om]
 hostid = "host0001"
 [om.config]
   LISTEN_ADDR = "10.10.5.137:1675"

[[host]]
 hostid = "host0001"
 group = "yashan"
 user = "yashan"
 password = "yashan123"
 ip = "10.10.5.137"
 port = 22
 path = "/home/yashan/yasdb_home"
 jvm_path = ""
 total_memory = 0
 [host.yasagent]
   [host.yasagent.config]
7、执行安装
执行如下命令安装YashanDB数据库,如实际安装数据库版本与示例中版本不同,请将-i参数后的软件包名称更改成实际名称:
[yashan@localhost insertall]$ ./bin/yasboot package install -t hosts.toml -i yashandb-personal-23.1.1.100-linux-x86_64.tar.gz
10.10.5.137
  ip:10.10.5.137 cpu cores is less than 2
config check failed
调整虚拟机重新来过:

[yashan@localhost insertall]$ ./bin/yasboot package install -t hosts.toml -i yashandb-personal-23.1.1.100-linux-x86_64.tar.gz
checking install package...
install version: yashandb 23.1.1.100
host0001 100% [====================================================================]    3s
host0001 failed, 1, , Process exited with status 1 /home/yashan/yasdb_home/yashandb/23.1.1.100/bin/yasagent: /lib64/libc.so.6: version `GLIBC_2.14' not found (required by /home/yashan/yasdb_home/yashandb/23.1.1.100/bin/yasagent)

package install failed
- 问题:/lib64/libc.so.6: version `GLIBC_2.14’ not found
- 原因:查看有问题的centos6的系统glibc支持的版本,发现只支持到2.12
yashan 数据库最低要求系统版为:CentOS 7.6,本系统为CentOS 6.7
[root@localhost glibc-2.14]# strings /lib64/libc.so.6 | grep GLIBC
GLIBC_2.2.5
GLIBC_2.2.6
GLIBC_2.3
GLIBC_2.3.2
GLIBC_2.3.3
GLIBC_2.3.4
GLIBC_2.4
GLIBC_2.5
GLIBC_2.6
GLIBC_2.7
GLIBC_2.8
GLIBC_2.9
GLIBC_2.10
GLIBC_2.11
GLIBC_2.12
GLIBC_PRIVATE
- 解决:升级glibc至2.18
[root@localhost ]# wget http://ftp.gnu.org/gnu/glibc/glibc-2.18.tar.gz
[root@localhost ]# tar -xvf glibc-2.18.tar.gz
[root@localhost ]# cd glibc-2.18
[root@localhost glibc-2.18]# mkdir build && cd build && ../configure --prefix=/usr && make -j4 && make install
[root@localhost build]# strings /lib64/libc.so.6 | grep GLIBC
GLIBC_2.2.5
GLIBC_2.2.6
GLIBC_2.3
GLIBC_2.3.2
GLIBC_2.3.3
GLIBC_2.3.4
GLIBC_2.4
GLIBC_2.5
GLIBC_2.6
GLIBC_2.7
GLIBC_2.8
GLIBC_2.9
GLIBC_2.10
GLIBC_2.11
GLIBC_2.12
GLIBC_2.13
GLIBC_2.14
GLIBC_2.15
GLIBC_2.16
GLIBC_2.17
GLIBC_2.18
GLIBC_PRIVATE
- 删除yasdb_home,重新安装
[yashan@localhost ~]$  rm -rf yasdb_home/
[yashan@localhost insertall]$ ./bin/yasboot package install -t hosts.toml -i yashandb-personal-23.1.1.100-linux-x86_64.tar.gz
checking install package...
install version: yashandb 23.1.1.100
host0001 100% [====================================================================]    3s
update host to yasom...
8、执行部署
- 部署YashanDB数据库:
[yashan@localhost insertall]$ ./bin/yasboot cluster deploy -t yashandb.toml
type | uuid             | name               | hostid | index    | status   | return_code | progress | cost
-------------------------------------------------------------------------------------------------------------
task | ec79fcc6465ed61e | DeployYasdbCluster | -      | yashandb | CANCELED | 1           | 100      | 13
------+------------------+--------------------+--------+----------+----------+-------------+----------+------
task completed, status: CANCELED
retcode: 1
stdout: start node with ping
stderr: wait node 1-1 process start failed: Starting instance nomount
failed to load dynamic library /home/yashan/yasdb_home/yashandb/23.1.1.100/plug-in/package/linux/libyspi_geometry.so, /usr/lib64/libstdc++.so.6: version `GLIBCXX_3.4.18' not found (required by /home/yashan/yasdb_home/yashandb/23.1.1.100/lib/libproj.so.25)
Failed to start instance
- 查看GLIBC版本
[yashan@localhost insertall]$  strings /usr/lib64/libstdc++.so.6 | grep GLIBC
GLIBCXX_3.4
GLIBCXX_3.4.1
GLIBCXX_3.4.2
GLIBCXX_3.4.3
GLIBCXX_3.4.4
GLIBCXX_3.4.5
GLIBCXX_3.4.6
GLIBCXX_3.4.7
GLIBCXX_3.4.8
GLIBCXX_3.4.9
GLIBCXX_3.4.10
GLIBCXX_3.4.11
GLIBCXX_3.4.12
GLIBCXX_3.4.13
GLIBC_2.2.5
GLIBC_2.3
GLIBC_2.4
GLIBC_2.3.2
GLIBCXX_FORCE_NEW
GLIBCXX_DEBUG_MESSAGE_LENGTH
- 安装 GLIBCXX_3.4.18
[root@localhost ~]#wget http://ftp.gnu.org/gnu/gcc/gcc-5.4.0/gcc-5.4.0.tar.gz
[root@localhost ~]#tar -xzvf gcc-5.4.0.tar.gz
[root@localhost ~]#cd gcc-5.4.0
[root@localhost gcc-5.4.0]./contrib/download_prerequisites
[root@localhost gcc-5.4.0]#  mkdir build && cd build && ../configure --disable-multilib --prefix=/usr && make -j4 && make install
-----这编译了好久------------------------------------------------------
----------------------------------------------------------------------
Libraries have been installed in:
   /usr/lib/../lib64

If you ever happen to want to link against installed libraries
in a given directory, LIBDIR, you must either use libtool, and
specify the full pathname of the library, or use the `-LLIBDIR'
flag during linking and do at least one of the following:
   - add LIBDIR to the `LD_LIBRARY_PATH' environment variable
     during execution
   - add LIBDIR to the `LD_RUN_PATH' environment variable
     during linking
   - use the `-Wl,-rpath -Wl,LIBDIR' linker flag
   - have your system administrator add LIBDIR to `/etc/ld.so.conf'

See any operating system documentation about shared libraries for
more information, such as the ld(1) and ld.so(8) manual pages.
----------------------------------------------------------------------
make[4]: Nothing to be done for `install-data-am'.
make[4]: Leaving directory `/root/gcc-5.4.0/build/x86_64-unknown-linux-gnu/libatomic'
make[3]: Leaving directory `/root/gcc-5.4.0/build/x86_64-unknown-linux-gnu/libatomic'
make[2]: Leaving directory `/root/gcc-5.4.0/build/x86_64-unknown-linux-gnu/libatomic'
make[1]: Leaving directory `/root/gcc-5.4.0/build'
- 再次检查GLIBC
[root@localhost build]# strings /usr/lib64/libstdc++.so.6 | grep GLIBC
GLIBCXX_3.4
GLIBCXX_3.4.1
GLIBCXX_3.4.2
GLIBCXX_3.4.3
GLIBCXX_3.4.4
GLIBCXX_3.4.5
GLIBCXX_3.4.6
GLIBCXX_3.4.7
GLIBCXX_3.4.8
GLIBCXX_3.4.9
GLIBCXX_3.4.10
GLIBCXX_3.4.11
GLIBCXX_3.4.12
GLIBCXX_3.4.13
GLIBCXX_3.4.14
GLIBCXX_3.4.15
GLIBCXX_3.4.16
GLIBCXX_3.4.17
GLIBCXX_3.4.18
GLIBCXX_3.4.19
GLIBCXX_3.4.20
GLIBCXX_3.4.21
GLIBC_2.3
GLIBC_2.2.5
GLIBC_2.14
GLIBC_2.18
GLIBC_2.17
GLIBC_2.3.2
GLIBCXX_FORCE_NEW
GLIBCXX_DEBUG_MESSAGE_LENGTH
- 卸载数据库
[yashan@localhost insertall]$ ./bin/yasboot cluster clean --cluster yashandb --purge
- 卸载OM
[yashan@localhost insertall]$ ./bin/yasboot package uninstall --cluster yashandb
- 清除~/.bashrc中与YashanDB有关的环境变量
- 重新部署- 无报错提示,都不知道从哪下手(头痛了20分钟啊)

- 看来是有链接
[yashan@localhost insertall]$ netstat -nat | grep 137
tcp        0      0 10.10.5.137:1675            0.0.0.0:*                   LISTEN
tcp        0      0 10.10.5.137:1676            0.0.0.0:*                   LISTEN
tcp        0     96 10.10.5.137:22              10.10.1.41:63515            ESTABLISHED
重启:
[root@localhost build]# reboot
- 重新再来一次
- 生成参数文件
[yashan@localhost ~]$ cd insertall/
[yashan@localhost insertall]$ ./bin/yasboot package se gen --cluster yashandb -u yashan -p yashan123 --ip 10.10.5.137 --port 22 --install-path /home/yashan/yasdb_home  --data-path /home/yashan/yasdb_data --begin-port 1688
 hostid   | group | node_type | node_name | listen_addr      | replication_addr | data_path
----------------------------------------------------------------------------------------------------------
 host0001 | dbg1  | db        | 1-1       | 10.10.5.137:1688 | 10.10.5.137:1689 | /home/yashan/yasdb_data
----------+-------+-----------+-----------+------------------+------------------+-------------------------

Generate config success
- 执行安装
[yashan@localhost insertall]$ ./bin/yasboot package install -t hosts.toml -i yashandb-personal-23.1.1.100-linux-x86_64.tar.gz
checking install package...
install version: yashandb 23.1.1.100
host0001 100% [====================================================================]    3s
update host to yasom...
- 执行部署
[yashan@localhost insertall]$ ./bin/yasboot cluster deploy -t yashandb.toml
 type | uuid             | name               | hostid | index    | status  | return_code | progress | cost
------------------------------------------------------------------------------------------------------------
 task | e6b2a81a832eb411 | DeployYasdbCluster | -      | yashandb | SUCCESS | 0           | 100      | 8
------+------------------+--------------------+--------+----------+---------+-------------+----------+------
task completed, status: SUCCESS
[yashan@localhost insertall]$
- 执行如下命令配置环境变量
# 如~/.bashrc中已存在YashanDB相关的环境变量,将其清除
[yashan@localhost ~]$ cd yasdb_home/yashandb/23.1.1.100/conf/
[yashan@localhost conf]$ cat yashandb.bashrc >> ~/.bashrc
[yashan@localhost conf]$  source ~/.bashrc
[yashan@localhost conf]$ cat ~/.bashrc
# .bashrc

# Source global definitions
if [ -f /etc/bashrc ]; then
        . /etc/bashrc
fi

export YASDB_HOME=/home/yashan/yasdb_home/yashandb/23.1.1.100
export PATH=${YASDB_HOME}/bin:$PATH
export LD_LIBRARY_PATH=${YASDB_HOME}/lib:$LD_LIBRARY_PATH
if command -v rlwrap >/dev/null 2>&1; then
  alias yasql="rlwrap yasql"
fi

export YASDB_DATA=/home/yashan/yasdb_data/db-1-1
- 设置YashanDB数据库sys用户口令
YashanDB不提供系统初始口令,请通过yasboot工具设置集群内所有节点sys用户的密码。
[yashan@localhost ~]$ cd /home/yashan/insertall/
[yashan@localhost insertall]$ ./bin/yasboot cluster password set -n yashan1234! -c yashandb
 type | uuid             | name             | hostid | index    | status  | return_code | progress | cost
----------------------------------------------------------------------------------------------------------
 task | b351a70c680eec0c | YasdbPasswordSet | -      | yashandb | SUCCESS | 0           | 100      | 2
------+------------------+------------------+--------+----------+---------+-------------+----------+------
task completed, status: SUCCESS
- 查看YashanDB数据库状态,如显示出数据库状态信息即为安装成功:
[yashan@localhost instance]$ yasboot cluster status -c yashandb
 host_id  | node_type | nodeid | pid
--------------------------------------
 host0001 | db        | 1-1:1  | 2303
----------+-----------+--------+------
- 登录数据库
[yashan@localhost instance]$ yasql sys/yashan1234!
YashanDB SQL Personal Edition Release 23.1.1.100 x86_64

Connected to:
YashanDB Server Personal Edition Release 23.1.1.100 x86_64 - X86 64bit Linux

SQL>
9、配合环境变量:
[yashan@localhost ~]$ cat .bash_profile
# .bash_profile

# Get the aliases and functions
if [ -f ~/.bashrc ]; then
        . ~/.bashrc
fi

# User specific environment and startup programs

PATH=$PATH:$HOME/bin:/sbin:/usr/bin:/usr/sbin

export PATH
export YASDB_HOME=/home/yashan/yasdb_home/yashandb/23.1.0.100
export PATH=${YASDB_HOME}/bin:$PATH
export LD_LIBRARY_PATH=${YASDB_HOME}/lib:$LD_LIBRARY_PATH
if command -v rlwrap >/dev/null 2>&1; then
  alias yasql="rlwrap yasql"
fi

export YASDB_DATA=/home/yashan/yasdb_data/db-1-1
数据库体验
- 查看当前实例状态及数据库名称:
SQL> SELECT status FROM V$INSTANCE;
STATUS
-------------
OPEN
1 row fetched.
SQL> SELECT database_name FROM V$DATABASE;
DATABASE_NAME
----------------------------------------------------------------
yashandb
1 row fetched.
- 命令关闭YashanDB服务
[yashan@localhost insertall]$ yasboot cluster stop -c yashandb
 type | uuid             | name             | hostid | index    | status  | return_code | progress | cost
----------------------------------------------------------------------------------------------------------
 task | 3d159544a9916589 | StopYasdbCluster | -      | yashandb | SUCCESS | 0           | 100      | 2
------+------------------+------------------+--------+----------+---------+-------------+----------+------
task completed, status: SUCCESS
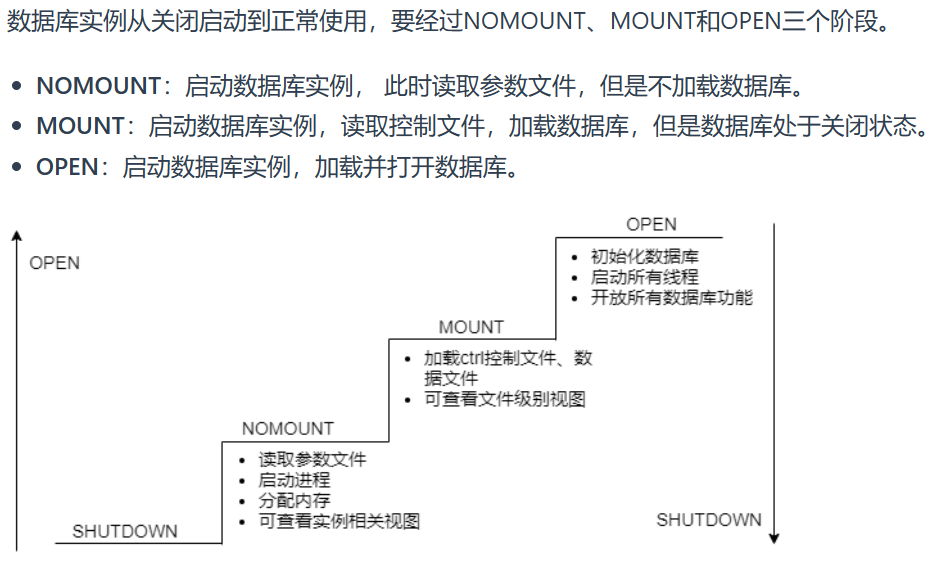
- 启YashanDB服务,同时会将实例切换至OPEN阶段:
[yashan@localhost insertall]$ yasboot cluster start -c yashandb
 type | uuid             | name              | hostid | index    | status  | return_code | progress | cost
-----------------------------------------------------------------------------------------------------------
 task | 78ddbd5a67ec9345 | StartYasdbCluster | -      | yashandb | SUCCESS | 0           | 100      | 2
------+------------------+-------------------+--------+----------+---------+-------------+----------+------
task completed, status: SUCCESS
- 重启YashanDB数据库,并将实例启动至OPEN阶段:
$ yasboot cluster restart -c yashandb
 type | uuid             | name                | hostid | index    | status  | return_code | progress | cost
-------------------------------------------------------------------------------------------------------------
 task | 78d6449df62594b5 | ReStartYasdbCluster | -      | yashandb | SUCCESS | 0           | 100      | 3
------+------------------+---------------------+--------+----------+---------+-------------+----------+------
task completed, status: SUCCESS
- 重启YashanDB数据库,并将实例启动至NOMOUNT阶段:
[yashan@localhost insertall]$ yasboot cluster restart -c yashandb
 type | uuid             | name                | hostid | index    | status  | return_code | progress | cost
-------------------------------------------------------------------------------------------------------------
 task | 216bb10372e665cd | ReStartYasdbCluster | -      | yashandb | SUCCESS | 0           | 100      | 5
------+------------------+---------------------+--------+----------+---------+-------------+----------+------
task completed, status: SUCCESS
- 重启YashanDB数据库,并将实例启动至MOUNT阶段:
[yashan@localhost insertall]$ yasboot cluster restart -c yashandb -m mount
 type | uuid             | name                | hostid | index    | status  | return_code | progress | cost
-------------------------------------------------------------------------------------------------------------
 task | f18028bf1caedc99 | ReStartYasdbCluster | -      | yashandb | SUCCESS | 0           | 100      | 5
------+------------------+---------------------+--------+----------+---------+-------------+----------+------
task completed, status: SUCCESS

体验总结
- 1、与Oracle 操作习惯基本很像,Oracle DBA接手会很快适应。
- 2、安装报错提示不明显(在这里我一直对为是有配置文件没有清理干净,头痛了好久):

- 3、CentOS release 6.7 的安装主要是GLIBC、GLIBC两个的版需要升级,稳定性待验证。
官网系统版最低为:CentOS release 7.6,此次操作为测试,供有相关需求的同仁参考。 - 4、个人小结:不按套路安装,就如过关斩将一般。学习的快乐就在于些吧
最后修改时间:2023-12-03 12:10:09
「喜欢这篇文章,您的关注和赞赏是给作者最好的鼓励」
关注作者
【版权声明】本文为墨天轮用户原创内容,转载时必须标注文章的来源(墨天轮),文章链接,文章作者等基本信息,否则作者和墨天轮有权追究责任。如果您发现墨天轮中有涉嫌抄袭或者侵权的内容,欢迎发送邮件至:contact@modb.pro进行举报,并提供相关证据,一经查实,墨天轮将立刻删除相关内容。


