


前言
Facebook 在 React.js Conf 2015 大会上推出了基于 JavaScript 的开源框架 React Native,本中文教程翻译自 React Native 官方文档。
React Native 结合了 Web 应用和 Native 应用的优势,可以使用 JavaScript 来开发 iOS 和 Android 原生应用。在 JavaScript 中用 React 抽象操作系统原生的 UI 组件,代替 DOM 元素来渲染等。
React Native 使你能够使用基于 JavaScript 和 React 一致的开发体验在本地平台上构建世界一流的应用程序体验。React Native 把重点放在所有开发人员关心的平台的开发效率上——开发者只需学习一种语言就能轻易为任何平台高效地编写代码。Facebook 在多个应用程序产品中使用了 React Native,并将继续为 React Native 投资。
React Native for Android
Facebook 于 2015 年 9 月 15 日发布了 React Native for Android, 把 Web 和原生平台的 JavaScript 开发技术扩展到了 Google 的流行移动平台--Android。
新增 Android 相关章节:
- 入门
- 安装 Android 运行环境
- 教程
- 辅助功能
- Native 模块(Android)
- Native UI 组件(Android)
- 调试
- 在设备上运行(Android)
- 已知 Issues
- DrawerLayoutAndroid
- 图像
- ProgressBarAndroid
- SwitchAndroid
- ToolbarAndroid
- BackAndroid
- ToastAndroid
React Native 官网:http://facebook.github.io/react-native/
更新日期 | 更新内容 |
2015-09-17 | React Native 中文教程(For Android)发布 |
1
官网首页
React Native 使你能够使用基于 JavaScript 和 React 一致的开发体验在本地平台上构建世界一流的应用程序体验。React Native 把重点放在所有开发人员关心的平台的开发效率上——开发者只需学习一种语言就能轻易为任何平台高效地编写代码。Facebook 在多个应用程序产品中使用了 React Native,并将继续为 React Native 投资。
React Native 入门
原生的 iOS 组件
有了 ReactNative,你可使用标准平台组件,比如 iOS 平台上的 UITabBar 和 UINavigationController。这可以让你的应用程序拥有和原生平台一致的外观和体验,并保持较高的品质。使用相应的 React 组件,如 iOS 标签栏和 iOS 导航器,这些组件可以轻松并入你的应用程序中。
var React = require('react-native');
var { TabBarIOS, NavigatorIOS } = React;
var App = React.createClass({
render: function() {
return (
<TabBarIOS>
<TabBarIOS.Item title="React Native" selected={true}>
<NavigatorIOS initialRoute={{ title: 'React Native' }} />
</TabBarIOS.Item>
</TabBarIOS>
);
},
});
异步执行
JavaScript 应用代码和原生平台之间所有的操作都是异步执行,并且原生模块也可以使用额外线程。这意味着我们可以解码主线程图像,并将其在后台保存至磁盘,在不阻塞 UI 的情况下进行文本和布局的估量计算,等等。因此,React Native 应用程序的流畅度和响应性都非常好。通信也是完全可序列化的,当运行完整的应用程序时,这允许我们使用 Chrome Developer Tools 来调试 JavaScript,或者在模拟器中,或者在真机上。
见 调试
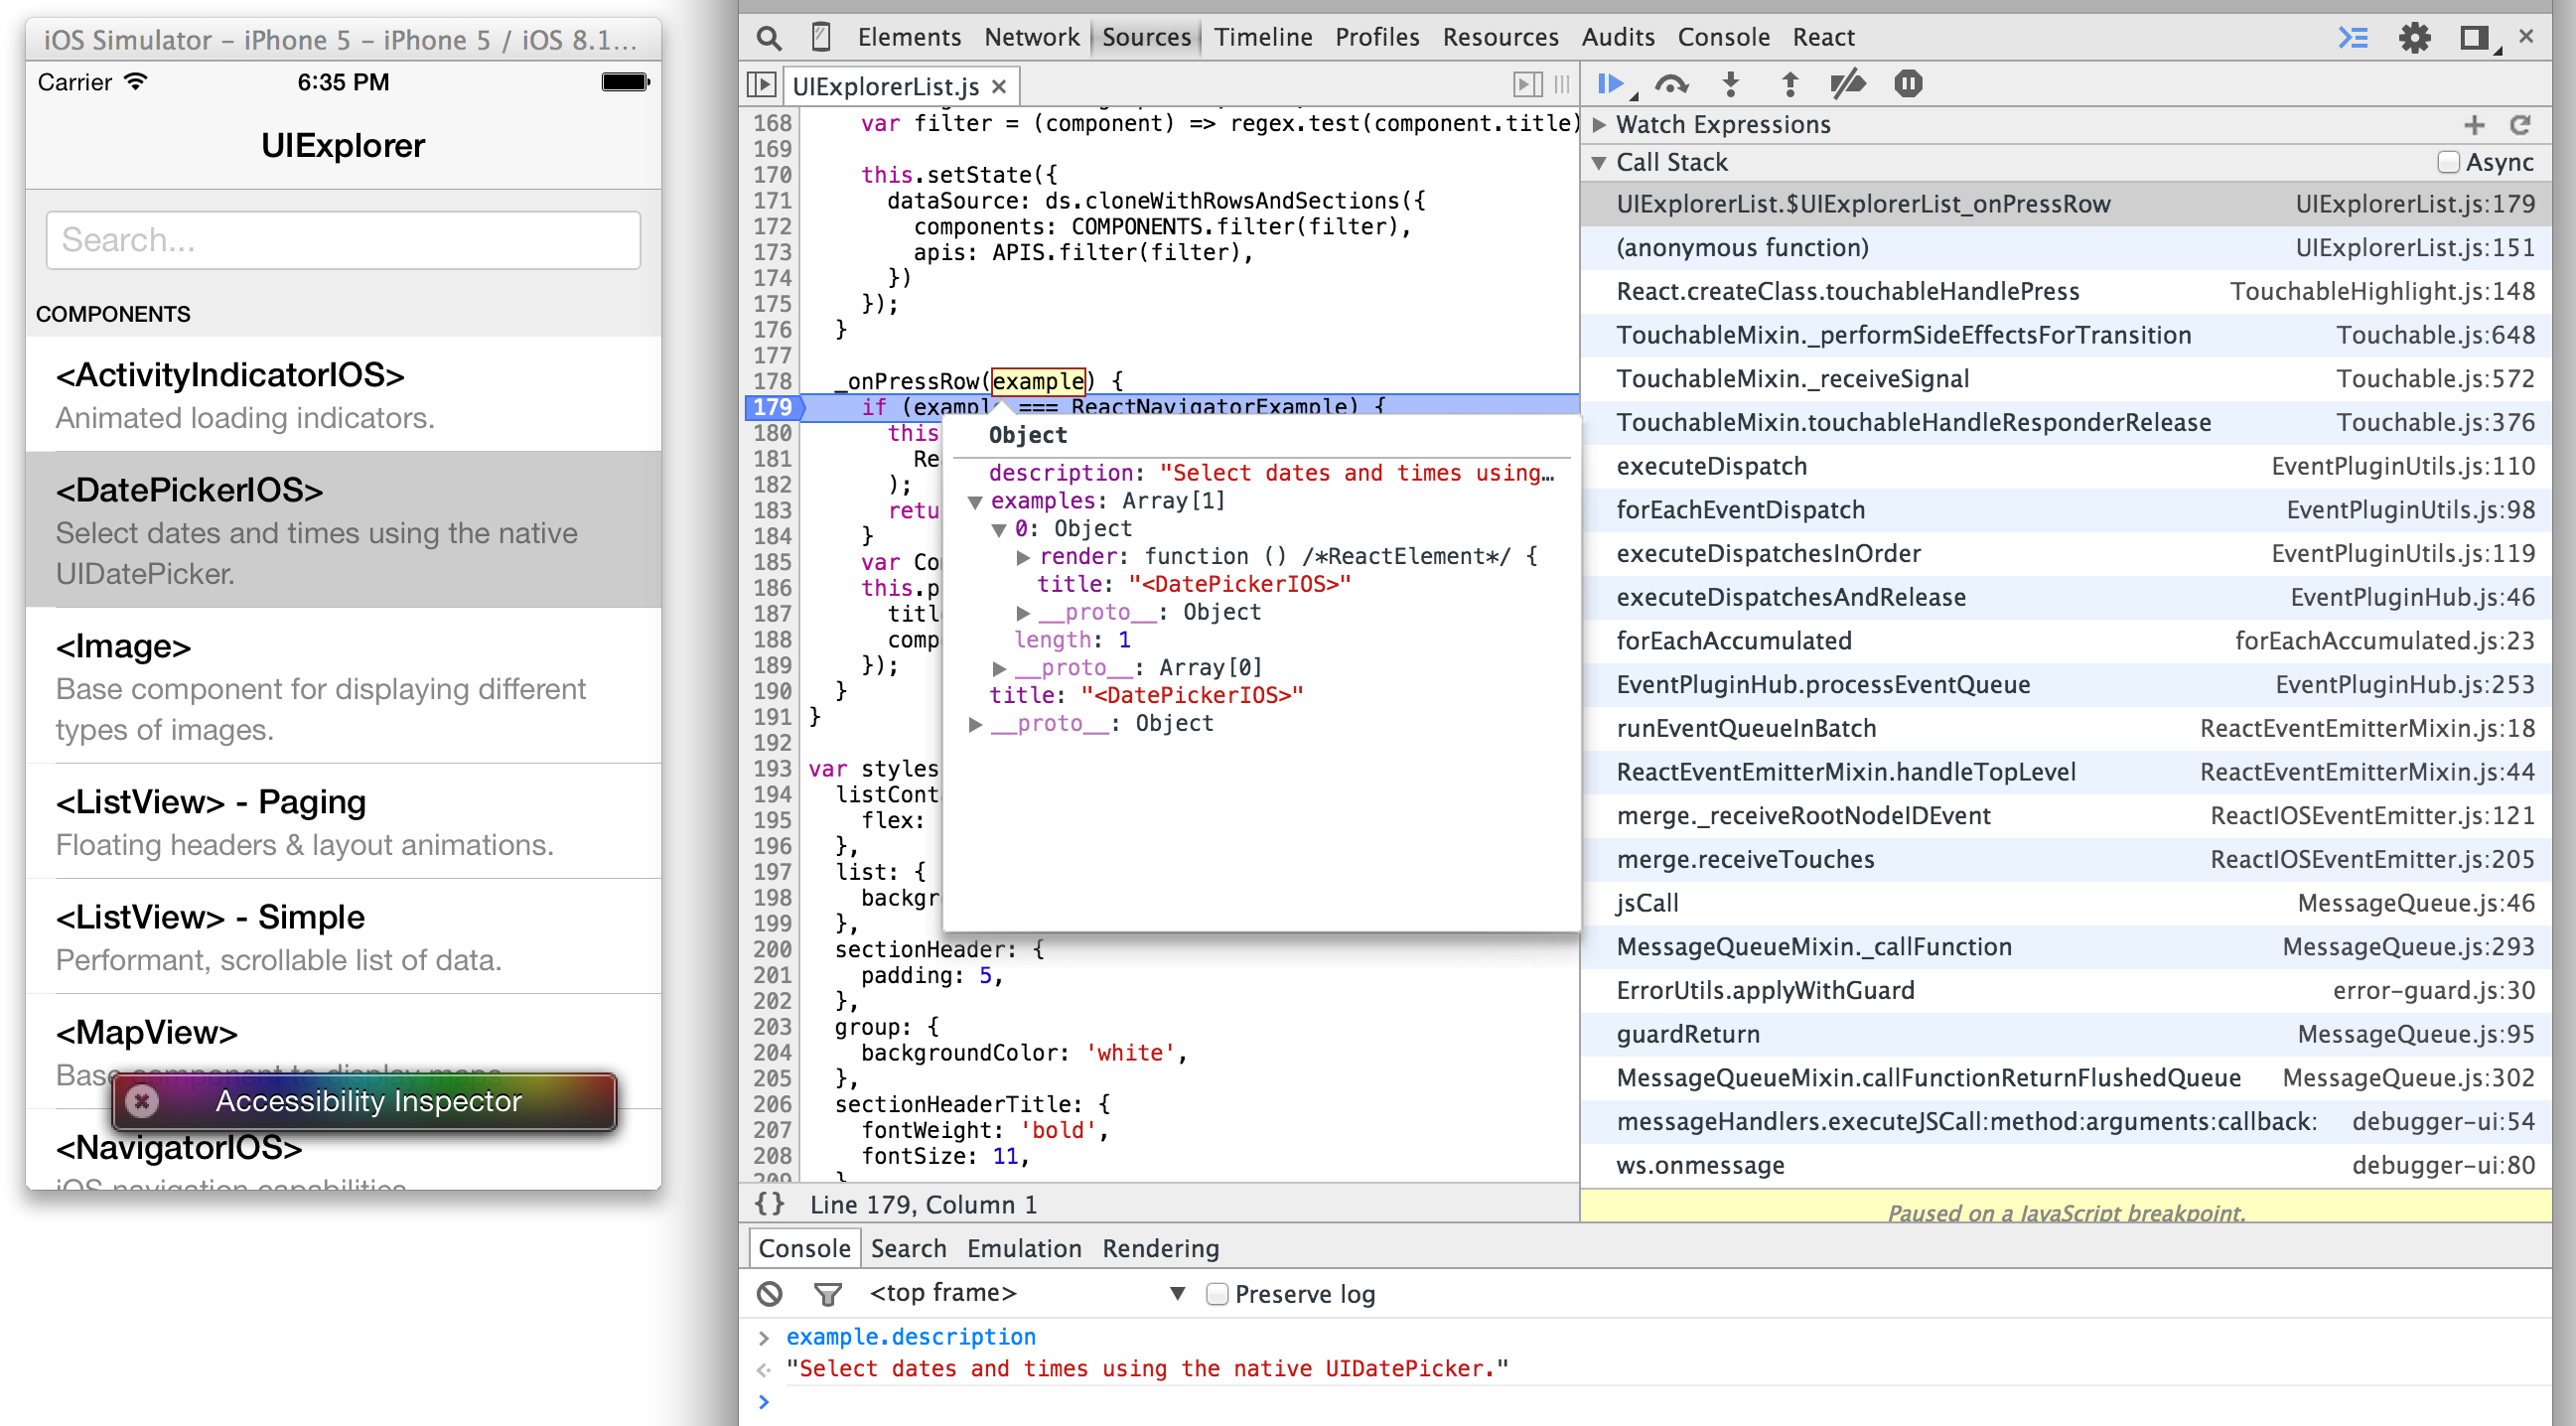
图片 1.1 chrome-breakpoint
触摸处理
iOS 有一个非常强大的系统称为 Responder Chain,可以用来响应复杂视图层级中的事件,但是在 Web 中并没有类似功能的工具。React Native 可实现类似的响应系统并提供高水平的组件,比如 TouchableHighlight,无需额外配置即可与滚动视图和其他元素适度整合。
var React = require('react-native');
var { ScrollView, TouchableHighlight, Text } = React;
var TouchDemo = React.createClass({
render: function() {
return (
<ScrollView>
<TouchableHighlight onPress={() => console.log('pressed')}>
<Text>Proper Touch Handling</Text>
</TouchableHighlight>
</ScrollView>
);
},
});
弹性框和样式
布局视图应该是简单的,所以我们将 Web 平台上的弹性框模块引入了 React Native。弹性框可用来搭建最常用的 UI 布局,比如代用边缘和填充的堆叠和嵌入。React Native 还支持常见的 Web 样式,比如 fontWeight 和 StyleSheet 抽象,它们提供了一种优化机制来宣称你所有的样式和布局在组件中的应用是正确的,且组件把它们应用到了内网中。
var React = require('react-native');
var { Image, StyleSheet, Text, View } = React;
var ReactNative = React.createClass({
render: function() {
return (
<View style={styles.row}>
<Image
source={{uri: 'http://facebook.github.io/react/img/logo_og.png'}}
style={styles.image}
/>
<View style={styles.text}>
<Text style={styles.title}>
React Native
</Text>
<Text style={styles.subtitle}>
Build high quality mobile apps using React
</Text>
</View>
</View>
);
},
});
var styles = StyleSheet.create({
row: { flexDirection: 'row', margin: 40 },
image: { width: 40, height: 40, marginRight: 10 },
text: { flex: 1, justifyContent: 'center'},
title: { fontSize: 11, fontWeight: 'bold' },
subtitle: { fontSize: 10 },
});
Polyfills
React Native 的重点是改变视图代码编写的方式。接下来,我们注意网络中普遍的并把那些 API 放在适当的地方。可以使用 npm 安装 JavaScript 库,这些库用于融入到 React Native 中的顶级功能,比如 XMLHttpRequest,window.requestAnimationFrame 及 navigator.geolocation。我们正在扩大可用的 API,并致力于为开源社区做出贡献。
var React = require('react-native');
var { Text } = React;
var GeoInfo = React.createClass({
getInitialState: function() {
return { position: 'unknown' };
},
componentDidMount: function() {
navigator.geolocation.getCurrentPosition(
(position) => this.setState({position}),
(error) => console.error(error)
);
},
render: function() {
return (
<Text>
Position: {JSON.stringify(this.state.position)}
</Text>
);
},
});
可扩展性
使用 React Native 无需编写一行原生代码即可创建出一款不错的应用程序,并且 React Native 可通过自定义原生视图和模块来进行扩展--也就是说你可以重用你已经构建的任何内容,并且可导入和使用你最喜欢的原生库。为了在 iOS 中创建一个简单的模块,需要创建一个新的类来实现 RCTBridgeModule 协议,并将你想要在 RCT_EXPORT_METHOD 中对 JavaScript 可用的功能包装起来。另外,类本身必须可以用 RCT_EXPORT_MODULE() 显式导出;
// Objective-C
#import "RCTBridgeModule.h"
@interface MyCustomModule : NSObject <RCTBridgeModule>
@end
@implementation MyCustomModule
RCT_EXPORT_MODULE();
// Available as NativeModules.MyCustomModule.processString
RCT_EXPORT_METHOD(processString:(NSString *)input callback:(RCTResponseSenderBlock)callback)
{
callback(@[[input stringByReplacingOccurrencesOfString:@"Goodbye" withString:@"Hello"];]]);
}
@end
// JavaScript
var React = require('react-native');
var { NativeModules, Text } = React;
var Message = React.createClass({
render: function() {
getInitialState() {
return { text: 'Goodbye World.' };
},
componentDidMount() {
NativeModules.MyCustomModule.processString(this.state.text, (text) => {
this.setState({text});
});
},
return (
<Text>{this.state.text}</Text>
);
},
});
自定义的 iOS 视图可以通过子类化 RCTViewManager,实现 -(UIView *)view 方法并用 RCT_EXPORT_VIEW_PROPERTY 宏导出属性的办法来公开。然后一个简单的 JavaScript 文件会连接这些点。
// Objective-C
#import "RCTViewManager.h"
@interface MyCustomViewManager : RCTViewManager
@end
@implementation MyCustomViewManager
- (UIView *)view
{
return [[MyCustomView alloc] init];
}
RCT_EXPORT_VIEW_PROPERTY(myCustomProperty);
@end
// JavaScript
module.exports = createReactIOSNativeComponentClass({
validAttributes: { myCustomProperty: true },
uiViewClassName: 'MyCustomView',
});
React Native 入门
2
快速入门
要求
- OS X - 当前仅支持 OS X
- 推荐使用 Homebrew 的方式来安装 nvm,watchman 和 flow。
- 安装 Node.js 4.0 或者更新的版本。
- brew 安装 watchman
。我们推荐您安装 watchman, 否则您可能在点击一个节点文件的时候出现错误。 - brew 安装 flow
。如果您想使用 flow.
我们建议定期运行 brew update && brew upgrade
来使您的应用程序保持最新状态。
安装 iOS
我们需要 Xcode 6.3 或者更高的版本。 您可以在 App 应用商店里面安装它。
安装 Android
如果想要编写 React Native 安卓应用程序, 您需要安装安卓 SDK (如果您不想在真机上运行您的应用程序,那么您还需要一个安卓模拟器)。请参阅安卓安装指南 说明来配置你的安卓环境 。
快速开始
$ npm install -g react-native-cli
$ react-native init AwesomeProject
$ cd AwesomeProject/
运行 iOS 应用程序:
- 在 Xcode 中打开 ios/AwesomeProject.xcodeproj
并且点击运行。 - 在选定的文本编辑器中打开 index.ios.js
并且编辑代码。 - 点击 iOS 模拟器中的 ⌘-R 来重新加载应用程序并且观察发生的变化!
运行 Android 应用程序:
- $ react-native run-android
- 在选定的文本编辑器中打开 index.android.js
并且编辑代码。 - 按下菜单按钮 (默认情况下是 F2,或在 Genymotion 中点击 ⌘ M),然后选择 * Reload JS * 看看发生了什么变化!
- 在一个终端中运行 adb logcat *:S ReactNative:V ReactNativeJS:V
来查看您的应用程序日志。
祝贺你!你已经成功运行并修改了你的第一个 React Native 应用程序。
_如果您在开始的时候遇到任何问题,请参阅 故障诊断页面
让安卓支持现有的 React Native 项目
如果您现在已经拥有一个(iOS) React Native 项目并且想让安卓也支持它, 那么您需要在您现有的项目目录中执行以下命令:
1.将您 package.json
文件中的 react-native
目录更新到最新的版本 2. $ npm install
3. $ react-native android
本指南描述了在安卓模拟器上运行 React Native 安卓应用程序所需要的开发环境的基本安装步骤。在这里我们不讨论诸如 IDE 的开发工具配置。
这些指南只包含了从头开始安装的过程。如果你恰好有一些旧的、 过时的 Android SDK 版本,请务必把所需的包更新至下面提到的版本并安装所有缺少的部分。
安装和配置 SDK
- 安装最新的 JDK.
- 使用 brew install android-sdk
来安装安卓 SDK。 - 将它添加到 ~/.bashrc
, ~/.zshrc
或者任何其他您的 shell 所使用的路径: export ANDROID_HOME=/usr/local/opt/android-sdk - 启动一个新的 shell 并且运行 android
;在出现窗口中请检查:- Android SDK 生成工具版本 23.0.1
- Android 6.0 (API 23)
- Android Support Repository
- 点击 "Install Packages".
安装和运行 Android 原生模拟器
- 启动一个新的 shell 并且运行 android
;在出现窗口中请检查:- Intel x86 原生系统映像 (支持 Android 5.1.1 - API 22)
- Intel x86 仿真器加速器 (HAXM 安装)
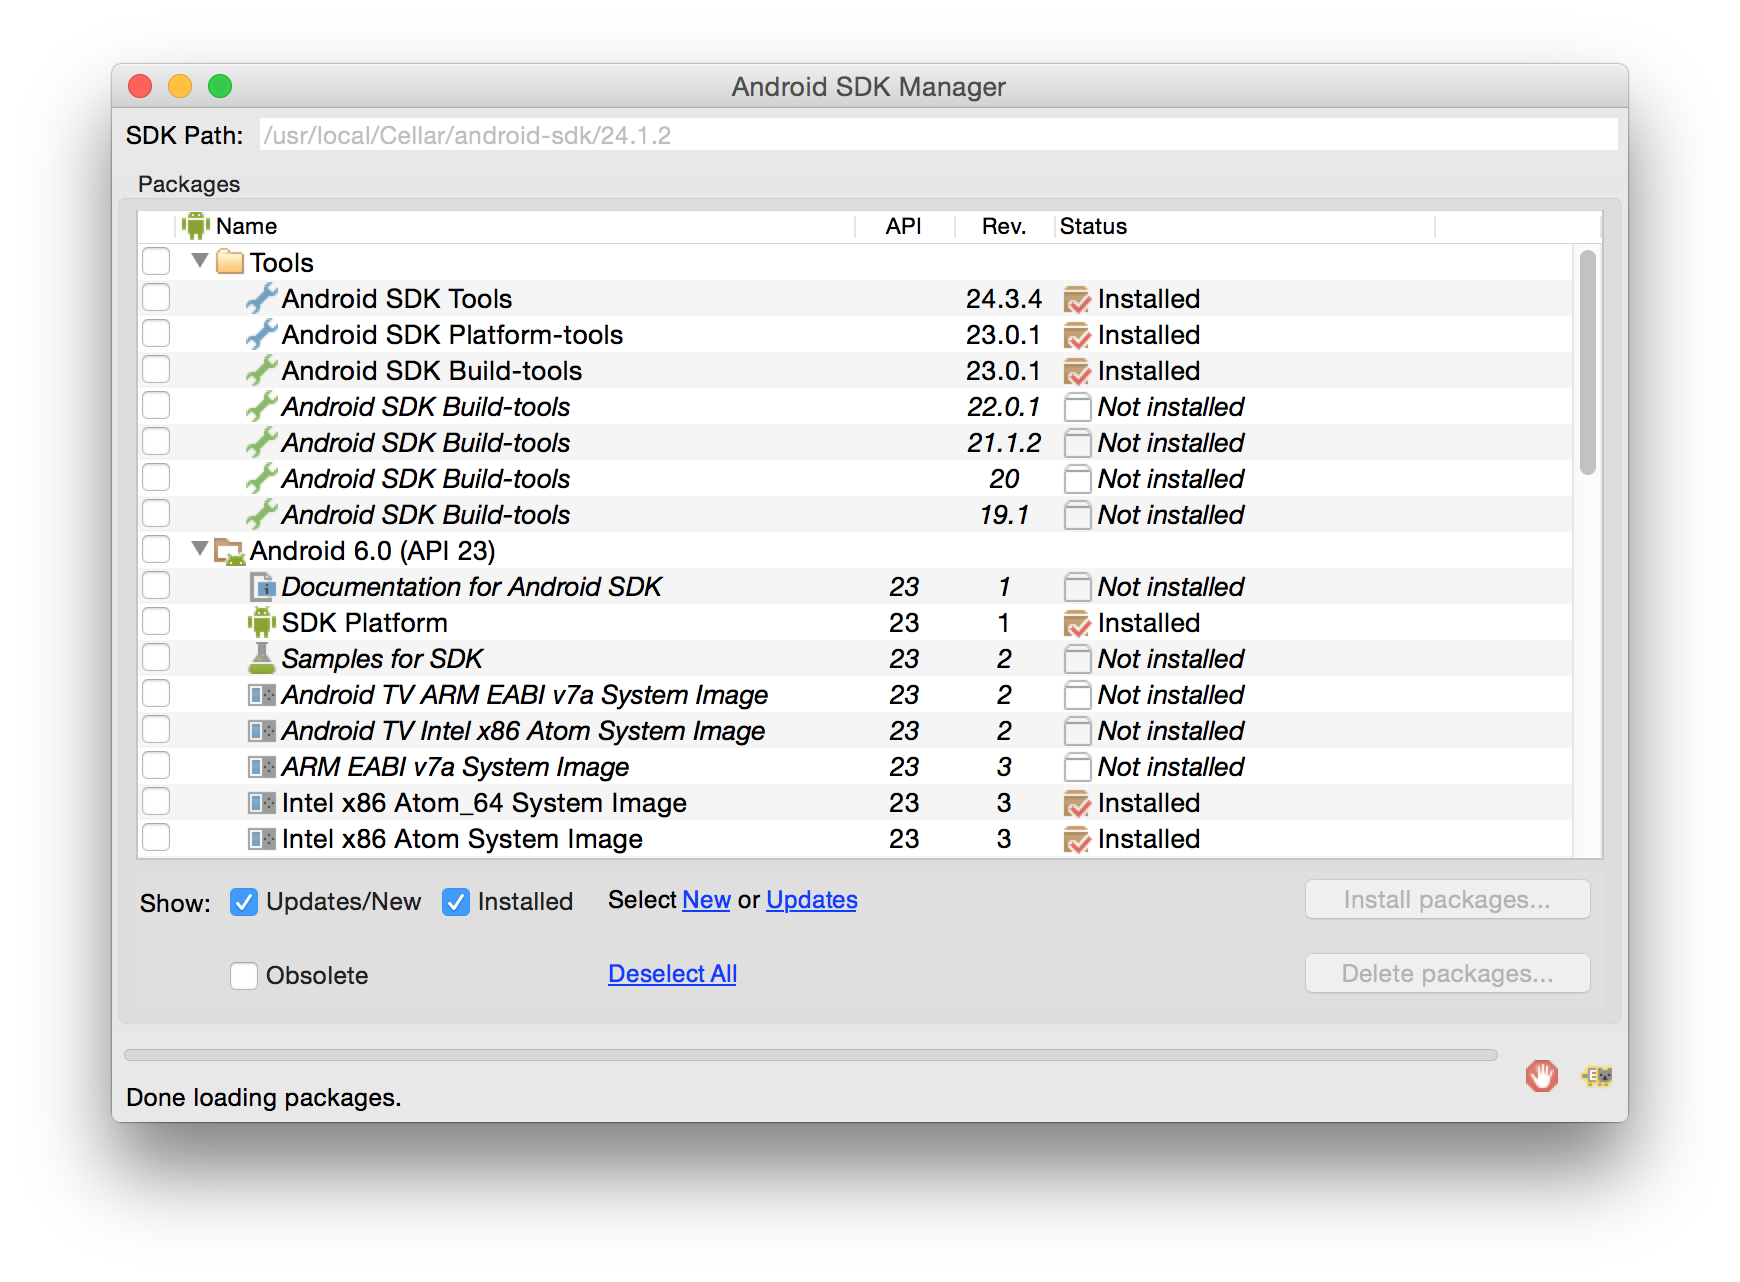
图片 2.1 SDK 管理器窗口
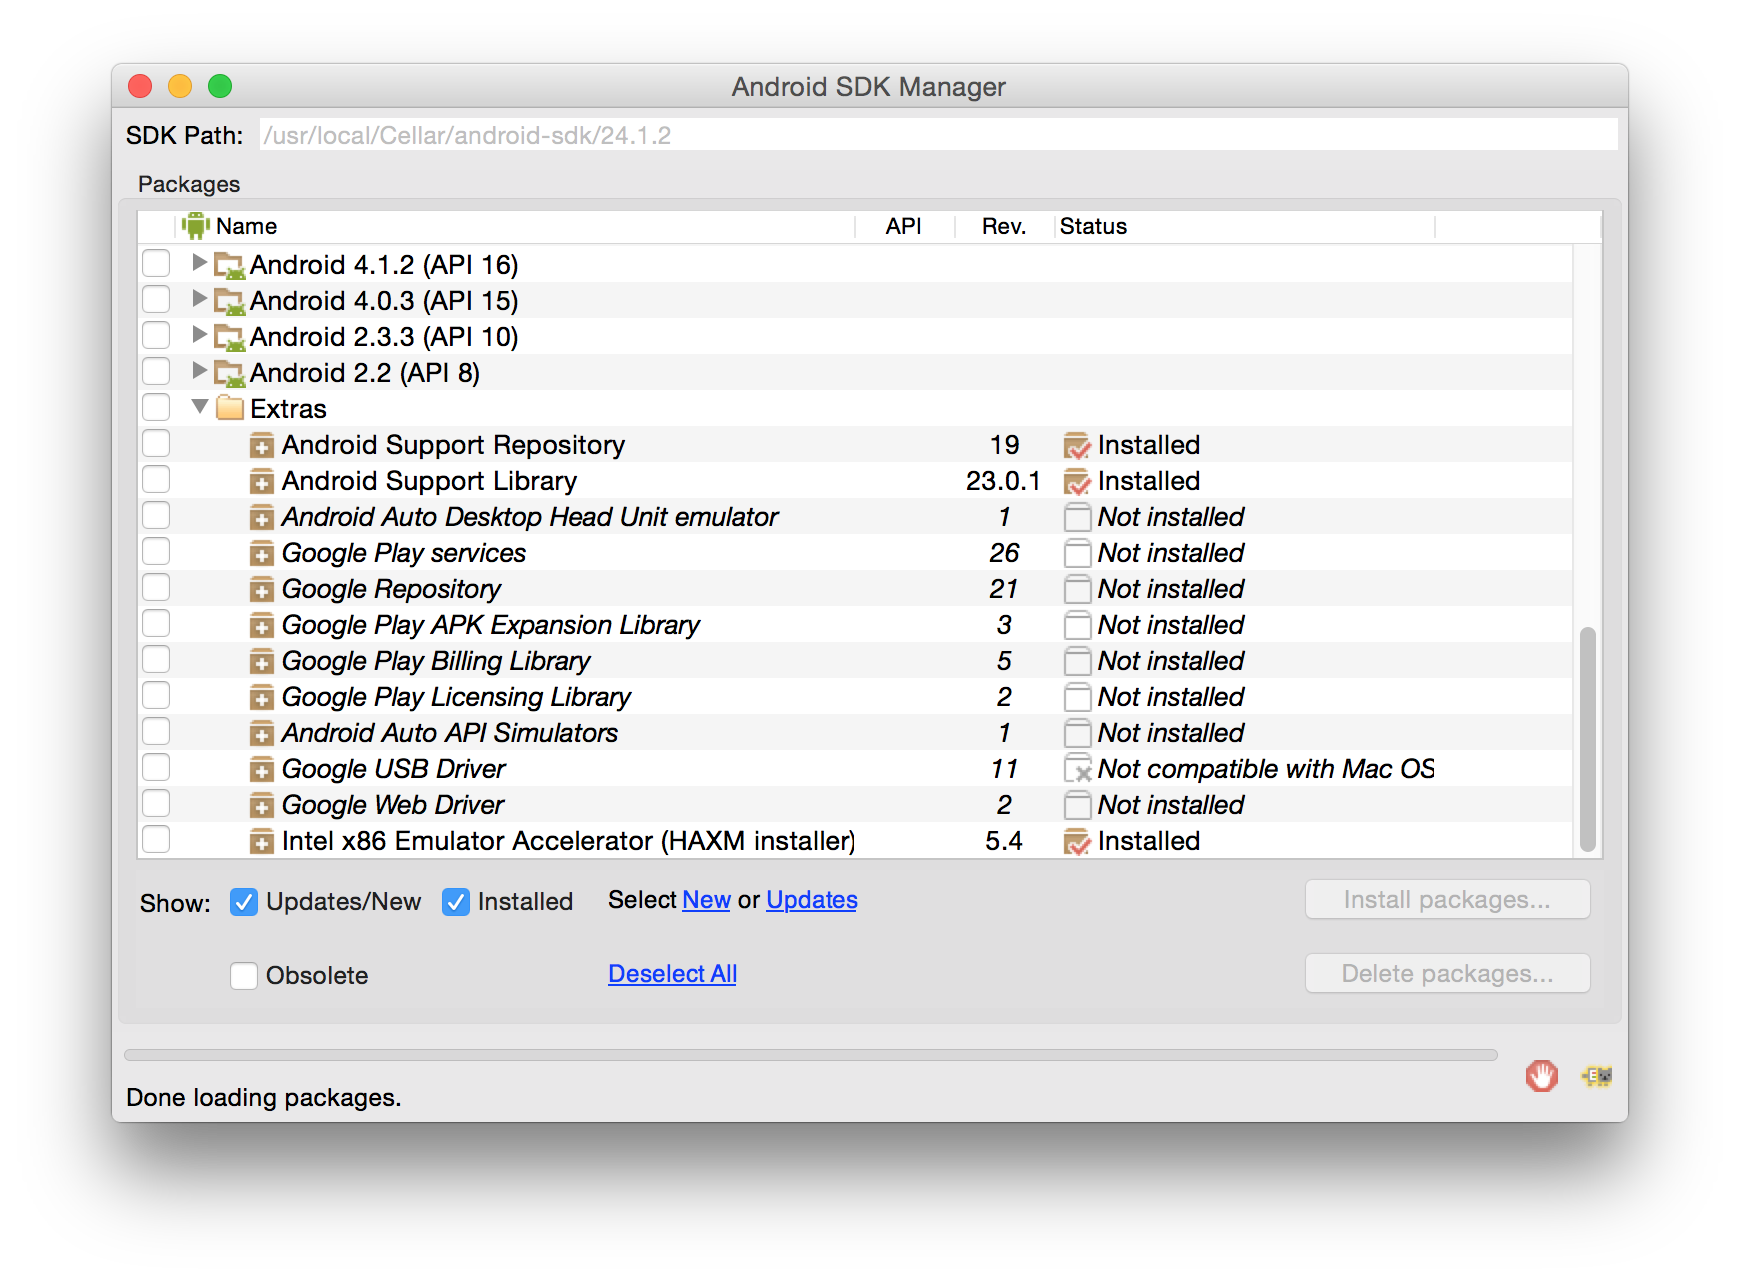
图片 2.2 SDK 管理器窗口
- 点击 "Install Packages".
- 配置 HAXM.
- 使用安卓模拟器创建一个 Android 的虚拟设备 (AVD):
- 运行 android avd
并且点击 Create...
- 运行 android avd
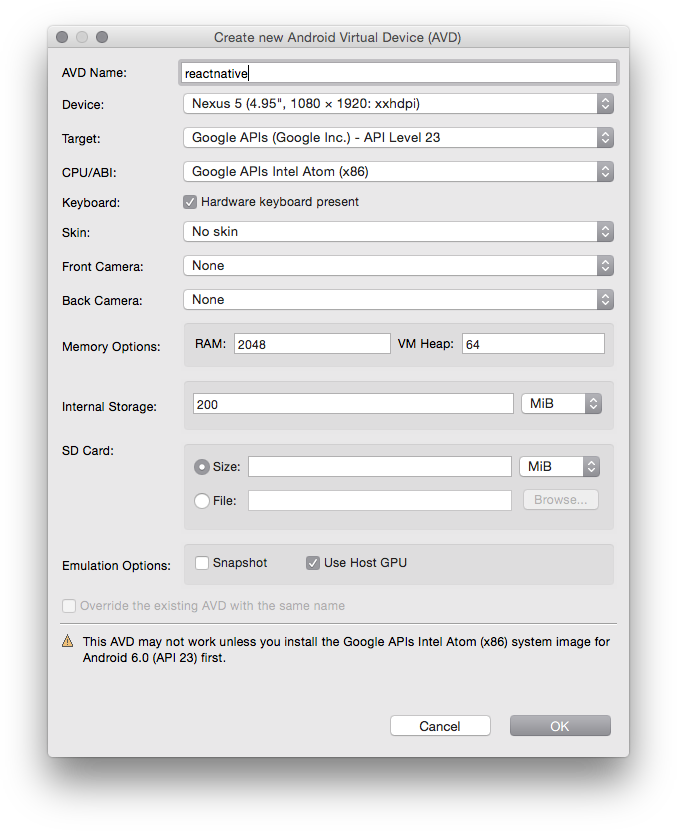
图片 2.3 创建 AVD 对话框
- 选定该新的 AVD, 并且点击 Start...
- 选定该新的 AVD, 并且点击 Start...
序言
这篇教程旨在让你使用 React Native 快速的开发 iOS 和 Android 应用。如果你会想什么是 React Native 并且为什么 Facebook 构建了它,这篇 文章 解释了为什么。
我们期望你有使用 React 来写应用的经验。如果没有,你可以在 React website 学到。
安装
React Native 需要一些在 开始 React Native 中阐明的基本的安装。
在完成了这些依赖项的安装之后,这里有两条可以为一个 React Native 项目完全准备好的命令。
- npm install -g react-native-cli
react-native-cli 是完成剩余安装的命令行工具。它是通过 npm 安装的。这将会在你的终端里面安装 react-native
这个命令行,你只需要做一次即可。
- react-native init AwesomeProject
这一条命令获取 React Native 的源代码和依赖包,然后在 AwesomeProject/iOS/AwesomeProject.xcodeproj
创建一个新的 Xcode 项目,并且在 AwesomeProject/android/app
下面创建一个 gradle 项目。
开发
在 iOS 端,现在你可以在 Xcode 里面打开这个新项目 (AwesomeProject/AwesomeProject.xcodeproj
),然后使用 ⌘+R
来简单的构建和运行这个项目。这样做也会开启允许代码实时渲染的 Node 服务器。有了它你可以通过在模拟器里面按住 ⌘+R
来看你的更改,而不用在 Xcode 里面重新编译。
在 Android 端,在 AwesomeProject
里面运行 react-native run-android
来在你的模拟器设备上面安装生成的应用,并且开启允许代码实时渲染的 Node 服务器。为了看到你的更改你必须打开震动菜单(摇动你的设备或者按住设备上面的菜单按钮,在模拟器上面按住 F2 或者 Page Up,在 Genymotion 上面按住 ⌘+M),然后点击 Reload JS
。
在这篇教程里面我们会开发一个简单版本的电影应用,该应用可以获取电影院里面的 25 部电影,并且将它们显示在 ListView 里面。
Hello World
react-native init
将会生成和你的工程名字一样的应用,在这个例子中就是 AwesomeProject。这是一个简单的 hello world 应用。在 iOS 上面你可以编辑 index.ios.js
来给这个应用做一些改变,然后在模拟器里面按住 ⌘+R 来看发生的改变。在 Android 上面可以编辑 index.android.js
来给你的应用做一些改变,并且按住震动菜单上面的 Reload JS
来看发生的改变。
伪造数据
在我们书写代码来获取真正的 Rotten Tomatoes 数据之前,我们可以伪造一些数据开始使用 React Native。在 Facebook 我们经常会在 JS 文件的头部申明常量,就在 requires 下面,但是你想增加什么数据就增加什么数据。在 index.ios.js
或者 index.android.js
里面:
var
MOCKED_MOVIES_DATA
=
[
{
title
:
'Title'
,
year
:
'2015'
,
posters
:
{
thumbnail
:
'http://i.imgur.com/UePbdph.jpg'
}
}
,
]
;
渲染一部电影
我们将要给这部电影渲染标题,年份,缩略图。因为缩略图在 React Native 里面是一个图片组件,在下面的 React requires 里面增加 Image。
var
{
AppRegistry
,
Image
,
StyleSheet
,
Text
,
View
,
}
=
React
;
现在我们改变这个渲染函数,因此我们可以渲染上面提到的数据,而不是 hello world。
render
:
function
(
)
{
var
movie
=
MOCKED_MOVIES_DATA
[
0
]
;
return
(
<
View style
=
{
styles.
container
}
>
<
Text
>
{
movie.
title
}
</
Text
>
<
Text
>
{
movie.
year
}
</
Text
>
<
Image source
=
{
{
uri
:
movie.
posters
.
thumbnail
}
}
/>
</
View
>
)
;
}
按住 ⌘+R
/ Reload JS
然后你就会看到在 "2015" 上面的 "Title" 。注意 Image 并不会渲染任何东西。这是因为我们没有给我们想要渲染的图片增加宽度和高度。这将会由样式来完成。让我们在改变样式的时候我们可以清除一些我们不再使用的样式。
var
styles
=
StyleSheet.
create
(
{
container
:
{
flex
:
1
,
justifyContent
:
'center'
,
alignItems
:
'center'
,
backgroundColor
:
'#F5FCFF'
,
}
,
thumbnail
:
{
width
:
53
,
height
:
81
,
}
,
}
)
;
最后我们需要将这个样式应用到这个图片组件上面:
<
Image
source
=
{
{
uri
:
movie.
posters
.
thumbnail
}
}
style
=
{
styles.
thumbnail
}
/>
按住 ⌘+R
/ Reload JS
现在这个图片就会渲染了。
增加一些样式
太棒了,我们已经渲染了我们的数据。现在让我们让它看起来更美观一点。我将会将文字放在图片的右边,并且让标题更大,然后在区域里面居中。
+---------------------------------+
|+-------++----------------------+|
|| || Title ||
|| Image || ||
|| || Year ||
|+-------++----------------------+|
+---------------------------------+
我们需要增加另外一个容器来垂直的展开在水平方向上面展开的组件。
return
(
<
View style
=
{
styles.
container
}
>
<
Image
source
=
{
{
uri
:
movie.
posters
.
thumbnail
}
}
style
=
{
styles.
thumbnail
}
/>
<
View style
=
{
styles.
rightContainer
}
>
<
Text style
=
{
styles.
title
}
>
{
movie.
title
}
</
Text
>
<
Text style
=
{
styles.
year
}
>
{
movie.
year
}
</
Text
>
</
View
>
</
View
>
)
;
没有改变很多,我们在文本外面增加了一个容器,然后将它们移动到图片后面(因为它们在图片右边)。现在让我们看看样式都改变了什么:
container
:
{
flex
:
1
,
flexDirection
:
'row'
,
justifyContent
:
'center'
,
alignItems
:
'center'
,
backgroundColor
:
'#F5FCFF'
,
}
,
我们使用 FlexBox 来布局-可以看看 这篇文章 来了解更多。
在上面的代码片段里面,我们简单的增加了 flexDirection: 'row'
,这将会让在主容器里面的孩子节点水平的展开而不是垂直展开。
现在我们给这个 JS 的 style
对象增加另外一个样式:
rightContainer
:
{
flex
:
1
,
}
,
这意味着这个 rightContainer
在没有被图片占据的父容器里面占据了剩余的空间。如果这不起作用的话,给 rightContainer
增加一个 backgroundColor
并且尝试着移除flex: 1
。你将会看到这将会导致父容器的大小将会变为能够容纳孩子视图的最小大小。
给文本加上样式就很直接了:
title
:
{
fontSize
:
20
,
marginBottom
:
8
,
textAlign
:
'center'
,
}
,
year
:
{
textAlign
:
'center'
,
}
,
然后按住 ⌘+R
/ Reload JS
你就会看到更新后的视图了。
获取真实数据
从 Rotten Tomatoes 的 API获取数据并不和学习 React Native 有任何关系,因此继续学习下去吧。
在这个文件的顶部增加下面的一些常量(通常在 requires 下面)来创建获取数据的 REQUEST_URL。
/**
* For quota reasons we replaced the Rotten Tomatoes' API with a sample data of
* their very own API that lives in React Native's Github repo.
*/
var
REQUEST_URL
=
'https://raw.githubusercontent.com/facebook/react-native/master/docs/MoviesExample.json'
;
给我们的应用增加一些初始化的状态,因此我们可以检查 this.state.movies === null
来看电影数据是否被加载。当带有 this.setState({movies: moviesData})
响应返回的时候我们可以设置数据。就在我们的 React 类里面的渲染函数上面增加这段代码:
getInitialState
:
function
(
)
{
return
{
movies
:
null
,
}
;
}
,
我们想在组件完成加载的时候关闭请求。 在组件被加载之后,componentDidMount
是 React 组件里面只会调用一次的函数。
componentDidMount
:
function
(
)
{
this
.
fetchData
(
)
;
}
,
现在给我们的主组件增加上面是用到的 fetchData
。这个方法将会负责处理数据的获取。你需要做的就是在解决预期的问题之后调用 this.setState({movies: data})
函数。因为 React 的工作方式是:setState
会触发一个从新渲染,之后渲染函数就会注意到 this.state.movies
不再为 null
。注意我们在最后调用 done()
-请总是确保调用 done()
否则任何抛出的错误信息都会被隐藏。
fetchData
:
function
(
)
{
fetch
(
REQUEST_URL
)
.
then
(
(
response
)
=>
response.
json
(
)
)
.
then
(
(
responseData
)
=>
{
this
.
setState
(
{
movies
:
responseData.
movies
,
}
)
;
}
)
.
done
(
)
;
}
,
现在修改这个渲染函数来渲染一个加载的视图,如果我们没有任何电影数据,否则选择第一部电影。
render
:
function
(
)
{
if
(
!
this
.
state
.
movies
)
{
return
this
.
renderLoadingView
(
)
;
}
var
movie
=
this
.
state
.
movies
[
0
]
;
return
this
.
renderMovie
(
movie
)
;
}
,
renderLoadingView
:
function
(
)
{
return
(
<
View style
=
{
styles.
container
}
>
<
Text
>
Loading movies...
</
Text
>
</
View
>
)
;
}
,
renderMovie
:
function
(
movie
)
{
return
(
<
View style
=
{
styles.
container
}
>
<
Image
source
=
{
{
uri
:
movie.
posters
.
thumbnail
}
}
style
=
{
styles.
thumbnail
}
/>
<
View style
=
{
styles.
rightContainer
}
>
<
Text style
=
{
styles.
title
}
>
{
movie.
title
}
</
Text
>
<
Text style
=
{
styles.
year
}
>
{
movie.
year
}
</
Text
>
</
View
>
</
View
>
)
;
}
,
现在按住 ⌘+R
/ Reload JS
然后直到响应返回的时候你会看到 "Loading movies..." ,之后它就会渲染从 Rotten Tomatoes 获取到的第一部电影。
ListView
现在让我们来修改这个应用来在一个 ListView
组件里面渲染所有的数据,而不是只是渲染第一部电影。
为什么一个 ListView
比只渲染所有的元素或者将它们放到一个 ScrollView
要好一些?尽管 React 很快,但是渲染一个不确定列表的元素可能就会慢。ListView
渲染视图,因此你只在屏幕上显示要显示的视图,那些已经渲染过但是不在屏幕上显示的就会被从原生视图层移除。
第一件事就是快:在这个文件顶部增加 ListView
必须项。
var
{
AppRegistry
,
Image
,
ListView
,
StyleSheet
,
Text
,
View
,
}
=
React
;
现在修改渲染函数,因此一旦我们获取到了数据,它就会渲染一个列表的电影而不只是一部电影。
render
:
function
(
)
{
if
(
!
this
.
state
.
loaded
)
{
return
this
.
renderLoadingView
(
)
;
}
return
(
<
ListView
dataSource
=
{
this
.
state
.
dataSource
}
renderRow
=
{
this
.
renderMovie
}
style
=
{
styles.
listView
}
/>
)
;
}
,
这个 DataSource
是一个被 ListView
用来决定在更新的过程中哪一行被改变了的接口。
你会注意到我们从 this.state
来使用 dataSource
。下一步就是给由 getInitialState
返回的对象增加一个空的dataSource
。既然我们在 dataSource
里面存放数据,我们不应该在此使用 this.state.movies
来保存数据两次。我们可以使用状态 (this.state.loaded
) 的布尔属性来判断获取数据是否完成。
getInitialState
:
function
(
)
{
return
{
dataSource
:
new
ListView.
DataSource
(
{
rowHasChanged
:
(
row1
,
row2
)
=>
row1
!==
row2
,
}
)
,
loaded
:
false
,
}
;
}
,
这里是更具状态更新的修改之后的 fetchData
:
fetchData
:
function
(
)
{
fetch
(
REQUEST_URL
)
.
then
(
(
response
)
=>
response.
json
(
)
)
.
then
(
(
responseData
)
=>
{
this
.
setState
(
{
dataSource
:
this
.
state
.
dataSource
.
cloneWithRows
(
responseData.
movies
)
,
loaded
:
true
,
}
)
;
}
)
.
done
(
)
;
}
,
最后我们给 ListView
组件的 styles
JS 对象增加样式:
listView
:
{
paddingTop
:
20
,
backgroundColor
:
'#F5FCFF'
,
}
,
现在这是最终结果:
这里仍然有一些工作要做来让它称为一个功能完全的应用,比如:增加导航栏,搜索框,下拉刷新加载等。在 Movies Example 来看全部的功能。
最终源代码
/**
* Sample React Native App
* https://github.com/facebook/react-native
*/
'use strict'
;
var
React
=
require
(
'react-native'
)
;
var
{
AppRegistry
,
Image
,
ListView
,
StyleSheet
,
Text
,
View
,
}
=
React
;
var
API_KEY
=
'7waqfqbprs7pajbz28mqf6vz'
;
var
API_URL
=
'http://api.rottentomatoes.com/api/public/v1.0/lists/movies/in_theaters.json'
;
var
PAGE_SIZE
=
25
;
var
PARAMS
=
'?apikey='
+
API_KEY
+
'&page_limit='
+
PAGE_SIZE
;
var
REQUEST_URL
=
API_URL
+
PARAMS
;
var
AwesomeProject
=
React.
createClass
(
{
getInitialState
:
function
(
)
{
return
{
dataSource
:
new
ListView.
DataSource
(
{
rowHasChanged
:
(
row1
,
row2
)
=>
row1
!==
row2
,
}
)
,
loaded
:
false
,
}
;
}
,
componentDidMount
:
function
(
)
{
this
.
fetchData
(
)
;
}
,
fetchData
:
function
(
)
{
fetch
(
REQUEST_URL
)
.
then
(
(
response
)
=>
response.
json
(
)
)
.
then
(
(
responseData
)
=>
{
this
.
setState
(
{
dataSource
:
this
.
state
.
dataSource
.
cloneWithRows
(
responseData.
movies
)
,
loaded
:
true
,
}
)
;
}
)
.
done
(
)
;
}
,
render
:
function
(
)
{
if
(
!
this
.
state
.
loaded
)
{
return
this
.
renderLoadingView
(
)
;
}
return
(
<
ListView
dataSource
=
{
this
.
state
.
dataSource
}
renderRow
=
{
this
.
renderMovie
}
style
=
{
styles.
listView
}
/>
)
;
}
,
renderLoadingView
:
function
(
)
{
return
(
<
View style
=
{
styles.
container
}
>
<
Text
>
Loading movies...
</
Text
>
</
View
>
)
;
}
,
renderMovie
:
function
(
movie
)
{
return
(
<
View style
=
{
styles.
container
}
>
<
Image
source
=
{
{
uri
:
movie.
posters
.
thumbnail
}
}
style
=
{
styles.
thumbnail
}
/>
<
View style
=
{
styles.
rightContainer
}
>
<
Text style
=
{
styles.
title
}
>
{
movie.
title
}
</
Text
>
<
Text style
=
{
styles.
year
}
>
{
movie.
year
}
</
Text
>
</
View
>
</
View
>
)
;
}
,
}
)
;
var
styles
=
StyleSheet.
create
(
{
container
:
{
flex
:
1
,
flexDirection
:
'row'
,
justifyContent
:
'center'
,
alignItems
:
'center'
,
backgroundColor
:
'#F5FCFF'
,
}
,
rightContainer
:
{
flex
:
1
,
}
,
title
:
{
fontSize
:
20
,
marginBottom
:
8
,
textAlign
:
'center'
,
}
,
year
:
{
textAlign
:
'center'
,
}
,
thumbnail
:
{
width
:
53
,
height
:
81
,
}
,
listView
:
{
paddingTop
:
20
,
backgroundColor
:
'#F5FCFF'
,
}
,
}
)
;
AppRegistry.
registerComponent
(
'AwesomeProject'
,
(
)
=>
AwesomeProject
)
;
3
指南
React Native 不实现 CSS,而是依赖于 JavaScript 来为你的应用程序设置样式。这是一个有争议的决定,你可以阅读那些幻灯片,了解背后的基本原理。
声明样式
在 React Native 中声明样式的方法如下:
var styles = StyleSheet.create({
base: {
width: 38,
height: 38,
},
background: {
backgroundColor: '#222222',
},
active: {
borderWidth: 2,
borderColor: '#00ff00',
},
});
StyleSheet.create
的创建是可选的,但提供了一些关键优势。它通过将它们转换为引用一个内部表的纯数字,来确保值是不可变的和不透明的。通过将它放在文件的最后,也确保了它们为应用程序只创建一次,而不是每一个 render 都创建。
所有的属性名称和值是工作在网络中的一个子集。对于布局来说,React Native实现了 Flexbox。
使用样式
所有的核心组件接受样式属性。
<Text style={styles.base} />
<View style={styles.background} />
它们也接受一系列的样式。
<View style={[styles.base, styles.background]} />
行为与 Object.assign
相同:在冲突值的情况下,从最右边元素的值将会优先,并且 falsy 值如 false
,undefined
和 null
将被忽略。一个常见的模式是基于某些条件有条件地添加一个样式。
<View style={[styles.base, this.state.active && styles.active]} />
最后,如果真的需要,您还可以在render中创建样式对象,但是这种做法非常不赞成。最后把它们放在数组定义中。
<View
style={[styles.base, {
width: this.state.width,
height: this.state.width * this.state.aspectRatio
}]}
/>
样式传递
为了让一个 call site 定制你的子组件的样式,你可以通过样式传递。使用 View.propTypes.style
和 Text.propTypes.style
,以确保只有样式被传递了。
var List = React.createClass({
propTypes: {
style: View.propTypes.style,
elementStyle: View.propTypes.style,
},
render: function() {
return (
<View style={this.props.style}>
{elements.map((element) =>
<View style={[styles.element, this.props.elementStyle]} />
)}
</View>
);
}
});
// ... in another file ...
<List style={styles.list} elementStyle={styles.listElement} />
属性支持
你可以在以下的链接中检测最新的 CSS 属性支持。
- View 属性
- Image 属性
- Text 属性
- Flex 属性
手势识别在移动设备上比在网络上要复杂得多。当应用程序确定用户的意图时,一个触摸可能要经历几个阶段。例如,应用程序需要确定触摸是否是滚动,滑动部件还是轻击。这甚至可以在触摸期间发生改变,也可以有多个同时触摸。
要想使组件在没有任何额外的关于它们的父组件或子组件的知识的情况下处理这些触摸交互,需要触摸应答系统。这个系统在 ResponderEventPlugin.js
中实现了,其中包含更多细节和文档。
最佳实践
用户在 web 应用程序与本机的可用性上可以感觉到巨大的差异,并且这是最大的原因之一。每一个动作都应该有以下属性:
- 反馈/高亮——显示给用户是什么正在处理他们的触摸,以及当他们释放手势时,会发生什么
- 撤销的能力——当做一个动作时,用户应该能够在触摸过程中通过移动手指中止该动作。
这些特性让用户使用一个应用程序时更舒适,因为它允许人们在实验和交互时不用担心犯错误。
TouchableHighlight 和 Touchable*
应答系统在使用时可能是复杂的。所以我们为应该“可以轻击的”东西提供了一个抽象的 Touchable
实现。这使用了应答系统,并且使你以声明的方式可以轻松地识别轻击交互。在网络中任何你会用到按钮或链接的地方使用 TouchableHighlight
。
应答器生命周期
通过实施正确的处理方法,视图可以成为接触应答器。有两种方法来询问视图是否想成为应答器:
- View.props.onStartShouldSetResponder: (evt) => true,
——这个视图是否在触摸开始时想成为应答器? - View.props.onMoveShouldSetResponder: (evt) => true,
——当视图不是应答器时,该指令被在视图上移动的触摸调用:这个视图想“声明”触摸响应吗?
如果视图返回 true 并且想成为应答器,那么下述的一种情况就会发生:
- View.props.onResponderGrant:(evt)= > { }
——视图现在正在响应触摸事件。这个时候要高亮标明并显示给用户正在发生的事情。 - View.props.onResponderReject:(evt)= > { }
——其他的东西时应答器并且不会释放它。
如果视图正在响应,那么可以调用以下处理程序:
- View.props.onResponderMove:(evt)= > { }
——用户正移动他们的手指 - View.props.onResponderRelease:(evt)= > { }
——在触摸最后被引发,即“touchUp” - View.props.onResponderTerminationRequest:(evt)= >true
——其他的东西想成为应答器。这种视图应该释放应答吗?返回 true 就是允许释放 - View.props.onResponderTerminate:(evt)= > { }
——应答器已经从视图获取了。可能在调用 onResponderTerminationRequest
之后被其他视图获取,也可能是被操作系统在没有请求的情况下获取了(发生在 iOS 的 control center/notification center)
evt
是一个综合的触摸事件,有以下形式:
- nativeEvent
- changedTouches
——自从上个事件之后,所有发生改变的触摸事件的数组 - identifier
——触摸的 ID - locationX
——触摸相对于元素的 X 位置 - locationY
——触摸相对于元素的 Y 位置 - pageX
——触摸相对于屏幕的 X 位置 - pageY
——触摸相对于屏幕的 Y 位置 - target
——接收触摸事件的元素的节点 id - timestamp
——触摸的时间标识符,用于速度计算 - touches
——所有当前在屏幕上触摸的数组
- changedTouches
捕捉 ShouldSet 处理程序
在冒泡模式,即最深的节点最先被调用,的情况下,onStartShouldSetResponder
和 onMoveShouldSetResponder
被调用。这意味着,当多个视图为 * ShouldSetResponder
处理程序返回 true 时,最深的组件会成为应答器。在大多数情况下,这是可取的,因为它确保了所有控件和按钮是可用的。
然而,有时父组件会想要确保它成为应答器。这可以通过使用捕获阶段进行处理。在应答系统从最深的组件冒泡时,它将进行一个捕获阶段,引发 * ShouldSetResponderCapture
。所以如果一个父视图要防止子视图在触摸开始时成为应答器,它应该有一个 onStartShouldSetResponderCapture
处理程序,返回 true。
- View.props.onStartShouldSetResponderCapture: (evt) => true,
- View.props.onMoveShouldSetResponderCapture: (evt) => true,
PanResponder
更高级的手势解释,看看 PanResponder。
iOS
在 iOS 系统上辅助功能涵盖许多话题,但对许多人来说辅助功能是 VoiceOver 的代名词,即 iOS 3.0 版本以后的一种技术。它充当屏幕阅读器的角色,允许有视觉障碍的人使用 iOS 设备。点击这里了解更多。
Android
对 Android 系统而言,辅助功能涉及到了许多不同的话题,其中之一是让丧失视力的人能够使用您的应用程序。对于现在的社会,谷歌提供了一个名叫 TalkBack 的内置屏幕读者服务机器人。使用该机器人,你可以使用触摸勘探和手势来使用移动设备和应用程序。TalkBack 可以使用文本语音转换器来阅读屏幕上的内容并且可以发出警报来通知用户有关于应用程序中的重要信息。点击这里来了解更多关于 Android 的辅助功能的特征以及点击这里来了解更多关于使您的本地应用程序的辅助功能。
创建辅助性应用程序
辅助功能的性质
辅助性(iOS, Android)
如果为 true
的情况,代表该视图是一个辅助功能元素。当视图是辅助功能元素时,它把它的子元素分组成一个单一的可选组件。默认情况下,可触摸的所有元素都具有辅助性。
在 Android 系统中,在 react-native 视图中 ' accessible={true}' 属性将被翻译成本地命令 ' focusable={true}'。
<
View
accessible
=
{
true
}
>
<
Text
>
text one
</
Text
>
<
Text
>
text two
</
Text
>
</
View
>
在上面的示例中,我们不能分别在 'text one' 和 'text two' 中获得辅助焦点。相反我们可以在父元素上使用 'accessible' 属性获得焦点。
accessibilityLabel (iOS, Android)
如果要将视图标记为具有辅助性,那么一个比较好的做法就是为这个视图设置一个 accessibilityLabel 标签以便使用 VoiceOver 的人知道他们选择了什么元素。当用户选择了一些元素,那么 VoiceOver 将会阅读响应的字符串文本。
若要使用它,在您的视图中将 accessibilityLabel
属性设置为一个自定义的字符串:
<
TouchableOpacity accessible
=
{
true
}
accessibilityLabel
=
{
'Tap me!'
}
onPress
=
{
this
._onPress
}
>
<
View
style
=
{
styles.
button
}
>
<
Text style
=
{
styles.
buttonText
}
>
Press me
!</
Text
>
</
View
>
</
TouchableOpacity
>
在上面的示例中,TouchableOpacity 元素中的 accessibilityLabel
会被默认的设置为 "点击我!"。 该标签是通过使用空格符来串联所有文本节点子元素构造的。
accessibilityTraits (iOS)
辅助功能特征告诉人们他们在使用 VoiceOver 的时候选择了什么元素。此元素是一个标签?一个按钮?还是标头? accessibilityTraits
将会回答这些问题。
如果要使用它,请把 accessibilityTraits 属性设置为 accessibilityTraits 辅助功能字符串(或数组)之一:
- none 当元素没有特征的时候使用。
- button 当元素需要被当做一个按钮的时候使用。
- link 当元素需要被当做链接的时候使用。
- header 当元素作为内容部分的标题 (如导航栏中的标题) 的时候使用。
- search 当文本字段元素也被视为一个搜索字段的时候使用。
- image 当元素需要被作为图像,比如和按钮和链接结合的时候使用。
- selected 当该元素被选中时使用。例如,表中被选中的行或者分段控件中选中的按钮。
- plays 当元素被激活的并且播放自己的声音的时候使用。
- key 当元素充当键盘按键的时候使用。
- text 当元素应该被视为不能更改的静态文本的时候使用。
- summary 当在应用程序首次启动的时候,该元素可以提供应用程序的实时状况的摘要的时候使用。例如,当关于天气的应用程序首次启动的时候,带有当天天气信息的元素将被该特征所标记。
- disabled 当控件未启动并且对用户的输入无响应的时候使用。
- frequentUpdates 当元素经常更新其标签或者它的值,但是太平凡的发送通知的时候使用。允许辅助功能客户端轮询更改。秒表就是一个例子。
- startsMedia 当激活一个元素并开始一段媒体会话(例如播放电影,录制音频)不应该被辅助技术的输出所打断,比如 VoiceOver。
- adjustable 当元素可以被"调整"的时候使用(例如滑块)。
- allowsDirectInteraction 当元素允许 VoiceOver 用户直接进行触摸互动的时候使用(例如,表示一个钢琴键盘的视图)。
- pageTurn 当它完成阅读的元素的内容时候通知 VoiceOver 需要滚动到下一个页面。
onAccessibilityTap (iOS)
使用此属性来分配一个自定义的函数,当有人在一个可访问元素被选中的时候通过双击来激活它的时候来调用该函数。
onMagicTap (iOS)
当有人使用 “magic tap”手势,即:用两个手指双击的时候,该属性就会被分配给一个自定义函数,同时,这个函数会被调用。一个魔法敲击函数应该执行用户可以在组件中找到的最具有相关性的操作。在 iPhone 的手机应用程序中,一个魔法敲击可以接听或者结束一个电话。如果所选的元素不具有 onMagicTap
功能,该系统将遍历视图层次结构直到它找到一个拥有此功能的视图。
accessibilityComponentType (Android)
在某些情况下,我们也要提醒选定的组件类型的最终用户 (即,它是一个"按钮")。如果我们正在使用本机的按钮,那么它会自动工作。由于我们使用的是 javascript,所以我们需要为 TalkBack 提供更多的语境。为了达到这个目的,您必须为所有 UI 组件指定 'accessibilityComponentType' 属性。例如,我们支持 'button','radiobutton_checked' 和 'radiobutton_unchecked'等。
<
TouchableWithoutFeedback accessibilityComponentType
=
”button”
onPress
=
{
this
._onPress
}
>
<
View
style
=
{
styles.
button
}
>
<
Text style
=
{
styles.
buttonText
}
>
Press me
!</
Text
>
</
View
>
</
TouchableWithoutFeedback
>
在上面的示例中,TouchableWithoutFeedback 是被 TalkBack 作为一个本机按钮声明的。
accessibilityLiveRegion (Android)
当组件动态的更改时,我们希望 TalkBack 去提醒最终用户。'AccessibilityLiveRegion' 属性让这成为可能。它可以被设置为 ‘none’, ‘polite’ 以及 ‘assertive’。
- none 辅助功能服务不应该对此视图通知改变的地方。
- polite 辅助功能服务应该对此视图通知改变的地方。
- assertive 辅助功能服务应该中断正在进行的会话,并且以立即宣布该视图的改变。
<
TouchableWithoutFeedback onPress
=
{
this
._addOne
}
>
<
View
style
=
{
styles.
embedded
}
>
<
Text
>
Click me
</
Text
>
</
View
>
</
TouchableWithoutFeedback
>
<
Text accessibilityLiveRegion
=
"polite"
>
Clicked
{
this
.
state
.
count
}
times
</
Text
>
在上面的示例方法 _addOne 更改了 state.count 变量。当最终用户单击 TouchableWithoutFeedback 的时候,因为 TalkBack 的 'accessibilityLiveRegion=”polite”' 属性,所以它读取了文本视图中的文本。
importantForAccessibility (Android)
对于两个重叠的并且拥有相同父元素的 UI 组件,默认的辅助功能焦点可以有不可预知的行为。如果一个视图触发辅助事件并且它被汇报给了辅助功能服务器,那么 'ImportantForAccessibility' 属性将会通过控制解决它,它可以被设置为‘auto’, ‘yes’, ‘no’ 以及 ‘no-hide-descendants’ (最后一个值将迫使辅助功能服务忽略该组件和它的所有子元素)。
<
View
style
=
{
styles.
container
}
>
<
View
style
=
{
{
position
:
'absolute'
, left
:
10
, top
:
10
, right
:
10
, height
:
100
,
backgroundColor
:
'green'
}
}
importantForAccessibility
=
”yes”
>
<
Text
>
First layout
</
Text
>
</
View
>
<
View
style
=
{
{
position
:
'absolute'
, left
:
10
, top
:
10
, right
:
10
, height
:
100
,
backgroundColor
:
'yellow'
}
}
importantForAccessibility
=
”no
-
hide
-
descendant”
>
<
Text
>
Second layout
</
Text
>
</
View
>
</
View
>
在上面的示例中,对于 TalkBack 以及其他的辅助功能服务而言,黄色的布局及其后代是完全不可见的。所以我们可以容易的使用来自于同一个父元素并且不带有令人疑惑的 TalkBack 的视图。
发送辅助功能事件(Android)
有时候在 UI 组件中去触发一个辅助功能事件很有用 (即当一个自定义的视图在屏幕上显示或自定义单选按钮已被选中)。为了达到这个目的,本地 UIManager 模块公布了一个名叫 'sendAccessibilityEvent' 的方法。它拥有两个参数: 视图标签和一个类型的事件。
_onPress
:
function
(
)
{
this
.
state
.
radioButton
=
this
.
state
.
radioButton
===
“radiobutton_checked”
?
“radiobutton_unchecked”
:
“radiobutton_checked”
;
if
(
this
.
state
.
radioButton
===
“radiobutton_checked”
)
{
RCTUIManager.
sendAccessibilityEvent
(
React.
findNodeHandle
(
this
)
,
RCTUIManager.
AccessibilityEventTypes
.
typeViewClicked
)
;
}
}
<
CustomRadioButton
accessibleComponentType
=
{
this
.
state
.
radioButton
}
onPress
=
{
this
._onPress
}
/>
在上面的例子中,我们创建了一个如同本按钮的自定义单选按钮。更具体地说,TalkBack 可以正确的公布单选按钮选择的变化。
测试 VoiceOver 支持的内容(iOS)
如果要启用 VoiceOver,那么请在你的 iOS 设备上打开设置应用程序的位置。点击 General,然后点击 Accessibility。那里你会发现许多人们用来优化他们的设备的工具,比如粗体文本、 增加的对比度以及 VoiceOver。
如果要启用 VoiceOver,点击 "Vision" 下的 VoiceOver,打开显示在顶部的开关。
在辅助功能设置的最底部,还有一个"辅助功能的快捷方式"。你可以使用它三次单击主页按钮来触发 VoiceOver。
有时一个应用程序需要访问平台 API,React Native 并没有相应的封装器。也许你想重用现有的一些 Objective——C 或 C++ 代码,无需在 JavaScript 上重新实现。或者写一些高性能,多线程的代码,如图像处理、网络堆栈,数据库或渲染。
我们设计 React Native,这样可以为你写真正的本地代码,并且能够访问整个平台。这是一个更高级的特性,且我们并不期望它成为通常开发过程的一部分,但是它的存在是至关重要的。如果 React Native 不支持你需要的本地特性,那么你应该能够自己构建它。
这是一个更高级的指南,展示了如何构建一个本地模块。它假设读者知道 Objective-C(Swift 还没有支持)和核心库(Foundation,UIKit)。
iOS 日历模块的例子
本指南将使用 iOS 日历 API 的例子。假设我们希望能够从 JavaScript 访问 iOS 日历。
Native 模块只是一个 Objectve-C 类,实现了 RCTBridgeModule
协议。如果你想知道,RCT 是 ReaCT 的一个简称。
// CalendarManager.h
#import "RCTBridgeModule.h"
#import "RCTLog.h"
@interface CalendarManager : NSObject <RCTBridgeModule>
@end
React Native 不会向 JavaScript 公开任何 CalendarManager
方法,除非有明确的要求。幸运的是有了 RCT_EXPORT
,这会非常简单:
// CalendarManager.m
@implementation CalendarManager
- (void)addEventWithName:(NSString *)name location:(NSString *)location
{
RCT_EXPORT();
RCTLogInfo(@"Pretending to create an event %@ at %@", name, location);
}
@end
现在从你的 JavaScript 文件中,你可以像这样调用方法:
var CalendarManager = require('NativeModules').CalendarManager;
CalendarManager.addEventWithName('Birthday Party', '4 Privet Drive, Surrey');
注意,导出的方法名称是从 Objective-C 选择器的第一部分中生成的。有时它会产生一个非惯用的 JavaScript 名称(就像在我们的例子中的那个)。你可以通过为 RCT_EXPORT
提供一个可选参数更改名字,如 RCT_EXPORT(addEvent)
。
方法返回的类型应该是 void
。React Native 桥是异步的,所以向 JavaScript 传递结果的唯一方法是使用回调或 emitting 事件(见下文)。
参数类型
React Native 支持多种参数类型,可以从 JavaScript 代码传递到 native 模块:
- 字符串型(NSString
) - 数字型(NSInteger
,float
,double
,CGFloat
,NSNumber
) - 布尔型(BOOL
,NSNumber
) - 这个列表中任何类型的数组(NSArray
) - 这个列表中任何类型的字符串键和值的映射(NSDictionary
) - 函数(RCTResponseSenderBlock
)
在我们的 CalendarManager
示例中,如果我们想把事件日期传递到 native,我们必须将它转换成一个字符串或一个数字:
- (void)addEventWithName:(NSString *)name location:(NSString *)location date:(NSInteger)secondsSinceUnixEpoch
{
RCT_EXPORT(addEvent);
NSDate *date = [NSDate dateWithTimeIntervalSince1970:secondsSinceUnixEpoch];
}
随着 CalendarManager.addEvent
方法变得越来越复杂,参数的数量将会增加。其中一些可能是可选的。在这种情况下对改变 API 一点来接受事件属性的字典是值得考虑的,如:
#import "RCTConvert.h"
- (void)addEventWithName:(NSString *)name details:(NSDictionary *)details
{
RCT_EXPORT(addEvent);
NSString *location = [RCTConvert NSString:details[@"location"]]; // ensure location is a string
...
}
并且从 JavaScript 调用它:
CalendarManager.addEvent('Birthday Party', {
location: '4 Privet Drive, Surrey',
time: date.toTime(),
description: '...'
})
注意:关于数组和映射
React Ntive 没有为这些结构中值的类型提供任何担保。你的 native 模块可能期望一个字符串数组,但如果 JavaScript 调用你的包含数字和字符串数组的方法,你会得到带有 NSNumber
和 NSString
的 NSArray
。检查数组/映射值类型是开发人员的责任 (助手方法见 RCTConvert
)。
回调
警告
本节比其他更具有实验性,围绕回调我们没有得到一组最佳实践。
Native 模块还支持一种特殊的参数——回调。在大多数情况下它是用来向 JavaScript 提供函数调用结果的。
- (void)findEvents:(RCTResponseSenderBlock)callback
{
RCT_EXPORT();
NSArray *events = ...
callback(@[[NSNull null], events]);
}
RCTResponseSenderBlock
只接受一个参数——参数的数组传递给 JavaScript 的回调。在本例中,我们使用节点的惯例来为 error 和其他的——函数的结果设置第一个参数。
CalendarManager.findEvents((error, events) => {
if (error) {
console.error(error);
} else {
this.setState({events: events});
}
})
Native 模块应该只调用它的回调一次。然而,它可以将回调作为 ivar 存储并稍后调用回调。这种模式通常用于包装需要委托的 iOS 的 APIs。请看 RCTAlertManager
。
如果你想向 JavaScript 传递 error ——如对象,使用 RCTUtils.h
的 RCTMakeError
。
实现 native 模块
Native 模块应该没有任何关于什么线程正在被调用的假设。React Native 在一个单独的串行 GCD 队列中调用 native 模块方法,但这是一个实现细节,可能会改变。如果 native 模块需要调用 main-thread-only iOS API,它应该在主队列安排操作:
- (void)addEventWithName:(NSString *)name callback:(RCTResponseSenderBlock)callback
{
RCT_EXPORT(addEvent);
dispatch_async(dispatch_get_main_queue(), ^{
// Call iOS API on main thread
...
// You can invoke callback from any thread/queue
callback(@[...]);
});
}
同样的方法,如果操作要很长时间才能完成,native 模块不应该阻塞。使用 dispatch_async
在后台队列中安排耗费大的工作是一个好主意。
导出常量
Native 模块可以在运行时向 JavaScript 导出立即可用的常量。导出一些初始数据是有用的,否则这些初始数据需要往返的桥梁。
- (NSDictionary *)constantsToExport
{
return @{ @"firstDayOfTheWeek": @"Monday" };
}
JavaScript 能够立即使用这些值:
console.log(CalendarManager.firstDayOfTheWeek);
注意,只有在初始化时常量才能被导出,所以如果你在运行时改变了 constantsToExport
的值,它不会影响 JavaScript 环境。
发送事件到 JavaScript
Native 模块可以在不被直接调用的情况下向 JavaScript 发送事件信号。最简单的方法是使用 eventDispatcher
:
#import "RCTBridge.h"
#import "RCTEventDispatcher.h"
@implementation CalendarManager
@synthesize bridge = _bridge;
- (void)calendarEventReminderReceived:(NSNotification *)notification
{
NSString *eventName = notification.userInfo[@"name"];
[self.bridge.eventDispatcher sendAppEventWithName:@"EventReminder"
body:@{@"name": eventName}];
}
@end
JavaScript 代码可以订阅这些事件:
var subscription = DeviceEventEmitter.addListener(
'EventReminder',
(reminder) => console.log(reminder.name)
);
...
// Don't forget to unsubscribe
subscription.remove();
更多的向 JavaScript 发送事件的例子,请看 RCTLocationObserver。
有时候一个应用需要访问 React Native 平台目前没有对应模块的 API 。也许你需要复用一些已经存在的 Java 代码而不需要在 JavaScript 里面重新实现,或者写一些高性能,多线程的代码,比如图片处理,数据库,或者任何先进的扩展。
我们设计了 React Native 以致于你可以写一些真正的原生代码并且可以完全拥有系统的权限的能力。这是一个更加先进的特征,并且我们不希望这是传统开发过程中的一部分,然而它存在是非常重要的。如果 React Native 不支持你需要的原生特征,那么你应该可以自己创建它。
Toast 模块
这个引导将会使用这个 Toast 的例子。我们将会可以通过使用 JavaScript 创建一个 toast 消息。
我们从创建一个原生模块开始。一个原生模块是一个通常继承 ReactContextBaseJavaModule
类的 Java 类,并且实现了 JavaScript 需要实现的方法。我们这里的目标是允许通过使用 JavaScript 书写 ToastAndroid.show('Awesome', ToastAndroid.SHORT);
就可以在屏幕上面显示一个短短的 toast 消息。
package
com.facebook.react.modules.toast
;
import
android.widget.Toast
;
import
com.facebook.react.bridge.NativeModule
;
import
com.facebook.react.bridge.ReactApplicationContext
;
import
com.facebook.react.bridge.ReactContext
;
import
com.facebook.react.bridge.ReactContextBaseJavaModule
;
import
com.facebook.react.bridge.ReactMethod
;
import
java.util.Map
;
public
class
ToastModule
extends
ReactContextBaseJavaModule
{
private
static
final
String
DURATION_SHORT_KEY
=
"SHORT"
;
private
static
final
String
DURATION_LONG_KEY
=
"LONG"
;
public
ToastModule
(
ReactApplicationContext reactContext
)
{
super
(
reactContext
)
;
}
}
ReactContextBaseJavaModule
需要一个叫做 getName
的方法被实现。这个方法的目的就是返回在 JavaScript 里面表示这个类的叫做 NativeModule
的字符串的名字。在这里我们调用 ToastAndroid
因此我们可以在 JavaScript 里面使用 React.NativeModules.ToastAndroid
来得到它。
@Override
public
String
getName
(
)
{
return
"ToastAndroid"
;
}
一个可选的叫做 getConstants
的方法会将传递给 JavaScript 的常量返回。这个方法的实现并不是必须的,但是却对在 JavaScript 和 Java 中同步的预定义的关键字的值非常重要。
@Override
public
Map
<
String
, Object
>
getConstants
(
)
{
final
Map
<
String
, Object
>
constants
=
new
HashMap
<>
(
)
;
constants.
put
(
DURATION_SHORT_KEY, Toast.
LENGTH_SHORT
)
;
constants.
put
(
DURATION_LONG_KEY, Toast.
LENGTH_LONG
)
;
return
constants
;
}
给 JavaScript 暴露一个方法,一个 Java 方法需要使用 @ReactMethod
来注解。桥接的方法的返回值类型总是 void
。React Native 的桥接是异步的,因此将一个结果传递给 JavaScript 的唯一方式就是使用回调函数或者调用事件(见下面)。
@ReactMethod
public
void
show
(
String
message,
int
duration
)
{
Toast.
makeText
(
getReactApplicationContext
(
)
, message, duration
)
.
show
(
)
;
}
参数类型
下面的参数类型是被使用 @ReactMethod
注解的方法支持的,并且它们直接对应 JavaScript 中对应的值。
Boolean -> Bool
Integer -> Number
Double -> Number
Float -> Number
String -> String
Callback -> function
ReadableMap -> Object
ReadableArray -> Array
注册模块
在使用 Java 的最后一步就是注册这个模块,这将在你的应用包中的 createNativeModules
发生。如果一个模块没有被注册,那么它在 JavaScript 是不可用的。
class
AnExampleReactPackage
implements
ReactPackage
{
...
@Override
public
List
<
NativeModule
>
createNativeModules
(
ReactApplicationContext reactContext
)
{
List
<
NativeModule
>
modules
=
new
ArrayList
<>
(
)
;
modules.
add
(
new
ToastModule
(
reactContext
)
)
;
return
modules
;
}
当包被创建的时候,它需要提供给 ReactInstanceManager 。可以看 UIExplorerActivity.java
这个例子。当你初始化一个新工程的时候默认的包是MainReactPackage.java
。
mReactInstanceManager
=
ReactInstanceManager.
builder
(
)
.
setApplication
(
getApplication
(
)
)
.
setBundleAssetName
(
"AnExampleApp.android.bundle"
)
.
setJSMainModuleName
(
"Examples/AnExampleApp/AnExampleApp.android"
)
.
addPackage
(
new
AnExampleReactPackage
(
)
)
.
setUseDeveloperSupport
(
true
)
.
setInitialLifecycleState
(
LifecycleState.
RESUMED
)
.
build
(
)
;
为了能让你更加方便的从 JavaScript 访问你的新功能的时候,通常会将原生模块包裹在一个 JavaScript 模块里面。这不是必须的,但是节省了你的类库的使用者每次都要 pull NativeModules
的不便。这个 JavaScript 文件也为你增加任何 JavaScript 端功能提供了方便。
/**
* @providesModule ToastAndroid
*/
'use strict'
;
/**
* This exposes the native ToastAndroid module as a JS module. This has a function 'showText'
* which takes the following parameters:
*
* 1. String message: A string with the text to toast
* 2. int duration: The duration of the toast. May be ToastAndroid.SHORT or ToastAndroid.LONG
*/
var
{
NativeModules
}
=
require
(
'react-native'
)
;
module.
exports
=
NativeModules.
ToastAndroid
;
现在,在你的 JavaScript 文件里面你可以像下面这样调用方法:
var ToastAndroid = require('ToastAndroid')
ToastAndroid.show('Awesome', ToastAndroid.SHORT);
// Note: We require ToastAndroid without any relative filepath because
// of the @providesModule directive. Using @providesModule is optional.
远不止 Toasts
回调
原生模块也提供了一种特殊的参数-一个回调。在大多数情况下这是给 JavaScript 返回结果使用的。
public
class
UIManagerModule
extends
ReactContextBaseJavaModule
{
...
@ReactMethod
public
void
measureLayout
(
int
tag,
int
ancestorTag,
Callback errorCallback,
Callback successCallback
)
{
try
{
measureLayout
(
tag, ancestorTag, mMeasureBuffer
)
;
float
relativeX
=
PixelUtil.
toDIPFromPixel
(
mMeasureBuffer
[
0
]
)
;
float
relativeY
=
PixelUtil.
toDIPFromPixel
(
mMeasureBuffer
[
1
]
)
;
float
width
=
PixelUtil.
toDIPFromPixel
(
mMeasureBuffer
[
2
]
)
;
float
height
=
PixelUtil.
toDIPFromPixel
(
mMeasureBuffer
[
3
]
)
;
successCallback.
invoke
(
relativeX, relativeY, width, height
)
;
}
catch
(
IllegalViewOperationException e
)
{
errorCallback.
invoke
(
e.
getMessage
(
)
)
;
}
}
...
使用以下方法可以来访问在 JavaScript 里面可以使用:
UIManager.measureLayout(
100,
100,
(msg) => {
console.log(msg);
},
(x, y, width, height) => {
console.log(x + ':' + y + ':' + width + ':' + height);
}
);
一个原生模块支持只调用一次它的回调。它可以保存这个回调,并且在以后调用。
有一点需要强调的就是在原生方法完成之后这个回调并不是立即被调用的-请记住桥接通信是异步的,因此这个也在运行时循环里面。
线程
原生模块不应该设想有它们将在哪些线程里面被调用,因为目前的任务在以后改变是主要的。如果一个块调用是必须的,那么耗时操作将会被分配到间歇性的工作线程中,并且任何回调将会从这里开始。
给 JavaScript 传递事件
原生模块可以不需要立即被调用就可以给 JavaScript 发送事件。最简单的方式就是使用从 ReactContext
获得的 RCTDeviceEventEmitter
,就像下面的代码片段:
...
private
void
sendEvent
(
ReactContext reactContext,
String
eventName,
@Nullable WritableMap params
)
{
reactContext
.
getJSModule
(
DeviceEventManagerModule.
RCTDeviceEventEmitter
.
class
)
.
emit
(
eventName, params
)
;
}
...
WritableMap
params
=
Arguments.
createMap
(
)
;
...
sendEvent
(
reactContext,
"keyboardWillShow"
, params
)
;
JavaScript 模块在那时可以通过使用 Subscribable
的 addListenerOn
来注册并且接收事件。
var RCTDeviceEventEmitter = require('RCTDeviceEventEmitter');
...
var ScrollResponderMixin = {
mixins: [Subscribable.Mixin],
componentWillMount: function() {
...
this.addListenerOn(RCTDeviceEventEmitter,
'keyboardWillShow',
this.scrollResponderKeyboardWillShow);
...
},
scrollResponderKeyboardWillShow:function(e: Event) {
this.keyboardWillOpenTo = e;
this.props.onKeyboardWillShow && this.props.onKeyboardWillShow(e);
},
有许多 native UI 小部件可以应用到最新的应用程序中——其中一些是平台的一部分,另外的可以用作第三方库,并且更多的是它们可以用于你自己的选集中。React Native 有几个最关键的平台组件已经包装好了,如 ScrollView
和 TextInput
,但不是所有的组件都被包装好了,当然了,你为先前的应用程序写的组件肯定没有包装好。幸运的是,为了与 React Native 应用程序无缝集成,将现存组件包装起来是非常容易实现的。
正如 native 模块指南,这也是一种更高级的指南,假定你对 iOS 编程有一定的了解。本指南将向你展示如何构建一个本地的 UI 组件,带你实现在核心 React Native 库中可用的现存的 MapView
组件的子集。
iOS MapView 示例
如果说我们想在我们的应用程序中添加一个交互式的 Map——不妨用 MKMapView
,我们只需要让它在 JavaScript 中可用。
Native 视图是通过 RCTViewManager
的子类创建和操做的。这些子类的功能与视图控制器很相似,但本质上它们是单件模式——桥只为每一个子类创建一个实例。它们将 native 视图提供给 RCTUIManager
,它会传回到 native 视图来设置和更新的必要的视图属性。RCTViewManager
通常也是视图的代表,通过桥将事件发送回 JavaScript。
发送视图是很简单的:
- 创建基本的子类。
- 添加标记宏 RCT_EXPORT_MODULE()
。 - 实现 -(UIView *)view
方法。
// RCTMapManager.m
#import <MapKit/MapKit.h>
#import "RCTViewManager.h"
@interface RCTMapManager : RCTViewManager
@end
@implementation RCTMapManager
RCT_EXPORT_MODULE()
- (UIView *)view
{
return [[MKMapView alloc] init];
}
@end
然后你需要一些 JavaScript 使之成为有用的 React 组件:
// MapView.js
var { requireNativeComponent } = require('react-native');
module.exports = requireNativeComponent('RCTMap', null);
现在这是 JavaScript 中一个功能完整的 native map 视图组件了,包括 pinch-zoom 和其他 native 手势支持。但是我们还不能用 JavaScript 来真正的控制它。
属性
为了使该组件更可用,我们可以做的第一件事是连接一些 native 属性。比如说我们希望能够禁用音高控制并指定可见区域。禁用音高是一个简单的布尔值,所以我们只添加这一行:
// RCTMapManager.m
RCT_EXPORT_VIEW_PROPERTY(pitchEnabled, BOOL)
注意我们显式的指定类型为 BOOL
——当谈到连接桥时,React Native 使用 hood 下的 RCTConvert
来转换所有不同的数据类型,且错误的值会显示明显的 “RedBox” 错误使你知道这里有 ASAP 问题。当一切进展顺利时,这个宏就会为你处理整个实现。
现在要真正的实现禁用音高,我们只需要在 JS 中设置如下所示属性:
// MyApp.js
<MapView pitchEnabled={false} />
但是这不是很好记录——为了知道哪些属性可用以及它们接收了什么值,你的新组件的客户端需要挖掘 objective-C 代码。为了更好的实现这一点,让我们做一个包装器组件并用 React PropTypes
记录接口:
// MapView.js
var React = require('react-native');
var { requireNativeComponent } = React;
class MapView extends React.Component {
render() {
return <RCTMap {...this.props} />;
}
}
var RCTMap = requireNativeComponent('RCTMap', MapView);
MapView.propTypes = {
/**
* When this property is set to `true` and a valid camera is associated
* with the map, the camera’s pitch angle is used to tilt the plane
* of the map. When this property is set to `false`, the camera’s pitch
* angle is ignored and the map is always displayed as if the user
* is looking straight down onto it.
*/
pitchEnabled: React.PropTypes.bool,
};
module.exports = MapView;
现在我们有一个很不错的已记录的包装器组件,它使用非常容易。注意我们为新的 MapView
包装器组件将第二个参数从 null
改为 requireNativeComponent
。这使得基础设施验证了 propTypes 匹配native 工具来减少 ObjC 和 JS 代码之间的不匹配的可能。
接下来,让我们添加更复杂的 region
工具。从添加 native 代码入手:
// RCTMapManager.m
RCT_CUSTOM_VIEW_PROPERTY(region, MKCoordinateRegion, RCTMap)
{
[view setRegion:json ? [RCTConvert MKCoordinateRegion:json] : defaultView.region animated:YES];
}
好的,这显然比之前简单的 BOOL
情况更加复杂。现在我们有一个 MKCoordinateRegion
类型,该类型需要一个转换函数,并且我们有自定义的代码,这样当我们从 JS 设置区域时,视图可以产生动画效果。还有一个 defaultView
,如果 JS 发送给我们一个 null 标记,我们使用它将属性重置回默认值。
当然你可以为你的视图编写任何你想要的转换函数——下面是通过 RCTConvert
的两类来实现 MKCoordinateRegion
的例子:
@implementation RCTConvert(CoreLocation)
RCT_CONVERTER(CLLocationDegrees, CLLocationDegrees, doubleValue);
RCT_CONVERTER(CLLocationDistance, CLLocationDistance, doubleValue);
+ (CLLocationCoordinate2D)CLLocationCoordinate2D:(id)json
{
json = [self NSDictionary:json];
return (CLLocationCoordinate2D){
[self CLLocationDegrees:json[@"latitude"]],
[self CLLocationDegrees:json[@"longitude"]]
};
}
@end
@implementation RCTConvert(MapKit)
+ (MKCoordinateSpan)MKCoordinateSpan:(id)json
{
json = [self NSDictionary:json];
return (MKCoordinateSpan){
[self CLLocationDegrees:json[@"latitudeDelta"]],
[self CLLocationDegrees:json[@"longitudeDelta"]]
};
}
+ (MKCoordinateRegion)MKCoordinateRegion:(id)json
{
return (MKCoordinateRegion){
[self CLLocationCoordinate2D:json],
[self MKCoordinateSpan:json]
};
}
这些转换函数是为了安全地处理任何 JSON 而设计的,当出现丢失的键或开发人员错误操作时,JS 可能向它们抛出 “RedBox” 错误并返回标准的初始化值。
为完成对 region
工具的支持,我们需要把它记录到 propTypes
中(否则我们将得到一个错误,即 native 工具没有被记录),然后我们就可以按照设置其他工具的方式来设置它:
// MapView.js
MapView.propTypes = {
/**
* When this property is set to `true` and a valid camera is associated
* with the map, the camera’s pitch angle is used to tilt the plane
* of the map. When this property is set to `false`, the camera’s pitch
* angle is ignored and the map is always displayed as if the user
* is looking straight down onto it.
*/
pitchEnabled: React.PropTypes.bool,
/**
* The region to be displayed by the map.
*
* The region is defined by the center coordinates and the span of
* coordinates to display.
*/
region: React.PropTypes.shape({
/**
* Coordinates for the center of the map.
*/
latitude: React.PropTypes.number.isRequired,
longitude: React.PropTypes.number.isRequired,
/**
* Distance between the minimum and the maximum latitude/longitude
* to be displayed.
*/
latitudeDelta: React.PropTypes.number.isRequired,
longitudeDelta: React.PropTypes.number.isRequired,
}),
};
// MyApp.js
render() {
var region = {
latitude: 37.48,
longitude: -122.16,
latitudeDelta: 0.1,
longitudeDelta: 0.1,
};
return <MapView region={region} />;
}
在这里你可以看到该区域的形状在 JS 文档中是显式的——理想情况下我们可以生成一些这方面的东西,但是这没有实现。
事件
所以现在我们有一个 native map 组件,可以从 JS 很容易的控制,但是我们如何处理来自用户的事件,如 pinch-zooms 或平移来改变可见区域?关键是要使 RCTMapManager
成为它发送的所有视图的代表,并把事件通过事件调度器发送给 JS。这看起来如下所示(从整个实现中简化出来的部分):
// RCTMapManager.m
#import "RCTMapManager.h"
#import <MapKit/MapKit.h>
#import "RCTBridge.h"
#import "RCTEventDispatcher.h"
#import "UIView+React.h"
@interface RCTMapManager() <MKMapViewDelegate>
@end
@implementation RCTMapManager
RCT_EXPORT_MODULE()
- (UIView *)view
{
MKMapView *map = [[MKMapView alloc] init];
map.delegate = self;
return map;
}
#pragma mark MKMapViewDelegate
- (void)mapView:(RCTMap *)mapView regionDidChangeAnimated:(BOOL)animated
{
MKCoordinateRegion region = mapView.region;
NSDictionary *event = @{
@"target": mapView.reactTag,
@"region": @{
@"latitude": @(region.center.latitude),
@"longitude": @(region.center.longitude),
@"latitudeDelta": @(region.span.latitudeDelta),
@"longitudeDelta": @(region.span.longitudeDelta),
}
};
[self.bridge.eventDispatcher sendInputEventWithName:@"topChange" body:event];
}
你可以看到我们设置管理器为它发送的每个视图的代表,然后在代表方法 -mapView:regionDidChangeAnimated:
中,区域与 reactTag
目标相结合来产生事件,通过 sendInputEventWithName:body
分派到你应用程序中相应的 React 组件实例中。事件名称 @"topChange"
映射到从 JavaScript 中回调的 onChange
(这里查看 mappings )。原始事件调用这个回调,我们通常在包装器组件中处理这个过程来实现一个简单的 API:
// MapView.js
class MapView extends React.Component {
constructor() {
this._onChange = this._onChange.bind(this);
}
_onChange(event: Event) {
if (!this.props.onRegionChange) {
return;
}
this.props.onRegionChange(event.nativeEvent.region);
}
render() {
return <RCTMap {...this.props} onChange={this._onChange} />;
}
}
MapView.propTypes = {
/**
* Callback that is called continuously when the user is dragging the map.
*/
onRegionChange: React.PropTypes.func,
...
};
样式
由于我们所有的 native react 视图是 UIView
的子类,大多数样式属性会像你预想的一样内存不足。然而,一些组件需要默认的样式,例如 UIDatePicker
,大小固定。为了达到预期的效果,默认样式对布局算法来说是非常重要的,但是我们也希望在使用组件时能够覆盖默认的样式。DatePickerIOS
通过包装一个额外的视图中的 native 组件实现这一功能,该额外的视图具有灵活的样式设计,并在内部 native 组件中使用一个固定的样式(用从 native 传递的常量生成):
// DatePickerIOS.ios.js
var RCTDatePickerIOSConsts = require('NativeModules').UIManager.RCTDatePicker.Constants;
...
render: function() {
return (
<View style={this.props.style}>
<RCTDatePickerIOS
ref={DATEPICKER}
style={styles.rkDatePickerIOS}
...
/>
</View>
);
}
});
var styles = StyleSheet.create({
rkDatePickerIOS: {
height: RCTDatePickerIOSConsts.ComponentHeight,
width: RCTDatePickerIOSConsts.ComponentWidth,
},
});
RCTDatePickerIOSConsts
常量是通过抓取 native 组件的实际框架从 native 中导出的,如下所示:
// RCTDatePickerManager.m
- (NSDictionary *)constantsToExport
{
UIDatePicker *dp = [[UIDatePicker alloc] init];
[dp layoutIfNeeded];
return @{
@"ComponentHeight": @(CGRectGetHeight(dp.frame)),
@"ComponentWidth": @(CGRectGetWidth(dp.frame)),
@"DatePickerModes": @{
@"time": @(UIDatePickerModeTime),
@"date": @(UIDatePickerModeDate),
@"datetime": @(UIDatePickerModeDateAndTime),
}
};
}
本指南涵盖了衔接自定义 native 组件的许多方面,但有你可能有更多需要考虑的地方,如自定义 hooks 来插入和布局子视图。如果你想了解更多,请在源代码中查看实际的 RCTMapManager
和其他组件。
这里有很多本地的 UI 部件准备被用到最新的应用程序中 - 其中一些是平台的一部分,其他的部分可以作为第三方库来使用,而且仍然还有更多的部分可能是在你自己的投资组合中使用。React Native 已经将几个最关键的平台组件进行了打包,如同 ScrollView
和 TextInput
,但是并不是所有都被打包了,所以当然也不可能是您以前写的应用程序。幸运的是,通过使用 React Native 应用程序可以很容易的将现有的组件进行无缝集成打包。
就如同本地模块指南,这是一个建立在假定你对 Android SDK 编程有些熟悉的基础上的更高级的指南。本指南将显示你该如何构建一个本地的 UI 组件, 帮助你遍历执行可用核心 React Native
库中可以使用的现有的 ImageViewcomponent 的一个子集。
ImageView 示例
在本例中我们将要完全了解实施要求来实现在 JavaScript 中允许使用 ImageViews。
本地视图是由扩展 ViewManage
或者更普遍的 SimpleViewManager
所创建和操纵的。在这种情况下 SimpleViewManager
是很方便的,因为它适用于普遍的属性,比如背景颜色、 不透明度和 Flexbox 布局。当然也有其他例子,当您在使用 FrameLayout 进行包装组件的时候,那么这时候您需要使用 ViewManage
,比如 ProgressBar。
这些子类在本质上是很单一的 — — 每个子类之中只有一个实例是通过这个桥接器创建的。他们将本地视图传递到了 NativeViewHierarchyManager
之中,这代表回到了通过使用它们原始的方法来设置并更新这些必要的视图的属性。ViewManagers
通常也是这些视图的代表,它通过该桥接器将事件发送回 JavaScript。
传递一个视图很简单:
1.创建 ViewManager 子类
2.使用 @UIProp
注释视图属性
3.执行 createViewInstance
方法
4.执行 updateView
方法
5.在应用程序软件包中的 createViewManagers
中注册管理器
6.执行 JavaScript 模块
1. 创建 ViewManager
子类
在本示例中,我们通过继承 ReactImageView
类型的 SimpleViewManager
来创建的视图管理器类 ReactImageManager
。它是由管理器管理的对象类型,这将成为一个本地视图。通过 getName
返回的名字将被用来从 Javascript 中引用本地视图类型。
...
public
class
ReactImageManager
extends
SimpleViewManager
<
ReactImageView
>
{
public
static
final
String
REACT_CLASS
=
"RCTImageView"
;
@Override
public
String
getName
(
)
{
return
REACT_CLASS
;
}
2. 注释视图属性
我们在 JavaScript 中使用 @UIProp
来注释需要被反映出来的属性。目前支持的类型有 BOOLEAN
, NUMBER
, STRING
, MAP
和 ARRAY
。每个属性都被声明为公共静态最终字符串常量,并且给它们分配的值在 JavaScript 中都会成为属性的名称。
@UIProp
(
UIProp.
Type
.
STRING
)
public
static
final
String
PROP_SRC
=
"src"
;
@UIProp
(
UIProp.
Type
.
NUMBER
)
public
static
final
String
PROP_BORDER_RADIUS
=
"borderRadius"
;
@UIProp
(
UIProp.
Type
.
STRING
)
public
static
final
String
PROP_RESIZE_MODE
=
ViewProps.
RESIZE_MODE
;
3. 执行 createViewInstance
方法
我们使用 CreateViewInstance
方法来创建视图,视图应将其自身初始化到默认状态,然后任何属性都会通过后续调用 updateView
来进行设置。
@Override
public
ReactImageView createViewInstance
(
ThemedReactContext context
)
{
return
new
ReactImageView
(
context, Fresco.
newDraweeControllerBuilder
(
)
, mCallerContext
)
;
}
4. 执行 updateView
方法
和 iOS 中有些不同的是在 Android 中,不是通过自动调用 setter 方法来给一个视图的属性进行赋值; 对于 Android 而言,你需要通过您的 ViewManager
中的 updateView
方法手动调用 setter。从 CatalystStylesDiffMap
中提取出来值,并且传递给视图实例。它是通过 updateView
和视图类的组合来检查属性的有效性,并采取相应的行动。
@Override
public
void
updateView
(
final
ReactImageView view,
final
CatalystStylesDiffMap props
)
{
super
.
updateView
(
view, props
)
;
if
(
props.
hasKey
(
PROP_RESIZE_MODE
)
)
{
view.
setScaleType
(
ImageResizeMode.
toScaleType
(
props.
getString
(
PROP_RESIZE_MODE
)
)
)
;
}
if
(
props.
hasKey
(
PROP_SRC
)
)
{
view.
setSource
(
props.
getString
(
PROP_SRC
)
)
;
}
if
(
props.
hasKey
(
PROP_BORDER_RADIUS
)
)
{
view.
setBorderRadius
(
props.
getFloat
(
PROP_BORDER_RADIUS, 0.0f
)
)
;
}
view.
maybeUpdateView
(
)
;
}
}
5. 注册 ViewManager
在 Java 中的最后一步是通过应用程序包的成员函数 createViewManagers
在应用程序中注册 ViewManager,这恰巧和 Native Modules 有些相似。
@Override
public
List
<
ViewManager
>
createViewManagers
(
ReactApplicationContext reactContext
)
{
return
Arrays
.
<
ViewManager
>
asList
(
new
ReactImageManager
(
)
)
;
}
6. 执行 JavaScript 模块
最后一步就是创建 JavaScript 模块来为您的新视图的用户定义 Java 和 JavaScript 之间的连接层。大量工作都是由 Java 和 JavaScript 中的 React 代码所完成,那么所有留给你的工作就是去描述 propTypes
。
// ImageView.js
var { requireNativeComponent } = require('react-native');
var iface = {
name: 'ImageView',
propTypes: {
src: PropTypes.string,
borderRadius: PropTypes.number,
resizeMode: PropTypes.oneOf(['cover', 'contain', 'stretch']),
},
};
module.exports = requireNativeComponent('RCTImageView', iface);
requireNativeComponent
通常具有两个参数,第一个是本地视图的名称,第二个是描述组件接口的对象。组件接口应该声明一个友好的名称
在调试消息中使用,并且必须声明本地视图所反映的 propTypes
。PropTypes
用于检查用户使用本地视图的有效性。
事件
现在我们知道了如何公开使用 JS 中那些可以轻松控制的本地视图组件。但是我们该如何处理用户的事件呢,比如捏拉缩放或平移?当本地事件发生的时候,本地代码应该把事件传递给视图中的 JavaScript 代表,并且这两个视图都与 getId()
方法返回的值相连接。
class
MyCustomView
extends
View
{
...
public
void
onReceiveNativeEvent
(
)
{
WritableMap event
=
Arguments.
createMap
(
)
;
event.
putString
(
"message"
,
"MyMessage"
)
;
ReactContext reactContext
=
(
ReactContext
)
getContext
(
)
;
reactContext.
getJSModule
(
RCTEventEmitter.
class
)
.
receiveEvent
(
getId
(
)
,
"topChange"
,
event
)
;
}
}
名字为 topChange
的事件对应于 JavaScript 里面的 onChange
回调 (映射是在 UIManagerModuleConstants.java
里面)。使用原始的事件来调用此回调。对于该事件,我们通常在包装组件中对它进行加工来形成一个更简单的 API。
// MyCustomView.js
class MyCustomView extends React.Component {
constructor() {
this._onChange = this._onChange.bind(this);
}
_onChange(event: Event) {
if (!this.props.onChange) {
return;
}
this.props.onChange(event.nativeEvent.message);
}
render() {
return <RCTMyCustomView {...this.props} onChange={this._onChange} />;
}
}
MyCustomView.propTypes = {
/**
* Callback that is called continuously when the user is dragging the map.
*/
onChange: React.PropTypes.func,
...
};
不是每个应用程序都使用所有的 native 功能,也不是包含支持这些特性的代码就会影响二进制大小...但是我们仍然想在你需要它们的时候添加这些特性变得容易。
记住我们把这些特性作为独立的静态库公开。
对于大多数的 libs 来说,它就像拖两个文件一样简单,有时第三步将是必要的,但仅此而已。
我们用 React Native 推出的所有的库存在在根仓库的 Libraries
文件夹中。它们中的一些是纯粹的 JavaScript,您只需要 require
它。其他的 libraries 也依赖于一些 native 代码,在这种情况下你需要将这些文件添加到你的应用程序中,否则当你尝试使用 library 时,程序将抛出一个错误。
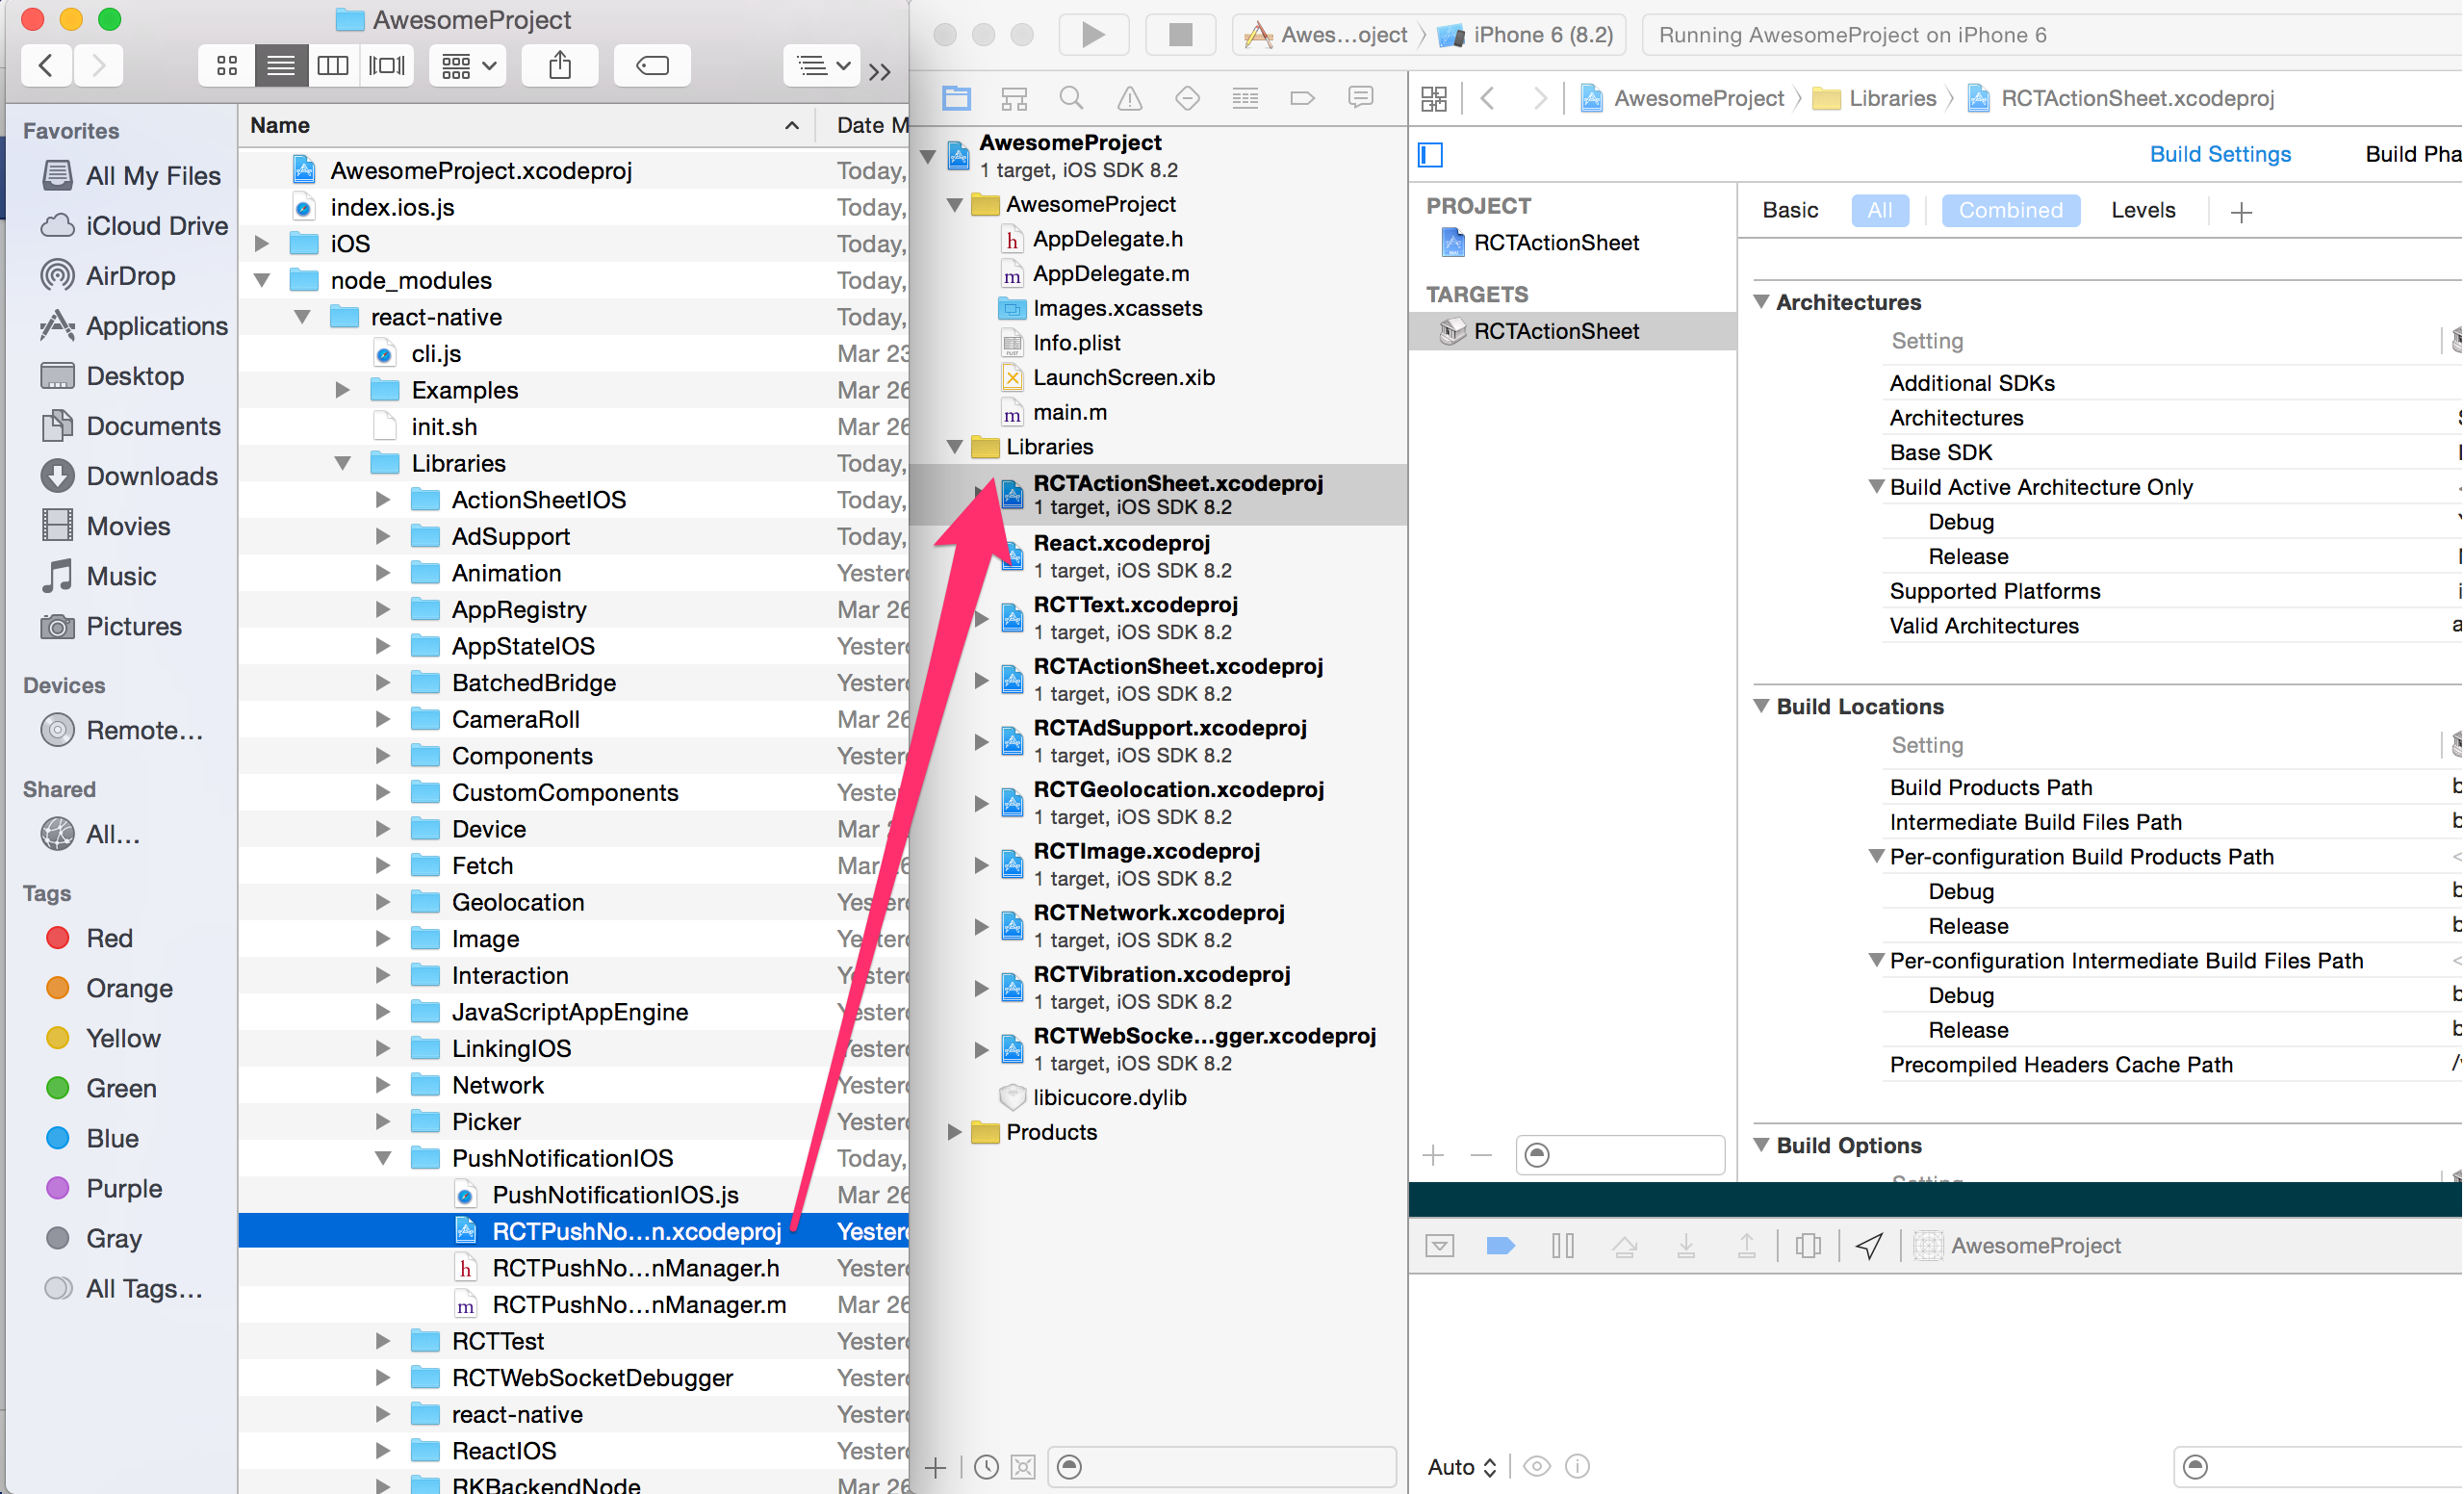
这几个步骤来链接包含 native 代码的库
步骤 1
如果库有 native 代码,那么在它的文件夹必须有一个 .xcodeproj
文件。拖动这个文件到 Xcode 项目中(通常在 Xcode 的 Libraries
小组);
图片 3.1 linking-libraries
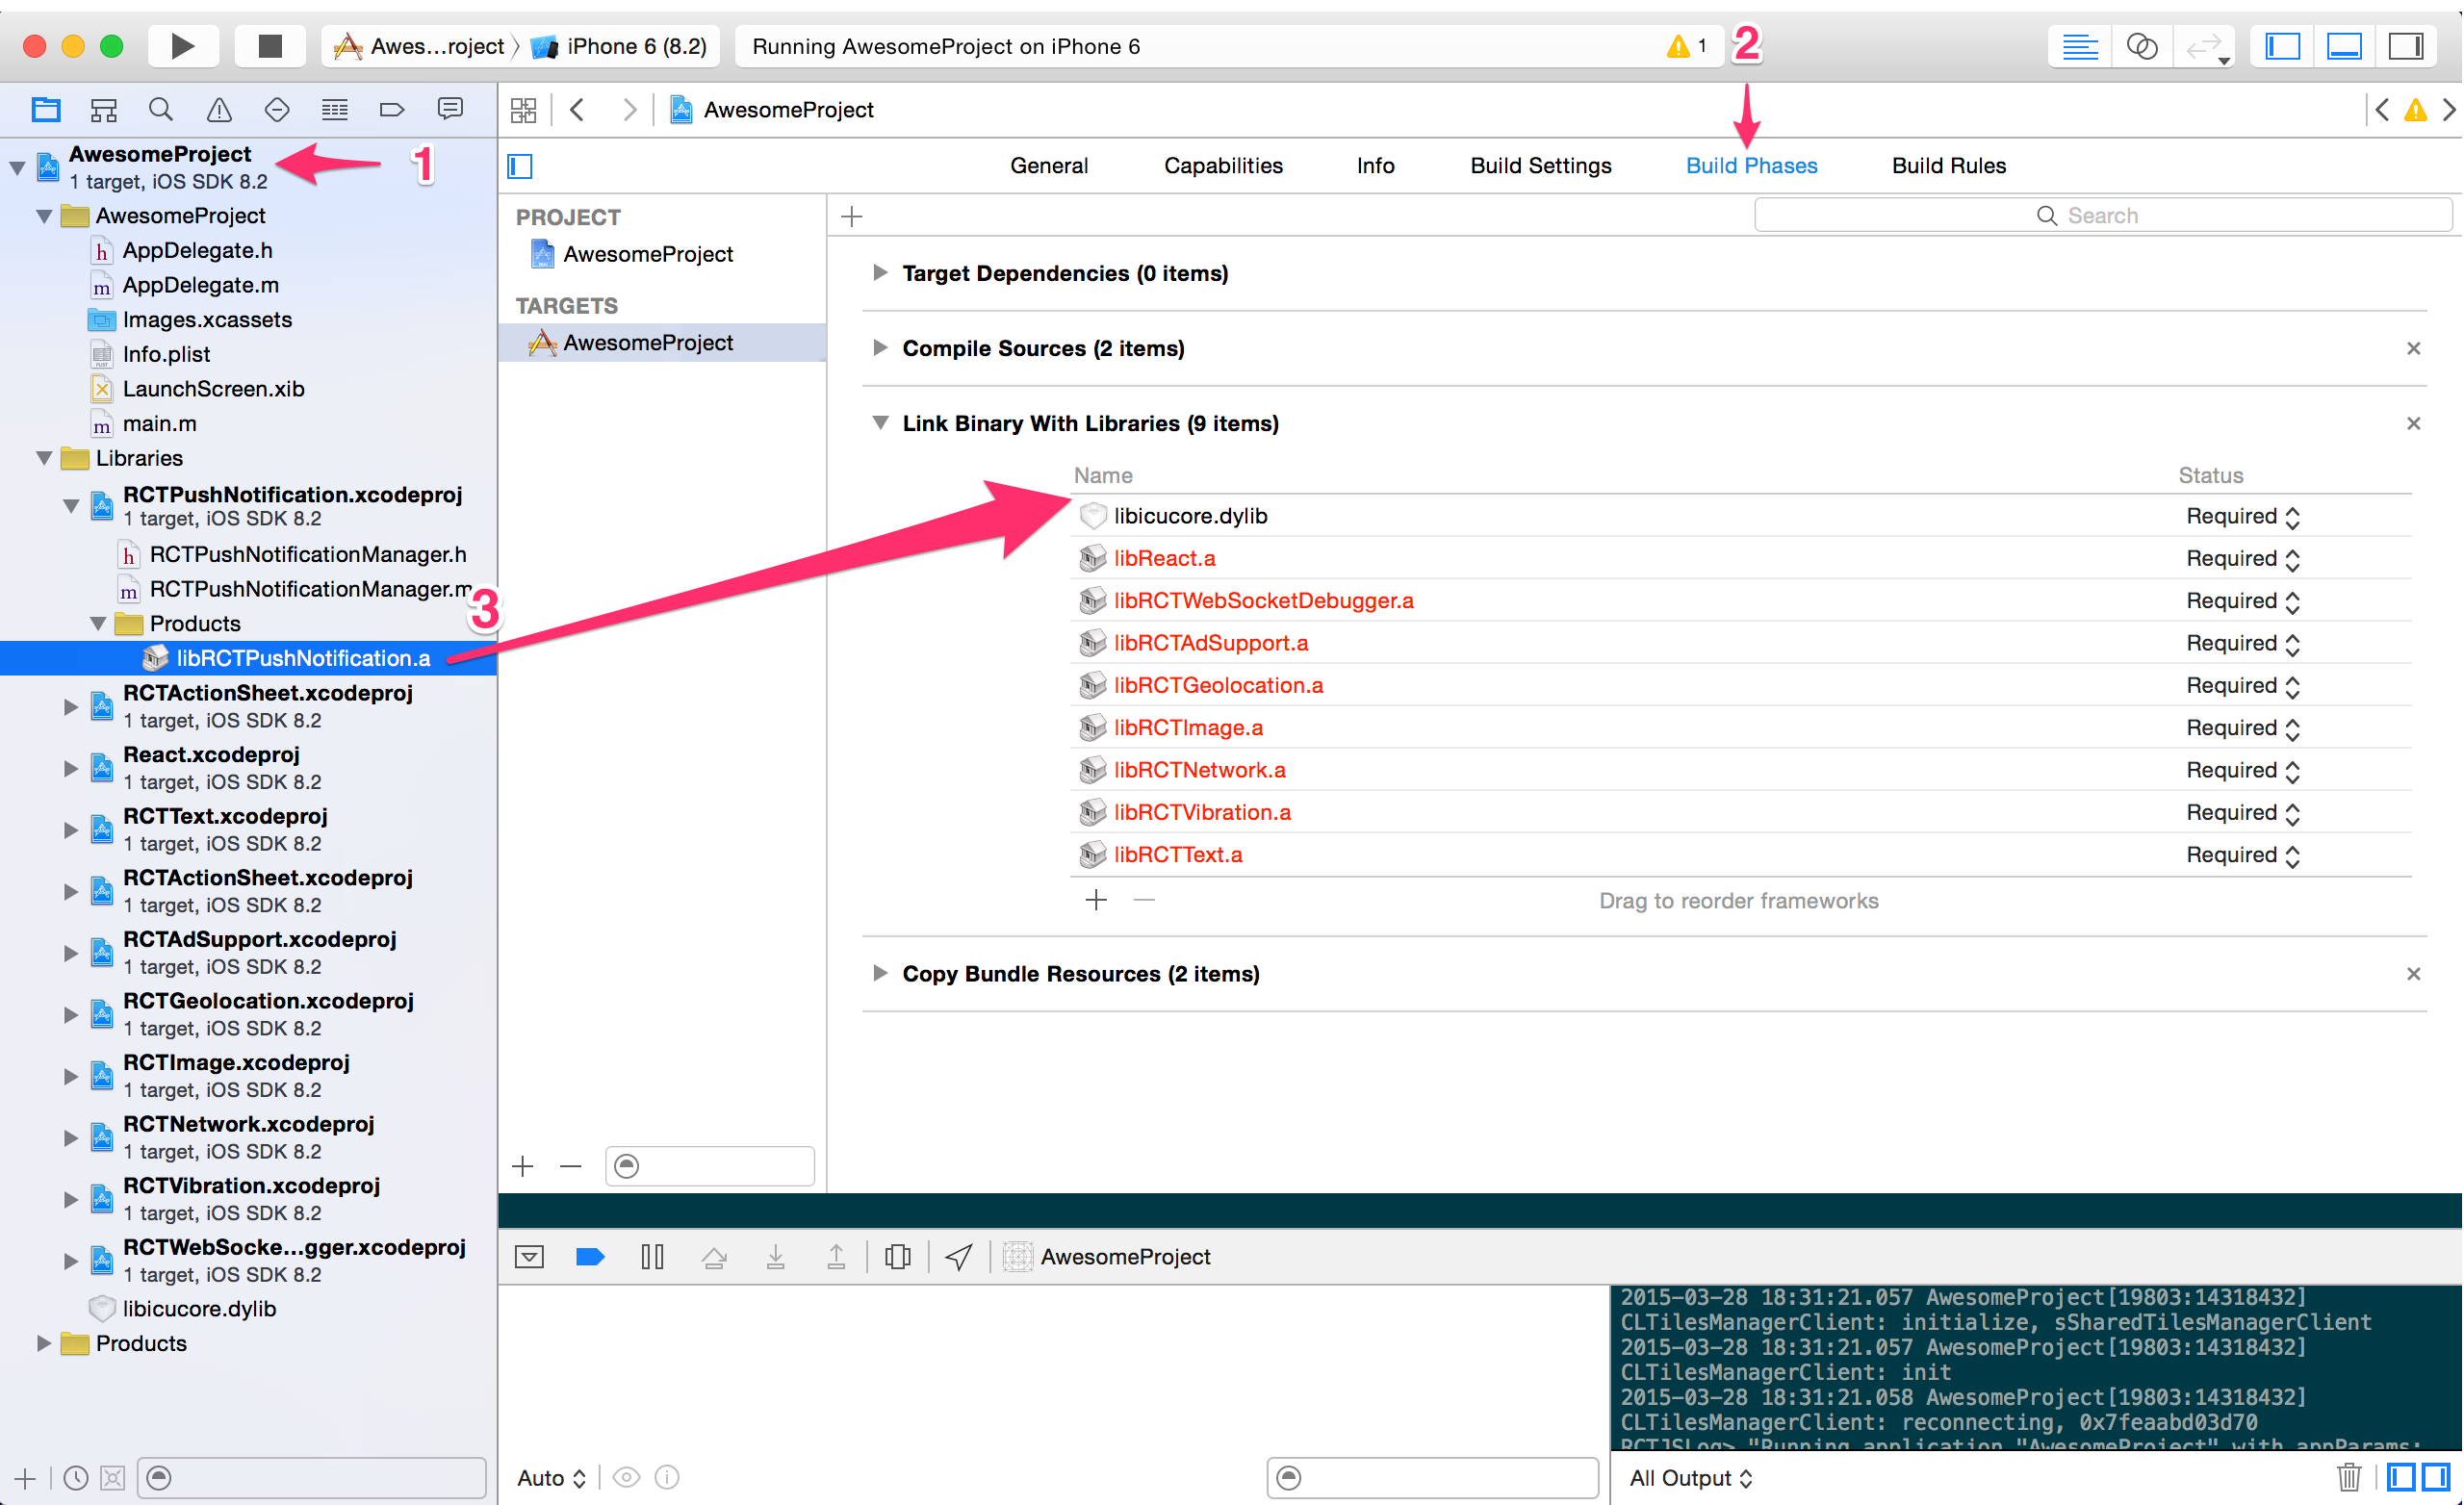
步骤 2
点击你的主项目文件(代表 .xcodeproj
的文件)选择 Build Phases
,从你正在导入 Link Binary With Libraries
的库中的 Products
文件夹中,拖动静态库。
图片 3.2 linking-libraries
步骤 3
不是每个库都需要这一步,你需要考虑的是:
我在编译时需要知道库的内容吗?
这意味着,你是在 native 网站中使用库还是只是在 JavaScript 中使用库呢?如果你只是在 JavaScript 中使用它,这样做很好!
对于我们用除了 PushNotificationIOS
和 LinkingIOS
的 React Native 推出的库来说,这个步骤是不必要的。
以 PushNotificationIOS
为例,每次你收到一个新的 push notifiation,你必须从 AppDelegate
的库中调用方法。
为此,我们需要知道库的头。为了实现这个,你必须在你的项目文件中选择 Build Settings
,搜索 Header Search Paths
。你应该包括通往库的路径(如果有相关文件的子目录,记得使它 recursive
,如例子中的 React
)。
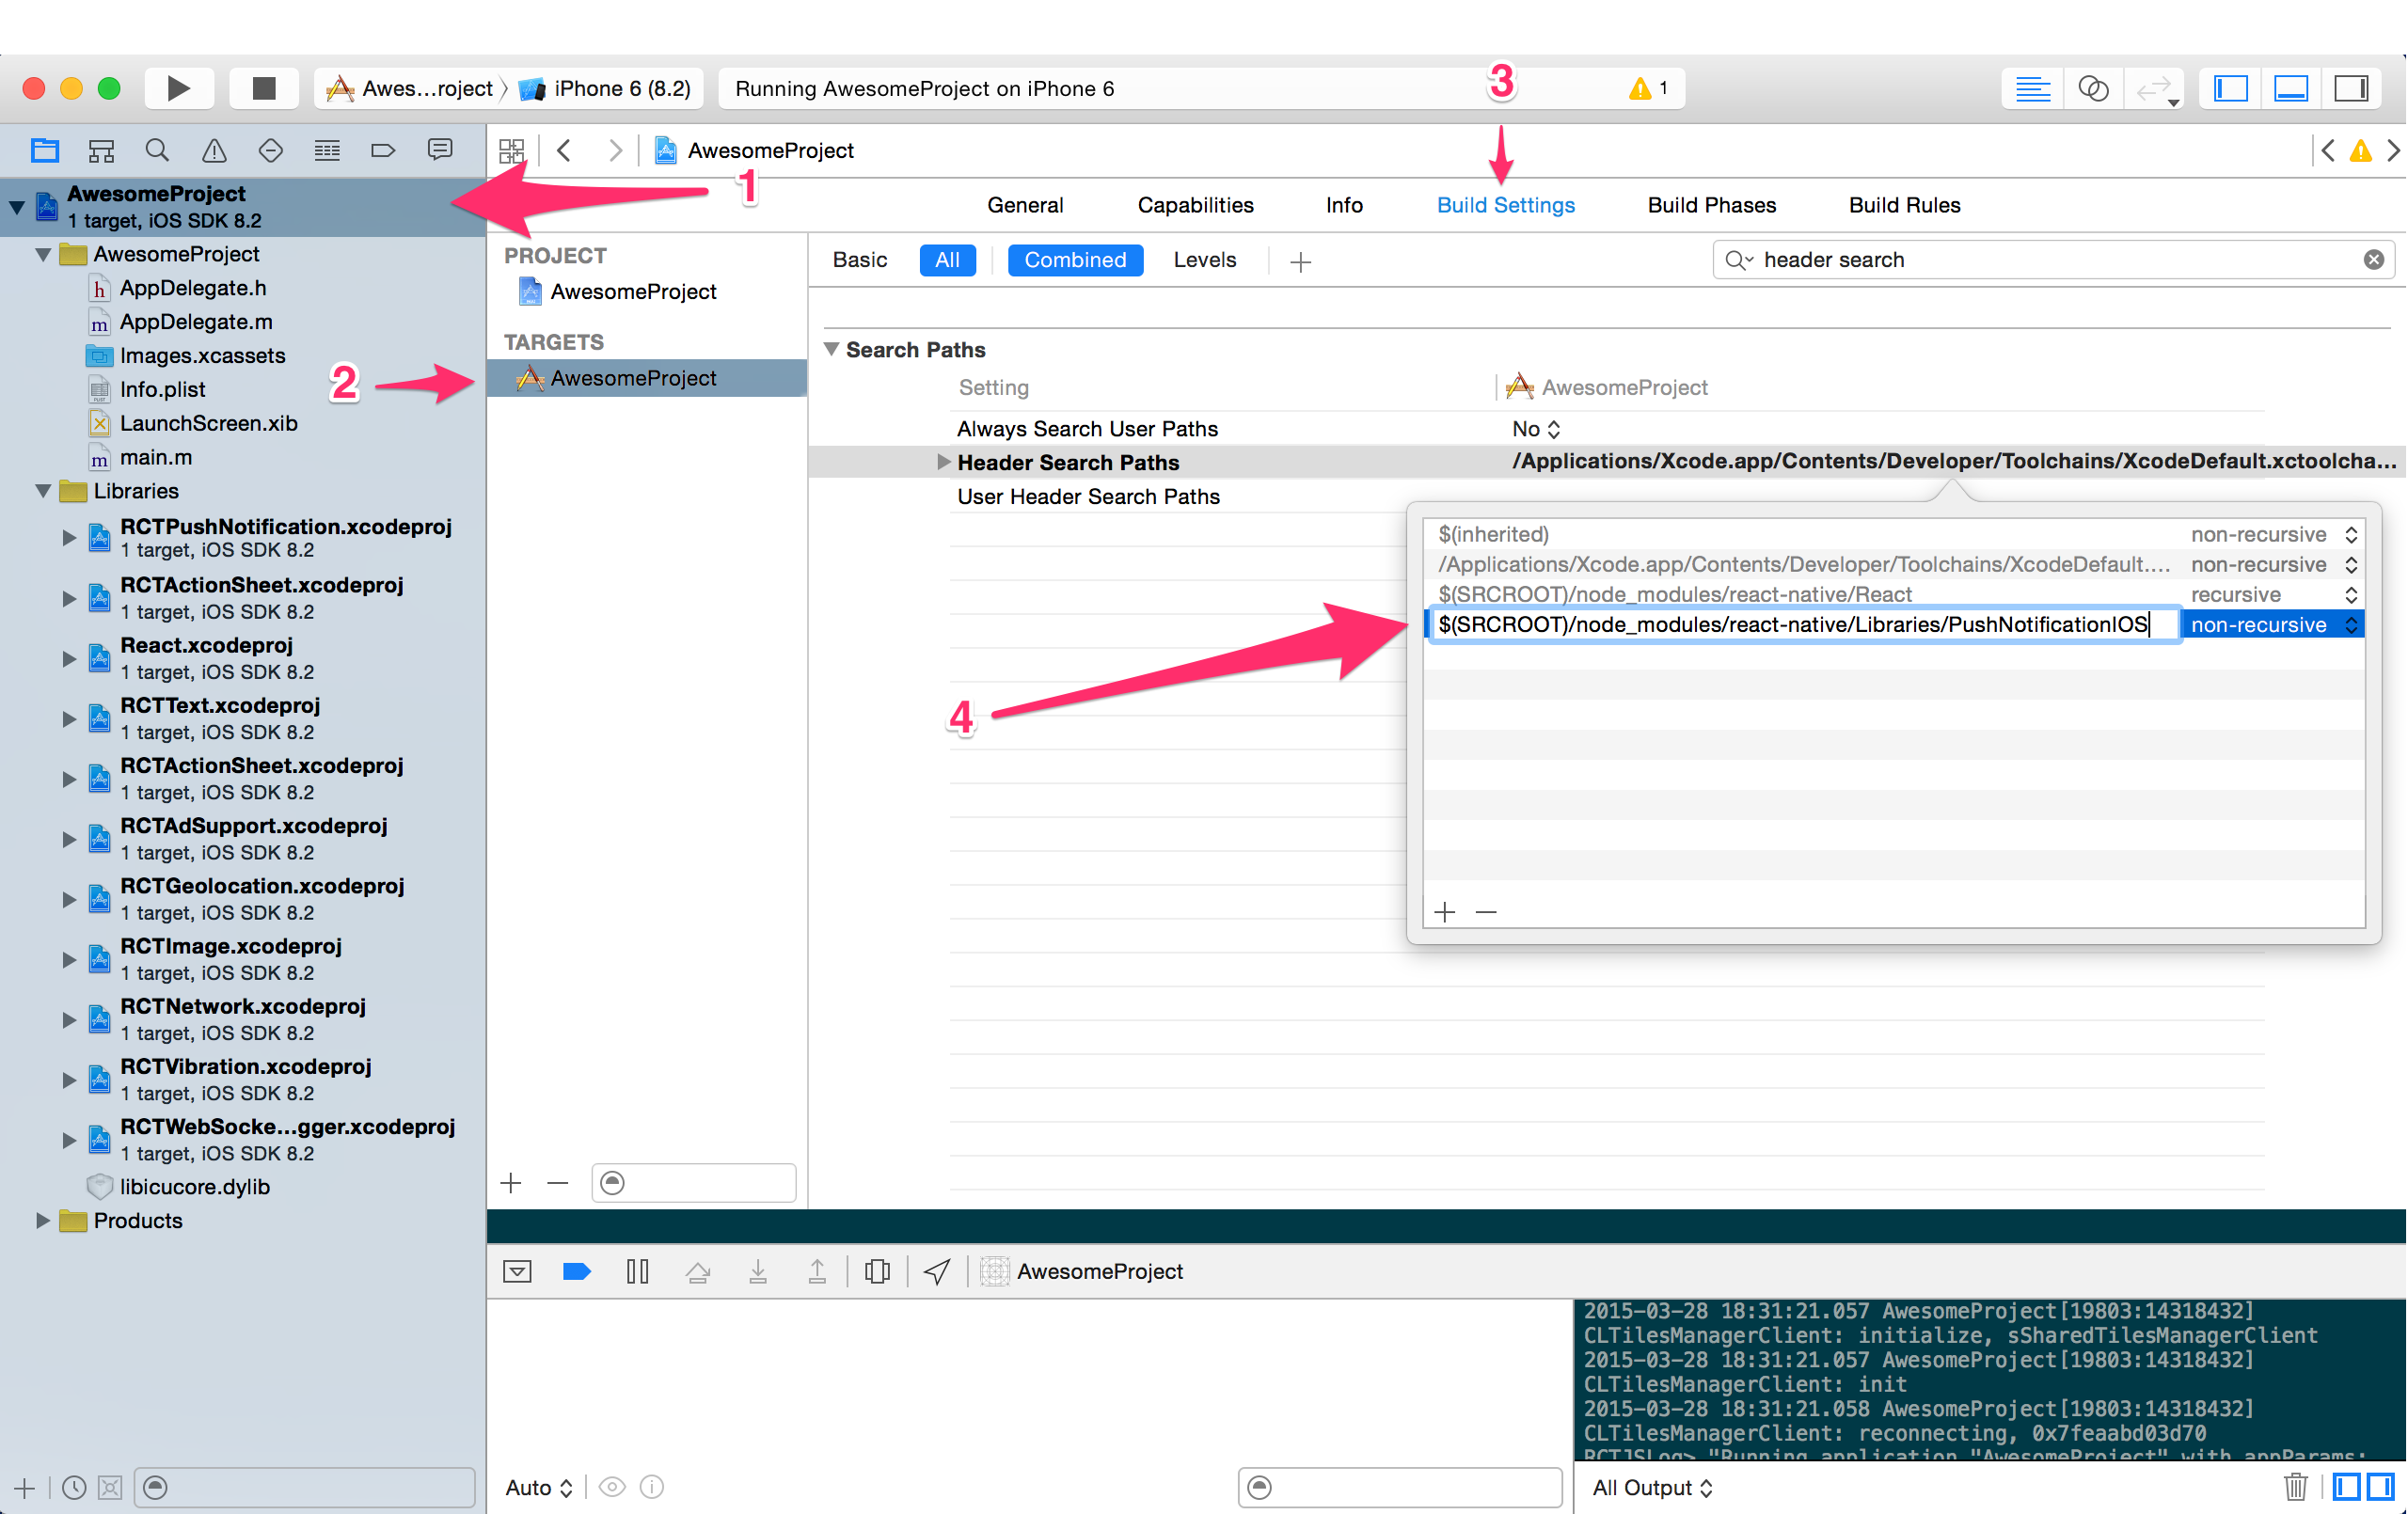
图片 3.3 linking-libraries
访问应用程序内开发者菜单:
- 在 iOS 中摇动设备或在虚拟机里按组合键 control + ⌘ + z
. - 在 Android 中摇动设备或按硬件菜单按钮 (旧的设备中以及大多数虚拟机中都有效,例如, 在 genymotion 中,你可以按组合键 ⌘ + m
来模拟点击硬件菜单按钮)
提示
要禁用产品构建的开发人员菜单:
- 在 iOS 中,打开 Xcode 中的项目,选择 Product
→ Scheme
→ Edit Scheme...
(或按组合键 ⌘ + <
).下一步, 在左边的菜单中选择 Run
然后将 Build Configuration 改为 Release
。 - 在 Android 中, 默认情况下, 由 Gradle 建立发布的开发者菜单将被禁用(例如, Gralde 的 assembleRelease
任务)。 虽然这种行为可以通过传递给 ReactInstanceManager#setUseDeveloperSupport
正确的值来自定义。
重加载
选择 Reload
(或者在 iOS 虚拟机中按组合键 ⌘ + r
) 将会重新加载作用于你的应用程序中的 JavaScript 。 如果你增加了新的资源 (例如,将一幅图添加到 iOS 中的 Images.xcassets
,或 Android 中的 res/drawable
文件夹) 或者对任何本地代码进行修改 ( iOS 中的 Objective-C/Swift 代码或 Android 中的 Java/C++ 代码),你将需要重新生成该应用程序以使更改生效。
Chrome 开发工具
在 Chrome 中调试 JavaScript 代码,在开发者菜单选择 Debug in Chrome
。 将打开一个新的标签 http://localhost:8081/debugger-ui。
在 Chrome 中,按下组合键 ⌘ + option + i
或选择 View
→ Developer
→ Developer Tools
切换开发工具控制台。 启用 捕获异常时暂停 以获得更佳的调试体验。
在实际设备上进行调试:
- 在 iOS 中,- 打开文件 RCTWebSocketExecutor.m
并更改 localhost
为你的电脑IP地址。摇动设备打开开发菜单,选择启动调试。 - 在 Android 中, 如果你正在运行通过 USB 连接的 Android 5.0+ 设备,您可以使用 adb
命令行工具来从设备到您的计算机设置端口转发。 运行: adb reverse 8081 8081
(参阅 此链接 以获得 adb
命令详情)。 或者,你可以打开设备上开发菜单并选择开发设置,然后为设备设置更新调试服务器主机到您的计算机的 IP 地址。
React 开发工具 (可选)
安装 React Developer Tools 作为谷歌浏览器的扩展。这将允许您通过 React
在开发工具中导航组件层次结构 ( 更多详情参阅 facebook/react-devtools )。
Live Reload
这个选项可触发 JS 在连接设备/模拟器上自动刷新。启用此选项:
- 在 iOS 中,通过开发者菜单选择 Enable Live Reload
,当 JavaScript 有任何改动时,应用程序会自动重新加载。 - 在 Android 中,启动开发菜单,进入 Dev Settings
并选择 Auto reload on JS change
选项。
FPS (每秒帧数) 显示器
在 0.5.0-rc
以及更高的版本,为了帮助调试性能问题,你可以在开发者菜单启用 FPS 图形叠置。
运行测试和贡献
React Native 回购有几个你可以运行的测试,来验证你没有用PR引起拟合。这些测试是用 Travis 持续集成系统运行的,并自动的向你的 PR 发布结果。你也可以在 IntegrationTest 和在 Xcode 中的 UIExplorer 应用中,使用 cmd+U 本地运行。您可以通过在命令行的 npm test
运行 jest 测试。但是我们目前还没有很大的测试覆盖率,所以大多数的变化仍将需要大量手工验证,但如果你想帮助我们提高我们的测试覆盖率,我们是非常欢迎的!
Jest 测试
Jest 测试是 JS-only 测试,运行在节点命令行上。测试位于它们测试的文件 __tests__
目录中,还有一个对不是位于故障隔离和最大速度测试下的积极模拟功能的强调。你可以用来自 react-native 根的 npm test
运行现有的 React Native jest 测试,并且我们鼓励你为你想做出贡献的任何组件添加你自己的测试。基本示例请看 getImageSource-test.js
。
集成测试
React Native 提供设施,使测试需要 native 和 JS 组件进行跨桥交互的集成组件更容易。两个主要组件是 RCTTestRunner
和 RCTTestModule
。RCTTestRunner
设置了 React Native 环境并提供设备运行测试,正如在 Xcode 中的 XCTestCase
(runTest:module
是最简单的方法)。RCTTestModule
和 TestModule
一样,通过 NativeModules
被导出到 JS 中。测试写在 JS 中,当它们完成时,必须调用 TestModule.markTestCompleted()
,否则测试将超时失败。测试失败主要是通过抛出异常表示。它还可以用 runTest:module:initialProps:expectErrorRegex:
或 runTest:module:initialProps:expectErrorBlock:
测试错误条件,它预计抛出一个错误并验证错误与提供的标准相匹配。对于例子的使用,请看 IntegrationTestHarnessTest.js
和 IntegrationTestsTests.m
。
快照测试
常见的一种集成测试是快照测试。这些测试渲染一个组件,并使用 TestModule.verifySnapshot()
验证参考图像的屏幕快照,在幕后使用 FBSnapshotTestCase
库。参考图像通过在 RCTTestRunner
中设置 recordMode = YES
被记录下来,然后运行测试。快照在 32 位和 64 位系统中略有不同,且在不同的操作系统版本中也有所不同,所以建议你使用正确的配置运行测试。同时强烈建议所有网络数据被模拟,以及其他潜在的麻烦的依赖性。基本示例请看 SimpleSnapshotTest
。
注意,在设备上运行需要 Apple Developer 账号,且需要配置你的 iPhone。本指南仅覆盖 React Native 特定的主题。
从设备访问开发服务器
你可以使用开发服务器在设备中快速迭代。要做到这一点,你的笔记本电脑和你的手机必须处于相同的 wifi 网络中。
- 打开 iOS / AppDelegate.m
- 更改 URL 中的 IP,从 Localhost
改成你的笔记本电脑的 IP - 在 Xcode 中,选择你的手机作为构建目标,并按“构建和运行”
提示
晃动设备来打开开发菜单(重载、调试等)
使用离线包
你也可以将应用程序本身的所有 JavaScript 代码打包。这样你可以在开发服务器没有运行时测试它,并把应用程序提交到到 AppStore。
- 打开 iOS / AppDelegate.m
- 遵循“选项 2”的说明:
- 取消 jsCodeLocation =[[NSBundle mainBundle]…
- 在你应用程序的根目录的终端运行给定 curl
命令
- 取消 jsCodeLocation =[[NSBundle mainBundle]…
Packager 支持几个选项:
- dev
(默认的 true)——设置了 __DEV__
变量的值。当是 true
时,它会打开一堆有用的警告。对于产品,它建议使用 dev = false
。 - minify
(默认的 false)——只要不通过 UglifyJS 传输 JS 代码。
故障排除
如果 curl
命令失败,确保 packager 在运行。也尝试在它的结尾添加 ——ipv4
标志。
如果你刚刚开始了你的项目,main.jsbundle
可能不会被包含到 Xcode 项目中。要想添加它,右键单击你的项目目录,然后单击“添加文件……”——选择生成的 main.jsbundle
文件。
USB 调试
在设备上开发最简单的方式就是使用 USB 调试。首先请确保你有 USB debugging enabled on your device。一旦在设备上调试是被允许的,在连接的设备上你可以以同样的方式在模拟器里面使用 react-native run-android
来安装并且运行你的 React Native 应用。
从设备上获取开发服务器
你也可以在设备上使用开发服务器快速集成。照着下面的描述的步骤之一来给你的设备构建在你的电脑上运行的开发者服务器。
注意
现在绝大多数的安卓设备没有一个我们来触发开发者模式的硬件按钮键。如果是那样的话,你可以通过摇动来开启开发者模式(重新加载,调试等)。
使用 adb 反转
请注意这个选项只支持运行在安卓 5.0+ (API 21) 上面的设备。
使用 USB 将你的设备连接,并开启调试模式(可以看看上面如何在你的设备上面允许 USB 调试模式)。
- 运行 adb reverse tcp:8081 tcp:8081
- 你可以使用 Reload JS
和其他开发者参数,而不需要额外的配置
通过 Wi-Fi 来配置设备并且连接上你的开发者服务器
要做到这一点,你的电脑和你的手机必须在同一个 wifi 网络下。
- 打开震动菜单 (摇动设备)
- 前往 Dev Settings
- 前往 Debug server host for device
- 输入该设备的 IP 和 Reload JS
由于 React 并没有做出关于你其他的技术堆栈的假设——通常在 MVC
中简单的用 V
来表示——这很容易嵌入到现有 non-React Native 应用程序中。事实上,它与另外的最佳实践社区工具集成了,如 CocoaPods。
需求
用 CocoaPods 安装 React Native
CocoaPods 是 iOS/Mac 开发的管理工具包。我们需要用它来下载 React Native。如果你还没有安装 CocoaPods,请查看本教程。
当你准备使用 CocoaPods 工作时,添加以下行到 Podfile
中。如果你没有,那么在你的项目的根目录下创建它。
pod 'React'
pod 'React/RCTText'
# Add any subspecs you want to use in your project
记得安装所有你需要的 subspecs。没有 pod 'React/RCTText'
,<Text>
元素不能使用。
然后安装你的 pods:
$ pod install
创建你的 React Native 应用程序
有两块你需要设置:
- 根 JavaScript 文件,该文件将包含实际的 React Native 应用程序和其他组件
- 包装 Objective - C 代码,将加载脚本并创建一个 RCTRootView
来显示和管理你的 React Native 组件
首先,为你的应用程序的 React 代码创建一个目录,并创建一个简单的 index.ios.js
文件:
$ mkdir ReactComponent
$ touch index.ios.js
为 index.ios.js
复制 & 粘贴以下 starter 代码——它是一个 barebones React Native 应用程序:
'use strict';
var React = require('react-native');
var {
Text,
View
} = React;
var styles = React.StyleSheet.create({
container: {
flex: 1,
backgroundColor: 'red'
}
});
class SimpleApp extends React.Component {
render() {
return (
<View style={styles.container}>
<Text>This is a simple application.</Text>
</View>
)
}
}
React.AppRegistry.registerComponent('SimpleApp', () => SimpleApp);
SimpleApp
将是你的模块名称,这将在后面使用。
将容器视图添加到你的应用程序中
现在,你应该为 React Native 组件添加一个容器视图。在你的应用程序中它可以是任何的 UIView
。
图片 3.4 integration app
但是,为了使代码简洁,让我们把 UIView
归入子类。让我们把它命名为 ReactView
。打开你的 Yourproject.xcworkspace
,并创建一个新类 ReactView
(你可以把它命名为任何你喜欢的名字:))。
// ReactView.h
#import <UIKit/UIKit.h>
@interface ReactView : UIView
@end
在一个视图控制器中,想要管理这一视图,继续添加一个出口并将其连接:
// ViewController.m
@interface ViewController ()
@property (weak, nonatomic) IBOutlet ReactView *reactView;
@end
在这里我简单的禁用了 AutoLayout。在实际产品中,你应该自己打开 AutoLayout,并且设置约束。
为容器视图添加 RCTRootView
准备好学习最有趣的这部分了吗?现在我们将在你的 React Native 应用程序存在的位置创建 RCTRootView
。
在 ReactView.m
中,我们首先需要用 index.ios.bundle
的 URI 启动 RCTRootView
。index.ios.bundle
将被 packager 创建,并由 React Native 服务器服务,这将在稍后讨论。
NSURL *jsCodeLocation = [NSURL URLWithString:@"http://localhost:8081/index.ios.bundle"];
// For production use, this `NSURL` could instead point to a pre-bundled file on disk:
//
// NSURL *jsCodeLocation = [[NSBundle mainBundle] URLForResource:@"main" withExtension:@"jsbundle"];
//
// To generate that file, run the curl command and add the output to your main Xcode build target:
//
// curl http://localhost:8081/index.ios.bundle -o main.jsbundle
RCTRootView *rootView = [[RCTRootView alloc] initWithBundleURL:jsCodeLocation
moduleName: @"SimpleApp"
launchOptions:nil];
然后把它作为 ReactView
的子视图添加。
[self addSubview:rootView];
rootView.frame = self.bounds;
启动开发服务器
在根目录,我们需要启动 React Native 开发服务器。
(JS_DIR=`pwd`/ReactComponent; cd Pods/React; npm run start -- --root $JS_DIR)
这个命令将在我们的 CocoaPods 依赖中启动一个 React Native 开发服务器,来创建捆绑脚本。——root
选项表明 React Native 应用程序的根——这将是我们包含单一 index.ios.js
文件的 ReactComponents
目录。该运行的服务器将通过 http:/ / localhost:8081 / index.ios.bundle
把 index.ios.bundle
打包成可访问的文件。
编译和运行
现在编译并运行你的应用程序。你将看到你的 React Native 应用程序在 ReactView
内部运行。
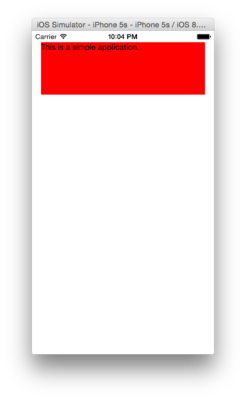
图片 3.5 integration app
Live 也从模拟器重新加载工作!你已经得到了一个简单的完全封装在 Objective–C UIView
子类中的 React 组件。
总结
所以,当 RCTRootView
初始化时,它会尝试从 React Native 开发服务器中下载,解析并运行包文件。这意味着你所需要做的就是为 RCTRootView
实现你自己的容器视图或视图控制器——RCTRootView
摄取了捆绑的 JS 并呈现出你的 React 组件。万岁!
你可以在这里查看一个示例应用程序的完整源代码。
JavaScript 运行时间
当使用 React Native 时,你将会在两个环境中运行 JavaScript 代码:
- 在模拟器和电话中:JavaScriptCore 是 JavaScript 的引擎,能够驱动 Safari 和 web 视图。由于在 iOS 应用程序中没有可写的可执行的内存,它不用 JIT 运行。
- 使用 Chrome 调试时,它在 Chrome 本身中运行所有 JavaScript 代码,并且通过 WebSocket 与 Objective-C 交互。所以你正在使用 V8。
虽然两个环境很相似,但是你可能会以触及一些矛盾而结束。将来我们很可能去尝试其他 JS 引擎,所以最好避免依赖任何运行时的细节。
JavaScript 转换
React Native 附带许多 JavaScript 转换,使编写代码更愉快。如果你好奇的话,你可以查看所有这些转换的实现。这是完整的列表:
ES5
- 关键字:promise.catch(function() { });
ES6
- 箭头函数:<C onPress={() => this.setState({pressed: true})}
- 调用传播:Math.max(...array);
- 类:class C extends React.Component { render() { return <View />; } }
- 解构:var {isActive, style} = this.props;
- 迭代:for (var element of array) { }
- 计算属性:var key = 'abc'; var obj = {[key]: 10};
- 对象 Consise 方法:var obj = { method() { return 10; } };
- 对象 short 表示法:var name = 'vjeux'; var obj = { name };
- 其他参数:function(type, ...args) { }
- 模板: var who = 'world'; var str = 'Hello ${who}';
ES7
- 对象传播:var extended = { ...obj, a: 10 };
- Trailing Comma 函数:function f(a, b, c,) { }
弃用的模块和原生视图
这是 React Native Android 的首次发行,因此在 iOS 平台上出现的视图不一定都会发布在 Android 上面。我们对社区里面的对下一系列模块和视图的开源代码的反馈非常感兴趣。并不是所有的视图在 iOS 和 Android 上面都有 100% 完全相同的表现,因此在这里就有必要使用一个对应的例子:在 Android 上面使用 ProgressBar,而在 iOS 上面则会使用 ActivityIndicator 来替代。
我们对共同的视图和模块的临时计划包括:
视图
View Pager
Swipe Refresh
Spinner
ART
Maps
Webview
模块
Geo Location
Net Info
Camera Roll
App State
Dialog
Intent
Media
Pasteboard
Alert
在 Android 上发布的模块
现在在 Android 上面发布自定义的原生模块并不是一件轻松的事。贡献者平滑稳定的工作流很重要并且这将在第一次开源版本发布之后被密切关注。当然,我们的目标是形成流水线并且尽量优化在 iOS 和 Android 平台之间的流程。
使用透明度为 0 来覆视图不能被点击
在 iOS 和 Android 之间使用透明度为 0 来处理视图有一个明显的差异。虽然在 iOS 上面允许这些视图被点击并且在这些视图下面的视图也将会接收到触摸输入,但是在 Android 上面这个触摸输入则会被阻塞。这一点可以用下面的一个只能在 iOS 上面点击的例子来演示。
<View style={{flex: 1}}>
<TouchableOpacity onPress={() => alert('hi!')}>
<Text>HELLO!</Text>
</TouchableOpacity>
<View style={{
position: 'absolute',
top: 0,
left: 0,
bottom: 0,
right: 0,
opacity: 0}} />
</View>
在 Android 上面的单独布局节点
在 React Native 的安卓版本一个优化的特征就是对于只能贡献布局的视图不能有原生视图,只有它们的布局属性能够传递到它们的子视图。这个优化是为了给更深层次的 React Native 视图层提供支持,因此默认是开启的。如果你需要一个视图被呈现,或者间歇性的测试检测一个视图是不是只是布局,关闭这个行为就很有必要了。为了做到这一点,你只需要设置 collapsable
为 false 即可:
<View collapsable={false}>
...
</View>
4
组件
Props
animating bool 型
显示指示器(true,默认的)还是隐藏它(false)。
color 字符串型
Spinner 的前景颜色(默认为灰色)。
size 枚举型(“小”,“大”)
指示器的大小。小的高度为 20,大的高度为 36。
例子
'use strict';
var React = require('react-native');
var {
ActivityIndicatorIOS,
StyleSheet,
View,
} = React;
var TimerMixin = require('react-timer-mixin');
var ToggleAnimatingActivityIndicator = React.createClass({
mixins: [TimerMixin],
getInitialState: function() {
return {
animating: true,
};
},
setToggleTimeout: function() {
this.setTimeout(
() => {
this.setState({animating: !this.state.animating});
this.setToggleTimeout();
},
1200
);
},
componentDidMount: function() {
this.setToggleTimeout();
},
render: function() {
return (
<ActivityIndicatorIOS
animating={this.state.animating}
style={[styles.centering, {height: 80}]}
size="large"
/>
);
}
});
exports.framework = 'React';
exports.title = '<ActivityIndicatorIOS>';
exports.description = 'Animated loading indicators.';
exports.examples = [
{
title: 'Default (small, white)',
render: function() {
return (
<ActivityIndicatorIOS
style={[styles.centering, styles.gray, {height: 40}]}
color="white"
/>
);
}
},
{
title: 'Gray',
render: function() {
return (
<View>
<ActivityIndicatorIOS
style={[styles.centering, {height: 40}]}
/>
<ActivityIndicatorIOS
style={[styles.centering, {backgroundColor: '#eeeeee', height: 40}]}
/>
</View>
);
}
},
{
title: 'Custom colors',
render: function() {
return (
<View style={styles.horizontal}>
<ActivityIndicatorIOS color="#0000ff" />
<ActivityIndicatorIOS color="#aa00aa" />
<ActivityIndicatorIOS color="#aa3300" />
<ActivityIndicatorIOS color="#00aa00" />
</View>
);
}
},
{
title: 'Large',
render: function() {
return (
<ActivityIndicatorIOS
style={[styles.centering, styles.gray, {height: 80}]}
color="white"
size="large"
/>
);
}
},
{
title: 'Large, custom colors',
render: function() {
return (
<View style={styles.horizontal}>
<ActivityIndicatorIOS
size="large"
color="#0000ff"
/>
<ActivityIndicatorIOS
size="large"
color="#aa00aa"
/>
<ActivityIndicatorIOS
size="large"
color="#aa3300"
/>
<ActivityIndicatorIOS
size="large"
color="#00aa00"
/>
</View>
);
}
},
{
title: 'Start/stop',
render: function(): ReactElement {
return <ToggleAnimatingActivityIndicator />;
}
},
];
var styles = StyleSheet.create({
centering: {
alignItems: 'center',
justifyContent: 'center',
},
gray: {
backgroundColor: '#cccccc',
},
horizontal: {
flexDirection: 'row',
justifyContent: 'space-around',
},
});
使用 DatePickerIOS
来在 iOS 上呈现一个日期/时间选择器(selector)。这是一个控制组件,所以为了组件更新,你必须钩在 onDateChange
回调中,并更新 date
支持,否则用户的变化将立即恢复以反映 props.date
。
Props
date 日期型
当前选中的日期。
maximumDate 日期型
最大的日期。
限制可能的日期/时间值的范围。
minimumDate 日期型
最小的日期。
限制了可能的日期/时间值的范围。
minuteInterval 枚举型(1,2,3,4,5,6,10,12,15,20,30)
可选择的分钟的间隔。
mode 枚举型(“date”,“time”,“datetime”)
日期选择器模式。
onDateChange 函数型
日期变更处理程序。
当用户更改了 UI 的日期或时间时,它就会被调用。第一个也是唯一一个参数是一个 Date 对象,代表了新的日期和时间。
timeZoneOffsetInMinutes 数字型
在几分钟内时区偏移。
默认情况下,日期选择器将使用设备的时区。有了这个参数,才有可能迫使某个时区偏移。例如,为了显示太平洋的标准时间,传递 -7 * 60。
例子
'use strict';
var React = require('react-native');
var {
DatePickerIOS,
StyleSheet,
Text,
TextInput,
View,
} = React;
var DatePickerExample = React.createClass({
getDefaultProps: function () {
return {
date: new Date(),
timeZoneOffsetInHours: (-1) * (new Date()).getTimezoneOffset() / 60,
};
},
getInitialState: function() {
return {
date: this.props.date,
timeZoneOffsetInHours: this.props.timeZoneOffsetInHours,
};
},
onDateChange: function(date) {
this.setState({date: date});
},
onTimezoneChange: function(event) {
var offset = parseInt(event.nativeEvent.text, 10);
if (isNaN(offset)) {
return;
}
this.setState({timeZoneOffsetInHours: offset});
},
render: function() {
// Ideally, the timezone input would be a picker rather than a
// text input, but we don't have any pickers yet :(
return (
<View>
<WithLabel label="Value:">
<Text>{
this.state.date.toLocaleDateString() +
' ' +
this.state.date.toLocaleTimeString()
}</Text>
</WithLabel>
<WithLabel label="Timezone:">
<TextInput
onChange={this.onTimezoneChange}
style={styles.textinput}
value={this.state.timeZoneOffsetInHours.toString()}
/>
<Text> hours from UTC</Text>
</WithLabel>
<Heading label="Date + time picker" />
<DatePickerIOS
date={this.state.date}
mode="datetime"
timeZoneOffsetInMinutes={this.state.timeZoneOffsetInHours * 60}
onDateChange={this.onDateChange}
/>
<Heading label="Date picker" />
<DatePickerIOS
date={this.state.date}
mode="date"
timeZoneOffsetInMinutes={this.state.timeZoneOffsetInHours * 60}
onDateChange={this.onDateChange}
/>
<Heading label="Time picker, 10-minute interval" />
<DatePickerIOS
date={this.state.date}
mode="time"
timeZoneOffsetInMinutes={this.state.timeZoneOffsetInHours * 60}
onDateChange={this.onDateChange}
minuteInterval={10}
/>
</View>
);
},
});
var WithLabel = React.createClass({
render: function() {
return (
<View style={styles.labelContainer}>
<View style={styles.labelView}>
<Text style={styles.label}>
{this.props.label}
</Text>
</View>
{this.props.children}
</View>
);
}
});
var Heading = React.createClass({
render: function() {
return (
<View style={styles.headingContainer}>
<Text style={styles.heading}>
{this.props.label}
</Text>
</View>
);
}
});
exports.title = '<DatePickerIOS>';
exports.description = 'Select dates and times using the native UIDatePicker.';
exports.examples = [
{
title: '<DatePickerIOS>',
render: function(): ReactElement {
return <DatePickerExample />;
},
}];
var styles = StyleSheet.create({
textinput: {
height: 26,
width: 50,
borderWidth: 0.5,
borderColor: '#0f0f0f',
padding: 4,
fontSize: 13,
},
labelContainer: {
flexDirection: 'row',
alignItems: 'center',
marginVertical: 2,
},
labelView: {
marginRight: 10,
paddingVertical: 2,
},
label: {
fontWeight: '500',
},
headingContainer: {
padding: 4,
backgroundColor: '#f6f7f8',
},
heading: {
fontWeight: '500',
fontSize: 14,
},
});
React 组件封装平台 DrawerLayout
(仅适用于Android)。Drawer(通常用于导航)呈现 renderNavigationView
渲染导航视图和直接子级,是呈现(您的内容)的主要视图。导航视图是最初在屏幕上不可见的,但可以从由 drawerPosition
指定的窗口的侧面拉出,其宽度可通过 drawerWidth
设置。
例如:
render
:
function
(
)
{
var navigationView
=
(
<
Text style
=
{
{
margin
:
10
, fontSize
:
15
, textAlign
:
'left'
}
}
>
I
'm in the
Drawer!</Text
);
return (
<DrawerLayoutAndroid
drawerWidth={300}
drawerPosition={DrawerLayoutAndroid.positions.Left}
renderNavigationView={() =navigationView}
<Text style={{10, fontSize: 15, textAlign: '
right
'}}>Hello</Text>
<Text style={{10, fontSize: 15, textAlign: '
right
'}}>World!</Text>
</DrawerLayoutAndroid>
);
},
```
### 属性
**drawerPosition** enum(DrawerConsts.DrawerPosition.Left, DrawerConsts.DrawerPosition.Right)
指定 drawer 将从屏幕的一侧滑动。
**drawerWidth** number
指定 drawer 的宽度,即从窗口的边缘拉到视图更精确的宽度。
**keyboardDismissMode** enum('
none
', "on-drag")
确定键盘是否响应拖动被驳回。
-'
none
' (默认值), 拖动不影响键盘。
-'
on
-
drag
', 拖动开始,键盘被驳回。
**onDrawerClose** 函数
导航视图关闭时调用函数。
**onDrawerOpen** 函数
导航视图打开时调用函数。
**onDrawerSlide** 函数
与导航视图交互时调用函数。
**onDrawerStateChanged** 函数
当 Drawer 状态发生变化时调用函数,drawer 有 3 种状态:
- idle, 表示与导航视图没有交互
- dragging,表示目前有与导航视图的交互
- settling, 表示有与导航视图的交互,并且导航视图正在的关闭或打开。
**renderNavigationView** 函数
导航图将被渲染到屏幕的一侧,并且可以拉出。
## 图片
一个 react 的组件用以显示不同类型的图片,包括网络图片,静态资源,临时的本地图片,还有本地磁盘的图片,比如手机照片。
举例:
```java
renderImages: function() {
return (
<View>
<Image
style={styles.icon}
source={require('
image
!
myIcon
')}
/>
<Image
style={styles.logo}
source={{uri: '
http
:
//facebook.github.io/react/img/logo_og.png'}}
/>
</
View
>
)
;
}
,
支撑工具
onLayout 函数
在进行装载和布局改变的时候使用{nativeEvent: {layout: {x, y, width, height}}}
调用。
resizeMode 枚举 ('cover', 'contain', 'stretch')
当帧与原始图像尺寸不匹配时用于确定如何调整图像的大小。
source {uri: string},编号 uri
是一个代表图片资源标识符的字符串,它可以是 http 地址、 本地文件路径或静态图像资源的名称 (它被包含在 require('image!name')
函数中) 。
style 样式
Flexbox......
Transforms...
resizeMode Object.keys(ImageResizeMode)
backgroundColor 字符串
borderColor 字符串
borderWidth 数字
borderRadius 数字
overflow 枚举('visible', 'hidden')
tintColor 字符串
opacity 数字
testID 字符串 一个在 UI 自动测试脚本中使用此元素的唯一标识符。
ios
accessibilityLabel 字符串
在用户与图像交互时,该文本会由屏幕阅读器读取。
ios
accessible 布尔值
当为 true 的时候,指示图像是可访问的元素。
ios
capInsets {top: number, left: number, bottom: number, right: number}
当图像的大小被重新调整时,由 capInsets 指定的角落的大小将保持在一个固定的值,但中心内容和图像的边界将被拉伸。这用于创建可调整大小的圆形按钮、 阴影和其他可调整大小的资源。更多关于苹果的文档请点击此处。
ios
defaultSource {uri: string}
在下载最终图像并且网络断开的时候用来显示的静态图像。
ios
onError 函数
在加载错误的时候使用 {nativeEvent: {error}}
进行调用。
ios
onLoadEndr 函数
当完全加载成功时进行调用。
ios
onLoadEnd 函数
不管加载成功还是失败都会调用。
ios
onLoadStart 函数
加载成功的时候调用。
ios
onProgress 函数
在下载进程中使用 {nativeEvent: {loaded, total}}
进行调用。
描述
静态资源
在项目的进程中,添加并且移除和处理那些在应用程序不是经常使用的图片是很常见的情况。为了处理这种情况,我们需要找到一个方法来静态地定位那些被用在应用程序里的图片。因此,我们使用了一个标记器。唯一允许的指向 bundle 里的图片的方法就是在源文件中遍历地搜索 require('image!name-of-the-asset')
。
// GOOD
<
Image source
=
{
require
(
'image!my-icon'
)
}
/>
// BAD
var
icon
=
this
.
props
.
active
?
'my-icon-active'
:
'my-icon-inactive'
;
<
Image source
=
{
require
(
'image!'
+
icon
)
}
/>
// GOOD
var
icon
=
this
.
props
.
active
?
require
(
'image!my-icon-active'
)
:
require
(
'image!my-icon-inactive'
)
;
<
Image source
=
{
icon
}
/>
当主要的代码执行到这里,你就可以做一些有趣的事情,比如自动将那些用于应用程序的 assets 打包。注意,这些代码不是强制实施的,但不代表将来也不会。
使用 Images.xcassets 将静态资源添加到你的 iOS 应用程序中
NOTE: 生成应用程序所需的新资源
无论在什么时候,您想把新的资源添加到 Images.xcassets
中,您都需要在使用它之前通过 Xcode 来重新构建您的应用程序 — — 仅在模拟器内重新加载它是不够的。
这一进程正在被改进,不久就会提供更好的工作流程。
将静态资源添加到您的 Android 应用程序中
将您的图像作为位图画板添加到 android 项目中(<yourapp>/android/app/src/main/res
)。 为了给您的 assets 文件提供不同的分辨率,使用 配置限定符进行检查。 通常情况下,您将想要把您的 assets 文件放在下列目录 (如果它们不存在,那么在 res
下创建它们):
- drawable-mdpi
(1x) - drawable-hdpi
(1.5x) - drawable-xhdpi
(2x) - drawable-xxhdpi
(3x)
如果您的 asset 文件丢失了一种分辨率,那么 Android 将采取下一个最好的分辨率并且为您调整它的大小。
NOTE: 生成应用程序所需的新资源
无论在什么时候您把新的资源添加到您的画板中您都需要在使用它之前通过运行 react-native run-android
重新构建您的应用程序 - 仅重新加载 JS 是不够的。
这一进程正在被改进,不久就会提供更好的工作流程。
网络资源
在您进行编译的时候,许多您的应用程序中需要展示的图片都不能使用,或者你会想要通过加载一些动态图片来保持二进制大小在较低的状态。不像静态资源那样,您将需要手动指定图像的尺寸。
// GOOD
<
Image source
=
{
{
uri
:
'https://facebook.github.io/react/img/logo_og.png'
}
}
style
=
{
{
width
:
400
,
height
:
400
}
}
/>
// BAD
<
Image source
=
{
{
uri
:
'https://facebook.github.io/react/img/logo_og.png'
}
}
/>
本地文件系统资源
请在 CameraRoll 中查看使用 Images.xcassets
之外的本地资源示例 。
最好的相片册图片
iOS 的相片册可以让你将同一张图片保存为不同的尺寸,对于选择那张接近你想要尺寸的图片来说,这很重要。你不会想用一张 3264x2448 分辨率的图片作为资源来显示一个 200x200 的缩略图。如果确实有符合你要求的尺寸, React Native 会自动选择它,否则它会使用第一张比特定尺寸大 50% 的图片来避免重新定义尺寸时带来的模糊失真。这些工作 React Native 自动帮你完成了,所以你不必再自己编写乏味和容易出错的代码。
为什么不自动调整所有事物?
在浏览器中 如果你不给一个图像规定大小,那么浏览器会呈现一个 0x0 的元素、 随后下载图像,然后再以正确的尺寸呈现图像。这种行为最大的问题是,您的 UI 会在正在加载的图像四周跳动,这会造成一个非常糟糕的用户体验。
在 React Native 中故意不实施该行为。它的目的是让开发人员可以提前知道远程图像的尺寸 (或图形比例),我们认为这样做的话可以实现更好的用户体验。通过使用 require('image!x')
语法从应用程序包中加载的静态图片可以自动的调整大小,因为它们的尺寸在安装时立即可用。
例如,上述使用 'require('image!logo')' 屏幕截图的结果:
{
"__packager_asset"
:
true
,
"isStatic"
:
true
,
"path"
:
"/Users/react/HelloWorld/iOS/Images.xcassets/react.imageset/logo.png"
,
"uri"
:
"logo"
,
"width"
:
591
,
"height"
:
573
}
Source 是一个对象类型
在 React Native 中,一个有趣的决定是 src
特性将会被命名为 source
,并且不作为一个字符串而是一个 uri
特性的对象类型。
<
Image source
=
{
{
uri
:
'something.jpg'
}
}
/>
站在底层来看,这样做的原因是它允许将元数据依附到这个对象中。举个例子,你正在使用 require('image!icon')
,我们将添加 isStatic
作为一个 flag 来标识本地文件(不要依赖这例子,将来这可能会改变!)。这在将来同时也会成为可能,比如我们可能会支持子画面,并用它来取代输出 {uri: ...}
,我们可以输出 {uri: ..., crop: {left: 10, top: 50, width: 20, height: 40}}
同时支持在所有已经存在的网站中透明地显示子画面。
在用户角度上,这会让你用有用的特性比如图片的几何尺寸来注释对象类型,从而计算出将要显示出来的尺寸。尽情地使用这种数据类型来储存你的图片吧。
背景图片叠加
一个对于 web 开发者们很常见的需求是 background-image
。这种情况下,创建一个简单的 <Image>
组件然后将它作为子 layer 添加到你想要添加的 layer 上面。
return
(
<
Image source
=
{
...
}
>
<
Text
>
Inside
</
Text
>
</
Image
>
)
;
非主线程加载
图片的解析会花费很多的时间。这是导致网页的帧数下降的其中一个重要的原因,因为解析工作会被执行在主线程中。在 React Native 中,图片的解析会在不同的线程中执行。在实际操作中,你已经处理好这种情况,当图片还没有下载完成,因此需要将 placeholder 显示出来,这不用你写任何代码。
举例
'use strict'
;
var React
=
require
(
'react-native'
)
;
var
{
Image
,
StyleSheet
,
Text,
View
,
ActivityIndicatorIOS
}
=
React
;
var ImageCapInsetsExample
=
require
(
'./ImageCapInsetsExample'
)
;
var NetworkImageExample
=
React.
createClass
(
{
watchID
:
(
null
:
?
number
)
,
getInitialState
:
function
(
)
{
return
{
error
:
false
,
loading
:
false
,
progress
:
0
}
;
}
,
render
:
function
(
)
{
var loader
=
this
.
state
.
loading
?
<
View
style
=
{
styles.
progress
}
>
<
Text
>
{
this
.
state
.
progress
}
%</
Text
>
<
ActivityIndicatorIOS style
=
{
{
marginLeft
:
5
}
}
/>
</
View
>
:
null
;
return
this
.
state
.
error
?
<
Text
>
{
this
.
state
.
error
}
</
Text
>
:
<
Image
source
=
{
this
.
props
.
source
}
style
=
{
[
styles.
base
,
{
overflow
:
'visible'
}
]
}
onLoadStart
=
{
(
e
)
=>
this
.
setState
(
{
loading
:
true
}
)
}
onError
=
{
(
e
)
=>
this
.
setState
(
{
error
:
e.
nativeEvent
.
error
, loading
:
false
}
)
}
onProgress
=
{
(
e
)
=>
this
.
setState
(
{
progress
:
Math
.
round
(
100
*
e.
nativeEvent
.
loaded
/
e.
nativeEvent
.
total
)
}
)
}
onLoad
=
{
(
)
=>
this
.
setState
(
{
loading
:
false
, error
:
false
}
)
}
>
{
loader
}
</
Image
>;
}
}
)
;
exports.
displayName
=
(
undefined
:
?
string
)
;
exports.
framework
=
'React'
;
exports.
title
=
'<Image>'
;
exports.
description
=
'Base component for displaying different types of images.'
;
exports.
examples
=
[
{
title
:
'Plain Network Image'
,
description
:
'If the `source` prop `uri` property is prefixed with '
+
'"http", then it will be downloaded from the network.'
,
render
:
function
(
)
{
return
(
<
Image
source
=
{
{
uri
:
'http://facebook.github.io/react/img/logo_og.png'
}
}
style
=
{
styles.
base
}
/>
)
;
}
,
}
,
{
title
:
'Plain Static Image'
,
description
:
'Static assets should be required by prefixing with `image!` '
+
'and are located in the app bundle.'
,
render
:
function
(
)
{
return
(
<
View
style
=
{
styles.
horizontal
}
>
<
Image
source
=
{
require
(
'image!uie_thumb_normal'
)
}
style
=
{
styles.
icon
}
/>
<
Image
source
=
{
require
(
'image!uie_thumb_selected'
)
}
style
=
{
styles.
icon
}
/>
<
Image
source
=
{
require
(
'image!uie_comment_normal'
)
}
style
=
{
styles.
icon
}
/>
<
Image
source
=
{
require
(
'image!uie_comment_highlighted'
)
}
style
=
{
styles.
icon
}
/>
</
View
>
)
;
}
,
}
,
{
title
:
'Error Handler'
,
render
:
function
(
)
{
return
(
<
NetworkImageExample source
=
{
{
uri
:
'http://TYPO_ERROR_facebook.github.io/react/img/logo_og.png'
}
}
/>
)
;
}
,
platform
:
'ios'
,
}
,
{
title
:
'Image Download Progress'
,
render
:
function
(
)
{
return
(
<
NetworkImageExample source
=
{
{
uri
:
'http://facebook.github.io/origami/public/images/blog-hero.jpg?r=1'
}
}
/>
)
;
}
,
platform
:
'ios'
,
}
,
{
title
:
'Border Color'
,
render
:
function
(
)
{
return
(
<
View
style
=
{
styles.
horizontal
}
>
<
Image
source
=
{
smallImage
}
style
=
{
[
styles.
base
,
styles.
background
,
{
borderWidth
:
3
, borderColor
:
'#f099f0'
}
]
}
/>
</
View
>
)
;
}
,
platform
:
'ios'
,
}
,
{
title
:
'Border Width'
,
render
:
function
(
)
{
return
(
<
View
style
=
{
styles.
horizontal
}
>
<
Image
source
=
{
smallImage
}
style
=
{
[
styles.
base
,
styles.
background
,
{
borderWidth
:
5
, borderColor
:
'#f099f0'
}
]
}
/>
</
View
>
)
;
}
,
platform
:
'ios'
,
}
,
{
title
:
'Border Radius'
,
render
:
function
(
)
{
return
(
<
View
style
=
{
styles.
horizontal
}
>
<
Image
style
=
{
[
styles.
base
,
{
borderRadius
:
5
}
]
}
source
=
{
fullImage
}
/>
<
Image
style
=
{
[
styles.
base
, styles.
leftMargin
,
{
borderRadius
:
19
}
]
}
source
=
{
fullImage
}
/>
</
View
>
)
;
}
,
}
,
{
title
:
'Background Color'
,
render
:
function
(
)
{
return
(
<
View
style
=
{
styles.
horizontal
}
>
<
Image
source
=
{
smallImage
}
style
=
{
styles.
base
}
/>
<
Image
style
=
{
[
styles.
base
,
styles.
leftMargin
,
{
backgroundColor
:
'rgba(0, 0, 100, 0.25)'
}
]
}
source
=
{
smallImage
}
/>
<
Image
style
=
{
[
styles.
base
, styles.
leftMargin
,
{
backgroundColor
:
'red'
}
]
}
source
=
{
smallImage
}
/>
<
Image
style
=
{
[
styles.
base
, styles.
leftMargin
,
{
backgroundColor
:
'black'
}
]
}
source
=
{
smallImage
}
/>
</
View
>
)
;
}
,
}
,
{
title
:
'Opacity'
,
render
:
function
(
)
{
return
(
<
View
style
=
{
styles.
horizontal
}
>
<
Image
style
=
{
[
styles.
base
,
{
opacity
:
1
}
]
}
source
=
{
fullImage
}
/>
<
Image
style
=
{
[
styles.
base
, styles.
leftMargin
,
{
opacity
:
0.8
}
]
}
source
=
{
fullImage
}
/>
<
Image
style
=
{
[
styles.
base
, styles.
leftMargin
,
{
opacity
:
0.6
}
]
}
source
=
{
fullImage
}
/>
<
Image
style
=
{
[
styles.
base
, styles.
leftMargin
,
{
opacity
:
0.4
}
]
}
source
=
{
fullImage
}
/>
<
Image
style
=
{
[
styles.
base
, styles.
leftMargin
,
{
opacity
:
0.2
}
]
}
source
=
{
fullImage
}
/>
<
Image
style
=
{
[
styles.
base
, styles.
leftMargin
,
{
opacity
:
0
}
]
}
source
=
{
fullImage
}
/>
</
View
>
)
;
}
,
}
,
{
title
:
'Nesting'
,
render
:
function
(
)
{
return
(
<
Image
style
=
{
{
width
:
60
, height
:
60
, backgroundColor
:
'transparent'
}
}
source
=
{
fullImage
}
>
<
Text style
=
{
styles.
nestedText
}
>
React
</
Text
>
</
Image
>
)
;
}
,
}
,
{
title
:
'Tint Color'
,
description
:
'The `tintColor` style prop changes all the non-alpha '
+
'pixels to the tint color.'
,
render
:
function
(
)
{
return
(
<
View
>
<
View
style
=
{
styles.
horizontal
}
>
<
Image
source
=
{
require
(
'image!uie_thumb_normal'
)
}
style
=
{
[
styles.
icon
,
{
borderRadius
:
5
, tintColor
:
'#5ac8fa'
}
]
}
/>
<
Image
source
=
{
require
(
'image!uie_thumb_normal'
)
}
style
=
{
[
styles.
icon
, styles.
leftMargin
,
{
borderRadius
:
5
, tintColor
:
'#4cd964'
}
]
}
/>
<
Image
source
=
{
require
(
'image!uie_thumb_normal'
)
}
style
=
{
[
styles.
icon
, styles.
leftMargin
,
{
borderRadius
:
5
, tintColor
:
'#ff2d55'
}
]
}
/>
<
Image
source
=
{
require
(
'image!uie_thumb_normal'
)
}
style
=
{
[
styles.
icon
, styles.
leftMargin
,
{
borderRadius
:
5
, tintColor
:
'#8e8e93'
}
]
}
/>
</
View
>
<
Text style
=
{
styles.
sectionText
}
>
It also works with downloaded images
:
</
Text
>
<
View
style
=
{
styles.
horizontal
}
>
<
Image
source
=
{
smallImage
}
style
=
{
[
styles.
base
,
{
borderRadius
:
5
, tintColor
:
'#5ac8fa'
}
]
}
/>
<
Image
source
=
{
smallImage
}
style
=
{
[
styles.
base
, styles.
leftMargin
,
{
borderRadius
:
5
, tintColor
:
'#4cd964'
}
]
}
/>
<
Image
source
=
{
smallImage
}
style
=
{
[
styles.
base
, styles.
leftMargin
,
{
borderRadius
:
5
, tintColor
:
'#ff2d55'
}
]
}
/>
<
Image
source
=
{
smallImage
}
style
=
{
[
styles.
base
, styles.
leftMargin
,
{
borderRadius
:
5
, tintColor
:
'#8e8e93'
}
]
}
/>
</
View
>
</
View
>
)
;
}
,
}
,
{
title
:
'Resize Mode'
,
description
:
'The `resizeMode` style prop controls how the image is '
+
'rendered within the frame.'
,
render
:
function
(
)
{
return
(
<
View
style
=
{
styles.
horizontal
}
>
<
View
>
<
Text style
=
{
[
styles.
resizeModeText
]
}
>
Contain
</
Text
>
<
Image
style
=
{
styles.
resizeMode
}
resizeMode
=
{
Image
.
resizeMode
.
contain
}
source
=
{
fullImage
}
/>
</
View
>
<
View
style
=
{
styles.
leftMargin
}
>
<
Text style
=
{
[
styles.
resizeModeText
]
}
>
Cover
</
Text
>
<
Image
style
=
{
styles.
resizeMode
}
resizeMode
=
{
Image
.
resizeMode
.
cover
}
source
=
{
fullImage
}
/>
</
View
>
<
View
style
=
{
styles.
leftMargin
}
>
<
Text style
=
{
[
styles.
resizeModeText
]
}
>
Stretch
</
Text
>
<
Image
style
=
{
styles.
resizeMode
}
resizeMode
=
{
Image
.
resizeMode
.
stretch
}
source
=
{
fullImage
}
/>
</
View
>
</
View
>
)
;
}
,
}
,
{
title
:
'Animated GIF'
,
render
:
function
(
)
{
return
(
<
Image
style
=
{
styles.
gif
}
source
=
{
{
uri
:
'http://38.media.tumblr.com/9e9bd08c6e2d10561dd1fb4197df4c4e/tumblr_mfqekpMktw1rn90umo1_500.gif'
}
}
/>
)
;
}
,
platform
:
'ios'
,
}
,
{
title
:
'Cap Insets'
,
description
:
'When the image is resized, the corners of the size specified '
+
'by capInsets will stay a fixed size, but the center content and '
+
'borders of the image will be stretched. This is useful for creating '
+
'resizable rounded buttons, shadows, and other resizable assets.'
,
render
:
function
(
)
{
return
<
ImageCapInsetsExample
/>;
}
,
platform
:
'ios'
,
}
,
]
;
var fullImage
=
{
uri
:
'http://facebook.github.io/react/img/logo_og.png'
}
;
var smallImage
=
{
uri
:
'http://facebook.github.io/react/img/logo_small_2x.png'
}
;
var styles
=
StyleSheet
.
create
(
{
base
:
{
width
:
38
,
height
:
38
,
}
,
progress
:
{
flex
:
1
,
alignItems
:
'center'
,
flexDirection
:
'row'
,
width
:
100
}
,
leftMargin
:
{
marginLeft
:
10
,
}
,
background
:
{
backgroundColor
:
'#222222'
}
,
sectionText
:
{
marginVertical
:
6
,
}
,
nestedText
:
{
marginLeft
:
12
,
marginTop
:
20
,
backgroundColor
:
'transparent'
,
color
:
'white'
}
,
resizeMode
:
{
width
:
90
,
height
:
60
,
borderWidth
:
0.5
,
borderColor
:
'black'
}
,
resizeModeText
:
{
fontSize
:
11
,
marginBottom
:
3
,
}
,
icon
:
{
width
:
15
,
height
:
15
,
}
,
horizontal
:
{
flexDirection
:
'row'
,
}
,
gif
:
{
flex
:
1
,
height
:
200
,
}
,
}
)
;
列表视图——为变化的数据列表的垂直滚动的高效显示而设计的一个核心组件。最小的 API 是创建一个 ListView.DataSource
,用一个简单的数组数据的 blob 填充,并用那个数据源实例化一个 ListView
组件和一个 renderRow
回调,它会从数组数据中带走一个 blob 并返回一个可渲染的组件。
最小的例子:
getInitialState: function() {
var ds = new ListView.DataSource({rowHasChanged: (r1, r2) => r1 !== r2});
return {
dataSource: ds.cloneWithRows(['row 1', 'row 2']),
};
},
render: function() {
return (
<ListView
dataSource={this.state.dataSource}
renderRow={(rowData) => <Text>{rowData}</Text>}
/>
);
},
列表视图还支持更高级的功能,包括带有 sticky 页眉的部分,页眉和页脚的支持,回调到可用数据的最后(onEndReached
)和设备窗口变化中可见的行集(onChangeVisibleRows),以及一些性能优化。
当动态加载一些可能非常大(或概念上无限大的)数据集时,为了让列表视图滚送的顺畅,有一些性能操作设计:
- 只有重新呈现改变行——提供给数据源的 hasRowChanged 函数告诉列表视图是否需要重新呈现一行,因为源数据发生了变化——更多细节请看 ListViewDataSource。
- 行限速呈现——默认情况下,每次事件循环时,只显示一行 (可用pageSize
道具定制)。这将工作分解为小块,在呈现行时,减少框架下降的机会。
Props
ScrollView props...
dataSource 列表视图数据源
initialListSize 数字型
多少行呈现在初始组件装置中。使用这个来实现,这样第一个屏幕需要的数据就会一次出现,而不是在多个框架的过程中出现。
onChangeVisibleRows 函数型
(visibleRows, changedRows) => void
当可见的行集改变时调用。visibleRows
为所有可见的行映射 { sectionID: { rowID: true }}
,changedRows
为已经改变了它们可见性的行映射 { sectionID: { rowID: true | false }}
,true 表明行可见,而 false 表明行已经从视图中被删除了。
onEndReached 函数型
当所有行已经呈现并且列表被滚动到了 onEndReachedThreshold 的底部时被调用。提供了 native 滚动事件。
onEndReachedThreshold 数字型
onEndReached 像素的阈值。
pageSize 数字型
每次事件循环显示的行的数量。
removeClippedSubviews 布尔型
为提高大型列表滚动性能的实验性能优化,与溢出一起使用:“隐藏”在行容器中。使用时自己承担风险。
renderFooter 函数型
() => renderable
页眉和页脚在每个呈现过程中都会出现(如果提供了这些道具)。如果重新呈现它们耗费很大,那就把它们包在 StaticContainer 或其他适当的机制中。在每一个呈现过程中,页脚始终是在列表的底部,页眉始终在列表的顶部。
renderHeader 函数型
renderRow 函数型
(rowData, sectionID, rowID) => renderable 需要从数据源和它的 id 取走一个数据条目,并返回一个可渲染的作为行呈现的组件。默认的情况下,数据正是被放入了数据源的东西,但也可以提供自定义的提取器。
renderSectionHeader 函数型
(sectionData, sectionID) => renderable
如果提供了该函数,那么本节的 sticky 页眉就会呈现。Sticky 行为意味着它将带着本节顶部的内容滚动,直到它到达屏幕的顶端,此时它会停在屏幕顶部,直到被下一节的页眉推掉。
scrollRenderAheadDistance 数字型
在它们以像素的形式出现在屏幕上之前,要多早就开始呈现行。
例子
'use strict';
var React = require('react-native');
var {
Image,
ListView,
TouchableHighlight,
StyleSheet,
Text,
View,
} = React;
var UIExplorerPage = require('./UIExplorerPage');
var ListViewSimpleExample = React.createClass({
statics: {
title: '<ListView> - Simple',
description: 'Performant, scrollable list of data.'
},
getInitialState: function() {
var ds = new ListView.DataSource({rowHasChanged: (r1, r2) => r1 !== r2});
return {
dataSource: ds.cloneWithRows(this._genRows({})),
};
},
_pressData: ({}: {[key: number]: boolean}),
componentWillMount: function() {
this._pressData = {};
},
render: function() {
return (
<UIExplorerPage
title={this.props.navigator ? null : '<ListView> - Simple'}
noSpacer={true}
noScroll={true}>
<ListView
dataSource={this.state.dataSource}
renderRow={this._renderRow}
/>
</UIExplorerPage>
);
},
_renderRow: function(rowData: string, sectionID: number, rowID: number) {
var rowHash = Math.abs(hashCode(rowData));
var imgSource = {
uri: THUMB_URLS[rowHash % THUMB_URLS.length],
};
return (
<TouchableHighlight onPress={() => this._pressRow(rowID)}>
<View>
<View style={styles.row}>
<Image style={styles.thumb} source={imgSource} />
<Text style={styles.text}>
{rowData + ' - ' + LOREM_IPSUM.substr(0, rowHash % 301 + 10)}
</Text>
</View>
<View style={styles.separator} />
</View>
</TouchableHighlight>
);
},
_genRows: function(pressData: {[key: number]: boolean}): Array<string> {
var dataBlob = [];
for (var ii = 0; ii < 100; ii++) {
var pressedText = pressData[ii] ? ' (pressed)' : '';
dataBlob.push('Row ' + ii + pressedText);
}
return dataBlob;
},
_pressRow: function(rowID: number) {
this._pressData[rowID] = !this._pressData[rowID];
this.setState({dataSource: this.state.dataSource.cloneWithRows(
this._genRows(this._pressData)
)});
},
});
var THUMB_URLS = ['https://fbcdn-dragon-a.akamaihd.net/hphotos-ak-ash3/t39.1997/p128x128/851549_767334479959628_274486868_n.png', 'https://fbcdn-dragon-a.akamaihd.net/hphotos-ak-prn1/t39.1997/p128x128/851561_767334496626293_1958532586_n.png', 'https://fbcdn-dragon-a.akamaihd.net/hphotos-ak-ash3/t39.1997/p128x128/851579_767334503292959_179092627_n.png', 'https://fbcdn-dragon-a.akamaihd.net/hphotos-ak-prn1/t39.1997/p128x128/851589_767334513292958_1747022277_n.png', 'https://fbcdn-dragon-a.akamaihd.net/hphotos-ak-prn1/t39.1997/p128x128/851563_767334559959620_1193692107_n.png', 'https://fbcdn-dragon-a.akamaihd.net/hphotos-ak-prn1/t39.1997/p128x128/851593_767334566626286_1953955109_n.png', 'https://fbcdn-dragon-a.akamaihd.net/hphotos-ak-prn1/t39.1997/p128x128/851591_767334523292957_797560749_n.png', 'https://fbcdn-dragon-a.akamaihd.net/hphotos-ak-prn1/t39.1997/p128x128/851567_767334529959623_843148472_n.png', 'https://fbcdn-dragon-a.akamaihd.net/hphotos-ak-prn1/t39.1997/p128x128/851548_767334489959627_794462220_n.png', 'https://fbcdn-dragon-a.akamaihd.net/hphotos-ak-prn1/t39.1997/p128x128/851575_767334539959622_441598241_n.png', 'https://fbcdn-dragon-a.akamaihd.net/hphotos-ak-ash3/t39.1997/p128x128/851573_767334549959621_534583464_n.png', 'https://fbcdn-dragon-a.akamaihd.net/hphotos-ak-prn1/t39.1997/p128x128/851583_767334573292952_1519550680_n.png'];
var LOREM_IPSUM = 'Lorem ipsum dolor sit amet, ius ad pertinax oportere accommodare, an vix civibus corrumpit referrentur. Te nam case ludus inciderint, te mea facilisi adipiscing. Sea id integre luptatum. In tota sale consequuntur nec. Erat ocurreret mei ei. Eu paulo sapientem vulputate est, vel an accusam intellegam interesset. Nam eu stet pericula reprimique, ea vim illud modus, putant invidunt reprehendunt ne qui.';
/* eslint no-bitwise: 0 */
var hashCode = function(str) {
var hash = 15;
for (var ii = str.length - 1; ii >= 0; ii--) {
hash = ((hash << 5) - hash) + str.charCodeAt(ii);
}
return hash;
};
var styles = StyleSheet.create({
row: {
flexDirection: 'row',
justifyContent: 'center',
padding: 10,
backgroundColor: '#F6F6F6',
},
separator: {
height: 1,
backgroundColor: '#CCCCCC',
},
thumb: {
width: 64,
height: 64,
},
text: {
flex: 1,
},
});
module.exports = ListViewSimpleExample;
Props
legalLabelInsets {顶部:数字型;左部:数字型;底部:数字型;右部:数字型}
为 map 嵌入合法的标签,最初是在 map 的左下角。更多信息请看 EdgeInsetsPropType.js
。
maxDelta 数字型
能够显示的区域的最大尺寸。
minDelta 数字型
能够显示的区域的最小尺寸。
onRegionChange 函数型
当用户拖动 map 时,会不断地调用回调函数。
onRegionChangeComplete 函数型
当用户完成移动 map 时,调用一次回调函数。
pitchEnabled 布尔型
当这个属性设置为 true
,且有效的相机与 map 相关联,那么相机的螺旋角用于倾斜 map 的平面。当这个属性设置为 false
时,相机的螺旋角被忽略,并且 map 上总是显示为好像用户直接向下看。
region {纬度:数字型,经度:数字型,latitudeDelta:数字型,longitudeDelta:数字型}
该地区会被 map 显示出来。
由中心坐标和坐标跨度定义的区域显示出来。
rotateEnabled 布尔型
当这个属性设置为 true
,且有效的相机与 map 相关联,那么相机的航向角用于围绕 map 中心点旋转 map 平面。当该属性设置为 false
时,相机的航向角被忽略,map 总是定向的,这样真正的北方就会位于 map 视图的顶部。
scrollEnabled 布尔型
如果是 false
,用户无法更改 map 显示的区域。默认值是 true
。
showsUserLocation 布尔型
如果是 true
,应用程序会请求用户的位置并关注它。默认值是 false
。
注意:为了获取地理位置,你需要添加把 NSLocationWhenInUseUsageDescription 键添加到 info.plist,否则就会失败!
style View#style
用于 MapView
的样式设置和布局。更多信息请看 StyleSheet.js
和 ViewStylePropTypes.js
。
zoomEnabled 布尔型
如果是 false
,用户无法缩小/放大 map。默认值是 true
。
例子
'use strict';
var React = require('react-native');
var StyleSheet = require('StyleSheet');
var {
MapView,
Text,
TextInput,
View,
} = React;
var MapRegionInput = React.createClass({
propTypes: {
region: React.PropTypes.shape({
latitude: React.PropTypes.number,
longitude: React.PropTypes.number,
latitudeDelta: React.PropTypes.number,
longitudeDelta: React.PropTypes.number,
}),
onChange: React.PropTypes.func.isRequired,
},
getInitialState: function() {
return {
latitude: 0,
longitude: 0,
latitudeDelta: 0,
longitudeDelta: 0,
};
},
componentWillReceiveProps: function(nextProps) {
this.setState(nextProps.region);
},
render: function() {
var region = this.state;
return (
<View>
<View style={styles.row}>
<Text>
{'Latitude'}
</Text>
<TextInput
value={'' + region.latitude}
style={styles.textInput}
onChange={this._onChangeLatitude}
/>
</View>
<View style={styles.row}>
<Text>
{'Longitude'}
</Text>
<TextInput
value={'' + region.longitude}
style={styles.textInput}
onChange={this._onChangeLongitude}
/>
</View>
<View style={styles.row}>
<Text>
{'Latitude delta'}
</Text>
<TextInput
value={'' + region.latitudeDelta}
style={styles.textInput}
onChange={this._onChangeLatitudeDelta}
/>
</View>
<View style={styles.row}>
<Text>
{'Longitude delta'}
</Text>
<TextInput
value={'' + region.longitudeDelta}
style={styles.textInput}
onChange={this._onChangeLongitudeDelta}
/>
</View>
<View style={styles.changeButton}>
<Text onPress={this._change}>
{'Change'}
</Text>
</View>
</View>
);
},
_onChangeLatitude: function(e) {
this.setState({latitude: parseFloat(e.nativeEvent.text)});
},
_onChangeLongitude: function(e) {
this.setState({longitude: parseFloat(e.nativeEvent.text)});
},
_onChangeLatitudeDelta: function(e) {
this.setState({latitudeDelta: parseFloat(e.nativeEvent.text)});
},
_onChangeLongitudeDelta: function(e) {
this.setState({longitudeDelta: parseFloat(e.nativeEvent.text)});
},
_change: function() {
this.props.onChange(this.state);
},
});
var MapViewExample = React.createClass({
getInitialState() {
return {
mapRegion: null,
mapRegionInput: null,
};
},
render() {
return (
<View>
<MapView
style={styles.map}
onRegionChange={this._onRegionChanged}
region={this.state.mapRegion}
/>
<MapRegionInput
onChange={this._onRegionInputChanged}
region={this.state.mapRegionInput}
/>
</View>
);
},
_onRegionChanged(region) {
this.setState({mapRegionInput: region});
},
_onRegionInputChanged(region) {
this.setState({
mapRegion: region,
mapRegionInput: region,
});
},
});
var styles = StyleSheet.create({
map: {
height: 150,
margin: 10,
borderWidth: 1,
borderColor: '#000000',
},
row: {
flexDirection: 'row',
justifyContent: 'space-between',
},
textInput: {
width: 150,
height: 20,
borderWidth: 0.5,
borderColor: '#aaaaaa',
fontSize: 13,
padding: 4,
},
changeButton: {
alignSelf: 'center',
marginTop: 5,
padding: 3,
borderWidth: 0.5,
borderColor: '#777777',
},
});
exports.title = '<MapView>';
exports.description = 'Base component to display maps';
exports.examples = [
{
title: 'Map',
render(): ReactElement { return <MapViewExample />; }
},
{
title: 'Map shows user location',
render() {
return <MapView style={styles.map} showsUserLocation={true} />;
}
}
];
在你的应用程序中使用 Navigator
来在不同场景之间过渡。为了实现这一功能,为导航器提供了路由对象来识别每一个场景,还提供了一个 renderScene
函数,导航器可以用它来为给定的路线渲染场景。
为了改变场景的动画或动作属性,提供了一个 configureScene
道具来为给定的路由配置对象。看到导航器。默认动画及更多的关于场景配置选项的信息,请看 Navigator.SceneConfigs
。
基本的使用
<Navigator
initialRoute={{name: 'My First Scene', index: 0}}
renderScene={(route, navigator) =>
<MySceneComponent
name={route.name}
onForward={() => {
var nextIndex = route.index + 1;
navigator.push({
name: 'Scene ' + nextIndex,
index: nextIndex,
});
}}
onBack={() => {
if (route.index > 0) {
navigator.pop();
}
}}
/>
}
/>
导航方法
Navigator
有两种方式进行导航。如果你有一个参考元素,你可以调用一些方法来触发导航:
- jumpBack()
——在不需要卸载当前场景的情况下向后跳 - jumpForward()
——向前跳转到路线堆栈中的下一个场景 -jumpTo(route)
——过渡到一个现有的没有被卸载的场景 - push(route)
——导航到一个新的场景,挤压任何你能够 jumpForward
的场景 -pop()
——回归并卸载当前场景 -replace(route)
——用一个新路线替换当前场景 - `replaceAtIndex(route,index)——取代一个由索引指定的场景
- replacePrevious(route)
——取代之前的场景 - immediatelyResetRouteStack(routeStack)
——用一组路线重置每个场景 - popToRoute(route)
——弹出一个由它的路线指定的特定的场景。这之后所有的场景将被卸载 - popToTop()
——弹出堆栈中的第一个场景,卸载其他场景
导航器对象
通过 renderScene
函数 navigator 对象对场景是可用的。对象有所有的导航方法,以及一些实用程序:
- parentNavigator
——父导航对象的参考,在 props.navigator 中被传递 - onWillFocus
——用来向父导航器传递一个导航焦点事件 - onDidFocus
——用来向父导航器传递一个导航焦点事件
Props
configureScene 函数型
可选功能,允许配置场景动画和手势。将由路线调用,且应该返回一个场景配置对象
(route) => Navigator.SceneConfigs.FloatFromRight
initialRoute 对象型
提供一个单一的“路线”来开始。路线是一个任意的对象,导航器将使用它在场景呈现之前确定每个场景。initialRoute 或 initialRouteStack 是必需的。
initialRouteStack [对象型]
提供一组路线来呈现最初的场景。如果没有提供 initialRoute,那么该道具就会被需求。
navigationBar 节点型
以可选的方式提供一个能够存留在场景之间转换的导航栏
navigator 对象型
以可选的方式从父导航器提供 navigator 对象
onDidFocus 函数型
在场景过渡完成后或在最初安装后该函数会被每个场景的新路线调用。这将覆盖在 this.props.navigator 的onDidFocus处理程序上。
onItemRef 函数型
当场景参考发生变化时,该函数会被调用 (ref,indexInStack)
onWillFocus 函数型
将在安装中和每个导航转换之前发射目标路线,覆盖this.props.navigator中的处理程序。这将覆盖this.props.navigator 中的 onDidFocus 处理程序
renderScene 函数型
对于一个给定的路线哪一个场景会出现需要该函数。将由路线和 navigator 对象调用。
(route, navigator) =>
<MySceneComponent title={route.title} />
sceneStyle View#style
设置样式,以应用于每个场景的容器中。
iOS 导航器包装了 UIKit 导航,并且允许你添加跨应用程序的 back-swipe 功能。
路线
路线是用于描述导航器每个页面的一个对象。第一个提供给 NavigatorIOS 的路线是 initialRoute
:
render: function() {
return (
<NavigatorIOS
initialRoute={{
component: MyView,
title: 'My View Title',
passProps: { myProp: 'foo' },
}}
/>
);
},
现在将由导航器呈现 MyView。它将在 route
道具,导航器及所有的 passProps
指定的道具中接受一个路线对象。
路线完整的定义请看 initialRoute propType。
导航器
Navigator
是视图能够调用的导航函数的一个对象。它作为一个道具会被传递给任何由 NavigatorIOS 呈现的组件。
var MyView = React.createClass({
_handleBackButtonPress: function() {
this.props.navigator.pop();
},
_handleNextButtonPress: function() {
this.props.navigator.push(nextRoute);
},
...
});
一个导航对象包含以下功能:
- push(route)
——导航到一个新的路线 - pop()
——返回一个页面 - popN(n)
——一次返回 N 页。当 N=1 时,该行为相当于 pop() - replace(route)
——取代当前页面的路线,并立即为新路线加载视图 - replacePrevious(route)
——取代前一页的路线/视图 - replacePreviousAndPop(route)
——取代了以前的路线/视图并转换回去 - resetTo(route)
——取代顶级的项目并 popToTop - popToRoute(route)
——为特定的路线对象回到项目 - popToTop()
——回到顶级项目
导航功能在 NavigatorIOS 组件中也是可用的:
var MyView = React.createClass({
_handleNavigationRequest: function() {
this.refs.nav.push(otherRoute);
},
render: () => (
<NavigatorIOS
ref="nav"
initialRoute={...}
/>
),
});
Props
initialRoute {组件:函数型,标题:字符串型,passProps:对象型,backButtonTitle:字符串型,rightButtonTitle:字符串型,onRightButtonPress:函数型,wrapperStyle:[对象型Object]}
NavigatorIOS 使用“路线”对象来识别子视图,道具,及导航栏的配置。“push”和所有其他的导航操作预计路线是这样的:
itemWrapperStyle View#style
默认的包为 navigator 中的组件设置样式。一个常见的用例是为每一页设置 backgroundColor
tintColor 字符串型
在导航栏中的按钮使用的颜色
例子
'use strict';
var React = require('react-native');
var ViewExample = require('./ViewExample');
var createExamplePage = require('./createExamplePage');
var {
PixelRatio,
ScrollView,
StyleSheet,
Text,
TouchableHighlight,
View,
} = React;
var EmptyPage = React.createClass({
render: function() {
return (
<View style={styles.emptyPage}>
<Text style={styles.emptyPageText}>
{this.props.text}
</Text>
</View>
);
},
});
var NavigatorIOSExample = React.createClass({
statics: {
title: '<NavigatorIOS>',
description: 'iOS navigation capabilities',
},
render: function() {
var recurseTitle = 'Recurse Navigation';
if (!this.props.topExampleRoute) {
recurseTitle += ' - more examples here';
}
return (
<ScrollView style={styles.list}>
<View style={styles.line}/>
<View style={styles.group}>
<View style={styles.row}>
<Text style={styles.rowNote}>
See <UIExplorerApp> for top-level usage.
</Text>
</View>
</View>
<View style={styles.line}/>
<View style={styles.groupSpace}/>
<View style={styles.line}/>
<View style={styles.group}>
{this._renderRow(recurseTitle, () => {
this.props.navigator.push({
title: NavigatorIOSExample.title,
component: NavigatorIOSExample,
backButtonTitle: 'Custom Back',
passProps: {topExampleRoute: this.props.topExampleRoute || this.props.route},
});
})}
{this._renderRow('Push View Example', () => {
this.props.navigator.push({
title: 'Very Long Custom View Example Title',
component: createExamplePage(null, ViewExample),
});
})}
{this._renderRow('Custom Right Button', () => {
this.props.navigator.push({
title: NavigatorIOSExample.title,
component: EmptyPage,
rightButtonTitle: 'Cancel',
onRightButtonPress: () => this.props.navigator.pop(),
passProps: {
text: 'This page has a right button in the nav bar',
}
});
})}
{this._renderRow('Pop', () => {
this.props.navigator.pop();
})}
{this._renderRow('Pop to top', () => {
this.props.navigator.popToTop();
})}
{this._renderRow('Replace here', () => {
var prevRoute = this.props.route;
this.props.navigator.replace({
title: 'New Navigation',
component: EmptyPage,
rightButtonTitle: 'Undo',
onRightButtonPress: () => this.props.navigator.replace(prevRoute),
passProps: {
text: 'The component is replaced, but there is currently no ' +
'way to change the right button or title of the current route',
}
});
})}
{this._renderReplacePrevious()}
{this._renderReplacePreviousAndPop()}
{this._renderPopToTopNavExample()}
</View>
<View style={styles.line}/>
</ScrollView>
);
},
_renderPopToTopNavExample: function() {
if (!this.props.topExampleRoute) {
return null;
}
return this._renderRow('Pop to top NavigatorIOSExample', () => {
this.props.navigator.popToRoute(this.props.topExampleRoute);
});
},
_renderReplacePrevious: function() {
if (!this.props.topExampleRoute) {
// this is to avoid replacing the UIExplorerList at the top of the stack
return null;
}
return this._renderRow('Replace previous', () => {
this.props.navigator.replacePrevious({
title: 'Replaced',
component: EmptyPage,
passProps: {
text: 'This is a replaced "previous" page',
},
wrapperStyle: styles.customWrapperStyle,
});
});
},
_renderReplacePreviousAndPop: function() {
if (!this.props.topExampleRoute) {
// this is to avoid replacing the UIExplorerList at the top of the stack
return null;
}
return this._renderRow('Replace previous and pop', () => {
this.props.navigator.replacePreviousAndPop({
title: 'Replaced and Popped',
component: EmptyPage,
passProps: {
text: 'This is a replaced "previous" page',
},
wrapperStyle: styles.customWrapperStyle,
});
});
},
_renderRow: function(title: string, onPress: Function) {
return (
<View>
<TouchableHighlight onPress={onPress}>
<View style={styles.row}>
<Text style={styles.rowText}>
{title}
</Text>
</View>
</TouchableHighlight>
<View style={styles.separator} />
</View>
);
},
});
var styles = StyleSheet.create({
customWrapperStyle: {
backgroundColor: '#bbdddd',
},
emptyPage: {
flex: 1,
paddingTop: 64,
},
emptyPageText: {
margin: 10,
},
list: {
backgroundColor: '#eeeeee',
marginTop: 10,
},
group: {
backgroundColor: 'white',
},
groupSpace: {
height: 15,
},
line: {
backgroundColor: '#bbbbbb',
height: 1 / PixelRatio.get(),
},
row: {
backgroundColor: 'white',
justifyContent: 'center',
paddingHorizontal: 15,
paddingVertical: 15,
},
separator: {
height: 1 / PixelRatio.get(),
backgroundColor: '#bbbbbb',
marginLeft: 15,
},
rowNote: {
fontSize: 17,
},
rowText: {
fontSize: 17,
fontWeight: '500',
},
});
module.exports = NavigatorIOSExample;
Props
onValueChange 函数型
selectedValue 任意类型
例子
'use strict';
var React = require('react-native');
var {
PickerIOS,
Text,
View,
} = React;
var PickerItemIOS = PickerIOS.Item;
var CAR_MAKES_AND_MODELS = {
amc: {
name: 'AMC',
models: ['AMX', 'Concord', 'Eagle', 'Gremlin', 'Matador', 'Pacer'],
},
alfa: {
name: 'Alfa-Romeo',
models: ['159', '4C', 'Alfasud', 'Brera', 'GTV6', 'Giulia', 'MiTo', 'Spider'],
},
aston: {
name: 'Aston Martin',
models: ['DB5', 'DB9', 'DBS', 'Rapide', 'Vanquish', 'Vantage'],
},
audi: {
name: 'Audi',
models: ['90', '4000', '5000', 'A3', 'A4', 'A5', 'A6', 'A7', 'A8', 'Q5', 'Q7'],
},
austin: {
name: 'Austin',
models: ['America', 'Maestro', 'Maxi', 'Mini', 'Montego', 'Princess'],
},
borgward: {
name: 'Borgward',
models: ['Hansa', 'Isabella', 'P100'],
},
buick: {
name: 'Buick',
models: ['Electra', 'LaCrosse', 'LeSabre', 'Park Avenue', 'Regal',
'Roadmaster', 'Skylark'],
},
cadillac: {
name: 'Cadillac',
models: ['Catera', 'Cimarron', 'Eldorado', 'Fleetwood', 'Sedan de Ville'],
},
chevrolet: {
name: 'Chevrolet',
models: ['Astro', 'Aveo', 'Bel Air', 'Captiva', 'Cavalier', 'Chevelle',
'Corvair', 'Corvette', 'Cruze', 'Nova', 'SS', 'Vega', 'Volt'],
},
};
var PickerExample = React.createClass({
getInitialState: function() {
return {
carMake: 'cadillac',
modelIndex: 3,
};
},
render: function() {
var make = CAR_MAKES_AND_MODELS[this.state.carMake];
var selectionString = make.name + ' ' + make.models[this.state.modelIndex];
return (
<View>
<Text>Please choose a make for your car:</Text>
<PickerIOS
selectedValue={this.state.carMake}
onValueChange={(carMake) => this.setState({carMake, modelIndex: 0})}>
{Object.keys(CAR_MAKES_AND_MODELS).map((carMake) => (
<PickerItemIOS
key={carMake}
value={carMake}
label={CAR_MAKES_AND_MODELS[carMake].name}
/>
)
)}
</PickerIOS>
<Text>Please choose a model of {make.name}:</Text>
<PickerIOS
selectedValue={this.state.modelIndex}
key={this.state.carMake}
onValueChange={(modelIndex) => this.setState({modelIndex})}>
{CAR_MAKES_AND_MODELS[this.state.carMake].models.map(
(modelName, modelIndex) => (
<PickerItemIOS
key={this.state.carmake + '_' + modelIndex}
value={modelIndex}
label={modelName}
/>
))
}
</PickerIOS>
<Text>You selected: {selectionString}</Text>
</View>
);
},
});
exports.title = '<PickerIOS>';
exports.description = 'Render lists of selectable options with UIPickerView.';
exports.examples = [
{
title: '<PickerIOS>',
render: function(): ReactElement {
return <PickerExample />;
},
}];
React 组建包裹了只是 Android 部分的 ProgressBar
。这个组件是被用来提示这个应用正在加载或者在应用里面有一些操作。
例子:
render
:
function
(
)
{
var
progressBar
=
<
View style
=
{
styles.
container
}
>
<
ProgressBar styleAttr
=
"Inverse"
/>
</
View
>;
return
(
<
MyLoadingComponent
componentView
=
{
componentView
}
loadingView
=
{
progressBar
}
style
=
{
styles.
loadingComponent
}
/>
)
;
}
,
属性
styleAttr 样式属性
进度条的样式,包括:
- Horizontal
- Small
- Large
- Inverse
- SmallInverse
- LargeInverse
testID 字符串 在端对端测试里面被用来定位这个视图。
例子
'use strict'
;
var
ProgressBar
=
require
(
'ProgressBarAndroid'
)
;
var
React
=
require
(
'React'
)
;
var
UIExplorerBlock
=
require
(
'UIExplorerBlock'
)
;
var
UIExplorerPage
=
require
(
'UIExplorerPage'
)
;
var
ProgressBarAndroidExample
=
React.
createClass
(
{
statics
:
{
title
:
'<ProgressBarAndroid>'
,
description
:
'Visual indicator of progress of some operation. '
+
'Shows either a cyclic animation or a horizontal bar.'
,
}
,
render
:
function
(
)
{
return
(
<
UIExplorerPage title
=
"ProgressBar Examples"
>
<
UIExplorerBlock title
=
"Default ProgressBar"
>
<
ProgressBar
/>
</
UIExplorerBlock
>
<
UIExplorerBlock title
=
"Small ProgressBar"
>
<
ProgressBar styleAttr
=
"Small"
/>
</
UIExplorerBlock
>
<
UIExplorerBlock title
=
"Large ProgressBar"
>
<
ProgressBar styleAttr
=
"Large"
/>
</
UIExplorerBlock
>
<
UIExplorerBlock title
=
"Inverse ProgressBar"
>
<
ProgressBar styleAttr
=
"Inverse"
/>
</
UIExplorerBlock
>
<
UIExplorerBlock title
=
"Small Inverse ProgressBar"
>
<
ProgressBar styleAttr
=
"SmallInverse"
/>
</
UIExplorerBlock
>
<
UIExplorerBlock title
=
"Large Inverse ProgressBar"
>
<
ProgressBar styleAttr
=
"LargeInverse"
/>
</
UIExplorerBlock
>
</
UIExplorerPage
>
)
;
}
,
}
)
;
module.
exports
=
ProgressBarAndroidExample
;
组件封装了滚动视图平台,同时提供了与锁定“应答”系统的触摸的集成。
尚不支持其他来自阻止滚动视图成为响应者的包含的响应。
Props
alwaysBounceHorizontal 布尔型
当为真时,滚动视图到达内容底部时,水平反弹,即使该内容小于滚动视图。当 horizontal={true}
时,默认值为 true,否则,默认值为 false。
alwaysBounceVertical 布尔型
当为真时,滚动视图到达内容底部时,垂直反弹,即使该内容小于滚动视图。当 horizontal={true}
时,默认值为 false,否则,默认值为 true。
automaticallyAdjustContentInsets 布尔型
bounces 布尔型
当为真时,当滚动视图到达内容底部时,反弹,如果内容比滚动视图是大,那么滚动视图沿着轴滚动方向反弹。当为假时,禁用所有反弹,即使 alwaysBounce *
道具为真。默认值为 true。
centerContent bool 布尔型
当为真时,当内容小于滚动视图边界时,滚动视图自动的集中内容;当内容大于滚动视图时,该属性没有任何影响。默认值是 false。
contentContainerStyle StyleSheetPropType(ViewStylePropTypes)
这些样式将应用到滚动视图内容容器中,内容容器包装了所有的子视图。例如:
return ( <ScrollView contentContainerStyle={styles.contentContainer}> </ScrollView> ); ... var styles = StyleSheet.create({ contentContainer: { paddingVertical: 20 } });
contentInset {顶部:数字型,左部:数字型,底部:数字型,右部:数字型}
contentOffset PointPropType
decelerationRate 数字型
一个浮点数,决定了在用户移开手指后,滚动视图减速有多快。合理的选择包括——正常:0.998(默认)——快速:0.9
horizontal 布尔型
当为真时,滚动视图的子视图水平排列为一行,而不是竖直排列为一列。默认值是 false。
keyboardDismissMode 枚举型(“none”,“interactive”,“onDrag”)
确定键盘在响应一个拖动时是否被摒弃。——“none”(默认),拖动没有摒弃键盘。——“onDrag”,当拖动开始时键盘就被摒弃了。——“interactive”,键盘被拖动交互式地摒弃并且与触摸同步移动;向上拖动取消了摒弃。
keyboardShouldPersistTaps 布尔型
当为假时,当键盘向上摒弃键盘时,轻击外部关注文本输入。当为真时,滚动视图不会抓取轻击,键盘不会自动摒弃。默认值是 false。
maximumZoomScale 数字型
最大允许缩放比例。默认值是 1.0。
minimumZoomScale 数字型
最小允许缩放比例。默认值是 1.0。
onScroll 函数型
onScrollAnimationEnd 函数型
pagingEnabled 布尔型
当为真时,滚动视图在滚动时会在滚动视图的尺寸的倍数上停止滚动。这可以用于水平分页。默认值是 false。
removeClippedSubviews 布尔型
实验:当为真时,屏幕以外的子视图(它的 overflow
值是 `hidden )从本地备份的 superview 中删除。这在长列表中可以提高滚动性能。默认值是 false。
scrollEnabled 布尔型
scrollEventThrottle 数字型
scrollIndicatorInsets {顶部:数字型,左部:数字型,底部:数字型,右部:数字型}
scrollsToTop 布尔型
当为真时,轻击状态栏滚动视图会滚动到顶部。默认值为 true。
showsHorizontalScrollIndicator 布尔型
showsVerticalScrollIndicator 布尔型
stickyHeaderIndices [数字型]
一组子视图表明确定当视图滚动时哪些子视图会停靠在屏幕的顶端。例如,传递 stickyHeaderIndices = {[0]}
将使得第一个子视图固定在滚动视图的顶部。此属性不支持与 horizontal = {true}
结合。
style style
Flexbox...
backgroundColor 字符串型
borderBottomColor 字符串型
borderColor 字符串型
borderLeftColor 字符串型
borderRadius 数字型
borderRightColor 字符串型
borderTopColor 字符串型
opacity 数字型
overflow 枚举型(‘visible’,’hidden’)
rotation 数字型
scaleX 数字型
scaleY 数字型
shadowColor 字符串型
shadowOffset {高:数字型,宽:数字型}
shadowOpacity 数字型
shadowRadius 数字型
transformMatrix [数字型]
translateX 数字型
translateY 数字型
zoomScale 数字型
当前滚动视图内容的规模。默认值是 1.0。
例子
'use strict';
var React = require('react-native');
var {
ScrollView,
StyleSheet,
View,
Image
} = React;
exports.title = '<ScrollView>';
exports.description = 'Component that enables scrolling through child components';
exports.examples = [
{
title: '<ScrollView>',
description: 'To make content scrollable, wrap it within a <ScrollView> component',
render: function() {
return (
<ScrollView
onScroll={() => { console.log('onScroll!'); }}
scrollEventThrottle={200}
contentInset={{top: -50}}
style={styles.scrollView}>
{THUMBS.map(createThumbRow)}
</ScrollView>
);
}
}, {
title: '<ScrollView> (horizontal = true)',
description: 'You can display <ScrollView>\'s child components horizontally rather than vertically',
render: function() {
return (
<ScrollView
horizontal={true}
contentInset={{top: -50}}
style={[styles.scrollView, styles.horizontalScrollView]}>
{THUMBS.map(createThumbRow)}
</ScrollView>
);
}
}];
var Thumb = React.createClass({
shouldComponentUpdate: function(nextProps, nextState) {
return false;
},
render: function() {
return (
<View style={styles.button}>
<Image style={styles.img} source={{uri:this.props.uri}} />
</View>
);
}
});
var THUMBS = ['https://fbcdn-dragon-a.akamaihd.net/hphotos-ak-ash3/t39.1997/p128x128/851549_767334479959628_274486868_n.png', 'https://fbcdn-dragon-a.akamaihd.net/hphotos-ak-prn1/t39.1997/p128x128/851561_767334496626293_1958532586_n.png', 'https://fbcdn-dragon-a.akamaihd.net/hphotos-ak-ash3/t39.1997/p128x128/851579_767334503292959_179092627_n.png', 'https://fbcdn-dragon-a.akamaihd.net/hphotos-ak-prn1/t39.1997/p128x128/851589_767334513292958_1747022277_n.png', 'https://fbcdn-dragon-a.akamaihd.net/hphotos-ak-prn1/t39.1997/p128x128/851563_767334559959620_1193692107_n.png', 'https://fbcdn-dragon-a.akamaihd.net/hphotos-ak-prn1/t39.1997/p128x128/851593_767334566626286_1953955109_n.png', 'https://fbcdn-dragon-a.akamaihd.net/hphotos-ak-prn1/t39.1997/p128x128/851591_767334523292957_797560749_n.png', 'https://fbcdn-dragon-a.akamaihd.net/hphotos-ak-prn1/t39.1997/p128x128/851567_767334529959623_843148472_n.png', 'https://fbcdn-dragon-a.akamaihd.net/hphotos-ak-prn1/t39.1997/p128x128/851548_767334489959627_794462220_n.png', 'https://fbcdn-dragon-a.akamaihd.net/hphotos-ak-prn1/t39.1997/p128x128/851575_767334539959622_441598241_n.png', 'https://fbcdn-dragon-a.akamaihd.net/hphotos-ak-ash3/t39.1997/p128x128/851573_767334549959621_534583464_n.png', 'https://fbcdn-dragon-a.akamaihd.net/hphotos-ak-prn1/t39.1997/p128x128/851583_767334573292952_1519550680_n.png'];
THUMBS = THUMBS.concat(THUMBS); // double length of THUMBS
var createThumbRow = (uri, i) => <Thumb key={i} uri={uri} />;
var styles = StyleSheet.create({
scrollView: {
backgroundColor: '#6A85B1',
height: 300,
},
horizontalScrollView: {
height: 120,
},
containerPage: {
height: 50,
width: 50,
backgroundColor: '#527FE4',
padding: 5,
},
text: {
fontSize: 20,
color: '#888888',
left: 80,
top: 20,
height: 40,
},
button: {
margin: 7,
padding: 5,
alignItems: 'center',
backgroundColor: '#eaeaea',
borderRadius: 3,
},
buttonContents: {
flexDirection: 'row',
width: 64,
height: 64,
},
img: {
width: 64,
height: 64,
}
});
属性
maximumValue 数值型
滑动块初始化最大值。默认值是 1。
minimumValue 数值型
滑动块初始化最小值。默认值是 0。
onSlidingComplete 函数
当用户已经完成改变它的值后,调用回调函数(例如,当滑动块被释放)
onValueChange 函数
当用户拖动滑动块时,连续不断的调用回调函数
style View#style
用于对 Slider
的设计与布局。未获取更多的信息,请查看StyleSheet.js
和 ViewStylePropTypes.js
value 数值型
初始化滑动块的值。该值应该是介于最大值和最小值之间的,最大值默认为 1,最小值默认为 0。默认值为 0。
这不是一个控制组件,比如说,如果你不更新组件的值,那么它将不会被重置成它的初始值。
例子
'use strict';
var React = require('react-native');
var {
SliderIOS,
Text,
StyleSheet,
View,
} = React;
var SliderExample = React.createClass({
getInitialState() {
return {
value: 0,
};
},
render() {
return (
<View>
<Text style={styles.text} >
{this.state.value}
</Text>
<SliderIOS
style={styles.slider}
onValueChange={(value) => this.setState({value: value})} />
</View>
);
}
});
var styles = StyleSheet.create({
slider: {
height: 10,
margin: 10,
},
text: {
fontSize: 14,
textAlign: 'center',
fontWeight: '500',
margin: 10,
},
});
exports.title = '<SliderIOS>';
exports.displayName = 'SliderExample';
exports.description = 'Slider input for numeric values';
exports.examples = [
{
title: 'SliderIOS',
render(): ReactElement { return <SliderExample />; }
}
];
标准的 Android 双态切换组件
属性
disable bool
如果为 true,则该组件不能进行交互。
onValueChange function
当值发生变化时调用新的值。
testID string
用于在端到端测试中查找此视图。
value bool
开关的布尔值。
例子
'use strict'
;
var React
=
require
(
'React'
)
;
var SwitchAndroid
=
require
(
'SwitchAndroid'
)
;
var Text
=
require
(
'Text'
)
;
var UIExplorerBlock
=
require
(
'UIExplorerBlock'
)
;
var UIExplorerPage
=
require
(
'UIExplorerPage'
)
;
var SwitchAndroidExample
=
React.
createClass
(
{
statics
:
{
title
:
'<SwitchAndroid>'
,
description
:
'Standard Android two-state toggle component'
}
,
getInitialState
:
function
(
)
{
return
{
trueSwitchIsOn
:
true
,
falseSwitchIsOn
:
false
,
colorTrueSwitchIsOn
:
true
,
colorFalseSwitchIsOn
:
false
,
eventSwitchIsOn
:
false
,
}
;
}
,
render
:
function
(
)
{
return
(
<
UIExplorerPage title
=
"<SwitchAndroid>"
>
<
UIExplorerBlock title
=
"Switches can be set to true or false"
>
<
SwitchAndroid
onValueChange
=
{
(
value
)
=>
this
.
setState
(
{
falseSwitchIsOn
:
value
}
)
}
style
=
{
{
marginBottom
:
10
}
}
value
=
{
this
.
state
.
falseSwitchIsOn
}
/>
<
SwitchAndroid
onValueChange
=
{
(
value
)
=>
this
.
setState
(
{
trueSwitchIsOn
:
value
}
)
}
value
=
{
this
.
state
.
trueSwitchIsOn
}
/>
</
UIExplorerBlock
>
<
UIExplorerBlock title
=
"Switches can be disabled"
>
<
SwitchAndroid
disabled
=
{
true
}
style
=
{
{
marginBottom
:
10
}
}
value
=
{
true
}
/>
<
SwitchAndroid
disabled
=
{
true
}
value
=
{
false
}
/>
</
UIExplorerBlock
>
<
UIExplorerBlock title
=
"Change events can be detected"
>
<
SwitchAndroid
onValueChange
=
{
(
value
)
=>
this
.
setState
(
{
eventSwitchIsOn
:
value
}
)
}
style
=
{
{
marginBottom
:
10
}
}
value
=
{
this
.
state
.
eventSwitchIsOn
}
/>
<
SwitchAndroid
onValueChange
=
{
(
value
)
=>
this
.
setState
(
{
eventSwitchIsOn
:
value
}
)
}
style
=
{
{
marginBottom
:
10
}
}
value
=
{
this
.
state
.
eventSwitchIsOn
}
/>
<
Text
>
{
this
.
state
.
eventSwitchIsOn
?
"On"
:
"Off"
}
</
Text
>
</
UIExplorerBlock
>
<
UIExplorerBlock title
=
"Switches are controlled components"
>
<
SwitchAndroid
/>
<
SwitchAndroid value
=
{
true
}
/>
</
UIExplorerBlock
>
</
UIExplorerPage
>
)
;
}
}
)
;
module.
exports
=
SwitchAndroidExample
;
使用 SwitchIOS
在 iOS 上呈现出布尔型的输入。这是一个控件组件,所以为了更新组件,你必须使用 onValueChange
回调并且更新值value
。否则的话用户的改变会被立即反映到 props.value
,这是一个真理。
属性
disabled 布尔型
如果值为真,那么用户将不能切换开关。默认值为假。
onTintColor 字符串型
当开关打开时候的背景颜色。
onValueChange 函数
当用户切换开关时,调用回调函数。
thumbTintColor 字符串型
开关按钮的背景颜色。
tintColor 字符串型
当开关关闭后的背景颜色。
value 布尔型
开关的值,如果为真,开关会打开。默认值为假。
例子
'use strict';
var React = require('react-native');
var {
SwitchIOS,
Text,
View
} = React;
var BasicSwitchExample = React.createClass({
getInitialState() {
return {
trueSwitchIsOn: true,
falseSwitchIsOn: false,
};
},
render() {
return (
<View>
<SwitchIOS
onValueChange={(value) => this.setState({falseSwitchIsOn: value})}
style={{marginBottom: 10}}
value={this.state.falseSwitchIsOn} />
<SwitchIOS
onValueChange={(value) => this.setState({trueSwitchIsOn: value})}
value={this.state.trueSwitchIsOn} />
</View>
);
}
});
var DisabledSwitchExample = React.createClass({
render() {
return (
<View>
<SwitchIOS
disabled={true}
style={{marginBottom: 10}}
value={true} />
<SwitchIOS
disabled={true}
value={false} />
</View>
);
},
});
var ColorSwitchExample = React.createClass({
getInitialState() {
return {
colorTrueSwitchIsOn: true,
colorFalseSwitchIsOn: false,
};
},
render() {
return (
<View>
<SwitchIOS
onValueChange={(value) => this.setState({colorFalseSwitchIsOn: value})}
onTintColor="#00ff00"
style={{marginBottom: 10}}
thumbTintColor="#0000ff"
tintColor="#ff0000"
value={this.state.colorFalseSwitchIsOn} />
<SwitchIOS
onValueChange={(value) => this.setState({colorTrueSwitchIsOn: value})}
onTintColor="#00ff00"
thumbTintColor="#0000ff"
tintColor="#ff0000"
value={this.state.colorTrueSwitchIsOn} />
</View>
);
},
});
var EventSwitchExample = React.createClass({
getInitialState() {
return {
eventSwitchIsOn: false,
eventSwitchRegressionIsOn: true,
};
},
render() {
return (
<View style={{ flexDirection: 'row', justifyContent: 'space-around' }}>
<View>
<SwitchIOS
onValueChange={(value) => this.setState({eventSwitchIsOn: value})}
style={{marginBottom: 10}}
value={this.state.eventSwitchIsOn} />
<SwitchIOS
onValueChange={(value) => this.setState({eventSwitchIsOn: value})}
style={{marginBottom: 10}}
value={this.state.eventSwitchIsOn} />
<Text>{this.state.eventSwitchIsOn ? "On" : "Off"}</Text>
</View>
<View>
<SwitchIOS
onValueChange={(value) => this.setState({eventSwitchRegressionIsOn: value})}
style={{marginBottom: 10}}
value={this.state.eventSwitchRegressionIsOn} />
<SwitchIOS
onValueChange={(value) => this.setState({eventSwitchRegressionIsOn: value})}
style={{marginBottom: 10}}
value={this.state.eventSwitchRegressionIsOn} />
<Text>{this.state.eventSwitchRegressionIsOn ? "On" : "Off"}</Text>
</View>
</View>
);
}
});
exports.title = '<SwitchIOS>';
exports.displayName = 'SwitchExample';
exports.description = 'Native boolean input';
exports.examples = [
{
title: 'Switches can be set to true or false',
render(): ReactElement { return <BasicSwitchExample />; }
},
{
title: 'Switches can be disabled',
render(): ReactElement { return <DisabledSwitchExample />; }
},
{
title: 'Custom colors can be provided',
render(): ReactElement { return <ColorSwitchExample />; }
},
{
title: 'Change events can be detected',
render(): ReactElement { return <EventSwitchExample />; }
},
{
title: 'Switches are controlled components',
render(): ReactElement { return <SwitchIOS />; }
}
];
属性
style View#style
例子
'use strict';
var React = require('react-native');
var {
StyleSheet,
TabBarIOS,
Text,
View,
} = React;
var TabBarExample = React.createClass({
statics: {
title: '<TabBarIOS>',
description: 'Tab-based navigation.'
},
getInitialState: function() {
return {
selectedTab: 'redTab',
notifCount: 0,
presses: 0,
};
},
_renderContent: function(color: string, pageText: string) {
return (
<View style={[styles.tabContent, {backgroundColor: color}]}>
<Text style={styles.tabText}>{pageText}</Text>
<Text style={styles.tabText}>{this.state.presses} re-renders of the More tab</Text>
</View>
);
},
render: function() {
return (
<TabBarIOS>
<TabBarIOS.Item
title="Blue Tab"
selected={this.state.selectedTab === 'blueTab'}
onPress={() => {
this.setState({
selectedTab: 'blueTab',
});
}}>
{this._renderContent('#414A8C', 'Blue Tab')}
</TabBarIOS.Item>
<TabBarIOS.Item
systemIcon="history"
badge={this.state.notifCount > 0 ? this.state.notifCount : undefined}
selected={this.state.selectedTab === 'redTab'}
onPress={() => {
this.setState({
selectedTab: 'redTab',
notifCount: this.state.notifCount + 1,
});
}}>
{this._renderContent('#783E33', 'Red Tab')}
</TabBarIOS.Item>
<TabBarIOS.Item
systemIcon="more"
selected={this.state.selectedTab === 'greenTab'}
onPress={() => {
this.setState({
selectedTab: 'greenTab',
presses: this.state.presses + 1
});
}}>
{this._renderContent('#21551C', 'Green Tab')}
</TabBarIOS.Item>
</TabBarIOS>
);
},
});
var styles = StyleSheet.create({
tabContent: {
flex: 1,
alignItems: 'center',
},
tabText: {
color: 'white',
margin: 50,
},
});
module.exports = TabBarExample;
badge 并
位于图标右上角的小的红色的泡沫。
icon Image.propTypes.source
标记的自动以图标。当定义了系统图标时,它将被忽略。
onPress 函数
当标记被选中时,该函数回调,你应该改变组件的状态来设置 selected={true}。
selected 布尔值
它指定了孩子是否可见。如果你看到了一个空白的内容,你很有可能是忘记添加选中项了。
selectedIcon Image.propTypes.source
当标记被选中时,自定义的图标。当定义了系统图标时,它会被忽略。如果为空,那么图标会呈现蓝色。
style View#style
React 样式对象。
systemIcon 枚举('bookmarks','contacts','downloads','favorites','featured','history','more','most-recent','most-viewed','recents','search','top-rated')
项目有一些预定义的系统图标。请注意如果你正在使用它们,标题和选中的图标将被系统图标覆盖。
title 字符串
出现在图标下的文本。当定义了系统图标时,它会被忽略。
用于显示文本的响应组件,支持嵌套、样式和触发处理。在接下来的例子中,嵌套的标题和正文文本将从 styles.baseText
继承 FontFamily
,但是标题会提供它自己其他的设计风格。标题和正文在文字换行时会堆叠在彼此之上。
renderText: function() {
return (
<Text style={styles.baseText}>
<Text style={styles.titleText} onPress={this.onPressTitle}>
{this.state.titleText + '\n\n'}
</Text>
<Text numberOfLines={5}>
{this.state.bodyText}
</Text>
</Text>
);
},
...
var styles = StyleSheet.create({
baseText: {
fontFamily: 'Cochin',
},
titleText: {
fontSize: 20,
fontWeight: 'bold',
},
};
Props
numberOfLines 数值型
用于在计算文本布局后将文本和省略符号进行截断,包括换行,这样总的行数就不会超过这个值。
onPress 函数
这个函数被称为按下。在默认高亮状态下,文本内部是支持按下动作处理的(该函数在 suppressHighlighting
是禁用的)。
View#style...
color 字符串型
containerBackgroundColor 字符串型
fontFamily 字符串型
fontSize 数值型
fontStyle enum('normal', 'italic')
fontWeight enum("normal", 'bold', '100', '200', '300', '400', '500', '600', '700', '800', '900')
lineHeight 数值型
textAlign enum("auto", 'left', 'right', 'center')
writingDirection enum("auto", 'ltr', 'rtl')
suppressHighlighting 布尔型
值为真时,当文本被按下时没有视觉上的变化。默认情况下,按下之前是一个灰色椭圆高亮的文本。
testID 字符串型
在端到端测试时用于定位视图
描述
[Edit on GitHubhref="https://github.com/facebook/react-native/blob/master/docs/Text.md")
嵌套文本
在 iOS 里,显示格式化文本的方式是使用 NSAttributedString
:你可以为你想要显示和注释的文本划定一些特定的格式范围。实际上,这是非常无聊的。对于 React Native,我们决定使用 Web 模式,在这里我们可以利用嵌套文本来达到同样的效果。
<Text style={{fontWeight: 'bold'}}>
I am bold
<Text style={{color: 'red'}}>
and red
</Text>
</Text>
在幕后,这将会被转换成一个完全的包含以下信息的 NSAttributedString
"I am bold and red"
0-9: bold
9-17: bold, red
容器
<Text>
元素是与布局设计有特定关系的:内部的一切都不再使用 flexbox 布局而是使用文本布局。这意味着一个 <Text>
内部的元素不在是矩形的,而是在结尾的时候被包装起来。
<Text>
<Text>First part and </Text>
<Text>second part</Text>
</Text>
// Text container: all the text flows as if it was one
// |First part |
// |and second |
// |part |
<View>
<Text>First part and </Text>
<Text>second part</Text>
</View>
// View container: each text is its own block
// |First part |
// |and |
// |second part|
有限制性的样式继承
在网络上,为整个文档设置字体体系和大小的常用方法是:
/* CSS, *not* React Native */
html {
font-family: 'lucida grande', tahoma, verdana, arial, sans-serif;
font-size: 11px;
color: #141823;
}
当浏览器想要显示一个文本节点时,它会一直走到树的根元素,并且找到一个有 font-size
属性的元素。该系统一个意想不到的性质是任何节点都可以有font-size
属性,包括一个 <div>
。这是为了方便而设计的,尽管语义并不是正确的。
在 React Naitve 里,我们关于这一点会更严格:你必须将 <Text>
组件里的所有节点都进行包装;你不能在 <View>
下直接拥有一个文本节点。
// BAD: will fatal, can't have a text node as child of a <View>
<View>
Some text
</View>
// GOOD
<View>
<Text>
Some text
</Text>
</View>
你也失去了对整个子树设置字体的能力。为了在你的应用程序里使用一致为字体和大小,推荐使用的方法是创建一个包括他们的 MyAppText
组件,并且在你的应用程序里使用这个组件。你可以使用该组件来构成更多特定的组件,比如用于其他类型文本的 MyAppHeaderText
组件。
<View>
<MyAppText>Text styled with the default font for the entire application</MyAppText>
<MyAppHeaderText>Text styled as a header</MyAppHeaderText>
</View>
React Native 还有继承风格的概念,但是仅限于文本子树。在这种情况下,第二部分将是粗体和红色。
<Text style={{fontWeight: 'bold'}}>
I am bold
<Text style={{color: 'red'}}>
and red
</Text>
</Text>
我们相信更多的文本约束方法将会产生更好的应用程序:
- (开发人员)响应组件的设计源于大脑中孤立的想法:你应该有能力将你的组件放置在你应用程序的任何一个地方,相信只有工具是相同的,那么它的表现和行为都是相同的。文本属性是可以从工具外继承的,这会打破这种孤立。
- (实现人员)React Native 实现也是很简单的。我们不需要对每一个单一的元素都要有一个 FontFamily
模块,并且我们在每一次显示一个文本节点时也不需要对树遍历到根节点。风格的继承只需要在原生文本内部进行编码,不需要泄露给其他文本或者是系统本身。
例子
'use strict';
var React = require('react-native');
var {
StyleSheet,
Text,
View,
} = React;
var Entity = React.createClass({
render: function() {
return (
<Text style={styles.entity}>
{this.props.children}
</Text>
);
}
});
var AttributeToggler = React.createClass({
getInitialState: function() {
return {fontWeight: '500', fontSize: 15};
},
increaseSize: function() {
this.setState({
fontSize: this.state.fontSize + 1
});
},
render: function() {
var curStyle = {fontSize: this.state.fontSize};
return (
<Text>
<Text style={curStyle}>
Tap the controls below to change attributes.
</Text>
<Text>
See how it will even work on{' '}
<Text style={curStyle}>
this nested text
</Text>
<Text onPress={this.increaseSize}>
{'>> Increase Size <<'}
</Text>
</Text>
</Text>
);
}
});
exports.title = '<Text>';
exports.description = 'Base component for rendering styled text.';
exports.displayName = 'TextExample';
exports.examples = [
{
title: 'Wrap',
render: function() {
return (
<Text>
The text should wrap if it goes on multiple lines. See, this is going to
the next line.
</Text>
);
},
}, {
title: 'Padding',
render: function() {
return (
<Text style={{padding: 10}}>
This text is indented by 10px padding on all sides.
</Text>
);
},
}, {
title: 'Font Family',
render: function() {
return (
<View>
<Text style={{fontFamily: 'Cochin'}}>
Cochin
</Text>
<Text style={{fontFamily: 'Cochin', fontWeight: 'bold'}}>
Cochin bold
</Text>
<Text style={{fontFamily: 'Helvetica'}}>
Helvetica
</Text>
<Text style={{fontFamily: 'Helvetica', fontWeight: 'bold'}}>
Helvetica bold
</Text>
<Text style={{fontFamily: 'Verdana'}}>
Verdana
</Text>
<Text style={{fontFamily: 'Verdana', fontWeight: 'bold'}}>
Verdana bold
</Text>
</View>
);
},
}, {
title: 'Font Size',
render: function() {
return (
<View>
<Text style={{fontSize: 23}}>
Size 23
</Text>
<Text style={{fontSize: 8}}>
Size 8
</Text>
</View>
);
},
}, {
title: 'Color',
render: function() {
return (
<View>
<Text style={{color: 'red'}}>
Red color
</Text>
<Text style={{color: 'blue'}}>
Blue color
</Text>
</View>
);
},
}, {
title: 'Font Weight',
render: function() {
return (
<View>
<Text style={{fontWeight: '100'}}>
Move fast and be ultralight
</Text>
<Text style={{fontWeight: '200'}}>
Move fast and be light
</Text>
<Text style={{fontWeight: 'normal'}}>
Move fast and be normal
</Text>
<Text style={{fontWeight: 'bold'}}>
Move fast and be bold
</Text>
<Text style={{fontWeight: '900'}}>
Move fast and be ultrabold
</Text>
</View>
);
},
}, {
title: 'Font Style',
render: function() {
return (
<View>
<Text style={{fontStyle: 'normal'}}>
Normal text
</Text>
<Text style={{fontStyle: 'italic'}}>
Italic text
</Text>
</View>
);
},
}, {
title: 'Nested',
description: 'Nested text components will inherit the styles of their ' +
'parents (only backgroundColor is inherited from non-Text parents). ' +
'<Text> only supports other <Text> and raw text (strings) as children.',
render: function() {
return (
<View>
<Text>
(Normal text,
<Text style={{fontWeight: 'bold'}}>
(and bold
<Text style={{fontSize: 11, color: '#527fe4'}}>
(and tiny inherited bold blue)
</Text>
)
</Text>
)
</Text>
<Text style={{fontSize: 12}}>
<Entity>Entity Name</Entity>
</Text>
</View>
);
},
}, {
title: 'Text Align',
render: function() {
return (
<View>
<Text style={{textAlign: 'left'}}>
left left left left left left left left left left left left left left left
</Text>
<Text style={{textAlign: 'center'}}>
center center center center center center center center center center center
</Text>
<Text style={{textAlign: 'right'}}>
right right right right right right right right right right right right right
</Text>
</View>
);
},
}, {
title: 'Spaces',
render: function() {
return (
<Text>
A {'generated'} {' '} {'string'} and some spaces
</Text>
);
},
}, {
title: 'Line Height',
render: function() {
return (
<Text>
<Text style={{lineHeight: 35}}>
A lot of space between the lines of this long passage that should
wrap once.
</Text>
</Text>
);
},
}, {
title: 'Empty Text',
description: 'It\'s ok to have Text with zero or null children.',
render: function() {
return (
<Text />
);
},
}, {
title: 'Toggling Attributes',
render: function(): ReactElement {
return <AttributeToggler />;
},
}, {
title: 'backgroundColor attribute',
description: 'backgroundColor is inherited from all types of views.',
render: function() {
return (
<View style={{backgroundColor: 'yellow'}}>
<Text>
Yellow background inherited from View parent,
<Text style={{backgroundColor: '#ffaaaa'}}>
{' '}red background,
<Text style={{backgroundColor: '#aaaaff'}}>
{' '}blue background,
<Text>
{' '}inherited blue background,
<Text style={{backgroundColor: '#aaffaa'}}>
{' '}nested green background.
</Text>
</Text>
</Text>
</Text>
</Text>
</View>
);
},
}, {
title: 'containerBackgroundColor attribute',
render: function() {
return (
<View>
<View style={{flexDirection: 'row', height: 85}}>
<View style={{backgroundColor: '#ffaaaa', width: 150}} />
<View style={{backgroundColor: '#aaaaff', width: 150}} />
</View>
<Text style={[styles.backgroundColorText, {top: -80}]}>
Default containerBackgroundColor (inherited) + backgroundColor wash
</Text>
<Text style={[
styles.backgroundColorText,
{top: -70, containerBackgroundColor: 'transparent'}]}>
{"containerBackgroundColor: 'transparent' + backgroundColor wash"}
</Text>
</View>
);
},
}, {
title: 'numberOfLines attribute',
render: function() {
return (
<View>
<Text numberOfLines={1}>
Maximum of one line no matter now much I write here. If I keep writing it{"'"}ll just truncate after one line
</Text>
<Text numberOfLines={2} style={{marginTop: 20}}>
Maximum of two lines no matter now much I write here. If I keep writing it{"'"}ll just truncate after two lines
</Text>
<Text style={{marginTop: 20}}>
No maximum lines specified no matter now much I write here. If I keep writing it{"'"}ll just keep going and going
</Text>
</View>
);
},
}];
var styles = StyleSheet.create({
backgroundColorText: {
left: 5,
backgroundColor: 'rgba(100, 100, 100, 0.3)'
},
entity: {
fontWeight: '500',
color: '#527fe4',
},
});
通过键盘将文本输入到应用程序的一个基本的组件。属性提供几个功能的可配置性,比如自动校正,自动还原,占位符文本,和不同的键盘类型,如数字键盘。 最简单的一个用例是放置一个 TextInput
,利用 onChangeText
事件来读取用户的输入。还有其他的事件可以使用,比如onSubmitEditing
和 onFocus
。一个简单的例子:
<View>
<TextInput
style={{height: 40, borderColor: 'gray', borderWidth: 1}}
onChangeText={(text) => this.setState({input: text})}
/>
<Text>{'user input: ' + this.state.input}</Text>
</View>
value
属性可以用于设置输入的值,其目的是让组件的状态更清晰,但是<TextInput>
所有的选项都是异步的,所以默认情况下它并不表现的像一个真正的控制组件。就像设置默认值一样设置 value
一次,但是你同样可以根据 onChangeText
不断的改变它的值。如果你真的想要迫使组件一直都可以恢复到你设置的值,那么你可以设置成 controlled={true}
。
不是所有版本都支持 multiline
属性,然后有些属性只支持多行输入。
属性
autoCapitalize enum('none', 'sentences', 'words', 'characters')
可以通知文本输入自动利用某些字符。
- characters:所有字符,
- words:每一个单词的首字母
- sentences:每个句子的首字母(默认情况下)
- none:不会自动使用任何东西
autoCorrect 布尔型
如果值为假,禁用自动校正。默认值为真。
autoFocus 布尔型
如果值为真,聚焦 componentDidMount 上的文本。默认值为假。
bufferDelay 数值型
这个会帮助避免由于 JS 和原生文本输入之间的竞态条件而丢失字符。默认值应该是没问题的,但是如果你每一个按键都操作的非常缓慢,那么你可能想尝试增加这个。
clearButtonMode enum('never', 'while-editing', 'unless-editing', 'always')
清除按钮出现在文本视图右侧的时机
controlled 布尔型
如果你真想要它表现成一个控制组件,你可以将它的值设置为真,但是按下按键,并且/或者缓慢打字,你可能会看到它闪烁,这取决于你如何处理 onChange 事件。
editable 布尔型
如果值为假,文本是不可编辑的。默认值为真。
enablesReturnKeyAutomatically 布尔型
如果值为真,当没有文本的时候键盘是不能返回键值的,当有文本的时候会自动返回。默认值为假。
keyboardType enum('default', "ascii-capable", 'numbers-and-punctuation', 'url', 'number-pad', 'phone-pad', 'name-phone-pad', 'email-address', 'decimal-pad', 'twitter', 'web-search', "numeric")
决定打开哪种键盘,例如,数字键盘。
multiline 布尔型
如果值为真,文本输入可以输入多行。默认值为假。
onBlur 函数
当文本输入是模糊的,调用回调函数
onChange 函数
当文本输入的文本发生变化时,调用回调函数
onChangeText 函数
onEndEditing 函数
onFocus 函数
当输入的文本是聚焦状态时,调用回调函数
onSubmitEditing 函数
password 布尔型
如果值为真,文本输入框就成为一个密码区域。默认值为假。
placeholder 字符串型
在文本输入之前字符串将被呈现出来
placeholderTextColor 字符串型
占位符字符串的文本颜色
returnKeyType enum('default', 'go', 'google', 'join', 'next', 'route', 'search', 'send', 'yahoo', 'done', 'emergency-call')
决定返回键的样式
secureTextEntry 布尔型
如果值为真,文本输入框就会使输入的文本变得模糊,以便于像密码这样敏感的文本保持安全。默认值为假。
selectionState 文档选择状态
见 DocumentSelectionState.js,一些状态是为了维护一个文档的选择信息。
style Text#style
testID 字符串型
用于端对端测试时定位视图。
value 字符串型
文本输入的默认值
例子
'use strict';
var React = require('react-native');
var {
Text,
TextInput,
View,
StyleSheet,
} = React;
var WithLabel = React.createClass({
render: function() {
return (
<View style={styles.labelContainer}>
<View style={styles.label}>
<Text>{this.props.label}</Text>
</View>
{this.props.children}
</View>
);
}
});
var TextEventsExample = React.createClass({
getInitialState: function() {
return {
curText: '<No Event>',
prevText: '<No Event>',
};
},
updateText: function(text) {
this.setState({
curText: text,
prevText: this.state.curText,
});
},
render: function() {
return (
<View>
<TextInput
autoCapitalize="none"
placeholder="Enter text to see events"
autoCorrect={false}
onFocus={() => this.updateText('onFocus')}
onBlur={() => this.updateText('onBlur')}
onChange={(event) => this.updateText(
'onChange text: ' + event.nativeEvent.text
)}
onEndEditing={(event) => this.updateText(
'onEndEditing text: ' + event.nativeEvent.text
)}
onSubmitEditing={(event) => this.updateText(
'onSubmitEditing text: ' + event.nativeEvent.text
)}
style={styles.default}
/>
<Text style={styles.eventLabel}>
{this.state.curText}{'\n'}
(prev: {this.state.prevText})
</Text>
</View>
);
}
});
var styles = StyleSheet.create({
page: {
paddingBottom: 300,
},
default: {
height: 26,
borderWidth: 0.5,
borderColor: '#0f0f0f',
padding: 4,
flex: 1,
fontSize: 13,
},
multiline: {
borderWidth: 0.5,
borderColor: '#0f0f0f',
flex: 1,
fontSize: 13,
height: 50,
},
eventLabel: {
margin: 3,
fontSize: 12,
},
labelContainer: {
flexDirection: 'row',
marginVertical: 2,
flex: 1,
},
label: {
width: 80,
justifyContent: 'flex-end',
flexDirection: 'row',
marginRight: 10,
paddingTop: 2,
},
});
exports.title = '<TextInput>';
exports.description = 'Single-line text inputs.';
exports.examples = [
{
title: 'Auto-focus',
render: function() {
return <TextInput autoFocus={true} style={styles.default} />;
}
},
{
title: 'Auto-capitalize',
render: function() {
return (
<View>
<WithLabel label="none">
<TextInput
autoCapitalize="none"
style={styles.default}
/>
</WithLabel>
<WithLabel label="sentences">
<TextInput
autoCapitalize="sentences"
style={styles.default}
/>
</WithLabel>
<WithLabel label="words">
<TextInput
autoCapitalize="words"
style={styles.default}
/>
</WithLabel>
<WithLabel label="characters">
<TextInput
autoCapitalize="characters"
style={styles.default}
/>
</WithLabel>
</View>
);
}
},
{
title: 'Auto-correct',
render: function() {
return (
<View>
<WithLabel label="true">
<TextInput autoCorrect={true} style={styles.default} />
</WithLabel>
<WithLabel label="false">
<TextInput autoCorrect={false} style={styles.default} />
</WithLabel>
</View>
);
}
},
{
title: 'Keyboard types',
render: function() {
var keyboardTypes = [
'default',
'ascii-capable',
'numbers-and-punctuation',
'url',
'number-pad',
'phone-pad',
'name-phone-pad',
'email-address',
'decimal-pad',
'twitter',
'web-search',
'numeric',
];
var examples = keyboardTypes.map((type) => {
return (
<WithLabel key={type} label={type}>
<TextInput
keyboardType={type}
style={styles.default}
/>
</WithLabel>
);
});
return <View>{examples}</View>;
}
},
{
title: 'Return key types',
render: function() {
var returnKeyTypes = [
'default',
'go',
'google',
'join',
'next',
'route',
'search',
'send',
'yahoo',
'done',
'emergency-call',
];
var examples = returnKeyTypes.map((type) => {
return (
<WithLabel key={type} label={type}>
<TextInput
returnKeyType={type}
style={styles.default}
/>
</WithLabel>
);
});
return <View>{examples}</View>;
}
},
{
title: 'Enable return key automatically',
render: function() {
return (
<View>
<WithLabel label="true">
<TextInput enablesReturnKeyAutomatically={true} style={styles.default} />
</WithLabel>
</View>
);
}
},
{
title: 'Secure text entry',
render: function() {
return (
<View>
<WithLabel label="true">
<TextInput secureTextEntry={true} style={styles.default} value="abc" />
</WithLabel>
</View>
);
}
},
{
title: 'Event handling',
render: function(): ReactElement { return <TextEventsExample /> },
},
{
title: 'Colored input text',
render: function() {
return (
<View>
<TextInput
style={[styles.default, {color: 'blue'}]}
value="Blue"
/>
<TextInput
style={[styles.default, {color: 'green'}]}
value="Green"
/>
</View>
);
}
},
{
title: 'Clear button mode',
render: function () {
return (
<View>
<WithLabel label="never">
<TextInput
style={styles.default}
clearButtonMode="never"
/>
</WithLabel>
<WithLabel label="while editing">
<TextInput
style={styles.default}
clearButtonMode="while-editing"
/>
</WithLabel>
<WithLabel label="unless editing">
<TextInput
style={styles.default}
clearButtonMode="unless-editing"
/>
</WithLabel>
<WithLabel label="always">
<TextInput
style={styles.default}
clearButtonMode="always"
/>
</WithLabel>
</View>
);
}
},
];
React 组件,包装了 Android Toolbar
小工具。工具栏可以显示一个标志,导航图标(如汉堡包菜单),标题和副标题和操作列表。标题和子标题被扩展这样以来标志和导航图标显示在左边,标题和副标题在中间并且操作在右边。
如果工具栏具有唯一子级,它将显示在标题和操作之间。
例子:
render
:
function
(
)
{
return
(
<
ToolbarAndroid
logo
=
{
require
(
'image!app_logo'
)
}
title
=
"AwesomeApp"
actions
=
{
[
{
title
:
'Settings'
, icon
:
require
(
'image!icon_settings'
)
show
:
'always'
}
]
}
onActionSelected
=
{
this
.
onActionSelected
}
/>
)
}
,
onActionSelected
:
function
(
position
)
{
if
(
position
===
0
)
{
// index of 'Settings'
}
}
属性
actions [{title: string, icon: Image.propTypes.source, show: enum('always', 'ifRoom', 'never'), showWithText: bool}]
将工具栏上的可能动作设置为动作菜单的一部分。这些都显示为图标或小部件右侧的文本。如果不适合,它们将被放置在一个'溢出'菜单。
此属性需要一个对象数组,其中每个对象具有以下键:
- title
:必要的, 这个操作的标题 - icon
: 这个操作的图标,例如: require('image!some_icon') - show
:当把这个操作显示为一个图标或隐藏在溢出菜单中时: always
, ifRoom
或 never - showWithText
: 布尔值,是否显示图标旁边的文本
logo Image.propTypes.source
设置工具栏的标志。
navIcon Image.propTypes.source
设置导航图标。
onActionSelected function
被选中时调用回调函数。传递到回调的唯一参数是操作数组中的位置。
onIconClicked function
在选定图标时调用。
subtitle string
设置工具栏副标题。
subtitleColor string
设置工具栏副标题的颜色。
testID string
用于在端到端测试中查找此视图。
title string
设置工具栏标题。
titleColor string
设置工具栏副标题的颜色。
例子
'use strict'
;
var React
=
require
(
'react-native'
)
;
var
{
StyleSheet
,
Text,
View
,
}
=
React
;
var UIExplorerBlock
=
require
(
'./UIExplorerBlock'
)
;
var UIExplorerPage
=
require
(
'./UIExplorerPage'
)
;
var SwitchAndroid
=
require
(
'SwitchAndroid'
)
;
var ToolbarAndroid
=
require
(
'ToolbarAndroid'
)
;
var ToolbarAndroidExample
=
React.
createClass
(
{
statics
:
{
title
:
'<ToolbarAndroid>'
,
description
:
'Examples of using the Android toolbar.'
}
,
getInitialState
:
function
(
)
{
return
{
actionText
:
'Example app with toolbar component'
,
toolbarSwitch
:
false
,
colorProps
:
{
titleColor
:
'#3b5998'
,
subtitleColor
:
'#6a7180'
,
}
,
}
;
}
,
render
:
function
(
)
{
return
(
<
UIExplorerPage title
=
"<ToolbarAndroid>"
>
<
UIExplorerBlock title
=
"Toolbar with title/subtitle and actions"
>
<
ToolbarAndroid
actions
=
{
toolbarActions
}
navIcon
=
{
require
(
'image!ic_menu_black_24dp'
)
}
onActionSelected
=
{
this
._onActionSelected
}
onIconClicked
=
{
(
)
=>
this
.
setState
(
{
actionText
:
'Icon clicked'
}
)
}
style
=
{
styles.
toolbar
}
subtitle
=
{
this
.
state
.
actionText
}
title
=
"Toolbar"
/>
<
Text
>
{
this
.
state
.
actionText
}
</
Text
>
</
UIExplorerBlock
>
<
UIExplorerBlock title
=
"Toolbar with logo & custom title view (a View with Switch+Text)"
>
<
ToolbarAndroid
logo
=
{
require
(
'image!launcher_icon'
)
}
style
=
{
styles.
toolbar
}
>
<
View
style
=
{
{
height
:
56
, flexDirection
:
'row'
, alignItems
:
'center'
}
}
>
<
SwitchAndroid
value
=
{
this
.
state
.
toolbarSwitch
}
onValueChange
=
{
(
value
)
=>
this
.
setState
(
{
'toolbarSwitch'
:
value
}
)
}
/>
<
Text
>
{
'
\'
Tis but a switch'
}
</
Text
>
</
View
>
</
ToolbarAndroid
>
</
UIExplorerBlock
>
<
UIExplorerBlock title
=
"Toolbar with no icon"
>
<
ToolbarAndroid
actions
=
{
toolbarActions
}
style
=
{
styles.
toolbar
}
subtitle
=
"There be no icon here"
/>
</
UIExplorerBlock
>
<
UIExplorerBlock title
=
"Toolbar with navIcon & logo, no title"
>
<
ToolbarAndroid
actions
=
{
toolbarActions
}
logo
=
{
require
(
'image!launcher_icon'
)
}
navIcon
=
{
require
(
'image!ic_menu_black_24dp'
)
}
style
=
{
styles.
toolbar
}
/>
</
UIExplorerBlock
>
<
UIExplorerBlock title
=
"Toolbar with custom title colors"
>
<
ToolbarAndroid
navIcon
=
{
require
(
'image!ic_menu_black_24dp'
)
}
onIconClicked
=
{
(
)
=>
this
.
setState
(
{
colorProps
:
{
}
}
)
}
title
=
"Wow, such toolbar"
style
=
{
styles.
toolbar
}
subtitle
=
"Much native"
{
...
this
.
state
.
colorProps
}
/>
<
Text
>
Touch the icon to reset the custom colors to the
default
(
theme
-
provided
)
ones.
</
Text
>
</
UIExplorerBlock
>
</
UIExplorerPage
>
)
;
}
,
_onActionSelected
:
function
(
position
)
{
this
.
setState
(
{
actionText
:
'Selected '
+
toolbarActions
[
position
]
.
title
,
}
)
;
}
,
}
)
;
var toolbarActions
=
[
{
title
:
'Create'
, icon
:
require
(
'image!ic_create_black_48dp'
)
, show
:
'always'
}
,
{
title
:
'Filter'
}
,
{
title
:
'Settings'
, icon
:
require
(
'image!ic_settings_black_48dp'
)
, show
:
'always'
}
,
]
;
var styles
=
StyleSheet
.
create
(
{
toolbar
:
{
backgroundColor
:
'#e9eaed'
,
height
:
56
,
}
,
}
)
;
module.
exports
=
ToolbarAndroidExample
;
一个包装器是为了让视图对触发做出合适的响应。按下按钮,包装后的视图的透明性就会降低,这样底衬的颜色就会显示出来,使视图颜色变暗或者着色。底衬的出现是因为向视图层次结构添加了一个视图,如果使用不正确的话,这有时候会导致不必要的认为视觉效果,例如,如果包装了的视图的背景颜色不是很明确的设置成一个不透明的颜色。
例子:
renderButton: function() {
return (
<TouchableHighlight onPress={this._onPressButton}>
<Image
style={styles.button}
source={require('image!myButton')}
/>
</TouchableHighlight>
);
},
属性
TouchableWithoutFeedback props...
activeOpacity 数值型
当触发处于活跃状态时,确定包装后的使徒的不透明度。
style View#style
underlayColor 字符串型
当触发处于活跃状态时,底衬的颜色会显示出来。
一个包装器是为了让视图对触发做出合适的响应。按下按钮,包装后的视图的透明性就会降低,变暗。这个动作的完成实际上并没有改变视图的层次,一般来说很容易添加到一个应用程序,并且不会产生奇怪的副作用。
例子:
renderButton: function() {
return (
<TouchableOpacity onPress={this._onPressButton}>
<Image
style={styles.button}
source={require('image!myButton')}
/>
</TouchableOpacity>
);
},
工具
TouchableWithoutFeedback props...
activeOpacity 数值
当触发处于活跃状态时,确定包装后的使徒的不透明度。
除非你有一个很好的理由,否则不要使用它。所有按下动作的相应元素在被触发时都应该有一个视觉反馈。一个“Web”应用程序并不感觉很“原生”,这是主要原因之一。
工具
onLongPress 函数
onPress 函数
释放触摸时该函数被调用,但如果触摸被取消则不调用(例如被窃取了应答器锁的滚动取消)。
onPressIn 函数
onPressOut 函数
创建 UI 最基本的组件,view
是一个容器,它支持 flexbox 布局、风格、一些触发处理,和可访问性控制,它被设计成嵌套在其他视图里,并且有 0 到很多个任意类型的孩子。view
直接映射到原生视图,相当于在任意正在运行的平台上的响应,不管它是 UIView
,<div>
,android.view
,等等。这个例子创建了一个视图,将两个颜色的框和自定义的组件打包填充成一行。
<View style={{flexDirection: 'row', height: 100, padding: 20}}>
<View style={{backgroundColor: 'blue', flex: 0.3}} />
<View style={{backgroundColor: 'red', flex: 0.5}} />
<MyCustomComponent {...customProps} />
</View>
为了清晰和性能,视图被设计成与样式表一起使用,尽管是内联样式也同样支持。
工具
accessibilityLabel 字符串型
当用户与元素进行交互时,覆盖通过屏幕阅读器阅读的文本。在默认情况下,标签是通过遍历所有孩子和累积所有由空间隔开的文本节点创建的。
accessible 布尔型
当它的值为真时,说明视图是一个可访问的元素。在默认情况下,所有的可触发的元素都是可以被访问的。
onMoveShouldSetResponder 函数
对于大多数的触发交互,你可能只是想在 TouchableHighlight
或者 TouchableOpacity
里包装你的组件。为了进一步的探讨,检查 Touchable.js
,ScrollResponder.js
和ResponderEventPlugin.js
。
onResponderGrant 函数
onResponderMove 函数
onResponderReject 函数
onResponderRelease 函数
onResponderTerminate 函数
onResponderTerminationRequest 函数
onStartShouldSetResponder 函数
onStartShouldSetResponderCapture 函数
pointerEvents enum('box-none', 'none', 'box-only', 'auto')
缺乏auto
属性,none
更像是 CSS
的 none
值。box-none
就好像你已经应用了 CSS
类:
.box-none {
pointer-events: none;
}
.box-none * {
pointer-events: all;
}
box-only
相当于
.box-only {
pointer-events: all;
}
.box-only * {
pointer-events: none;
}
但是由于 pointerEvents
并不影响布局/外观,通过添加附加模式,我们已经偏离了规范,我们选择在 style
上不包括 pointerEvents
。在一些平台上,不管怎样偶们都需要将它作为一个 className
来实现。是否使用 style
时这个平台的实现细节。
removeClippedSubviews 布尔
这是一个通过 RCTView 显示的特定性能属性,当有很多子视图,并且它们大部分都是在幕后,这时被用于滚动内容。为了使这个属性有效,它必须被应用到一个视图中,在这个视图里包含很多子视图和外部约束。子视图中还应该有溢出:隐藏,应该包含视图(或者它的一个子视图)。
Flexbox...
backgroundColor 字符串
borderBottomColor 字符串
borderColor 字符串
borderLeftColor 字符串
borderRadius 数值
borderRightColor 字符串
borderTopColor 字符串
opacity 数值
overflow enum('visible', 'hidden')
rotation 数值
scaleX 数值
scaleY 数值
shadowColor 字符串
shadowOffset {h: number, w: number}
shadowOpacity 数值
shadowRadius 数值
transformMatrix [数值]
translateX 数值
translateY 数值
testID 字符串型
在端到端测试中用于定位视图
例子
'use strict';
var React = require('react-native');
var {
StyleSheet,
Text,
View,
} = React;
var styles = StyleSheet.create({
box: {
backgroundColor: '#527FE4',
borderColor: '#000033',
borderWidth: 1,
}
});
exports.title = '<View>';
exports.description = 'Basic building block of all UI.';
exports.displayName = 'ViewExample';
exports.examples = [
{
title: 'Background Color',
render: function() {
return (
<View style={{backgroundColor: '#527FE4', padding: 5}}>
<Text style={{fontSize: 11}}>
Blue background
</Text>
</View>
);
},
}, {
title: 'Border',
render: function() {
return (
<View style={{borderColor: '#527FE4', borderWidth: 5, padding: 10}}>
<Text style={{fontSize: 11}}>5px blue border</Text>
</View>
);
},
}, {
title: 'Padding/Margin',
render: function() {
return (
<View style={{borderColor: '#bb0000', borderWidth: 0.5}}>
<View style={[styles.box, {padding: 5}]}>
<Text style={{fontSize: 11}}>5px padding</Text>
</View>
<View style={[styles.box, {margin: 5}]}>
<Text style={{fontSize: 11}}>5px margin</Text>
</View>
<View style={[styles.box, {margin: 5, padding: 5, alignSelf: 'flex-start'}]}>
<Text style={{fontSize: 11}}>
5px margin and padding,
</Text>
<Text style={{fontSize: 11}}>
widthAutonomous=true
</Text>
</View>
</View>
);
},
}, {
title: 'Border Radius',
render: function() {
return (
<View style={{borderWidth: 0.5, borderRadius: 5, padding: 5}}>
<Text style={{fontSize: 11}}>
Too much use of `borderRadius` (especially large radii) on
anything which is scrolling may result in dropped frames.
Use sparingly.
</Text>
</View>
);
},
}, {
title: 'Circle with Border Radius',
render: function() {
return (
<View style={{borderRadius: 10, borderWidth: 1, width: 20, height: 20}} />
);
},
}, {
title: 'Overflow',
render: function() {
return (
<View style={{flexDirection: 'row'}}>
<View
style={{
width: 95,
height: 10,
marginRight: 10,
marginBottom: 5,
overflow: 'hidden',
borderWidth: 0.5,
}}>
<View style={{width: 200, height: 20}}>
<Text>Overflow hidden</Text>
</View>
</View>
<View style={{width: 95, height: 10, marginBottom: 5, borderWidth: 0.5}}>
<View style={{width: 200, height: 20}}>
<Text>Overflow visible</Text>
</View>
</View>
</View>
);
},
}, {
title: 'Opacity',
render: function() {
return (
<View>
<View style={{opacity: 0}}><Text>Opacity 0</Text></View>
<View style={{opacity: 0.1}}><Text>Opacity 0.1</Text></View>
<View style={{opacity: 0.3}}><Text>Opacity 0.3</Text></View>
<View style={{opacity: 0.5}}><Text>Opacity 0.5</Text></View>
<View style={{opacity: 0.7}}><Text>Opacity 0.7</Text></View>
<View style={{opacity: 0.9}}><Text>Opacity 0.9</Text></View>
<View style={{opacity: 1}}><Text>Opacity 1</Text></View>
</View>
);
},
},
];
工具
automaticallyAdjustContentInset 布尔型
contentInset {top: number, left: number, bottom: number, right: number}
html 字符串型
onNavigationStateChange 函数
renderError 函数
renderLoading 函数
shouldInjectAJAXHandler 布尔型
startInLoadingState 布尔型
style View#style
url 字符串型
例子
[Edit on GitHub](Edit on GitHub)
'use strict';
var React = require('react-native');
var StyleSheet = require('StyleSheet');
var {
StyleSheet,
Text,
TextInput,
TouchableOpacity,
View,
WebView
} = React;
var HEADER = '#3b5998';
var BGWASH = 'rgba(255,255,255,0.8)';
var DISABLED_WASH = 'rgba(255,255,255,0.25)';
var TEXT_INPUT_REF = 'urlInput';
var WEBVIEW_REF = 'webview';
var DEFAULT_URL = 'https://m.facebook.com';
var WebViewExample = React.createClass({
getInitialState: function() {
return {
url: DEFAULT_URL,
status: 'No Page Loaded',
backButtonEnabled: false,
forwardButtonEnabled: false,
loading: true,
};
},
inputText: '',
handleTextInputChange: function(event) {
this.inputText = event.nativeEvent.text;
},
render: function() {
this.inputText = this.state.url;
return (
<View style={[styles.container]}>
<View style={[styles.addressBarRow]}>
<TouchableOpacity onPress={this.goBack}>
<View style={this.state.backButtonEnabled ? styles.navButton : styles.disabledButton}>
<Text>
{'<'}
</Text>
</View>
</TouchableOpacity>
<TouchableOpacity onPress={this.goForward}>
<View style={this.state.forwardButtonEnabled ? styles.navButton : styles.disabledButton}>
<Text>
{'>'}
</Text>
</View>
</TouchableOpacity>
<TextInput
ref={TEXT_INPUT_REF}
autoCapitalize="none"
value={this.state.url}
onSubmitEditing={this.onSubmitEditing}
onChange={this.handleTextInputChange}
clearButtonMode="while-editing"
style={styles.addressBarTextInput}
/>
<TouchableOpacity onPress={this.pressGoButton}>
<View style={styles.goButton}>
<Text>
Go!
</Text>
</View>
</TouchableOpacity>
</View>
<WebView
ref={WEBVIEW_REF}
automaticallyAdjustContentInsets={false}
style={styles.webView}
url={this.state.url}
onNavigationStateChange={this.onNavigationStateChange}
startInLoadingState={true}
/>
<View style={styles.statusBar}>
<Text style={styles.statusBarText}>{this.state.status}</Text>
</View>
</View>
);
},
goBack: function() {
this.refs[WEBVIEW_REF].goBack();
},
goForward: function() {
this.refs[WEBVIEW_REF].goForward();
},
reload: function() {
this.refs[WEBVIEW_REF].reload();
},
onNavigationStateChange: function(navState) {
this.setState({
backButtonEnabled: navState.canGoBack,
forwardButtonEnabled: navState.canGoForward,
url: navState.url,
status: navState.title,
loading: navState.loading,
});
},
onSubmitEditing: function(event) {
this.pressGoButton();
},
pressGoButton: function() {
var url = this.inputText.toLowerCase();
if (url === this.state.url) {
this.reload();
} else {
this.setState({
url: url,
});
}
// dismiss keyoard
this.refs[TEXT_INPUT_REF].blur();
},
});
var styles = StyleSheet.create({
container: {
flex: 1,
backgroundColor: HEADER,
},
addressBarRow: {
flexDirection: 'row',
padding: 8,
},
webView: {
backgroundColor: BGWASH,
height: 350,
},
addressBarTextInput: {
backgroundColor: BGWASH,
borderColor: 'transparent',
borderRadius: 3,
borderWidth: 1,
height: 24,
paddingLeft: 10,
paddingTop: 3,
paddingBottom: 3,
flex: 1,
fontSize: 14,
},
navButton: {
width: 20,
padding: 3,
marginRight: 3,
alignItems: 'center',
justifyContent: 'center',
backgroundColor: BGWASH,
borderColor: 'transparent',
borderRadius: 3,
},
disabledButton: {
width: 20,
padding: 3,
marginRight: 3,
alignItems: 'center',
justifyContent: 'center',
backgroundColor: DISABLED_WASH,
borderColor: 'transparent',
borderRadius: 3,
},
goButton: {
height: 24,
padding: 3,
marginLeft: 8,
alignItems: 'center',
backgroundColor: BGWASH,
borderColor: 'transparent',
borderRadius: 3,
alignSelf: 'stretch',
},
statusBar: {
flexDirection: 'row',
alignItems: 'center',
paddingLeft: 5,
height: 22,
},
statusBarText: {
color: 'white',
fontSize: 13,
},
spinner: {
width: 20,
marginRight: 6,
},
});
exports.title = '<WebView>';
exports.description = 'Base component to display web content';
exports.examples = [
{
title: 'WebView',
render(): ReactElement { return <WebViewExample />; }
}
];
5
APIs
利用一个特定的标题和消息来启动一个警告对话框。
提供一个可选按钮的列表。点击任何按钮触发各自的按下回调动作,并且忽略警告。在默认情况下,只有一个按钮是“OK”按钮。列表中最后一个按钮被视为“主”按钮,它被用粗体显示出来了。
AlertIOS.alert(
'Foo Title',
'My Alert Msg',
[
{text: 'Foo', onPress: () => console.log('Foo Pressed!')},
{text: 'Bar', onPress: () => console.log('Bar Pressed!')},
]
)}
方法
static alert(title: string, message?: string, buttons?: Array<{ text: ?string; onPress: ?Function; }>)
例子
'use strict';
var React = require('react-native');
var {
StyleSheet,
View,
Text,
TouchableHighlight,
AlertIOS,
} = React;
exports.framework = 'React';
exports.title = 'AlertIOS';
exports.description = 'iOS alerts and action sheets';
exports.examples = [{
title: 'Alerts',
render() {
return (
<View>
<TouchableHighlight style={styles.wrapper}
onPress={() => AlertIOS.alert(
'Foo Title',
'My Alert Msg'
)}>
<View style={styles.button}>
<Text>Alert with message and default button</Text>
</View>
</TouchableHighlight>
<TouchableHighlight style={styles.wrapper}
onPress={() => AlertIOS.alert(
null,
null,
[
{text: 'Button', onPress: () => console.log('Button Pressed!')},
]
)}>
<View style={styles.button}>
<Text>Alert with only one button</Text>
</View>
</TouchableHighlight>
<TouchableHighlight style={styles.wrapper}
onPress={() => AlertIOS.alert(
'Foo Title',
'My Alert Msg',
[
{text: 'Foo', onPress: () => console.log('Foo Pressed!')},
{text: 'Bar', onPress: () => console.log('Bar Pressed!')},
]
)}>
<View style={styles.button}>
<Text>Alert with two buttons</Text>
</View>
</TouchableHighlight>
<TouchableHighlight style={styles.wrapper}
onPress={() => AlertIOS.alert(
'Foo Title',
null,
[
{text: 'Foo', onPress: () => console.log('Foo Pressed!')},
{text: 'Bar', onPress: () => console.log('Bar Pressed!')},
{text: 'Baz', onPress: () => console.log('Baz Pressed!')},
]
)}>
<View style={styles.button}>
<Text>Alert with 3 buttons</Text>
</View>
</TouchableHighlight>
<TouchableHighlight style={styles.wrapper}
onPress={() => AlertIOS.alert(
'Foo Title',
'My Alert Msg',
'..............'.split('').map((dot, index) => ({
text: 'Button ' + index,
onPress: () => console.log('Pressed ' + index)
}))
)}>
<View style={styles.button}>
<Text>Alert with too many buttons</Text>
</View>
</TouchableHighlight>
</View>
);
},
}];
var styles = StyleSheet.create({
wrapper: {
borderRadius: 5,
marginBottom: 5,
},
button: {
backgroundColor: '#eeeeee',
padding: 10,
},
});
AppRegistry
是运行所有 React Native 应用程序的 JS 入口点。应用程序跟组件需要通过 AppRegistry.registerComponent
来注册它们自身,然后本地系统就可以加载应用程序的包,再然后当 AppRegistry.runApplication
准备就绪后就可以真正的运行该应用程序了。
AppRegistry
在 require
序列里是 required
,确保在其他模块被需求之前 JS 执行环境已经被 required
。
方法
static **registerConfig**(config: Array<AppConfig>)
static **registerComponent**(appKey: string, getComponentFunc: Function)
static **registerRunnable**(appKey: string, func: Function)
static **runApplication**(appKey: string, appParameters: any)
AppStateIOS
可以告诉你应用程序是在前台还是在后台,而且状态更新时会通知你。 在处理推送通知时,AppStateIOS 经常被用于判断目标和适当的行为。
iOS 应用程序状态
- Active - 应用程序在前台运行
- Background - 应用程序在后台运行。用户正在使用另一个应用程序或者在主屏幕上。
- Inactive - 这是一种过渡状态,目前不会在React Native的应用程序上发生。
想要获取更多的信息,见 Apple's documentation
基本用法
为了查看当前的状态,你可以检查 AppStateIOS.currentState
,该方法会一直保持最新状态。然而,当 AppStateIOS
在桥接器上检索currentState
时,在启动时它将会为空。
getInitialState: function() {
return {
currentAppState: AppStateIOS.currentState,
};
},
componentDidMount: function() {
AppStateIOS.addEventListener('change', this._handleAppStateChange);
},
componentWillUnmount: function() {
AppStateIOS.removeEventListener('change', this._handleAppStateChange);
},
_handleAppStateChange: function(currentAppState) {
this.setState({ currentAppState, });
},
render: function() {
return (
<Text>Current state is: {this.state.currentAppState}</Text>
);
},
这个例子似乎只能说"当前状态是:活跃的"因为在 active
状态时,应用程序只对用户是可见的,空状态只能是暂时的。
方法
static addEventListener(type: string, handler: Function)
通过监听 change
事件类型和提供处理程序,为应用程序状态变化添加一个处理程序。
static removeEventListener(type: string, handler: Function)
通过传递 change
事件类型和处理程序,删除一个处理程序。
例子
'use strict';
var React = require('react-native');
var {
AppStateIOS,
Text,
View
} = React;
var AppStateSubscription = React.createClass({
getInitialState() {
return {
appState: AppStateIOS.currentState,
previousAppStates: [],
};
},
componentDidMount: function() {
AppStateIOS.addEventListener('change', this._handleAppStateChange);
},
componentWillUnmount: function() {
AppStateIOS.removeEventListener('change', this._handleAppStateChange);
},
_handleAppStateChange: function(appState) {
var previousAppStates = this.state.previousAppStates.slice();
previousAppStates.push(this.state.appState);
this.setState({
appState,
previousAppStates,
});
},
render() {
if (this.props.showCurrentOnly) {
return (
<View>
<Text>{this.state.appState}</Text>
</View>
);
}
return (
<View>
<Text>{JSON.stringify(this.state.previousAppStates)}</Text>
</View>
);
}
});
exports.title = 'AppStateIOS';
exports.description = 'iOS app background status';
exports.examples = [
{
title: 'AppStateIOS.currentState',
description: 'Can be null on app initialization',
render() { return <Text>{AppStateIOS.currentState}</Text>; }
},
{
title: 'Subscribed AppStateIOS:',
description: 'This changes according to the current state, so you can only ever see it rendered as "active"',
render(): ReactElement { return <AppStateSubscription showCurrentOnly={true} />; }
},
{
title: 'Previous states:',
render(): ReactElement { return <AppStateSubscription showCurrentOnly={false} />; }
},
];
异步存储是一个简单的、异步的、持久的、全局的、键-值存储系统。它应该会代替本地存储被使用。
由于异步存储是全局性的,建议您在异步存储之上使用抽象体,而不是对任何轻微用法直接使用异步存储。
在本地 iOS 实现上 JS 代码是一个简单的外观模式,用来提供一个清晰的 JS API,真正的错误对象,和简单的非多元化功能。每个方法返回一个 Promise
对象。
方法
static **getItem**(key: string, callback: (error: ?Error, result: ?string) => void)
如果有任何一个错误,获取 key
并传递 callback
的结果,返回一个 Promise
对象。
static **setItem**(key: string, value: string, callback: ?(error: ?Error) => void)
如果有任何一个错误,获取 key
并在结束时调用 callback
函数,返回一个 Promise
对象。
static **removeItem**(key: string, callback: ?(error: ?Error) => void)
返回一个 Promise
对象。
static **mergeItem**(key: string, value: string, callback: ?(error: ?Error) => void)
将现有值与输入值进行合并,假设它们是 stringified json,返回一个 Promise
对象。
所有本地实现不支持。
static **clear**(callback: ?(error: ?Error) => void)
为所有客户、函数库等清除所有的异步存储。你可能不想调用这个-使用 removeItem 或者 multiRemove 来清除只属于你的键值。返回一个 Promise
对象。
static **getAllKeys**(callback: (error: ?Error) => void)
为调用者、函数库等获取系统已知的所有键值。返回一个 Promise
对象。
static **multiGet**(keys: Array<string>, callback: (errors: ?Array<Error>, result: ?Array<Array<string>>) => void)
multiGet利用一个键值对的数组调用回调函数来获取multiSet的输入格式。返回一个 `Promise` 对象。
multiGet(['k1', 'k2'], cb) -> cb([['k1', 'val1'], ['k2', 'val2']])
static **multiSet**(keyValuePairs: Array<Array<string>>, callback: ?(errors: ?Array<Error>) => void)
multiSet 和 multiMerge 利用键值对的数组匹配multiGet的输出。返回一个 Promise
对象。例如,
multiSet([['k1', 'val1'], ['k2', 'val2']], cb);
static **multiRemove**(keys: Array<string>, callback: ?(errors: ?Array<Error>) => void)
删除键值数组中所有的键值。返回一个 Promise
对象。
static **multiMerge**(keyValuePairs: Array<Array<string>>, callback: ?(errors: ?Array<Error>) => void)
将现有值与输入值进行合并,假设它们是 stringified json,返回一个 Promise
对象。
所有本地实现不支持。
例子
'use strict';
var React = require('react-native');
var {
AsyncStorage,
PickerIOS,
Text,
View
} = React;
var PickerItemIOS = PickerIOS.Item;
var STORAGE_KEY = '@AsyncStorageExample:key';
var COLORS = ['red', 'orange', 'yellow', 'green', 'blue'];
var BasicStorageExample = React.createClass({
componentDidMount() {
AsyncStorage.getItem(STORAGE_KEY)
.then((value) => {
if (value !== null){
this.setState({selectedValue: value});
this._appendMessage('Recovered selection from disk: ' + value);
} else {
this._appendMessage('Initialized with no selection on disk.');
}
})
.catch((error) => this._appendMessage('AsyncStorage error: ' + error.message))
.done();
},
getInitialState() {
return {
selectedValue: COLORS[0],
messages: [],
};
},
render() {
var color = this.state.selectedValue;
return (
<View>
<PickerIOS
selectedValue={color}
onValueChange={this._onValueChange}>
{COLORS.map((value) => (
<PickerItemIOS
key={value}
value={value}
label={value}
/>
))}
</PickerIOS>
<Text>
{'Selected: '}
<Text style={{color}}>
{this.state.selectedValue}
</Text>
</Text>
<Text>{' '}</Text>
<Text onPress={this._removeStorage}>
Press here to remove from storage.
</Text>
<Text>{' '}</Text>
<Text>Messages:</Text>
{this.state.messages.map((m) => <Text>{m}</Text>)}
</View>
);
},
_onValueChange(selectedValue) {
this.setState({selectedValue});
AsyncStorage.setItem(STORAGE_KEY, selectedValue)
.then(() => this._appendMessage('Saved selection to disk: ' + selectedValue))
.catch((error) => this._appendMessage('AsyncStorage error: ' + error.message))
.done();
},
_removeStorage() {
AsyncStorage.removeItem(STORAGE_KEY)
.then(() => this._appendMessage('Selection removed from disk.'))
.catch((error) => { this._appendMessage('AsyncStorage error: ' + error.message) })
.done();
},
_appendMessage(message) {
this.setState({messages: this.state.messages.concat(message)});
},
});
exports.title = 'AsyncStorage';
exports.description = 'Asynchronous local disk storage.';
exports.examples = [
{
title: 'Basics - getItem, setItem, removeItem',
render(): ReactElement { return <BasicStorageExample />; }
},
];
方法
static exitApp()
static addEventListener(eventName: BackPressEventName, handler: Function)
static removeEventListener(eventName: BackPressEventName, handler: Function)
保留所有版权。
源代码是在 BSD-style 许可下经过许可的,是在源代码树的根目录下的 LICENSE 文件里找到的。额外授予的专利权可以在同目录下的 PATENTS 文件里找到。
@flow
方法
static saveImageWithTag(tag: string, successCallback, errorCallback)
利用tag标签保存图像到相机相册。
@param {string} tag - 可以是我们所接受的三种标签中的任意一个:1、url 2、assets-library 标签 3、存储一个图像的内存中返回的标签
static getPhotos(params: object, callback: function, errorCallback: function)
利用来自设备中的本地相机相册的图片识别对象来调用 callback
函数,通过 getPhotosReturnChecker
来定义匹配类型。
@param {object} params -见 getPhotosParamChecker
。@param {function} callback -通过 getPhotosReturnChecker
定义自变量的类型调用成功。@param {function} errorCallback - 通过错误消息调用失败。
例子
'use strict';
var React = require('react-native');
var {
CameraRoll,
Image,
SliderIOS,
StyleSheet,
SwitchIOS,
Text,
View,
} = React;
var CameraRollView = require('./CameraRollView.ios');
var CAMERA_ROLL_VIEW = 'camera_roll_view';
var CameraRollExample = React.createClass({
getInitialState() {
return {
groupTypes: 'SavedPhotos',
sliderValue: 1,
bigImages: true,
};
},
render() {
return (
<View>
<SwitchIOS
onValueChange={this._onSwitchChange}
value={this.state.bigImages} />
<Text>{(this.state.bigImages ? 'Big' : 'Small') + ' Images'}</Text>
<SliderIOS
value={this.state.sliderValue}
onValueChange={this._onSliderChange}
/>
<Text>{'Group Type: ' + this.state.groupTypes}</Text>
<CameraRollView
ref={CAMERA_ROLL_VIEW}
batchSize={5}
groupTypes={this.state.groupTypes}
renderImage={this._renderImage}
/>
</View>
);
},
_renderImage(asset) {
var imageSize = this.state.bigImages ? 150 : 75;
var imageStyle = [styles.image, {width: imageSize, height: imageSize}];
var location = asset.node.location.longitude ?
JSON.stringify(asset.node.location) : 'Unknown location';
return (
<View key={asset} style={styles.row}>
<Image
source={asset.node.image}
style={imageStyle}
/>
<View style={styles.info}>
<Text style={styles.url}>{asset.node.image.uri}</Text>
<Text>{location}</Text>
<Text>{asset.node.group_name}</Text>
<Text>{new Date(asset.node.timestamp).toString()}</Text>
</View>
</View>
);
},
_onSliderChange(value) {
var options = CameraRoll.GroupTypesOptions;
var index = Math.floor(value * options.length * 0.99);
var groupTypes = options[index];
if (groupTypes !== this.state.groupTypes) {
this.setState({groupTypes: groupTypes});
}
},
_onSwitchChange(value) {
this.refs[CAMERA_ROLL_VIEW].rendererChanged();
this.setState({ bigImages: value });
}
});
var styles = StyleSheet.create({
row: {
flexDirection: 'row',
flex: 1,
},
url: {
fontSize: 9,
marginBottom: 14,
},
image: {
margin: 4,
},
info: {
flex: 1,
},
});
exports.title = '<CameraRollView>';
exports.description = 'Example component that uses CameraRoll to list user\'s photos';
exports.examples = [
{
title: 'Photos',
render(): ReactElement { return <CameraRollExample />; }
}
];
交互管理器在任意交互/动画完成之后,允许安排长期的运行工作。特别是,这允许 JavaScript 动画可以顺利的运行。
应用程序可以在交互完成之后根据以下代码来安排运行任务:
InteractionManager.runAfterInteractions(() => {
// ...long-running synchronous task...
});
与其他调度方案进行比较:
- requestAnimationFrame():代码是动画在时间上的一个视图
- setImmediate/setTimeout():运行代码后,请注意这有可能会延迟动画
- runAfterInteractions(): 运行代码后,没有延迟的动态动画
触发处理系统将一个或者多个动态触发看成是一个“交互”,并且将推迟 runAfterInteractions()
回调直到所有的触发都已经结束或者被取消了。
交互管理器还允许应用程序通过创建一个“处理”动画的开端来注册动画,结束之后进行清除:
var handle = InteractionManager.createInteractionHandle();
// run animation... (`runAfterInteractions` tasks are queued)
// later, on animation completion:
InteractionManager.clearInteractionHandle(handle);
// queued tasks run if all handles were cleared
方法
static runAfterInteractions(callback: Function)
在所有交互都完成之后安排一个函数来运行。
static createInteractionHandle()
通知管理器已经启动了一个交互。
static clearInteractionHandle(handle: number)
通知管理器一个交互动作已经完成了。
保留所有版权。
源代码是在 BSD-style 许可下经过许可的,是在源代码树的根目录下的 LICENSE 文件里找到的。额外授予的专利权可以在同目录下的 PATENTS 文件里找到。
@flow
方法
static configureNext(config: Config, onAnimationDidEnd?: Function, onError?: Function)
static create(duration: number, type, creationProp)
LinkingIOS
给你提供了一个通用接口,用来连接接收和发送应用程序的链接。
基本用法
处理深度链接
如果你的应用程序是从一个外部链接启动的,并且这个外部链接是注册到你的应用程序里的,那么你就可以利用任意你想要的组件去访问并且处理它
componentDidMount() {
var url = LinkingIOS.popInitialURL();
}
在你的应用程序运行期间,如果你也想监听传入应用程序的链接,那么你需要将以下几行添加到你的 *AppDelegate.m
:
- (BOOL)application:(UIApplication *)application openURL:(NSURL *)url sourceApplication:(NSString *)sourceApplication annotation:(id)annotation {
return [RCTLinkingManager application:application openURL:url sourceApplication:sourceApplication annotation:annotation];
}
那么,在你的 React 组件中,你可以监听 LinkingIOS
上的事件,如下所示:
componentDidMount() {
LinkingIOS.addEventListener('url', this._handleOpenURL);
},
componentWillUnmount() {
LinkingIOS.removeEventListener('url', this._handleOpenURL);
},
_handleOpenURL(event) {
console.log(event.url);
}
触发应用程序链接
为了触发一个应用程序的链接(浏览器,电子邮件,或者自定义模式),你需要调用
LinkingIOS.openURL(url)
如果你想要检查一个已经安装的应用程序是否可以提前处理一个给定的链接,你可以调用
LinkingIOS.canOpenURL(url, (supported) => {
if (!supported) {
AlertIOS.alert('Can\'t handle url: ' + url);
} else {
LinkingIOS.openURL(url);
}
});
方法
static addEventListener(type: string, handler: Function)
通过监听 url
事件类型和提供处理程序,将一个处理程序添加到 LinkingIOS changes
static removeEventListener(type: string, handler: Function)
通过传递 url
事件类型和处理程序,删除一个处理程序
static openURL(url: string)
尝试通过任意已经安装的应用程序打开给定的 url
static canOpenURL(url: string, callback: Function)
决定一个已经安装的应用程序是否可以处理一个给定的 url
,该方法中回调函数将被调用,并且仅通过一个 bool supported
的参数。
static popInitialURL()
如果应用程序启动是通过一个应用程序链接触发的,那么它将弹出这个链接的 url,否则它将返回 null
。
网络信息公开在线或者离线信息
reachabilityIOS
异步确定设备是否处于在线状态并且在蜂窝网络。
- None - 设备处于离线状态
- WiFi - 设备处于在线状态,并且通过 WiFi 或者是 iOS 模拟器连接
- Cell - 设备通过网络连接,3G,WiMax,或者 LTE 进行连接
- Unknown - 错误情况,并且网络状态未知
NetInfo.reachabilityIOS.fetch().done((reach) => {
console.log('Initial: ' + reach);
});
function handleFirstReachabilityChange(reach) {
console.log('First change: ' + reach);
NetInfo.reachabilityIOS.removeEventListener(
'change',
handleFirstReachabilityChange
);
}
NetInfo.reachabilityIOS.addEventListener(
'change',
handleFirstReachabilityChange
);
连接状态
在所有的平台上都可用。异步获取一个布尔值来确定网络连接。
NetInfo.isConnected.fetch().done((isConnected) => {
console.log('First, is ' + (isConnected ? 'online' : 'offline'));
});
function handleFirstConnectivityChange(isConnected) {
console.log('Then, is ' + (isConnected ? 'online' : 'offline'));
NetInfo.isConnected.removeEventListener(
'change',
handleFirstConnectivityChange
);
}
NetInfo.isConnected.addEventListener(
'change',
handleFirstConnectivityChange
);
例子
'use strict';
var React = require('react-native');
var {
NetInfo,
Text,
View
} = React;
var ReachabilitySubscription = React.createClass({
getInitialState() {
return {
reachabilityHistory: [],
};
},
componentDidMount: function() {
NetInfo.reachabilityIOS.addEventListener(
'change',
this._handleReachabilityChange
);
},
componentWillUnmount: function() {
NetInfo.reachabilityIOS.removeEventListener(
'change',
this._handleReachabilityChange
);
},
_handleReachabilityChange: function(reachability) {
var reachabilityHistory = this.state.reachabilityHistory.slice();
reachabilityHistory.push(reachability);
this.setState({
reachabilityHistory,
});
},
render() {
return (
<View>
<Text>{JSON.stringify(this.state.reachabilityHistory)}</Text>
</View>
);
}
});
var ReachabilityCurrent = React.createClass({
getInitialState() {
return {
reachability: null,
};
},
componentDidMount: function() {
NetInfo.reachabilityIOS.addEventListener(
'change',
this._handleReachabilityChange
);
NetInfo.reachabilityIOS.fetch().done(
(reachability) => { this.setState({reachability}); }
);
},
componentWillUnmount: function() {
NetInfo.reachabilityIOS.removeEventListener(
'change',
this._handleReachabilityChange
);
},
_handleReachabilityChange: function(reachability) {
this.setState({
reachability,
});
},
render() {
return (
<View>
<Text>{this.state.reachability}</Text>
</View>
);
}
});
var IsConnected = React.createClass({
getInitialState() {
return {
isConnected: null,
};
},
componentDidMount: function() {
NetInfo.isConnected.addEventListener(
'change',
this._handleConnectivityChange
);
NetInfo.isConnected.fetch().done(
(isConnected) => { this.setState({isConnected}); }
);
},
componentWillUnmount: function() {
NetInfo.isConnected.removeEventListener(
'change',
this._handleConnectivityChange
);
},
_handleConnectivityChange: function(isConnected) {
this.setState({
isConnected,
});
},
render() {
return (
<View>
<Text>{this.state.isConnected ? 'Online' : 'Offline'}</Text>
</View>
);
}
});
exports.title = 'NetInfo';
exports.description = 'Monitor network status';
exports.examples = [
{
title: 'NetInfo.isConnected',
description: 'Asyncronously load and observe connectivity',
render(): ReactElement { return <IsConnected />; }
},
{
title: 'NetInfo.reachabilityIOS',
description: 'Asyncronously load and observe iOS reachability',
render(): ReactElement { return <ReachabilityCurrent />; }
},
{
title: 'NetInfo.reachabilityIOS',
description: 'Observed updates to iOS reachability',
render(): ReactElement { return <ReachabilitySubscription />; }
},
];
PanResponder
将几个触发调节成一个单一的触发动作。该方法可以使单一触发动作对额外的触发具有弹性,可以用来识别简单的多点触发动作。
它为响应处理程序提供了一个可预测包,这个相应处理程序是由动作应答系统提供的。对每一个处理程序,在正常事件旁提供了一个新的 gestureState
对象。 一个 gestureState
对象有以下属性:
- stateID
-gestureState 的ID-在屏幕上保持至少一个触发动作的时间 - moveX
-最近动态触发的最新的屏幕坐标 - x0
-应答器横向的屏幕坐标 - y0
-应答器纵向的屏幕坐标 - dx
-触发开始后累积的横向动作距离 - dy
-触发开始后累积的纵向动作距离 - vx
-当前手势的横向速度 - vy
-当前手势的纵向速度 - numberActiveTouch
-屏幕上当前触发的数量
基本用法
componentWillMount: function() {
this._panGesture = PanResponder.create({
// Ask to be the responder:
onStartShouldSetPanResponder: (evt, gestureState) => true,
onStartShouldSetPanResponderCapture: (evt, gestureState) => true,
onMoveShouldSetPanResponder: (evt, gestureState) => true,
onMoveShouldSetPanResponderCapture: (evt, gestureState) => true,
onPanResponderGrant: (evt, gestureState) => {
// The guesture has started. Show visual feedback so the user knows
// what is happening!
// gestureState.{x,y}0 will be set to zero now
},
onPanResponderMove: (evt, gestureState) => {
// The most recent move distance is gestureState.move{X,Y}
// The accumulated gesture distance since becoming responder is
// gestureState.d{x,y}
},
onResponderTerminationRequest: (evt, gestureState) => true,
onPanResponderRelease: (evt, gestureState) => {
// The user has released all touches while this view is the
// responder. This typically means a gesture has succeeded
},
onPanResponderTerminate: (evt, gestureState) => {
// Another component has become the responder, so this gesture
// should be cancelled
},
});
},
render: function() {
return (
<View {...this._panResponder.panHandlers} />
);
},
工程实例
想要查看它的实际应用,尝试 PanResponder example in UIExplorer。
方法
static create(config: object)
@param {object} 所有应答器回调配置的增强版本,应答器回调不仅可以提供典型的 ResponderSyntheticEvent
,还可以提供 PanResponder
动作状态。在每一个典型的 onResponder*
回调中,用 PanResponder
对 Responder
做简单的替换。例如, config
对象可能看起来像如下形式:
- onMoveShouldSetPanResponder: (e, gestureState) => {...}
- onMoveShouldSetPanResponderCapture: (e, gestureState) => {...}
- onStartShouldSetPanResponder: (e, gestureState) => {...}
- onStartShouldSetPanResponderCapture: (e, gestureState) => {...}
- onPanResponderReject: (e, gestureState) => {...}
- onPanResponderGrant: (e, gestureState) => {...}
- onPanResponderStart: (e, gestureState) => {...}
- onPanResponderEnd: (e, gestureState) => {...}
- onPanResponderRelease: (e, gestureState) => {...}
- onPanResponderMove: (e, gestureState) => {...}
- onPanResponderTerminate: (e, gestureState) => {...}
- onPanResponderTerminationRequest: (e, gestureState) => {...}
一般来说,对于那些捕获的等价事件,我们在捕获阶段更新一次 gestureState ,并且也可以在冒泡阶段使用。
在 onStartShould* 回调时需要注意一点。在对节点的捕获/冒泡阶段的开始/结束事件中,它们只对更新后的 gestureState
做出反应。一旦节点成为应答器,你可以依靠每一个被动作和 gestureState
处理后相应更新的开始/结束事件。 (numberActiveTouches) 可能不完全准确,除非你是应答器。
PixelRatio 类为像素密度设备提供了访问权。
这里有一些使用 PixelRatio 的用例:
显示一条和设备许可一样细的线
宽度 1 实际上相当于 iPhone4+ 的厚度,我们可以使用设定宽度为 1 / PixelRatio.get()
的函数来实现。这是一项独立于像素密度的应用在所有设备上的技术。
style={{ borderWidth: 1 / PixelRatio.get() }}
获取一个正确大小的图像
如果你使用的是一台像素密度比较高的设备上,那你应该得到一个更高分辨率的图像。一个好的经验法则是在 pixel ratio 上显示多种图像的尺寸。
var image = getImage({
width: 200 * PixelRatio.get(),
height: 100 * PixelRatio.get()
});
<Image source={image} style={{width: 200, height: 100}} />
方法
static get()
返回设备的像素密度。一些例子:
- PixelRatio.get() === 2
- iPhone 4, 4S
- iPhone 5, 5c, 5s
- iPhone 6
- PixelRatio.get() === 3
- iPhone 6 plus
产品描述
[Edit on GitHubhref="https://github.com/facebook/react-native/blob/master/docs/PixelRatio.md")
像素网格拍摄
在 iOS 里,你可以为元素指定有任意精度的位置和尺寸,例如29.674825。但是,最终的物理显示就只有一个固定的像素值,例如在 iPhone4 上是 640960,或者在 iPhone6 上是 7501334。iOS 试图通过将一个原始的像素扩展成多个值得方法,看似是尽可能忠实于用户的体验价值,实际上是欺骗了众人的眼睛。这项技术的缺点是使得生成的元素看起来很模糊。
实际上,我们发现开发人员并不需要这项功能,但是为了避免生成模糊的像素,他们不得不对它进行手动舍入操作。在 React Native 里,我们都是自动对这些元素进行舍入。
在进行舍入时,我们必须相当的小心。你永远不希望在同一时间使用正常值和四舍五入的值,那就好像你正在不断的积累舍入误差。甚至一个舍入误差会造成致命性的错误,因为一个像素边界可能会消失或者变成两倍那么大。
在 React Native 里,在JS和布局引擎里的一切值都是以一个任意精度的数来进行工作的。这只会发生在当在为主线程里我们进行舍入的原生元素设定任意位置和尺寸的时候。同时,舍入操作是针对根而不是父母完成的,这又一次避免了累积舍入误差。
为你的应用程序处理推送通知,包括权限的处理和图标标记数量。
为了启动和运行,在Apple上配置您的通知 和服务器端系统。为了得到一个想法,这里是 解析指南。
方法
static setApplicationIconBadgeNumber(number: number)
在主屏幕上为应用程序的图标设置标记数量
static getApplicationIconBadgeNumber(callback: Function)
在主屏幕上为应用程序的图标获取当前的标记数量
static addEventListener(type: string, handler: Function)
当应用程序在前台或者后台运行的时候,为了远程通知链接一个监听器。
处理程序将会以一个 PushNotificationIOS
的实例的形式被调用
static requestPermissions()
从iOS上请求所有的通知权限,提示用户对话框
static checkPermissions(callback: Function)
查看当前正被启用的推送权限。Callback
函数将被一个 permission
的对象调用:
- alert :boolean
- badge :boolean
- sound :boolean
static removeEventListener(type: string, handler: Function)
删除事件监听器。为了防止内存泄露,该操作在 componentWillUnmount
里完成。
static popInitialNotification()
如果应用程序从一个通知被冷发射,那么一个原始通知将变成可用状态。 popInitialNotification
的第一个调用者将获取最初的通知对象,或者为 null
。后续的调用将返回 null。
constructor(nativeNotif)
你自己可能永远都不需要 instansiate PushNotificationIOS
。你只需要监听 notification
事件并且调用 popInitialNotification
就足够了。
getMessage()
getAlert
的一个别名,该函数是为了获取通知的主要消息字符串
getSound()
从 aps
对象中获取声音字符串
getAlert()
从 aps
对象中获取通知的主要消息字符串
getBadgeCount()
从 aps
对象中获取标记数量
getData()
在通知上获取数据对象
例子
'use strict';
var React = require('react-native');
var {
AlertIOS,
PushNotificationIOS,
StyleSheet,
Text,
TouchableHighlight,
View,
} = React;
var Button = React.createClass({
render: function() {
return (
<TouchableHighlight
underlayColor={'white'}
style={styles.button}
onPress={this.props.onPress}>
<Text style={styles.buttonLabel}>
{this.props.label}
</Text>
</TouchableHighlight>
);
}
});
class NotificationExample extends React.Component {
componentWillMount() {
PushNotificationIOS.addEventListener('notification', this._onNotification);
}
componentWillUnmount() {
PushNotificationIOS.removeEventListener('notification', this._onNotification);
}
render() {
return (
<View>
<Button
onPress={this._sendNotification}
label="Send fake notification"
/>
</View>
);
}
_sendNotification() {
require('RCTDeviceEventEmitter').emit('remoteNotificationReceived', {
aps: {
alert: 'Sample notification',
badge: '+1',
sound: 'default',
category: 'REACT_NATIVE'
},
});
}
_onNotification(notification) {
AlertIOS.alert(
'Notification Received',
'Alert message: ' + notification.getMessage(),
[{
text: 'Dismiss',
onPress: null,
}]
);
}
}
class NotificationPermissionExample extends React.Component {
constructor(props) {
super(props);
this.state = {permissions: null};
}
render() {
return (
<View>
<Button
onPress={this._showPermissions.bind(this)}
label="Show enabled permissions"
/>
<Text>
{JSON.stringify(this.state.permissions)}
</Text>
</View>
);
}
_showPermissions() {
PushNotificationIOS.checkPermissions((permissions) => {
this.setState({permissions});
});
}
}
var styles = StyleSheet.create({
button: {
padding: 10,
alignItems: 'center',
justifyContent: 'center',
},
buttonLabel: {
color: 'blue',
},
});
exports.title = 'PushNotificationIOS';
exports.description = 'Apple PushNotification and badge value';
exports.examples = [
{
title: 'Badge Number',
render(): React.Component {
PushNotificationIOS.requestPermissions();
return (
<View>
<Button
onPress={() => PushNotificationIOS.setApplicationIconBadgeNumber(42)}
label="Set app's icon badge to 42"
/>
<Button
onPress={() => PushNotificationIOS.setApplicationIconBadgeNumber(0)}
label="Clear app's icon badge"
/>
</View>
);
},
},
{
title: 'Push Notifications',
render(): React.Component {
return <NotificationExample />;
}
},
{
title: 'Notifications Permissions',
render(): React.Component {
return <NotificationPermissionExample />;
}
}];
保留所有版权。
源代码是在 BSD-style 许可下经过许可的,是在源代码树的根目录下的LICENSE 文件里找到的。额外授予的专利权可以在同目录下的 PATENTS 文件里找到。
@flow
方法
static setStyle(style: number, animated?: boolean)
static setHidden(hidden: boolean, animation: number)
例子
'use strict';
var React = require('react-native');
var {
StyleSheet,
View,
Text,
TouchableHighlight,
StatusBarIOS,
} = React;
exports.framework = 'React';
exports.title = 'StatusBarIOS';
exports.description = 'Module for controlling iOS status bar';
exports.examples = [{
title: 'Status Bar Style',
render() {
return (
<View>
{Object.keys(StatusBarIOS.Style).map((key) =>
<TouchableHighlight style={styles.wrapper}
onPress={() => StatusBarIOS.setStyle(StatusBarIOS.Style[key])}>
<View style={styles.button}>
<Text>setStyle(StatusBarIOS.Style.{key})</Text>
</View>
</TouchableHighlight>
)}
</View>
);
},
}, {
title: 'Status Bar Style Animated',
render() {
return (
<View>
{Object.keys(StatusBarIOS.Style).map((key) =>
<TouchableHighlight style={styles.wrapper}
onPress={() => StatusBarIOS.setStyle(StatusBarIOS.Style[key], true)}>
<View style={styles.button}>
<Text>setStyle(StatusBarIOS.Style.{key}, true)</Text>
</View>
</TouchableHighlight>
)}
</View>
);
},
}, {
title: 'Status Bar Hidden',
render() {
return (
<View>
{Object.keys(StatusBarIOS.Animation).map((key) =>
<View>
<TouchableHighlight style={styles.wrapper}
onPress={() => StatusBarIOS.setHidden(true, StatusBarIOS.Animation[key])}>
<View style={styles.button}>
<Text>setHidden(true, StatusBarIOS.Animation.{key})</Text>
</View>
</TouchableHighlight>
<TouchableHighlight style={styles.wrapper}
onPress={() => StatusBarIOS.setHidden(false, StatusBarIOS.Animation[key])}>
<View style={styles.button}>
<Text>setHidden(false, StatusBarIOS.Animation.{key})</Text>
</View>
</TouchableHighlight>
</View>
)}
</View>
);
},
}];
var styles = StyleSheet.create({
wrapper: {
borderRadius: 5,
marginBottom: 5,
},
button: {
backgroundColor: '#eeeeee',
padding: 10,
},
});
一个样式表是一个类似于CSS样式表的抽象体
创建一个新的样式表:
var styles = StyleSheet.create({
container: {
borderRadius: 4,
borderWidth: 0.5,
borderColor: '#d6d7da',
},
title: {
fontSize: 19,
fontWeight: 'bold',
},
activeTitle: {
color: 'red',
},
});
使用样式表:
<View style={styles.container}>
<Text style={[styles.title, this.props.isActive && styles.activeTitle]} />
</View>
代码质量:
- 通过移动样式渲染功能,你可以是你的代码理解起来更容易。
- 对样式进行命名,对在渲染功能的低水平组件中添加意义是一个很好的方式。
性能:
- 在样式对象中使用一个样式表可以使得通过ID对它进行参考成为可能,而不是每一次都创建一个新的样式对象。
- 它还允许通过桥梁对样式进行一次发送。所有后续的使用都是通过id(尚未实施)。
方法
static create(obj: {[key: string]: any})
它揭示了如何将本地 ToastAndroid 模块作为一个 JS 模块。它有一个名为 showText
的函数,其拥有的参数如下所示:
- 字符串消息:将文本传递给 toast 的字符串
- int 持续期:toast 的持续期。可能是 ToastAndroid.SHORT
或 ToastAndroid.LONG
方法
static show(message: string, duration: number)
性质
SHORT: MemberExpression
LONG: MemberExpression
示例
'use strict'
;
var React
=
require
(
'react-native'
)
;
var
{
StyleSheet
,
Text,
ToastAndroid,
TouchableWithoutFeedback
}
=
React
;
var UIExplorerBlock
=
require
(
'UIExplorerBlock'
)
;
var UIExplorerPage
=
require
(
'UIExplorerPage'
)
;
var ToastExample
=
React.
createClass
(
{
statics
:
{
title
:
'Toast Example'
,
description
:
'Toast Example'
,
}
,
getInitialState
:
function
(
)
{
return
{
}
;
}
,
render
:
function
(
)
{
return
(
<
UIExplorerPage title
=
"ToastAndroid"
>
<
UIExplorerBlock title
=
"Simple toast"
>
<
TouchableWithoutFeedback
onPress
=
{
(
)
=>
ToastAndroid.
show
(
'This is a toast with short duration'
, ToastAndroid.
SHORT
)
}
>
<
Text style
=
{
styles.
text
}
>
Click me.
</
Text
>
</
TouchableWithoutFeedback
>
</
UIExplorerBlock
>
<
UIExplorerBlock title
=
"Toast with long duration"
>
<
TouchableWithoutFeedback
onPress
=
{
(
)
=>
ToastAndroid.
show
(
'This is a toast with long duration'
, ToastAndroid.
LONG
)
}
>
<
Text style
=
{
styles.
text
}
>
Click me too.
</
Text
>
</
TouchableWithoutFeedback
>
</
UIExplorerBlock
>
</
UIExplorerPage
>
)
;
}
,
}
)
;
var styles
=
StyleSheet
.
create
(
{
text
:
{
color
:
'black'
,
}
,
}
)
;
module.
exports
=
ToastExample
;
震动 API 是在 VibrationIOS.vibrate()
里显示的。在 iOS 上,调用这个函数可以出发一秒钟的振动。振动是异步的,所以这个方法会立即返回。
这对不支持振动的设备是没有任何影响的,例如,iOS 模拟器。
目前是不支持振动模式的。
方法
static vibrate()
例子
'use strict';
var React = require('react-native');
var {
StyleSheet,
View,
Text,
TouchableHighlight,
VibrationIOS
} = React;
exports.framework = 'React';
exports.title = 'VibrationIOS';
exports.description = 'Vibration API for iOS';
exports.examples = [{
title: 'VibrationIOS.vibrate()',
render() {
return (
<TouchableHighlight
style={styles.wrapper}
onPress={() => VibrationIOS.vibrate()}>
<View style={styles.button}>
<Text>Vibrate</Text>
</View>
</TouchableHighlight>
);
},
}];
var styles = StyleSheet.create({
wrapper: {
borderRadius: 5,
marginBottom: 5,
},
button: {
backgroundColor: '#eeeeee',
padding: 10,
},
});
6
温馨提示
属性
alignItems enum('flex-start', 'flex-end', 'center', 'stretch')
alignSelf enum('auto', 'flex-start', 'flex-end', 'center', 'stretch')
borderBottomWidth 数值型
borderLeftWidth 数值型
borderRightWidth 数值型
borderTopWidth 数值型
borderWidth 数值型
bottom 数值型
flex 数值型
flexDirection enum('row', 'column')
flexWrap enum('wrap', 'nowrap')
height 数值型
justifyContent enum('flex-start', 'flex-end', 'center', 'space-between', 'space-around')
left 数值型
margin 数值型
marginBottom 数值型
marginHorizontal 数值型
marginLeft 数值型
marginRight 数值型
marginTop 数值型
marginVertical 数值型
padding 数值型
paddingBottom 数值型
paddingHorizontal 数值型
paddingLeft 数值型
paddingRight 数值型
paddingTop 数值型
paddingVertical 数值型
position enum('absolute', 'relative')
right 数值型
top 数值型
width 数值型
你需要在 info.plist 中添加 NSLocationWhenInUseUsageDescription
键来定位,当你用 react-native init
来创建一个项目时,默认情况下定位是能够使用的。
定位遵循 MDN 规范:
https://developer.mozilla.org/en-US/docs/Web/API/Geolocation
方法
static getCurrentPosition(geo_success: Function, geo_error?: Function, geo_options?: Object)
static watchPosition(success: Function, error?: Function, options?: Object)
static clearWatch(watchID: number)
static stopObserving()
例子
/* eslint no-console: 0 */
'use strict';
var React = require('react-native');
var {
StyleSheet,
Text,
View,
} = React;
exports.framework = 'React';
exports.title = 'Geolocation';
exports.description = 'Examples of using the Geolocation API.';
exports.examples = [
{
title: 'navigator.geolocation',
render: function(): ReactElement {
return <GeolocationExample />;
},
}
];
var GeolocationExample = React.createClass({
watchID: (null: ?number),
getInitialState: function() {
return {
initialPosition: 'unknown',
lastPosition: 'unknown',
};
},
componentDidMount: function() {
navigator.geolocation.getCurrentPosition(
(initialPosition) => this.setState({initialPosition}),
(error) => console.error(error)
);
this.watchID = navigator.geolocation.watchPosition((lastPosition) => {
this.setState({lastPosition});
});
},
componentWillUnmount: function() {
navigator.geolocation.clearWatch(this.watchID);
},
render: function() {
return (
<View>
<Text>
<Text style={styles.title}>Initial position: </Text>
{JSON.stringify(this.state.initialPosition)}
</Text>
<Text>
<Text style={styles.title}>Current position: </Text>
{JSON.stringify(this.state.lastPosition)}
</Text>
</View>
);
}
});
var styles = StyleSheet.create({
title: {
fontWeight: '500',
},
});
React Native 的一个目标是成为一个游乐场所,在这里我们可以尝试不同的体系结构和疯狂的想法。自从浏览器使用起来不够灵活,我们别无选择,只能去实现整个堆栈。在这个我们并不打算改变什么的地方,我们试图尽可能忠实于浏览器的 APIS。网络协议栈是一个很好的例子。
XMLHttpRequest
XMLHttpRequest API 是在 iOS networking apis 之上实现的。与 web 显著的区别是其安全模式:由于没有 CORS 的概念,你可以从互联网上的任一网站上进行阅读。
var request = new XMLHttpRequest();
request.onreadystatechange = (e) => {
if (request.readyState !== 4) {
return;
}
if (request.status === 200) {
console.log('success', request.responseText);
} else {
console.warn('error');
}
};
request.open('GET', 'https://mywebsite.com/endpoint.php');
request.send();
请按照 MDN Documentation,一个对 API 进行了完整描述的文档。
作为一个开发人员,你可能不会直接将 XMLHttpRequest 对象作为他的 API,因为这是一个非常繁琐的工作。但事实上,他的实现和与浏览器 APIS 的兼容能够使你使用第三方库,例如,直接来自 npm 的 Parse 和 super-agent。
Fetch
Fetch 是一种更好的网络 API,它的工作是通过标准委员会完成,并且已经在火狐浏览器上可以使用。默认情况下在 React Native 上也是可用的。
fetch('https://mywebsite.com/endpoint.php')
.then((response) => response.text())
.then((responseText) => {
console.log(responseText);
})
.catch((error) => {
console.warn(error);
});
计时器是一个应用程序的重要的一个组成部分,React Native 实现了Browser timers。
计时器
- setTimeout,clearTimeout
- setInterval, clearInterval
- setImmediate, clearImmediate
- requestAnimationFrame, cancelAnimationFrame
requestAnimationFrame(fn)
相当于 setTimeout(fn, 0)
,他们是在刷新屏幕之后被正确触发。
setImmediate
是在向本地发送批处理相应之前,当前 JavaScript 执行块结束时执行的。注意,如果你在一个回调函数 setImmediate
之内调用 setImmediate
,它将立即被执行,而且不会返回到本地之间。
这个 Promise
的实现是将 setImmediate
作为异步性的开端。
交互管理器
良好的原生应用可以用起来感觉很顺利的一个原因是在交互和动画方面避免了复杂的操作。在 React Native,目前我们有一个限制,只有一个JS执行线程,但是你可以使用 InteractionManager
来确保在任一交互或者动画完成之后,长期的运行工作的开始是被规划好的。
在下面的交互完成之后,应用程序可以安排任务来运行:
InteractionManager.runAfterInteractions(() => {
// ...long-running synchronous task...
});
与其他调度方案相比:
- requestAnimationFrame():代码是在时间上的一个动画视图
- setImmediate/setTimeout/setInterval():运行代码之后,请注意这可能会延迟动画
- runAfterInteractions():运行代码之后,没有延迟的动态动画
触发处理系统将一个或多个触发看作是一个“交互”,并且将runAfterInteractions()
延迟回调,直到所有的触发都已结束或者被取消。
交互管理器还允许应用程序通过对动画的开始创建一个交互“处理”来注册动画,并且完成之后进行清理:
var handle = InteractionManager.createInteractionHandle();
// run animation... (`runAfterInteractions` tasks are queued)
// later, on animation completion:
InteractionManager.clearInteractionHandle(handle);
// queued tasks run if all handles were cleared
TimerMixin
我们发现在 React Native 上的应用程序出现致命性问题的主要原因是由于一个组件被卸载后计时器就会被触发。为了解决这个反复出现的问题,我们引入了 TimerMixin
。如果你有 TimerMixin
,那么你可以用 this.setTimeout(fn, 500)
(只是加上 this.
)来替换 setTimeout(fn, 500)
函数的调用,并且当组件被卸载时,一切都会被清理干净。
var TimerMixin = require('react-timer-mixin');
var Component = React.createClass({
mixins: [TimerMixin],
componentDidMount: function() {
this.setTimeout(
() => { console.log('I do not leak!'); },
500
);
}
});
我们强烈建议不用只单独使用 Timers,而是一直使用 mixin,这样将会为你节省很多很难追踪的bugs。


更多信息请访问

